Installing Moodle
If you just want to try Moodle on a standalone machine there are ‘one-click’ installers for Windows (see Complete install packages for Windows) and for OSX (see Complete Install Packages for Mac OS X) or install on OS X. These are unsuitable for production servers.
If you want to avoid installing Moodle yourself completely, consider https://moodle.com/moodlecloud/
Contents
- 1 Requirements
- 1.1 Hardware
- 1.2 Software
- 5.1 Securing moodledata in a web directory
- 6.1 Command line installer
- 6.2 Web based installer
- 7.1 Settings within Moodle
- 7.2 Remaining tasks
- 7.3 Installation is complete 🙂
- 7.4 If something goes wrong.
Requirements
Moodle is primarily developed in Linux using Apache, PostgreSQL/MySQL/MariaDB and PHP (sometimes known as the LAMP platform). Typically this is also how Moodle is run, although there are other options (Nginx/OpenLiteSpeed) as long as the software requirements of the release are met.
If you are installing Moodle in a Windows server, note that from php5.5 onwards, you will also need to have the Visual C++ Redistributable for Visual Studio 2012 installed from: http://www.microsoft.com/en-us/download/details.aspx?id=30679 Visual C++] ( x86 or x64).
The basic requirements for Moodle are as follows:
Hardware
- Disk space: 200MB for the Moodle code, plus as much as you need to store content. 5GB is probably a realistic minimum.
- Processor: 1 GHz (min), 2 GHz dual core or more recommended.
- Memory: 512MB (min), 1GB or more is recommended. 8GB plus is likely on a large production server
- Consider separate servers for the web «front ends» and the database. It is much easier to «tune»
All the above requirements will vary depending on specific hardware and software combinations as well as the type of use and load; busy sites may well require additional resources. Further guidance can be found under performance recommendations. Moodle scales easily by increasing hardware.
For very large sites, you are much better starting with a small pilot and gaining some experience and insight. A «what hardware do I need for 50,000 user?» style post in the forums is highly unlikely to get a useful answer.
Software
See the release notes in the dev docs for software requirements.
Set up your server
Depending on the use case a Moodle server may be anything from a Desktop PC (e.g. for testing and evaluating) to a rack-mounted or clustered solution to cloud VMs or other hosted solutions. As mentioned above there are lots of possibilities for installing the basic server software, for details see:
It will help hugely, regardless of your deployment choices, if time is taken to understand how to configure the different parts of your software stack (HTTP daemon, database, PHP etc.). Do not expect the standard server configuration to be optimal for Moodle. For example, the web server and database servers will almost certainly require tuning to get the best out of Moodle.
If you’re unsure which packages to use (eg. MariaDB vs. MySQL), then have a look at what the consensus on the internet is, but also have a look at the Performance recommendations page, as this may also help give you an idea of exactly how much work is involved/what your workflow may end up looking like and planning that aspect as well.
If a hosting provider is being used ensure that all Moodle requirements (such as PHP version) are met by the hosting platform before attempting the installation. It will help to become familiar with changing settings within the hosting provider’s platform (e.g. PHP file upload maximums) as the options and tools provided vary.
Download and copy files into place
IMPORTANT: While there are now a number of places you can get the Moodle code (including host provided Moodle installers), you are strongly advised to only obtain Moodle from moodle.org. If you run into problems it will be a great deal easier to support you.
You have two options:
- Download your required version from http://moodle.org/downloads and unzip/unpack.
- OR Pull the code from the Git repository (recommended for developers and also makes upgrading very simple):
$ git clone -b MOODLE_>_STABLE git://git.moodle.org/moodle.git
For a fuller discussion see Git for Administrators.
Either of the above should result in a directory called moodle, containing a number of files and folders.
You can typically place the whole folder in your web server documents directory, in which case the site will be located at http://yourwebserver.com/moodle, or you can copy all the contents straight into the main web server documents directory, in which case the site will be simply http://yourwebserver.com. See the documentation for your system and/or web server if you are unsure.
- Secure the Moodle files: It is vital that the files are not writeable by the web server user. For example, on Unix/Linux (as root):
chown -R root /path/to/moodle chmod -R 0755 /path/to/moodle
(files are owned by the administrator/superuser and are only writeable by them — readable by everyone else)
On test/dev sites you may want to make the files writeable in order to use the built-in plugin installer. This is discouraged for live sites (at least, revert to more secure settings if you do).
This link about setting folder permissions on Linux Webservers may assist as well: The right folder permissions for a website on a Linux server.
Create an empty database
Next create a new, empty database for your installation. You need to find and make a note of following information for use during the final installation stage:
- dbhost — the database server hostname. Probably localhost if the database and web server are the same machine, otherwise the name of the database server
- dbname — the database name. Whatever you called it, e.g. moodle
- dbuser — the username for the database. Whatever you assigned, e.g. moodleuser — do not use the root/superuser account. Create a proper account with the minimum permissions needed.
- dbpass — the password for the above user
If your site is hosted you should find a web-based administration page for databases as part of the control panel (or ask your administrator). For everyone else or for detailed instructions, see the page for your chosen database server:
Create the (moodledata) data directory
Moodle requires a directory to store all of its files (all your site’s uploaded files, temporary data, cache, session data etc.). The web server needs to be able to write to this directory. On larger systems consider how much free space you are going to use when allocating this directory.
Due to the default way Moodle caches data you may have serious performance issues if you use relatively slow storage (e.g. NFS) for this directory. Read the Performance recommendations carefully and consider using (e.g.) redis or memcached for Caching.
IMPORTANT: This directory must NOT be accessible directly via the web. This would be a serious security hole. Do not try to place it inside your web root or inside your Moodle program files directory. Moodle will not install. It can go anywhere else convenient.
Here is an example (Unix/Linux) of creating the directory and setting the permissions for anyone on the server to write here. This is only appropriate for Moodle servers that are not shared. Discuss this with your server administrator for better permissions that just allow the web server user to access these files.
# mkdir /path/to/moodledata # chmod 0777 /path/to/moodledata
Securing moodledata in a web directory
If you are using a hosted site and you have no option but to place ‘moodledata’ in a web accessible directory. You may be able to secure it by creating an .htaccess file in the ‘moodledata’ directory. This does not work on all systems — see your host/administrator. Create a file called .htaccess containing only the following lines:
order deny,allow deny from all
Require all denied
Start Moodle install
It’s now time to run the installer to create the database tables and configure your new site. The recommended method is to use the command line installer. If you cannot do this for any reason (e.g. on a Windows server) the web-based installer is still available.
Command line installer
It’s best to run the command line as your system’s web user. You need to know what that is — see your system’s documentation (e.g. Ubuntu/Debian is ‘www-data’, Centos is ‘apache’)
- Example of using the command-line (as root — substitute ‘www-data’ for your web user):
# chown www-data /path/to/moodle # cd /path/to/moodle/admin/cli # sudo -u www-data /usr/bin/php install.php # chown -R root /path/to/moodle
The chowns allow the script to write a new config.php file. More information about the options can be found using
# php install.php --help
You will be asked for other settings that have not been discussed on this page — if unsure just accept the defaults. For a full discussion see Administration via command line
Web based installer
For ease of use you can install Moodle via the web. We recommend configuring your web server so that the page is not publicly accessible until the installation is complete.
To run the web installer script, just go to your Moodle’s main URL using a web browser.
The installation process will take you through a number of pages. You should be asked to confirm the copyright, see the database tables being created, supply administrator account details and supply the site details. The database creation can take some time — please be patient. You should eventually end up at the Moodle front page with an invitation to create a new course.
It is very likely that you will be asked to download the new config.php file and upload it to your Moodle installation — just follow the on-screen instructions.
Final configuration
Settings within Moodle
There are a number of options within the Moodle Site Administration screens (accessible from the ‘Site administration’ tab in the ‘Administration’ block (Classic theme) or the Site administration button in the navigation bar (Boost). Here are a few of the more important ones that you will probably want to check:
- Administration > Site administration > Server > Email >Outgoing mail configuration: Set your smtp server and authentication if required (so your Moodle site can send emails). You can also set a norepy email on this page.
- Administration > Site administration > Server > Server > Support contact. Set your support contact email.
- Administration > Site administration > Server > System paths: Set the paths to du, dot and aspell binaries.
- Administration > Site administration > Server > HTTP: If you are behind a firewall you may need to set your proxy credentials in the ‘Web proxy’ section.
- Administration > Site administration > Location > Update timezones: Run this to make sure your timezone information is up to date. (more info Location)
- Set server’s local timezone inside php.ini (should probably be inside /etc/php.ini or /etc/php.d/date.ini, depending on the underlying OS):
[Date] ; Defines the default timezone used by the date functions date.timezone = "YOUR LOCAL TIMEZONE"
Remaining tasks
- Configure Cron: Moodle’s background tasks (e.g. sending out forum emails and performing course backups) are performed by a script which you can set to execute at specific times of the day. This is known as a cron script. Please refer to the Cron instructions.
- Set up backups: See Site backup and Automated course backup.
- Secure your Moodle site: Read the Security recommendations. Also have a look at the Security Checks Section under Site Administration -> Reports -> Security Checks.
- Increasing the maximum upload size See Installation FAQ Maximum upload file size — how to change it?
- Check mail works : From Site administration > Server > Test outgoing mail configuration, use the link to send yourself a test email. Don’t be tempted to skip this step.
Installation is complete 🙂
- Create a new course: You can now access Moodle through your web browser (using the same URL as you set during the install process), log in as your admin user and create a new course. See create a new course.
- Now that your site is running, when you’ve got a chance, consider seeing how you can maximize its performance by having a look at Performance recommendations.
If something goes wrong.
Here are some things you should try.
- Check the Installation FAQ
- Check your file permissions carefully. Can your web server read (but not write) the Moodle program files? Can your web server read and write your Moodle data directory? If you don’t fully understand how file ownership and permissions work on your operating system it would be time very well spent to find out.
- Check your database permissions. Have you set up your database user with the correct rights and permissions for your configuration (especially if the web server and database server are different machines)?
- Create your Configuration file (config.php) by hand. Copy config-dist.php (in the root of the Moodle program directory) to config.php, edit it and set your database/site options there. Installation will continue from the right place.
- Once you have a config.php (see previous tip) you can edit it to turn on debugging (in section 8). This may give you extra information to help track down a problem. If you have access, check your web server error log(s).
- Re-check your php.ini / .htaccess settings. Are they appropriate (e.g. memory_limit), did you edit the correct php.ini / .htaccess file and (if required) did you restart the web server after making changes?
- Did you include any non-core (optional) plugins, themes or other code before starting the installation script? If so, remove it and try again (it may be broken or incompatible).
- Explain your problem in the Installation problems forum. PLEASE list your software versions; explain what you did, what happened and what error messages you saw (if any); explain what you tried. There is no such thing as ‘nothing’, even a blank page is something!
Platform specific instructions
Note: Much of this information is provided by the community. It may not have been checked and may be out of date. Please read in conjunction with the above installation instructions.
- Windows installation
- Installing Moodle on SmarterASP.NET
See also
- Slideshare presentation by Gareth Barnard on installing a local installation of Moodle and accompanying help guides
- New Video Tutorial- How to Install Moodle on Shared Hosting via cPanel (Not Fantastico)
- Another one for cPanel using videos
- Video Tutorial — Install Moodle on a Virtual Box from scratch
Установка Moodle
Эта статья содержит описание процесса установки Moodle. Некоторые этапы установки содержат большое количество разных деталей, поэтому эта страница может показаться длинной и сложной. Не паникуйте, однажды узнав, как это всё делается, вы сможете установить Moodle за считанные минуты!
Если у вас возникли проблемы, пожалуйста, прочитайте эту страницу внимательно — Вы найдете здесь решения для многих своих проблем. Если после этого у вас все же возникнут какие-то трудности, то Вы можете обратиться за помощью на форумы moodle.org в курсе Using Moodle (англ.) или в курсе Russian Moodle (рус.).
Если Вы хотите установить Moodle на свой компьютер, но эта страница выглядит немного пугающе, то, пожалуйста, изучите следующие статьи: Установка Apache, MySQL и PHP или Как установить один из полных пакетов Moodle. Они обеспечат Вас подробными инструкциями .
Содержание
- 1 Требования к системе
- 1.1 Оборудование
- 1.2 Программное обеспечение
- 4.1 Проверка настроек веб-сервера
- 4.2 Проверка настроек PHP
- 4.3 Использование файла .htaccess для настроек веб-сервера и PHP
- 4.4 Создание базы данных
- 4.5 Создание папки для хранения данных
Требования к системе
Поначалу Moodle создавался в Linux с использованием Apache, MySQL and PHP (Linux + Apache + MySQL + PHP = LAMP), но регулярно проверялся в работе в среде Windows XP/2000/2003 (WAMP), Solaris 10 (Sparc and x64), Mac OS X и Netware 6. Также имеется поддержка СУБД PostgreSQL, Oracle и Microsoft SQL Server.
Замечание о хостинге: В России не так уж много хостингов удовлетворяет требованиям к системе, предъявляемым Moodle. Вам необходимо связаться со службой поддержки соответствующей организации до подписания соглашений с ними. Особое внимание необходимо уделить ограничениям PHP (memory_limit) и MySQL. Если же веб-хостинг не обладает нижеперечисленными возможностями, необходимо выяснить почему, и, по возможности, отказаться от их услуг.
Для работы Moodle предъявляет следующие требования к системе:
Оборудование
- Место на диске: на диске должны быть свободными минимум 160 МБайт. Кроме того потребуется больше свободного места, для хранения Ваших учебных материалов.
- Оперативная память: минимальный объём — 256 МБайт, рекомендуемый — 1 ГБайт. Вы можете руководствоваться следующим правилом для приблизительного вычисления необходимого Вам объема памяти: 50 одновременно работающих в системе пользователей на каждый 1 Гб памяти. Обратите внимание, что эта цифра может быть неточной и зависит от комбинации используемого вами оборудования и программного обеспечения.
- Это определяется ограничениями услуг хостинга PHP и MySQL.
- Количество пользователей, которые смогут пользоваться Moodle может быть ограничено производительностью сервера. Смотрите про производительность сервера
Программное обеспечение
- Веб-сервер. Большинство предпочитают веб-сервер Apache, но Moodle будет хорошо работать и с любым другим веб-сервером, который поддерживает PHP, например IIS под Windows. PHP не предъявляет требования к версии веб-сервера, но тем не менее (общий совет) — используйте, по возможности, самую новую, из стабильных, версию веб-сервера.
- Язык сценариев PHP (обратите внимание, что есть особенности установки Moodle с PHP-Accelerator). На данный момент существует 2 основные версии (ветки) PHP: PHP4 и PHP5. Ознакомьтесь с требованиями к php
- версия 4.3.0 и выше для Moodle 1.9
- версия 5.2.8 и выше для Moodle 2.0
- MySQL (Внимание! Опция «strict mode» в MySQL должна быть отключена)
- версия 4.1.16 и выше для Moodle 1.9
- версия 5.0.25 и выше для Moodle 2.0
-
- PostgreSQL
- версия 8.0 и выше для Moodle 1.9
- версия 8.3 и выше для Moodle 2.0
- версия 9.0 и выше для Moodle 1.9
- версия 2005 и выше для Moodle 2.0
- версия 9.0 и выше для Moodle 1.9
- версия 10.2 и выше для Moodle 2.0
MySQL подойдет для в большинстве случаев, потому что она очень популярна, но есть и аргументы в пользу PostgreSQL.
Загрузка и размещение
Получить Moodle можно двумя способами — загрузить архивный файл или через CVS.
- Существует два типа архивов на странице загрузки http://download.moodle.org/: архив, содержащий только файлы Moodle и полный установочный пакет, который в дополнение содержит необходимый для работы с Moodle набор программ.
- Информация о том, как воспользоваться CVS, содержится на странице CVS Администраторам. Кроме того вы можете поработать с полным репозитарием Moodle на Sourceforge.
После загрузки распакуйте архив, используя комманды
tar -zxvf [filename]
unzip [filename]
в зависимости от ОС.
Если Вы пользуетесь CVS, примените CVS-команду Checkout. Вы получите папку, называемую «moodle», которая содержит все нужные файлы и каталоги.
Полученную папку moodle вы можете скопировать на свой веб-сервер, если ваш сайт будет иметь адрес http://yourwebserver.com/moodle, либо вы можете скопировать содержимое этой папки прямо на веб-сервер, если ваш сайт будет называться http://yourwebserver.com.
Если Вы скачиваете Moodle на ваш компьютер, а затем загружаете его на ваш веб-сайт, то намного удобнее будет загружать весь архив как один файл, а затем уже распаковать его на сервере. Интерфейс веб-хостинга, например такой как Cpanel, также позволит вам распаковать архив с помощью файлового менеджера («File Manager»).
Структура каталога Moodle
Вы можете спокойно пропустить этот раздел, но здесь кратко изложено содержимое каталога Moodle, что поможет вам лучше ориентироваться:
config.php — содержит основные настройки. Этот файл создается в процессе установки. install.php — файл, который вы должны будете запустить, чтобы создать config.php. version.php — содержит информацию об установленной у вас версии Moodle. index.php — это главная страница вашего сайта. admin/ — скрипты администрирования вашего сайта. auth/ — подключаемые модули для аутентификации пользователей сайта blocks/ — подключаемые модули небольших блоков, которые могут быть размещены на многих страницах calendar/ — скрипты для вывода и управления календарями course/ — скрипты для вывода и управления учебными курсами doc/ — помощь по Moodle (например, эта страница) files/ — скрипты для просмотра и управления загруженными файлами lang/ — тексты на разных языках, одна директория — один язык (для локализации Moodle) lib/ — основные библиотеки ядра Moodle. login/ — скрипты для обработки входа и создания учетных записей mod/ — все основные модули, которые используются для создания курсов pix/ — картинки для сайта theme/ — темы для оформления сайта user/ — скрипты для управления пользователями
Настройка вашей системы
Для обеспечения успешной установки Moodle, вам необходимо проверить корректность настроек веб-сервера, затем создать пустую базу данных для Moodle и в завершении создать каталог на вашем диске, в который будут сохраняться материалы и другие файлы курсов.
Проверка настроек веб-сервера
Во первых, убедитесь, что на Вашем веб-сервере файл index.php установлен как главная страница (бывает, что в качестве таких страниц используются index.html, default.htm и т.п.). В Apache, это настраивается параметром DirectoryIndex в файле httpd.conf. Найдите строку в Вашем файле похожую на эту:
DirectoryIndex index.php index.html index.htm
Включите index.php в список перечисленных в ней файлов (и желательно в начало списка, для быстроты работы).
Во вторых, если Вы используете Apache 2, тогда Вам нужно установить переменную AcceptPathInfo , которая разрешает скриптам передавать аргументы подобно http://server/file.php/arg1/arg2. Это необходимо, чтобы разрешить относительные ссылки между Вашими ресурсами, и ускорить загрузку Вашего сайта на машины Ваших пользователей. Добавьте эту строку в Ваш файл httpd.conf.
AcceptPathInfo on
Проверка настроек PHP
Moodle для своей работы требует множество настроек PHP. На большинстве серверов эти настройки уже сделаны «по умолчанию». Однако, на некоторых PHP серверах (а также некоторых версиях PHP) какие-то настройки могут отличаться. Они делаются в файлах конфигурации PHP (обычно это php.ini):
magic_quotes_gpc = 1 (желательно, но не необходимо) magic_quotes_runtime = 0 (необходимо) file_uploads = 1 session.auto_start = 0 session.bug_compat_warn = 0
Вы также можете сделать другие необзательные настройки, раз уж уже редактируете файл. Например, вы можете захотеть увеличить максимальный объем загружаемых файлов, который по умолчанию ограничен 2Мб. Чтобы увеличить это значение до 16Мб необходимо сделать следующие настройки:
post_max_size = 16M upload_max_filesize = 16M
Использование файла .htaccess для настроек веб-сервера и PHP
Если Вы не имеете доступа к файлам httpd.conf или php.ini на вашем сервере, либо вы установливаете Moodle на сервер с другим ПО, которое требует других настроек, не переживайте, очень часто вы можете обойти настройки по «умолчанию».
Для этого вам необходимо создать файл .htaccess в директории, где лежат все файлы Moodle, и прописать в нем строки подобные указанным ниже. Это работает только на сервере под управлением Apache и только когда Переопределения разрешены в основной конфигурации.
DirectoryIndex index.php index.html index.htm
AcceptPathInfo on php_flag magic_quotes_gpc 1 php_flag magic_quotes_runtime 0 php_flag file_uploads 1 php_flag session.auto_start 0 php_flag session.bug_compat_warn 0
Вы можете также записать что-то подобное тому что написано ниже, чтобы ограничить максимальный размер загружаемых файлов 2 мегабайтами:
LimitRequestBody 0 php_value upload_max_filesize 2M php_value post_max_size 2M
Проще всего это сделать если скопировать одноименный файл с примерными настройками из папки Moodle/lib/ и отредактировать его как вам надо. Это можно сделать по разному. Например, в оболочке Unix надо ввести такую команду:
cp lib/htaccess .htaccess
Обратите внимение, что использование файла .htaccess может сказаться на производительности вашей СДО и привести к замедлению заргузки страниц.
Создание базы данных
Вам надо создать пустую базу данных (типа «moodle«) в Вашей СУБД от имени специально созданного для этого пользователя (например «moodleuser») который имел бы доступ к этой базе данных (и только к ней). Вы могли бы использовать пользователя «root», если бы пожелали, для тестирования сервера, но это не рекомендуется делать из соображений безопасности.
Moodle версии 1.5.x не работает с опцией «STRICT_TRANS_TABLES» из MySQL 5.x. Так что если Вы используете MySQL 5.x, редактируйте файл конфигурации MySQL (обычно «my.ini» в Windows и «my.cnf» в Unix/Linux) и закоментируйте эту опцию (или просто удалите ее). Чтобы изменения заработали Вам надо перезапустить MySQL.
Если Вы используете webhost, то Вы вероятно имеете панель управления через веб-интрефейс для создания и управления Вашей базой данных.
Cpanel — одно из наиболее популярных средств для этого. Чтобы создать базу данных в Cpanel,
- Кликните по значку «MySQL Databases«.
- Напечатайте «moodle» в поле имени БД и нажмите «Add Database«.
- Введите имя пользователя и пароль (не используйте их больше нигде) в соответствующие поля и нажмите «Add User«.
- Теперь используйте кнопку «Add User to Database» чтобы получить новую учетную запись с правами «ALL» в новой БД.
- Обратите внимание что «username» и «database names» могут иметь приставку — это ваше «account name» в Cpanel. Когда вы вводите информацию в инсталлятор Moodle — используйте полные имена.
Если Вы имеете доступ к коммандной строке Unix, то Вы можете сделать тоже самое вводя комманды.
Здесь приведен пример таких комманд для MySQL (красным цветом выделено то, надо печатать только если у вас Moodle 1.6 или позже. Не печатайте их если у Вас Moodle 1.5.x или более ранняя версия):
# mysql -u root -p > CREATE DATABASE moodle DEFAULT CHARACTER SET utf8 COLLATE utf8_unicode_ci; > GRANT SELECT,INSERT,UPDATE,DELETE,CREATE,DROP,INDEX,ALTER ON moodle.* TO moodleuser@localhost IDENTIFIED BY 'yourpassword'; > quit # mysqladmin -p reload
Если Вы используете MySQL 4.0.2 или более новую, Вам необходимо разрешить привилегию CREATE TEMPORARY TABLES командой GRANT:
> GRANT SELECT,INSERT,UPDATE,DELETE,CREATE,CREATE TEMPORARY TABLES, DROP,INDEX,ALTER ON moodle.* TO moodleuser@localhost IDENTIFIED BY 'yourpassword';
И пример команд для PostgreSQL:
# su - postgres > psql -c "create user moodleuser createdb;" template1 > psql -c "create database moodle with encoding 'unicode';" -U moodleuser template1 > psql -c "alter user moodleuser nocreatedb;" template1 > psql -c "alter user moodleuser with encrypted password 'yourpassword';" template1 > su - root # /etc/init.d/postgresql reload
Если выполнение команды создания базы данных (>psql -c «create database moodle. «) приводит к ошибке, попробуйте ввести:
psql -c "create database moodle with template=template1 encoding = 'unicode' owner = moodleuser
location = '/var/mydata';"
Создание папки для хранения данных
Moodle потребуется место на жестком диске Вашего сервера для хранения загруженных файлов. Например документы учебных курсов или рисунки учеников.
В процессе установки Moodle попытается создать эту директорию. Но если это ему не удастся, то Вам нужно будет создать ее вручную.
В целях безопасности, лучше всего ЗАКРЫТЬ к этой папке прямой доступ из интернета. Проще всего достичь этого, если разместить ее ВНЕ веб директории. Однако если Вы должны иметь ее именно там, то для защиты создайте в ней файл .htaccess, который содержит строку
deny from all
Чтобы Moodle мог сохранять загруженные файлы в эту папку, проверьте, что веб сервер (например Apache) имеет разрешение на запись, чтение и выполнение файлов в этой папке. На Unix системах это условие устанавливает владелец директории. Обычно это что-то типа «nobody» или «apache». И после этого дает разрешения другим пользователям. Для этого надо выполнить команду
chown -R nobody:nobody moodledata
По умолчанию mysql не примет директорию данных, созданную под именем ROOT, но Вы можете разместить папку где хотите. Позже Вы можете изменить или переместить директорию. Но если вы сделаете это, то Вам надо будет редактировать файл config.php, который хранит путь к этой директории. Для этого надо найти строку похожую на
$CFG->dataroot = '/data/moodledata';
В Cpanel Вы можете использовать «File Manager» для поиска папки. Когда найдете, щелкните по нему и выберите «Change Permissions». На большинстве хостинг-серверах Вам будет необходимо ограничить доступ ко всем файлам только Вашей группы (чтобы запретить другим пользователям вебхостинга просматривать или изменять Ваши файлы).
Если у Вас есть трудности с настройкой безопасности, обратитесь к Вашему администратору сервера. Это может произойти, если на сервере включена РНР опция «Safe Mode.»
Запуск установочного файла для создания файла config.php
Чтобы запустить установочный файл (install.php), попробуйте зайти в Ваш Moodle используя веб-броузер или просто наберите http://yourserver/install.php в строке адреса.
(Инсталлер будет использовать cookie. Если Вы увидете всплывающее окно с сообщением об этом, то разрешите использовать cookie!)
Moodle определит конфигурацию вашей системы и поможет в несколько шагов создать файл конфигурации config.php. Затем Moodle запишет его в ту же папку на сервере, в которую Вы поместили Moodle, Либо Вы можете нажать на кнопку и загрузить файл config.php из программы установки чтобы потом самостоятельно скопировать его в директорию Moodle на сервере.
Далее программа установки будет проверять настройки вашего сервера и давать советы по преодолению трудностей. В большинстве случаев этих советов будет достаточно.
Переход к странице администратора для продолжения конфигурации
После того как основной файл config.php создан, Вам необходимо создать свой «admin» для получения доступа к главной странице.
Для начала Вам нужно будет ознакомиться с представленными условиями соглашения GPL «shrinkwrap» и принять их.
Затем Moodle начнет создание базы данных для хранения информации. Вначале создается основная база данных таблиц. Вы должны просмотреть SQL сообщение, следуемое за основным сообщением. Оно будет записано зеленым или красным цветом. Вот пример:
. и затем: Main databases set up successfully.
Это означает, что папка успешно создана. Если Вы не получили такого сообщения, то значит, возникли какие-то проблемы при создании папки или были допущены ошибки в файле config.php. Проверь, чтобы PHP не был ограничен «Safe Mode» (коммерческий веб-хостинги иногда держат «safe mode» включенным). Вы можете проверить PHP создав небольшой файл, содержащий и просмотреть его через браузер. Проверьте все и попытайтесь создать папку снова.
Затем внизу страницы нажмите «Continue». Вы увидете форму, где сможете установить различные параметры для Вашего варианта установки, такие как требование языка, SMTP хосты и другие. В последствии Вы всегда сможете вернуться к этой странице и исправить те или иные пункты. Наконец, нажмите внизу страницы «Save changes».
If (and only if) you find yourself getting stuck on this page, unable to continue, then your server probably has what I call the «buggy referrer» problem. This is easy to fix: just turn off the «secureforms» setting, then try to continue again.
Затем Вы увидете страницу со множеством сообщений, они настраивают все таблицы, используемые различными модулями Moodlе. Как и прежде, они (сообщения) должны быть зеленого цвета если все в порядке.
Внизу страницы нажмите «Continue».
На следующей странице Вы найдете форму, где нужно будет внести параметры Вашего Moodle сайта и главной страницы, такие как имя, формат, описание и другие. Заполните их и нажмите кнопку «Save changes».
В конце, Вас спросят, создать ли нового пользователя для дальнейшего доступа к странице администратора. Заполните детали: Ваше имя, email адрес, затем нажмите кнопку «Save changes». Обязательно заполненными должны быть не все пункты, но если Вы пропустите важные пункты, обязательные в заполнении, то будете возвращены на эту страницу.
Удостоверьтесь, что Вы запомнили Ваше имя username и пароль password, которые Вы выбрали для учетной записи администратора, так как они будут необходимы в дальнейшем для входа на страницу администратора.
(Если по каким-то причинам Ваш процесс устеновки был прерван или какие-то системные ошибки помешали Вашей регистрации, Вы можете всегда воспользоваться именем «admin» и паролем «admin» для вхождения в систему.)
После успешной регистрации произойдет возврат на домашнюю страницу Вашего нового сайта! Заметьте, что внизу слева страницы появятся администраторские связи (эти пункты также появятся на отдельной странице администратора) — эти пункты доступны только Вам, так как Вы зарегистрирован как админ-пользователь. Все Ваши последующие действия могут быть выполнены с помощью разделов меню,таких как:
- создание и удаление курсов
- создание и правка пользовательских отчетов
- управление преподавательскими отчетами
- изменение сайта
Но Вы еще не закончили установку! Есть еще одна очень важная вещь, которую необходимо сделать (изучите следующий раздел).
Настройка cron
Пожалуйста перейдите к cron instructions.
Создание нового курса
Если Moodle работает должным образом, Вы можете попытаться создать новый курс.
Выберите пункт «Создание нового курса» на странице администратора (или администраторские связи на домашней странице).
Заполните форму, уделив особое внимание формату курса. Не беспокойтесь о деталях слишком сильно на этой странице, так как всё потом может быть изменено преподавателем. Заметьте, что везде будет Вас сопровождать желтый значок помощи по любому аспекту.
Нажмите кнопку «Save changes», Вам будет представлена новая форма, где вы сможете определить преподавателей для курса. Вы можете только добавить существующие отчеты этой формы-если Вы хотите создать новый преподавательский отчет, то можете спросить об этом у одного из преподавателей, или создать используя опцию «Добавит новый отчет» на странице администратора.
После этого, курс действительно создан и доступен через опцию «Курсы» на домашней странице.
Изучите также
- FAQ по установке
- Полный пакет установки
- Установка Apache, MySQL и PHP — откройте ресурс программ, которые может содержать Moodle на сайте или на рабочем столе.
- Обновление Moodle
- Как установить Moodle в операционной системе Windows
- Установка RedHat шаг за шагом операционная система
- Установка Debian GNU/Linux шаг за шагом операционная система
- Использование Moodle Selecting a webhost for Moodle форум
- Маскарадинг — работа Moodle в сети защищенной NAT firewall
Installing Moodle
This page explains how to install Moodle. Moodle runs on a large number of different configurations which are (mostly) explained in linked pages. Please take the time to find and read the parts that are relevant to you.
- If you are an expert and/or in a hurry try Installation Quickstart.
- If you are upgrading from a previous version go to Upgrading to Moodle 2.2
- If you just want to try Moodle on a standalone machine there are ‘one-click’ installers for Windows (see Complete install packages for Windows) and for OSX (see Complete Install Packages for Mac OS X). These are unsuitable for production servers.
Contents
- 1 Planning
- 2 Requirements
- 2.1 Hardware
- 2.2 Software
- 2.2.1 Client
- 6.1 Securing moodledata in a web directory
- 7.1 Command line installer
- 7.2 Web based installer
- 8.1 Settings within Moodle
- 8.2 Remaining tasks
- 8.3 Installation is complete 🙂
- 8.4 If something goes wrong.
Planning
A Moodle installation will require planning. This may vary from almost nothing to a serious project. Here are a few things you might want to consider:
- Do you really want to install Moodle yourself at all? See Finding and Selecting A Web Host.
- What skills do you have available to you or are prepared to learn? Administering a secure, stable public web server is a serious undertaking before Moodle even enters the discussion. This documentation assumes that you have (at least) a basic understanding of the platform on which you will be installing Moodle (or are prepared for a learning curve).
- What are your hardware/hosting requirements? Moodle scales easily but, depending on your requirements, you could be looking at anywhere along the spectrum — shared hosting, dedicated virtual host, your own server, your own multiple server setup.
- What software platforms will you use? This may depend on your skills or local policies. You may have a free choice.
- What are your support requirements? Will the free support in the moodle.org forums be sufficient or do you need professional support.
- How will you organise backups?
Requirements
Moodle is primarily developed in Linux using Apache, MySQL and PHP (also sometimes known as the LAMP platform). If in doubt, this is the safest combination (if for no other reason than being the most common). There are other options — see the Software section that follows:
The basic requirements for Moodle are as follows:
Hardware
- Disk space: 160MB free (min) plus as much as you need to store your materials. 5GB is probably a realistic minimum.
- Backups: at least the same again (at a remote location preferably) as above to keep backups of your site
- Memory: 256MB (min), 1GB or more is strongly recommended. The general rule of thumb is that Moodle can support 10 to 20 concurrent users for every 1GB of RAM, but this will vary depending on your specific hardware and software combination and the type of use. ‘Concurrent’ really means web server processes in memory at the same time (i.e. users interacting with the system within a window of a few seconds). It does NOT mean people ‘logged in’.
Software
- An operating system (!). Anything that runs the following software; although the choice will most likely depend on the performance you need and the skills you have available. Linux and Windows are the most common choices (and good support is available). If you have a free choice, Linux is generally regarded to be the optimal platform. Moodle is also regularly tested with Windows XP/2000/2003, Solaris 10 (Sparc and x64), Mac OS X and Netware 6 operating systems.
- Web server. Primarily Apache or IIS. Not fully tested (or supported) but should work are lightttpd, nginx, cherokee, zeus and LiteSpeed. Moodle will refuse to install on any other web server. Your web server needs to be correctly configured to serve PHP files.The version is not critical but try to use the newest web server build available to you.
- PHP — The minimum version is currently 5.3.2. A number of extensions are required; see the PHP page for full details. Installation will halt at the environment check if any of the required extensions are missing.
- A database. MySQL and PostgreSQL are the primary development database, the most comprehensively tested and have extensive documentation and support. Oracle and MSSQL are fully supported (note that optional plugins may be untested with these databases) but documentation and online help are not as comprehensive as MySQL/PostgreSQL. If in doubt use MySQL (more documentation) or PostgreSQL (better stability/performance). You will need the appropriate PHP extension (configured if need be) for your chosen database.
- MySQL — minimum version 5.0.25
- PostgreSQL — minimum version 8.3
- MSSQL — minimum version 9.0
- Oracle — minimum version 10.2
- SQLite — minimum version 2.0
Client
- Your clients/users access Moodle from a web browser on their PC/tablet/notepad. Any modern browser should work (but Internet Explorer version 6 and earlier are NOT supported). The operating system is not important but you may need software to read files that you upload (e.g. if you upload Microsoft Word files then all your users need software to read Word files)
Also read.
Especially if you are planning a large or complex installation, read Performance recommendations and (in particular) the Performance FAQ to understand some common terms and concerns.
Set up your server
. or desktop computer, if you are just evaluating Moodle. There are lots of possibilities for installing the basic server software depending on your particular choices. Some links and pointers are at Installing AMP
If you are using a hosted server all this should be done for you. However, (especially on shared hosting) make sure you understand or find out how to change PHP settings (e.g. file upload maxmimums). This can vary a huge amount from host to host.
Download and copy files into place
IMPORTANT: While there are now a number of places you can get the Moodle code, you are strongly advised to obtain Moodle from moodle.org. If you run into problems it will be a great deal easier to support you.
You have three basic options:
- Download your required version from http://moodle.org/downloads and unzip/unpack.
- OR Pull the code from the Git repository (recommended for developers and also makes upgrading very simple):
$ git clone -b MOODLE_22_STABLE git://git.moodle.org/moodle.git
. this fetches a complete copy of the Moodle repository and then switches to the 2.2 Stable branch (latest weekly build). For a fuller discussion see Git for Administrators.
- OR Pull the code from one of the CVS repositories. See CVS for Administrators.
Any of the above should result in a directory called moodle, containing a number of files and folders.
You can either place the whole folder in your web server documents directory, in which case the site will be located at http://yourwebserver.com/moodle, or you can copy all the contents straight into the main web server documents directory, in which case the site will be simply http://yourwebserver.com. See the documentation for your system and/or web server if you are unsure.
- Secure the Moodle files: It is vital that the files are not writeable by the web server user. For example, on Unix/Linux (as root):
# chown -R root /path/to/moodle # chmod -R 0755 /path/to/moodle
(files are owned by the administrator/superuser and are only writeable by them — readable by everyone else)
Create an empty database
Next create a new, empty database for your installation. You need to find and make a note of following information for use during the final installation stage:
- dbhost — the database server hostname. Probably localhost if the database and web server are the same machine, otherwise the name of the database server
- dbname — the database name. Whatever you called it, e.g. moodle
- dbuser — the username for the database. Whatever you assigned, e.g. moodleuser — do not use the root/superuser account. Create a proper account with the minimum permissions needed.
- dbpass — the password for the above user
If your site is hosted you should find a web-based administration page for databases as part of the control panel (or ask your administrator). For everyone else or for detailed instructions, see the page for your chosen database server:
Create the (moodledata) data directory
Moodle requires a directory to store all of its files (all your site’s uploaded files, temporary data, session data etc.). The web server needs to be able to write to this directory. On larger systems consider how much free space you are going to use when allocating this directory.
IMPORTANT: This directory must NOT be accessible directly via the web. This would be a serious security hole. Do not try to place it inside your web root or inside your Moodle program files directory. Moodle will not install. It can go anywhere else convenient.
Here is an example (Unix/Linux) of creating the directory and setting the permissions for anyone on the server to write here. This is only appropriate for Moodle servers that are not shared. Discuss this with your server administrator for other scenarios.
# mkdir /path/to/moodledata # chmod 0777 /path/to/moodledata
Securing moodledata in a web directory
If you are using a hosted site and you have no option but to place ‘moodledata’ in a web accessible directory. You may be able to secure it by creating an .htaccess file in the ‘moodledata’ directory. This does not work on all systems — see your host/administrator. Create a file called .htaccess containing only the following lines:
order deny,allow deny from all
Start Moodle install
It’s now time to run the installer to create the database tables and configure your new site. The recommended method is to use the command line installer. If you cannot do this for any reason (e.g. on a Windows server) the web based installer is still available.
Command line installer
It’s best to run the command line installer as your system’s web user. You need to know what that is — see your system’s documentation (e.g. Ubuntu/Debian is ‘www-data’, Centos is ‘apache’)
- Example of using the command-line installer (as root — substitute ‘www-data’ for your web user):
# chown www-data /path/to/moodle # cd /path/to/moodle/admin/cli # sudo -u www-data /usr/bin/php install.php # chown -R root /path/to/moodle
The chowns allow the script to write a new config.php file. More information about the options can be found using
# php install.php --help
You will be asked for other settings that have not been discussed on this page — if unsure just accept the defaults. For a full discussion see Administration via command line
Web based installer
To run the web installer script, just go to your Moodle’s main URL using a web browser.
The installation process will take you through a number of pages. You should be asked to confirm the copyright, see the database tables being created, supply administrator account details and supply the site details. The database creation can take some time — please be patient. You should eventually end up at the Moodle front page with an invitation to create a new Course.
It is very likely that you will be asked to download the new config.php file and upload it to your Moodle installation — just follow the on-screen instructions.
Final configuration
Settings within Moodle
There are a number of options within the Moodle Site Administration screens (accessible from the ‘Site administration’ tab in the ‘Settings’ block. Here are a few of the more important ones that you will probably want to check:
- Settings > Site administration > Server > Email: Set your smtp server and authentication if required (so your Moodle site can send emails). The support contact for your site is also set on this page.
- Settings > Site administration > Server > System paths: Set the paths to du, dot and aspell binaries.
- Settings > Site administration > Server > HTTP: If you are behind a firewall you may need to set your proxy credentials in the ‘Web proxy’ section.
- Settings > Site administration > Location > Update timezones: Run this to make sure your timezone information is up to date.
Remaining tasks
- Configure Cron: Moodle’s background tasks (e.g. sending out forum emails and performing course backups) are performed by a script which you can set to execute at specific times of the day. This is known as a cron script. Please refer to the Cron instructions.
- Set up backups: See Site backup and Automated course backup.
- Check mail works: Create a test user with a valid email address and send them a message. Do they receive an email copy of the message? If not, check the settings in Settings > Site administration > Plugins > Message outputs > Email.
- Secure your Moodle site: Read the Security recommendations.
Installation is complete 🙂
- Create a new course: You can now create a new course and have a play 😉
If something goes wrong.
Here are some things you should try.
- Check the Installation FAQ
- Check your file permissions carefully. Can your web server read (but not write) the Moodle program files? Can your web server read and write your Moodle data directory?
- Check your database permissions. Have you set up your database user with the correct rights and permissions for your configuration (especially if the web server and database server are different machines)?
- If you are having trouble creating a config.php file, you can do it manually by copying config-dist.php (in the root of the Moodle program directory) to config.php, editing it and setting your database/site options there. Installation will continue from the right place.
- Once you have a config.php (see previous tip) you can edit it to turn on debugging (in section 8). This may give you extra information to help track down a problem. If you have access, check your web server error log(s).
- Re-check your php.ini / .htaccess settings. Are they appropriate (e.g. memory_limit), did you edit the correct php.ini / .htaccess file and (if required) did you re-start the web server after making changes?
- Did you include any non-core (optional) plugins, themes or other code before starting the installation script? If so, remove it and try again (it may be broken or incompatible).
- Explain your problem in the Installation problems forum. PLEASE list your software versions; explain what you did, what happened and what error messages you saw (if any); explain what you tried. There is no such thing as ‘nothing’, even a blank page is something!
Platform specific instructions
Note: Much of this information is provided by the community. It may not have been checked and may be out of date. Please read in conjunction with the above installation instructions.
- Windows installation
- Unix or Linux Installation
- Mac Installation
- Amazon EC2 Cloud Services Installation
See also
- Tutorial on choosing a host and setting up moodle via the old cpanel
- New Video Tutorial- How to Install Moodle on Shared Hosting via cPanel (Not Fantastico)
- Video Tutorial — Install Moodle on a Virtual Box from scratch
- Install Moodle 2.2 on GoDaddy Windows Shared Hosting
Как установить Moodle на shared hosting или VPS
Если у вас уже есть свой готовый к работе сервер, и вы планируете запустить обучение, например, внутри локальной сети вашей компании, установите систему дистанционных курсов Moodle на локальный сервер. Если вы планируете запустить общедоступное обучение, воспользуйтесь арендой виртуального хостинга (shared hosting), или используйте VPS (virtual private server, то есть виртуальный выделенный сервер).
Многие компании предлагают хостинг с уже установленными и настроенными решениями, которые могут быть нужны в работе, например, с развернутыми системами управления контентом (CMS) или настроенными сервисами для работы сайтов, также можно найти решения с предустановленным Moodle. Наш хостинг удобен в использовании и соответствует всем техническим требованиям Moodle.
Для тех, кто ищет готовое решение, мы предлагаем VPS с готовыми настройками и установленной СДО Moodle. В нее уже интегрирована платформа BigBlueButton, вам останется лишь загрузить материалы для вебинара и добавить участников.
Если вы всё же решили настраивать Moodle самостоятельно, для начала нужно определиться, какой сервер выбрать – shared hosting или VPS (virtual private server).
Выберите, что вы будете использовать — shared hosting или VPS
Shared hosting — самый простой вид хостинга. На одном web-сервере размещаются сайты (аккаунты) нескольких клиентов хостинг-провайдера, которые делят ресурсы между собой. Но для управления хостингом не нужны навыки администрирования. Это решение подойдет, если вам достаточно базового функционала и на вашем сайте не предполагается высоких нагрузок.
VPS подразумевает аренду виртуального выделенного сервера. Для того, чтобы разобраться в настройках, вам понадобятся навыки администрирования сервера. Также вам будет нужно установить на сервер Apache, PHP и базу данных MySQL.
Определитесь с тарифом Shared hosting или VPS
Вам нужно лишь выбрать подходящий тариф и оплатить его.
Мы предлагаем 30 дней тестирования виртуального хостинга. При покупке VPS мы предоставляем бесплатное резервное копирование, а оплату берем только за дни использования.
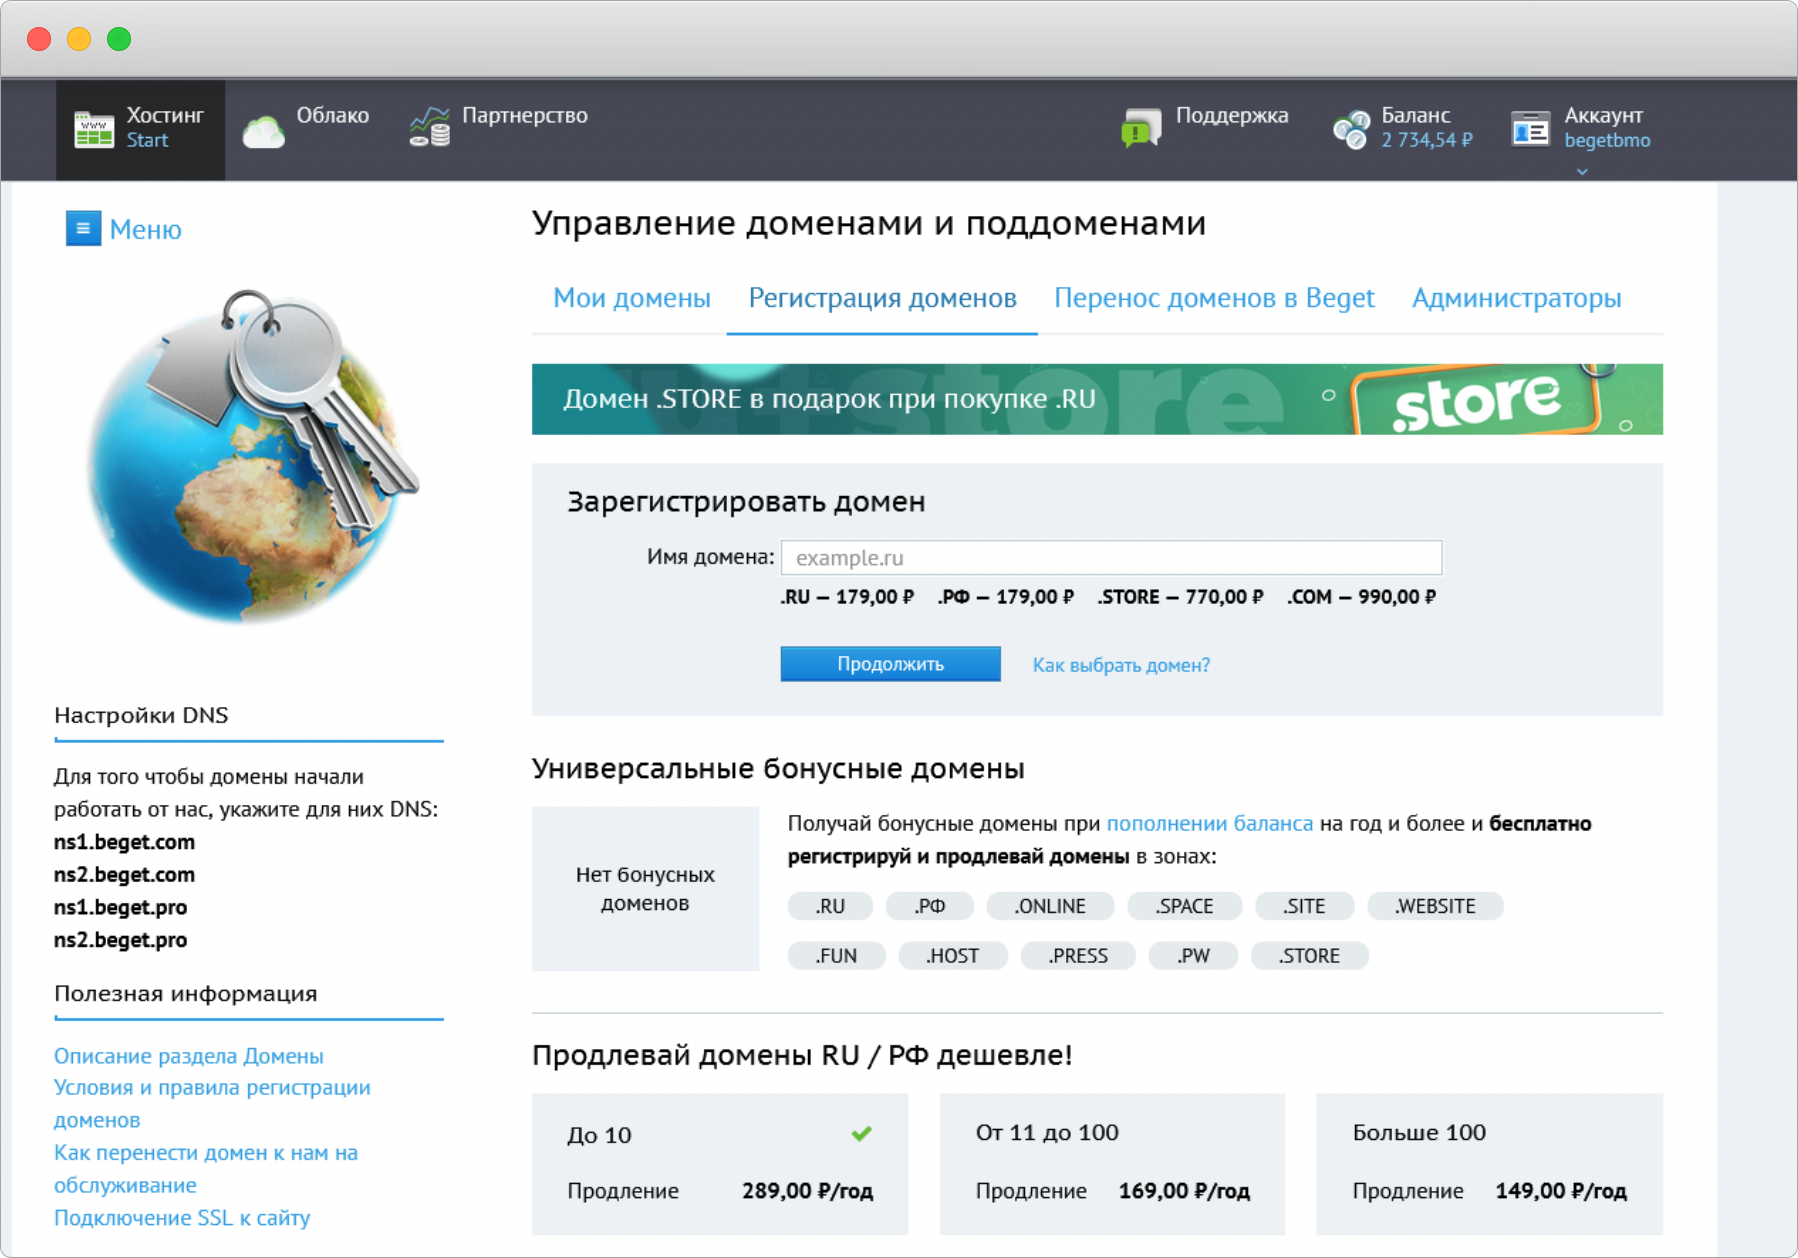
Выберите и зарегистрируйте домен
Вы можете пропустить регистрацию доменного имени, но тогда на сервер придется заходить по IP-адресу, если у вас VPS. Для shared hosting можно использовать технический домен beget.tech.
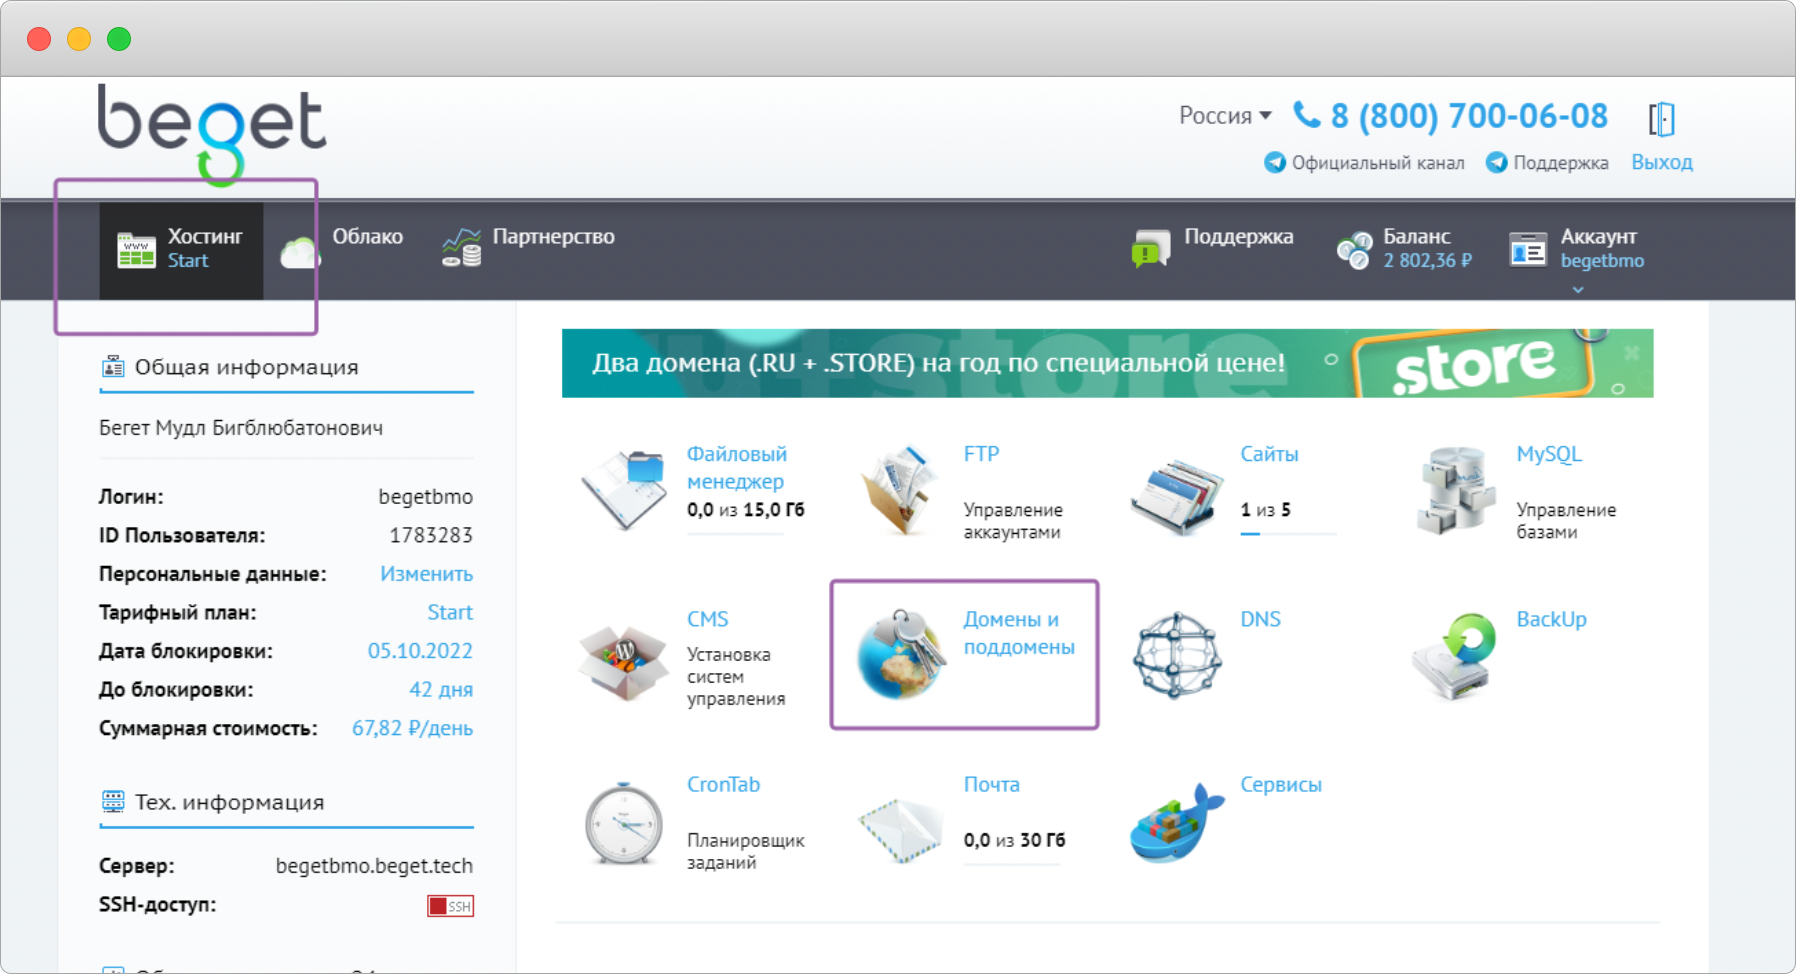
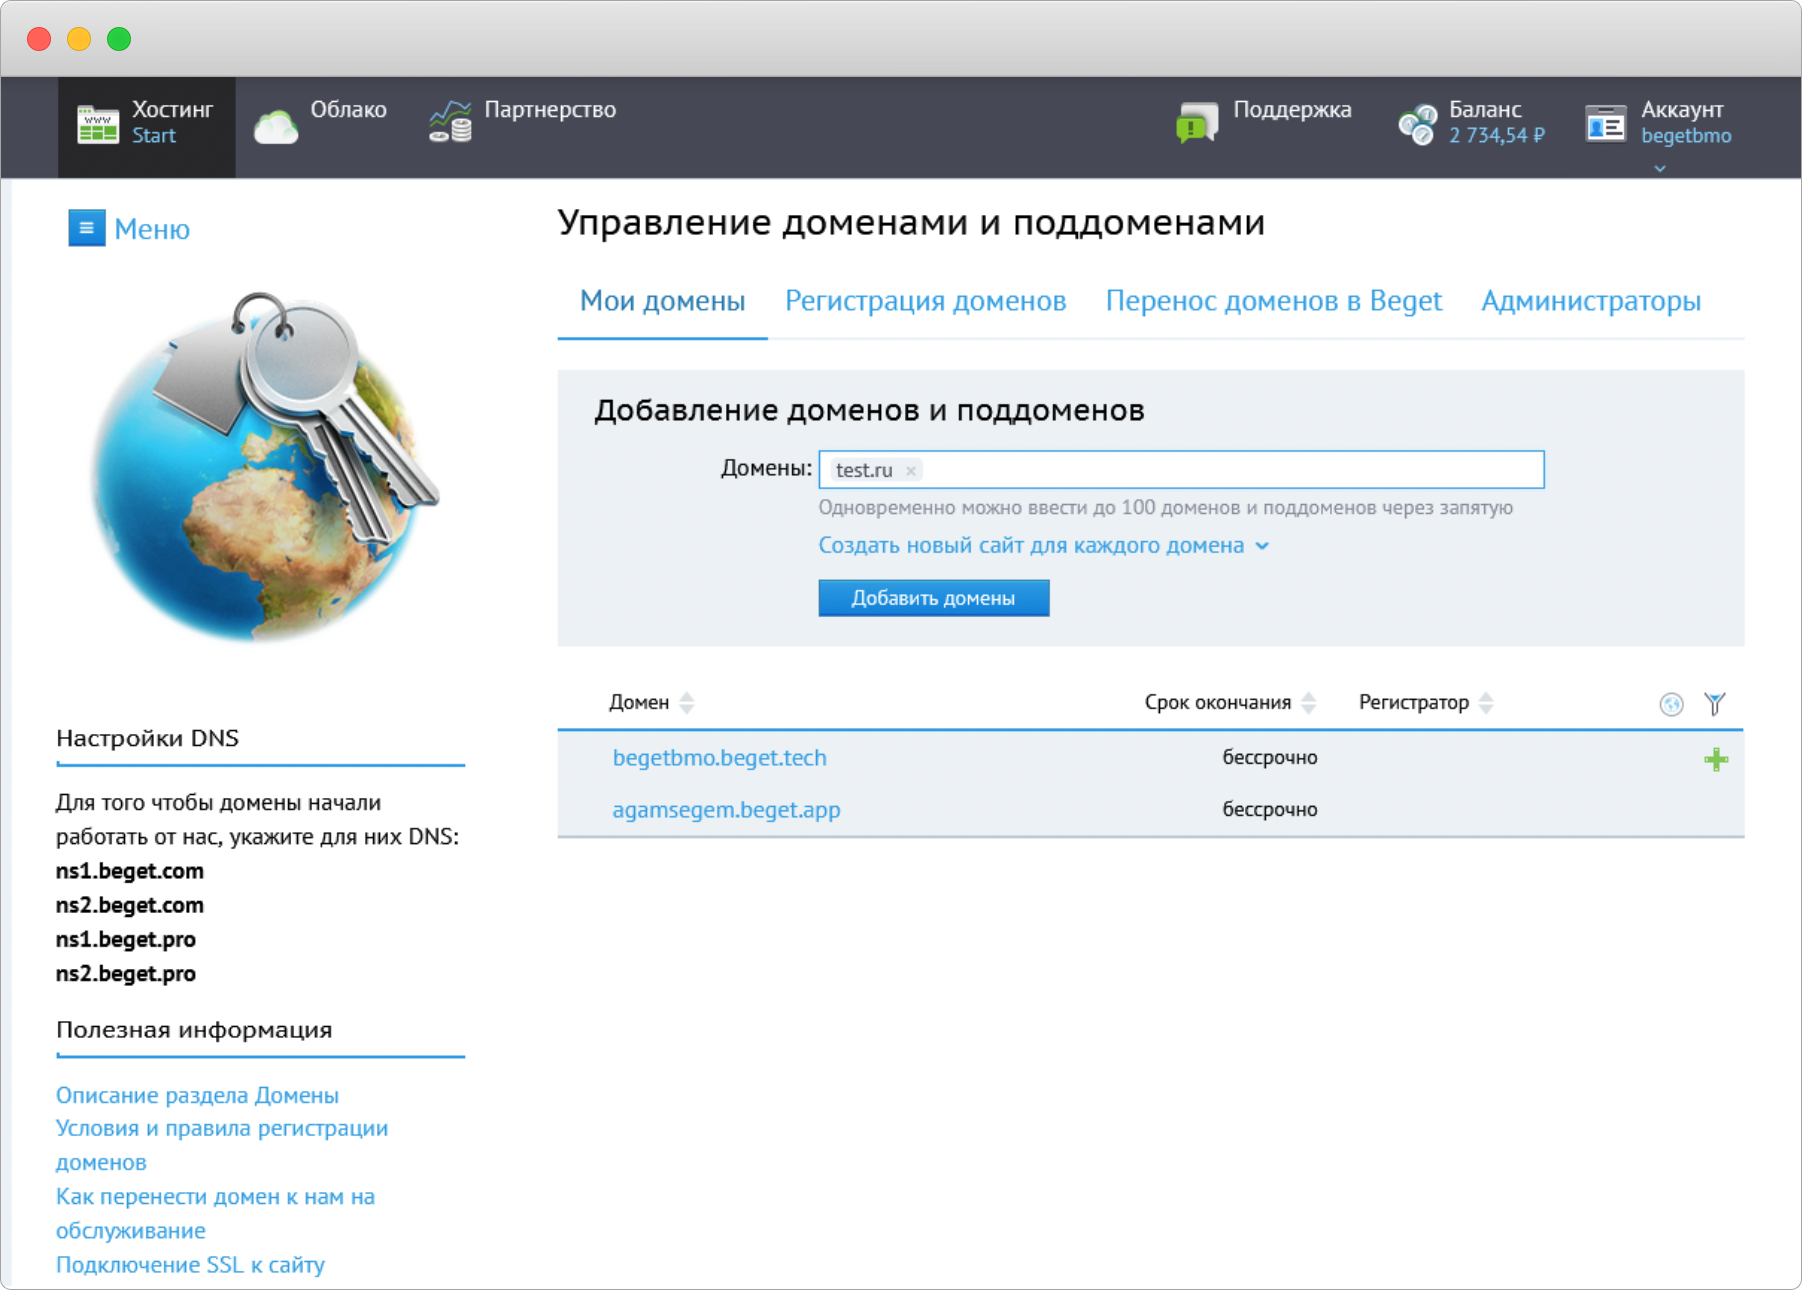
Если вы приобрели домен в Beget, то в панели управления хостингом перейдите в раздел «Домены и поддомены», нажмите на изображение в виде шестеренки и выберите пункт «Настройки DNS». В поле «А» укажите IP-адрес, выданный провайдером.
Установка Moodle на VPS
Шаг 1. Подключаемся по SSH-соединению.
Используя ваш логин и пароль доступа к аккаунту хостинга, подключитесь к серверу по SSH.
Шаг 2. Установка необходимых приложений
Для этого вводим в терминале:
> apt-get update > apt-get install graphviz aspell ghostscript clamav gitОбратите внимание: мы обозначили начало всех консольных команд с >, но вам необходимо вводить их в консоль сервера без этого символа.
Шаг 3. Установка и настройка базы данных MySQL
Устанавливаем клиент и сервер MySQL:
> apt-get update > apt-get install mysql-server mysql-clientТеперь создадим пользователя, базу данных и предоставим доступы созданному пользователю:
- Заходим в клиент MySQL:
> mysql -u root- Создаем базу данных:
CREATE DATABASE moodle DEFAULT CHARACTER SET utf8mb4 COLLATE utf8mb4_unicode_ci;- Создаем пользователя:
CREATE USER 'moodle'@'localhost' IDENTIFIED BY 'ПАРОЛЬ';- Выдаем права созданному пользователю к базе данных:
GRANT SELECT,INSERT,UPDATE,DELETE,CREATE,CREATE TEMPORARY TABLES,DROP,INDEX,ALTER ON moodle.* TO moodle@localhost;- Выходим из клиента MySQL:
quit;Шаг 4. Установка веб-сервера Apache2, PHP и необходимых для него пакетов
> apt-get update > apt-get install apache2 php libapache2-mod-php php-cli php-mysql php-mbstring php-xmlrpc php-zip > apt-get install php-gd php-xml php-bcmath php-ldap php-pspell php-curl php-intl php-soap > service apache2 restartШаг 5. Скачайте Moodle с официального сайта системы
Извлеките файлы из скаченного архива и разместите их в папке файлов на веб-сервере или передайте файлы через sftp.
> mkdir /downloads > cd /downloadsНа официальном сайте Moodle найдите ссылку для скачивания tgz-архива для установки системы и скопируйте ее. Затем введите команду:
> wget ССЫЛКА > tar -zxvf НАЗВАНИЕ TGZ АРХИВАСкопируем файлы в каталог сайта на сервере:
> cp /downloads/moodle /var/www/html/ -R > chown www-data.www-data /var/www/html/moodle -R > chmod 0755 /var/www/html/moodle -RШаг 5. Настройка каталога для Moodle
После того, как вы скачали и распаковали файлы проекта Moodle, вам нужно создать каталог moodledata:
> mkdir /var/www/moodledata > chown www-data /var/www/moodledata -R > chmod 0770 /var/www/moodledata -RШаг 6. Финальная установка Moodle
Откройте браузер и введите IP-адрес вашего веб-сервера или домен (если он привязан), добавив после него /moodle.
Шаг 7. Настройка cron
Перейдите в редактирование cron-файла:
> crontab -eВставьте следующую команду:
* * * * * /usr/bin/php /var/www/html/moodle/admin/cli/cron.php >/dev/nullУстановка Moodle на Shared hosting
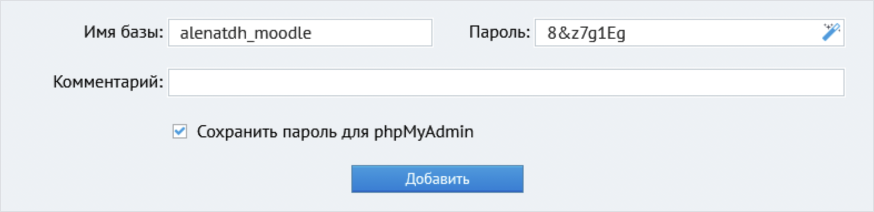
Шаг 1. Создаем базу данных
Для shared hosting создать базу данных можно в соответствующем разделе панели управления beget.
Шаг 2. Загрузка и настройка каталога для Moodle
Подключитесь к серверу по SSH, используя ваш логин и пароль доступа к аккаунту хостинга.
Перейдите в каталог созданного ранее сайта:
> cd ~/имя_сайта/public_html/На официальном сайте Moodle найдите ссылку для скачивания tgz-архива для установки системы и скопируйте ее. Затем введите команду:
> wget ССЫЛКА > tar -zxvf НАЗВАНИЕ TGZ АРХИВАОбратите внимание, что вместо слова “ССЫЛКА” необходимо вставить ссылку на tgz-архив с официального сайта Moodle, а вместо фразы “НАЗВАНИЕ TGZ АРХИВА” – имя архива, который был скачан командой wget, например, moodle-latest-400.tgz.
Дождитесь распаковки архива и скопируйте содержимое из распакованной папки в корень директории сайта:
> cp ~/имя_сайта/public_html/moodle/* ~/имя_сайта/public_html -RПосле этого можно удалить архив и папку, полученную при распаковке архива, они нам больше не нужны:
> rm НАЗВАНИЕ TGZ АРХИВА > rm -r moodleШаг 3. Финальная установка Moodle
Откройте браузер и введите домен вашего веб-сервера, или введите технический (имя_сайта.beget.tech), если вы не привязывали домен к веб-серверу. За более подробной инструкцией настройкой Moodle вы можете обратиться к статье по установке Moodle.
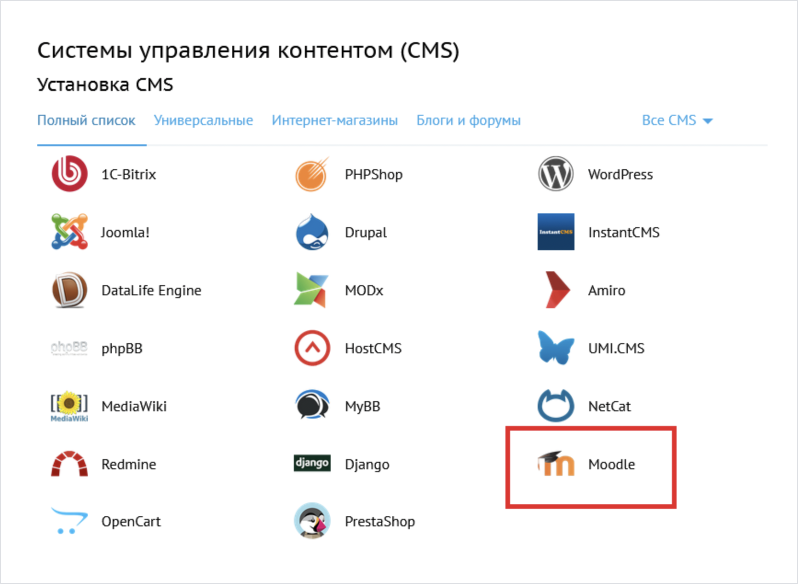
Обратите внимание, что для shared-хостинга в разделе CMS есть простая удобная автоустановка Moodle.
Готово! Вы успешно установили мудл на сервер или хостинг и можете приступать к созданию онлайн-курса.
- PostgreSQL