Как вывести список пользователей в Ubuntu Linux

Linux — отличная операционная система, которая широко используется для командных проектов. Итак, хорошо бы иметь подробную информацию о пользователях системы. Получить подробную информацию о пользователях системы в Ubuntu Linux VPS легко, а ввод из командной строки может помочь системному администратору проверить права доступа и действия пользователей в системе.
Очень важно изучить эти команды, чтобы иметь возможность быстро увидеть список пользователей в вашей системе Ubuntu VPS. В этой статье показано, как использовать командную строку для вывода списка пользователей в Ubuntu Linux VPS.
Как составить список пользователей в Ubuntu Linux VPS: руководство для начинающих
Если вы хотите просмотреть всех пользователей в Linux Ubuntu VPS, вы можете использовать команду /etc/passwd, поскольку данные локального пользователя сохраняются в файле «/etc/passwd». Есть два способа выполнить эту команду, а именно:
cat /etc/passwd
less /etc/passwd
После успешного выполнения указанной выше команды вы получите следующий результат:
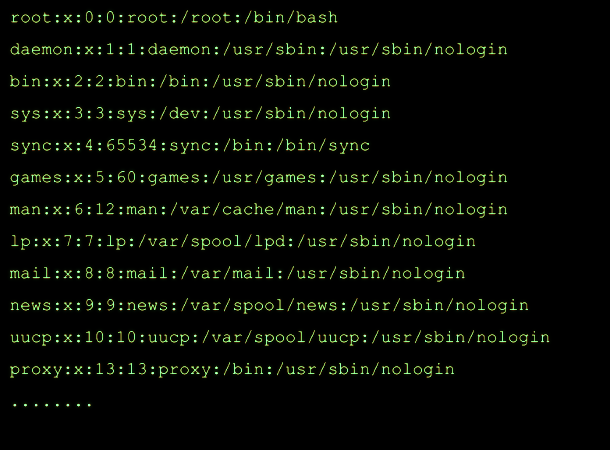
Эти выходные строки относятся к пользователям. Количество строк зависит от количества пользователей в системе.
Каждая строка содержит семь разных полей, которые представляют подробные сведения о конкретном пользователе. Например, первая строка вывода — это root:x:0:0:root:/root:/bin/bash , что означает:
- root — логин пользователя.
- b — заполнитель пароля, так как фактический пароль сохраняется в отдельном файле.
- 0 — UserID пользователя.
- 0 — GroupID пользователя.
- root — командное поле с некоторыми подробностями о пользователе.
- /root — домашний каталог, который является основным каталогом пользователя.
- /bin/bash — оболочка пользователя.
Обратите внимание, что двоеточия (:) используются для разделения значений в выводе.
Выполните следующие команды, чтобы увидеть имена пользователей:
cut -d : -f 1 /etc/passwd
awk -F: '< print $1>' /etc/passwd
Как просматривать группы в Ubuntu Linux VPS
Вы также можете создавать группы, собирая нескольких пользователей и давая им некоторые административные права в системе. Этот вариант удобен для создания групп пользователей в одной системе. Информация об этих группах будет сохранена в папке Group. Итак, используйте следующую команду для просмотра групп в терминале.
less /etc/group
После успешного выполнения команды вы получите следующий результат:
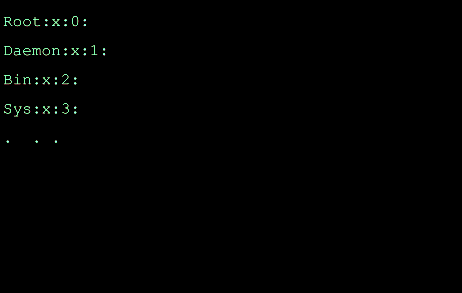
Используйте команду ниже, если вы хотите отобразить имена групп:
cut -d : -f 1 /etc/group
Как вывести список пользователей в Ubuntu Linux VPS с помощью команды getent
Команда getent используется для отображения записей из базы данных, настроенной в файле /etc/nsswitch.conf. Он охватывает базу данных passwd, которую можно использовать для запроса списка пользователей. Команда getent отображает записи из баз данных, настроенных в файле /etc/nsswitch.conf, включая базу данных passwd, для запроса списка всех пользователей.
Используйте следующую команду для выполнения getent в терминале:
getent passwd
После выполнения команды вы получите следующий вывод:
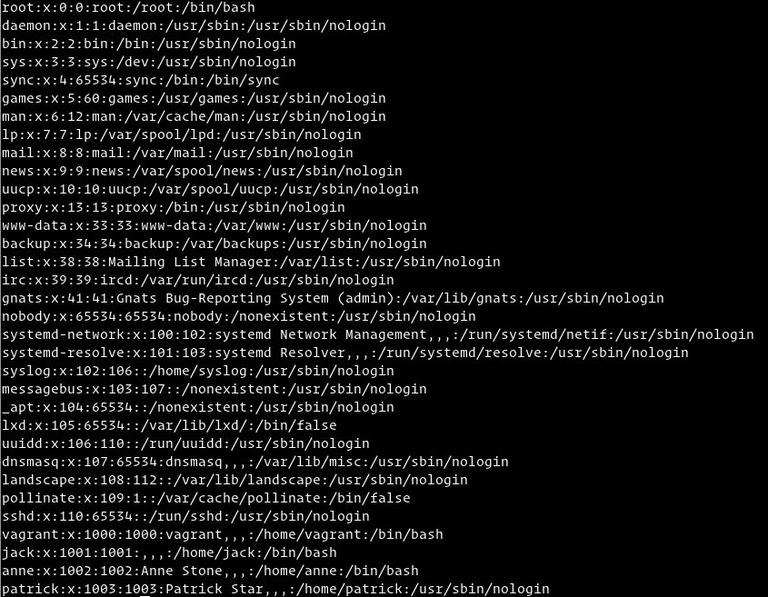
Вы можете использовать awk или cut для печати первого поля, содержащего имя пользователя:
getent passwd | awk -F: '< print $1>' getent passwd | cut -d: -f1
Как просмотреть зарегистрированных пользователей с помощью команды w
Вы можете использовать команду w для вывода списка зарегистрированных пользователей Linux Ubuntu VPS. Чтобы использовать эту команду, введите «w» в терминале и выполните ее, нажав Enter.
После выполнения команды вы получите вывод, состоящий из различной информации о пользователе, такой как время входа в систему, время простоя и информация об удаленном хосте. Подробности в выводе следующие:
- user - представляет имя пользователя.
- TTY - представляет имя терминала.
- From - представляет имя удаленного хоста.
- Login@ — время входа в систему.
- Idle — представляет собой простой.
- JCPU — представляет время, используемое процессом, связанным с TTY.
- PCPU — представляет время, используемое конкретным процессом, отображаемым в поле WHAT.
- WHAT - представляет текущий процесс пользователя.
Заключение
В этой статье подробно описано, как составить список пользователей и информацию о пользователях в Ubuntu Linux VPS. Эти команды помогают системным администраторам получить сведения о пользователях, использующих определенную систему, и узнать другие важные сведения о них. Надеемся, статья была достаточно информативной и исчерпывающей для ваших нужд.
Насколько публикация полезна?
Нажмите на звезду, чтобы оценить!
Средняя оценка / 5. Количество оценок:
Оценок пока нет. Поставьте оценку первым.
Команда who Linux
Название команды who Linux полностью отображает ее функциональность — она служит для получения информации о пользователях, которые подключены к системе, в том числе и об терминальных сессиях, через которые происходит подключение.
При выполнении команды используются данные из файла /etc/utmp, хотя можно прописать в терминале и другой файл (как правило, используют /etc/wtmp либо /etc/inittab).
Синтаксис who
Синтаксис этой команды достаточно прост и выглядит так:
who опции имя_файла аргументы
Вообще, можно использовать who без каких-либо опций или аргументов. В таком случае отобразится набор данных по умолчанию об учетных записях подключенных пользователей — имя пользователя, название пользовательского терминала, время подключения.
Также можно прописывать команду в виде who am i — тогда она будет идентифицировать конкретно того пользователя, который работает сейчас в терминале (аналогично опции -m).
Опции who
Используя различные опции, можно получать именно ту информацию, которая нужна здесь и сейчас:
- -a (—all) — включает в себя все основные опции.
- — b (—boot) — показывает время загрузки операционной системы.
- -d (—dead) — выводит перечень зомби-процессов.
- — H (—heading) — никак не влияет на получаемую информацию, зато добавляет колонкам заголовки и помогает понять что где находится.
- -m — показать пользователя, который сейчас работает в терминале.
- -r — вывести текущий уровень запуска (runinit);
- -t — показать последнее изменение системных часов;
- -s— вывести только имя, терминальную сессию и время.
- -q— вывести количество авторизованных пользователей.
- -T — данные о терминальной сессии.
- -u — показать активных пользователей.
- —ips — вместо названия хостов показывает ips.
- —lookup — используется в сочетании с —ips, выводит данные, которые основываются на сохраненном IP, если он доступен, а не на названии хоста.
Примеры использования who
Используя опцию -a, мы получаем максимум данных, которыми команда готова снабдить нас без каких-либо дополнительных указаний. В состав этой опции входят опции -b, -d, —login, -p, -r, -t, -T, -u:
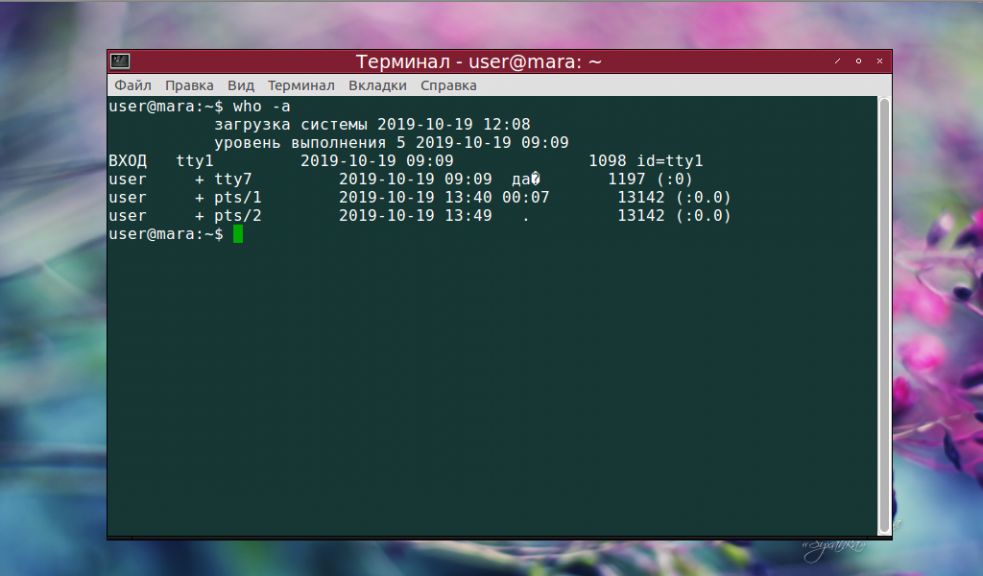
Этих данных больше, чем при простом использовании who:
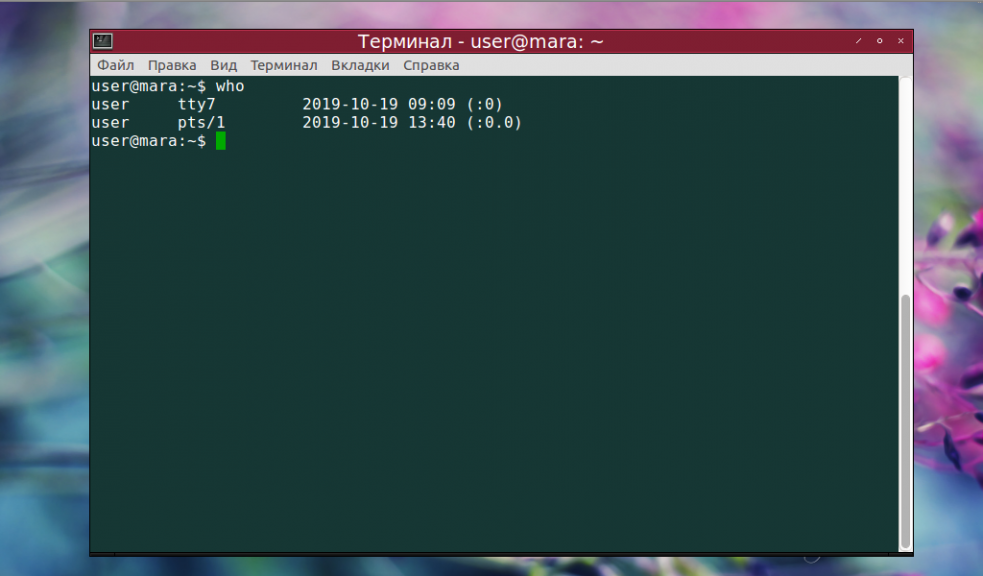
Чтобы узнать только время загрузки системы, достаточно написать в терминале:
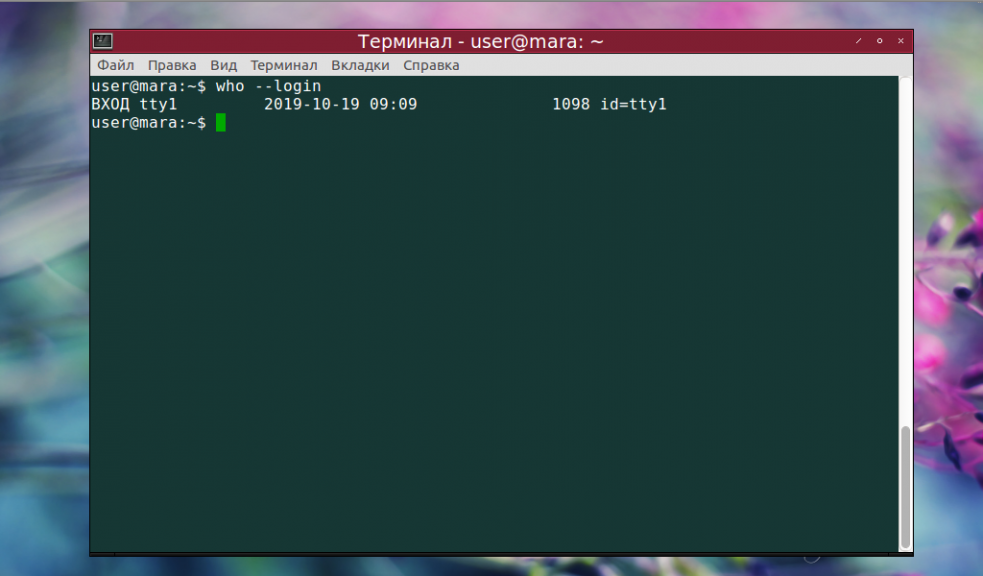
Нужно узнать текущий уровень запуска (runinit)? Для этого служит команда who в сочетании с опцией -r:
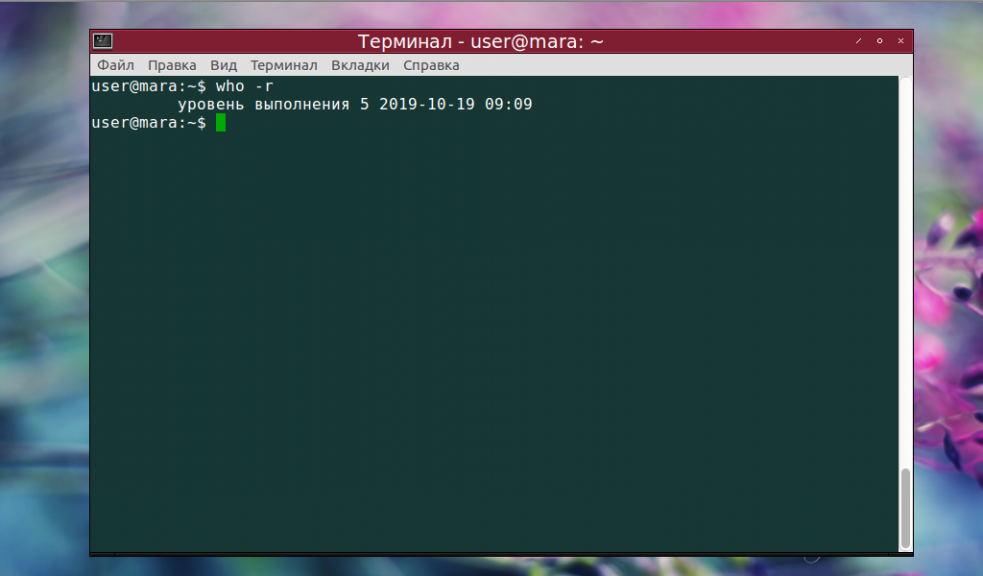
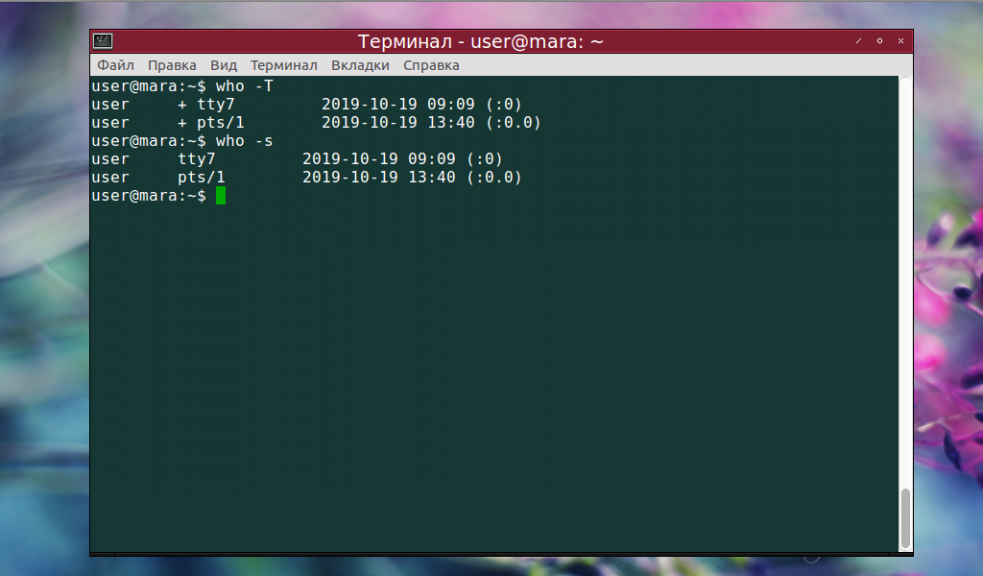
При использовании опции -s выводятся значения NAME, LINE и TIME — информация, идентичная той, что будет получена без использования каких-либо опций. Все то же самое, но уже с добавлением данных о состоянии терминальной сессии, показывает опция -T.
Состояние — это возможность принимать сообщения от других терминалов. Если рядом с названием терминальной линии стоит «+», как на скриншоте, значит, сообщения могут быть приняты от любого стороннего терминала, в противном случае значение примет вид «-». Если вместо плюса или минуса там находится вопросительный знак, то линия неисправна:
Не упоминается в мануале опция -q, тем не менее, она работает, выводя информацию о количестве пользователей в системе:
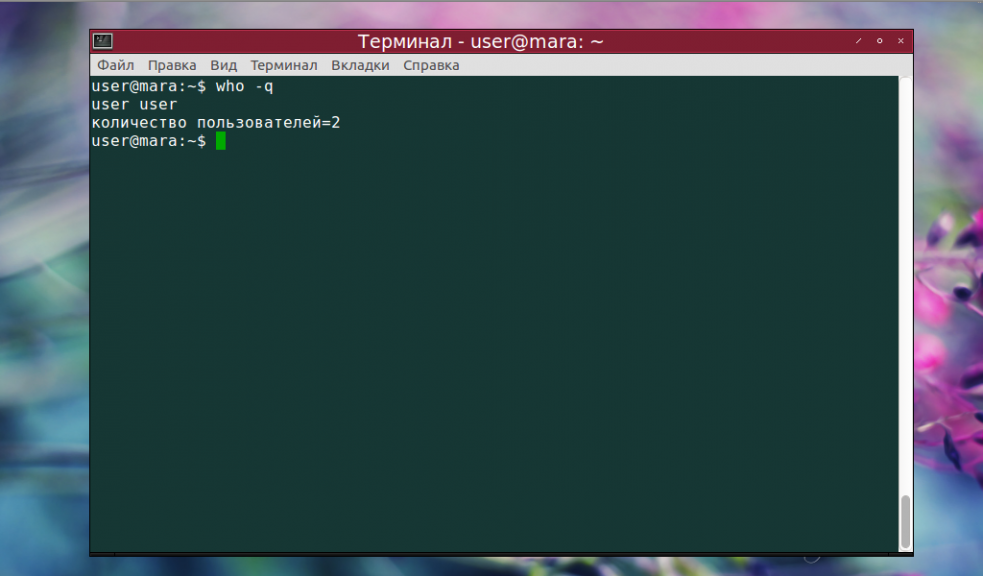
С помощью -u можно узнать информацию о тех пользователях, которые активны в данный момент:
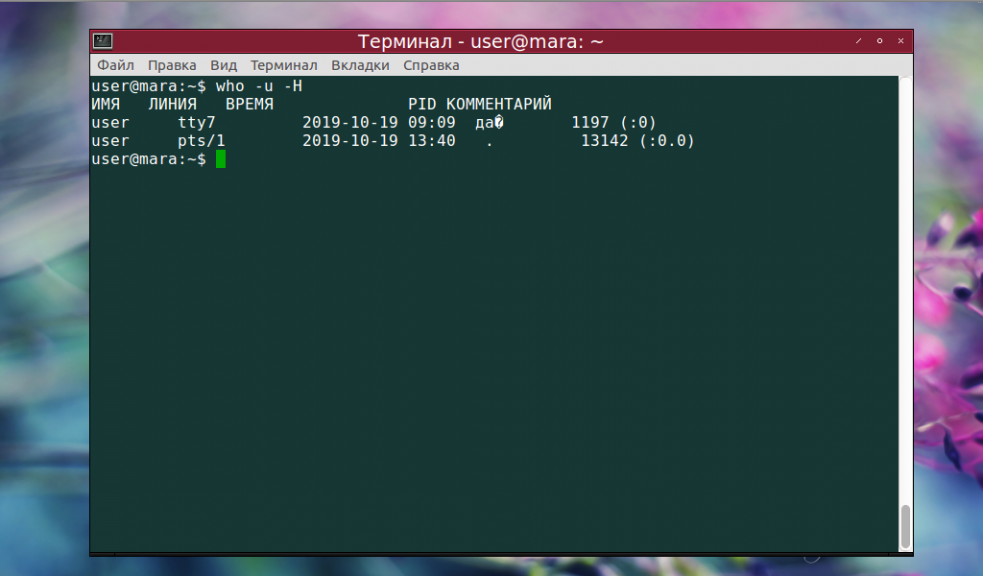
На этом же скрине видны изменения, которые происходят при использовании опции -H — у колонок с данными появились заголовки.А вот и зомби-процессы, которые показывает опция -d:
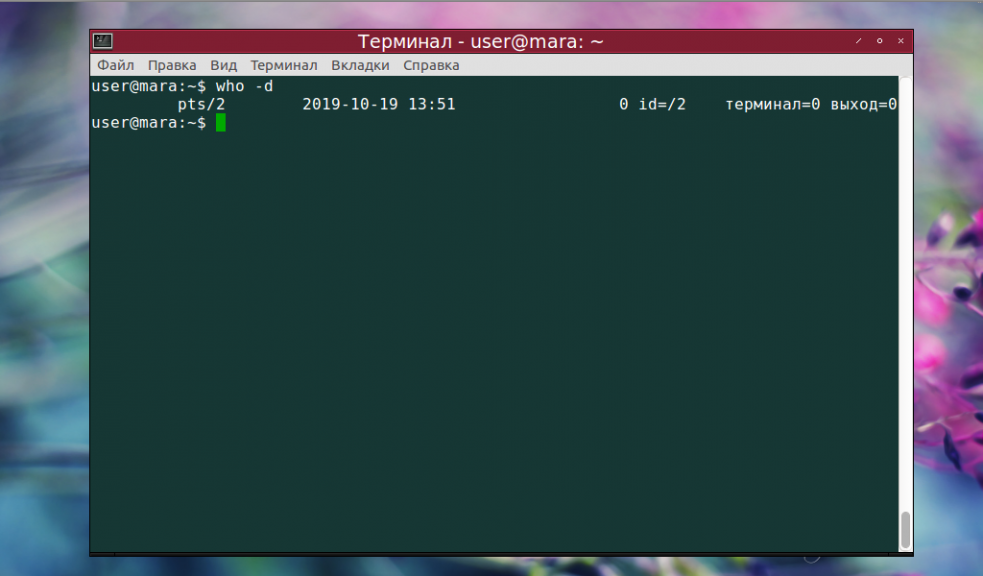
Кстати, поле EXIT при использовании этой опции не выводится. Чтобы увидеть его, следует использовать -a.
Выводы
Команда who Linux — это интересный и полезный инструмент для пользователей Linux. С ее помощью можно узнать всю доступную информацию о пользователях, которые активны в системе сейчас или были активны раньше. Мы постарались как можно подробнее рассказать вам о правилах и нюансах использования who, однако, если у вас остались вопросы, задавайте их в комментариях.
List Groups in Ubuntu Command Line


Linux, from its core, is built to have multiple users.
And separating users into different groups is pretty convenient for managing permissions.
A user can be a member of more than one group. This is why the groups are divided into the following two categories:
Ubuntu 18.04 Review of New Features
Please enable JavaScript
- Primary group : Also known as the login or default group. If the user creates a file, the primary group takes the group ownership. Usually, the primary group has the same name as the user.
- Secondary group : Also known as a supplementary group. It is used to grant specific permissions to users. For example, in Ubuntu, only members of the sudo groups can run commands with sudo.
How do you know which group a user belongs to? Let me show you that.
How to check the groups of a user
Here are various scenarios for listing user groups in Ubuntu.
List groups of the current user
To list the groups of the current user, all you have to do is execute a single command without any additional flags:
groups
Yep, all you have to do is execute the groups command!
List groups of the other users
If you want to find out the groups to which the specific user belongs, all you have to do is append the username to the groups command:
groups usernameFor your reference, here, I checked the groups where the user root and sagar belong:
groups root groups sagar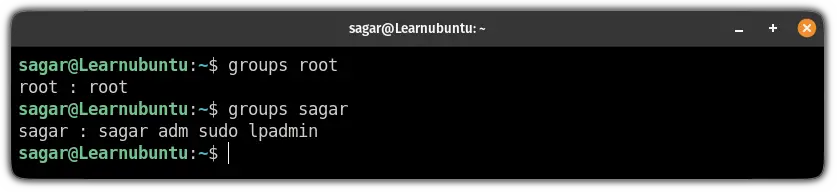
I could have used both users in single command as well.
You can get the primary group of a user using the command: id -gn user_name
List all the groups in Ubuntu
You just learned how to see which groups a user belongs to. How about listing all the available groups? That can be done too.
The /etc/group file contains all the necessary information about the local group.
So you can read the contents of that file and easily list the groups:
cat /etc/group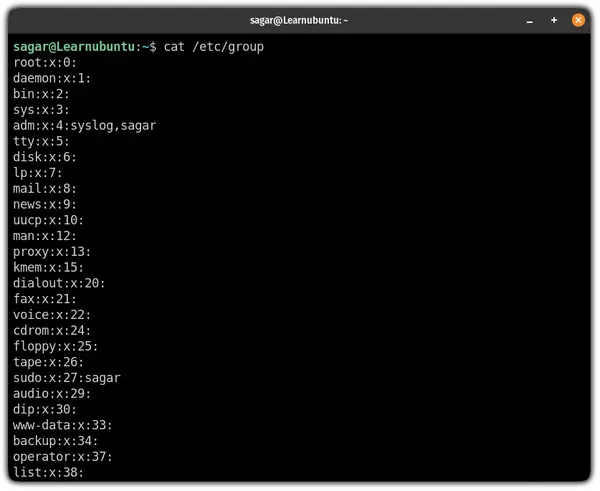
Similarly, if you want to find a specific group, you can use the grep command to filter the output:
cat /etc/group | grep sudo
In case you are wondering about the meaning of the output, here’s what that means:
- sudo is the name of the group.
- x indicates that shadow passwords are being used and can be found at /etc/gshadow .
- 27 is the group ID.
- sagar is the list of the group users. You can have multiple of them.
And if they seem irrelevant, you can use the cut command and print the group names only:
cut -d: -f1 /etc/group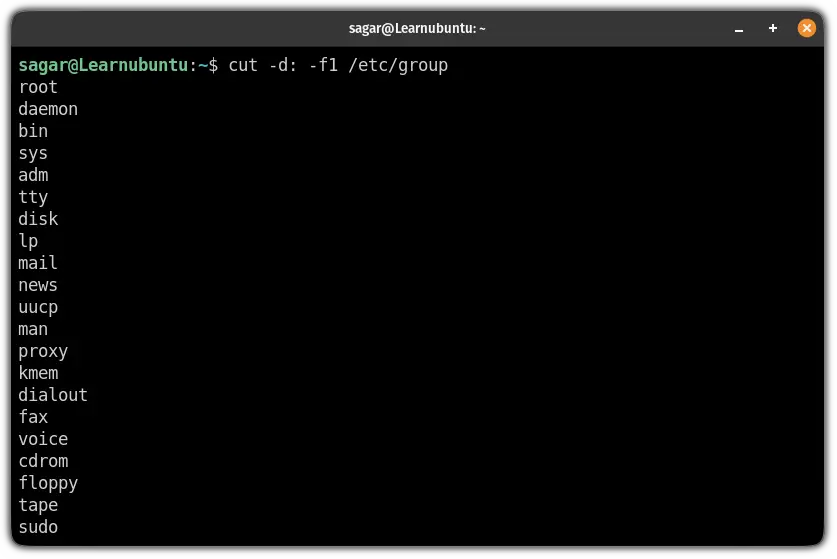
Another option is to use the getent command
How to list groups using the getent command
The getent command is used to get entries from the database, including passwd and group database.
This means it can be used for our purpose too!
To get a list of groups, all you need to do is append group to the getent command:
getent group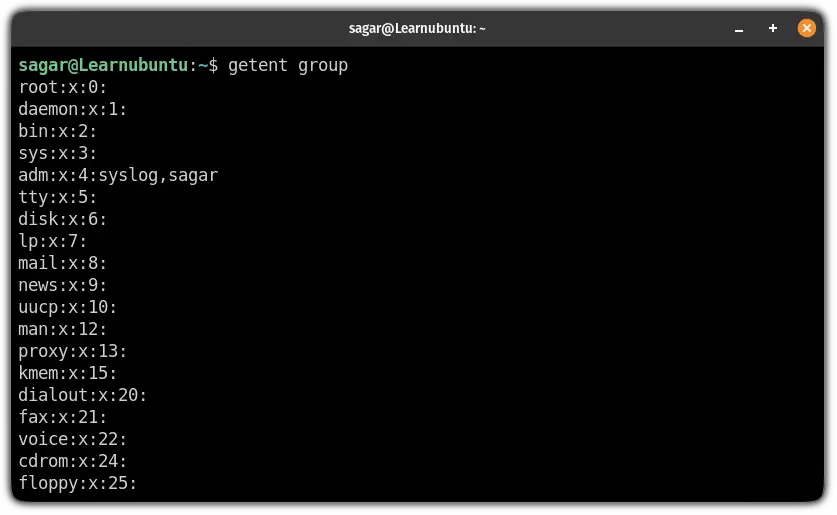
List every member of a specific group
If you want a list of every user belonging to a specific group, you can use the getent command in the following syntax:
getent group [group_name]Let’s say I want to list every member of the sudo group, then I will be using the following command:
getent group sudo
Want to know how you can add a user to a group?
Cannot see the group you are looking for? How about creating that group?
If you want to add a user to an existing group and have no idea how to? We have a dedicated guide to solve this issue:
I hope you will find this guide helpful and if you have any queries, let me know in the comments.
How to List Users in Ubuntu Command Line

As a sysadmin, you’ll encounter scenarios where you need to list the users present on your system.
Perhaps you want to remove a user or add it to the sudoer list or modify its groups, there can be several reasons you would want to check users.
And there are several ways to list users in Ubuntu. Let me share some of them with you.
Ubuntu 18.04 Review of New Features
Please enable JavaScript
List all users with /etc/passwd file
The most common and reliable way is to look at the content of /etc/passwd file. This file keeps the details of the user accounts.
cat /etc/passwdYou’ll probably see a huge output like this:
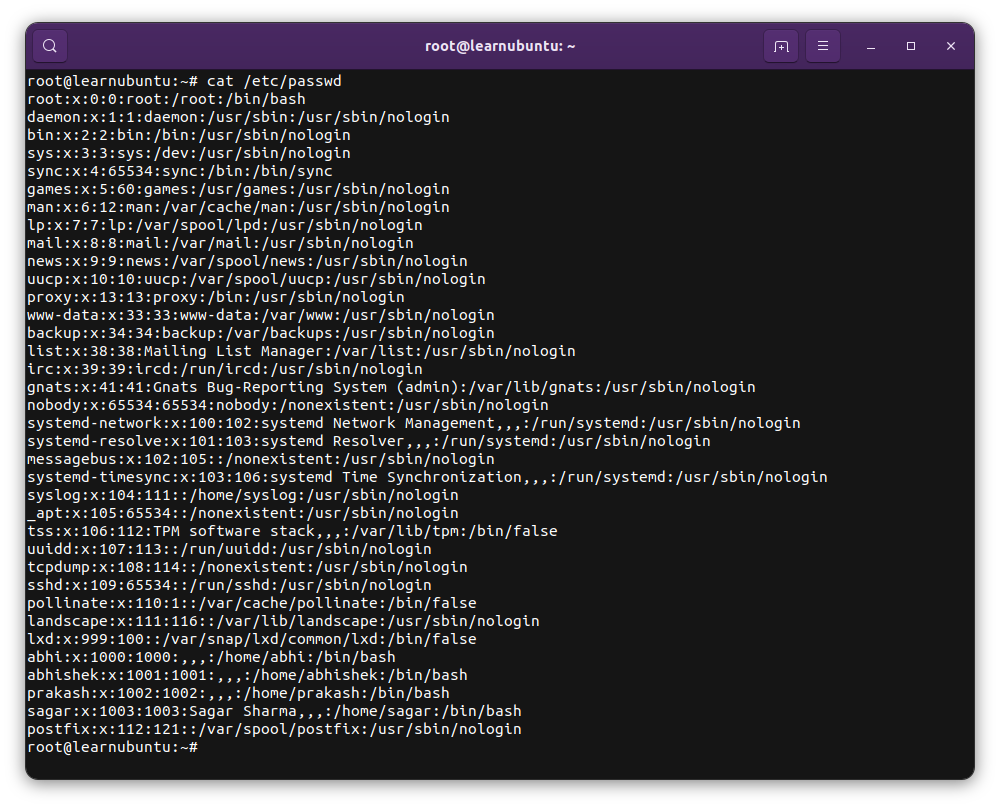
Each row represents a user and the fields separated by the colon (:) has the following meaning:
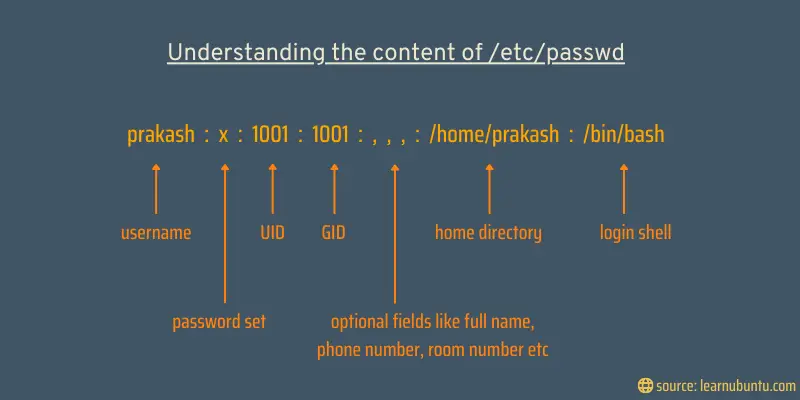
- User name
- Password, x means that a password is set for the user
- User ID (UID)
- User’s group ID (GID)
- Full name, room number, phone number etc (optional)
- Home directory of the user
- Default login shell for the user
So many users? Which ones are real?
Surprised and overwhelmed to see so many users? You don’t remember creating them all, do you? That’s because you didn’t create all of them.
Most of these users are created automatically with the Linux system itself. Some of them are created automatically or as part of the configuration when you install specialized software like postfix, MySQL etc.
These are system users. You’ll notice that most of them have nologin set for the default login shell. This indicates that these system users cannot be used to login to the system. They will be used from within the system but you cannot do a ssh postfix@server .
The users that you create to be used by other human users are called normal or regular users.
How do you distinguish between the system users and normal users? You use the UID.
System users have UID less than the UID_MIN. Regular users have UID between UID_MIN and UID_MAX. You can get these value with this command:
grep -E '^UID_MIN|^UID_MAX' /etc/login.defsIn some Linux systems, UID_MIN is 500. But in Ubuntu it is 1000.
root@learnubuntu:~# grep -E '^UID_MIN|^UID_MAX' /etc/login.defs UID_MIN 1000 UID_MAX 60000 In other words, if you see the UID is 1000 or more, it is a normal user. Root user always has 0 UID and 0 GID.

Only list user names, not other details in /etc/passwd
You can parse the output of the /etc/passwd file to cut or awk command to only display the first column which shows the user name.
Use the cut command to use the : as column separator and then display the first column.
cat /etc/passwd | cut -d: -f1You can do the same with the awk command:
cat /etc/passwd | awk -F: ''Both commands will give you output like this:
root daemon bin sys sync games man lp Use getent command to list users
The getent command queries the configuration files located at /etc/nsswitch.conf. The /etc/passwd file is one of them.
So, you query it with getent like this:
getent passwdThis will give you a result similar to what you saw in the contnet of /etc/passwd file:
root@learnubuntu:~# getent passwd root:x:0:0:root:/root:/bin/bash daemon:x:1:1:daemon:/usr/sbin:/usr/sbin/nologin bin:x:2:2:bin:/bin:/usr/sbin/nologin sys:x:3:3:sys:/dev:/usr/sbin/nologin sync:x:4:65534:sync:/bin:/bin/sync games:x:5:60:games:/usr/games:/usr/sbin/nologin man:x:6:12:man:/var/cache/man:/usr/sbin/nologinYou can list only the regular users the same way:
getent passwd | cut -d: -f1Use compgen to get the list of users
You can use the compgen command with option -u and list only the users present on the system without any additional information.
compgen -uThis lists all users, system and regular, without additional details.
root daemon bin sys sync games man lp Check if a user exists on the system
You know how to list the users in Ubuntu. What if you just want to know if a user exists or not?
While there is no dedicated command for that, you can filter the user list with the grep command like this:
getent passwd : grep user_nameIf you see a result, the user exists.
root@learnubuntu:~# getent passwd | grep prakash prakash:x:1002:1002. /home/prakash:/bin/bashIf you don’t see it, it doesn’t.
root@learnubuntu:~# getent passwd | grep random root@learnubuntu:~# 
New Book: Efficient Linux at the Command Line
Pretty amazing Linux book with lots of practical tips. It fills in the gap, even for experienced Linux users. Must have in your collection.
List normal users only (for scripting)
If you just want to see what other regular users have been added to your Ubuntu system, you can use any of the above commands and look at the users with UID of more than 1,000.
This is good enough for day-to-day, manual use. But things will be different if you want to use this information in a script.
Say you plan to just list the names of the regular users on the system and use it in a script for some specific purpose.
In that case, you could do something like this:
eval getent passwd <$(awk '/^UID_MIN/ ' /etc/login.defs)..$(awk '/^UID_MAX/ ' /etc/login.defs)> | cut -d: -f1 The eval command executes the arguments as a shell command. The awk commands get the UID_MIN and UID_MAX and then use them with getent passwd to only fetch the rows with UIDs in 1000 to 60,000 (normal users). The cut command shows only the first column, which is the username.
List currently logged in users
If you are using an Ubuntu server with multiple users, you can check which users are currently logged in.
There are multiple ways to view users who are current logged into the Linux system. The most common is who command:
It will show additional details like the time of the last login and the IP address from where it was accessed.
root@learnubuntu:~# who root pts/0 2022-09-07 02:23 (103.211.12.162)If you just want to display the currently logged-in users without additional details, use the users command:
usersAs you can see, it just gives the names of the currently logged-in users:
root@learnubuntu:~# users root In the end .
You saw numerous ways of listing users in the Ubuntu command line. You got to learn about the structure of the /etc/passwd command and the difference between system and normal users. You also learned to check if the user exists in the system and display the currently logged in users.
That’s a pretty good addition to your Linux knowledge. Feel free to leave your questions and suggestions in the comments.