How To Sidechain in FL Studio 20
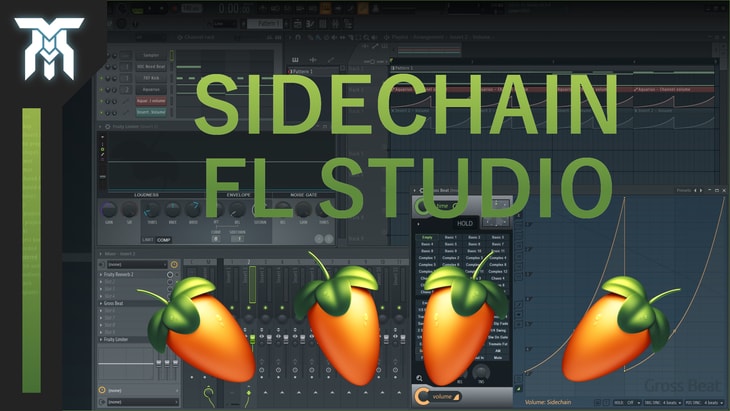
Learn how to sidechain in FL Studio 20 with this sidechaining tutorial.
With sidechain compression, you can make your leading elements stand out while ducking the volume of other sounds that are played at the same time.
If you’re wondering what sidechaining is and how to use this mixing technique on drums, vocals, and other sounds, this tutorial will show you why using sidechain compression can clear up your mix and even create a pumping sound.
What is Sidechaining / Sidechain Compression?
First of all, sidechaining is more professionally known as sidechain compression as its true way of doing this is through a compressor.
What it does is it will compress one sound whenever another one is present.
This can be as short as a kick drum or as long as a phrase in your vocals, but really, there’s no limit to this.
Now, let’s get into 3 of the many ways you can be applying sidechain compression throughout your mix.
Method One: Using a Limiter
The first way is by using a compressor and is the most versatile way to sidechain sounds with different lengths, not to mention it’s automated.
Go to the mixer track of the sound you want to lower in volume and apply a compressor onto that.
Then, go over to the mixer track of the source you want to use to trigger the compressor and route it over to the track you want to duck in volume.
Depending on whether or not you want the triggering sound to be heard, such as using a Ghost Kick, you can take two approaches to this.
A Ghost Kick is just a kick drum that is not sent to the master (i.e. not heard).
You can either use «sidechain to this track», which will keep the sound audible or «sidechain to this track only» which will silence the triggering sound but will still activate the compressor whenever it is present.
Then, depending on the mixer track of the sound you are using to trigger the compressor, select it on the sidechain input option.
To set up the sidechain to make a pumping sound, lower the threshold to anywhere below -30dB.
Next, you’ll need to raise the ratio to anything higher than 1.5.
Taking it further, you can move on to the envelope and noise gate to further refine the way the compressor works.
Method Two: Volume Automation
The next way to do this is a pretty dirty way of doing this and is through volume automation.
This is really only practical for letting percussion or repetitive sounds through or for a sound effect.
If you want to let effects like reverb or delay tail off while ducking the sound, create an automation clip of the channel volume.
If you want to completely silence the effects as well, automate the mixer track volume.
Once you have these automation clips set up, you can go into the playlist and change the pattern of automation.
Method Three: Gross Beat
The last way is probably the easiest for a specific pattern of sidechaining and is done with Gross Beat.
Once you have it on the mixer track you want to pump, go into the effect plugin and down to the sidechain option.
You can take it further by changing the automation clip here if you wanted to make a different pattern or change the intensity.
One of the reasons you might want to start using this technique is that it can make your mix sound much better when used with subtlety.
Sidechaining allows important elements in your mix to stand out while not sacrificing the volume of something else, especially if it’s a leading element.
I hope you enjoyed this tutorial on how to use sidechain compression.
If you did, don’t forget to share this with a friend and subscribe on YouTube!
As always, thanks for reading.
Сайдчейн кика и баса �� Как сделать сайдчейн в FL Studio и Ableton Live

В этом видео я расскажу вам про все основы сайдчейн (sidechain) компрессии. Как настроить сайдчейн, какие плагины использовать и в каких случаях. Разберу примеры, где будет сайдчейн кика и баса в FL Studio и Ableton Live, а так же с вокалом и реверберацией. Покажу, как сделать сайдчейн в FL Studio с помощью лимитера (Fruity Limiter), а в Ableton Live с помощью стандартного компрессора (Compressor). Приятного просмотра! Подписывайся на мой канал, что бы не пропустить новые видео. Я в социальных сетях: Вконтакте: https://www.vk.com/bonset Тайм-коды: 00:00 — Что будет в видео 00:11 — Всем привет! 00:20 — Заставка 00:28 — Что такое сайдчейн? 00:52 — Пример технического сайдчейна 02:40 — Пример художественного сайдчейна 03:30 — Разные VST-плагины для сайдчейна 03:49 — Альтернативы сайдчейну 04:00 — Как настроить сайдчейн? 04:06 — Настройка сайдчейна в Ableton Live 05:24 — Настройка сайдчейна в FL Studio 06:45 — Мои поздравления! 06:54 — Поддержите меня 07:04 — Пока ^^ Плагины, которые я перечисляю в видео: 1. [WavesFactory] Trackspacer: https://www.wavesfactory.com/audio-plugins/trackspacer 2. [Oeksound] Soothe 2: https://oeksound.com/plugins/soothe2 3. [Nicky Romero] Kickstart: https://www.kickstart-plugin.com 4. [Cableguys] VolumeShaper 6: http://www.cableguys.com/volumeshaper.html
Показать больше
Войдите , чтобы оставлять комментарии
Как сделать сайдчейн

В своей статье «Что такое sidechain» я рассказывал о том, как сделать сайдчейн в программе Cubase. Сегодня же я хочу показать как реализовать этот эффект в программе Image-line FLStudio. Коме того, я познакомлю Вас с плагинами, которые позволяют сделать сайдчейн в любом секвенсоре.
Существует несколько способов создания эффекта сайдчейн в программе FLStudio:
– Автоматизация громкости;
– Peak Controller;
– Gross Beat;
– Использование сторонних плагинов.
Автоматизация громкости
1.) В разрыв (Insert) канала, где необходимо сделать сайдчейн, вставляем плагин Fruity Balance

2.) Наводим курсор мыши на регулятор Volume и нажимаем правую клавишу. Из выпадающего меню выбираем пункт Create automation clip

3.) Изменяем форму кривой автоматизации

4.) Расставляем кривую автоматизации в нужные структурные участки трека

Сайдчейн с помощью плагина Peak Controller
1.) В Insert канала, где необходимо сделать сайдчейн вставляем плагин Fruity Balance
2.) В разрыв канала с управляющим сигналом (например, канал с бочкой) вставляем плагин Peak Controller

3.) Настраиваем Peak Controller следующим образом:
Если управляющий сигнал должен быть слышим (бочка), то стоит отключить функцию MUTE.

4.) Наводим курсор мыши на регулятор Volume во Fruity Balance и нажимаем правую клавишу. Выбираем пункт Link to controller…

5.) В окне Remove control settings в области Internal controller выбираем пункт Peak ctrl (название управляющего канала) – Peak и жмём клавишу Accept.

Сайдчейн с помощью Fruity Limiter
1.) Выбираем в микшере канал с управляющим сигналом (например, канал с бочкой). Наводим курсор мыши на стрелку (Enable send from…) и нажимаем левую клавишу мыши (направляем управляющий сигнал на нужный канал).

2.) В Insert канала, где необходимо сделать сайдчейн вставляем плагин Fruity Limiter

3.) Выбираем канал с управляемым сигналам (например, бас), открываем плагин Fruity Limiter и настраиваем его следующим образом:
Threshold: чувствительный (приблизительно -25 dB).

Сайдчейн с помощью Gross Beat
1.) В Insert канала, где необходимо сделать сайдчейн вставляем плагин Gross Beat


3.) Редактируем пресет под свои нужды

Использование сторонних плагинов для создания эффекта sidechain
Существует множество различных плагинов для создания эффекта сайдчейн, которые могут быть использованы абсолютно в любом секвенсоре. Вот одни из самых популярных:
– Nicky Romero Kickstart.
VolumeShaper позволяет прорисовывать кривую громкости по аналогии с плагином Gross Beat. Он имеет ряд пресетов, среди которых есть несколько для создания эффекта сайдчейн.

Плагин Kickstart от Nicky Romero имеет фиксированный набор кривых, которые могут быть использованы для создания различной продолжительности и глубины сайдчейн эффекта.

Лично мне нравиться плагин VolumeShaper3. Он очень удобный и гибкий в настройке.
Смотрите видео о том, как сделать сайдчейн.
Читайте также:
Если понравилась статья, поделись с друзьями!
Автор: Александр Коваленко
20. 09. 2014
Добавьте свой комментарий. Отменить ответ
Комментарии: 3
Доброго времени суток.
Попробовал Я эти: “Cableguys VolumeShaper” и “Nicky Romero Kickstart” плагины на виртуальной студии LMMS, но вот проблема: одна и таже пария нот каждый раз по разному звучит на этих плагинах.
В чём конкретно разница?
Эффект создаваемый плагином VolumeShaper отличается от эффекта Kickstart?
Или же каждый новый такт партии звучит по разному?
Да, каждый новый такт партии звучит по разному. Но Я разобрался в чём проблема, Я в секвенсоре LMMS активировал функцию: “sync vst plugins to host playback” вроде теперь всё нормально воспроизводит.
Рубрики
- Интервью
- Оборудование
- Выбор оборудования
- Обзоры оборудования
- Подключение оборудования
- Аудиоредакторы
- Музыкальные проигрыватели
- Нотные редакторы
- Программы для диджеинга
- Программы для создания музыки
- Запись звука
- Обработка звука
- Синтез звука
- VST плагины
- Обзор VST плагинов
- Плагины FL Studio
- Уроки Cubase
- Уроки FL Studio
Подписывайся на новые статьи
Онлайн курс
Электронная музыка
с нуля до PRO
Подробнее
Нашли ошибку?
Выделите текст и нажмите Ctrl+Enter.© Создание электронной музыки, 2011 — 2024. Все права защищены.
Мы используем файлы cookie, чтобы вам было удобнее пользоваться нашим сайтом.
Вы можете узнать больше о том, какие файлы cookie мы используем, или отключить их в настройках .
Закрыть настройки файлов cookie GDPR
- Конфиденциальность
- Строго необходимые файлы cookie
- Политика конфиденциальности
Конфиденциальность
Этот веб-сайт использует файлы cookie, чтобы мы могли предоставить вам лучшие результаты вашего запроса. Информация о файлах cookie хранится в вашем браузере и выполняет такие функции, как распознавание вас, когда вы возвращаетесь на наш веб-сайт, и помогает нашей команде понять, какие разделы веб-сайта вы находите наиболее интересными и полезными.
Мы используем файлы cookie, чтобы анализировать трафик, подбирать для вас подходящий контент и рекламу, а также дать вам возможность делиться информацией в социальных сетях. Мы передаем информацию о ваших действиях на сайте партнерам Google: социальным сетям и компаниям, занимающимся рекламой и веб-аналитикой. Наши партнеры могут комбинировать эти сведения с предоставленной вами информацией, а также данными, которые они получили при использовании вами их сервисов.
Строго необходимые файлы cookie
Строго необходимые файлы cookie должны быть включены постоянно, чтобы мы могли сохранить ваши предпочтения в настройках файлов cookie.
Включить или отключить файлы cookie
Если вы отключите эти файлы cookie, мы не сможем сохранить ваши настройки. Это означает, что каждый раз, когда вы посещаете этот веб-сайт, вам нужно будет снова включать или отключать файлы cookie.
How to Sidechain in FL Studio [Complete Guide]
Sidechaining is common when you are mixing and mastering electronic music such as trance, house and techno. It is an essential technique if you are looking to achieve a clean and modern mix. When implemented correctly, sidechaining can add dynamic and rhythm to your mix. It works by using the volume of one signal to control a parameter on another signal. However, it is not one solution that fits all. If you try to apply it everywhere, it may do more harm than good.
Table of contents
Understanding Compression in FL Studio
To understand sidechaining, we must first understand compression. Compression is a processing tool that keeps your signal in the same dynamic range. It typically reduces the difference between the loudest and softest parts of your signal. A compressor has parameters that you can adjust to precisely regulate its behavior:
Threshold – the compressor works by reducing the volume of a signal once it passes a specified level. This level is called the threshold. You set it using a gain knob.
Ratio – this determines how much a compressor reduces a signal once it’s past the threshold. A compressor set with a ratio of 4:1 means that the amplitude of the signal will be reduced by 4db for every 1db that passes the threshold.
Attack – this determines how quickly the compression acts once the threshold is passed. A fast attack is great for handling sharp transients. A slow track will let some transients through; this especially works great with drums.
Release – this defines how quickly the compression lets go after it acts on the signal
Knee – the knee determines how fast the compressor acts on a signal. A soft knee applies the compression gradually until the compression ratio is reached. A hard knee applies the compression only when the signal passes the threshold.
Scenarios for Applying Sidechain Compression in FL Studio
I use sidechain compression in a few scenarios
To separate the Kick and bass
Often, the kick and bass clash in the same frequencies. To make sure they don’t fight and cancel each other out, I use sidechain compression to make the kick cut through the mix.
To balance lead vocal and synths
I always want my vocals to pop in the mix. I use a little sidechain compression to make sure that the lead vocal gets a little more presence in the mix.
To create special FX
I use sidechain compression to add dynamics and movement to delays and reverbs by only activating the effects when the lead signal is not playing.
How to Sidechain in FL Studio (4 Different Ways)
In FL studio there are four ways to implement sidechaining
- Sidechaining using Fruity Limiter.
- Sidechaining using Fruity Peak Controller.
- Sidechaining using automation.
- Sidechaining using Gross beat.
Sidechain using Fruity Limiter
It is important to remember that sidechaining works by reducing the volume of one signal relative to another, in this case we will sidechain a kick to the bassline. When you’re doing sidechain compression using the limiter, add the fruity limiter plugin to the signal you want to duck.
- Start by adding Fruity Limiter to an effect slot in the Bass insert.

- Now I link the kick insert to the bass insert. I do this by selecting the kick insert, and right clicking on the small arrow on the bass insert. Select ‘Sidechain to this track’ from the menu.

- If you don’t want your kick to be heard you can select “Sidechain to this track only”. This is usually known as using a ‘Ghost Kick’. The kick insert will not output to the master track.
- Open Fruity Limiter and change from Limit to Comp mode.

- In the sidechain box , drag up or down until it changes to 1. You can also right click on the sidechain box and select an input.
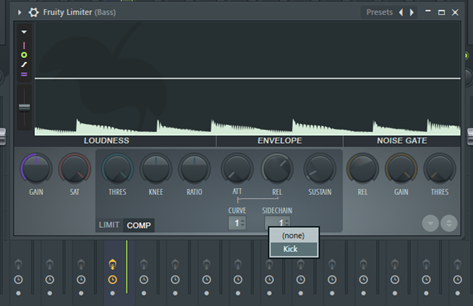
- Lower the threshold to the level you want the compression to take effect. Adjust the knee to adjust the compression curve.

- Increase the ratio until it sounds the way you want it to.
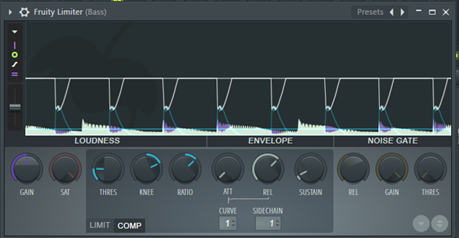
Other settings you should ideally play with, are the attack and release.
Adjusting the curve will allow you to determine the tension of the attack and release. A short curve means that the attack and release will be immediate. In contrast to longer curve times that allow the attack and release to be achieved gradually.
Sidechain using Fruity Peak Controller
We’re still going to use a kick and bass to demonstrate this technique. When using sidechain compression, the whole bass signal ducks as the kick plays. What if you want to preserve the high end frequencies of the bass? You can use a combination of Fruity peak controller and Fruity parametric EQ2 to sidechain a specific frequency range. You can control the automation signal using the Peak and LFO controllers.

- Base – sets the base value of the control output.
- Volume – this knob controls how the peak controller is affected by volume peaks. It is bipolar and goes from -200% to 200%.
- Tension – adjusting this parameter changes the shape of the attack and release curve.
- Decay – this defines the time it takes for the signal to get back to the base level.
- Base – sets the lowest value output by the LFO
- Volume – determines the highest value of the LFO output. It ranges from -100% to 100%
- Tension – this alters the shape of the curve mapping the LFO values to the LFO controller.
- Shape – Use this to select the shape of the LFO waveform (Triangle, Square, Sine, Saw or Random).
- Speed – this determines the speed of the LFO
- Phase – this defines the start position of the LFO.
In our case, we’re going to use the kick to trigger the sidechain effect on the bass. To start, load the fruity peak controller on an effect slot in the kick track.
- Add the Fruity parametric eq to an effect slot on the bass track.

- On the parametric eq, set the frequency range you want to sidechain. You can do this by selecting the first frequency band and dragging it to your preferred frequency. If you’re looking to sidechain the low end frequencies, you should set it to around 100-150Hz.
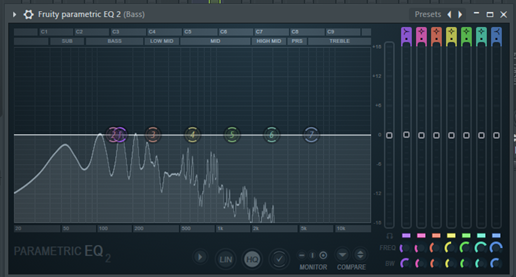
- The next thing to do is to right click on the first frequency band and from the menu that appears, select ‘link to controller’
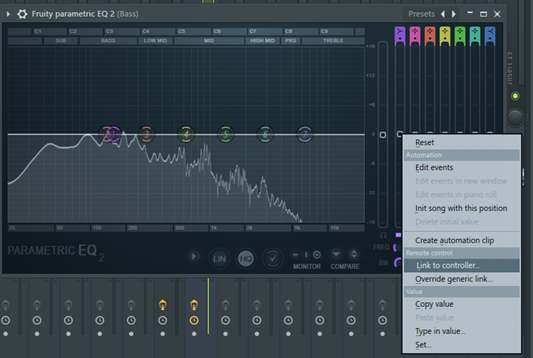
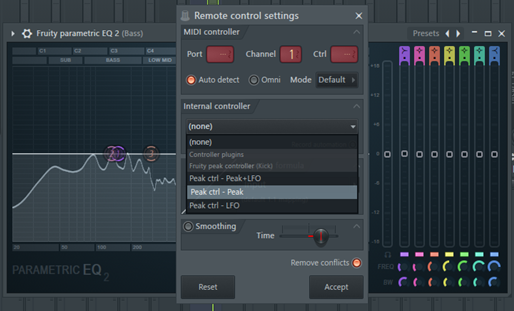
- In the internal controller menu that appears, select ‘Peak ctrl – Peak’ to complete the link to the Fruity peak controller on the kick track.
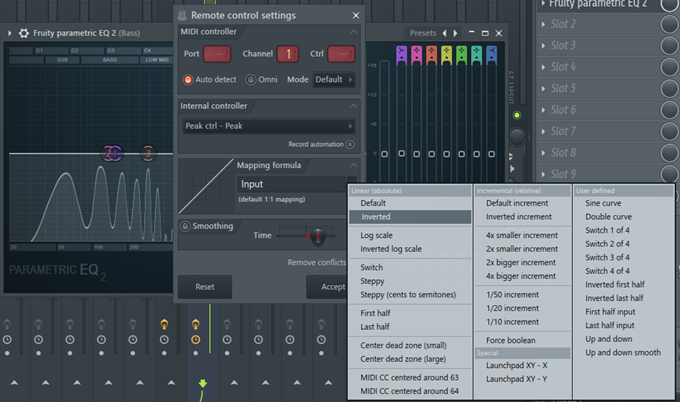
- Select ‘inverted’ under the mapping control menu. This means that every time the kick plays the low frequency band will duck.
- In the peak controller, set the ‘Peak base level’ to 50%. This puts the volume of the low frequency band in the eq at 0db.

- Set the ‘Volume’’ to 200% or lower. This will lower the volume of the low frequency band by about -18db everytime the Kick hits. Adjust this to taste. Your peak amount may vary depending on how much you want to lower the volume of the bass when the kick plays.

Another way to achieve this effect is to link the fruity peak controller with the fruity balance plugin.
- Add the Fruity balance to an effect slot on the bass track.
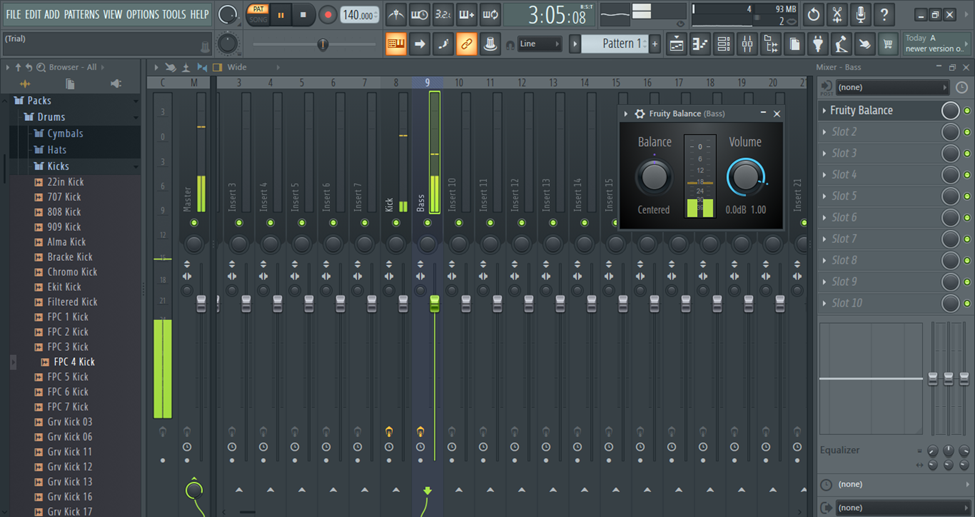
- Right click on the volume knob and select ‘Link to controller’

- From here, just follow the same procedure from step 4 above.
Sidechain using Automation
This method is more of a workaround because the volume of the bass is determined by the automation curve and not affected by the kick output. It is relatively easy and allows you to have complete control over your bass. It is especially useful when you are trying to create a specific sound effect that will not run continuously through the whole song.
- To sidechain your bass track, add Fruity balance to an empty effect slot.
- Right click on the volume knob and select ‘Create Automation Clip. this will create an automation clip that appears in the playlist.

- The next thing is to shape the automation such that the bass ducks when the kick hits. It is important that you know where your kick starts and ends so that you can shape the automation clip to fit.

- To shape your automation clip, right click any part of the clip area to create a control point. To delete a control point, right click on it and select ‘delete’.

- When you create more than one control point, there’ll be a tension control point that is automatically added between 2 points. Left clicking and dragging up or down on the tension control will change the steepness of the curve. To undo all your changes, Right click on the tension handle.
- You can change the curve type by right clicking the control point and selecting an option from the menu.
- You can change the length of your automation clip by dragging the right-most control point.
- When you are done shaping the automation clip, you can copy paste it across the track or wherever you deem fit.
Sidechaining using Gross Beat
Gross beat allows you to duck your signal without setting up complex sidechains. It is arguably the easiest way to do sidechaining in FL. It has a 2-bar buffer that allows you to manipulate the volume and pitch of the buffered audio using the time and volume presets. You can also draw your own waveform in the graph for a more custom sound.
- Add Gross beat to your bass insert.
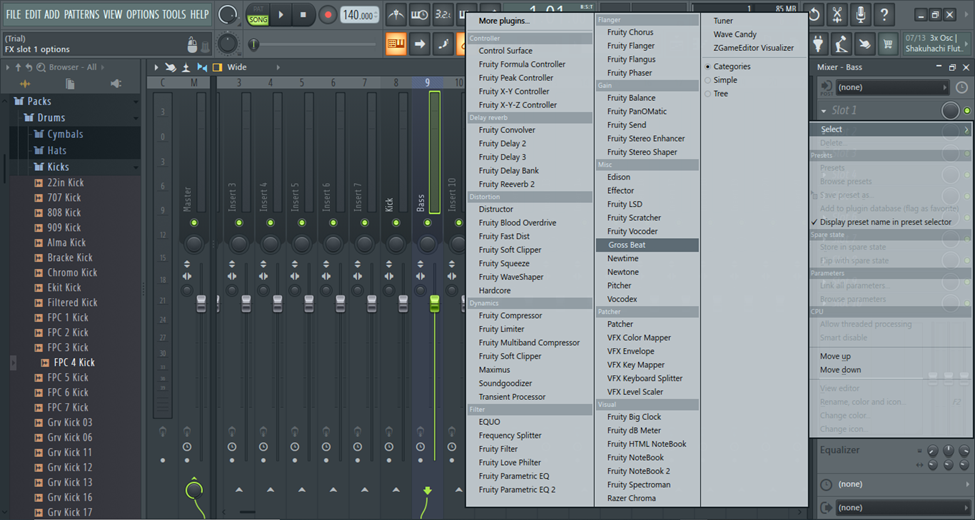
- Select ‘sidechain’ from the volume presets on the bottom left and let the magic work.

- You can manually edit the waveform to fit your track or choose from the myriad of presets available. Editing the waveform follows a similar workflow to editing an automation clip.

The only drawback to using Gross beat is that it may add some latency to the signal. An easy way to fix this is to export the sidechained signal once you’ve finished setting up your gross beat and re-importing it back into the project.

- You can also add Edison in an effect slot after the Gross beat and record the output, then use it to replace the signal in the playlist.
Conclusion
And just like that, you’ve successfully done sidechaining in FL. There’s more than one way to do it. Just make sure to choose what works best for your track. Sidechaining, like most production techniques, is most effective when used subtly. Too much salt is bad for your food, so don’t do it too much. You can always try gain-staging, panning and subtractive eq to clear out clashing frequencies before pulling sidechain from your hat of tricks. Sidechaining lets crucial elements in your mix shine without affecting the volume of something else.
Using Gross Beat is the easiest and fastest way to sidechain. You can also use the Fruity limiter set to comp mode, create custom automation clips and even use Fruity Peak controller linked to a parametric eq or fruity balance. Depending on what you’re looking for, one or all of these methods may help you achieve the sidechaining technique.
Wishing you all the best on your next track.
Contributing Writer (FL Studio) at ProRec
Alexander is a talented self taught music producer and writer who is passionate about all things related to music production and tech. He graduated from the Technical University of Kenya with a degree in Computer Technology and opened his first studio in 2016, doubling as a producer as well as a UX designer. With several years of experience in the industry, Alex has honed his skills in producing, mixing, and mastering various genres of music. As a writer, Alex shares his unique perspective with aspiring producers and enthusiasts alike, providing in-depth analysis of the latest music production techniques, software, and gear, as well as tips and tricks to help others take their production game to the next level.
Latest posts by Alexander O. (see all)
- FL Studio Tempo Changes When I Press Play [FIXED] — January 14, 2023
- How to Speed up / Stretch Sample in FL Studio — January 14, 2023
- How to Find / Detect Tempo BPM in FL Studio — September 30, 2022