Vitek VT-1660: инструкция
телевидения. Помехи могут быть уменьшены при помощи следующих мер:
1. Do not attempt to oper ate this oven with the door open since opendoor operation can
а) закройте дверь,
r esult in harmful exposure to microwave energy . It is important not to defeat or tamper
б) переустановите принимающую антенну радиоприемника или телевизора,
with the safety interlocks.
в) слегка измените расположение печи по отношению к этим приборам,
2. Do not place any object between the oven front face and the door or allow soil or clean
г) включите микроволновую печь в другую розетку таким образом, чтобы приборы не
er residue to accumulate on sealing surfaces.
мешали друг другу в эксплуатации.
3. Do not oper ate the oven if it is damaged. It is particularly important that the oven door
2. Следующие явления не должны вызывать у Вас настороженности:
close properly and that ther e is no damage to the :
а) тусклый свет духовки;
б) скопление пара;
b. Hinges and latches (broken or loosened),
в) включение печи без продуктов на короткое время.
c. Door seals and sealing surfaces.
4. The oven should not be adjusted or r epair ed by anyone except properly qualified serv
• Отключите печь от сети.
• Протрите внутренние поверхности мягким очищающим средством, сполосните и
вытрите досуха мягкой тканью.
• Вымойте поворачивающийся столик и роликовое кольцо в мыльной воде, затем
сполосните и высушите.
• Аккуратно протрите дверцу и замки влажной тканью.
Питание, потребляемая мощность: 230 В ~ 50 Г ц,1400 Вт
Выходная мощность гриля: 1000 Вт
Выходная мощность печи: 800 Вт
Частота: 2450 МГц
Стеклянный поворотный стол: диаметр 314 мм
Вес печи: 16,5 кг .
СРОК СЛУЖБЫ МИКРОВОЛНОВОЙ ПЕЧИ НЕ МЕНЕЕ 5 ЛЕТ
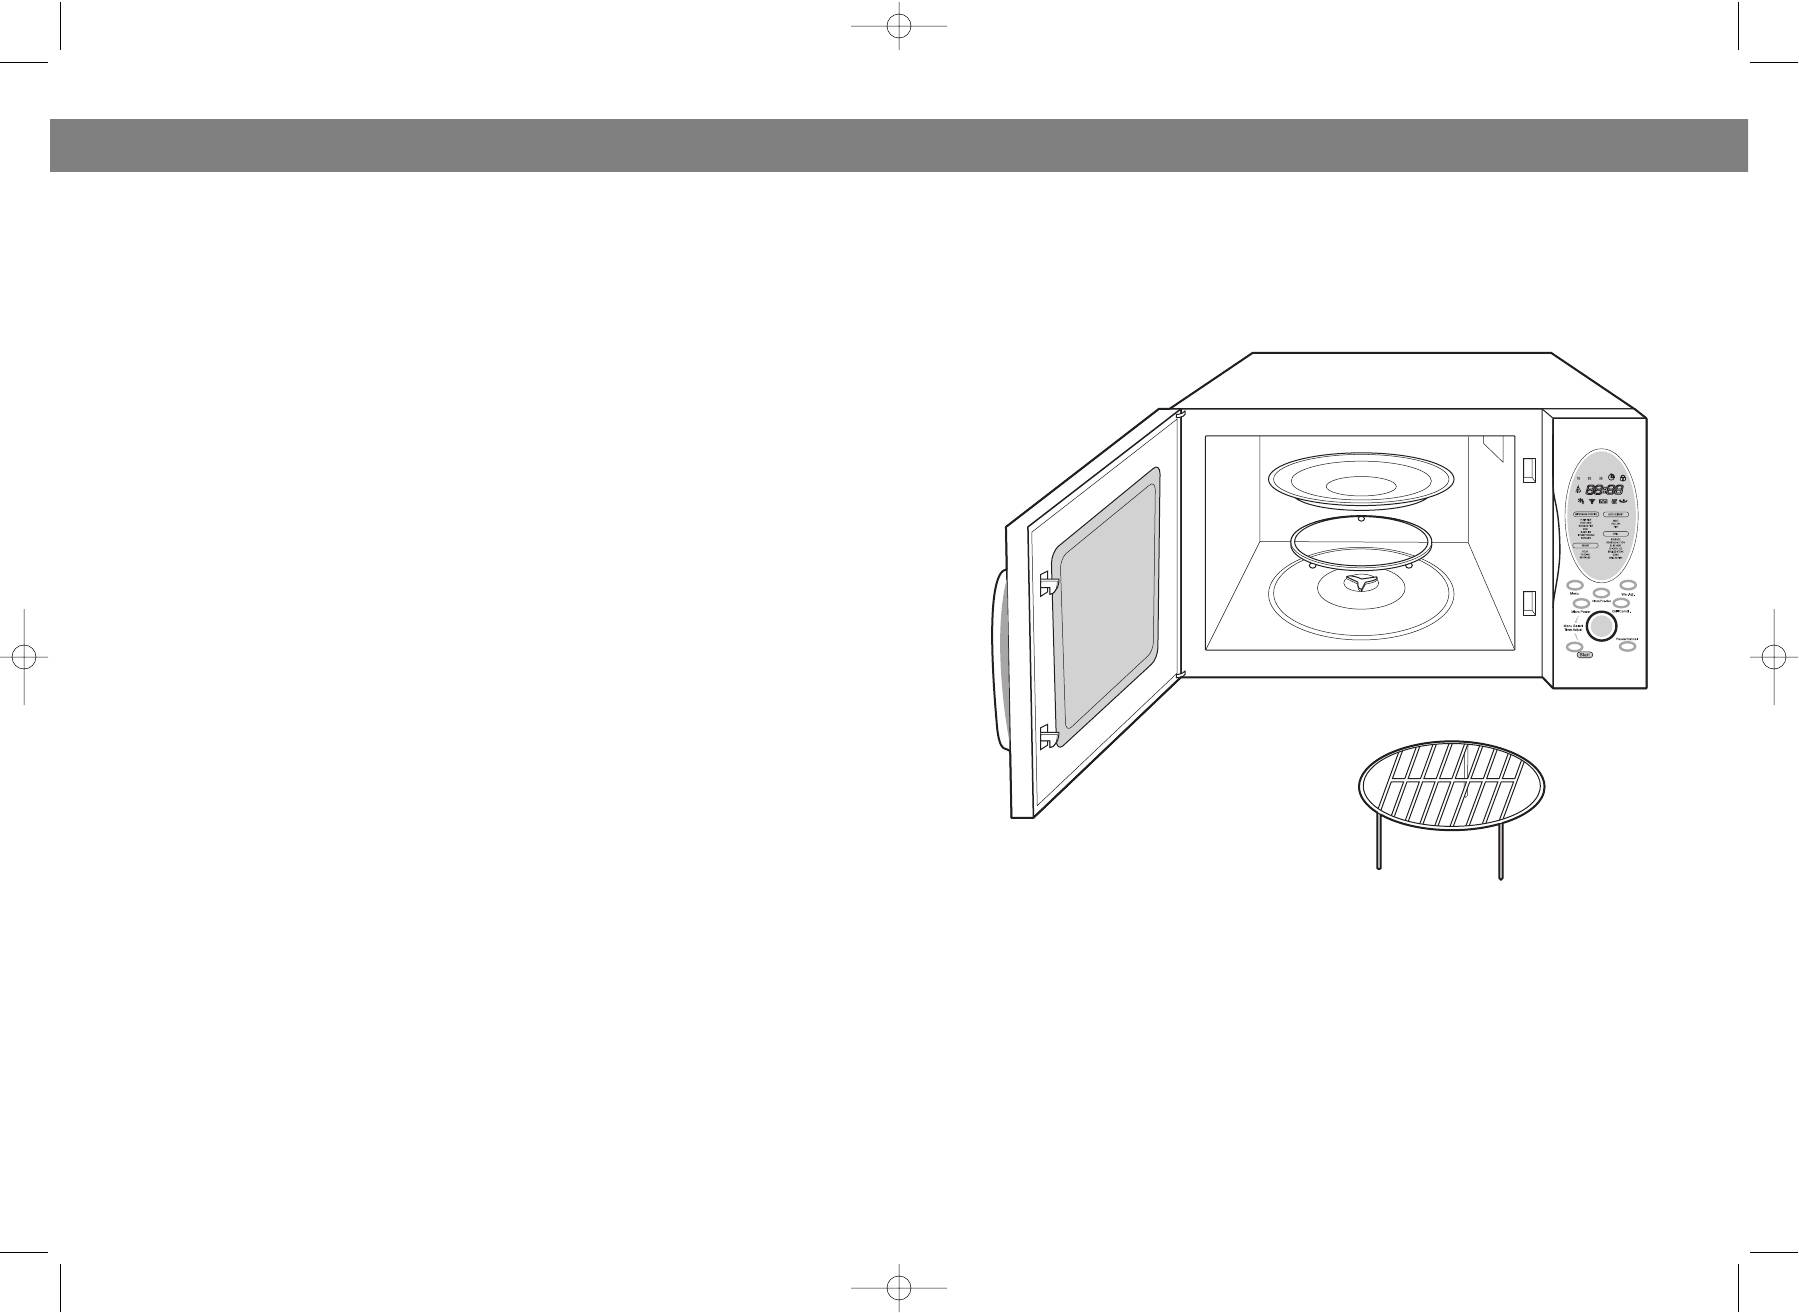
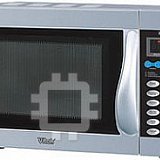
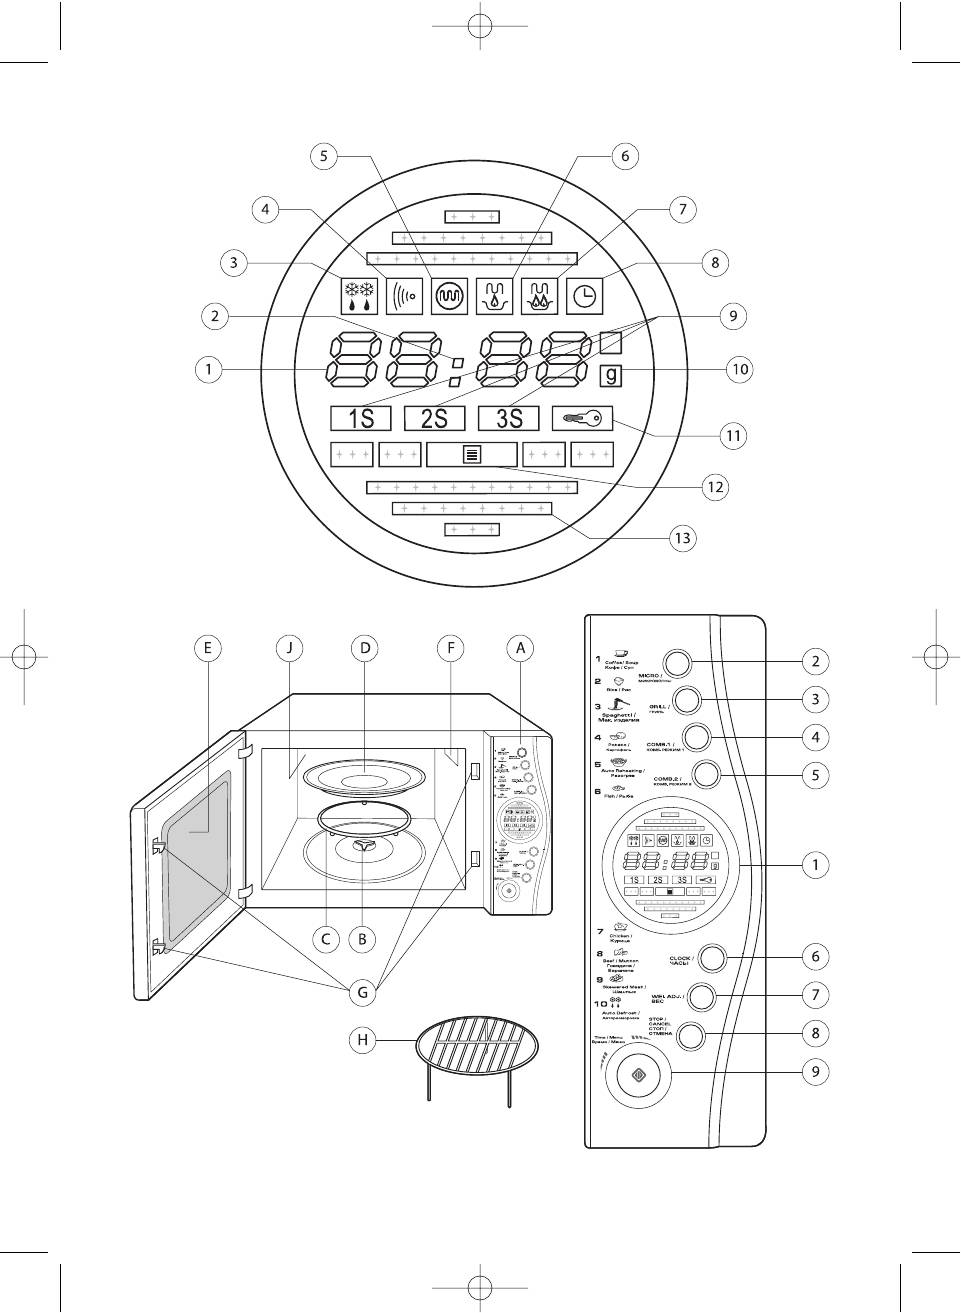
1. Door safety lock system
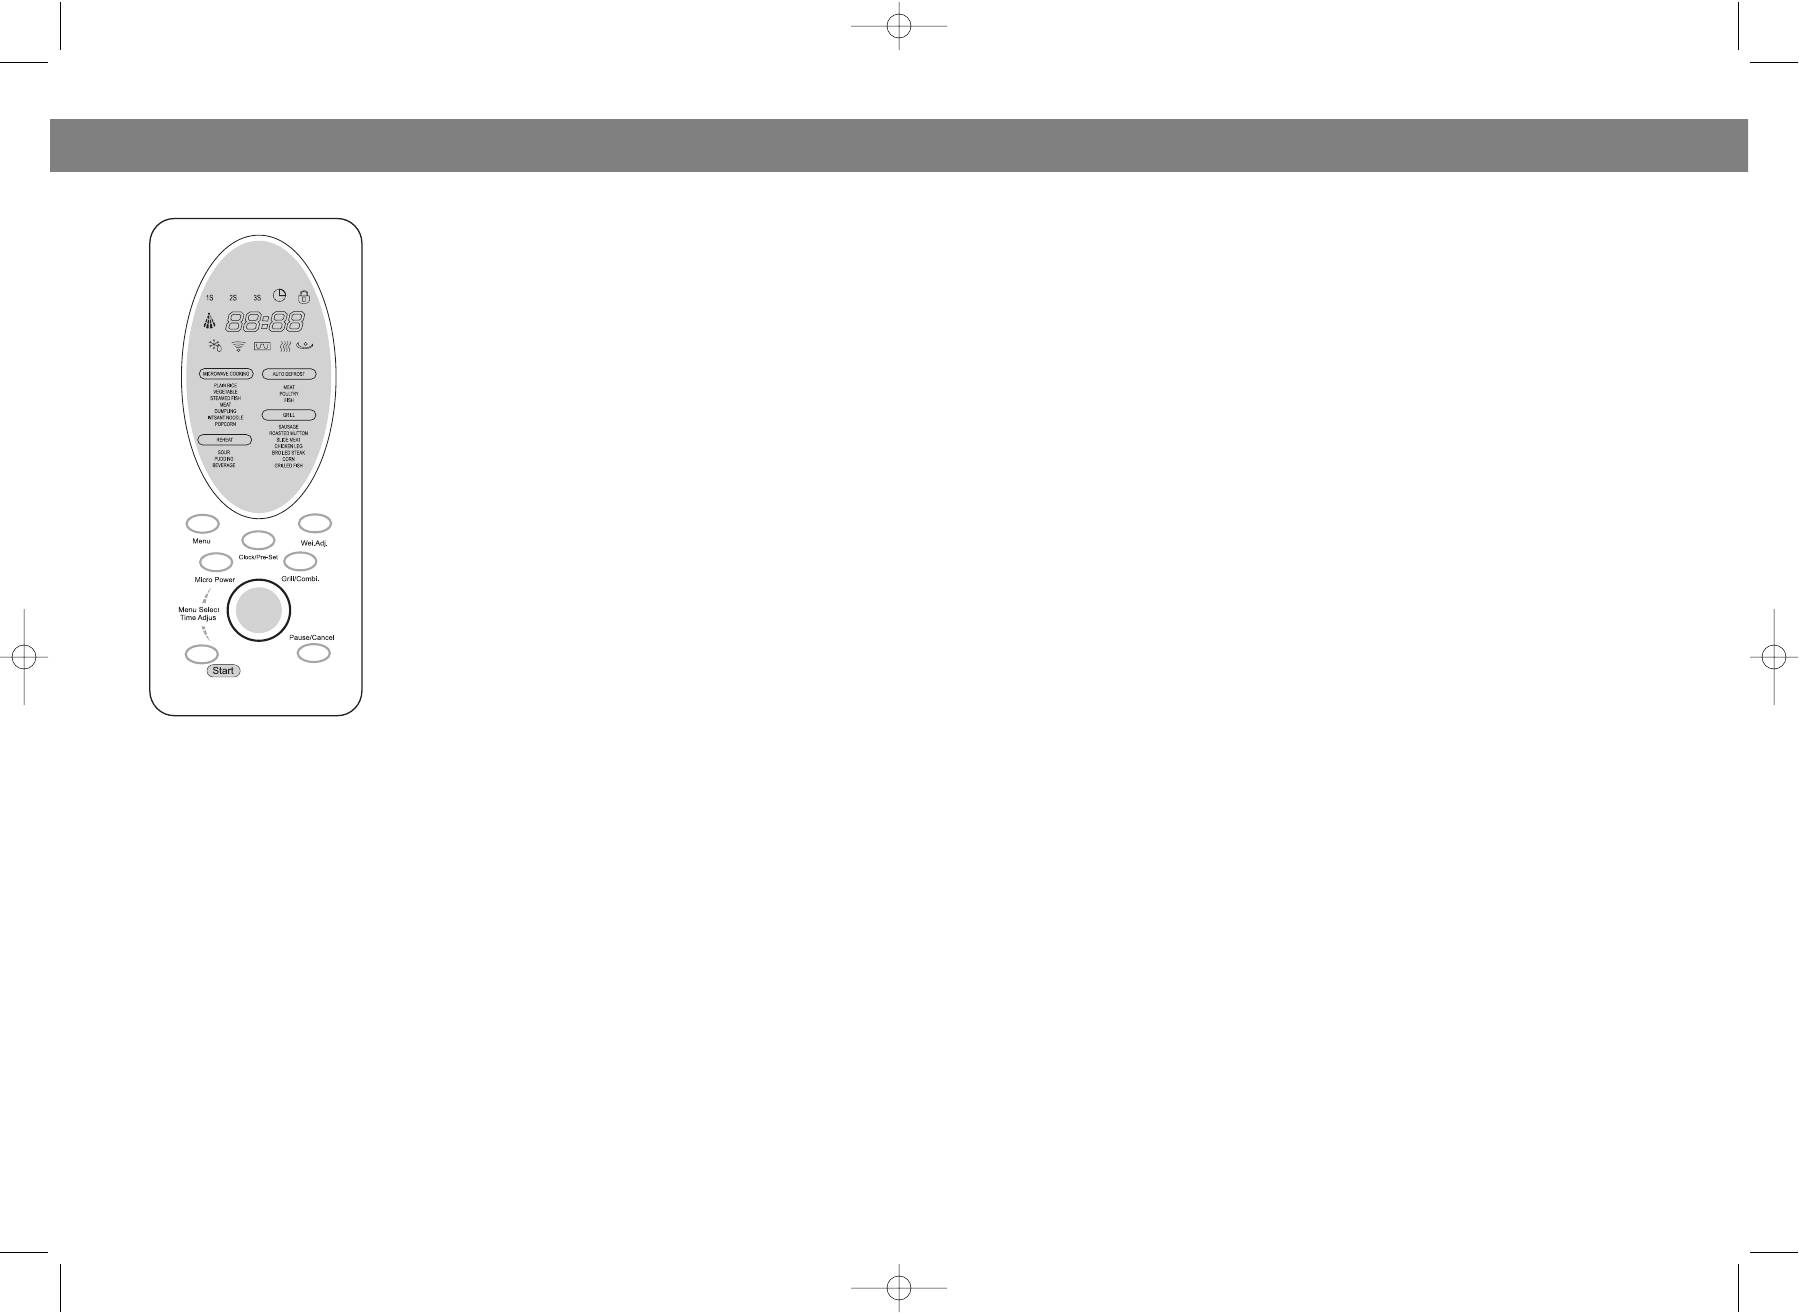
7. Control panel
3. Oven air vent
1660.qxd 17.12.03 10:17 Page 2
РУССКИЙ
ENGLISH
6. Нажмите кнопку MICRO POWER 3 раза для выбора 50% уровня мощности.
7. Вращайте регулятор MENU/TIME для установки времени приготовления пищи.
• MENU ACTION SCREEN
8. Нажмите кнопку ST ART.
Cooking time, power , action indicators, and clock
time are displayed.
Примечание: удостоверьтесь, что текущее время было установлено ранее.
После завершения необходимых установок на дисплее появится индикатор ожидаемого
времени. По достижении 11:30 начнется процесс приготовления пищи по заданной
T ouch this button a number of times to set
microwave cooking power level.
Быстрый разогрев готового блюда со 100% уровнем мощности (от 5 с. до 90 c.). Для этого
просто установите желаемое время разогрева блюда поворотом регулятора MENU SELECT/
Pr ess this button to start setting an auto cook
TIME ADJUST и нажмите кнопку ST ART .
Например, Вы хотите подогреть блюдо за 2 минуты, для этого:
1. Поворотом регулятора MENU SELECT/TIME ADJUST установите время 2:00 мин.
2. Нажмите кнопку ST ART .
T ouch this button up to 3 times to set a grill cook
ing progr am or cook with combined microwave
Допустим, Вы хотите установить таймер на 3 минуты. Для этого:
and grill power .
1. Нажмите кнопку PAUSE/CANCEL.
2. Нажмите кнопку MICRO POWER шесть раз.
• MENU SELECT/TIME ADJUST
3. Вращайте регулятор MENU SELECT/TIME ADJUST до тех пор, пока на дисплее не появится
T urn the dial to set the oven clock time or input
4. Нажмите кнопку ST ART .
T urn the dial to select an autocooking menu
including auto defrost.
Чтобы предотвратить использование печи детьми, Вы можете установить режим
Rotate the dial to indicate cooking time and start
блокировки. Для этого нажмите и удерживайте кнопку P AUSE/CANCEL в течение
up the oven quickly at full power .
приблизительно 3 секунд, пока на дисплее не появится индикатор блокировки печи и не
прозвучит звуковой сигнал.
Чтобы отменить блокировку , снова нажмите и удерживайте кнопку PAUSE/CANCEL в течение
Pr ess this button and then use the MENU
приблизительно 3 секунд, пока на дисплее не погаснет индикатор блокировки печи и не
SELECT/TIME ADJUST dial to indicate weight of
прозвучит звуковой сигнал.
НЕИСПРАВНОСТИ И ИХ УСТРАНЕНИЕ
T ouch this button to start setting the oven clock
Проблема Возможная причина Устранение
and ending by touching it again.
Delay start contr ol enables you to place food in
the oven and pr ogram the oven to cook it later .
Печь не Прибор не включен в сеть Включите еще раз
включается Перегорел предохранитель Замените
T ouch to start a cooking progr am.
Перебои в сети Обратитесь к электрику
Печь не нагревается Плохо закрыта дверь Плотно закройте дверь
Pr ess to cancel setting or r eset the oven before
setting a cooking pr ogram.
Стеклянный столик Г рязные роликовое кольцо и дно Вымойте эти
Pr ess once to temporarily stop cooking, or twice
создает шум печи аксессуары
to cancel cooking altogether .
It is also used for setting child lock.
1660.qxd 17.12.03 10:17 Page 4
ENGLISH
РУССКИЙ
MENU ACTION SCREEN
4. Вращайте регулятор MENU SELECT/TIME ADJUST для установки веса продукта: 100 г .
5. Нажмите кнопку ST ART .
Вам нужно только выбрать вес продуктов, которые Вы хотите разморозить (мясо, птицу ,
морепродукты), а печь сама выберет надлежащую программу и автоматически разморозит
продукты. Дисплей покажет максимальный вес для каждой категории размораживаемых
Пример: допустим, Вы хотите разморозить 600 г . креветок. Для этого:
1. Нажмите кнопку MENU.
2. Вращайте регулятор MENU SELECT/TIME ADJUST до тех пор, пока на дисплее не замигает
пункт меню FISH.
3. Нажмите кнопку WEIGHT ADJ.
4. Вращайте регулятор MENU SELECT/TIME ADJUST для установки веса продукта: 600 г .
5. Нажмите кнопку ST ART .
BEFORE YOU CALL FOR SERVICE
1. Check to ensure that the oven is plugged in secur ely . If it is not, r emove the plug from
Установка программы приготовления пищи
the outlet, wait 10 seconds, and plug it in again secur ely .
Вы можете задать последовательность процесса приготовления пищи на Ваше усмотрение.
2. Check for a blown cir cuit fuse or a tripped main circuit breaker . If these seem to be
Допустим, Вы хотите:
1. Разморозить продукт .
oper ating pr operly , test the outlet with another appliance.
2. Установить определенный уровень мощности.
3. Check to ensur e that the contr ol panel is progr ammed corr ectly and the timer is set.
3. Приготовить пищу , используя режим гриль.
4. Check to ensur e that the door is secur ely closed engaging the door safety lock system.
Otherwise, the microwave energy will not flow into the oven.
I. 1. Нажмите кнопку MENU.
IF NONE OF THE ABOVE RECTIFY THE SITUA TION, THEN CONT ACT A QUALIFIED TECH
2. Вращайте регулятор MENU SELECT/TIME ADJUST до тех пор, пока на дисплее не
NICIAN. DO NOT TRY T O ADJUST OR REP AIR THE OVEN YOURSELF .
замигает нужный пункт меню.
3. Нажмите кнопку WEIGHT ADJ.
4. Вращайте регулятор MENU SELECT/TIME ADJUST для установки веса
1. Make sur e that all the packing materials ar e removed from the inside of the door .
2. Check the oven for any damage, such as misaligned or bent door , damaged door seals
II. 1. Нажмите кнопку MICRO POWER для выбора желаемого уровня мощности.
and sealing surface, broken or loose door hinges and latches and dents inside the cavity
III. 1. Нажмите кнопку GRILL/COMB.
or on the door . If ther e is any damage, do not oper ate the oven and contact qualified serv
2. Установите необходимые параметры приготовления пищи в режиме гриль.
IV. Нажмите кнопку ST ART.
3. This microwave oven must be placed on a flat, stable surface to hold its weight and the
Примечание: Во время процесса приготовления пищи по заданной программе, на дисплее
heaviest food likely to be cooked in the oven.
появляются индикаторы 1S, 2S или 3S в зависимости от стадии, на которой находится
4. Do not place the oven wher e heat, moistur e, or high humidity are gener ated, or near
процесс приготовления. По завершении программы приготовления пищи прозвучит
тройной звуковой сигнал.
5. For correct oper ation, the oven must have sufficient airflow . Allow 20cm of space
above the oven, 10cm at back and 5cm at both sides. Do not cover or block any openings
Установка времени, по достижении которого начнется приготовление пищи по
on the appliance. Do not r emove feet.
6. Do not oper ate the oven without glass tr ay , roller support, and shaft in their proper
Допустим, Вы хотите начать процесс приготовления пищи в 11:30 c 50% уровнем мощности:
1. Поместите продукты, которые необходимо приготовить в печь.
7. Make sur e that the power supply cord is undamaged and does not run under the oven
2. Нажмите кнопку CLOCK/PRESET.
or over any hot or sharp surface.
3. Вращайте регулятор MENU SELECT/TIME ADJUST до тех пор, пока на дисплее не появится
8. The socket must be readily accessible so that it can be easily unplugged in an emer
4. Нажмите кнопку CLOCK/PRESET.
5. Вращайте регулятор MENU SELECT/TIME ADJUST до тех пор, пока на дисплее не появится
9. Do not use the oven outdoors.
1660.qxd 17.12.03 10:17 Page 6
ENGLISH РУССКИЙ
Для микроволнового приготовления пищи нажмите кнопку MICRO POWER необходимое
This appliance must be grounded. This oven is equipped with a cor d having a gr ounding
количество раз для выбора уровня мощности, а затем, поворотом регулятора MENU
wir e with a grounding plug. It must be plugged into a wall receptacle that is properly
SELECT/TIME ADJUST установите время приготовления. Для начала работы печи по
installed and grounded. In the event of an electrical short cir cuit, gr ounding r educes risk
заданной программе, нажмите кнопку ST ART .
of electric shock by providing an escape wir e for the electric current. It is r ecommended
Т аблица поможет Вам при выборе уровня
that a separ ate circuit serving only the oven be pr ovided. Using a high voltage is danger
Например, Вы хотите подогреть блюдо за 1
ous and may result in a fir e or other accident causing oven damage. WARNING improper
минуту при 80% уровне мощности.
use of the gr ounding plug can r esult in a risk of electric shock.
1. Нажмите кнопку MICRO POWER дважды.
2. Поворотом регулятора MENU SELECT/TIME
1. If you have any questions about the grounding or electrical instructions, consult a
ADJUST установите время 1:00 мин.
qualified electrician or service person.
3. Нажмите кнопку ST ART .
2. Neither the manufactur er nor the dealer can accept any liability for damage to the oven
or personal injury resulting from failur e to observe the electrical connection procedur es.
Г риль используется для приготовления хорошо поджаренных хрустящих кусочков мяса,
The wires in this cable main are colored in accordance with the following code:
рыбы, курицы, картофеля, сосисок, а также для приготовления горячих бутербродов. Для
Green and Y ellow = EARTH
входа в режим “Г риль” нажмите кнопку GRILL/COMB. один раз. Поворотом регулятора MENU
SELECT/TIME ADJUST установите время приготовления. Для начала работы печи по
заданной программе, нажмите кнопку ST ART .
Предположим, Вы хотите установить гриль на 12 минут . Для этого:
1. Нажмите кнопку GRILL/COMB. один раз.
Oper ation of the microwave oven can cause interfer ence to your r adio, TV , or similar
2. Поворотом регулятора MENU SELECT/TIME ADJUST установите время 12:00 мин.
equipment. When there is interfer ence, it may be reduced or eliminated by taking the fol
3. Нажмите кнопку ST ART .
1. Clean door and sealing surface of the oven.
Сочетает микроволновое приготовление и гриль для наилучшего приготовления продуктов.
2. Reorient the receiving antenna of radio or television.
Этот режим рекомендуется использовать для приготовления таких блюд, как “лазанья”,
3. Relocate the microwave oven with respect to the receiver .
“ленивые вареники” и запеченные овощи.
4. Move the micr owave oven away from the receiver .
Возможны 2 комбинации:
5. Plug the microwave oven into a differ ent outlet so that microwave oven and r eceiver
комбинация 1 (30% микроволн. пригот . + 70% гриль) рекомендуется использовать при
ar e on different br anch cir cuits.
приготовлении рыбы, картофеля.
Допустим, Вы хотите установить комбинированный режим 1 на 25 минут:
1. Нажмите кнопку GRILL/COMB. два раза.
IMPORT ANT SAFETY INSTRUCTIONS
2. Поворотом регулятора MENU SELECT/TIME ADJUST установите время 25:00 мин.
When using electrical appliance basic safety pr ecautions should be followed, impound
3. Нажмите кнопку ST ART .
ing the following:
комбинация 2 (55% микроволн. пригот . + 45% гриль) рекомендуется использовать при
WARNING: T o r educe the risk of burns, electric shock, fire, injury to persons or exposure
приготовлении пудингов, омлетов, печеного картофеля и домашней птицы.
to excessive microwave energy:
Допустим, Вы хотите установить комбинированный режим 2 на 12 минут:
1. Read all instructions befor e using the appliance.
1. Нажмите кнопку GRILL/COMB. три раза.
2. Use this appliance only for its intended use as described in this manual. Do not use
2. Поворотом регулятора MENU SELECT/TIME ADJUST установите время 12:00 мин.
corrosive chemicals or vapor s in this appliance. This type of oven is specifically designed
3. Нажмите кнопку ST ART .
to heat, cook or dry food. It is not designed for industrial or labor atory use.
3. Do not oper ate the oven when empty .
4. Do not oper ate this appliance if it has a damaged cor d or plug, if it is not working pr op
Данная функция позволяет выбрать запрограммированный режим приготовления того или
иного блюда. Вам нужно только установить код блюда, выбрать вес и нажать кнопку ST ART .
erly or if it has been damaged or dr opped.
Пример: Рис, 100 г .
5. As with any appliance, close supervision is necessary when used by childr en.
1. Нажмите кнопку MENU.
6. T o r educe the risk of fire in the oven cavity:
a. When heating food in plastic or paper container , check the oven frequently to the pos
2. Вращайте регулятор MENU SELECT/TIME ADJUST до тех пор, пока на дисплее не замигает
пункт меню PLAIN RICE.
sibility of ignition.
3. Нажмите кнопку WEIGHT ADJ.
b. Remove wir e twistties from paper or plastic bags befor e placing bag in oven.
1660.qxd 17.12.03 10:17 Page 8
6 раз установка
ENGLISH
РУССКИЙ
c. If smoke is observed, switch off or unplug the appliance and keep the door closed in
8. При нагревании напитков в микроволновой печи поверхность посуды нагревается.
or der to stifle any flames.
Аккуратно вынимайте посуду , избегая ожога.
9. Не жарь те пищу в микроволновой печи. Г орячее масло может повредить поверхность.
d. Do not use the cavity for storage purposes. Do not leave paper products, cooking
10. Яйца не должны готовиться в скорлупе; желтки так же, как и куриную печень, помидоры
utensils or food in the cavity when not in use.
и картофель нужно протыкать.
7. Liquid or other food must not be heated in sealed containers since they are liable to
11. Другие виды пищи с кожицей, например, сосиски, также нужно протыкать перед
8. Microwave heating of beverage can r esult in delayed eruptive boiling, therefor e care
12. Кухонная посуда может сильно нагреваться в микроволновой печи. Используйте
has to be taken when handle the container .
кухонные прихватки, чтобы извлечь посуду из прибора.
9. Do not fry food in the oven. Hot oil can damage oven parts and utensils and even r esult
13. Используйте только специально предназначенную для микроволновой печи кухонную
Т ест: поместите пустую посуду в микроволновую печь, установленную на самую большую
10. Whole eggs should not be heated in the oven since they may explode.
степень нагрева 60 сек. Если посуда сильно нагреется, то ее использовать не
11. Pierce foods with heavy skins such as potatoes, whole squashes, apples and chest
nuts before cooking.
12. The contents of feeding bottles and baby jars should be stirred or shaken and the
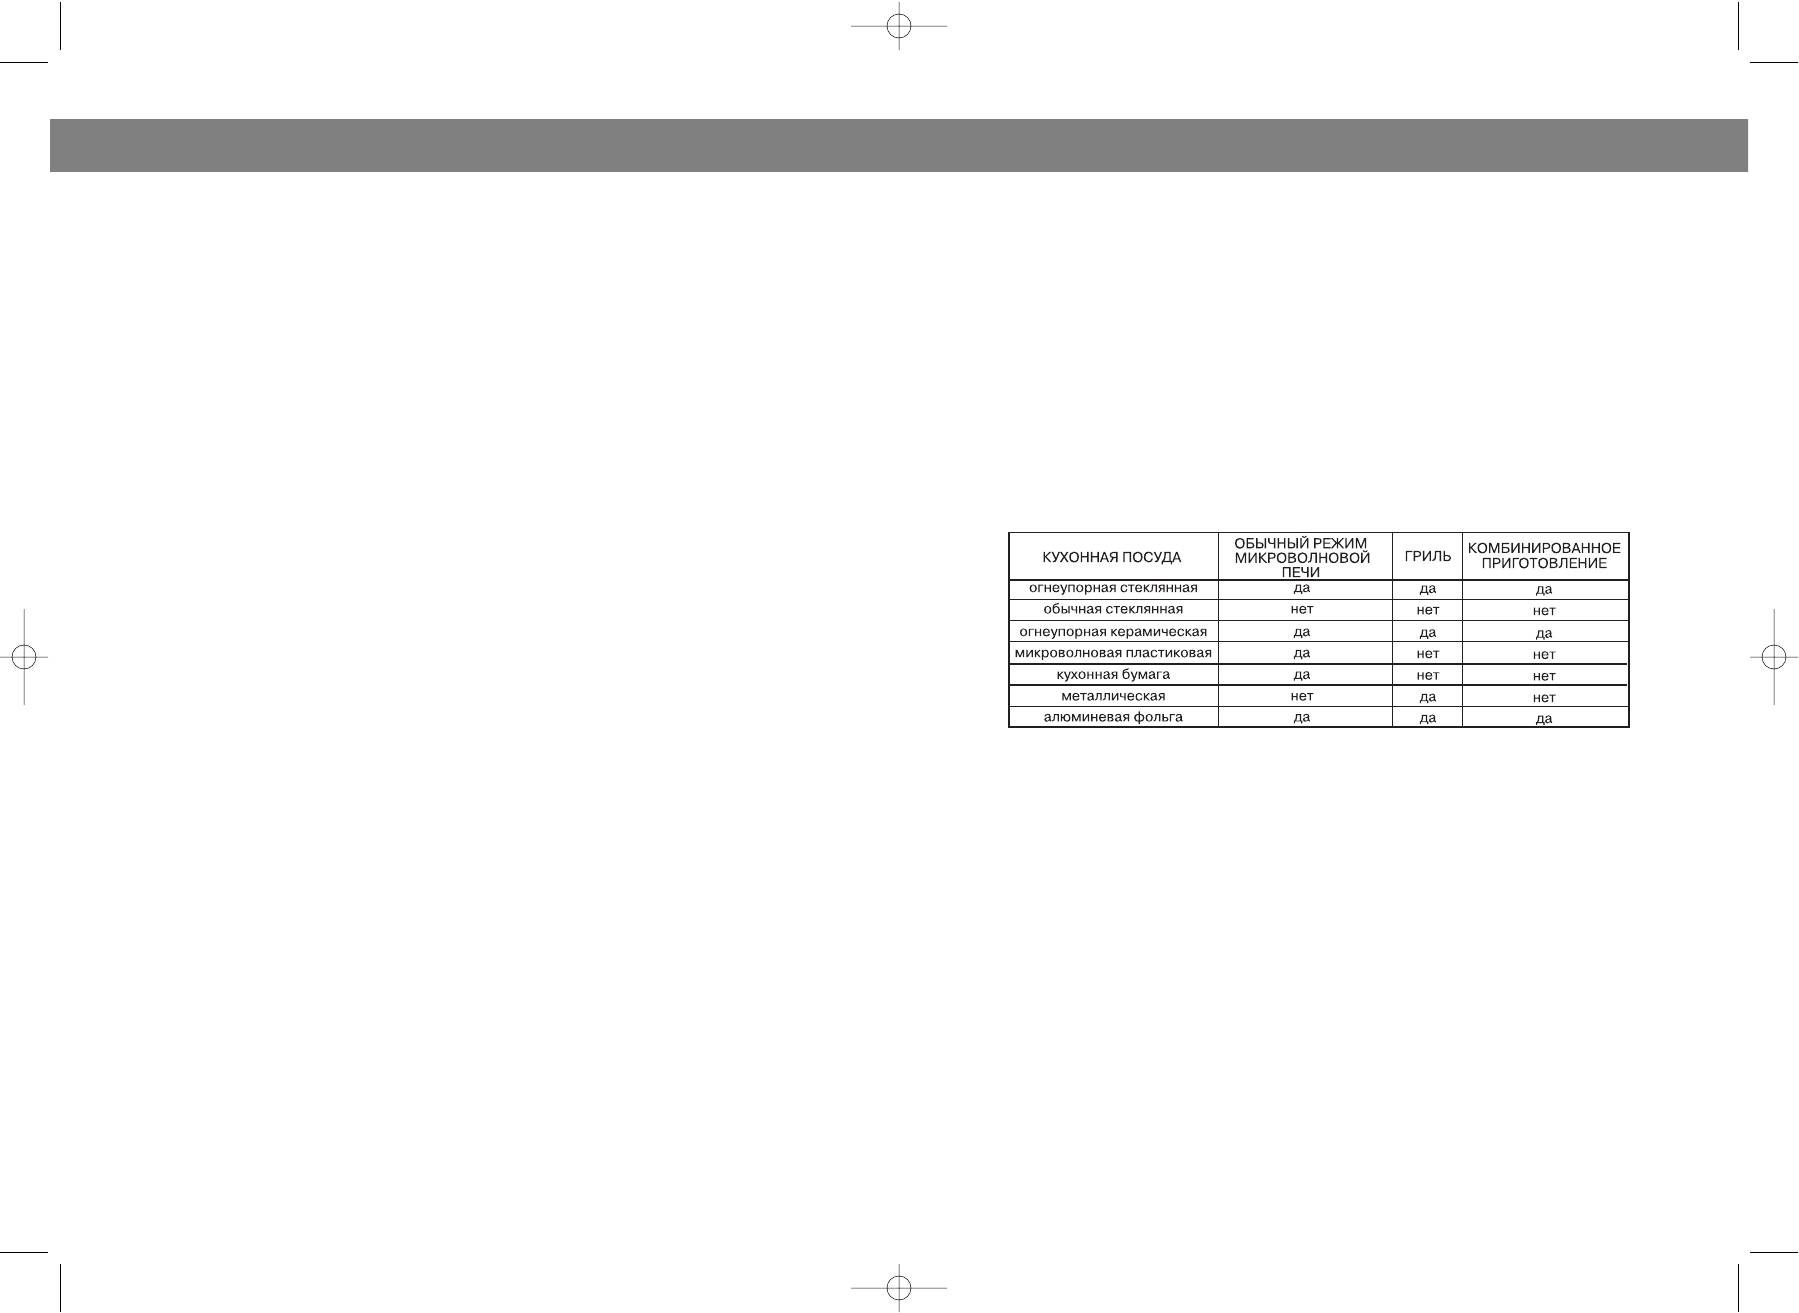
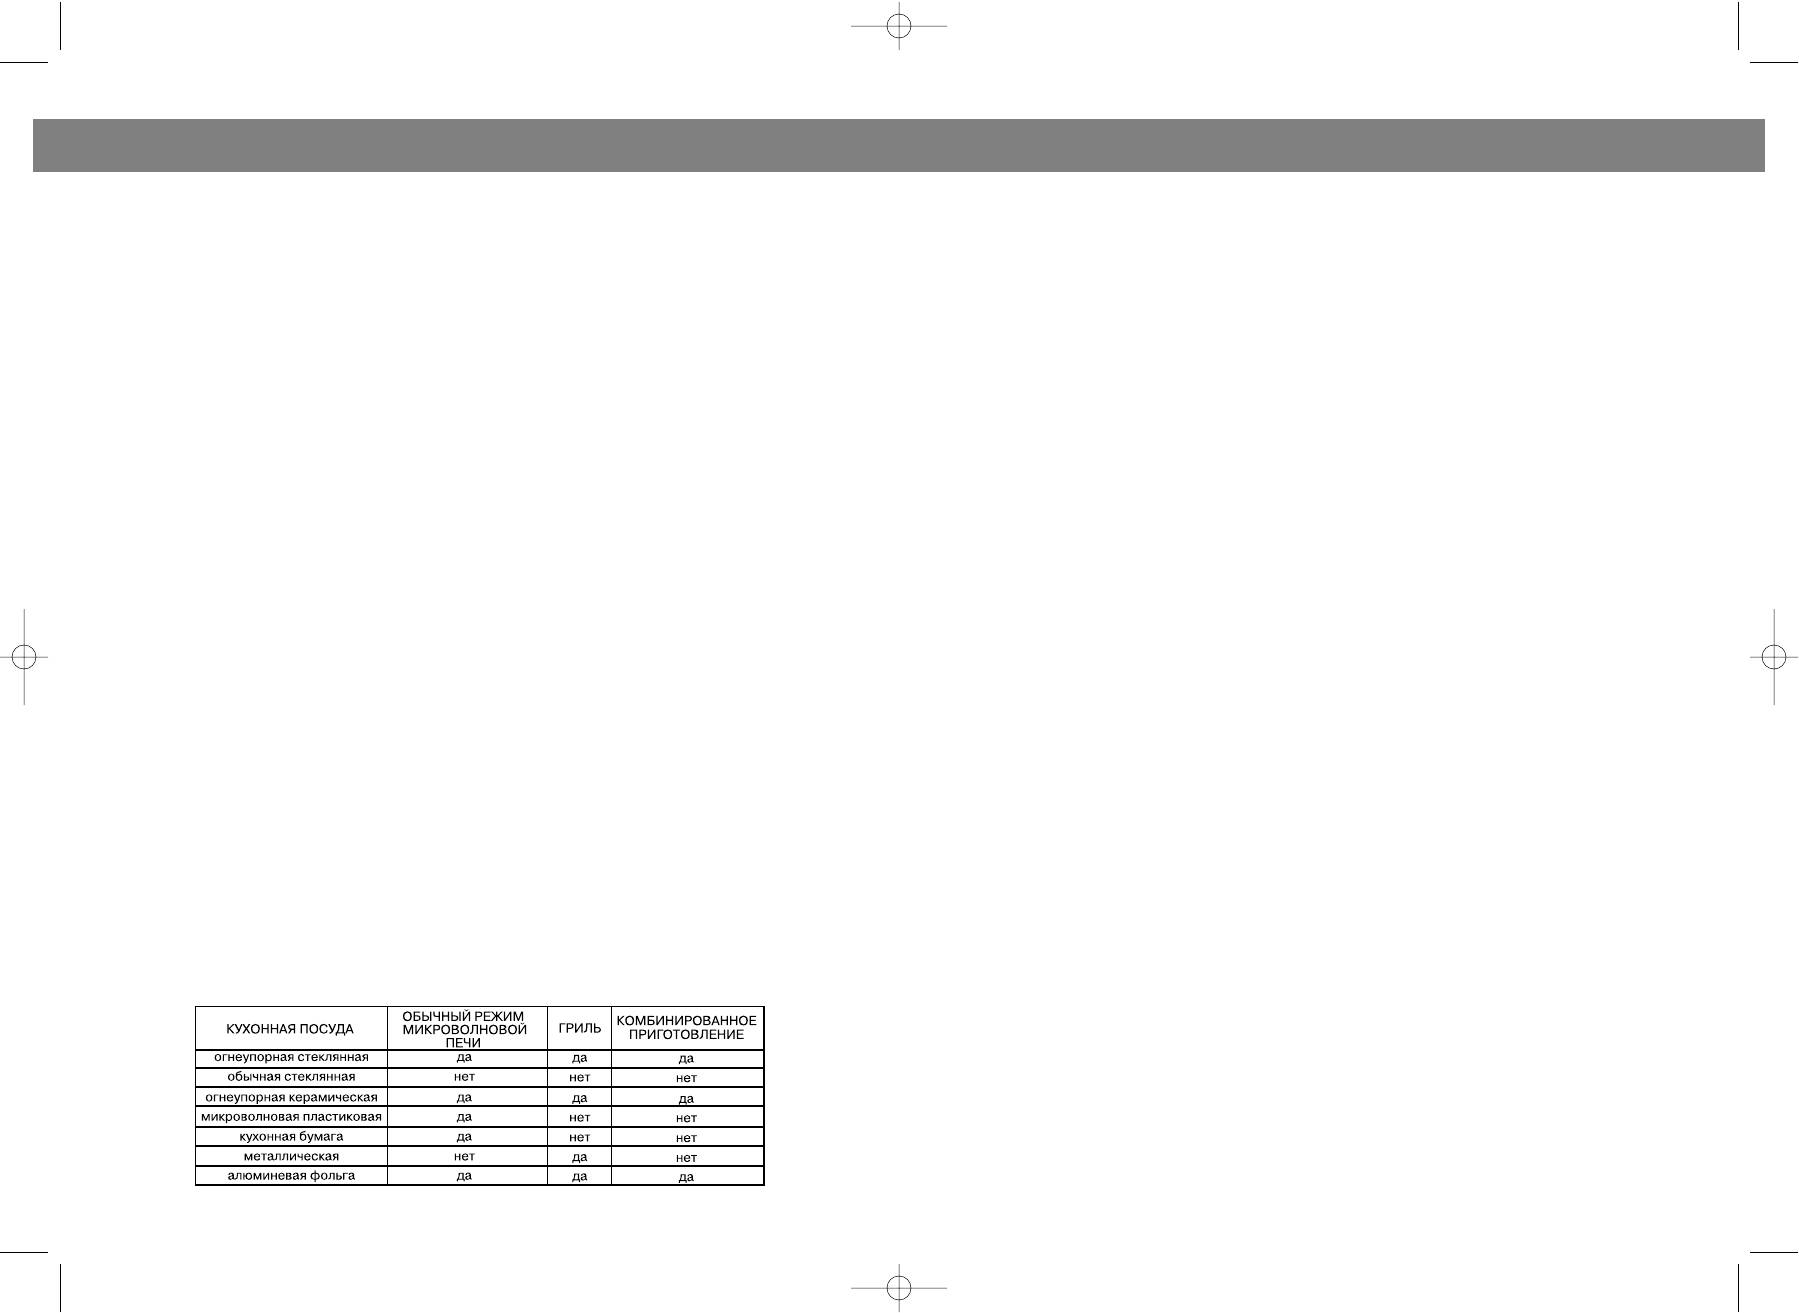
ПОСУДА ДЛЯ МИКРОВОЛНОВОЙ ПЕЧИ
temper atur e should be checked befor e serving in order to avoid burns.
Представленная ниже таблица поможет Вам при выборе посуды:
13. Cooking utensils may become hot because of heat tr ansferr ed fr om ‘he heated food.
Potholders may be needed to handle the utensil.
14. Utensils should be checked to ensure that they are suitable for use in microwave
15. Utensil T est: Place the empty utensil in the oven, micr owave at high power for 60 sec
onds. A utensil, which becomes very hot, should not be used.
16. WARNING: It is hazardous for anyone other than a trained per son to carry out any
service or r epair oper ation which involves the r emoval of any cover which gives pr otection
against exposure to micr owave ener gy .
MICROWA VE COOKING PRINCIPLES
Для использования в микроволновой печи годится практически любая посуда из материала,
1. Arrange food carefully Place thickest areas towar ds outside of dish.
не содержащего металлические элементы: из стекла, стеклокерамики, фарфора и г лины.
2. Watch cooking time. Cook for the shortest amount of time indicated and add mor e as
Микроволны отражаются от металлической посуды и поэтому не достигают пищи.
needed. Food sever ely over cooked can smoke or ignite.
Стекло, фарфор, картон и керамика обеспечивают быстрое проникновение
3. Cover foods while cooking. Covers prevent spattering and help foods to cook evenly .
4. T urn foods over once during micr owaving to speed cooking of such foods as chicken
При использовании пластмассовой посуды следует помнить о том, что некоторые изделия
and hamburgers. Lar ge items like roasts must be turned over at least once.
из пластиков могут деформироваться в СВЧпечи.
5. Rearr ange foods such as meatballs halfway through cooking both from top to bottom
and from the center of the dish to the outside.
ЭКСПЛУ А Т АЦИЯ ПЕЧИ
Нажатие на любую кнопку функциональной панели сопровождается звуковым сигналом.
Установка текущего времени
1. The ideal material for a microwave utensil is tr ansparent to micr owave, it allows energy
При включении прибора в сеть на дисплее появится “12:00”.
to pass through the container and heat the food.
Например, Вам надо установить текущее время 8:30. Для этого:
2. Micr owave cannot penetr ate metal, so metal utensils or dishes with metallic trim
1. Нажмите кнопку CLOCK/PRESET один раз.
should not be used.
2. Нажмите кнопку PAUSE/CANCEL один раз.
3. Do not use recycled paper products when microwave cooking, as they may contain
3. Вращайте регулятор MENU SELECT/TIME ADJUST до тех пор, пока на дисплее не появится
small metal fragments which may cause sparks and/or fir es.
4. Нажмите кнопку CLOCK/PRESET еще раз.
4. Round /oval dishes r ather than squar e/oblong ones are r ecommend, as food in cor
5. Вращайте регулятор MENU SELECT/TIME ADJUST до тех пор, пока на дисплее не появится
ners tends to overcook.
5. Narrow strips of aluminum foil may be used to pr event over cooking of exposed ar eas.
6. Нажмите кнопку CLOCK/PRESET для окончательной установки текущего времени.
But be car eful don’t use too much and keep a distance of 1 inch (2.54cm) between foil
1660.qxd 17.12.03 10:17 Page 10
РУССКИЙ
ENGLISH
6. Не используйте печь без стеклянного подноса и других запчастей, установленных в
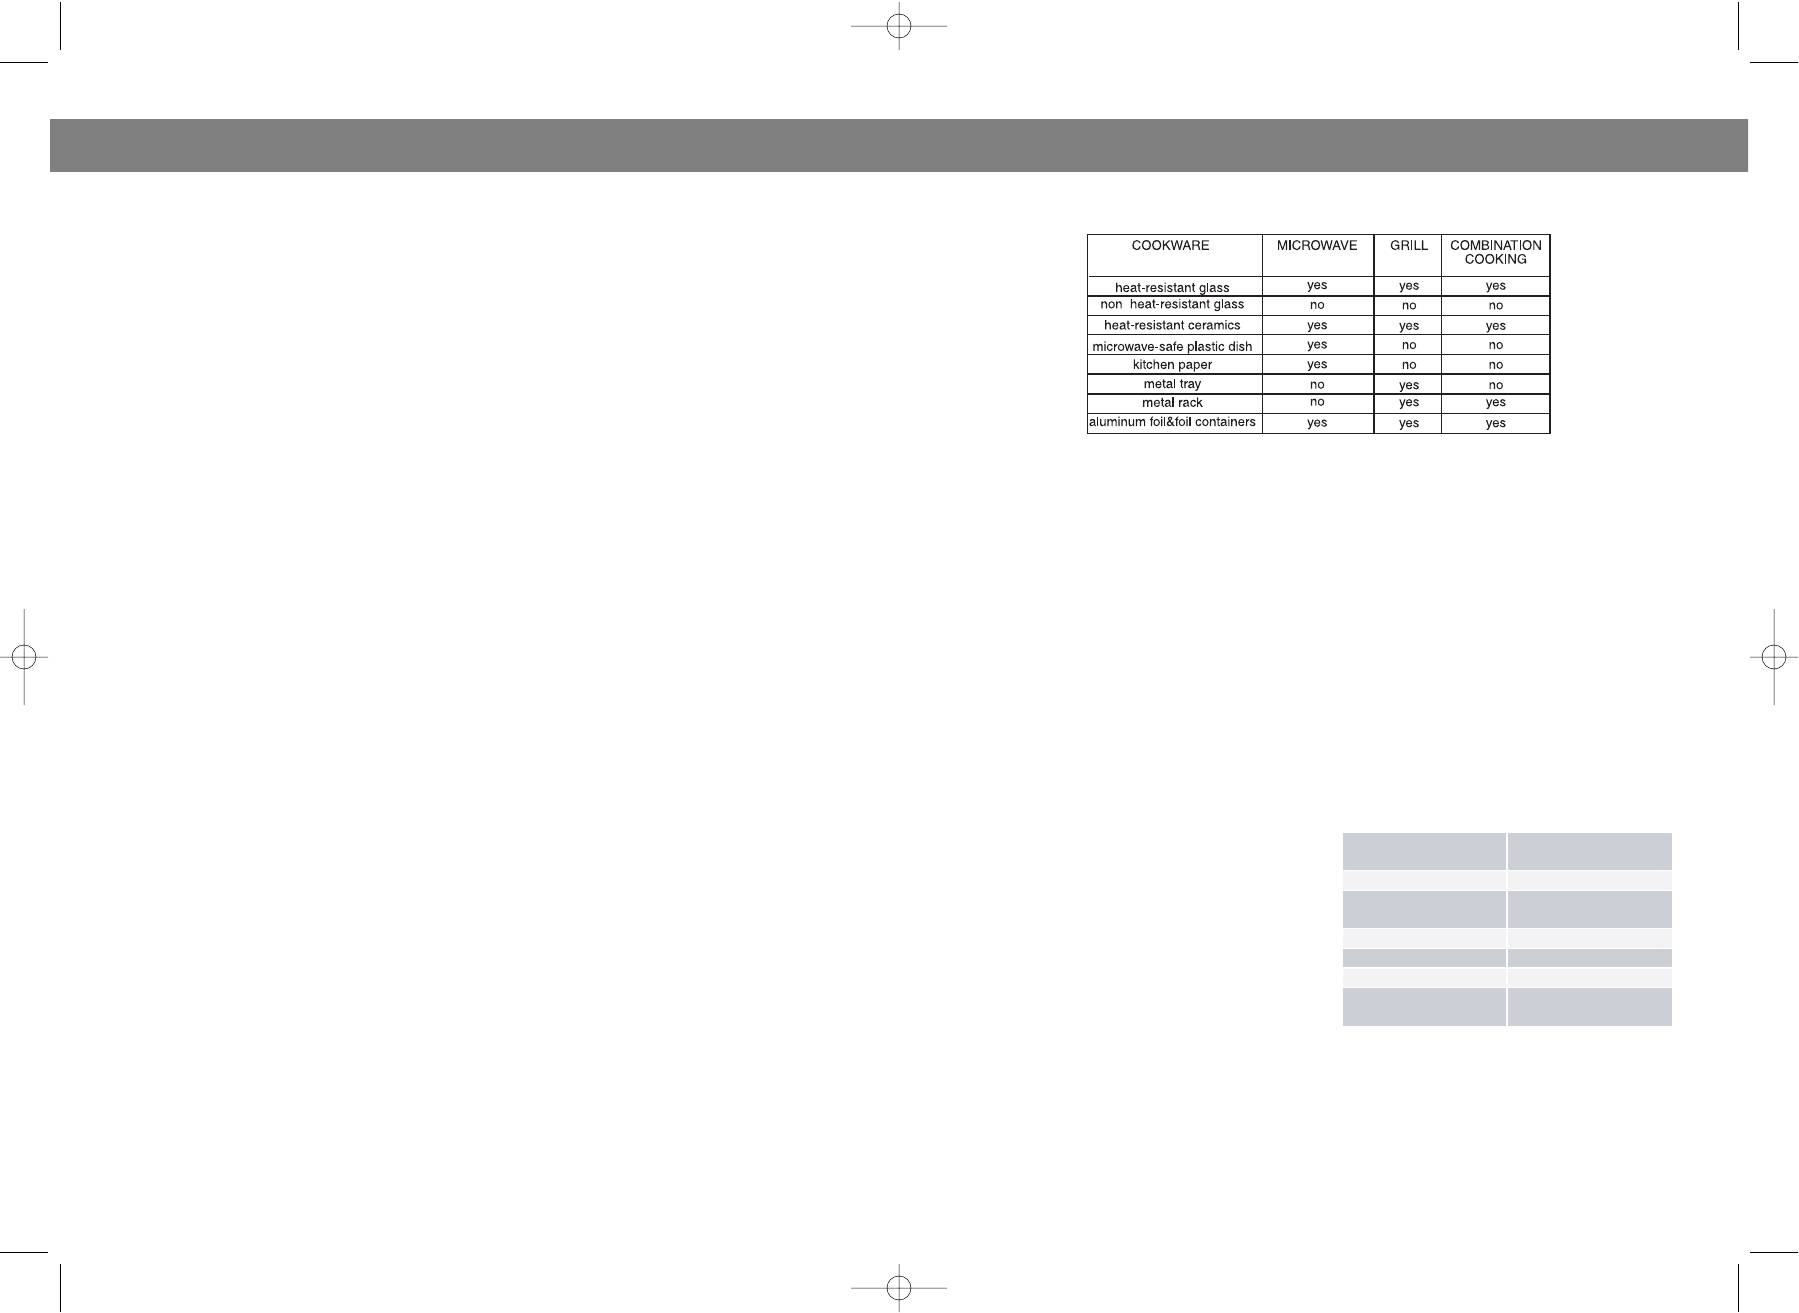
and cavity . The list below is a general guide to help you select the correct utensils.
7. Поместите поворачивающуюся основу в печь и убедитесь в том, что она нормально
установилась на роликовое кольцо.
ИНСТРУКЦИИ ПО ЗАЗЕМЛЕНИЮ
Этот прибор должен быть заземлен. В случае какоголибо замыкания, заземление снижает
риск получения электрошока, т .к. ток может уйти по запасному проводу . К этому прибору
прилагается шнур с заземленным проводом и заземленной вилкой. Вилка подсоединяется к
розетке, которая должна быть установлена и заземлена соответствующим образом.
ПРЕДУПРЕЖДЕНИЕ: Использование заземленной вилки не по правилам может привести к
риску получения электрошока.
Проконсуль тируйтесь с квалифицированным специалистом, если Вам не ясны инструкции
по заземлению или существуют сомнения, заземлен ли прибор соответствующим образом.
HOW T O SET THE OVEN CONTROLS
Each time a button is touched, a beep will sound to acknowledge the touch.
1.Эксплуатация микроволновой печи может создать помехи при работе радио, телевизора и
2. Устранение помех:
SETTING CL OCK TIME
а) плотно закройте дверь микроволновой печи;
With the oven plugged in, the oven scr een will show the default time setting 12:00. Y ou
б) переустановите принимающую антенну радиоприемника или телевизора;
need to set the oven clock time in order , for example, to be able to use the pr eset cook
в) измените расположение печи по отношению к этим приборам;
ing function later . Y ou can do so by the following steps:
г) включите микроволновую печь в другую розетку таким образом, чтобы приборы не
1. Press the CLOCK/PRESET button once.
мешали в эксплуатации друг другу .
2. Pr ess the PAUSE/CANCEL button once to indicate that you ar e setting clock time, not
progr amming a pr eset cooking session yet.
ПРАВИЛА БЕЗОПАСНОСТИ ПРИ ПРИГОТ ОВЛЕНИИ ПИЩИ В МИКРОВОЛНОВОЙ ПЕЧИ
3. Rotate the MENU SELECT/TIME ADJUST dial to indicate the hour digits.
При использовании электробытовых приборов внимательно следуйте следующим
4. Press the CLOCK/PRESET once again.
5. Rotate the MENU SELECT/TIME ADJUST dial to set the minute digits.
ПРЕДОСТЕРЕЖЕНИЕ: Чтобы снизить риск ожога, электрического удара, пожара или
6. Press the CLOCK/RRESET finally to confirm the setting.
воздействия микроволной энергией необходимо:
1. Прочитать внимательно инструкции перед использованием.
MICROWA VE COOKING
2. Используйте микроволновую печь строго по назначению. Не помещайте химические
T o cook with microwave power , pr ess the
вещества вовнутрь печи. Печь предназначена для подогрева и для приготовления пищи.
MICRO POWER button a number of times
Печь не предназначена для промышленного или лабораторного использования.
to set a cooking power level, then rotate
3. Не допускается пользование печью при отсутствии пищи внутри. Это может привести к
the TIME/ADJUST dial to set cooking time;
4. Не используйте прибор, если повреждены вилка или шнур.
the oven will work immediately after you
5. Как и в отношении других электроприборов, необходим строгий контроль за детьми, при
have pressed the ST ART button.
эксплуатации ими печи.
Select power level by pr essing the MICRO
6. Для того чтобы снизить риск возгорания внутри печи, придерживайтесь следующих
For example, suppose you want to cook
а) Не пережаривайте пищу . Внимательно следите за прибором при
for 1 minute at 80% of microwave power .
использовании бумажных, пластиковых или других материалов, ускоряющих приготовление
1. Press MICRO POWER button 2 times.
б) Снимите закрепляющую проволоку с бумажных и пластиковых пакетов перед тем, как
2. T urn TIME/MENU to 1:00.
поместить их внутрь.
3. Press ST ART button.
в) В случае возгорания материалов в печи не открывайте дверцу , а выключите прибор,
отсоедините его от розетки.
г) Не храните продукты внутри микроволновой печи.
T o broil slices of meat, steaks, chops, kebabs, pieces of chicken sausages, or hot sand
7. Жидкости и другая пища, предназначенные для подогревания, должны быть помещены в
wiches, etc, you start by pressing the GRILL/COMB. button once and then rotate the
плотно закрытую посуду .
1660.qxd 17.12.03 10:17 Page 12
4 times MEDIUM LOW
6 times SETTING
ENGLISH
РУССКИЙ
TIME/ADJUST dial to set cooking time; the oven will work immediately after you have
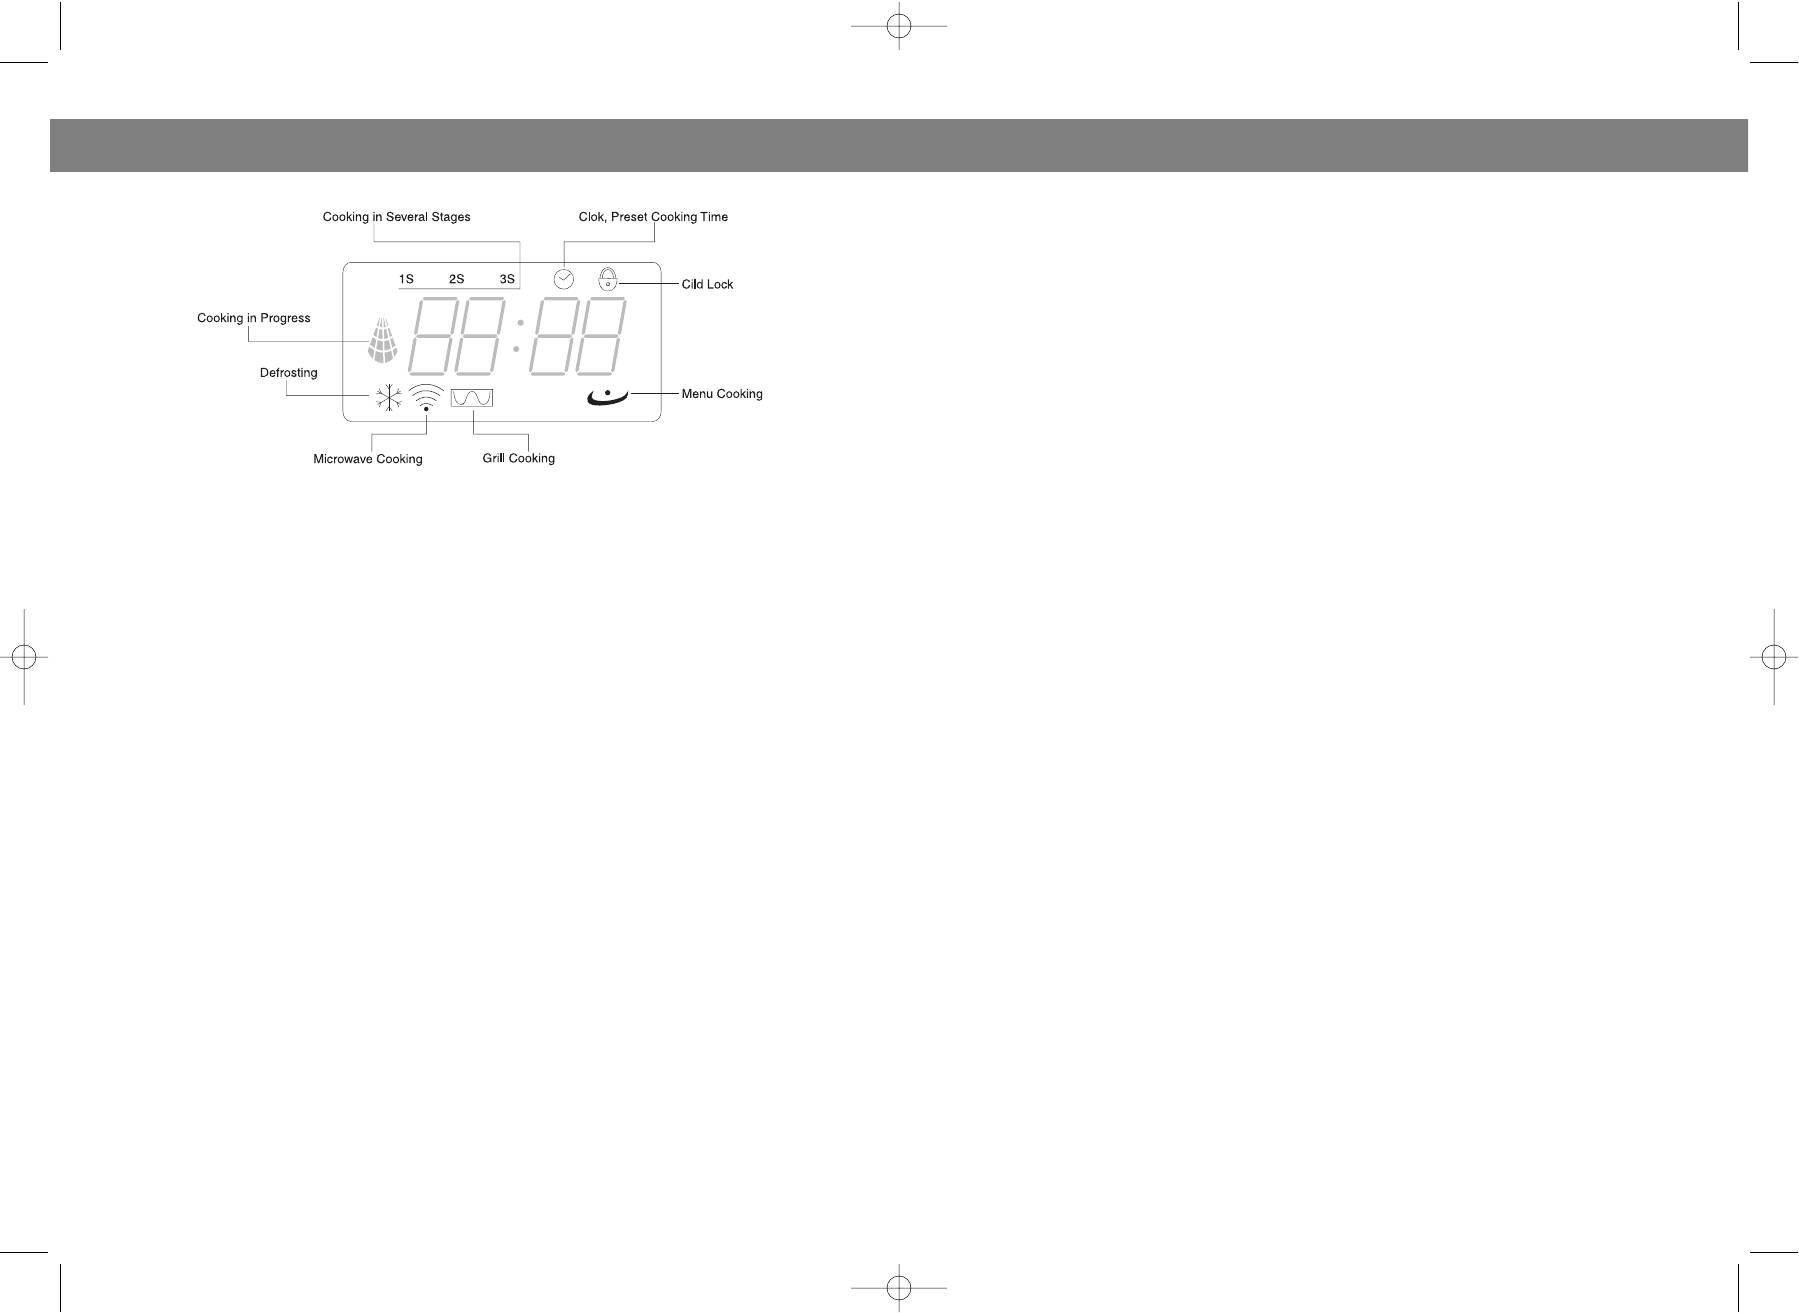
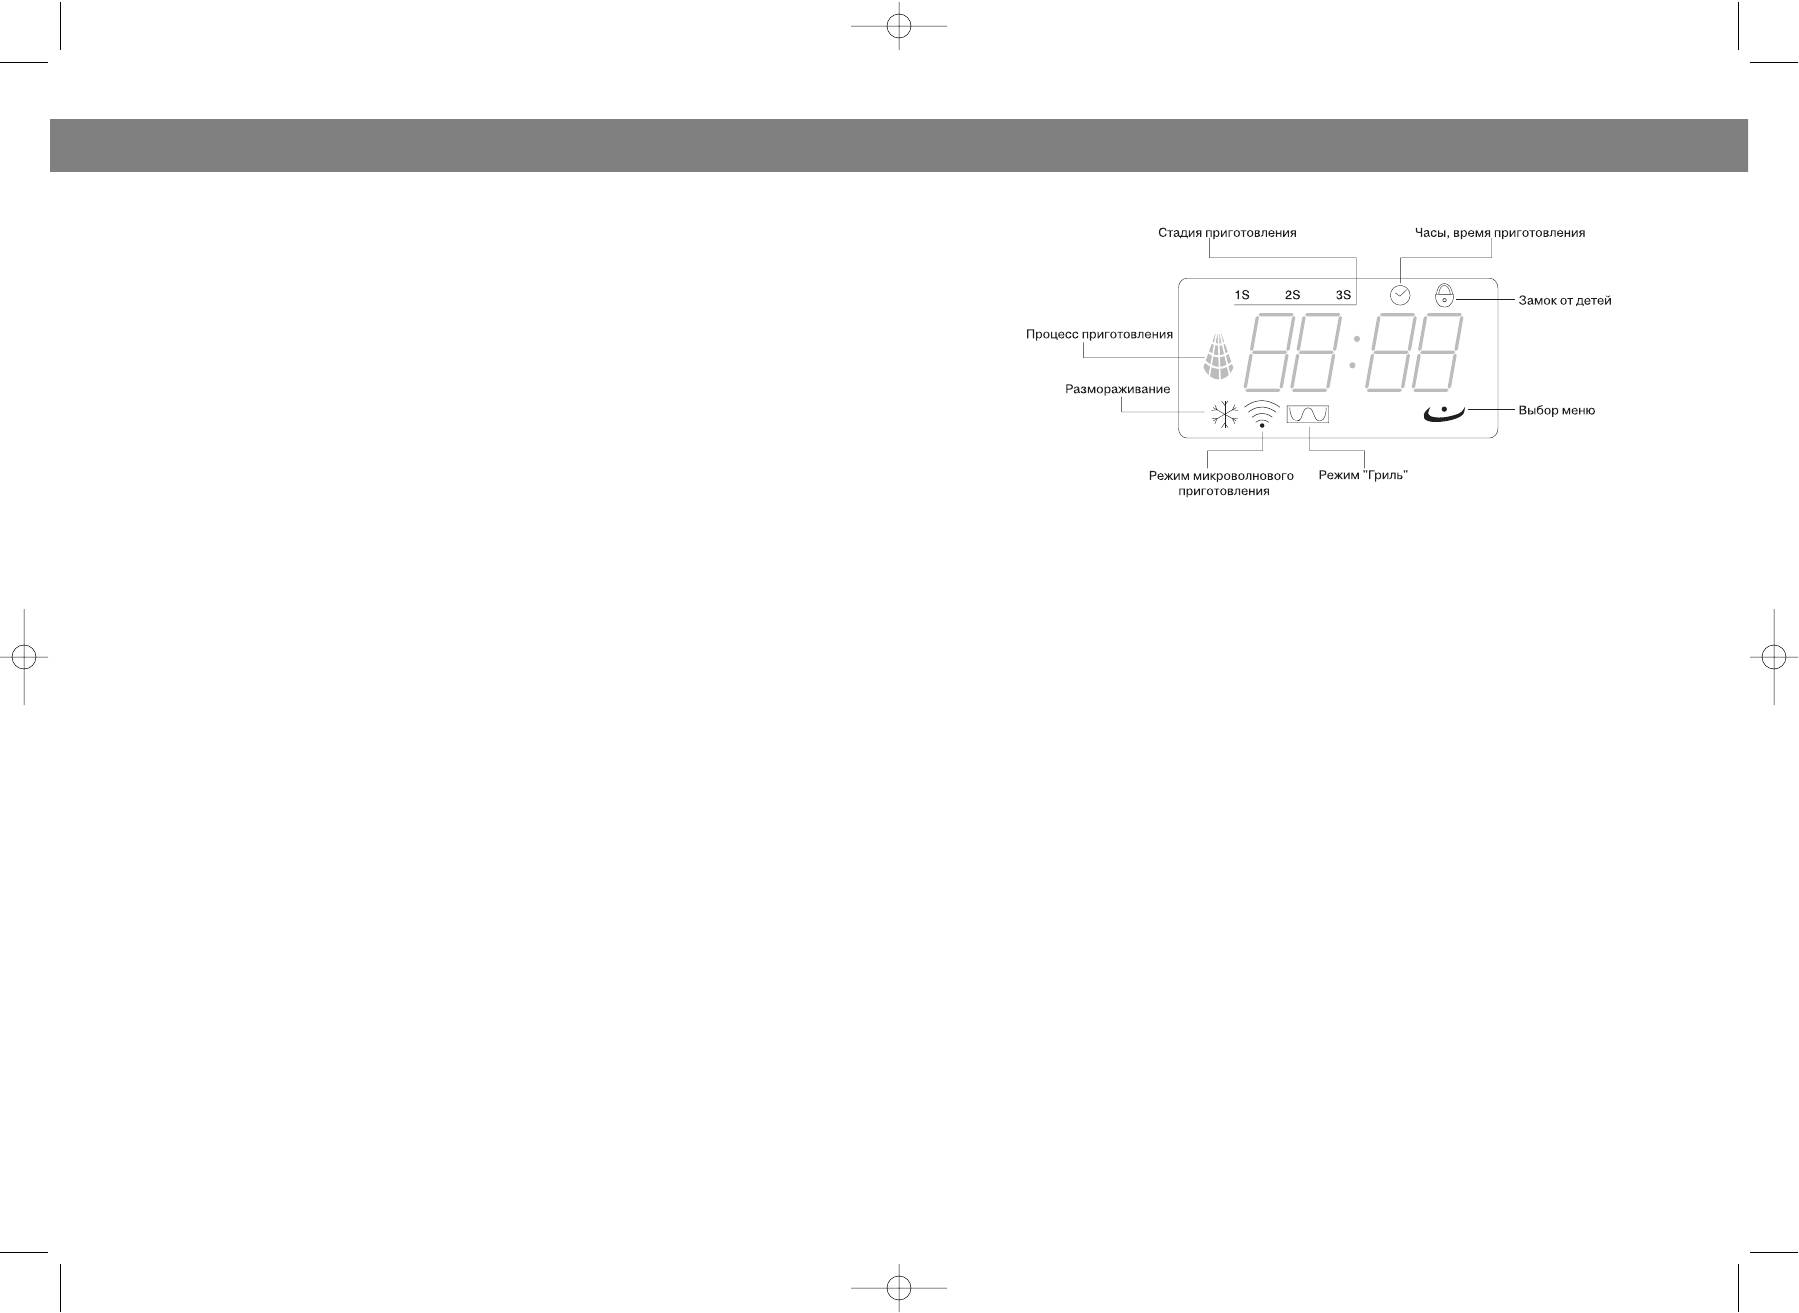
НАИМЕНОВАНИЕ ЭЛЕМЕНТОВ ДИСПЛЕЯ
pr essed the ST ART button.
For example, suppose you want to grill for 12 minutes.
1. Press GRILL/COMB. button once.
2. T urn the TIME/ADJUST to 12:00.
3. Press ST ART button.
T o cook with a combination of microwave power and grill cooking, you press the
GRILL/COMB. button twice or thrice to select a combination power setting C1 or C2..
The power setting for combination 1 is 30% time for microwave cooking, 70% for grill
cooking. Use for fish, potatoes or au gratin.
FOR EXAMPLE: Suppose you want to set combination 1 cooking for 25 minutes.
1. Press GRILL/COMB. twice.
2. T urn TIME/ADJUST to 25:00.
3. Press ST ART button.
ПРЕДОСТ ОРОЖНОСТИ, КОТ ОРЫЕ НЕОБХОДИМО СОБЛЮДА ТЬ, ЧТОБЫ НЕ
ПОДВЕРГ А ТЬСЯ РИСКУ ВОЗДЕЙСТВИЯ МИКРОВОЛНОВОЙ ЭНЕРГИЕЙ
The power setting for combination 2 is 55% time for microwave cooking, 45% for grill
1. Не пытайтесь пользоваться микроволновой печью при открытой двери, т .к. при этом
возникает риск подвернуться вредному воздействию микроволновой энергии. Очень важно
cooking. Use for puddings omelettes, baked potatoes and poultry .
не повредить и не испортить внутренние защитные замки.
FOR EXAMPLE: Suppose you want to set combination 2 cooking for 12 minutes.
2. Не помещайте посторонние предметы между дверей и лицевой частью микроволновой
1. Press GRILL/COMB. thr ee times.
печи и не позволяйте грязи или остаткам очищающих средств скапливаться на изолирующих
2. T urn TIME/ADJUST to 12:00.
3. Press ST ART button.
3. Не пользуйтесь микроволновой печью, ког да она повреждена. Особенно важно, чтобы
дверца была плотно закрыта, и не были повреждены:
a. дверца (согнута)
With auto cook function, you do not need to input cooking power and time. Instead you
b. крючки и защелки (сломаны или ослаблены)
c. дверной изолирующий слой
will tell the oven what you want to cook and how much it weighs.
4. Печь должна настраиваться и чиниться квалифицированным специалистом.
When you press the MENU button, the screen will illuminate. Then you can rotate the
MENU SELECT dial to select a food or cooking operation. The next step is to pr ess the
ПЕРЕД ТЕМ КАК ОБРА ТИТЬСЯ В СЕРВИСНУЮ СЛУЖБУ
WEI. ADJ. and then rotate the MENU SELECT/TIME ADJUST dial again to indicate weight
1. Убедитесь в том, что печь включена в сеть правильно. Если нет , отсоедините шнур от
of food. The oven starts after the ST ART button is engaged. For example:
источника питания, подождите 10 секунд и снова повторите.
T o cook 100g of rice with auto cook:
2. Проверьте предохранитель. Если предохранитель исправлен, проверь те, подается ли
1. Press MENU button.
2. T urn MENU SELECT/TIME ADJUST dial to rice cooking with PLAIN RICE flickering on
3. Убедитесь, что контрольная панель запрограммирована правильно и таймер установлен.
4. Проверьте, закрыта ли дверца печи на защелку во время эксплуатации.
3. Press WEI. ADJ. button and then r otate MENU SELECT/TIME ADJUST dial to indicate
1. Убедитесь, что весь упаковочный материал удалён из микроволновой печи.
4. Press ST ART button.
2. Систематически проверяйте печь на предмет поломки. Не пользуйтесь печью, если
сломан замок, дверца или есть дефекты внутри печи. В случае таких поломок или дефектов,
DEFROST BY WEIGHT
обращайтесь в сервисный центр.
Automatically sets proper defrosting cycle once you have entered the weight of the food
3. Печь должна быть установлена на ровной и устойчивой поверхности.
to be thawed. Maximum allowable weight for each category of meat, poultry and fish is
4. Не устанавливайте печь вблизи источников высокой температуры и в местах
shown on scr een.
5. Для правильного использования установите печь таким образом, чтобы было обеспечена
Suppose you want to defrost 600g shrimp.
вентиляция вокруг нее: сверху свободное пространство 20 см, с задней стороны 10 см,
1. Press the MENU button.
по бокам по 5 см.
1660.qxd 17.12.03 10:17 Page 14
РУССКИЙ
ENGLISH
2. Rotate the MENU SELECT/TIME ADJUST dial to select fish under AUT O DEFROST cat
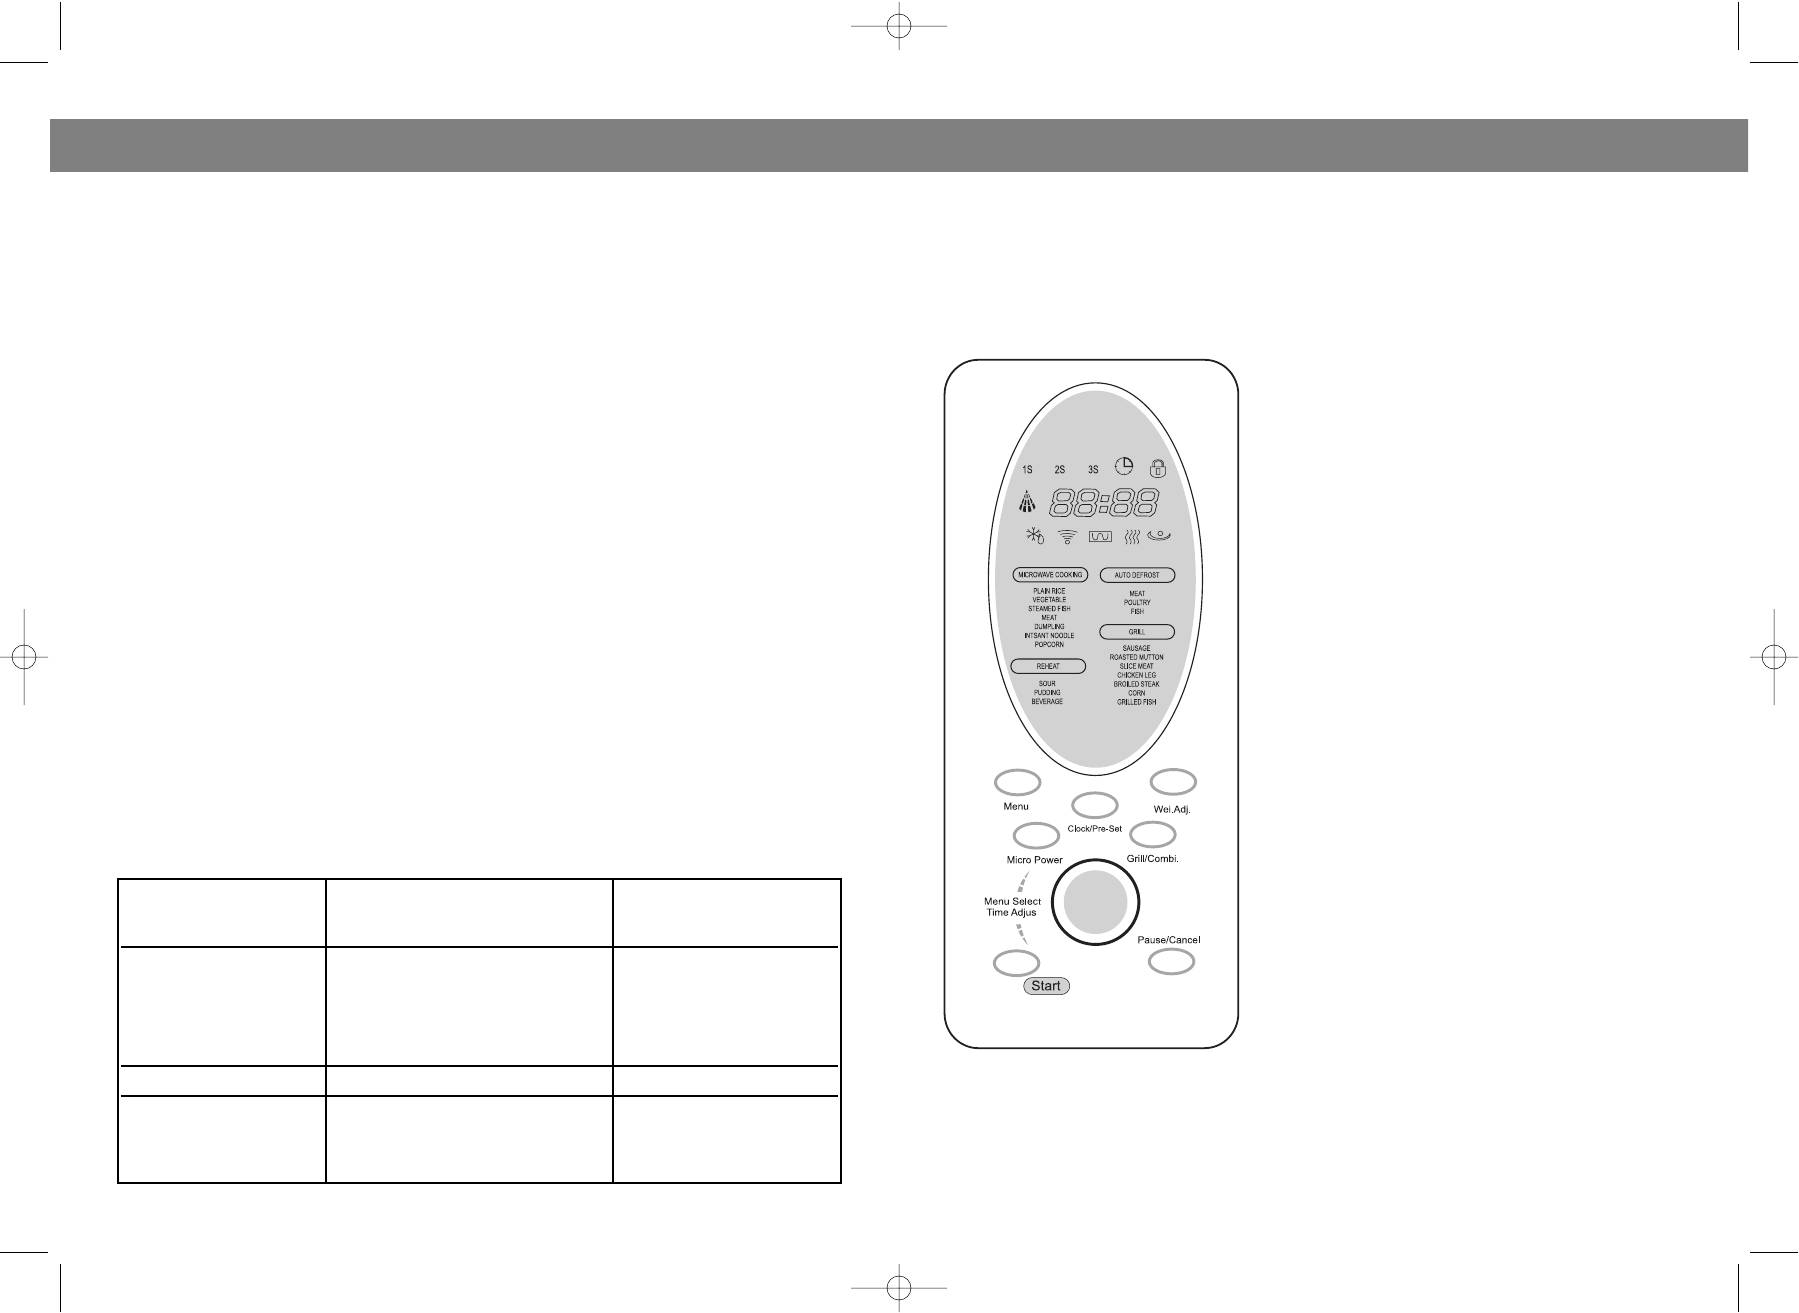
На дисплее отражается время приготовления
пищи, уровень мощности, индикаторы работы, а
3. T ouch WEI. ADJ. button and rotate the MENU SELECT/TIME ADJUST dial to indicate
также текущее время.
4. Touch ST ART button.
Установите желаемый уровень мощности, нажав
на кнопку MICRO POWER необходимое количество
MUL TIJST AGE COOKING
The oven can be progr ammed to do sever al consecutive functions.
The following steps ar e needed if we ar e going to set a cooking pr ogram involving auto
3. АВТОМА ТИЧЕСКОЕ МЕНЮ
defrost, microwave, and grill cooking.
Нажмите для входа в режим автоматического
1. Input autodefrost progr am with display screen showing «1S» light.
2. Input microwavecooking progr am with display screen showing «2S» light.
3. Input grillcooking pr ogram with display scr een showing «3S» light.
4. ГРИЛЬ/КОМБИНИРОВАННЫЙ РЕЖИМ
Вы можете установить режим “Г риль”,
4. Touch ST ART button.
комбинированный режим 1 или 2 нажав на кнопку
GRILL/COMBI. необходимое количество раз в
Logically , any defrosting progr am must precede a cooking function in a multistage cook
зависимости от выбранной Вами программы
ing progr am. The r espective lights will come on to indicate which stage the oven is oper
ating in. After total time has elapsed, 3 beep sound.
вращайте регулятор по или против часовой
Y ou can put food in the oven, and progr am the oven to start up in a later time within the
стрелки для установки текущего времени;
вращайте для выбора необходимого пункта
oven’s clock cycle (12 hours). Suppose you want to set the oven to startup at 11:30
автоматического меню, включая разморозку;
o’clock, with 50% micr owave power for 30 minutes.
вращайте для установки времени приготовления.
1. Place food in the oven
2. Touch CLOCK/PRESET button.
3. Rotate the TIME/ADJUST dial to the designated hour digit(s)
6. РЕГУЛЯТ ОР ВЕСА
4. Touch CLOCK/PRESET button.
После выбора пункта автоменю, установите приблизительный вес продукта. Для этого
5. Rotate the MNEU/TIME dial to the designated minutes digit(s).
нажмите на кнопку WEIGHT ADJ. и, поворотом регулятора MENU SELECT/TIME ADJUST
6. Set a cooking progr am by inputting cooking power (press the power button 3 times)
установите приблизительный вес продукта. Печь сама выберет оптимальное время и
мощность, подходящие для приготовления конкретного продукта.
and time (rotate the MENU SELECT/TIME ADJUST dial until 11:30 is displayed).
7. Touch ST ART button.
7. ТЕКУЩЕЕ ВРЕМЯ/УСТ АНОВКА ВРЕМЕНИ, ПО ДОСТИЖЕНИИ КОТ ОРОГО НА ЧНЕТ СЯ
ПРИГОТ ОВЛЕНИЕ ПИЩИ
Для входа в режим установки текущего времени нажмите кнопку CLOCK/PRESET и с
Y ou can start the oven to work immediately at full power by rotating the MENU
помощью регулятора MENU/TIME установите время. Для подтверждения выбранных
SELECT/TIME ADJUST dial to indicate a desir ed cooking time and then pr ess the ST ART
установок, нажмите кнопку CLOCK/PRESET еще раз.
button. For example, to set the oven to cook for 2 minutes using this feature:.
Нажмите кнопку CLOCK/PRESET для задания времени, по достижении которого начнется
1. Rotate the MENU SELECT/TIME ADJUST dial till the display shows 2:00.
приготовление пищи по установленной программе.
2. Press the ST ART button.
Нажмите кнопку ST ART для включения предварительно запрограммированного режима.
The minute timer will enable you to set a countdown time. The oven light, turntable, and
cooling fan ar e in oper ation, but there is no micr owave r adiation. Y ou may use this feature
а) Нажмите кнопку PAUSE/CANCEL перед программированием печи для сброса предыдущих
in case you want to time cooking operation.
For example, suppose you want to set timer for 3 minutes.
б) Нажмите кнопку PAUSE/CANCEL один раз для временного отключения программы и два
1. Press P AUSE/CANCEL button.
раза для окончания приготовления блюда.
в) Данная кнопка используется также для установки замка от детей.
2. Press MICRO POWER button 6 times
1660.qxd 17.12.03 10:17 Page 16
ENGLISH РУССКИЙ
3. T urn TIME/ADJUST to 3:00.
4. Press ST ART button.
Use to prevent unsupervised oper ation of the oven by little children. The CHILD LOCK
indicator will show up on display scr een, and the oven can not be operated while the
CHILD LOCK is set. T o set the CHILD LOCK: Press and hold the PAUSE/CANCEL button
for 3 seconds, a beep sounds and LOCK indicator lights. T o cancel the CHILD LOCK:
Pr ess and hold the PAUSE/CANCEL button for 3 seconds until lock indicator on display
CLEANING AND CARE
1. T urn off the oven and r emove the power plug from the wall socket befor e cleaning.
2. Keep the inside of the oven clean. When food splatter s or spilled liquids adher e to oven
walls, wipe with a damp cloth. Mild detergent may be used if the oven gets very dirty .
Avoid the use of spray and other harsh cleaner s as they may stain, str eak or dull the door
3. The outside surfaces should be cleaned with a damp cloth. T o pr event damage to the
oper ating parts inside the oven, water should not be allowed to seep into the ventilation
4. Wipe the window on both sides with a damp cloth to r emove any spills or spatter s.
5. Do not allow the control panel to become wet. Clean with a soft cloth. When cleaning
the control panel, leave oven door open to pr event oven from accidentally turning on.
6. If steam accumulates inside or around the outside of the oven door , wipe with a soft
cloth. This may occur when the oven is oper ated under high humidity condition.
7. It is occasionally necessary to r emove the glass tray for cleaning. Wash the tray in warm
sudsy water or in a dishwasher .
8. The roller ring and oven floor should be cleaned regularly to avoid excessive noise.
Simply wipe the bottom surface of the oven with mild deter gent. The roller ring may be
washed in mild sudsy water or dishwasher . When r emoving the r oller ring fr om cavity floor
for cleaning, be sur e to r eplace in the proper position.
9. Remove odors fr om your oven by combining a cup of water with the juice and skin of
one lemon in a deep microwave able bowl, microwave for 5 minutes. Wipe thor oughly and
dry with a soft cloth.
10. When it becomes necessary to r eplace the oven light, please consult a dealer to have
Power Consumption: 230 V ~ 50 Hz, 1400 W (Micr owave)
Microwave power output 800 W
Grill power 1000 W
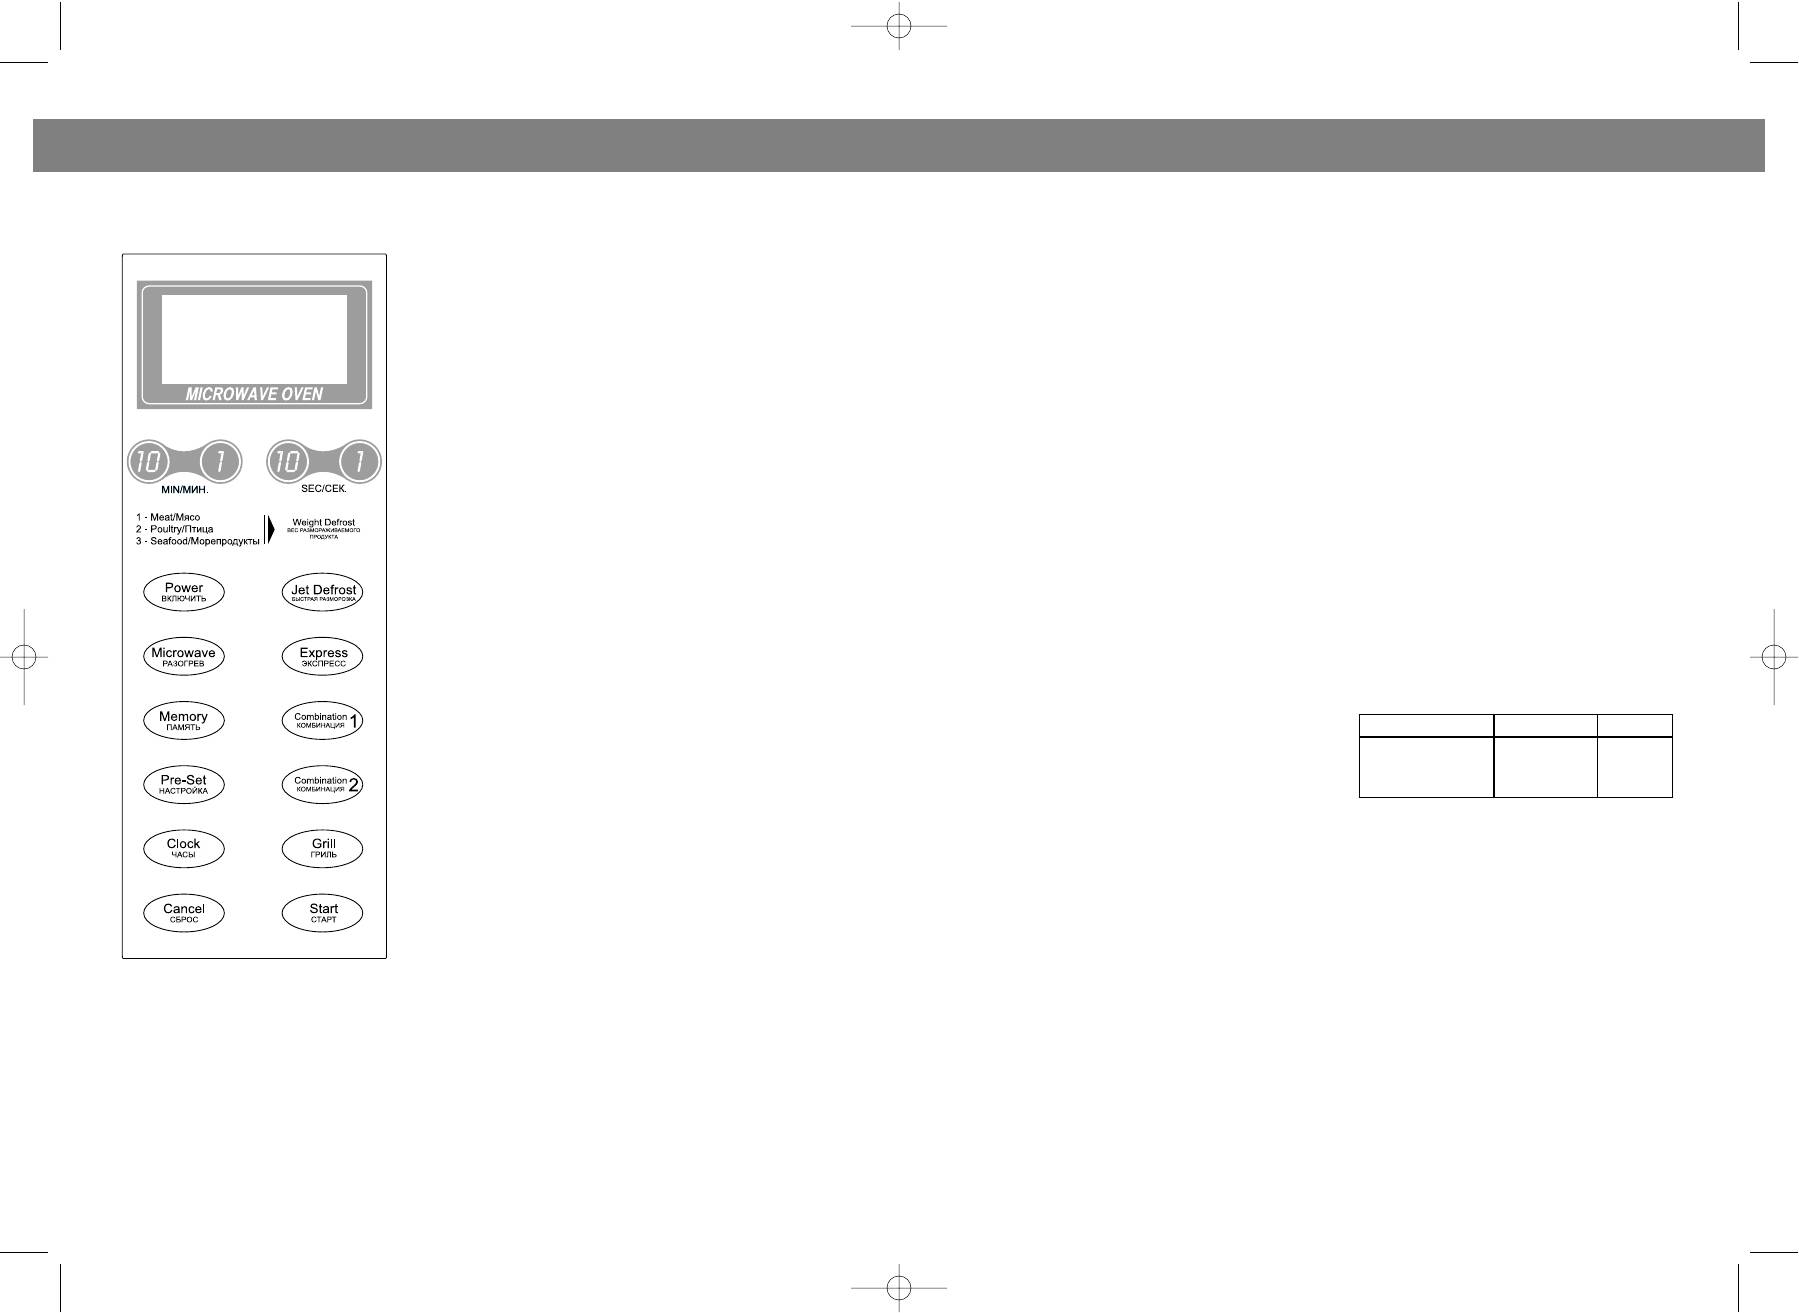
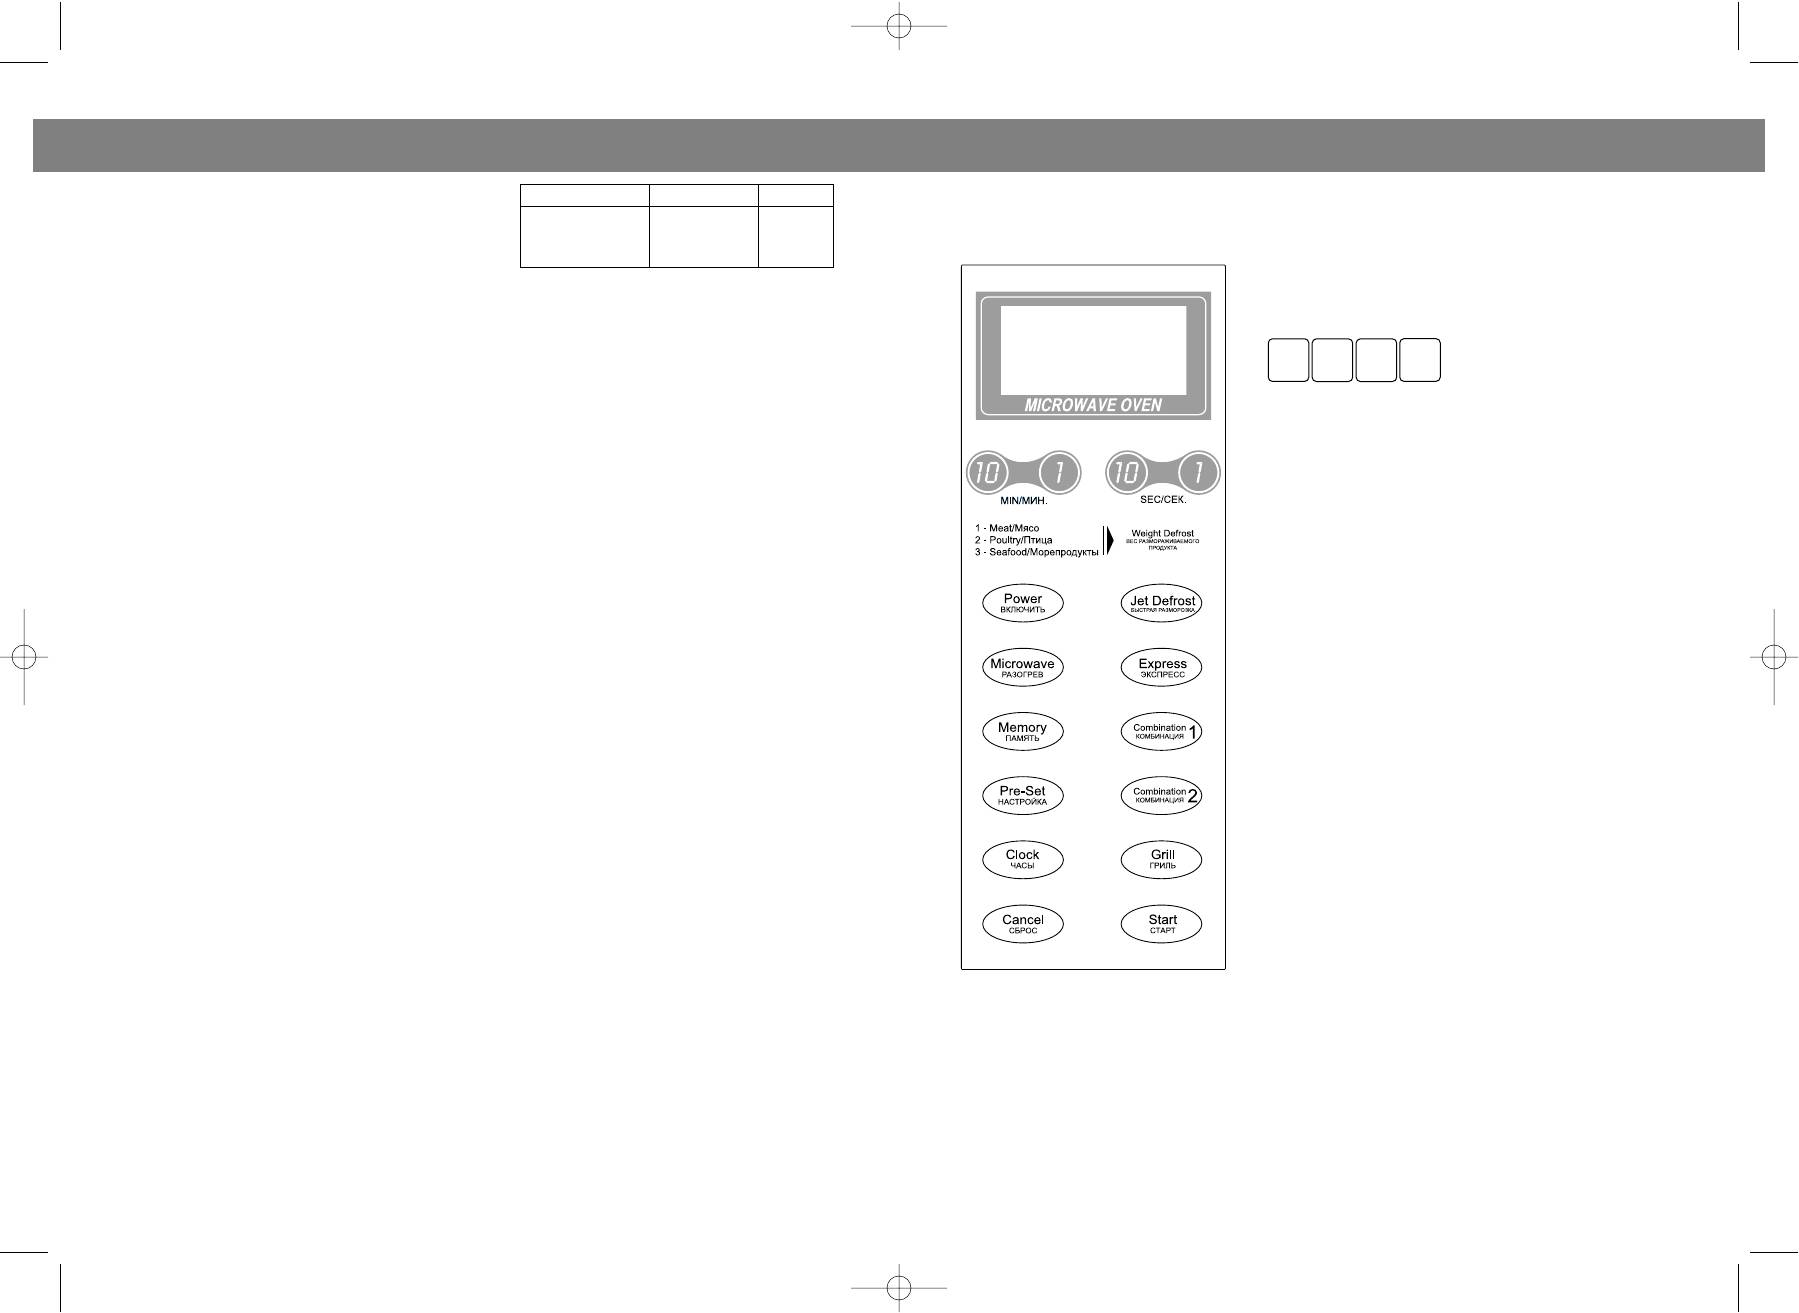
1. Система, блокирующая дверцу печи
5. Роликовое кольцо
Oper ation Fr equency: 2450 MHz
6. Вращающийся стеклянный поднос
Oven Capacity: 23 Litr es
3. Вентиляция печи
7. Функциональная панель
Cooking Uniformity: T urntable System 314mm>
4. Крепление для вращающегося
Net Weight: Approx.16.5 kg
9. Решетка для гриля
SERVICE LIFE OF THE MICROWA VE OVEN NOT LESS THAN 5 YEARS
1660.qxd 17.12.03 10:17 Page 18
Инструкции микроволновых печей VITEK


Данный раздел представляет большой выбор инструкций по эксплуатации микроволновых печей марки VITEK. Если Вы утратили инструкцию из комплекта, то, надеемся, без труда сможете найти ее на нашем сайте и бесплатно скачать.
Если, по каким-то причинам, Вы не смогли найти нужное руководство, не стесняясь пишите запрос нам.
Vitek VT-1658: инструкция
3. Check to ensure that the control panel is progr ammed correctly and the timer is set.
4. Check to ensur e that the door is secur ely closed engaging the door safety lock system. Otherwise,
the microwave energy will not flow into the oven.
IF NONE OF THE ABOVE RECTIFY THE SITUA TION, THEN CONT ACT A QUALIFIED TECHNICIAN. DO
NOT TRY T O ADJUST OR REPAIR THE OVEN YOURSELF .
1. Make sur e that all the packing materials are r emoved from the inside of the door .
2. Warning: Check the oven for any damage, such as misaligned or bent door , damaged door seals
and sealing surface, broken or loose door hinges and latches and dents inside the cavity or on the
door . If ther e is any damage, do not oper ate the oven and contact qualified service per sonnel.
3. This microwave oven must be placed on a flat, stable surface to hold its weight and the heaviest
food likely to be cooked in the oven.
4. Do not place the oven wher e heat, moistur e, or high humidity ar e gener ated, or near combustible
5. For corr ect operation, the oven must have sufficient airflow . Allow 20cm of space above the oven,
10cm at back and 5cm at both sides. Do not cover or block any openings on the appliance. Do not
6. Do not operate the oven without glass tr ay , r oller support, and shaft in their proper positions.
7. Make sur e that the power supply cor d is undamaged and does not run under the oven or over any
hot or sharp surface.
8. The socket must be readily accessible so that it can be easily unplugged in an emergency .
9. Do not use the oven outdoor s.
This appliance must be grounded. This oven is equipped with a cord having a grounding wire with a
grounding plug. It must be plugged into a wall r eceptacle that is properly installed and grounded. In
the event of an electrical short cir cuit, grounding r educes risk of electric shock by providing an
escape wir e for the electric current. It is r ecommended that a separ ate cir cuit serving only the oven
be provided. Using a high voltage is dangerous and may r esult in a fir e or other accident causing
WARNING: Improper use of the grounding plug can r esult in a risk of electric shock.
1. If you have any questions about the grounding or electrical instructions, consult a qualified elec
trician or service person.
2. Neither the manufacturer nor the dealer can accept any liability for damage to the oven or per
sonal injury resulting from failure to observe the electrical connection pr ocedur es. The wires in this
cable main ar e colored in accor dance with the following code:
Green and Y ellow = EARTH
Oper ation of the microwave oven can cause interference to your radio, TV , or similar equipment.
When there is interfer ence, it may be r educed or eliminated by taking the following measures:
1. Clean door and sealing surface of the oven.
1658.qxd 06.06.03 17:50 Page 6

ENGLISH
РУССКИЙ
2. Reorient the r eceiving antenna of r adio or television.
3. Relocate the microwave oven with respect to the r eceiver .
Питание: 230 В ~ 50 Г ц, 1200 Вт (Микроволны)
4. Move the microwave oven away from the receiver .
Выходная мощность: 800 Вт
5. Plug the micr owave oven into a differ ent outlet so that microwave oven and r eceiver are on dif
Частота: 2450 МГц
fer ent branch circuits.
Объем: 20 литров
Стеклянный поворотный стол: диаметр 270 мм
IMPORT ANT SAFETY INSTRUCTIONS
Вес печи: 15.1 кг .
When using electrical appliance basic safety pr ecautions should be followed, ino.uding the follow
СРОК СЛУЖБЫ МИКРОВОЛНОВОЙ ПЕЧИ НЕ МЕНЕЕ 5 ЛЕТ
WARNING: T o r educe the risk of burns, electric shock, fir e, injury to per sons or exposur e to exces
sive microwave energy:
УСЛОВИЯ Г АРАНТИЙНОГО ОБСЛУЖИВАНИЯ
1. Read all instructions before using the appliance.
2. Use this appliance only for its intended use as described in this manual. Do not use corrosive
chemicals or vapors in this appliance. This type of oven is specifically designed to heat, cook or dry
Фирма VITEK выражает благодарность за Ваш выбор и гарантирует высокое качество и
food. It is not designed for industrial or laboratory use.
безупречное функционирование приобретенного Вами изделия при соблюдении правил его
3. Do not operate the oven when empty .
4. Do not oper ate this appliance if it has a damaged cord or plug, if it is not working properly or if it
Срок гарантии на все изделия — 12 месяцев со дня покупки. Данным гарантийным талоном
has been damaged or dropped. If the supply cor d is damaged, it must be r eplaced by the manufac
VITEK подтверждает исправность данного изделия и берет на себя обязательство по
tur er or its service agent or a similarly qualified per son in order to avoid a hazard.
бесплатному устранению всех неисправностей, возникших по вине производителя.
5. WARNING: Only allow children to use the oven without supervision when adequate instructions
Г арантийный ремонт может быть произведен в авторизированном сервис-центре на
have been given so that the child is able to use the oven in a safe way and understands the hazards
of improper use.
6. T o reduce the risk of fir e in the oven cavity:
У словия гарантии:
a. When heating food in plastic or paper container , frequency keep an eye on the oven due to the
1. Настоящая гарантия имеет силу при соблюдении следующих условий:
possibility of ignition.
— правильное и четкое заполнение гарантийного талона с указанием наименования модели,
b. Remove wir e twistties from paper or plastic bags before placing bag in oven.
ее серийного номера, даты продажи и печати фирмы-продавца в гарантийном талоне и
c. If smoke is observed, switch off or unplug the appliance and keep the door closed in order to sti
— наличие оригинала квитанции (чека), содержащего дату покупки.
d. Do not use the cavity for stor age purposes. Do not leave paper products, cooking utensils or food
2. VITEK оставляет за собой право на отказ в гарантийном обслуживании в случае
in the cavity when not in use.
непредоставления вышеуказанных документов, или если информация в них будет
7. WARNING: Liquid or other food must not be heated in sealed container s since they are liable to
неполной, неразборчивой, противоречивой.
3. Г арантия не включает в себя периодическое обслуживание, установку , настройку изделия
8. Micr owave heating of beverage can result in delayed eruptive boiling, ther efore care has to be
на дому у владельца.
taken when handle the container .
4. Не подлежат гарантийному ремонту изделия с дефектами, возникшими вследствие:
9. Do not fry food in the oven. Hot oil can damage oven parts and utensils and even result in skin
— несоблюдения условий эксплуатации или ошибочных действий владельца;
10. Whole eggs should not be heated in the oven since they may explode.
— неправильной установки, транспортировки;
11. Pierce foods with heavy skins such as potatoes, whole squashes, apples and chestnuts before
— стихийных бедствий (молния, пожар, наводнение и т . п.), а также других причин,
находящихся вне контроля продавца и изготовителя;
12. The contents of feeding bottles and baby jar s should be stirred or shaken and the temperatur e
— попадания внутрь изделия посторонних предметов, жидкостей, насекомых;
should be checked before serving in order to avoid burns.
— ремонта или внесения конструктивных изменений неуполномоченными лицами;
13. Cooking utensils may become hot because of heat tr ansferred fr om ‘he heated food. Potholders
— использования аппаратуры в профессиональных целях;
may be needed to handle the utensil.
— отклонений от Г осударственных Т ехнических Стандартов питающих,
14. Utensils should be checked to ensure that they ar e suitable for use in mic. oven.
телекоммуникационных и кабельных сетей;
15. Utensil T est: Place the empty utensil in the oven, microwave at high power for 60 seconds. A
— при выходе из строя деталей, обладающих ограниченным сроком службы.
utensil which becomes very hot should not be used.
5. Настоящая гарантия не ущемляет законных прав потребителя, предоставленных ему
16. WARNING: It is hazardous for anyone other than a trained person to carry out any service or
r epair operation which involves the removal of any cover which gives protection against exposur e to
MICROWA VE COOKING PRINCIPLES
1. Arr ange food carefully Place thickest ar eas towards outside of dish.
1658.qxd 06.06.03 17:50 Page 8

РУССКИЙ ENGLISH
Возможны 2 режима:
2. Watch cooking time. Cook for the shortest amount of time indicated and add mor e as needed.
режим 1 (30% микроволн. пригот . + 70% гриль) для приготовления рыбы, картофеля.
Food severely overcooked can smoke or ignite.
режим 2 (55% микроволн. пригот . + 45% гриль) для приготовления омлета, запеченого
3. Cover foods while cooking. Covers prevent spattering and help foods to cook evenly .
4. T urn foods over once during microwaving to speed cooking of such foods as chicken and ham
Допустим, Вы хотите приготовить пищу , используя 2й комбинированный режим приготов
burger s. Large items like roasts must be turned over at least once.
ления в течение 25 минут:
5. Rearr ange foods such as meatballs halfway through cooking both from top to bottom and from
1. Нажмите кнопку COMBINA TION 2.
the center of the dish to the outside.
2. Нажмите кнопку 10 SEC 2 раза и кнопку 1 SEC 5 раз.
3. Нажмите кнопку ST ART.
1. The ideal material for a microwave utensil is transpar ent to microwave, it allows energy to pass
Установка программы приготовления пищи
through the container and heat the food. Only use a temper ature pr obe r ecommended for this oven.
Вы можете задать последовательность процесса приготовления пищи на Ваше усмотрение.
2. Microwave cannot penetr ate metal, so metal utensils or dishes with metallic trim should not be
Допустим, Вы хотите:
1. Разморозить продукт .
3. Do not use r ecycled paper products when microwave cooking, as they may contain small metal
2. Установить определенный уровень мощности.
fr agments which may cause sparks and/or fires.
3. Приготовить пищу , используя режим гриль.
4. Round /oval dishes rather than square/oblong ones are recommend, as food in corners tends to
1. Нажмите кнопку CANCEL.
5. Narrow strips of aluminum foil may be used to prevent over cooking of exposed areas. But be
2. Установите время размораживания продукта (см. выше)
car eful don’t use too much and keep a distance of 1 inch (2.54cm) between foil and cavity . The list
3. Установите желаемый уровень мощности с помощью кнопки POWER.
below is a general guide to help you select the correct utensils.
4. Нажмите кнопку MEMORY.
5. Установите необходимые параметры приготовления пищи в режиме гриль.
6. Нажмите кнопку ST ART.
Примечание: Во время процесса приготовления пищи по заданной программе, на дисплее
появляются индикаторы 1st или 2 st в зависимости от стадии, на которой находится
процесс приготовления. По завершении программы приготовления пищи прозвучит
тройной звуковой сигнал.
Чтобы предотвратить использование печи детьми, Вы можете установить режим
блокировки, для этого:
1. Нажмите кнопку CANCEL.
2. Нажмите одновременно кнопки 10 MIN и 1 SEC . При этом прозвучит звуковой сигнал и на
(Also see following pages for more detail.)
дисплее появится индикатор LOCK.
Для отмены режима блокировки:
Cooking time, power , indicators and present time ar e displayed.
Нажмите одновременно кнопки 10 MIN и 1 SEC . При этом прозвучит звуковой сигнал и с
дисплея исчезнет индикатор LOCK.
Остановка печи во время процесса приготовления пищи
T ouch to set times or weights.
Для остановки достаточно просто открыть дверцу печи. Чтобы продолжить процесс
приготовления пищи, закройте дверцу и нажмите кнопку ST ART.
Use to set microwave cooking time. Allows you to set up to 99 minutes and 99 seconds.
Use to set grill cooking time. Allows you to set up to 99 minutes and 99 seconds.
Отключите печь от сети. Протрите внутренние поверхности мягким очищающим средством,
сполосните и вытрите досуха мягкой тканью. Вымойте поворачивающийся столик и
COMBINA TION 1 & 2
роликовое кольцо в мыльной воде, затем сполосните и высушите. Аккуратно протрите
Use to set combination cooking time.
дверцу и замки влажной тканью.
Use to defrost frozen meat, poultry and seafood by weight. The defr osting time and power level
ar e automatically set once the food category and the weight are progr ammed.
1658.qxd 06.06.03 17:50 Page 10
ENGLISH
РУССКИЙ
3. Установите желаемую программу приготовления пищи.
Use to defrost foods by time. This cycle starts
4. Нажмите кнопку ST ART.
Примечание: удостоверьтесь, что текущее время было установлено ранее.
at mediumhigh power , then automatically
После завершения необходимых установок индикатор PRESET будет мигать в период
r educes to mediumlow power and then to low
ожидания заданного времени. По достижении 2:00 начнется процесс приготовления пищи
power as the food thaws. JET DEFROST
по заданной программе.
indicator light and cooking indicator light will
both turn on during the defrosting cycle.
Выбор экспресс2программы приготовления пищи
Нажмите кнопку EXPRESS необходимое количество раз для выбора одной из 4х заданных
программ микроволнового приготовления пищи по времени:
Use this featur e to progr am the oven for 4
15 секунд ………1 раз 1 минута……….3 раза
popular microwave timings. The oven will
30 секунд……….2 раза 2 минуты………4 раза
oper ate at HIGH power (100% power output)
При выборе экспресспрограммы приготовления пищи, автоматически устанавливается
for EXPRESS cooking progr am.
уровень мощности равный 100%.
Допустим, Вам желаете установить время приготовления пищи в течение 1 минуты:
Use to set power level. To check power level
1. Нажмите кнопку EXPRESS 3 раза, при этом на дисплее появится выбранное время “1:00”.
during time cooking, touch POWER pad.
2. Нажмите кнопку ST ART.
Установка времени размораживания продукта
Use to set the oven to startup at a later time.
Допустим, Вы хотите установить время размораживания продукта в течение 5 мин. 30 с.:
The preset indicator will flicker when the oven
1. Нажмите кнопку JET DEFROST.
is in the PRESET state. The clock must be set before
2. Нажмите кнопку 1 MIN 5 раз и кнопку 10 SEC 3 раза.
the preset function can be pr ogrammed.
3. Нажмите кнопку ST ART.
T ouch to cancel the selected power level, cook or
Автоматическое размораживание продуктов
defrost times that pr eviously progr ammed. But the time
Перед размораживанием продуктов обратите внимание на представленную ниже таблицу:
of day clock cannot be cancelled.
Допустим, Вы хотите разморозить 600 г . креветок:
1. Нажмите кнопку WEIGHT DEFROST 3 раза, при
этом на дисплее появится выбранная категория
T ouch to start the cooking or defrosting pr ogr ams. The
cooking indicator light and the
2. Нажмите кнопку 1 MIN 6 раз.
oven light will turn on and the cooling fan will operate.
3. Нажмите кнопку ST ART.
Во время процесса размораживания продукта прозвучит 2 звуковых сигнала,
Use to set the time of day or recall the time of day . The
напоминающие Вам о том, что размораживаемый продукт необходимо перевернуть.
time of day will be displayed at all times except when
Если вес размораживаемого продукта превышает указанный в таблице, печь работать не
the oven is operating. In the event of a power failure or
будет . В этом случае воспользуйтесь функцией JET DEFROST для установки времени
if the oven is unplugged, the clock will have to be reset.
По окончании процесса размораживания начнут звучать 3 звуковых сигнала каждые две
минуты до тех пор, пока Вы не нажмете кнопку CANCEL или откроете дверь печи.
When progr amming the oven to cook by time, use the
MEMORY pad when setting both the 1st and the 2nd
cooking stage. The r espective lights will come on to
Г риль используется для приготовления хорошо поджаренных хрустящих кусочков мяса,
рыбы, курицы, картофеля. При таком приготовлении высокая температура
which stage the oven is operating in.
распространяется непосредственно на продукты от кварцевой трубки.
Допустим, Вы хотите приготовить пищу в режиме гриль в течении 40 мин.:
OPERA TION INSTRUCTIONS
1. Нажмите кнопку GRILL.
BEEP DURING OVEN SETTINGS
2. Нажмите кнопку 10 MIN 4 раза.
Each time a pad is touched, a beep will sound to acknowledge the touch.
3. Нажмите кнопку ST ART.
SETTING THE CLOCK
Сочетает микроволновое приготовление и гриль для наилучшего приготовления продуктов.
Suppose you want to enter the correct time of day 6: 00 (A.M or P .M).
1658.qxd 06.06.03 17:50 Page 12

РУССКИЙ
ENGLISH
Step: 1. Touch CLOCK pad.
Нажмите для задания времени, по достижении которого начнется приготовление пищи по
2. Touch CANCEL pad.
установленной программе. При этом индикатор PRESET будет мигать в период ожидания
3. Touch number pad 1 MIN 6 times.
установленного времени. Примечание: Т екущее время должно быть установлено перед
4. Touch CLOCK pad again to confirm.
программированием функции PRESET .
NOTE: This is a 12hour clock. When the oven was plugged in, «1:01» should have
appear ed in the display . T o reset the time of day , repeat the steps given above. Y ou can
Нажмите для отмены предварительно установленного уровня мощности, программы
check the clock time while cooking is in progr ess by touching the CLOCK pad.
приготовления пищи или времени разморозки. Примечание: Функция CANCEL не отменяет
SETTING COOKING TIMES AND
Нажмите, чтобы начать процесс приготовления или разморозки пищи по заданной
Suppose you want to cook for 5 minute at 60%.
Step: 1. Touch MICRO pad.
2. Touch number pad 1 MIN five times.
3. Touch POWER pad 3 times.
Нажмите для установки текущего времени. Т екущее время будет отражено на дисплее,
4. Touch ST ART pad.
кроме тех случаев, ког да происходит процесс приготовления или разморозки пищи. При
NOTE: Step 3 is not necessary for cooking at 100% power level.
отключении микроволновой печи от сети, установленное время исчезает с дисплея.
Используйте кнопку MEMORY для программирования процесса приготовления пищи,
Suppose you want to set the oven to startup at 2 o’clock.
состоящего из нескольких этапов: разморозка, приготовление пищи в микроволновом,
Step: 1. Touch PRESET pad.
комбинированном режимах или режиме гриль.
2. Touch number pad 1 MIN twice.
ЭКСПЛУ А Т АЦИЯ ПЕЧИ
3. Set the cooking progr ams.
4. Touch ST ART pad.
При каждом нажатии на кнопки панели управления Вы будете слышать звуковой сигнал.
Be sure the time of day clock is set at the corr ect time befor e progr amming PRESET .
Установка текущего времени
Допустим, Вам необходимо установить текущее время 6:00 (АМ или РМ):
Use this featur e to progr am the oven for 4 popular microwave timings.
1. Нажмите кнопку CLOCK.
2. Нажмите кнопку CANCEL.
With each touch of the EXPRESS pad you can pr ogram the oven for :
3. Нажмите кнопку 1 MIN 6 раз.
15 seconds ………T OUCH ONCE 1 minute……….T OUCH 3 TIMES
4. Нажмите кнопку CLOCK для подтверждения установленного времени.
30 seconds……….TOUCH TWICE 2 minutes………T OUCH 4 TIMES
Примечание: в данной модели установлен 12часовой режим времени. Чтобы увидеть
The oven will operate at HIGH power (100% power output) for EXPRESS cooking progr am.
текущее время на дисплее во время процесса работы печи, нажмите кнопку CLOCK.
Suppose you want to set the oven to cook for 1 minute at 100% by using the featur e.
Step: 1. Touch the EXPRESS pad 3 times then «1:00» will appear in the display .
Установка времени приготовления и уровня мощности
Допустим, Вам необходимо установить время приготовления пищи 5 минут при уровне
2. Touch ST ART pad.
1. Нажмите кнопку MICROWA VE.
SETTING «JET DEFROST»
2. Нажмите кнопку 1 MIN 5 раз.
Suppose you want to set the oven to JET DEFROST for 5 minutes and 30 seconds.
3. Нажмите кнопку POWER 3 раза.
Step: 1. Touch JET DEFROST pad.
4. Нажмите кнопку ST ART.
Примечание: при установке уровня мощности 100% 3й шаг не обязателен.
2. Touch number pad 1 MIN 5 times and 10 SEC 3 times.
3. Touch ST ART pad.
Установка времени, по достижении которого начнется приготовление пищи по
SETTING «WEIGHT DEFROST»
Допустим, Вы хотите начать процесс приготовления пищи в 2:00 (АМ или РМ):
The maximum allowable weight for each category is shown below . Suppose you want to defrost
1. Нажмите кнопку PRESET.
2. Нажмите кнопку 1 MIN 2 раза.
1658.qxd 06.06.03 17:50 Page 14
ENGLISH
РУССКИЙ
Step: 1. Touch WEIGHT DEFROST pad 3 times.
«d3» will appear in the display .
2. Touch number pad 1 MIN 6 times.
На дисплее отражается информация о времени
3. Touch ST ART pad.
приготовления, уровне мощности, текущем
NOTE: During the defrosting process, ther e will be two beeps to reminder you to r earrange or turn
времени и индикация работы печи.
For foods exceeding these maximum weights, use the JET DEFROST progr am. If you
progr am weight in excess of the maximum recommended, the oven will not oper ate
properly . After a cooking or defrosting progr am has completed, the oven will automatically contin
ue to sound three beeps every two minutes until the door is opened or the
Нажмите для установки времени или веса.
CLEAR pad is touched.
Кнопка MICROWA VE
Нажмите для установки времени микроволнового
Suppose you want to grill for 40 minutes.
приготовления пищи. Максимальное время
приготовления 99 мин. 99 с.
Step: 1. Touch GRILL pad.
2. Touch number pad 4 times.
3. Touch ST ART pad.
Нажмите для установки времени приготовления
пищи в режиме гриль. Максимальное время
COMBINA TION COOKING
приготовления 99 мин. 99 с.
Кнопка COMBINA TION 1&2
30% time for microwave cooking.
55% time for microwave cooking.
Нажмите для установки времени комбинированного
70% time for grill cooking.
45% time for grill cooking.
Use for fish, potatoes or au gratin.
Use for pudding omelets, baked potatoes, and
Кнопка WEIGHT DEFROST
Suppose you want to set the oven to COMBI
Нажмите для разморозки одного из 3х видов
NA TION 2 for 25 minutes.
замороженного продукта: мяса, птицы,
Step: 1. Touch COMBINA TION 2 pad.
морепродуктов. При выборе категории и веса
продукта, время размораживания и уровень
2. Touch number pad 2 and 5 times.
мощности устанавливаются автоматически.
3. Touch ST ART pad.
Кнопка JET DEFROST
The oven has the ability to be pr ogr ammed to do sever al consecutive functions.
Предназначена для размораживания продуктов по
заданному времени. Процесс разморозки
Suppose you want set the following cooking pr ogr am:
начинается с высокого уровня мощности, затем
постепенно автоматически снижаясь. При этом на
2. Microwave and power level cooking;
дисплее будет показан индикатор в течении всего
3. Grill cooking.
Step: 1. Touch CANCEL pad.
2. Input jet defrost progr am.
Нажмите для выбора одной из 4х заданных
3. Input microwave and power level cooking progr am.
программ микроволнового приготовления пищи по
4. Touch MEMORY pad.
5. Input grill cooking progr am.
6. Touch ST ART pad.
NOTE: JET DEFROST and WEIGHT DEFROST can only be selected befor e the cooking stage in a
Используйте для установки уровня мощности. Чтобы проверить заданный уровень
progr am. It can not be selected between or after stage1 or stage 2.
мощности во время процесса приготовления пищи, достаточно просто нажать кнопку
The respective lights will come on to indicate which stage the oven is oper ating in. After
total time has elapsed, 3 beeps sound.
1658.qxd 06.06.03 17:50 Page 16
РУССКИЙ
ENGLISH
Печь не предназначена для промышленного или лабораторного использования.
3. Не допускается пользование печью при отсутствии пищи внутри. Это может привести к
Step: 1. Touch MICRO pad.
2. Use number pads to input needed time.
4. Не используйте прибор, если повреждены вилка или шнур.
3. Touch POWER pad 6 times and the display will show «0».
5. Как и в отношении других электроприборов, необходим строгий контроль за детьми, при
эксплуатации ими печи.
4. Touch ST ART pad.
6. Для того, чтобы снизить риск возгорания внутри печи, придерживайтесь следующих
NOTE: Use for timing things done outside the oven. Thr ee beeps will sound at the end of the
elapsed time. The oven light and cooling fan will turn on while the time is counting down
а) Не пережаривайте пищу . Внимательно следите за прибором при
but there is no microwave present.
использовании бумажных, пластиковых или других материалов, ускоряющих приготовление
SETTING «SAFETY LOCK»
б) Снимите закрепляющую проволоку с бумажных и пластиковых пакетов перед тем, как
поместить их внутрь.
T o set the SAFETY LOCK.
в) В случае возгорания материалов в печи не открывайте дверцу , а выключите прибор,
Step: 1. T ouch CANCEL pad.
отсоедините его от розетки.
2. T ouch pads 10 MIN and 1 SEC at the same time. A beep sounds and LOCK indicator lights.
г) Не храните продукты внутри микроволновой печи.
T o cancel the SAFETY LOCK Touch pads 10 MIN and 1 SEC at the same time.
7. Жидкости и другая пища, предназначенные для подогревания, должны быть помещены в
A beep will sound and the child lock indicator light will go out.
плотно закрытую посуду .
NOTE: Y ou can not operate the oven while the child lock is set.
8. При нагревании напитков в микроволновой печи поверхность посуды нагревается.
Аккуратно вынимайте посуду , избегая ожога.
9. Не жарь те пищу в микроволновой печи. Г орячее масло может повредить поверхность.
T O ST OP THE OVEN WHILE THE OVEN IS OPERA TING
10. Яйца не должны готовиться в скорлупе; желтки так же, как и куриную печень, помидоры
Open the door . Y ou can r estart the oven by closing the door and touching ST ART pad.Oven stops
и картофель нужно протыкать.
oper ating when door is opened.
11. Другие виды пищи с кожицей, например, сосиски, также нужно протыкать перед
CLEANING AND CARE
12. Кухонная посуда может сильно нагреваться в микроволновой печи. Используйте
1. T urn off the oven and remove the power plug from the wall socket before cleaning.
кухонные прихватки, чтобы извлечь посуду из прибора.
2. Keep the inside of the oven clean. When food splatters or spilled liquids adher e to oven walls, wipe
13. Используйте только специально предназначенную для микроволновой печи кухонную
with a damp cloth. Mild detergent may be used if the oven gets very dirty . Avoid the use of spray and
other harsh cleaners as they may stain, streak or dull the door surface.
Т ест: поместите пустую посуду в микроволновую печь, установленную на самую большую
3. The outside surfaces should be cleaned with a damp cloth. T o prevent damage to the oper ating
степень нагрева 60 сек. Если посуда сильно нагреется, то ее использовать не
parts inside the oven, water should not be allowed to seep into the ventilation openings.
4. Wipe the door and window on both sides, the door seals and adjacent parts fr equently with a damp
cloth to r emove any spills or spatters. Do not use abr asive cleaner .
ПОСУДА ДЛЯ МИКРОВОЛНОВОЙ ПЕЧИ
5. Do not allow the control panel to become wet. Clean with a soft, damp cloth. When cleaning the
Для использования в микроволновой печи годится практически любая посуда из материала,
control panel, leave oven door open to prevent oven from accidentally turning on.
не содержащего металлические элементы: из стекла, стеклокерамики, фарфора и г лины.
6. If steam accumulates inside or around the outside of the oven door , wipe with a soft cloth. This
Микроволны отражаются от металлической посуды и поэтому не достигают пищи.
may occur when the microwave oven is operated under high humidity condition. And it is normal.
Стекло, фарфор, картон и керамика обеспечивают быстрое проникновение
7. It is occasionally necessary to r emove the glass tray for cleaning. Wash the tray in warm sudsy
water or in a dishwasher .
При использовании пластмассовой посуды следует помнить о том, что некоторые изделия
8. The r oller ring and oven floor should be cleaned r egularly to avoid excessive noise. Simply wipe
из пластиков могут деформироваться в СВЧпечи.
the bottom surface of the oven with mild detergent. The roller ring may be washed in mild sudsy
Представленная ниже таблица поможет Вам при выборе посуды:
water or dishwasher . When r emoving the roller ring from cavity floor for cleaning, be sure to r eplace
in the proper position.
Power Consumption: 230 V ~ 50 Hz, 1200 W (Microwave)
Oper ation Frequency: 2450 MHz
Oven Capacity: 20 Litr es
Cooking Uniformity: T urntable System 270mm>
Net Weight: Approx 15.1 kg
SERVICE LIFE OF THE MICROWA VE OVEN NOT LESS THAN 5 YEARS
1658.qxd 06.06.03 17:50 Page 18
Vitek VT-1687 LACERTA: инструкция

Инструкция к Микроволновой Печи Vitek VT-1687 LACERTA
VT1 68 7 MA NU AL INS TRUCTION 3 12 22 33 45 55 64 73 82 90 10 0 11 0 www .vitekaus.com
Vt-1687im.qxd 07.06.2006 17:53 Page 1
Vt-1687im.qxd 07.06.2006 17:53 Page 2

ENGLISH
MICROWAVE OVEN Plea se acquaint yourself with these instructions befor e using your micr owave oven. If these instructions ar e strictly adhered to , your microwave oven will serve you troublefr ee for many years. Stor e these instructions in an ea sily accessible location PRECA UTIONS, WHICH MUS T BE FOLLOWED IN ORDER T O MINIMIZE THE RISK OF MICROWAVE ENERGY EXPO S URE 1. Do not attempt to use the micr owave oven with the door open a s you will risk expo sure to harmful micr owave energy . It is very important that you do not damage the internal latches and do or blocking mechanism. 2. Do not pla ce for eign objects between the door and the fr ont of the microwave oven and do not allow fo od or cleaning liquid r emnants to bu ild up on the screening grill or on the inside of the do or . 3. Do not use the micr owave oven if it is damaged or malfunctioning. It is especially important that the do or always be clo sed and that the following parts ar e not damaged: • door (bent) • hinges and latches (br oken or weakened) • scr eening grill on the inside of the door IMPORT ANT S AFE TY INSTRUCTIONS WARNING: While the microwave oven is oper ating in combination mode (MICROWA VE + GRILL) or being oper ated by childr en, an adult should always be pr esent to super vise in order to pr event the children from burning themselves. WARNING: Do not u se the microwave oven if the scr eening grill on the door is damaged. WARNING: Repairing a micr owave oven always pr esents danger to a ny pers on conducting the r epairs if it is neces sary to remove the metal housing that pr ovides protections fr om microwave r adiation. Do not r epair the microwave oven yourself. WARNING: Do not for get to open products pa ckaged in hermetic or vacu um packaging befor e he ating or co oking. Otherwise, pressur e could grow within the package a nd cause it to explode, regar dless of whether or not the food wa s prepar ed earlier . WARNING: Childr en may only use the micr owave oven by themselves after they have been acquainted with these instructions and u nderstand the da ngers a ss ociated with operating a micr owave oven. • Use only microwaves afe dishes. Do not use metallic dishes in the micr owave oven a s microwaves r eflected of f the dish may ca use sparks and fir e. • In order to avo id overheating and burning food, consta ntly super vise the micr owave’s operation if you ar e he at ing food in dispo sable pla stic, paper or other similar containers or if the oven is heating only a small amo unt of food. • When heating any kind of liquid (water , coffee, milk, etc.), keep in mind that it can suddenly start to boil and spla sh on your hands while you ar e removing it from the oven. T o avoid this, place a heat resista nt pla stic spoon or gla ss mixer in the container a nd stir the liquid befor e removing it fr om the oven. • Infant feeding bottles a nd jars of baby fo od should be he ating without lids or nipples. Their contents should be mixed or periodically shaken. T est the temper atur e of the food befor e feeding in order to pr event burns. Important information • ALWA YS check to make sure the fo od is not too hot befor e giving it to a child. We recommend shaking the bottle or jar to make sur e the he at is distributed evenly throughout the volume of the container . • Do not co ok an egg in its shell or r eheat an egg in its shell in MICROWA VE mode a s they can br e ak fr om the inter nal pr essure. SAFET Y MEA S URE S 1. Install the oven on a flat, stable surface. Choo se a place that will not be a ccessible to small childr en. 2. Install the oven s o that the distance between the wall and the ba ck of the oven is no less than 78 cm a nd the fr ee space above the micr owave is no less tha n 30 cm. 3. The microwave do or is equipped with a blocking system that turns off the power when it is open. Do not make changes to the oper ation of the door blocking mechanism. 4. Do not turn on the micr owave while empty; operating the oven with n o food inside ca n le ad to malfunction. 5. Pr eparing foods with extr emely small moistur e contents can lead to burning and fir e. If a fire occur s: • Do not open the do or . • T urn of f the microwave oven a nd disconnect the plug from the electrical outlet. 6. When pr eparing bacon, do not pla ce it directly on the gla ss tr ay; localized overheating of the gla ss tra y can ca use it to cra ck. 3
Vt-1687im.qxd 07.06.2006 17:53 Page 3

ENGLISH
7. Do not heat liquids in container s with narrow openings. 8. Do not attempt to heat products to a welldone state. 9. Do not use the micr owave for canning a nd preserving food beca use ther e is no wa y of knowing if the contents of the jar r e ached bo iling temperatur e. 1 0. In order to avo id prolonged r apid boiling of liqu id foods and drinks, a nd also to pr event burns, we recommend stir ring the product befor e and in the middle of the cooking pr ocess. T o do this, start cooking, wait a while, r emove the dish from the oven a nd stir , then place it back in the oven to continue the co oking process. 1 1. Cle a n the microwave oven r egularly . Irregular car e for your oven can lead to poor outward appeara nce, nega tively affects its operating ability , and als o can le ad to da nger during further exploitation. Rules that sho uld always be r emembered: 1. Do n ot exceed product co oking times in the microwave oven. Alwa ys monitor the cooking pr ocess when using dishes made from paper , pla stic and other flammable materials. 2. Never u se the microwave oven to stor e things. Never stor e flammable materials and food in the micr owave like br e ad, cookies, paper pa ckaging, etc., because during lightning storms, the micr owave oven can turn on by itself. 3. Metal ties and wire ha ndles must be r emoved from paper a nd pla stic bags and containers befor e placing them into the microwave oven. 4. The microwave oven should be properly gr ounded. Only connect the microwave oven to a n electrical o utlet that is properly gr ounded. 5. Some fo od items, like eggs in their shells, liquid or har d fats, and als o hermetically se aled jars a nd se aled gla ss container s can be explo sive and should not be pla ced in your microwave oven. 7. Use your microwave oven exclusively for the purpo ses for which it wa s designed and in strict adherence to the instructions explained her ein. 8. The microwave oven in designed exclusively for heating and pr eparing food a nd is not designed for labor ator y or industrial use. 8. P ay special attention when childr en are u sing the microwave oven. 9. Do not u se the microwave oven if the power cor d or plug is damaged, or if the oven ha s been damaged or dropped. 1 0. Repair of the microwave oven should only be conducted by qualified specialists at an authorized service center . 1 1. Do not block the ventilation openings on the micr owave oven’s housing. 1 2. Do not store or u se the microwave oven outdoor s. 1 3. Do not u se the microwave oven near water , immediately ne ar kitchen sinks, in damp ba sements or directly near swimming pools. 1 4. Do not submerse the power cor d and plug in water . 1 5. Avoid allowing the power cord a nd plug to come into contact with hot surfaces. 1 6. Do not allow the power cord to ha ng off the edge of the table or co unter . 1 7. When cleaning the door a nd internal surfaces of the microwave oven, alwa ys use a s oft, nonabr a sive cleanser on a sponge or s oft cloth. CA UTION Injury due to electric shock. T ouching the elements of the electrical circuits inside the micr owave oven can le ad to serious tr auma a nd injur y fr om electric shock. Do not take apart the microwave oven y ourself. Grounding the Micr owave Oven The microwave oven should be pr operly grounded. In ca se of any kind of shortcircuit, gr o unding r educes the risk of electric shock, a s the current will flow through the gr ound wire. The microwave oven u ses a power cord with gr ound wire a nd a grounded plug. The plug should be connected to an electrical outlet that also ha s a ground conta ct. WARNING: Connecting a grounded plug to a n ungrounded outlet can lead to electric shock. Consult with a qualified electrician if you do not under stand these gr ounding instructions or if you are n ot sure that the microwave oven is pr operly grounded. • In order to avo id confusion, the microwave oven is equ ipped with a short power cord. • If an extension cor d is necessary , only use a 3wire extensions cor d with ground conta cts on the power plug and outlet(s). • The sectional markings on the microwave oven’s power cor d should match tho se on the extension cord. • The extension cord should n ot hang off the edge of the table where childr en can pull on it; it should be placed wher e it will not be walked on. 4
Vt-1687im.qxd 07.06.2006 17:53 Page 4
ENGLISH
Dishes for microwave ovens CA UTION! • Tightly sealed containers heated in a microwave ca n be explosive. • Sealed containers should be opened and pla stic bags should be poked a few times with a fork in order to allow steam to escape before being pla ced in the microwave oven. • If you ar e unsure about using a certain dish in the micr owave oven, then conduct a test. Checking dishes before us ing them in the microwave • Place the dish in the co oking chamber of the oven (a plate, for example) and pla ce a gla ss cup of water in the center of the dish. • Set the microwave to maximum power a nd heat for no more tha n one minute. • Car efully touch the dish you are testing: if it heated up and the water in the cup is cold, than the dish should n ot be used in the micr owave. • Avoid testing dishes for mor e than one minute. Materials you can us e in micr owave oven Utensils Remarks Aluminum foil Shielding only . Small smooth pieces can be u sed to cover thin parts of me at or poultr y to pr event overco oking. Arcing ca n occur if foil is too clo se to oven walls. The foil should be at lea st 1 inch (2.5cm) away from oven walls. Br owning dish Follow ma nufactur er’s instructions. The bottom of browning dish mu st be at the turntable to br e ak. Dinner war e Microwaves afe only . Follow manufactur er’s instructions. Do not use cr acked or chipped dishes. Glass jars Always r emove lid. Use only to he at food until ju st warm. Most gla ss jars ar e not he at r esist ant a nd may br e ak. Glassware Heatresistant oven gla sswar e only . Make sure ther e is no metallic trim. Do not u se cra cked or chipped dishes. Oven cooking Follow ma nufactur er’s instructions. Do not clo se with metal tie. Make slits to bags allow steam to escape. P aper plates Use for short term cooking/warming only . Do not leave oven unattended while and cups cooking. P aper towels Use to cover food for r ehe ating and abs orbing fat. Use with supervision and only for short term cooking. P ar chment paper Use a s a cover to prevent splattering or a wr ap for ste aming. Plastic Microwaves afe only . Follow the manufactur er’s instructions. Should be labeled «Microwave Safe». Some pla stic containers s often a s the food inside gets hot. «Boiling bags» and tightly clo sed pla stic bags should be slit, pierced or vented a s dir ected by pack age. Plastic wrap Microwaves afe only . Use to cover food during cooking to r etain moistur e. Do not allow pla stic wrap to touch food. Thermometers Microwaves afe only (me at and ca ndy thermometers). Wax paper Use a s a cover to prevent splattering and r etain moistur e. Materials to be avoided in micr owave oven Utensils Remarks Aluminum tra y May ca use arcing. T ra nsfer food into microwavesafe dish. Fo od car ton with May ca use arcing. T ra nsfer food into microwavesafe dish. metal handle Metal or metal Metal shields the food fr om microwave ener gy . Metal trim may cause ar cing. trimmed utensils Metal twist tie s May cau se arcing a nd could cause a fir e in the oven. P aper bags May ca use a fir e in the oven. Plastic foam Pla stic fo am may melt or contaminate the liqu id inside when expo sed to high temperatur e. Wood Wood will dry out when used in the microwave oven a nd may split or cr ack. Description A . Contr ol panel B. Rotating s ocket C. Rollerring 5
Vt-1687im.qxd 07.06.2006 17:53 Page 5

ENGLISH
D. Gla ss tra y E. Looking window F . Micr owave sour ce G. Locks with childlock system H. Screen for grill. Use only in «Grill» mode. J. Grill heating element Contr ol Pa nel 1. Display The display shows the curr ent time, cooking time information, power levels and oper ating mode pictograms. 2. «Micr o» (Microwave) button Is used to select the micr owave power level. Setting the power is done in the following order: HI(1 00%), 80%, 60%, 40%, 20%, 0%. 3. GRIL button Pr ess to activate the grill mode. 4. COMB.1 button A ctivates the fir st combined cooking mode. 5. COMB.2 button A ctivates the second combined co oking mode. 6. CLO CK but ton T o select 1 2 or 24 hours time mode, to set the time. 7 . WE I.ADJ. button (Weight Adjust) Pr ess to select the weight of the product to be co oked or defro sted. 8. CANCEL/S TOP button. Pr ess to cancel pr eviously set power level, cooking pr ograms a nd defro st time. Note: ST OP/CA NCEL button doesn’t ca ncel the current time. 9. TIME/MENU knob By turning the knob clockwise, the co oking time is selected. By turning the knob counterclockwise, one of the ten automatic co oking progr ams is selected. Pr essing the knob starts cooking or defro sting process, a ccording to the selected pr ogram. Display 1. Timer mode pictogr am. 2. Blinking hours a nd minutes separator . 3. Defro st mode pictogram. 4. Microwave co oking mode pictogram. 5. Grill mode pictogram. 6. Combination cooking mode 1 pictogr am. 7. Combination cooking mode 2 pictogr am. 8. Curr ent time pictogram. 9. Icon for 3 su ccessive stages, progr ammed by the user . 1 0. Food we ight pictogram. 1 1. Childlock mode pictogram. 1 2. A utomatic cooking pictogr am. 1 3. «Display decor ation elements» icon. A ssembling the micr owave oven Remove the packing material a nd access ories from the co oking chamber of the oven. Inspect the microwave oven for any deformities. P ay special attention to the operation of the oven do or . If any defects ar e found, do not install the oven and do n o turn it on. 6
Vt-1687im.qxd 07.06.2006 17:53 Page 6

ENGLISH
Pr otective covering Housing: Remove the protective film (if a ny) from the micr owave housing. Do not r emove the lightgrey micaceous plate fr om the inside of the co oking chamber; it protects the mag netr on. Installing the glass tray 1. Install the ba se for the rotating tra y (B) into the opening located in the floor of the cooking chamber . 2. Install the rolling ring (C) onto the flo or of the cooking chamber . 3. Car efully install the gla ss tra y (D), aligning its lip with the gro oves on the ba se. Never install the gla ss tra y upside down. • Do not block the r otation of the gla ss tray during the co oking process. • During the cooking pr ocess, always use the gla ss tra y , rolling ring and tr ay ba se. • Fo od and co oking dishes must always be pla ced only on the gla ss tra y . • The gla ss tra y may r otate clockwise or counterclockwise. This is normal. • Replace the tr ay immediately if it becomes cra cked or chipped. Installation • Befor e connecting the microwave oven, make sur e that the oper ating voltage and power usage matches the parameter s of your electrical system. Connect the microwave oven to a grounded electrical outlet. • Install the oven on a flat, stable surface. Cho o se a location that will not be accessible to small childr en. • Install the oven s o that the distance between the wall and the ba ck of the oven is no less tha n 78 cm and the fr ee space above the micr owave is no less tha n 30 cm. • Do not r emove the legs from the bottom of the microwave oven. • Do not block the ventilation openings on the micr owave oven’s housing. • The microwave oven should be installed awa y from televisions a nd radio s in order to pr event static interference of radio a nd television signals. WARNING: Do not install the micr owave oven on heating surf aces (kitchen stoves) or other s o ur ce s of heat waves. If the micr owave oven malfunctio ns due to user err or , the warra nt y for free service and repa ir is voided. While operating, the top surf ace of the micr owave oven and heat up s ignificantly; avo id to uching hot sur fa ces of the oven with bare skin in or der to prevent burns. Using the oven A udible signal Each time when pr essing buttons on the control panel, y ou will he ar a single s ound signal. Double sound signal means input error . Check attentively your input and try again. Setting the current time Example: In order to set the curr ent time on 16 hour s 30 minutes: 1. Pr ess and hold the CLOCK button for about 3 seconds, a signal will be heard a nd the display will show: Hr 24( 24 hours time displa y mode). Note: Pr essing the CLOCK button again toggles the time mode 1 2/24 hours. 2. T urn the TIME/MENU knob and set hour s value to 1 6. 3. Pr ess the CLOCK button to confirm. 4. T urn the TIME/MENU knob and set the minutes to 30, the displa y will show the time: 1 6:30. 5. Pr ess the «Clock» button to confirm. The display will show the set time; the (8) pictogr am and the colon (2) will blink. Note: if you do not complete the time setting process then, after 30 seconds, the micr owave will «be ep» and the dis pla y will return to its initial setting. T o see the current time during the cooking process, just press the «Clock» button and the current time will be dis pla yed for 5 seconds. Cooking in the micr owave oven T o activate the micr owave cooking mode, pr ess the MICRO button several times to select the desir ed power level, and then, by turning the TIME/MENU kn ob counterclockwise, select the desir ed cooking time. Maximum cooking time is 95 minutes. 7
Vt-1687im.qxd 07.06.2006 17:53 Page 7
ENGLISH
Choo se the power level: » MICRO » button pushes Power level 1 time Hi(1 00%) 2 times 80% 3 times 60% 4 times 40% 5 times 20% 6 times (timer) 0 Example: to cook s ome food for 1 0 minutes at 60% microwave power level. 1. Pr ess the MICRO button3 times, the display will show the selected power level (60%) a nd icon 4 will light up. 2. T urn the TIME/MENU knob clockwise and set the time to «1 0:00». 3. Pr ess the TIME/MENU knob to start cooking. During the cooking, the r emaining cooking time is shown on the display a nd the icon 4 fla shes. Grill Is used to co ok roa sted crisp pieces of meat, fish, po ultry , potatoes. In this mode, the heat from the quar tz heat ing element is distributed along the entir e oven cavity . Maximum cooking time is 95 minutes. Example: if you need to turn on grill for 1 2 minutes. 1. Pr ess GRILL button once, the icon 5 will appe ar on the display . 2. T urn the TIME/MENU knob clockwise a nd set the time to «1 2:00». 3. Pr ess the TIME/MENU knob to start cooking. While in the grill mode, the display shows the r emaining cooking time and the icon 5 is fla shing. Combi cooking mode The Combi cooking mode combines micr owave and grill co oking for the best result. COMB.1 30% time is micr owave cooking + 70% grill cooking, (to co ok fish, potato). COMB.2 55% time is micr owave cooking +45% grill cooking, (to co ok omelet, baked potatoes, poultry). Maximum cooking time is 95 minutes. Example: to activate the C OMB.1 mode for 25 minutes: 1. Pr ess the COMB.1 button two times, the icons (4, 5, 6) will light up. 2. T urn the TIME/MENU knob clockwise a nd set the time to «25:00». 3. Pr ess the TIME/MENU knob to start cooking. While in the combined cooking mode, the displa y shows the rema ining cooking time a nd icons (4, 5, 6) light up. Depending on what cooking mode is selected curr ently , icon (4) or (5) will fla sh. Example: to activate the C OMB.2 mode for 1 2 minutes: 1. Pr ess the COMB.2 button, the icons (4, 5, 7) will light up. 2. T urn the TIME/MENU knob clockwise a nd set the time to «1 2:00». 3. Pr ess the TIME/MENU knob to start cooking. While in the combined cooking mode, the displa y shows the rema ining cooking time a nd icons (4, 5, 7) light up. A utomatic cooking of pr oducts In the automatic co oking mode you don’t have to set the cooking power a nd time, you just need to select the product type a nd indicate its weight. T o do that, turn the TIME/MENU knob counterclockwise to select the pr oduct categor y , and then set its weight by pr essing the WEI.ADJ button the needed number of times. P ress the TIME/MENU kn ob to start cooking. You may need to turn over the pr oduct in the middle of cooking, to co ok the product evenly . Example: to cook 400 g of fish. 1. T urn the TIME/MENU knob counter clockwise, until the automatic co oking progr am number is displayed (in this ca se 06), and icon 1 2 fla shes. 2. Pr ess the WEI.ADJ. button 3 times to set the weight on 400 g. 3. Pr ess the TIME/MENU knob to start cooking. In the automatic co oking mode the display shows the co oking time and icon (1 2), and depending on what cooking mode is curr ently selected, icon (4) or (5) will fla sh. 8
Vt-1687im.qxd 07.06.2006 17:53 Page 8
ENGLISH
A utomatic cooking menu Pr ogram # T ype of Food Fo od weight (grams) 1 Coffee/Soup (cup) 1 2 3 2 Rice 10 0 200 400 600 800 1 000 3 Spaghetti 10 0 200 300 4 Potato 15 0 300 450 600 5 A uto reheat 10 0 200 300 400 500 600 700 800 10 0 0 6 Fish 10 0 200 400 600 800 1 000 7 Whole chicken 800 10 0 0 1200 1 300 1 400 8 Beef/Veal 300 500 800 1 000 12 0 0 1 300 9 Beef on a spit 10 0 200 300 400 500 600 700 The r esults of automatic food pr eparation depend on the weight a nd form of the food, a nd also on the fo od’s po sition on the gla ss tray . In a ny ca se, if you think that the food pr eparation is unsatisfa ctory , ple a se increa se or decrea se the weight of the fo od. A utomatic defrosting of pr oducts The oven supports the automatic defro st function. Defro st time and power is set automatically , you only have to set the product we ight. Example: to defro st 60 g of shrimps. 1. Put the shrimps into the oven cavity . 2. T urn the TIME/MENU knob counterclockwise, until the a utomatic defro st program number is displa yed (in this ca se 1 0), and icon 3 fla shes. 3. Pr ess the WEI.ADJ. button 6 times to set the we ight on 600 g. 4. Pr ess the TIME/MENU button to start defro sting, icon (3) will be shown on the display a nd icon (4) will fla sh. During the defro sting, the display shows the r emaining defro st time, icon (3). Quick start This function allows to quickly turn on the oven to warm or co ok products at full power . T urn the TIME/MENU button clockwise to select the cooking time and pr ess on it the oven will start cooking at full power . Example: to set the cooking time to 2 minutes. 1. 1. T urn the TIME/MENU knob clockwise until the display shows the desir ed time: 2:00. 2. 2. Pr ess the TIME/MENU knob to start cooking. 3. During the cooking, the r emaining cooking time is shown on the displa y and the icon (4) is fla shing. Note: maximum speed co oking time is 95 minutes. speed co oking setting interval from 1 0 sec to 5 min: 1 0 sec. from 5 min to 1 0 min. 30 sec. from 1 0 min to 30 min: 1 min. from 30 min to 95 min. 5 min. Timer mode Is used to issue a s ound signal over the set period of time. Example: to set the timer to 2 minutes. 1. Pr ess the MICRO button 6 times, the display will show the selected power level (00%) a nd icon 4 will light up. 2. T urn the TIME/MENU knob clockwise and set the time to «02:00». 3. Pr ess the TIME/MENU knob to start the timer . 4. In the timer mode, the display shows the r emaining cooking time a nd icon 4 is fla shing. In the timer mode, the display shows the r emaining cooking time and icon 2 is fla shing. 9
Vt-1687im.qxd 07.06.2006 17:53 Page 9

ENGLISH
Child lock T o prevent childr en from using the oven, you may set the child lock mode. P ress a nd hold the STOP/CA NCEL button for 3 seconds, the sound signal will be heard a nd icon (1 1) will light up. T o de a ctivate the Child Lock function, press a nd hold the Cancel/Stop button for 3 seconds, a s o und signal will be heard and the icon (1 1) will disappear Special Functi ons A uto Remind After the co oking or defro sting program is finished, four s ound signals will be he ar d, and they will be r epeated in each two minutes, until the oven door is open or the Stop/Cancel button is pr essed. If the time or mode setting operation is not completed, a s o und signal will be issued in 30 minutes and the displa y will r eturn into its original condition. Cooking in thr ee stage s You can pr ogram y our oven for 3 successive cooking stages. Example: you need to cook pr oducts for 35 minutes at the microwave power level of 80%, then a ctivate the COMB.1 mode for 20 minutes and r oa st the product in the grill mode for 1 5 minutes. 1. Pr ess the MICRO button 3 times, the display will show the selected power level (80%), the icon 4 will light up a nd icon (9) (1S the first stage of co oking). 2. T urn the TIME/MENU knob clockwise and set the time to «35:00». 3. Pr ess the COMB.1 button, the icons (4, 5, 6) will light up a nd icon (9) (2S second stage). 4. T urn the TIME/MENU knob clockwise and set the time to «20:00». 5. Pr ess the GRILL button, the icon (5) will light up and icon (9) (2S thir d stage) 6. T urn the TIME/MENU knob clockwise and set the time to «1 5:00». 7. Pr ess the TIME/MENU knob to start cooking. Depending on what cooking stage is curr ently engaged, the icon (9) will light, showing the cooking stage number (by decr e a se). During combined cooking modes, additional icon (6) or (7) is shown. Note: In nonpr ogrammed cooking mode s, in all cases the icon (9) 1S is shown. Note: In the standby mode and during all stages and cooking modes, «the decorative display eleme nts» will light up in turn (icon 1 2). Stopping the oven during cooking To stop the oven during cooking, y ou just have to open the oven door . To continue the cooking pr ocess, clo se the door a nd press the TIME/MENU kn ob. To ca ncel the cooking pr ogram, pr ess the Stop/Cancel button. Care a nd clea ning • T urn of f the oven a nd disconnect from electrical power befor e cle a ning. • Do not allow mo isture to conta ct the control pa nel. Clean it with a soft, lightly dampened paper towel. • Keep the oven’s cooking chamber clean. If pieces of fo od or liquid spr ays ar e left on the chamber walls, remove them with a damp paper towel. • A mild cleanser may be u sed if the chamber becomes exceptionally dirty . • Do not u se abra sive cleaning instruments or wire bru shes to cle an the inside or outside of the oven. Make sur e that no water or cleanser gets in a ny of the ventilation or ste am r ele a se openings on the top of the microwave oven. • Do not u se ammoniaba sed cleansers. • The outer surfaces should be cle a ned with a damp paper towel. • The oven door should alwa ys be cle a n. Do not allow crumbs of food to bu ildup between the door and the fr ont panel of the oven; this ma y prevent n ormal clo sure of the do or . • Clean the ventilation openings on top of the oven housing r egularly keep them free of du st and dirt. • Regularly r emove and wa sh the gla ss tray a nd its ba se wipe the oven chamber floor clean. • Wa sh the gla ss tra y and rotating drive mecha nism in water with a neutral s oap solution. These parts are dishwa sh er safe. • Do not submer se the gla ss tray in cold water if it is still hot: the sudden dr op in temperatur e can cau se the gla ss tra y to break. 10
Vt-1687im.qxd 07.06.2006 17:53 Page 10
ENGLISH
Eliminating malfunctio ns Malfunctio n Possible causes Method of elimination The power plug is not firmly connected to Remove the power plug from the outlet. the electrical outlet Wait 1 0 seconds and then repla ce The oven will not turn on T ry plugging another electrical device into Pr oblem with power outlet the outlet to test it The oven will not heat The door is n ot closed firmly Clo se the door firmly Remove the gla ss tray a nd roller ring. Wa sh When the oven is operating, the r otating The roller ring or the co oking chamber the roller ring a nd the cooking chamber gla ss tray makes str ange no ises floor is dirty floor Normal operati on Static in television and r adio signals can occur while the oven is The microwave oven cr eates static in television and radio signals. operating. Similar static is cr e ated by small electrical devices like mixers, va cu um cle aner s and electrical fa ns. This is a normal occurrence. If the oven is set to a low power level, the light in the cooking The oven light is dim. chamber may als o be low . This is a normal occurr ence. During the cooking pr ocess, ste am is r eleased fr om the food. Steam collects on the door and hot air comes out of the ventila Mo st of the ste am is r eleased thr ough the ventilation openings, tion openings. but some ca n collect on the inside of the door . This is a normal occurrence. T urning on the microwave oven for a short period of time while The microwave oven wa s turned on without food inside. empty will not cau se any harm. Always make sur e there is food in the oven before starting it. T echnical Characteristics Power r equirements: 220V ~50Hz Power u sage in microwave mode: 1 200W Nominal output power in microwave mode: 800 W Power u sage in grill mode: 1 000W Operating fr equency: 2450MHz External dimensions: 295mm (H) x 458mm (W) x 390mm (D) Oven volume: 20 l Gla ss tray: 3 1 4mm Weight: 1 4.1kg The manufa cturer reserve s the right to change the char acteristics of the device without prior warning. Service life of the unit not le ss than 5 ye ars Guar antee Details r egarding guar antee conditions can be obta ined from the dealer from whom the appliance wa s pur cha sed. The bill of sale or r eceipt must be pr oduced when making any cla im under the terms of this guarantee. This product co nforms to the EMCRequirements as laid down by the Council Dire ctiv e 89/336/EEC and to the La w Voltage Regulation (7 3/23 EEC) 11