Создание загружаемого установщика для macOS
В качестве загрузочного диска для установки операционной системы на компьютер Mac можно использовать внешний диск или дополнительный том.
Эти расширенные инструкции предназначены в первую очередь для системных администраторов и других опытных пользователей, которые умеют вводить команды в приложении «Терминал».
Для обновления macOS или переустановки macOS не требуется загружаемый установщик, но он может быть полезен, если нужно установить ОС на несколько компьютеров, не загружая установщик заново каждый раз, или если не удается установить совместимую ОС macOS из приложения Finder или раздела восстановления macOS.
Что нужно для создания загружаемого установщика
- Флеш-накопитель USB или другой дополнительный том, на котором есть не менее 14 ГБ свободного пространства, отформатированный в Mac OS Extended
- Полный установщик macOS
Для загрузки полного установщика на компьютере Mac должна быть установлена ОС macOS High Sierra или более поздней версии, последняя версия ОС macOS Sierra или последняя версия OS X El Capitan. Кроме того, компьютер Mac должен быть совместим с операционной системой macOS, которую вы загружаете. Корпоративные администраторы: используйте сервер компании Apple, а не сервер обновления, размещенный в локальной сети.
Создание загружаемого установщика с помощью приложения «Терминал»
- Подключите к компьютеру Mac флеш-накопитель USB.
- Откройте приложение «Терминал» в подпапке «Утилиты» папки «Программы».
- Введите или вставьте одну из приведенных ниже команд Для каждой команды предполагается, что установщик находится в папке «Программы», а имя MyVolume обозначает флеш-накопитель USB или другой используемый вами том. Если у тома другое имя, замените MyVolume в команде на имя вашего тома.
- При появлении запроса введите пароль администратора. Вводимые символы не отображаются в приложении «Терминал». Затем нажмите клавишу «Ввод».
- При появлении запроса нажмите клавишу Y, чтобы подтвердить удаление всех данных на томе, затем клавишу «Ввод». Приложение «Терминал» показывает прогресс по мере стирания тома.
- После стирания тома может быть отображено предупреждение о том, что приложению «Терминал» требуется доступ к файлам на съемном томе. Нажмите «OK», чтобы продолжить копирование.
- Когда приложение «Терминал» сообщит о завершении процесса, имя тома будет совпадать с именем загруженного установщика, например «Установка macOS Sonoma». После этого можно закрыть приложение «Терминал» и извлечь том.
Команды
В зависимости от того, какую версию macOS вы загрузили, введите одну из следующих команд в приложении «Терминал» в соответствии с приведенными выше инструкциями.
- Не забудьте заменить MyVolume в команде на имя вашего тома.
- Если ваш компьютер Mac работает под управлением ОС macOS Sierra или более ранней версии, добавьте к команде аргумент —applicationpath , а затем — путь к соответствующему установщику, аналогичный тому, который отображается в приведенной ниже команде для El Capitan.
Sonoma
sudo /Applications/Install\ macOS\ Sonoma.app/Contents/Resources/createinstallmedia —volume /Volumes/MyVolume
Ventura
sudo /Applications/Install\ macOS\ Ventura.app/Contents/Resources/createinstallmedia —volume /Volumes/MyVolume
Monterey
sudo /Applications/Install\ macOS\ Monterey.app/Contents/Resources/createinstallmedia —volume /Volumes/MyVolume
Big Sur
sudo /Applications/Install\ macOS\ Big\ Sur.app/Contents/Resources/createinstallmedia —volume /Volumes/MyVolume
Catalina
sudo /Applications/Install\ macOS\ Catalina.app/Contents/Resources/createinstallmedia —volume /Volumes/MyVolume
Mojave
sudo /Applications/Install\ macOS\ Mojave.app/Contents/Resources/createinstallmedia —volume /Volumes/MyVolume
High Sierra
sudo /Applications/Install\ macOS\ High\ Sierra.app/Contents/Resources/createinstallmedia —volume /Volumes/MyVolume
El Capitan
sudo /Applications/Install\ OS\ X\ El\ Capitan.app/Contents/Resources/createinstallmedia —volume /Volumes/MyVolume —applicationpath /Applications/Install\ OS\ X\ El\ Capitan.app
Использование загружаемого установщика
Убедитесь в том, что используете компьютер Mac с процессором Apple, а затем выполните следующие действия. Помните, что компьютер Mac, который вы запускаете с помощью загружаемого установщика, должен быть совместим с ОС macOS на загружаемом установщике. В противном случае при запуске может отобразиться перечеркнутый круг.
Mac с чипом Apple
- Подключите загружаемый установщик к компьютеру Mac, подключенному к Интернету и совместимому с устанавливаемой версией macOS. Загружаемый установщик не загружает macOS из Интернета, однако ему требуется интернет-подключение для получения прошивки и другой информации для конкретной модели Mac.
- Включите компьютер Mac и продолжайте удерживать кнопку питания, пока не отобразится окно параметров запуска, содержащее загрузочные тома.
- Выберите том, содержащий загружаемый установщик, затем нажмите «Продолжить».
- Когда откроется установщик macOS, следуйте инструкциям по установке на экране.
Любой другой компьютер Mac
- Подключите загружаемый установщик к компьютеру Mac, подключенному к Интернету и совместимому с устанавливаемой версией macOS. Загружаемый установщик не загружает macOS из Интернета, однако ему требуется интернет-подключение для получения прошивки и другой информации для конкретной модели Mac.
- Включите компьютер Mac, затем сразу же нажмите и удерживайте клавишу Option (Alt).
- Отпустите клавишу Option, когда увидите темный экран, показывающий загружаемые тома.
- Выберите том, содержащий загружаемый установщик. Затем щелкните стрелку на экране или нажмите клавишу «Ввод».
- Если вы используете компьютер Mac с чипом Apple T2 Security Chip и вам не удается запустить его с загружаемого установщика, убедитесь, что в утилите безопасной загрузки разрешена загрузка с внешних или съемных носителей.
- Если потребуется, выберите язык.
- Выберите «Установить macOS» (или «Установить OS X») в окне «Утилиты», затем нажмите кнопку «Продолжить» и следуйте инструкциям на экране.
Дополнительная информация
Для получения сведений о команде createinstallmedia и доступных аргументах убедитесь, что установщик macOS находится в папке «Программы», затем введите соответствующий путь в приложении «Терминал»:
/Applications/Install\ macOS\ Sonoma.app/Contents/Resources/createinstallmedia
/Applications/Install\ macOS\ Ventura.app/Contents/Resources/createinstallmedia
/Applications/Install\ macOS\ Monterey.app/Contents/Resources/createinstallmedia
/Applications/Install\ macOS\ Big\ Sur.app/Contents/Resources/createinstallmedia
/Applications/Install\ macOS\ Catalina.app/Contents/Resources/createinstallmedia
/Applications/Install\ macOS\ Mojave.app/Contents/Resources/createinstallmedia
/Applications/Install\ macOS\ High\ Sierra.app/Contents/Resources/createinstallmedia
/Applications/Install\ OS\ X\ El\ Capitan.app/Contents/Resources/createinstallmedia
Create a bootable installer for macOS
You can use an external drive or secondary volume as a startup disk from which to install the Mac operating system.
These advanced steps are primarily for system administrators and other experienced users who are familiar with entering commands in Terminal.
You don’t need a bootable installer to upgrade macOS or reinstall macOS, but it can be useful if you want to install macOS on multiple computers without downloading the installer each time, or you’re unable to install a compatible macOS from the Finder or macOS Recovery.
What you need to create a bootable installer
- A USB flash drive or other secondary volume with at least 14 GB of available storage, formatted as Mac OS Extended
- A full macOS installer
To download a full installer, your Mac must be using macOS High Sierra or later, the latest version of macOS Sierra or the latest version of OS X El Capitan. Your Mac must also be compatible with the macOS that you’re downloading. Enterprise administrators: download from Apple, not a locally hosted update server.
Use Terminal to create the bootable installer
- Plug the USB flash drive into your Mac.
- Open Terminal, which is in the Utilities folder of your Applications folder.
- Type or paste one of the commands below Each command assumes that the installer is in your Applications folder and MyVolume is the name of the USB flash drive or other volume you’re using. If the volume has a different name, replace MyVolume in the command with the name of your volume.
- When prompted, type your administrator password. Terminal doesn’t show any characters as you type. Then press Return.
- When prompted, type Y to confirm that you want to erase the volume, then press Return. Terminal displays the progress as the volume is being erased.
- After the volume has been erased, you may see an alert stating that Terminal would like to access files on a removable volume. Click OK to allow the copy to proceed.
- When Terminal says that it’s finished, the volume will have the same name as the installer you’ve downloaded, such as Install macOS Sonoma. You can now quit Terminal and eject the volume.
Commands
Depending on which macOS you downloaded, enter one of the following commands in Terminal as instructed above.
- Remember to replace MyVolume in the command with the name of your volume.
- If your Mac is using macOS Sierra or earlier, append —applicationpath to your command, followed by the appropriate installer path, similar to what is shown in the command below for El Capitan.
Sonoma
sudo /Applications/Install\ macOS\ Sonoma.app/Contents/Resources/createinstallmedia —volume /Volumes/MyVolume
Ventura
sudo /Applications/Install\ macOS\ Ventura.app/Contents/Resources/createinstallmedia —volume /Volumes/MyVolume
Monterey
sudo /Applications/Install\ macOS\ Monterey.app/Contents/Resources/createinstallmedia —volume /Volumes/MyVolume
Big Sur
sudo /Applications/Install\ macOS\ Big\ Sur.app/Contents/Resources/createinstallmedia —volume /Volumes/MyVolume
Catalina
sudo /Applications/Install\ macOS\ Catalina.app/Contents/Resources/createinstallmedia —volume /Volumes/MyVolume
Mojave
sudo /Applications/Install\ macOS\ Mojave.app/Contents/Resources/createinstallmedia —volume /Volumes/MyVolume
High Sierra
sudo /Applications/Install\ macOS\ High\ Sierra.app/Contents/Resources/createinstallmedia —volume /Volumes/MyVolume
El Capitan
sudo /Applications/Install\ OS\ X\ El\ Capitan.app/Contents/Resources/createinstallmedia —volume /Volumes/MyVolume —applicationpath /Applications/Install\ OS\ X\ El\ Capitan.app
Use the bootable installer
Determine whether you’re using a Mac with Apple silicon, then follow the appropriate steps. Remember that the Mac you’re starting up with the bootable installer must be compatible with the macOS on the bootable installer. If not, the Mac may start up to a circle with a line through it.
Mac with Apple silicon
- Plug the bootable installer into a Mac that is connected to the internet and compatible with the version of macOS you’re installing. A bootable installer doesn’t download macOS from the internet, but it does require an internet connection to get firmware and other information specific to the Mac model.
- Turn on the Mac and continue to hold the power button until you see the startup options window, which shows your bootable volumes.
- Select the volume containing the bootable installer, then click Continue.
- When the macOS installer opens, follow the onscreen installation instructions.
Any other Mac
- Plug the bootable installer into a Mac that is connected to the internet and compatible with the version of macOS you’re installing. A bootable installer doesn’t download macOS from the internet, but it does require an internet connection to get firmware and other information specific to the Mac model.
- Turn on your Mac, then immediately press and hold the Option (Alt) key.
- Release the Option key when you see a dark screen displaying your bootable volumes.
- Select the volume containing the bootable installer. Then, click the onscreen arrow or press Return.
- If you’re using a Mac with the Apple T2 Security Chip and you can’t start up from the bootable installer, make sure that Startup Security Utility is set to allow booting from external or removable media.
- Choose your language, if prompted.
- Select Install macOS (or Install OS X) from the Utilities window, then click Continue and follow the onscreen instructions.
Learn more
For information about the createinstallmedia command and the arguments you can use with it, make sure that the macOS installer is in your Applications folder, then enter the appropriate path in Terminal:
/Applications/Install\ macOS\ Sonoma.app/Contents/Resources/createinstallmedia
/Applications/Install\ macOS\ Ventura.app/Contents/Resources/createinstallmedia
/Applications/Install\ macOS\ Monterey.app/Contents/Resources/createinstallmedia
/Applications/Install\ macOS\ Big\ Sur.app/Contents/Resources/createinstallmedia
/Applications/Install\ macOS\ Catalina.app/Contents/Resources/createinstallmedia
/Applications/Install\ macOS\ Mojave.app/Contents/Resources/createinstallmedia
/Applications/Install\ macOS\ High\ Sierra.app/Contents/Resources/createinstallmedia
/Applications/Install\ OS\ X\ El\ Capitan.app/Contents/Resources/createinstallmedia
Create a bootable installer for macOS
You can use an external drive or secondary volume as a startup disk from which to install the Mac operating system.
These advanced steps are primarily for system administrators and other experienced users who are familiar with entering commands in Terminal.
You don’t need a bootable installer to upgrade macOS or reinstall macOS, but it can be useful if you want to install macOS on multiple computers without downloading the installer each time, or you’re unable to install a compatible macOS from the Finder or macOS Recovery.
What you need to create a bootable installer
- A USB flash drive or other secondary volume with at least 14GB of available storage, formatted as Mac OS Extended
- A full macOS installer
To download a full installer, your Mac must be using macOS High Sierra or later, the latest version of macOS Sierra, or the latest version of OS X El Capitan. Your Mac must also be compatible with the macOS that you’re downloading. Enterprise administrators: download from Apple, not a locally hosted update server.
Use Terminal to create the bootable installer
- Plug the USB flash drive into your Mac.
- Open Terminal, which is in the Utilities folder of your Applications folder.
- Type or paste one of the commands below into Terminal, then press Return to enter the command. Each command assumes that the installer is in your Applications folder, and MyVolume is the name of the USB flash drive or other volume you’re using. If the volume has a different name, replace MyVolume in the command with the name of your volume.
- When prompted, type your administrator password. Terminal doesn’t show any characters as you type. Then press Return.
- When prompted, type Y to confirm that you want to erase the volume, then press Return. Terminal shows the progress as the volume is erased.
- After the volume is erased, you may see an alert that Terminal would like to access files on a removable volume. Click OK to allow the copy to proceed.
- When Terminal says that it’s done, the volume will have the same name as the installer you downloaded, such as Install macOS Sonoma. You can now quit Terminal and eject the volume.
Commands
Depending on which macOS you downloaded, enter one of the following commands in Terminal as instructed above.
- Remember to replace MyVolume in the command with the name of your volume.
- If your Mac is using macOS Sierra or earlier, append —applicationpath to your command, followed by the appropriate installer path, similar to what is shown in the command below for El Capitan.
Sonoma
sudo /Applications/Install\ macOS\ Sonoma.app/Contents/Resources/createinstallmedia —volume /Volumes/MyVolume
Ventura
sudo /Applications/Install\ macOS\ Ventura.app/Contents/Resources/createinstallmedia —volume /Volumes/MyVolume
Monterey
sudo /Applications/Install\ macOS\ Monterey.app/Contents/Resources/createinstallmedia —volume /Volumes/MyVolume
Big Sur
sudo /Applications/Install\ macOS\ Big\ Sur.app/Contents/Resources/createinstallmedia —volume /Volumes/MyVolume
Catalina
sudo /Applications/Install\ macOS\ Catalina.app/Contents/Resources/createinstallmedia —volume /Volumes/MyVolume
Mojave
sudo /Applications/Install\ macOS\ Mojave.app/Contents/Resources/createinstallmedia —volume /Volumes/MyVolume
High Sierra
sudo /Applications/Install\ macOS\ High\ Sierra.app/Contents/Resources/createinstallmedia —volume /Volumes/MyVolume
El Capitan
sudo /Applications/Install\ OS\ X\ El\ Capitan.app/Contents/Resources/createinstallmedia —volume /Volumes/MyVolume —applicationpath /Applications/Install\ OS\ X\ El\ Capitan.app
Use the bootable installer
Determine whether you’re using a Mac with Apple silicon, then follow the appropriate steps. Remember that the Mac you’re starting up with the bootable installer must be compatible with the macOS on the bootable installer. If not, the Mac might start up to a circle with a line through it.
Mac with Apple silicon
- Plug the bootable installer into a Mac that is connected to the internet and compatible with the version of macOS you’re installing. A bootable installer doesn’t download macOS from the internet, but it does require an internet connection to get firmware and other information specific to the Mac model.
- Turn on the Mac and continue to hold the power button until you see the startup options window, which shows your bootable volumes.
- Select the volume containing the bootable installer, then click Continue.
- When the macOS installer opens, follow the onscreen installation instructions.
Any other Mac
- Plug the bootable installer into a Mac that is connected to the internet and compatible with the version of macOS you’re installing. A bootable installer doesn’t download macOS from the internet, but it does require an internet connection to get firmware and other information specific to the Mac model.
- Turn on your Mac, then immediately press and hold the Option (Alt) key.
- Release the Option key when you see a dark screen showing your bootable volumes.
- Select the volume containing the bootable installer. Then click the onscreen arrow or press Return.
- If you’re using a Mac with the Apple T2 Security Chip and you can’t start up from the bootable installer, make sure that Startup Security Utility is set to allow booting from external or removable media.
- Choose your language, if prompted.
- Select Install macOS (or Install OS X) from the Utilities window, then click Continue and follow the onscreen instructions.
Learn more
For information about the createinstallmedia command and the arguments you can use with it, make sure that the macOS installer is in your Applications folder, then enter the appropriate path in Terminal:
/Applications/Install\ macOS\ Sonoma.app/Contents/Resources/createinstallmedia
/Applications/Install\ macOS\ Ventura.app/Contents/Resources/createinstallmedia
/Applications/Install\ macOS\ Monterey.app/Contents/Resources/createinstallmedia
/Applications/Install\ macOS\ Big\ Sur.app/Contents/Resources/createinstallmedia
/Applications/Install\ macOS\ Catalina.app/Contents/Resources/createinstallmedia
/Applications/Install\ macOS\ Mojave.app/Contents/Resources/createinstallmedia
/Applications/Install\ macOS\ High\ Sierra.app/Contents/Resources/createinstallmedia
/Applications/Install\ OS\ X\ El\ Capitan.app/Contents/Resources/createinstallmedia
Создание загрузочной флешки OS X 10.10 Yosemite
Как ни странно, но при обновлении OS X 10.9 Mavericks через Mac AppStore до OS X 10.10 Yosemite, не обновился раздел Recovery HD. В итоге, если после обновления на OS X Yosemite, у вас что-то случится с системой или вы просто решите установить OS X Yosemite с «нуля», то при перезагрузке компьютера с зажатой клавишей «Option», вы увидите раздел Recovery 10.9 вместо 10.10.

Это значит, что из раздела «Восстановления», вместо OS X 10.10 Yosemite, вы сможете установить только OS X 10.9 Mavericks, а потом вам снова прийдется ставить обновление до OS X Yosemite через Mac AppStore. Я думаю что скоро Apple это поправит, обновит раздел Recovery HD до Yosemite и вы сможете устанавливать «чистую» систему по «воздуху» из раздела восстановления. А пока, единственный способ поставить «чистую» OS X 10.10 Yosemite — это установка с внешнего носителя, например USB флешки, и в этой статье я напомню пользователям как создать «загрузочную» флешку с OS X 10.10 Yosemite.
Для создания «загрузочной» флешки с OS X 10.10 Yosemite нужно выполнить несколько простых шагов:
1. Нам понадобится USB флешка объемом не менее 8GB отформатировная в HFS+ с GUID таблицей разделов. Для этого: запускаем дисковую утилиту, в столбике слева выбираем нужный нам накопитель, жмем «Раздел диска», выбираем «1 раздел», указываем формат «Mac OS Extended (журнальный)» и даем ей имя «Untitled»

далее жмем «Параметры», выбираем «Схема разделов GUID», жмем «ОК» и затем «Применить»
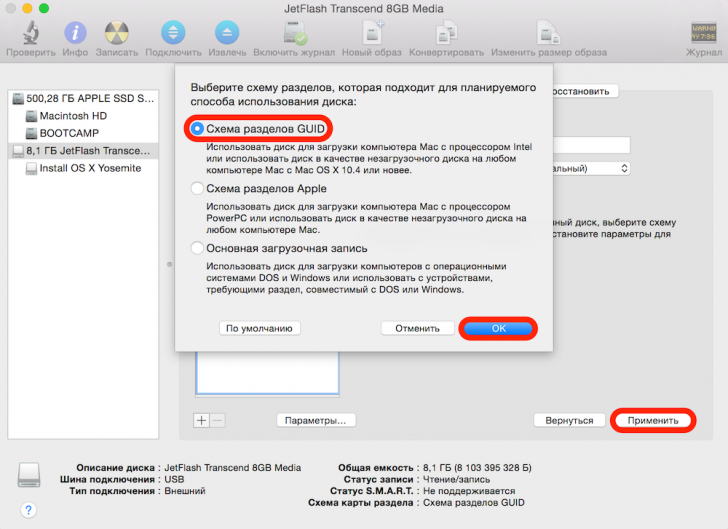
Закрываем дисковую утилиту.
2. Если вы еще не скачали, то скачиваем, но не устанавливаем OS X 10.10 Yosemite из Mac AppStore. После загрузки дистрибутив Yosemite будет находится в папке «Applications» или «Программы» (в зависимости от локализации вашего интерфейса).
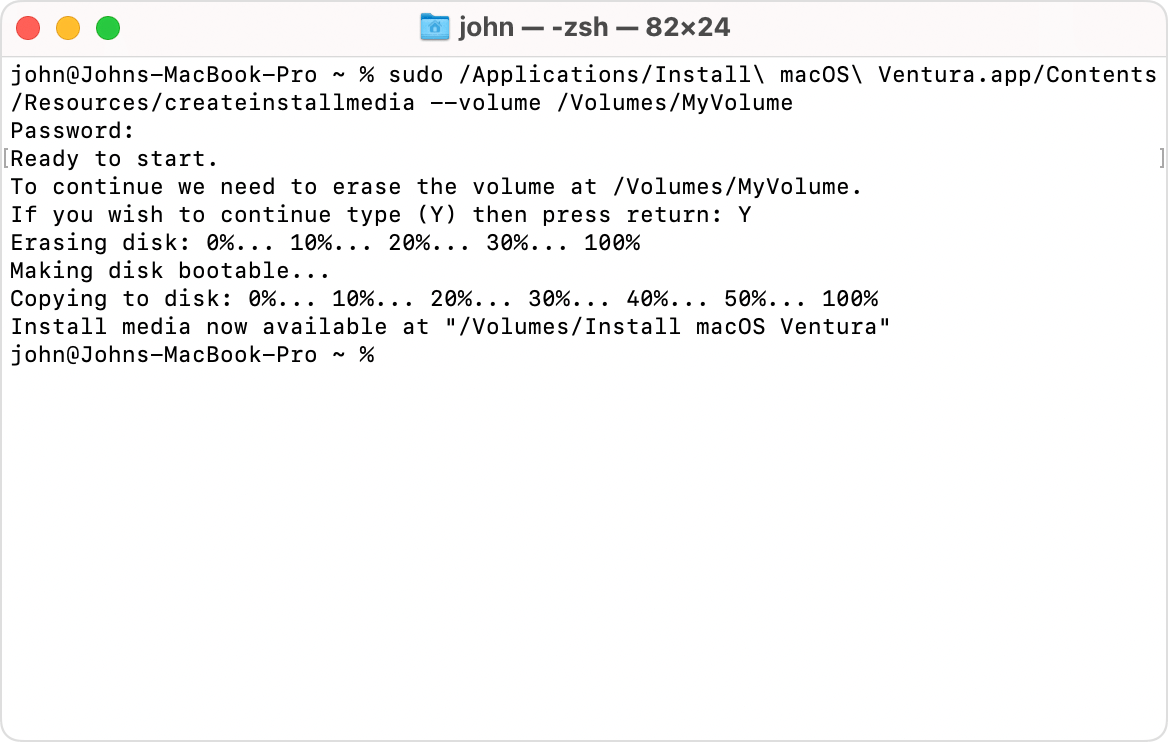
3. Запускаем «Терминал» (Terminal.app), копируем и вставляем в окно «Терминала» следующую ниже команду:
sudo /Applications/Install\ OS\ X\ Yosemite.app/Contents/Resources/createinstallmedia —volume /Volumes/ Untitled —applicationpath /Applications/Install\ OS\ X\ Yosemite.app —nointeraction
жмем «Enter» и вводим пароль администратора. После чего, в окне «Терминала», вы увидите следующее:
Erasing Disk: 0%… 10%… 20%… 30%…100%… Copying installer files to disk… Copy complete. Making disk bootable… Copying boot files… Copy complete. Done.
Процесс создания загрузочной флешки может занимать 20-30 мин.
Все готово. Теперь вы смело можете перезагружаться с зажатым «Option» и ставить OS X 10.10 Yosemite с созданной вами «загрузочной» флешки.
Статья "Создание загружаемого установщика для ОС OS X Mavericks или Yosemite" на Apple.com