Run a Java application
This tutorial explains how to quickly run a Java application. It also covers the setup required to run a Java application, such as creating a new project, configuring the JDK, and setting up run configurations with various options.
Create a new project

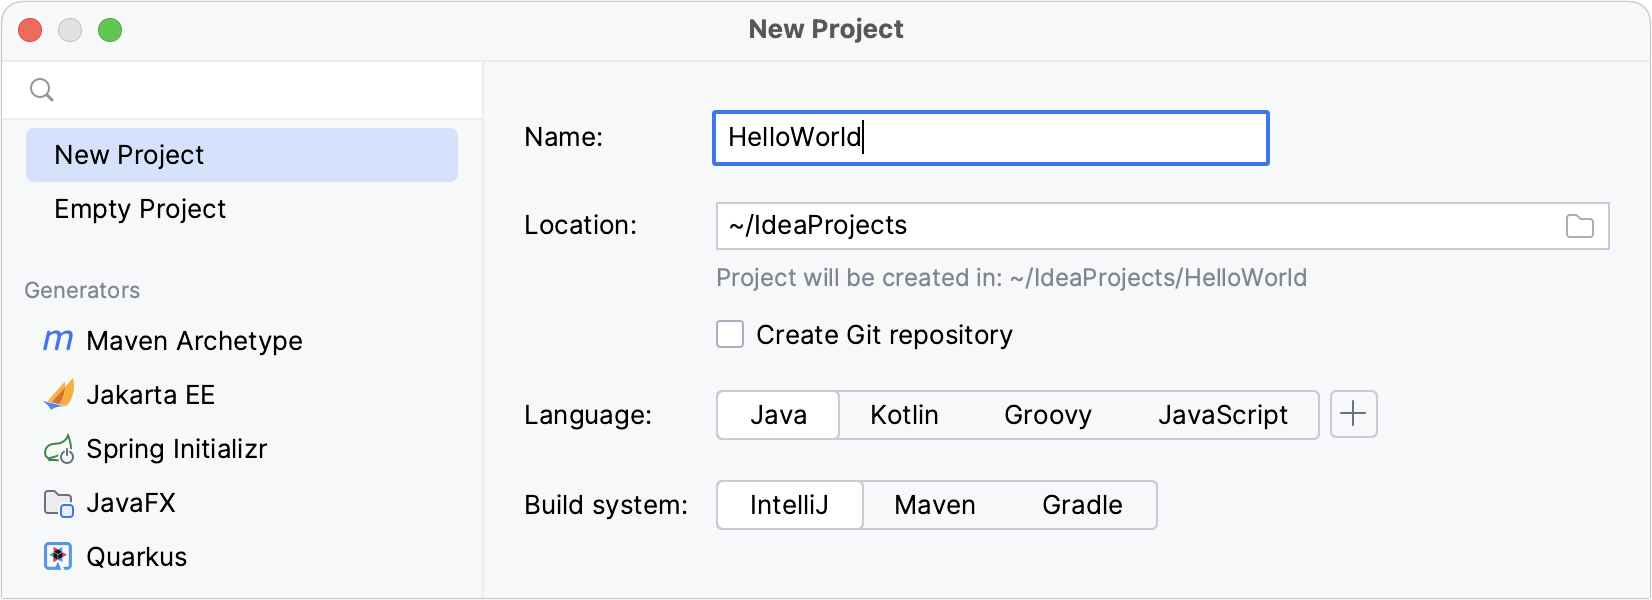
- Launch IntelliJ IDEA. If the Welcome screen opens, click New Project . Otherwise, go to File | New | Project in the main menu.
- From the list on the left, select New Project . Name the new project.
- Select the following project options:
- Language : Java
- Build system : Maven
- Add sample code : enabled
- From the JDK list, select the latest available Oracle OpenJDK version. If the JDK is installed on your computer, but not defined in the IDE, select Add JDK and specify the path to the JDK home directory. If you don’t have the necessary JDK on your computer, select Download JDK .
- Click Create .
Run the application
- When the project is created, in the Project tool window ( Alt+1 ), locate the src | main | java | Main.java file and open it in the editor.
- Replace the existing code with the following code sample:
package org.example; import java.util.stream.Stream; public class Main < public static void main(String[] args) < Stream.iterate(1, i ->i + 1) .limit(10) .forEach(System.out::println); > >

IntelliJ IDEA runs your code. After that, the Run tool window opens at the bottom of the screen.
The application has run successfully, that is why you will see the Process finished with exit code 0 message in the output.

When you clicked Run , IntelliJ IDEA created a temporary run configuration named after the Main class. The number of temporary configurations is limited to 5 by default, so the older ones are automatically deleted when new ones are added. That is why it is makes sense to save the temporary configurations that you want to keep.
You change the maximum number of temporary configurations in Settings | Advanced Settings | Run/Debug | Temporary configurations limit .
Save the run configuration

- In the main menu, go to Run | Edit Configurations .
- In the area on the left, select the Main configuration, and then click the icon on the toolbar above. The icons of temporary configurations are semi-transparent. So, as soon as the configuration is saved, its icon will become brighter. Do not close the dialog yet.
For the full list of options in this run/debug configuration, refer to Run/debug configuration: Application.
Enable the Store as project file option to place the run configuration under version control and share it with other project contributors.
Save console output to a file
Now let’s copy this configuration and modify it so that the IDE saves the console output to a file every time you run the configuration. This might be useful if you use console output for logging.
- In the area on the left, click the Main configuration and then click on the toolbar. This will create a copy of the run configuration.
- In the area on the right, rename the configuration to SaveConsoleOutput .
- Click Modify options and from the Logs settings group, select Save console output to file .
- Specify the path to the file to which the IDE will write the output. If the file does not exist, it will be created automatically. In our case, we will create a file in the project directory, so the path that we specify is /Users/jetbrains/IdeaProjects/RunApplication/console.txt .
- Apply the changes and close the dialog.
The new Save console output to file field appears in the dialog.

Run the saved configuration
- Make sure that SaveConsoleOutput is selected in the Run widget in the window header and click next to it or press Shift+F10 .

- When the IDE finishes running the configuration, locate the new file with the console output in the Project tool window and make sure it has content.

If you store logs in the project directory, add the logs folder to .gitignore to avoid sharing it through VCS. You can also mark the folder as excluded to exclude it from indexing and search.
Run configurations allow you to run the same application with different parameters. Now that you have two configurations, you can choose between them according to your needs. For example, if you do not need to save the console output every single time you run the application, you can run the Main configuration that does not have this setting.
Press Alt+Shift+F10 or use the Run widget in the window header to switch between configurations:

Let’s take a look at another scenario.
Change the code
Imagine that our code sample has a problem.
-
In the Main.java file, remove:
Stream.iterate(1, i -> i + 1) .limit(10) .forEach(System.out::println);
Instead, paste the following code:
var list = Stream.iterate(1, i -> i + 1) .toList(); System.out.println(list.size());
The application hangs for several seconds and then fails with OutOfMemoryError . Our program declares an infinite stream of integers and then tries to convert it into a list using the toList() method. Since the stream is infinite, the toList() method will never return, and the program will keep running indefinitely, consuming system resources.

In this case, we can add a VM option that will create an .hprof file for us if our application fails with OutOfMemoryError . Later on, we will be able to analyze this file in detail using the built-in profiler.
This is useful if you do not know the reason for OutOfMemoryError and would like to investigate it further.
Add the VM options

- In the main menu, go to Run | Edit Configurations .
- In the area on the left, click the Main configuration and then click on the toolbar to duplicate the configuration.
- Rename the configuration to OutOfMemory .
- Open the Modify options list and click Add VM options .
- The VM Options field appears in the dialog. In this field, add the following options with a space between them: -Xmx512m -XX:+HeapDumpOnOutOfMemoryError -XX:+HeapDumpOnOutOfMemoryError creates an .hprof file, and -Xmx512m limits the size of the dump.
- Apply the changes and close the dialog.
- Make sure that the OutOfMemory configuration is selected in the Run widget and click next to it or press Shift+F10 .
The Run tool window opens showing you that the OutOfMemoryError exception has been thrown. Since we have configured the corresponding VM option, the IDE has created an .hprof file in your project directory.

Double-click the created .hprof file to analyze it with the profiler.
Create your first Java application
In this tutorial, you will learn how to create, run, and package a simple Java application that prints Hello World! to the system output. Along the way, you will get familiar with IntelliJ IDEA features for boosting your productivity as a developer: coding assistance and supplementary tools.
Prepare a project
Create a new Java project
In IntelliJ IDEA, a project helps you organize your source code, tests, libraries that you use, build instructions, and your personal settings in a single unit.
- Launch IntelliJ IDEA. If the Welcome screen opens, click New Project . Otherwise, go to File | New Project in the main menu.
- In the New Project wizard, select New Project from the list on the left.
- Name the project (for example HelloWorld ) and change the default location if necessary.
- We’re not going to work with version control systems in this tutorial, so leave the Create Git repository option disabled.
- Make sure that Java is selected in Language , and IntelliJ is selected in Build system .
- To develop Java applications in IntelliJ IDEA, you need the Java SDK ( JDK ). If the necessary JDK is already defined in IntelliJ IDEA, select it from the JDK list. If the JDK is installed on your computer, but not defined in the IDE, select Add JDK and specify the path to the JDK home directory (for example, /Library/Java/JavaVirtualMachines/jdk-20.0.1.jdk ).
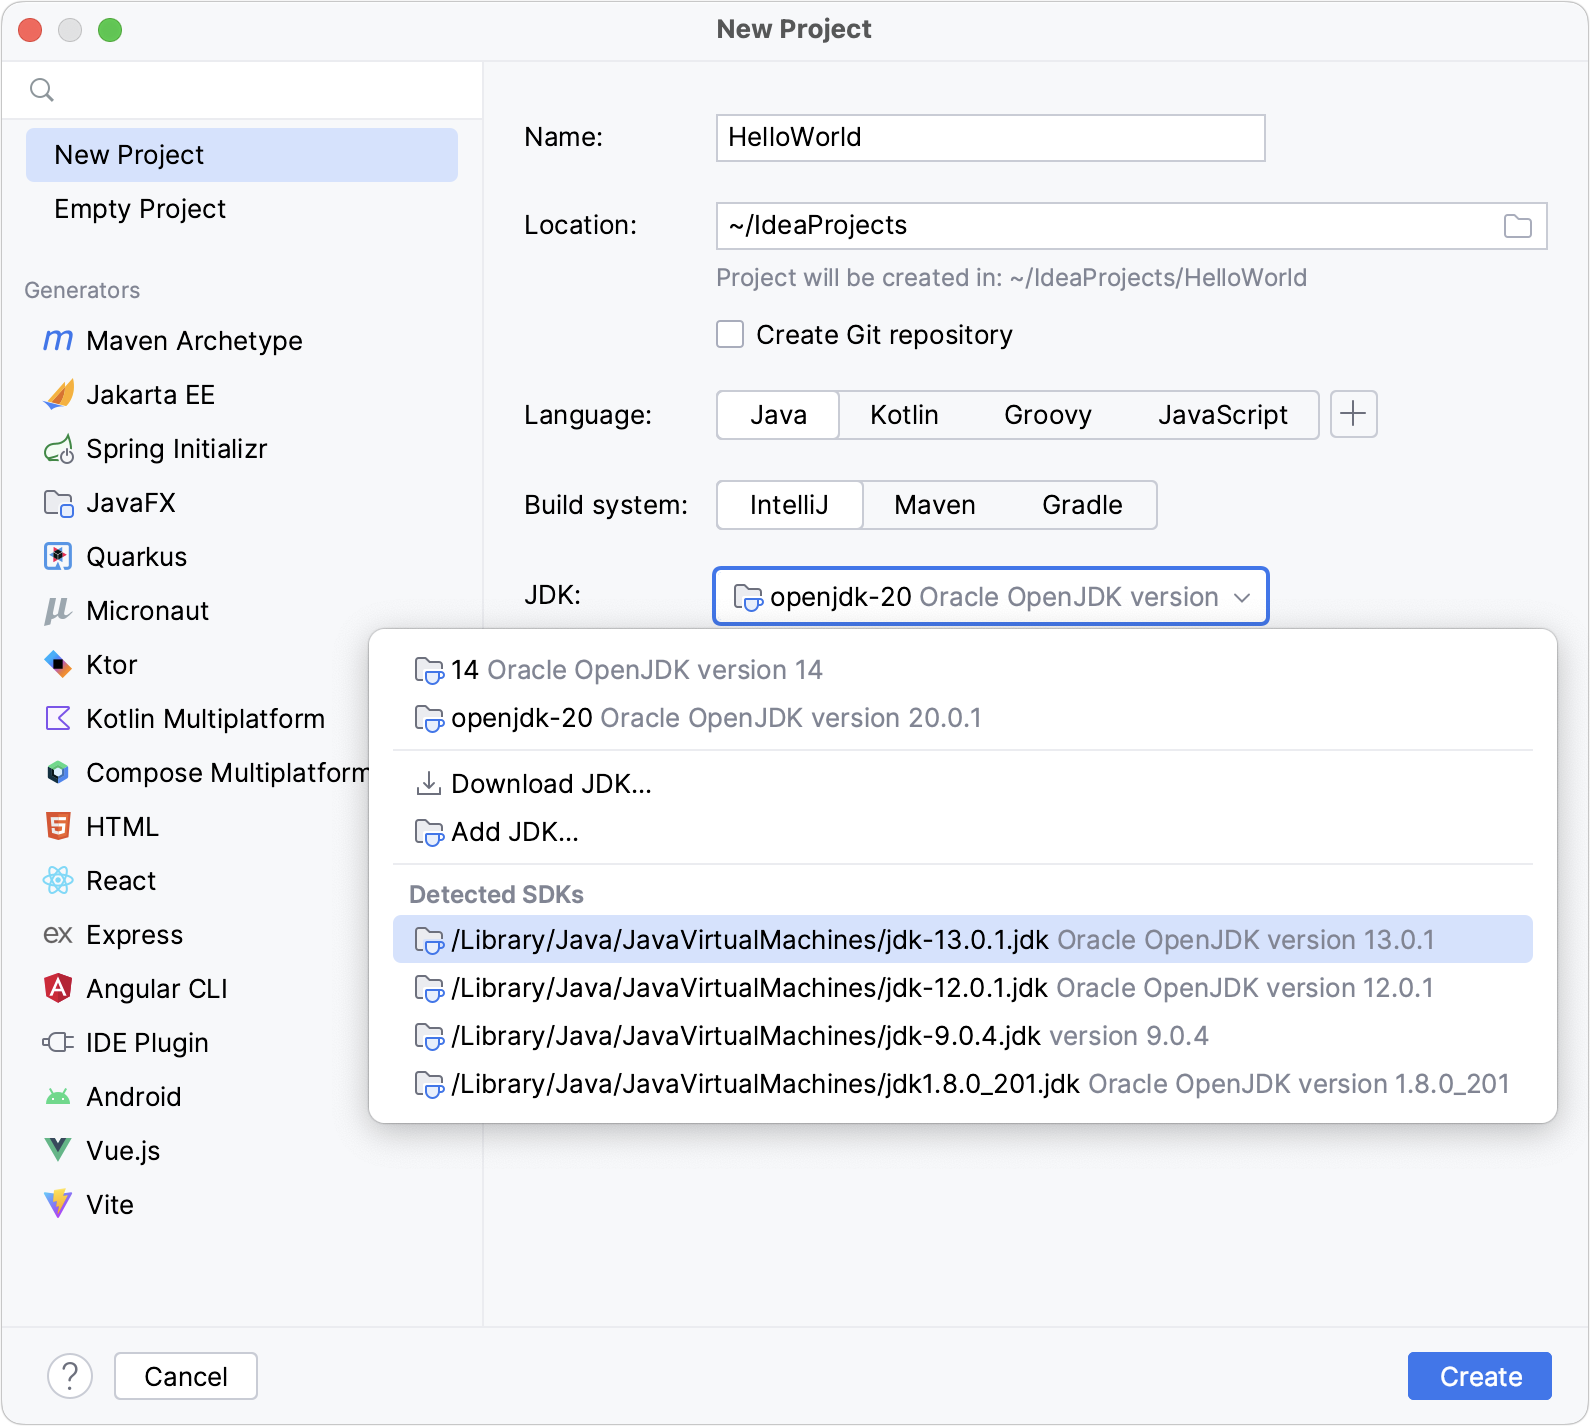 If you don’t have the necessary JDK on your computer, select Download JDK . In the next dialog, specify the JDK vendor (for example, OpenJDK), version, change the installation path if required, and click Download .
- Leave the Add sample code option disabled as we’re going to do everything from scratch in this tutorial. Click Create .
After that, the IDE will create and load the new project for you.
Create a package and a class
Packages are used for grouping together classes that belong to the same category or provide similar functionality, for structuring and organizing large applications with hundreds of classes.
- In the Project tool window, right-click the src folder, select New (or press Alt+Insert ), and then select Java Class .
- In the Name field, type com.example.helloworld.HelloWorld and click OK . IntelliJ IDEA creates the com.example.helloworld package and the HelloWorld class.
Together with the file, IntelliJ IDEA has automatically generated some contents for your class. In this case, the IDE has inserted the package statement and the class declaration.
This is done by means of file templates. Depending on the type of the file that you create, the IDE inserts initial code and formatting that is expected to be in all files of that type. For more information about how to use and configure templates, refer to File templates.
The Project tool window Alt+1 displays the structure of your application and helps you browse the project.
In Java, there’s a naming convention that you should follow when you name packages and classes.
Write the code
Add the main() method using live templates
- Place the caret at the class declaration string after the opening bracket < and press Shift+Enter . In contrast to Enter , Shift+Enter starts a new line without breaking the current one.
- Type main and select the template that inserts the main() method declaration. As you type, IntelliJ IDEA suggests various constructs that can be used in the current context. You can see the list of available live templates using Control+J .
Live templates are code snippets that you can insert into your code. main is one of such snippets. Usually, live templates contain blocks of code that you use most often. Using them can save you some time as you don’t have to type the same code over and over again.
For more information about where to find predefined live templates and how to create your own, refer to Live templates.
Call the println() method using code completion
After the main() method declaration, IntelliJ IDEA automatically places the caret at the next line. Let’s call a method that prints some text to the standard system output.
- Type Sy and select the System class from the list of code completion suggestions (it’s from the standard java.lang package). Press Control+. to insert the selection with a trailing period.
- Type o , select out , and press Control+. again.
- Type p , select the println(String x) method, and press Enter . IntelliJ IDEA shows you the types of parameters that can be used in the current context. This information is for your reference.
- Type » . The second quotation mark is inserted automatically, and the caret is placed between the quotation marks. Type Hello World!
Basic code completion analyzes the context around the current caret position and provides suggestions as you type. You can open the completion list manually by pressing Control+Space .
For more information about different completion modes, refer to Code completion.
Call the println() method using a live template
You can call the println() method much quicker using the sout live template.
After the main() method declaration, IntelliJ IDEA automatically places the caret at the next line. Let’s call a method that prints some text to the standard system output.
- Type sout and press Enter .
- Type » . The second quotation mark is inserted automatically, and the caret is placed between the quotation marks. Type Hello World! .
Build and run the application
Valid Java classes can be compiled into bytecode. You can compile and run classes with the main() method right from the editor using the green arrow icon in the gutter.
- Click in the gutter and select Run ‘HelloWorld.main()’ in the popup. The IDE starts compiling your code.
- When the compilation is complete, the Run tool window opens at the bottom of the screen. The first line shows the command that IntelliJ IDEA used to run the compiled class. The second line shows the program output: Hello World! . And the last line shows the exit code 0 , which indicates that it exited successfully. If your code is not correct, and the IDE can’t compile it, the Run tool window will display the corresponding exit code.
When you click Run , IntelliJ IDEA creates a special run configuration that performs a series of actions. First, it builds your application. On this stage, javac compiles your source code into JVM bytecode.
Once javac finishes compilation, it places the compiled bytecode to the out directory, which is highlighted with yellow in the Project tool window.
After that, the JVM runs the bytecode.
Automatically created run configurations are temporary, but you can modify and save them.
If you want to reopen the Run tool window, press Alt+4 .
IntelliJ IDEA automatically analyzes the file that is currently opened in the editor and searches for different types of problems: from syntax errors to typos. The Inspections widget in the top-right corner of the editor allows you to quickly see all the detected problems and look at each problem in detail. For more information, refer to Current file.
Package the application in a JAR
When the code is ready, you can package your application in a Java archive (JAR) so that you can share it with other developers. A built Java archive is called an artifact .
Create an artifact configuration for the JAR
- In the main menu, go to File | Project Structure ( Control+Alt+Shift+S ) and click Artifacts .
- Click , point to JAR and select From modules with dependencies .
- To the right of the Main Class field, click and select HelloWorld (com.example.helloworld) in the dialog that opens. IntelliJ IDEA creates the artifact configuration and shows its settings in the right-hand part of the Project Structure dialog.
- Apply the changes and close the dialog.
Build the JAR artifact
- In the main menu, go to Build | Build Artifacts .
- Point to HelloWorld:jar and select Build .
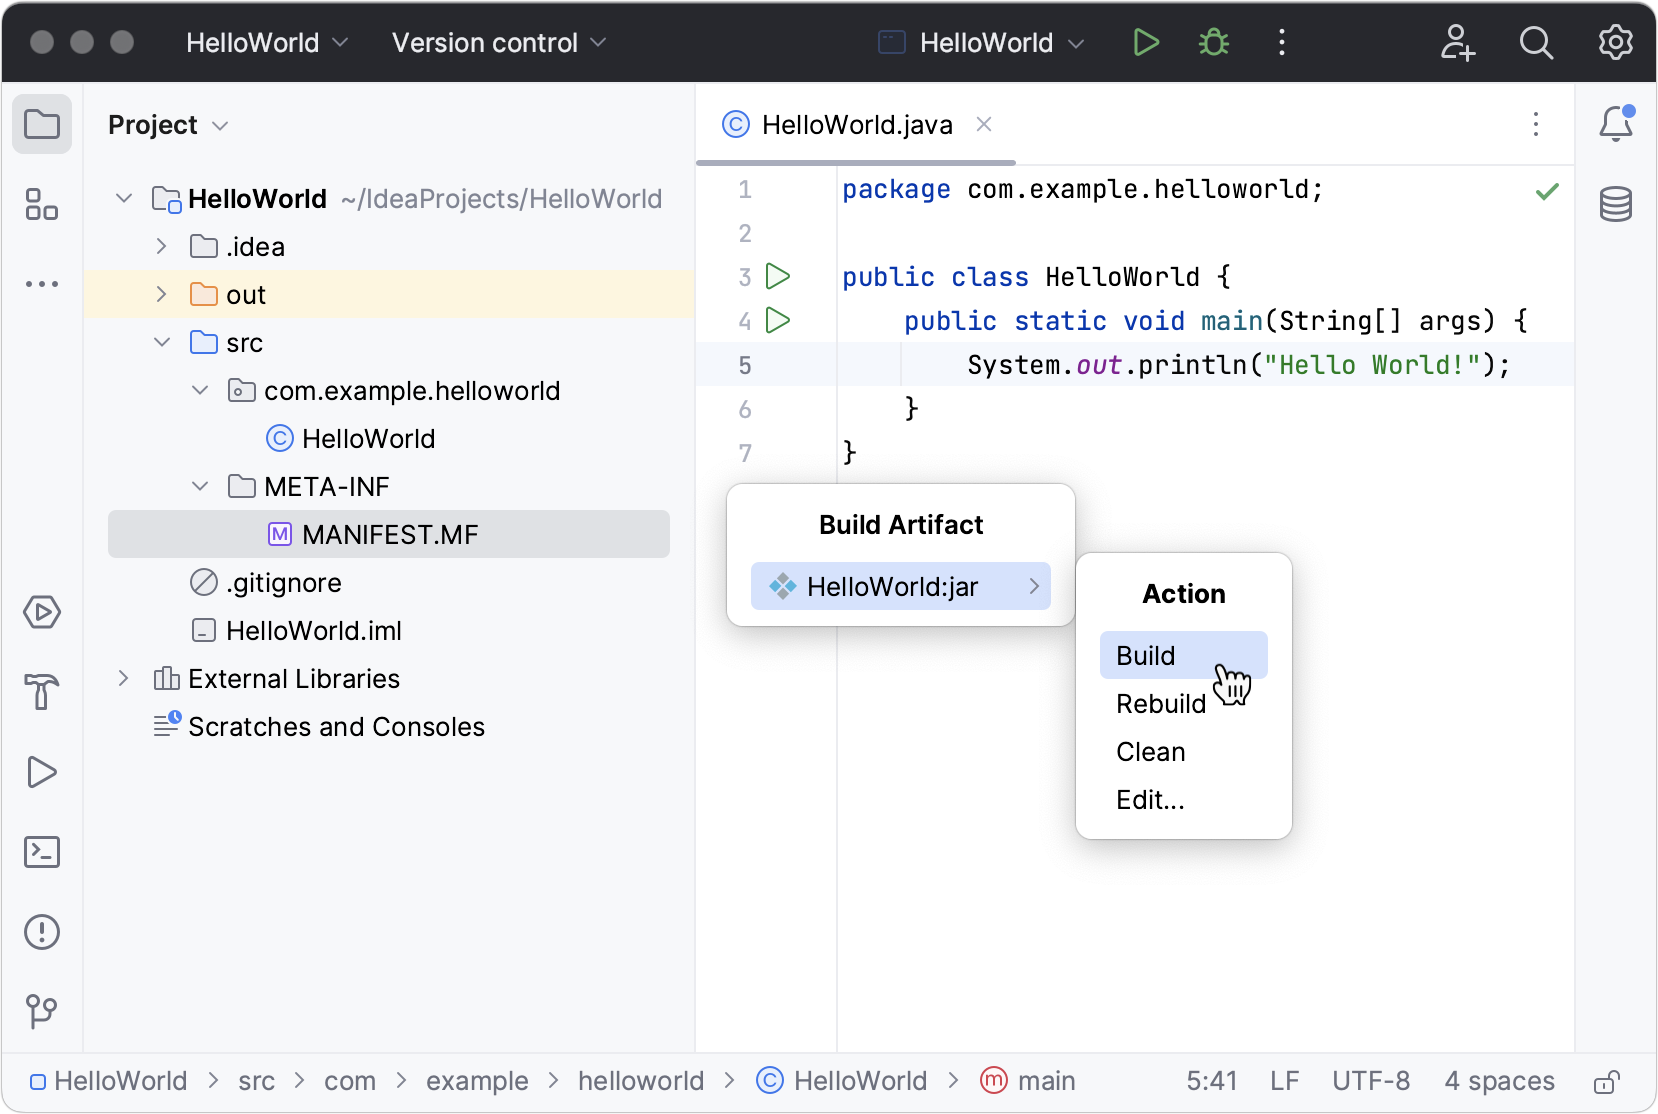 If you now look at the out/artifacts folder, you’ll find your JAR there.
Run the packaged application
To make sure that the JAR artifact is created correctly, you can run it.
Use Find Action Control+Shift+A to search for actions and settings across the entire IDE.
Create a run configuration for the packaged application
To run a Java application packaged in a JAR, IntelliJ IDEA allows you to create a dedicated run configuration.
- Press Control+Shift+A , find and run the Edit Configurations action.
- In the Run/Debug Configurations dialog, click and select JAR Application .
- Name the new configuration: HelloWorldJar .
Run configurations allow you to define how you want to run your application, with which arguments and options. You can have multiple run configurations for the same application, each with its own settings.
Execute the run configuration
- On the toolbar, select the HelloWorldJar configuration and click to the right of the run configuration selector. Alternatively, press Shift+F10 if you prefer shortcuts. As before, the Run tool window opens and shows you the application output.
The process has exited successfully, which means that the application is packaged correctly.
Run IntelliJ IDEA for the first time
You can use the Toolbox App to run any JetBrains product. In case of a standalone installation, running IntelliJ IDEA depends on the operating system:
To run IntelliJ IDEA, find it in the Windows Start menu or use the desktop shortcut. You can also run the launcher batch script or executable in the installation directory under bin .
Run the IntelliJ IDEA app from the Applications directory, Launchpad, or Spotlight.
Run the idea.sh shell script in the installation directory under bin . You can also use the desktop shortcut if it was created during installation.
For more information about running IntelliJ IDEA from the command line, refer to Command-line interface.
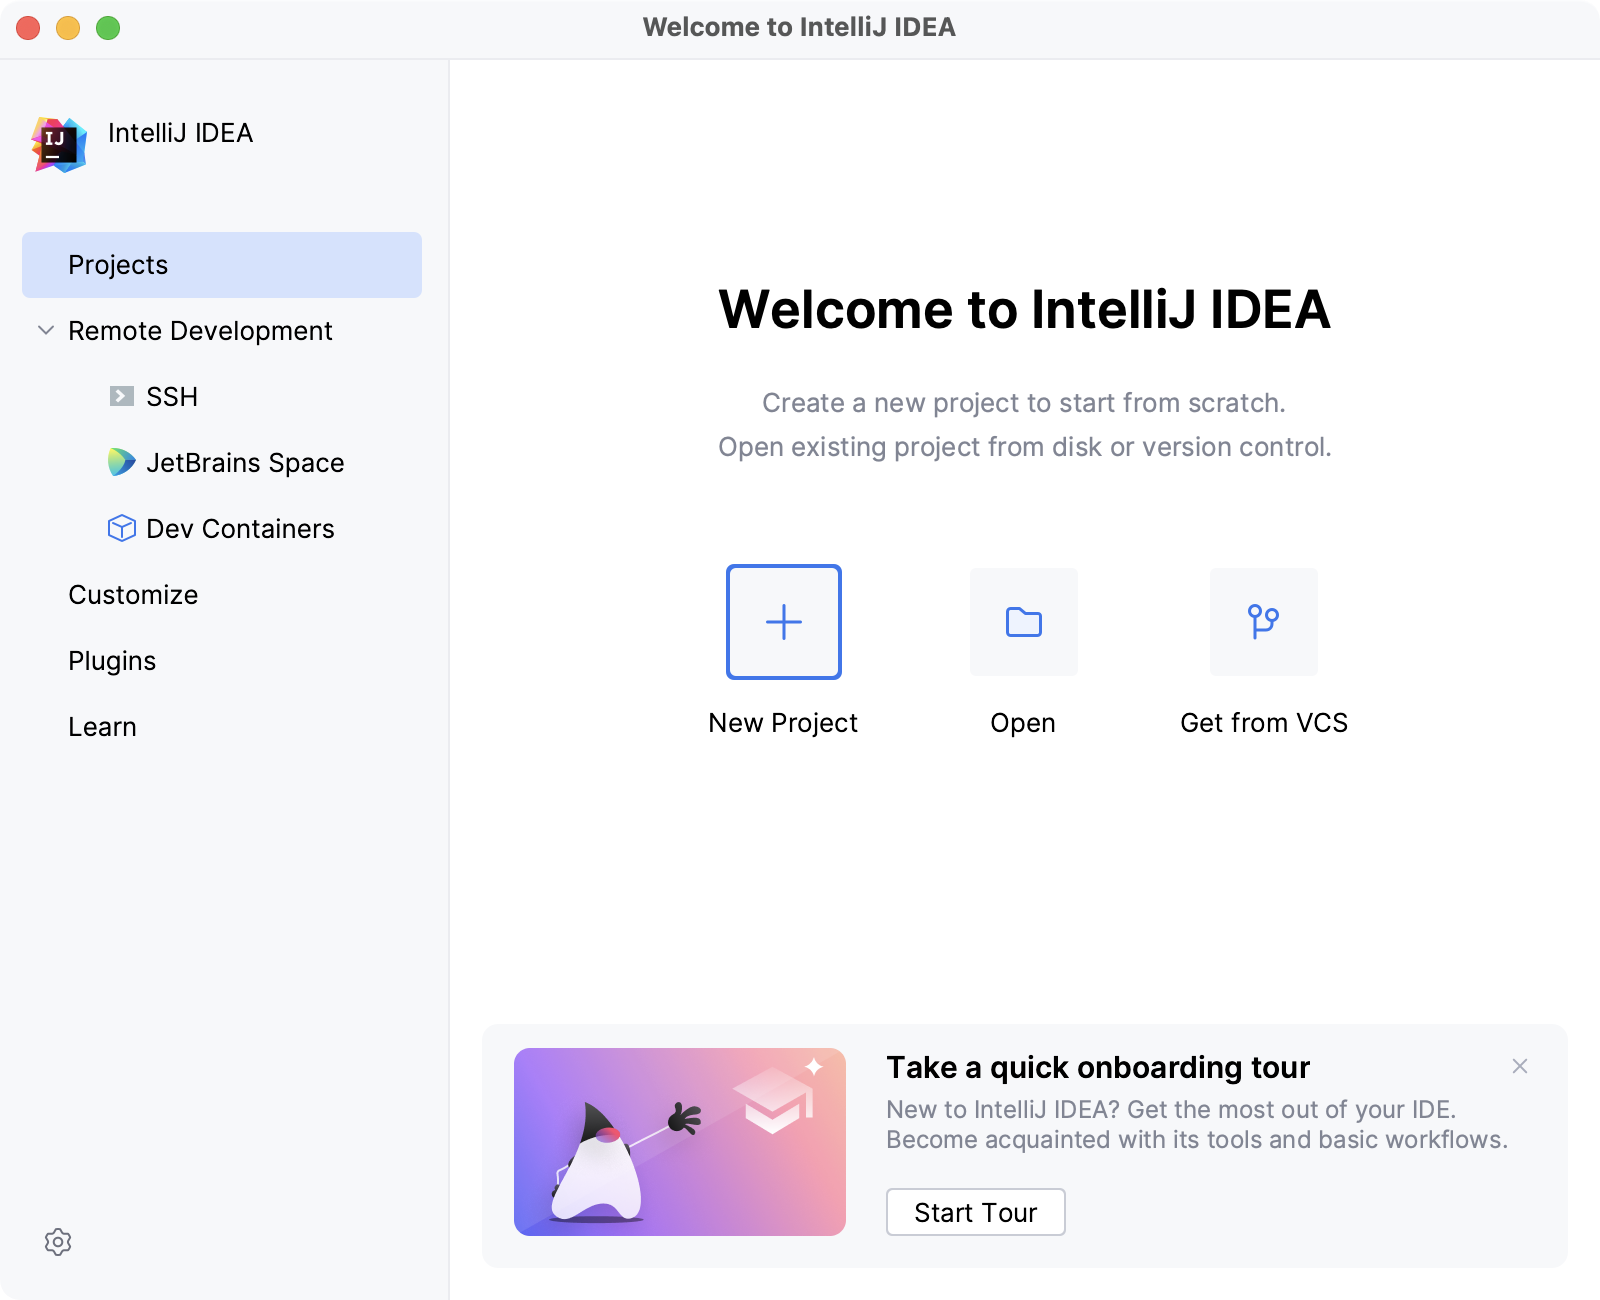
Once you launch IntelliJ IDEA, you will see the Welcome screen, the starting point to your work with the IDE, and configuring its settings. This screen also appears when you close all opened projects. Use the tabs on the left side to switch to the specific welcome dialog.
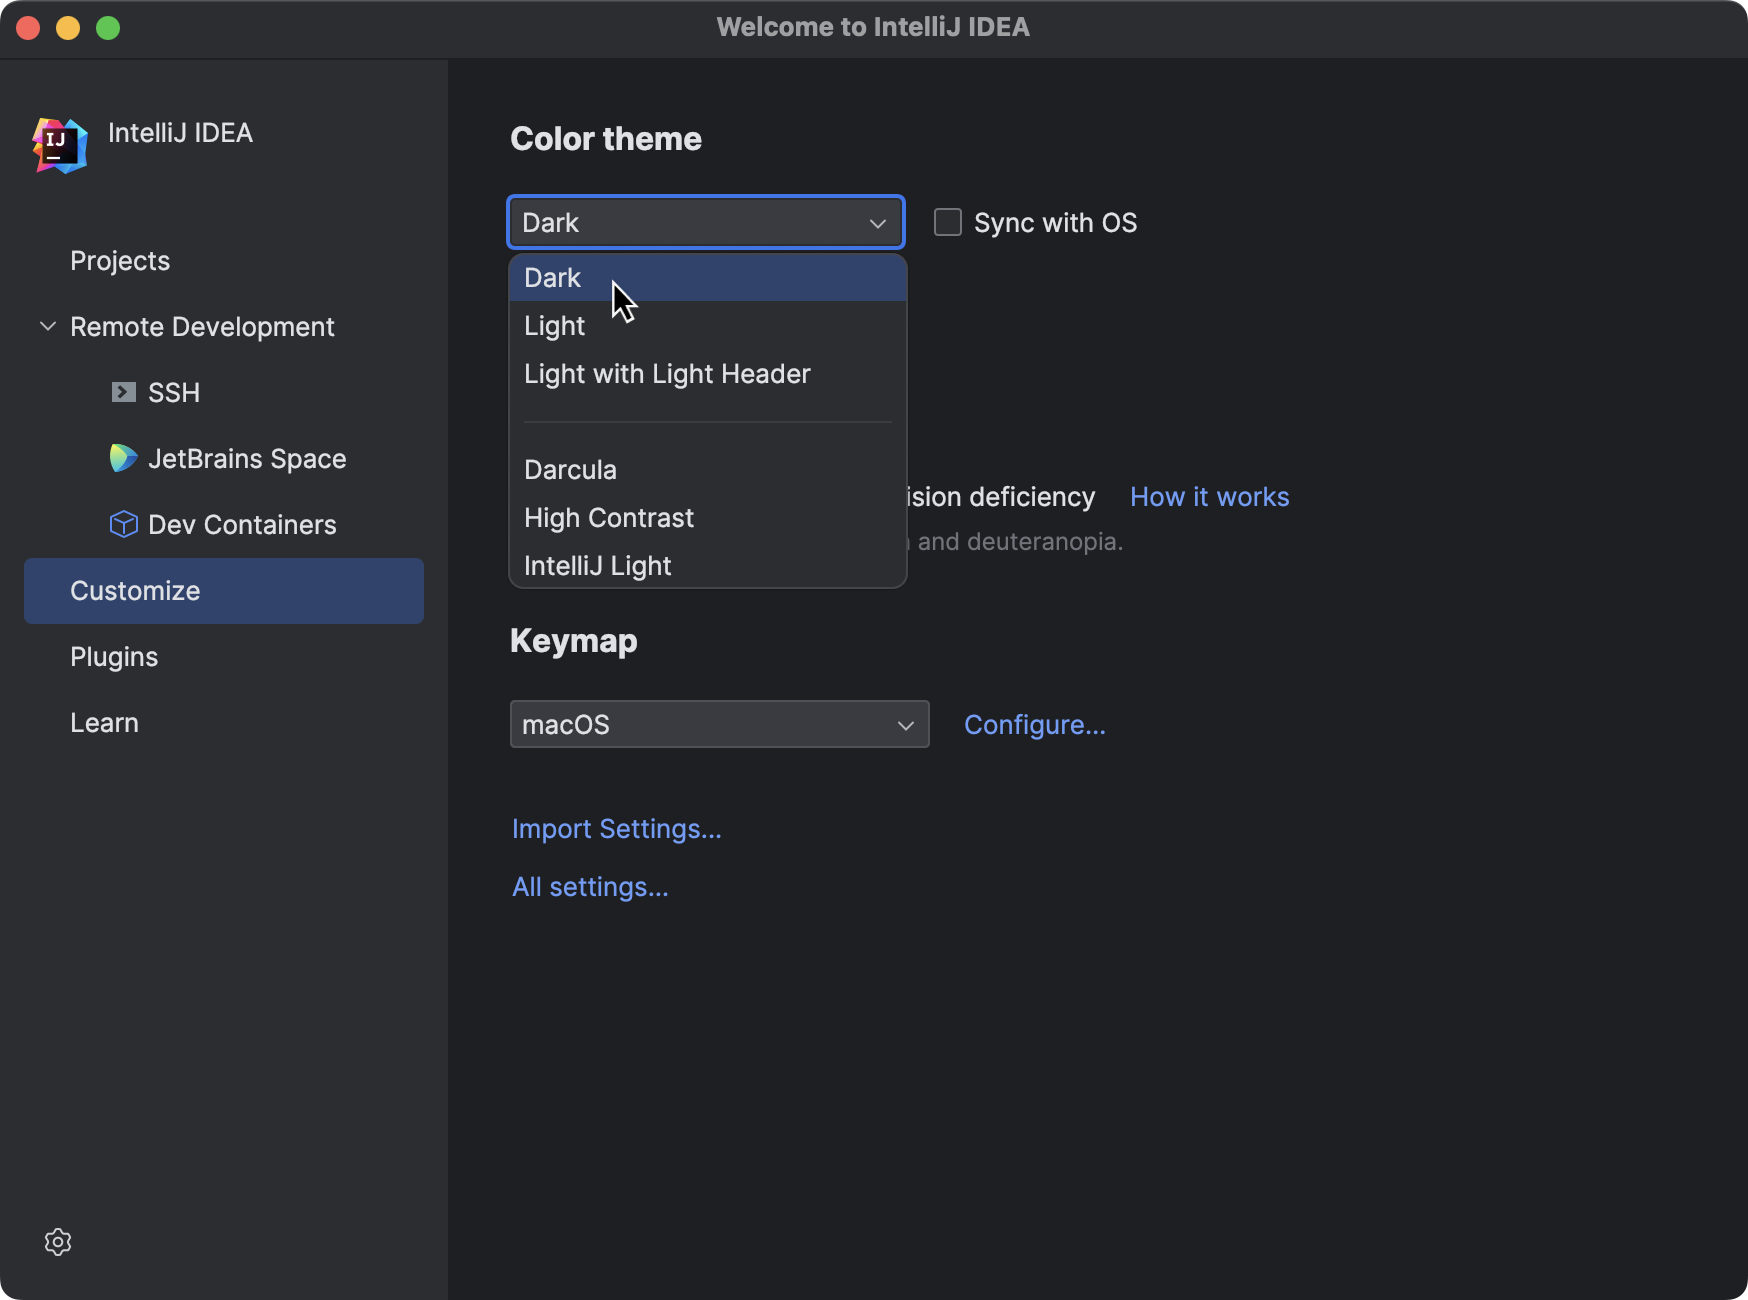
Customize the IDE appearance
Click Customize and select another color theme or select the Sync with OS checkbox to use your system default theme. Here you can also configure accessibility settings or select another keymap.
Try the new IntelliJ IDEA user interface.
Configure the default settings
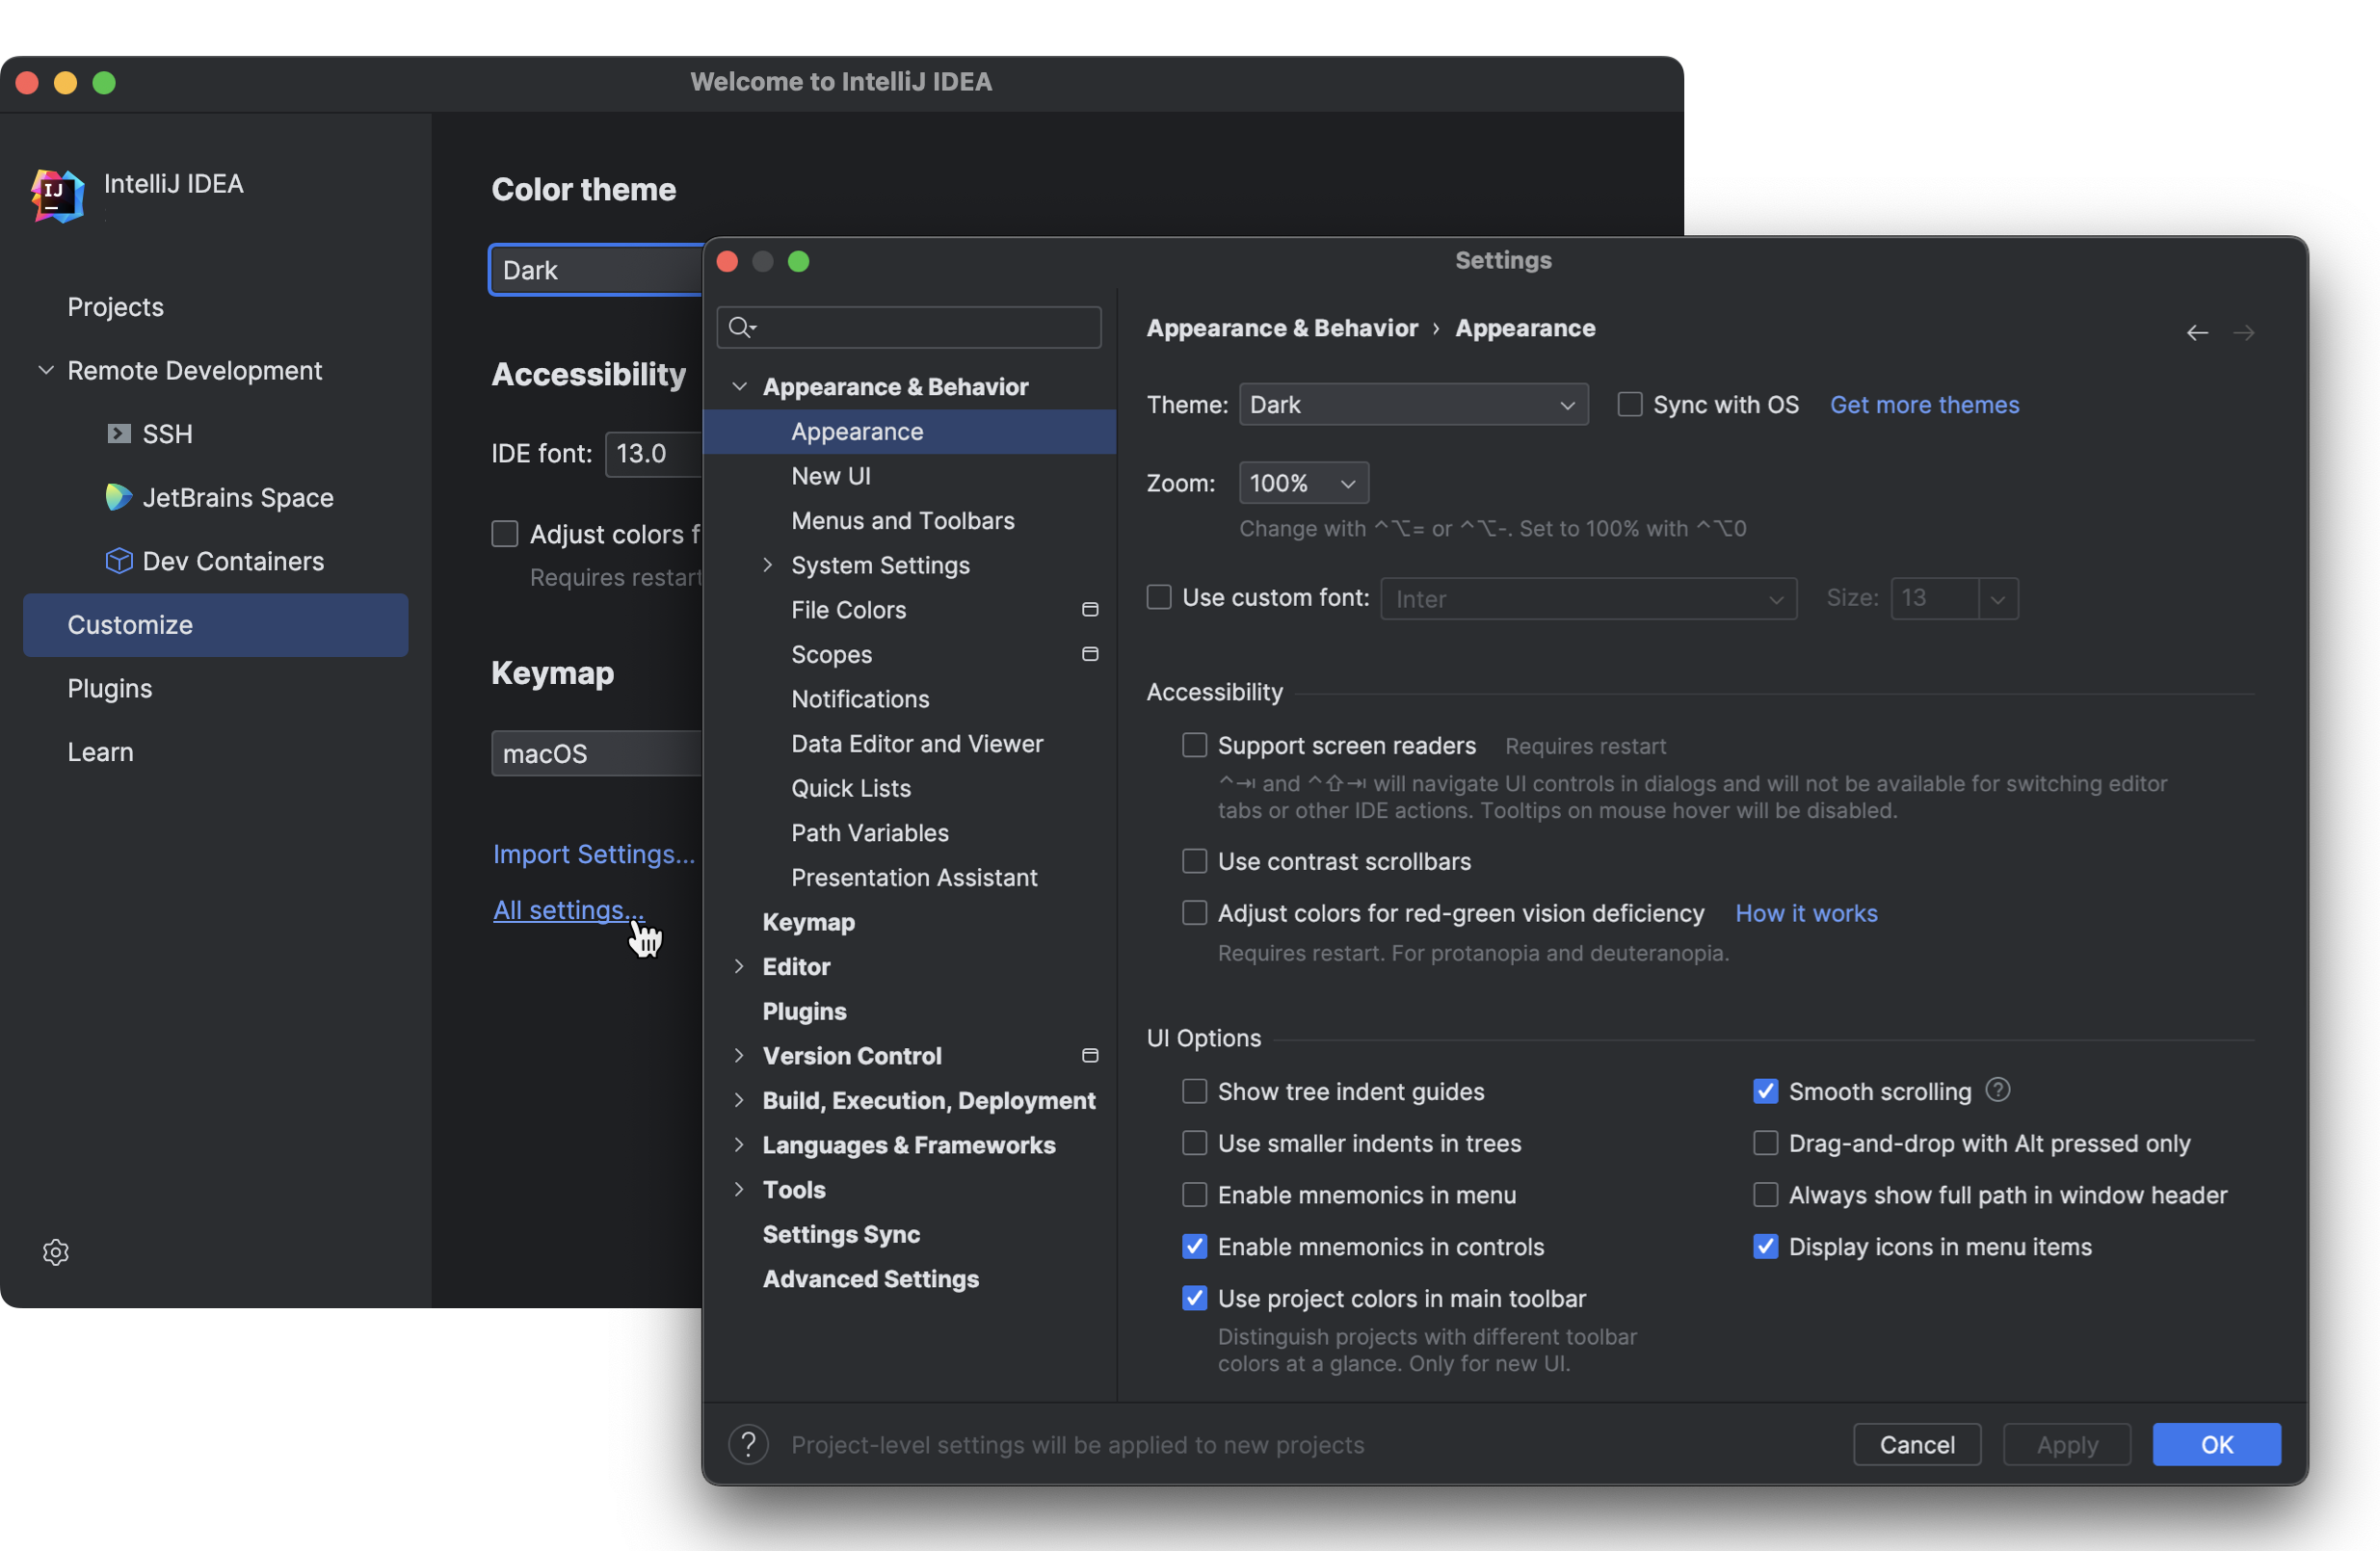
Click Customize and select Import Settings if you already have a copy of the required settings that you want to apply.
Alternatively, click All settings to open the settings dialog. The settings that you modify at this moment will become the new default configuration for your projects and the IDE.
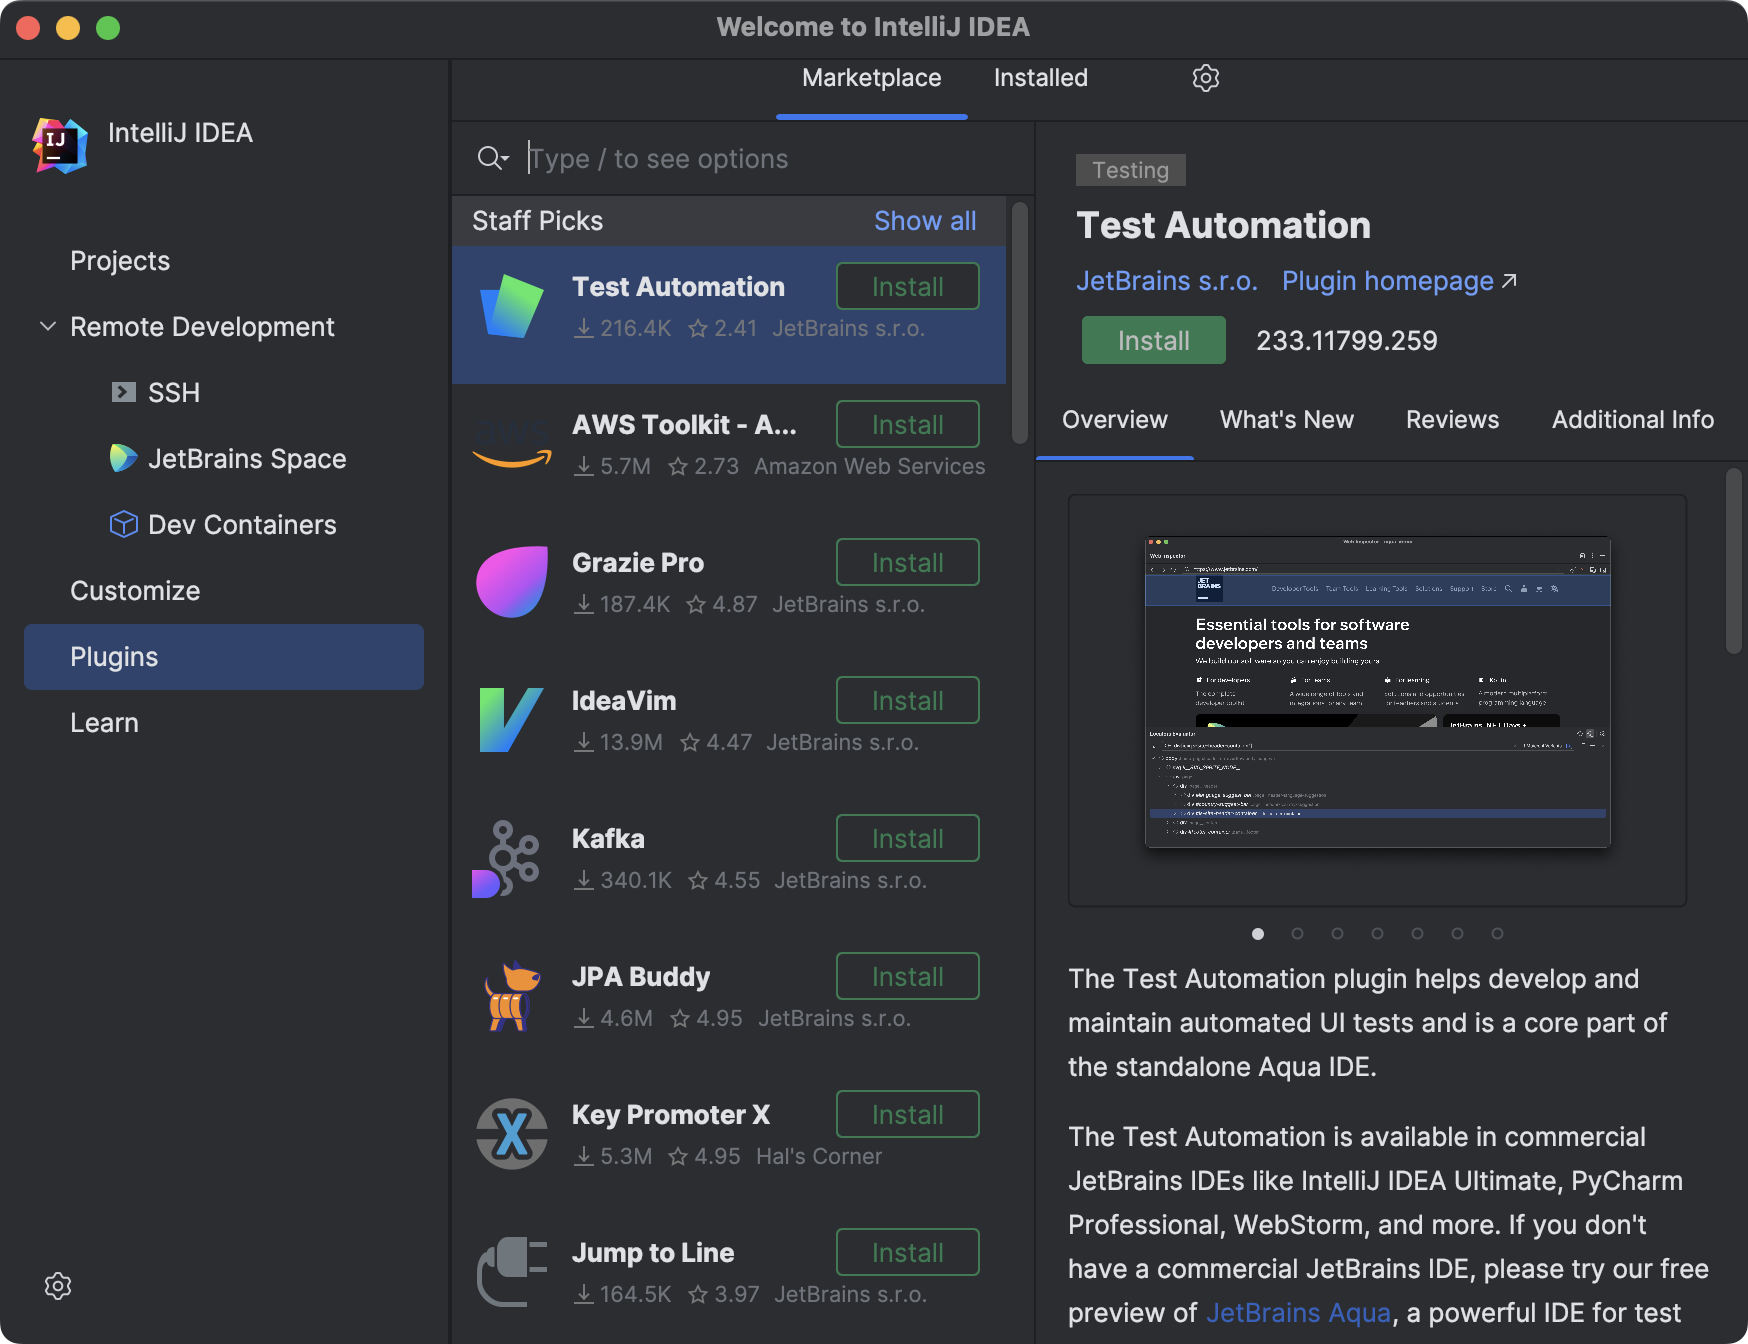
Install additional plugins
Click Plugins in the left pane and download and install additional plugins from JetBrains Marketplace.
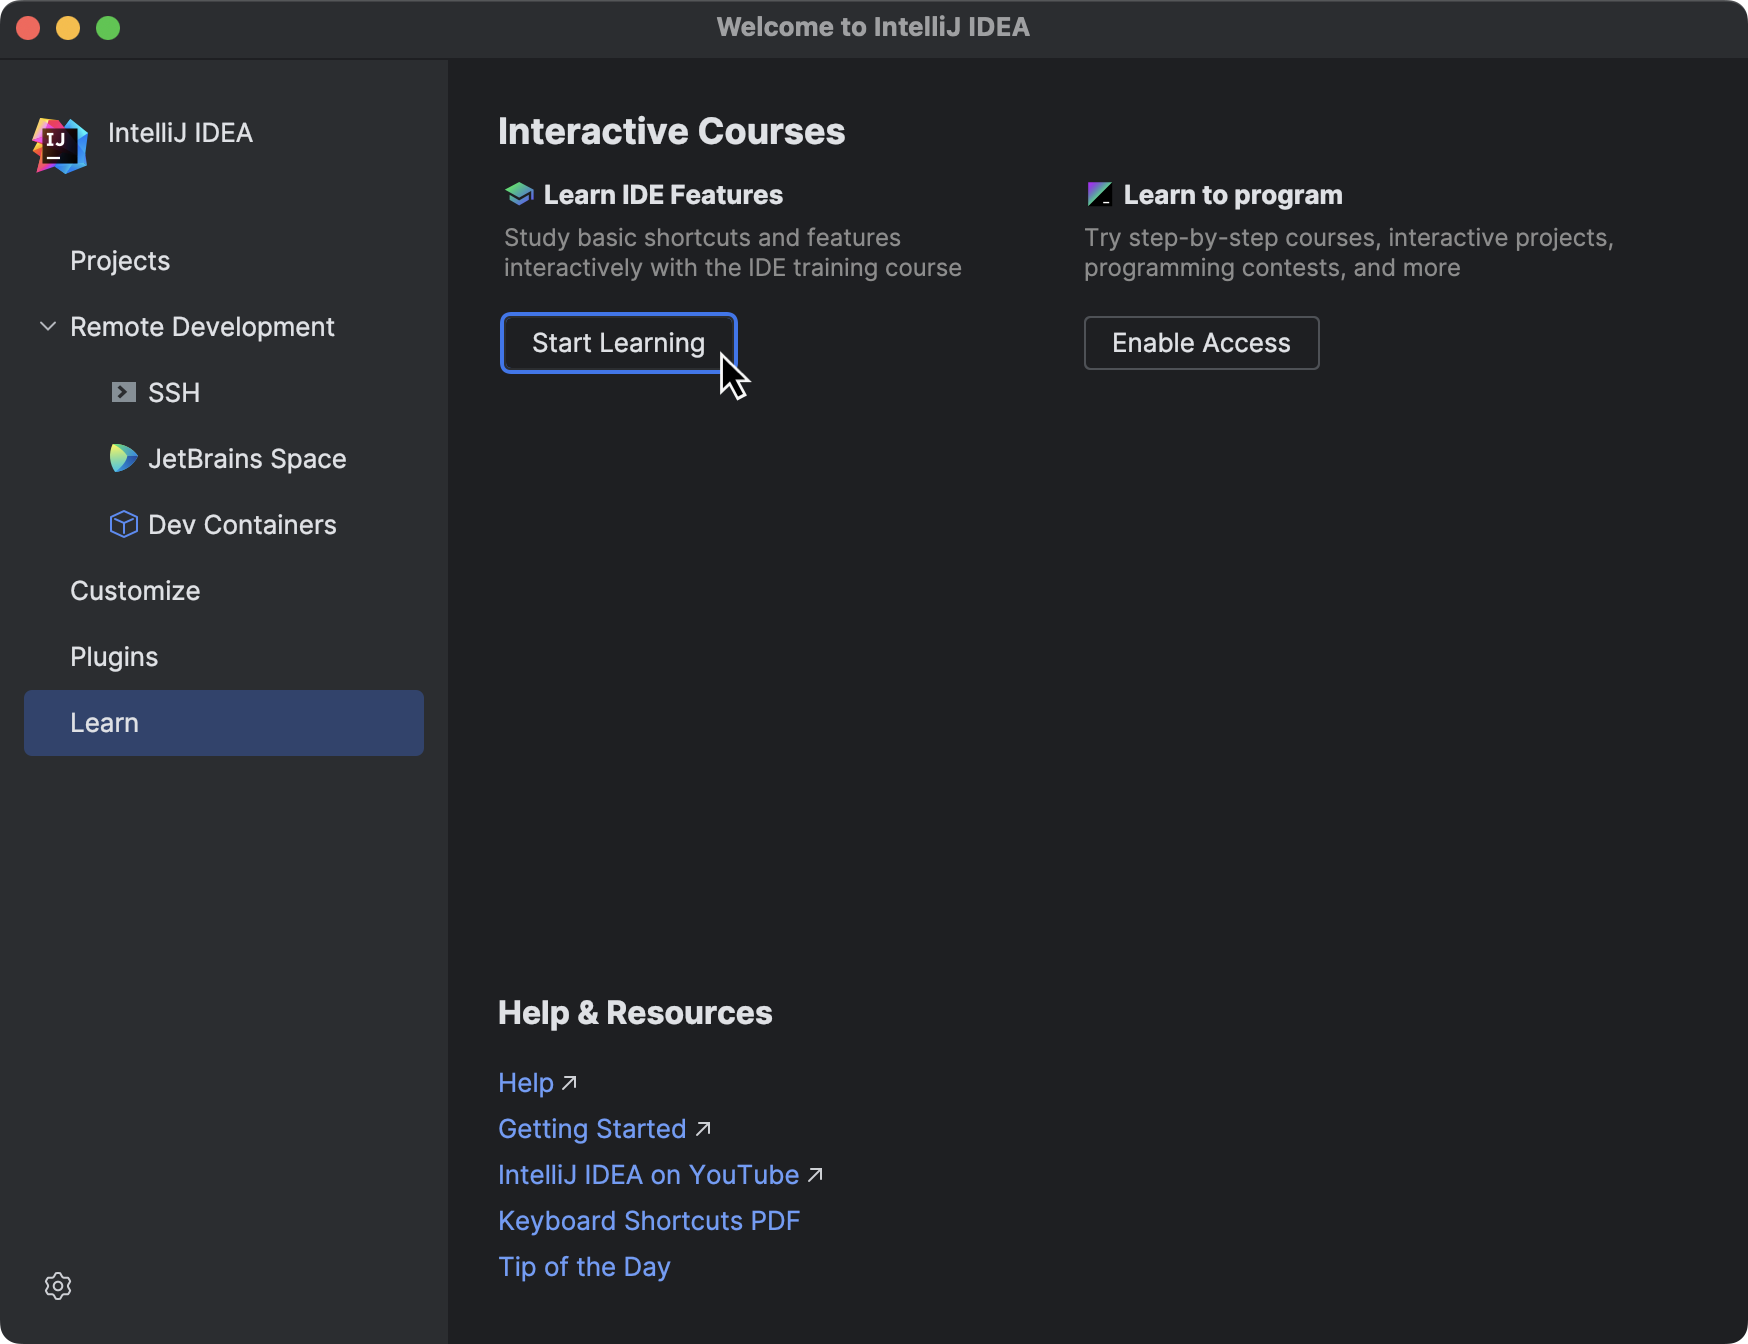
Learn IntelliJ IDEA
Click Learn to get more familiar with the shortcuts, features, and workflows that the IDE has to offer. For more information, refer to Learn IDE features.
This feature is available only in the new UI. Enable it to access the lessons.
Develop your applications remotely
Click Remote Development to configure an entry point to connect to a remote server and code, run, debug, and deploy your projects remotely. For more information, refer to Connect to a remote server from IntelliJ IDEA.

Start a project in IntelliJ IDEA
When you start IntelliJ IDEA, it will show you the Welcome screen .
From the Welcome to IntelliJ IDEA dialog, you can do the following:
- Create a new project
- Create your first Java application
- Open a project
- Get a project from a version control system
Как запустить intellij idea
В прошлой теме мы рассмотрели, как создавать первую программу с последующим ее запуском в командной строке. Однако в реальности, как правило, крупные программы разрабатываются не при помощи простого текстового редактора, а с использованием таких средств как IDE или интегрированные среды разработки, которые упрощают и ускоряют написание кода и создание приложений. На данный момент одной из самых популярных сред разработки для Java является IntelliJ IDEA от компании JetBrains. Рассмотрим, как использовать данную среду.
Прежде всего загрузим установочный дистрибутив с официального сайта https://www.jetbrains.com/idea/download. По этому адресу можно найти пакеты для Windows, MacOS, Linux. Кроме того, сама среда доступна в двух версиях — Ultimate (платная с триальным бесплатным периодом) и Community (бесплатная). В данном случае выберем бесплатную версию Community .
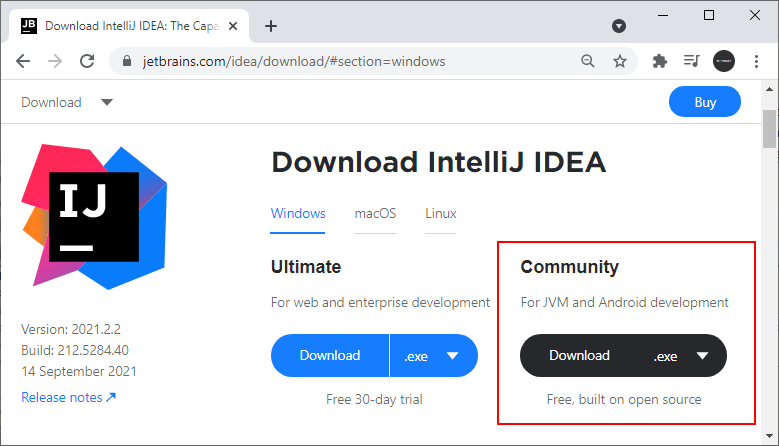
Конечно, Community-версия не имеет ряда многих возможностей, которые доступны в Ultimate-версии (в частности, в Community недоступны опции для веб-приложений на Java). Но Community-версия тоже довольно функциональна и тоже позволяет делать довольно много, в том числе приложения на JavaFX и Android.
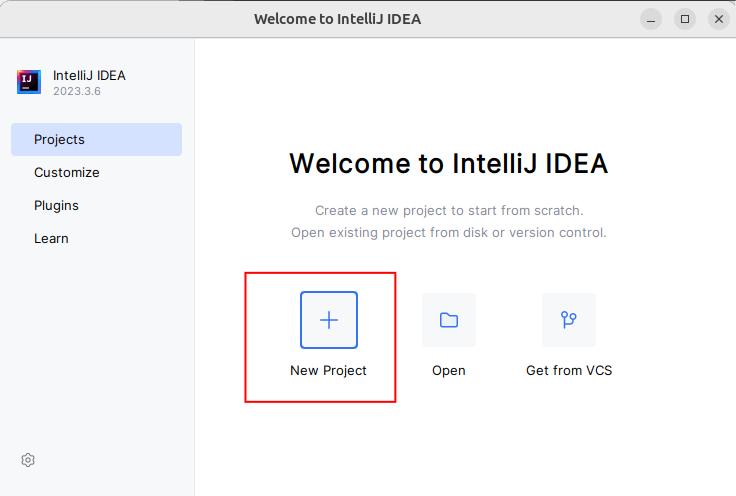
После установки запустим IntelliJ IDEA и создадим первый проект. Для этого на стартовом экране выберем New Project :
Далее откроется окно создания проекта. В левой части в качестве типа проекта выберем Java.
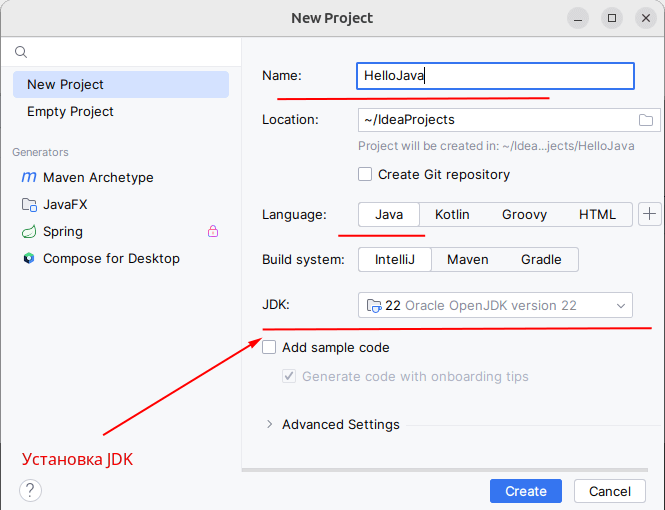
В поле Name укажем имя проекта. В моем случае проект будет называться HelloApp.
В поле Location можно указать путь к проекту, если не устраивает путь по умолчанию.
Поскольку мы будем работать с языком Java, в поле Language выберем пункт Java
Кроме того, в поле JDK можно указать путь к Java SDK, который будет использоваться в проекте. Как правило, это поле по умолчанию уже содержит путь к JDK, который установлен на локальном компьютере. Если это поле пусто, то его надо установить.
После этого нажмем на кнопку Create. После этого среда создаст и откроет проект.
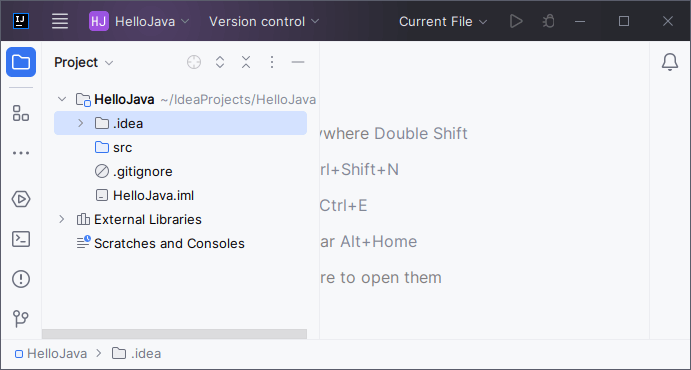
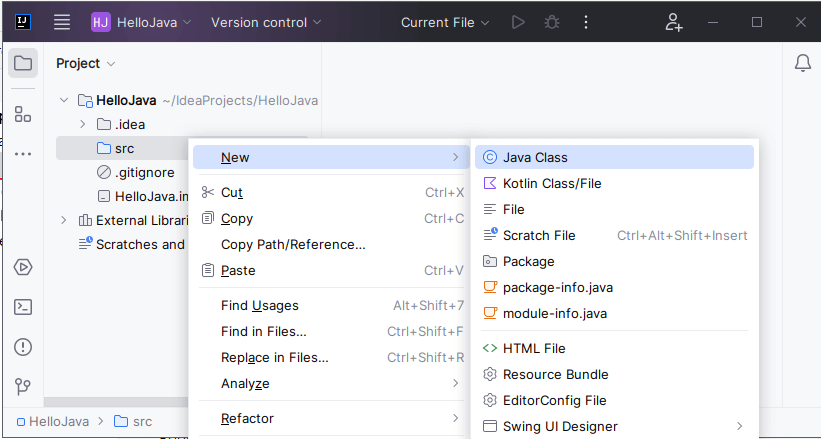
В левой части мы можем увидеть структуру проекта. Все файлы с исходным кодом помещаются в папку src . По умолчанию эта папка пуста, никаких файлов кода у нас в проекте пока нет. Поэтому добавим файл с исходным кодом. Для этого нажмем на папку src правой кнопкой мыши и в контекстном меню выберем пункт New -> Java Class :
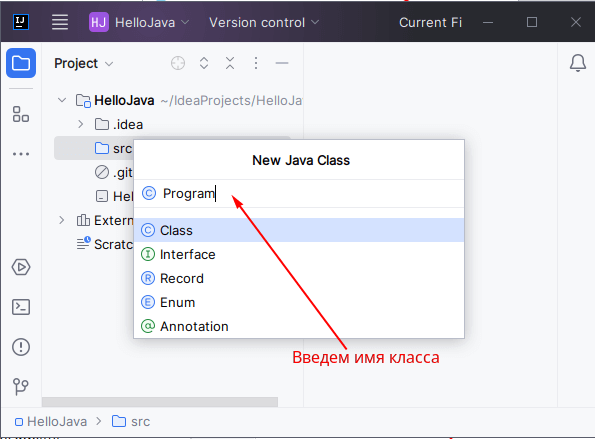
После этого нам откроется небольшое окошко, в которое надо ввести имя класса. Пусть класс будет называться Program :
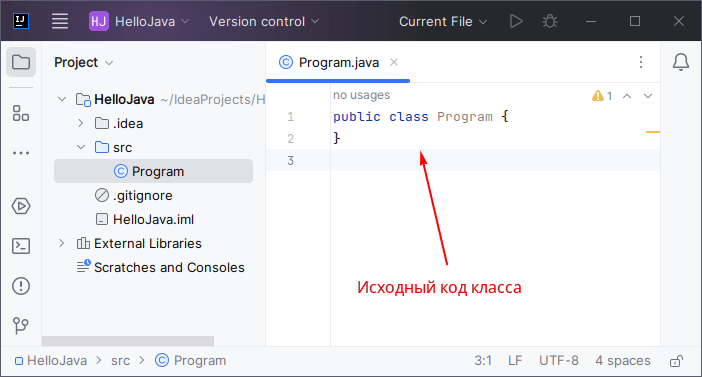
После нажатия на клавишу Enter в папку src будет добавлен новый файл с классом java (в случае выше класс Program). А в центральной части откроется его содержимое — собственно исходный код:
Изменим код класса следующим образом:
public class Program < public static void main(String[] args) < System.out.println("Hello Java!"); >>
С помощью зеленой стрелки на панели инструментов или через меню Run -> Run. запустим проект.
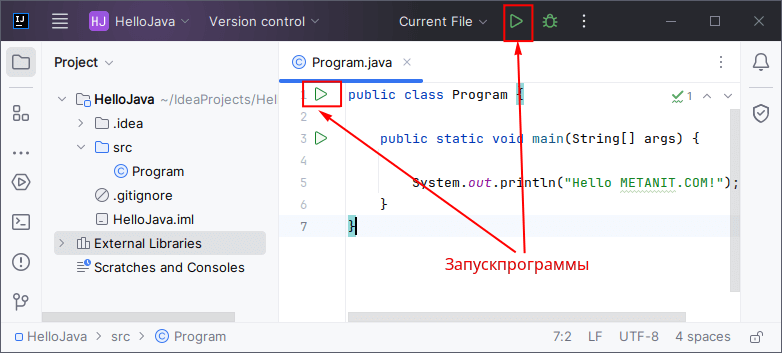
И внизу IntelliJ IDEA отобразится окно вывода, где мы можем увидеть результат работы нашей программы.