Add a hyperlink to a slide
The fastest way to create a basic web hyperlink on a PowerPoint slide is to press Enter after you type the address of an existing webpage (such as http://www.contoso.com ).
You can link to a webpage, or you can link to a new document or a place in a existing document, or you can begin a message to an email address.

Link to a website
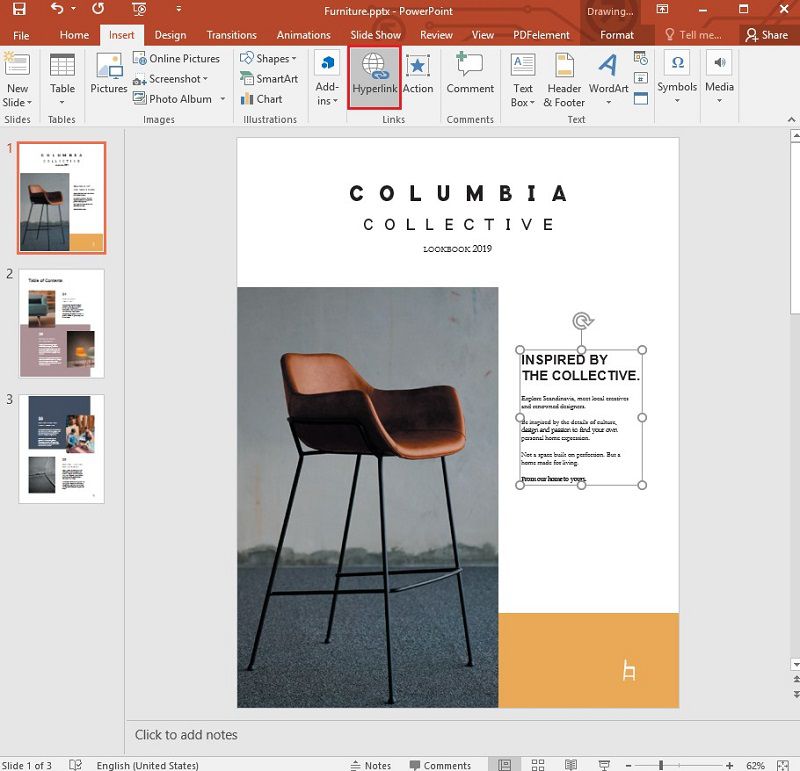
- Select the text, shape, or picture that you want to use as a hyperlink.
- Select Insert >Hyperlink.
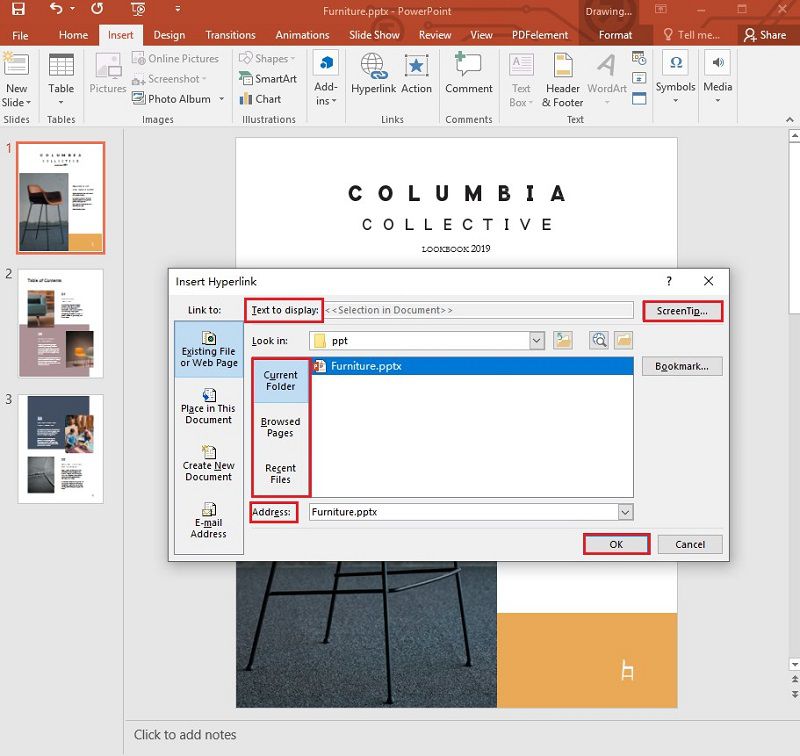
- Select Existing File or Web Page, and add the:
- Text to display: Type the text that you want to appear as hyperlink.
- ScreenTip: Type the text that you want to appear when the user hovers over the hyperlink (optional).
- Current Folder, Browsed Pages, or Recent Files: Select where you want to link to.
- Address: If you haven’t already selected a location above, insert the URL for the web site you want to link to. If you link to a file on your computer, and move your PowerPoint presentation to another computer, you’ll also need to move any linked files.
- 4. Select OK.
Link to a place in a document, new document, or email address
- Select the text, shape, or picture that you want to use as a hyperlink.
- Select Insert >Hyperlink and select an option:
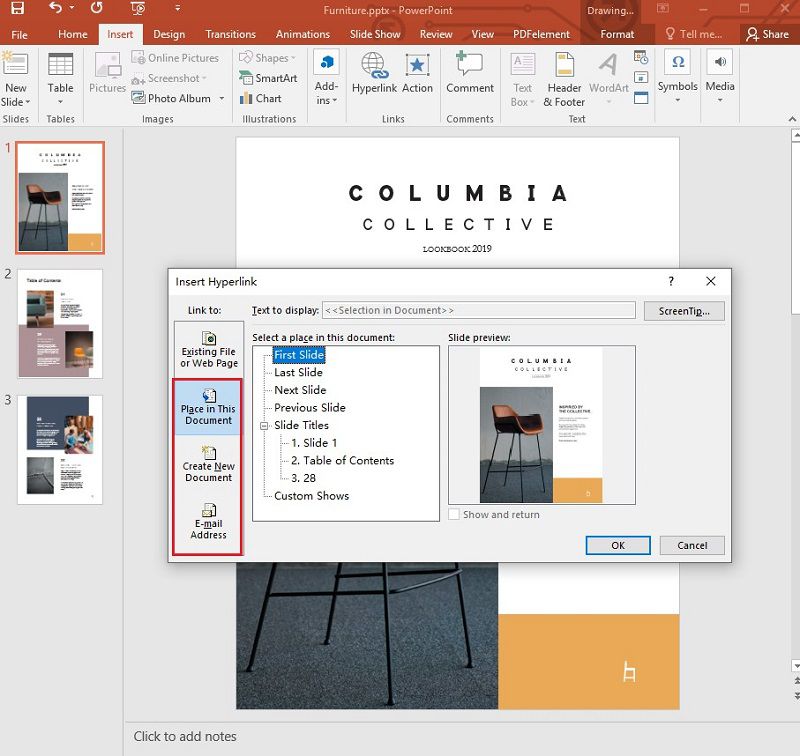
- Place in This Document: Link to a specific slide in your presentation.
- Create New Document: Link from your presentation to another presentation.
- E-mail Address: Link a displayed email address to open up a user’s email program.
- Fill in the Text to display, ScreenTip, and where you want to link to.
- Select OK.
Change the color of a hyperlink
You can change the color of a hyperlink if you like. If you want to change the display text of a link, right-click it and select Edit Link.
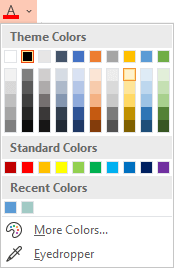
- Select the hyperlink you want to re-color.
- On the Home tab of the ribbon, select down arrow next to the Font Color button to open the menu of colors.
- Select the color you want for the hyperlink.
Test the hyperlink
Once you’ve inserted the link, you can test it (in Normal view) by right-clicking the hyperlink and selecting Open Hyperlink.
Show and return
The Show and return box is grayed out unless you are linking to a Custom Show in your presentation.
If you’re a Microsoft 365 subscriber and want to use a feature like show and return , click here to read about linking to another slide by using Zoom for PowerPoint, and see the «Choose to return» feature discussed near the end of that article.
See Also
The fastest way to create a basic web hyperlink on a PowerPoint slide is to press Enter after you type the address of an existing webpage (such as http://www.contoso.com ).
You can link to a web page, link to a different place in your presentation, open a different presentation, or begin a message to an email address.
2016
Select a heading below to open it and see the detailed instructions.
Link to a web page

- In Normal view, select the text, shape, or picture that you want to use as a hyperlink.
- On the Insert tab, click Hyperlink. The Insert Hyperlink dialog appears. 1 — Text to Display: The linked text in the document. 2 — ScreenTip: Text shown when you point your mouse at the linked text on the slide.
- Enter the web address in the Address box. (Example: https://www.contoso.com )
Change the color of a hyperlink
This new feature is available in PowerPoint 2016 for Mac version 16.14.18061000. Find your Office version

- Select the hyperlink you want to re-color.
- On the Home tab of the ribbon, select down arrow next to the Font Color button to open the menu of colors.
- Select the color you want for the hyperlink.
Link to a slide in the same presentation
- In the Insert Hyperlink dialog box, click This Document.
- Under Select a place in this document, click the slide you want to link to.
Link to a different presentation
- In the Insert Hyperlink dialog box, click Web Page or File.
- Click Select and then click the presentation or file you want to link to.
Note: PowerPoint for macOS can’t link to a specific slide on another presentation.
Link to an email address
- In the Insert Hyperlink dialog box, click Email Address.
- In the Email address box, type the email address that you want to link to, or in the Recently used email addresses box, click an email address.
- In the Subject box, type the subject of the email message.
2011
Select a heading below to open it and see the detailed instructions.
Link to a Web page
- Select the text or object that you want to make into a hyperlink.
- On the Home tab, under Insert, click Text, and then click Hyperlink.
- In the Link to box, enter the Web address.
Note: To link to a specific location on a Web page, click the Web Page tab, and then under Anchor, follow the instructions.
Link to a document or an email address
You can add text or an object as a hyperlink that opens a specific slide in a PowerPoint presentation or a custom slide show. You can also link to a Word document, an Excel workbook, a file, or an email address.
- Select the text or object that you want to make into a hyperlink.
- On the Home tab, under Insert, click Text, and then click Hyperlink.
- Click the Document or E-mail Address tab for the kind of hyperlink that you want to insert.
- Follow the instructions to create a link.
Note: The hyperlink is active in slide show view.
Link to a specific place in the presentation
You can link to different places in a presentation, such as first slide, last slide, next slide, or slide titles.
- Select the text or object that you want to make into a hyperlink.
- On the Home tab, under Insert, click Text, and then click Hyperlink.
- Click the Document tab, and then under Anchor, click Locate.
- Select the place in the document that you want to link to.
Note: The hyperlink is active in slide show view.
Link to a custom show
A hyperlinked custom show is a quick way to navigate to other custom shows from your primary presentation. You can also create a table of contents slide to link from. Designing your presentation this way allows you to navigate from the table of contents slide to different sections of your presentation, so that you can choose which sections to show to your audience at a particular time. The following instructions explain how to create one or more custom shows, and then add a hyperlink from the primary presentation to the custom shows.
Note: If you want to create a hyperlink from one presentation to a completely different presentation, you can add a hyperlink to the other document. For more information, see Create, edit, or remove a hyperlink.
- Open the presentation that you want to use to create a hyperlinked custom show.
- On the Slide Show tab, under Play Slide Show, click Custom Shows, and then click Edit Custom Shows.
- Click New.
- Under Slides in presentation, click the slides that you want to include in the custom show, and then click Add.
Tip: To select multiple sequential slides, click the first slide, and then hold down SHIFT while you click the last slide that you want to select. To select multiple nonsequential slides, hold down COMMAND while you click each slide that you want to select.
Edit a hyperlink
- Select the hyperlink that you want to change.
- On the Insert menu, click Hyperlink.
- Make the changes that you want.
Remove a hyperlink
- Select the text or object that represents the hyperlink that you want to remove.
- On the Home tab, under Insert, click Text, click Hyperlink, and then click Remove Link.
See Also
- Highlight the text that you want to be the hyperlink.
- On the Insert tab, click Hyperlink.
 The Link dialog box opens.
 - In the Display text box, type the text you want to be visible on the slide for the hyperlink.
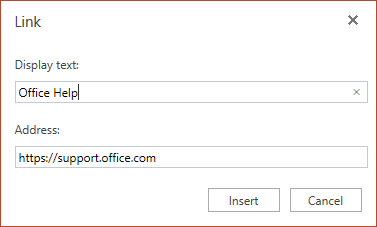
- Enter the web address in the Address box. (Example: https://www.contoso.com )
- Select Insert.
- To test the hyperlink, select the Slide Show tab on the ribbon, and then select Play from Beginning. (If you’ve turned off the Simplified Ribbon, you don’t have a Slide Show tab; instead use the View tab to start Slide Show.)
- You can also create a hyperlink to an email address. Instead of entering the web address in the Address box (step 4 above), type mailto:// followed by the complete email address.
Insert a hyperlink
- On the slide, tap where you want to add the link.
- On the Insert tab of the ribbon, select Link.
- Select Insert Link. Or: You can make a link to a recent web address or recently open file by selecting the item from the Recent Items list that appears.
- In the Text to display box, enter the text that will be the hyperlink.
- In the Address box, enter the address you want to link to. (Example: https://www.contoso.com )
- Select Insert.
Change the color of a hyperlink

This feature is available to Office Insiders only right now.

- Select the hyperlink you want to re-color.
- On the Home tab of the ribbon, tap the Font Color button to open the menu of colors.
- Tap the color you want for the hyperlink.
Insert a hyperlink
- On the slide, tap where you want to add the link.
- On the Insert tab of the ribbon, select Link.
- Select Insert Link. Or: You can make a link to a recent web address or recently open file by selecting the item from the Recent Items list that appears.
- In the Text to display box, enter the text that will be the hyperlink.
- In the Address box, enter the address you want to link to. (Example: https://www.contoso.com )
- Select Insert.
Change the color of a hyperlink
- Select the hyperlink you want to re-color.
- On the Home tab of the ribbon, tap the arrow next to the Font Color button to open the menu of colors.
- Tap the color you want for the hyperlink.
Insert a hyperlink
- On the slide, enter the text you want to turn into a hyperlink.
- Select the text.
- On the Insert tab of the ribbon, select Link.
- Select Insert Link. Or: You can make a link to a recently open file by selecting it from the Recent Items list that appears.
- In the dialog box that opens, in the Address box, enter the address you want to link to. (Example: https://www.contoso.com )
- Select Insert.
Change the color of a hyperlink

- Select the hyperlink you want to re-color.
- On the Home tab of the ribbon, tap the arrow next to the Font Color button to open the menu of colors.
- Tap the color you want for the hyperlink.
Как вставить гиперссылку в PowerPoint
Если вы хотите сделать свою презентацию более креативной, добавив ссылку, вы можете руководствоваться этой статьей, которая показывает, как вставить гиперссылку в PowerPoint.
Статьи по теме
- 1. Топ 10 Альтернатив PowerPoint для Mac в 2023 году
- 2. Как Вставить PDF в PowerPoint на MacOS 10.15 Catalina
Wondershare
PDFelement
PDF приложение для самой удобной работы.
Скачать Бесплатно
Скачать Бесплатно

Василий Лебедев
2023-03-23 16:04:51 • Отправлено: Для Презентации • Проверенные решения
Одним из лучших способов повышения убедительности, авторитетности и связи вашего слайда с важными источниками для взаимодействия с аудиторией, является вставка гиперссылки. Изучение того, как вставить гиперссылки в PowerPoint важно, чтобы помочь вам подготовиться соответствующим образом и быть готовым к такому моменту, когда вам нужно будет использовать это средство. Есть более быстрый способ сделать это, и он работает в зависимости от того, на что и как вы хотите вставить ссылку. Здесь мы покажем вам, как вставить гиперссылку в PowerPoint быстрым способом.
Как вставить гиперссылку в PowerPoint?
Самый быстрый способ добавления гиперссылок в слайд PowerPoint довольно прост. Перейдите на свой слайд, впишите URL или адрес веб-страницы и нажмите «Enter». На этом все. Проще создать ссылку на веб-страницу или даже ссылку на определенное место внутри слайда PowerPoint или в новом слайде или документе.
Шаг 1. Откройте презентацию PowerPoint.
Откройте презентацию PowerPoint и на слайде выберите объект, например, картинку, фигуру или текст, который будет использоваться в качестве рабочей гиперссылки. Перейдите к «Вставка» и выберите «Гиперссылка».
Шаг 2. Добавьте гиперссылку.
Выберите «Существующий файл/веб-страница» и продолжайте добавлять следующее по мере возможности:
- Текст для отображения — где вы добавляете слова/текст, которые собираетесь использовать в качестве гиперссылки.
- ScreenTip —, как правило, необязательная опция, она заключается в добавлении текста или слов, которые вы хотите, чтобы пользователи видели при наведении курсора на гиперссылку.
- Последние файлы/просмотренные страницы/текущая папка — по сути, все о месте, на которое вы ссылаетесь.
- Адрес — если вы еще не выбрали местоположение, добавьте URL-адрес сайта, на который будет вести ссылка.
После этого нажмите «OK», чтобы завершить процесс.
Обратите внимание, если у вас есть ссылки на файлы на ноутбуке или компьютере, и вы в конечном итоге перемещаете или используете содержимое PowerPoint на другом устройстве, перенос всех связанных файлов очень важен и даже обязателен.
Шаг 3. Вставьте гиперссылку в различные области (необязательно).
Кроме того, обратите внимание, что вы можете сделать дополнительные действия, такие как ссылка на различные области в конкретном документе, адрес электронной почты или даже новый документ, а не только веб-страницу или веб-сайт. Сначала нужно выбрать изображение, форму или текст, который будет вашей гиперссылкой, затем перейти на вкладку «Вставка» > «Гиперссылка». На этом этапе появится диалоговое окно, в котором вам будет предложено несколько различных вариантов.
- Поместить в этот документ — ссылка на указанный слайд в содержимом PPT.
- Создать новый документ — можно связать одну презентацию с другой.
- Адрес электронной почты — по сути, все о месте, на которое вы ссылаетесь.
- Конвертирование PDF в различные форматы файлов, включая RTF, HTML, PPT, Epub, Word, Excel и так далее.
- Создание PDF из изображений, отсканированных документов, HTML, текстовых форматов файлов или непосредственно со сканера.
- OCR (оптическое распознавание символов), позволяющее преобразовать любое отсканированное изображение или документ в PDF-файл с возможностью полного поиска и редактирования.
- Автоматическое распознавание и создание интерактивных полей формы.
- Извлечение данных из полей формы или отмеченных PDF.
- Вставка ссылки, изображения или текста в документ PDF.
- Добавление защиты паролем к документам.
- Редактирование фона, верхнего и нижнего колонтитулов документа.
- Создание и конвертирование PDF-документов в пакетном режиме.
Примечание: убедитесь, что вы добавили ScreenTip, текст для отображения подробной информации, включая место, на которое вы ссылаетесь.
Мощное программное обеспечение для работы с PDF.
Вы не сможете добиться успеха в работе с документами, если не будете знать, как можно конвертировать PDF-документы, редактировать их всеми способами, защищать паролями и разрешениями, добавлять электронные подписи, создавать и пакетно обрабатывать их. Все, что вам нужно, — это наиболее рекомендуемый инструмент управления PDF-документами Wondershare PDFelement — Редактор PDF-файлов, содержащий все необходимые решения для редактирования и управления PDF-документами. Он считается лучшей альтернативой Adobe, позволяющей делать все то, что умеет Adobe Acrobat, и даже намного больше за меньшую стоимость. Вот некоторые из основных возможностей:
Как вставить гиперссылку в PDF с помощью PDFelement?
Мы уже говорили, что вы можете изменять и редактировать PDF-файл различными способами. Более того, вы также можете добавить музыку в PDF-файл, подобно тому, как вы добавляете музыку в PowerPoint, с помощью функции «Добавить вложение». Вы можете добавлять вложения в качестве комментариев для ссылок на более длинные документы. Кроме того, вам не придется вставлять весь текст ссылки. Просто добавьте вложение и позвольте читателю перейти в нужное место. Далее приведено краткое руководство о том, как добавить музыку в качестве вложения.
Шаг 1. Откройте PDF-файл.
Запустите PDFelement и загрузите PDF-документ, в который нужно добавить гиперссылку.

Шаг 2. Вставьте гиперссылку.
Перейдите к пункту «Редактировать» > «Добавить ссылку» и выберите место в PDF, куда нужно добавить ссылку. В появившемся диалоговом окне задайте параметры и внешний вид гиперссылки. После этого найдите вкладку «Установить ссылку», чтобы завершить процесс добавления гиперссылки в выбранный PDF-документ.
Как вставить документ Word в PowerPoint за 60 секунд
Большинство приложений Microsoft Office отлично работают вместе, Word и PowerPoint не являются исключением. В этом уроке, я научу вас как вставляется документ Word в вашу презентацию PowerPoint.
А ещё у нас есть полезное дополнение к этому уроку. Скачаете нашу БЕСПЛАТНУЮ электронную книгу: The Complete Guide to Making Great Presentations. Получите книгу прямо сейчас.

Примечание: В этом уроке мы используем PowerPoint шаблон Simphony. Вы можете найти отличные шаблоны для презентаций PPT на Envato Elements или GraphicRiver, или в нашем полном руководстве по лучшим шаблонам — Ultimate Guide to the Best Microsoft PowerPoint Templates.
Как быстро вставить документы Word в PowerPoint
Примечание: посмотрите этот короткий видео урок или следуйте шагам, описанными ниже.
1. Вставка файла документа Word в PowerPoint
Первый способ, которым можно добавить документ Word в презентацию PowerPoint, это пойти на вкладку Вставка и выбрать Объект. Давайте выберем Создать из файла, а затем найдём и укажем наш документ Word.
.jpg)
Для нашего первого примера, давайте отметим Как значок и нажмём ОК. Теперь вы можете видеть значок документа Word в презентации. Файл на самом деле вставлен в презентацию PowerPoint. Вы можете открыть этот файл в Word двойным кликом по значку.
.jpg)
Даже если вы отправите кому-то эту презентацию, файл документа Word все ещё будет в ней и они смогут открыть его.
2. Вставка текста документа Word в
Другой способ, который работает с документами Word это ставка некоторого содержимого из файла в презентацию. Давайте повторим те же шаги, но в этот раз, мы не будем отмечать опцию Как значок.
.jpg)
Когда мы нажимаем OK, мы увидим текстовое поле с содержимым файла Word. Может потребоваться повторное форматирование текста, но все же это намного быстрее, чем создавать его заново.
Завершаем!
Вы только что изучили как вставить документ Word в PowerPoint двумя разными способами. Не забудьте отдать их способах, когда вам потребуется работать с документами Word и PowerPoint.
Больше уроков по PowerPoint на Envato Tuts+
Учитесь большему из наших уроков по PowerPoint и коротких видео-уроков на Envato Tuts+. У нас есть ассортимент материалов по PowerPoint, который поможет вам освоить работу с изображениями в презентации:
Урок за 60 секунд: Как вставлять ссылки в слайды PowerPoint
PowerPoint позволяет добавлять в слайды все виды контента, включая ссылки, с помощью которых, вы можете осуществлять переход по презентации. Сегодня мы узнаем, как быстро добавить на слайды PowerPoint ссылки, файлы и гиперссылки на сайт. Это важный навык для создания интерактивной презентации в PowerPoint.
Как вставлять ссылки в слайды PowerPoint (коротко)
Примечание: посмотрите этот короткий ролик или следуйте коротким шагам, которые дополняют это видео.
1. Открываем панель «Вставка гиперссылки» в PowerPoint
Давайте нажмём на вкладку Вставка на ленте PowerPoint и, выбрав поле на слайде, я нажимаю на Гиперссылка. Первым делом предлагается выбрать гиперссылку на файл на вашем компьютере, который вы можете просмотреть, используя эту центральную панель.

2. Вводим ссылку в панель добавления гиперссылки PowerPoint
Мы можем ссылаться на онлайн сайт. Я вставлю ссылку сюда, в мой буфер обмена, а затем наверху, я наберу текст, который будет отображать ссылка. Теперь я нажимаю ОК.

3. Теперь нажимаем на ссылку в слайде PowerPoint
Вы можете видеть ссылку на моем слайде, и когда я нажму на неё, она откроет эту ссылку в веб-браузере.

4. Вставляем ссылку, для перехода к конкретному слайду PowerPoint
Используя тот же самый способ вставки Гиперссылки, на этот раз на боковой панели я выберу — Место в документе. Я могу продолжить и нажать на одну из этих ссылок сбоку, чтобы перейти к определенному слайду в этой презентации. И снова, я набираю название ссылки и нажимаю ОК.

В завершение!
Как только она вставлена в презентацию, я могу нажать на ссылку, которую я создал, и это позволит мне перейти к другому разделу презентации.

Ещё уроки по слайдам PowerPoint
Вот еще несколько уроков по слайдам PowerPoint, которые помогут вам улучшить ваши презентационные познания: