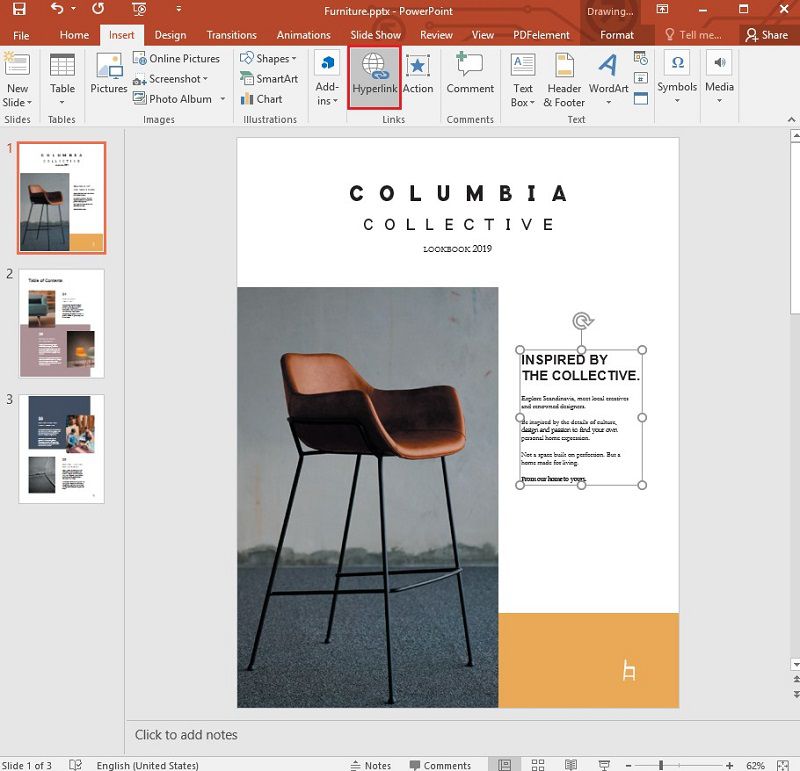
Добавление гиперссылок на слайды

Добавьте в свою презентацию ссылки для демонстрации сопутствующей информации в Интернете, быстрого перехода к другому слайду или создания сообщения электронной почты.
Создание ссылки на веб-сайт
- Выделите текст, фигуру или рисунок, который требуется использовать как гиперссылку.
- На вкладке Вставка нажмите кнопку Ссылка.
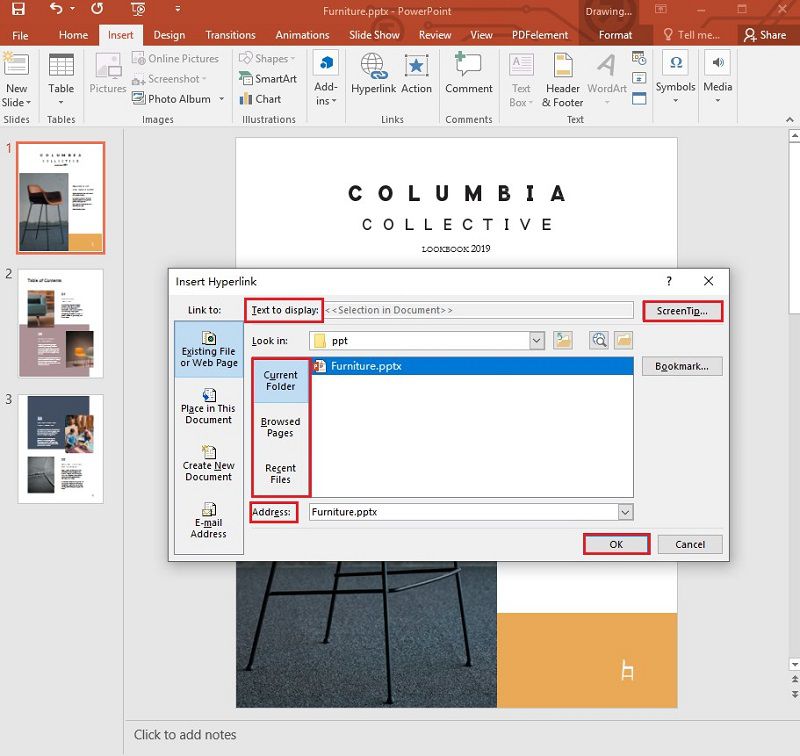
- Выберите связь с файлом, веб-страницей и настройте следующие параметры:
- Текст. Введите текст, который должен отображаться в качестве гиперссылки.
- Подсказка. Введите текст, который должен отображаться при наведении указателя мыши на гиперссылку (необязательно).
- Текущая папка, Просмотренные страницы или Последние файлы. Выберите, куда должна указывать ссылка.
- Адрес. Если вы еще не выбрали расположение выше, вырежьте и вставьте либо введите URL-адрес веб-сайта, на который должна указывать ссылка.
Примечание: Если создать ссылку на файл, расположенный на локальном компьютере, и перенести презентацию PowerPoint на другой компьютер, необходимо также перенести все связанные файлы.
Создание ссылки на место в документе, новый документ или адрес электронной почты
- Выделите текст, фигуру или рисунок, который требуется использовать как гиперссылку.
- На вкладке Вставка нажмите кнопку Ссылка и выберите подходящий вариант:
- Место в документе. Используется для создания ссылки на определенный слайд в презентации.
- Новый документ. Используется для создания ссылки на другую презентацию.
- Электронная почта. Используется для создания ссылки на отображаемый адрес электронной почты, с помощью которой запускается почтовый клиент пользователя.
- Заполните поля Текст, Подсказка и укажите, куда должна указывать ссылка.
- Нажмите кнопку ОК.
Как вставить HTML в PowerPoint
Известно, что добавление HTML в PowerPoint делает вашу презентацию более профессиональной. Поэтому в этой статье приводится простое руководство о том, как вставить HTML в PowerPoint.
Статьи по теме
- 1. Топ 10 Альтернатив PowerPoint для Mac в 2023 году
- 2. Как Вставить PDF в PowerPoint на MacOS 10.15 Catalina
Wondershare
PDFelement
PDF приложение для самой удобной работы.
Скачать Бесплатно
Скачать Бесплатно

Василий Лебедев
2023-03-23 16:01:18 • Отправлено: Для Презентации • Проверенные решения
HTML — это отличный способ включить дополнительную информацию в презентацию PowerPoint, когда информация имеет отношение к содержанию презентации, но вы не хотите включать всю веб-страницу в слайд. Стоит отметить, что существует два способа вставить HTML в PowerPoint. Вы можете либо добавить веб-страницу в качестве ссылки на изображения или текст на слайдах, либо вставить HTML-файл в качестве объекта. В этой статье мы рассмотрим, как вставить HTML в PowerPoint так, чтобы он отображался, как объект.
Как вставить HTML в PowerPoint?
Шаг 1. Откройте презентацию PowerPoint.
Откройте презентацию PowerPoint, а затем на слайде вы можете выбрать объект, такой как картинка, фигура, Gif, онлайн-изображение или текст для вставки гиперссылки. Вы можете перейти к «Вставка» и выбрать «Гиперссылка».
Шаг 2. Добавьте гиперссылку.
Затем вы можете ввести веб-адрес в поле ввода адреса и, наконец, нажать «OK».
Шаг 3. Проверьте ссылку.
Чтобы проверить ссылку, нажмите на значок «Слайд-шоу», а затем нажмите на объект. Должно открыться окно веб-браузера, ведущее на веб-страницу, к которой привязан объект.
Мощное программное обеспечение для работы с PDF.
Точно так же можно использовать HTML для предоставления дополнительной информации в документе PDF. Тем не менее, редактирование PDF-документов может быть очень сложным для большинства людей. Часть препятствий, которые приходится преодолевать тем, кто хочет легко редактировать PDF-документы, заключается в поиске подходящего инструмента. К счастью для вас, мы нашли лучший инструмент, который поможет вам редактировать PDF документы. Wondershare Wondershare PDFelement — Редактор PDF-файлов призвана облегчить процесс создания, редактирования и конвертирования PDF-документов. Некоторые из популярных функций программы включают:
- Позволяет пользователям легко и разнообразно редактировать документы PDF. Благодаря удобному интерфейсу, вы можете редактировать страницы, изображения, ссылки и водяные знаки в дополнение к тексту и изображениям.
- Функция OCR, которой оснащена программа, позволяет преобразовывать отсканированные PDF-файлы в редактируемые PDF-документы.
- PDFelement для Mac также позволяет легко аннотировать документ множеством способов, включая возможность рисовать, заполнять комментарии, ставить штампы и даже выделять PDF-документы.
- Вы также можете легко защитить документы PDF, добавив подпись или установив защиту паролем, чтобы защитить документ от несанкционированного использования.
- Создавайте формы, легко управляйте ими и даже извлекайте из них данные с помощью PDFelement.
- Программа также позволяет легко конвертировать документы PDF в другие форматы, такие как Word, Excel, PowerPoint и EPUB.
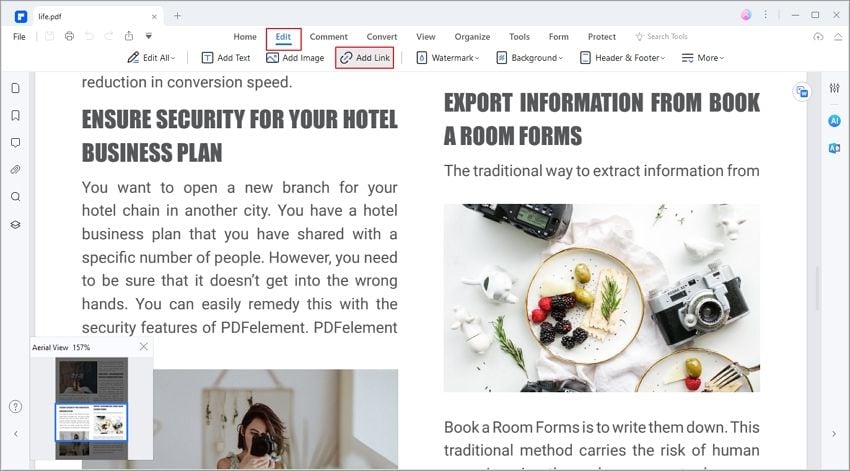
Как вставить HTML в PDF с помощью PDFelement?
Выполните следующие простые шаги, чтобы вставить гиперссылку в любой PDF-документ с помощью PDFelement.
Шаг 1. Откройте PDF-файл.
Загрузите в PDFelement документ, в который нужно добавить гиперссылку.

Шаг 2. Вставьте HTML-ссылку.
Чтобы добавить HTML-ссылку к содержимому документа, нажмите «Правка» > «Ссылка» и установите курсор в том месте, где вы хотите добавить ссылку. Удерживая и перетаскивая мышь, нарисуйте треугольник. Появится всплывающее окно, позволяющее настроить параметры HTML-ссылки, включая ее внешний вид и тип ссылки.
Шаг 3. Сохраните PDF.
Не забудьте сохранить изменения, внесенные в документ. Просто нажмите «Файл» > «Сохранить» или «Файл» > «Сохранить как», если вы хотите изменить название файла.
LiveWeb. Вставка и просмотр веб-страниц в режиме реального времени
LiveWeb — интересная и полезная надстройка для PowerPoint, позволяющая вставлять и просматривать веб-страницы в режиме реального времени непосредственно при демонстрации презентации.
Как установить LiveWeb в PowerPoint?
Скачайте файл, соответствующий вашей версии Microsoft Office
Для PowerPoint 97-2003: Нажмите здесь (ZIP)
Для PowerPoint 2007/2010 (32bit/64-bit): Нажмите здесь (ZIP)
1. Извлеките содержимое ZIP-архива в папку.
2. Запустите PowerPoint.
3. Перейдите на панель инструментов, нажмите Файл — Параметры
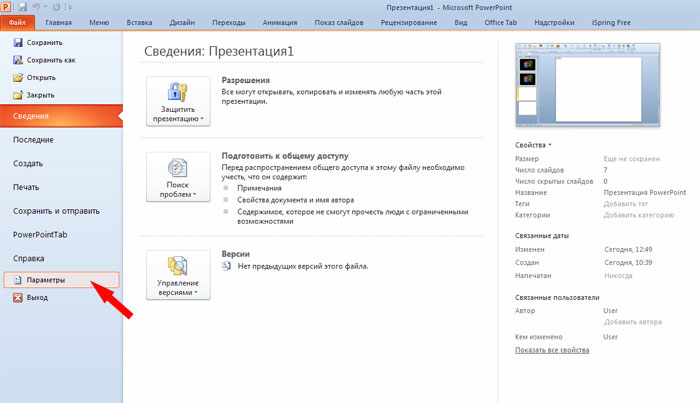
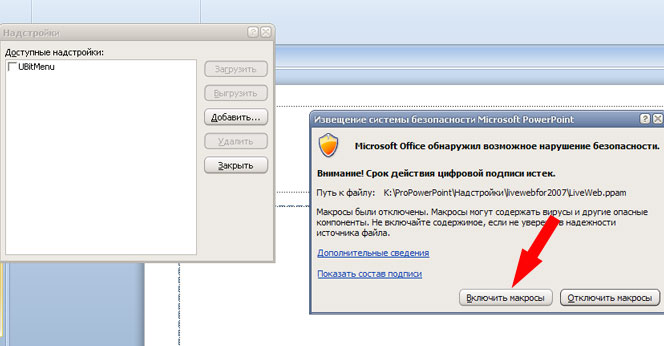
4. В открывшемся окне Параметры PowerPoint выберите вкладку Надстройки. Внизу страницы в выпадающем списке окошка Управление выберите пункт Надстройки PowerPoint и нажмите на кнопку Перейти.

5. В окне Надстройки нажмите на кнопку Добавить. С помощью диалогового окна найдите папку, в которую вы распаковали скачанный архив, и выберите файл «LiveWeb.ppam» для версии PowerPoint 2007 / 2010 или LiveWeb.ppa для версии PowerPoint 97-2003 . Нажмите ОК.
6. Вы можете увидеть извещение системы безопасности об истечении срока действия цифровой подписи и отключении макросов. Просто нажмите кнопку Включить макросы.
На этом интеграция LiveWeb в PowerPoint успешно закончена.
Если вы все сделали правильно, то на панели инструментов на вкладке Вставка у вас появится дополнительный раздел

ПРИМЕЧАНИЕ: если вы не можете загрузить надстройку, проверьте ваши настройки безопасности макросов .
Как непосредственно вставлять страницы веб-сайтов в презентацию с помощью LiveWeb можно посмотреть в этой статье.
Пожалуйста, проголосуйте за статью и поделитесь с друзьями в социальных сетях!
Похожие записи
Как добавить, удалить, дублировать, переместить или скрыть слайды в PowerPoint
Быстрая вставка заголовков слайдов в презентацию из структуры
- Советы и хитрости, Текст
- 1 комментарий
Большой мир. Шаблон PowerPoint
Старинная карта. Шаблон для презентаций по истории
Морской городок. Шаблон PowerPoint
- Google Slides, География, Детские, Природа, Шаблоны Google Slides
Шаблон PowerPoint «Красные лилии»
Статьи, уроки
Шаблоны PowerPoint
Google Slides
- Уроки Google Slides
- Шаблоны Google Slides
Ответить Отменить ответ
Все права защищены © 2012 — 2024 ProPowerPoint.Ru.
Копирование и размещение материалов сайта на других ресурсах разрешено только при условии
наличия гиперссылки на источник материала
Manage Cookie Consent
To provide the best experiences, we use technologies like cookies to store and/or access device information. Consenting to these technologies will allow us to process data such as browsing behavior or unique IDs on this site. Not consenting or withdrawing consent, may adversely affect certain features and functions.
Functional Functional Always active
The technical storage or access is strictly necessary for the legitimate purpose of enabling the use of a specific service explicitly requested by the subscriber or user, or for the sole purpose of carrying out the transmission of a communication over an electronic communications network.
Preferences Preferences
The technical storage or access is necessary for the legitimate purpose of storing preferences that are not requested by the subscriber or user.
Statistics Statistics
The technical storage or access that is used exclusively for statistical purposes. The technical storage or access that is used exclusively for anonymous statistical purposes. Without a subpoena, voluntary compliance on the part of your Internet Service Provider, or additional records from a third party, information stored or retrieved for this purpose alone cannot usually be used to identify you.
Marketing Marketing
The technical storage or access is required to create user profiles to send advertising, or to track the user on a website or across several websites for similar marketing purposes.
How to Embed a Live Website in PowerPoint

Wondering if it is possible to directly embed a website in PowerPoint? Well you’re in luck! Using a free PowerPoint add-in, you can add an internet browser to your PowerPoint. That’s right, a full functioning Google browser added to the bottom toolbar of your PowerPoint slide show that you can open anytime to surf the web. You can browse search results, open multiple windows, bookmark pages ahead of time, and pin sites to your home page!
No more pasting links and leaving PowerPoint for a separate internet window. Let’s take a look at how you can embed a live internet browser right into PowerPoint.
1. Download PowerPoint add-in, ClassPoint
To embed a website into Microsoft PowerPoint, you need to use a free add-in, ClassPoint. PowerPoint doesn’t offer an embedded website or web viewer, but this is where add-ins come in and why they are so great!
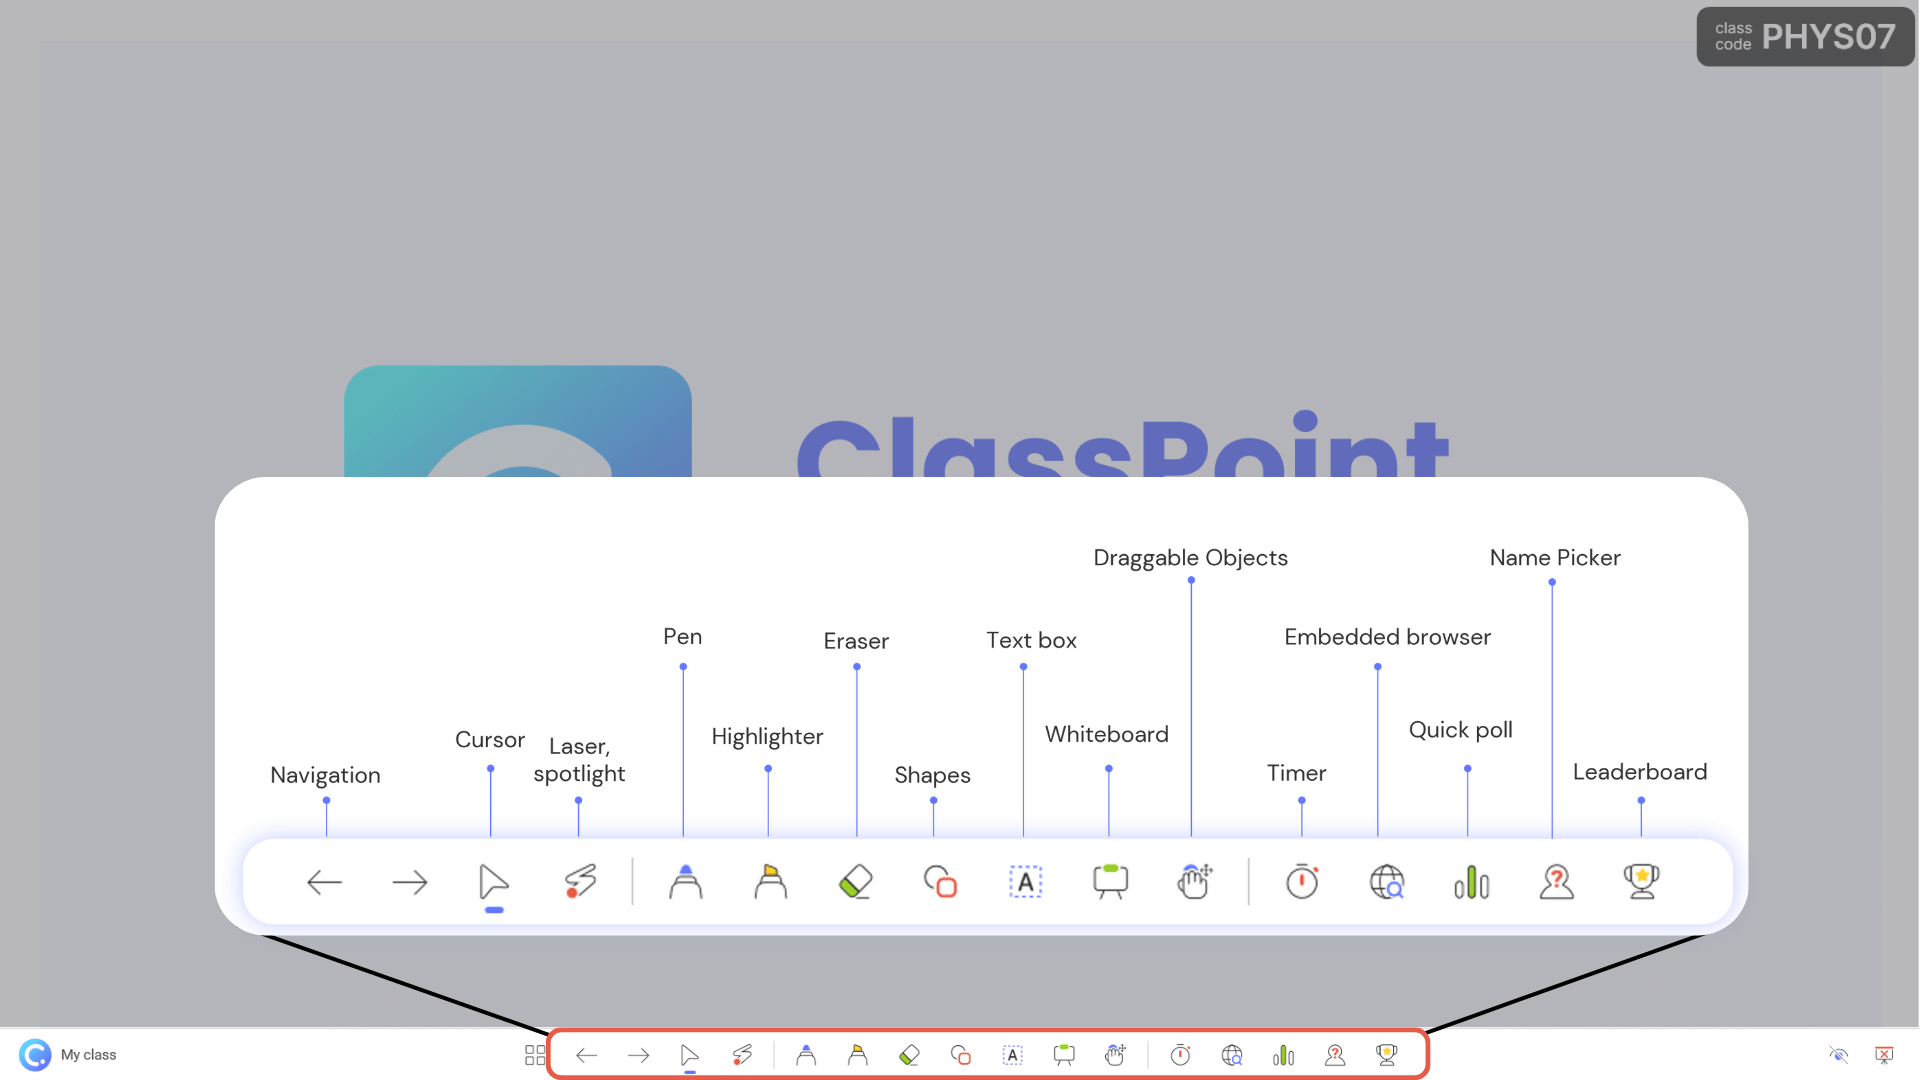
So the first step, is to simply download ClassPoint for free. Once you do that, you will gain a toolbar full of presentation tools that enhance audience engagement & your presentation delivery including the Embedded Browser.
2. Open Embedded Browser from the Toolbar in Slide show
To access the embedded internet browser, enter presentation mode. Running across the bottom of your slides, you will find the ClassPoint toolbar. Find the Embedded Browser icon and click it to open Google! Now you can search, scroll, add tabs, and navigate the web just as you would on any internet browser!
3. Bookmark and Pin your favorite sites
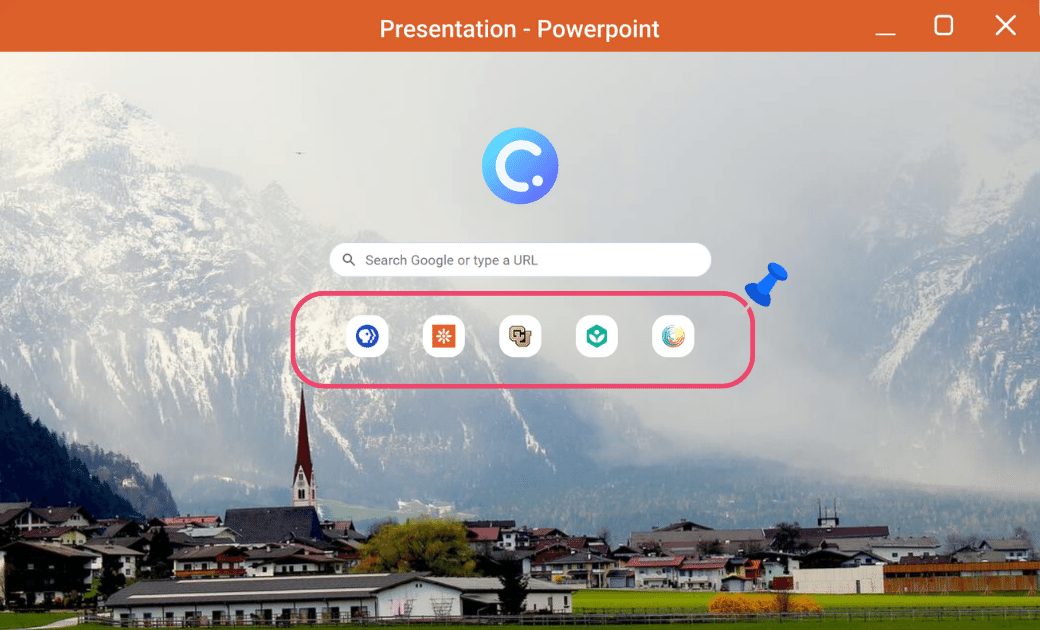
Just like your default internet browser, you can bookmark your favorite websites and pin them to the home search page for quick access!
If you are prepping for a presentation or lesson and plan on visiting a website during your presentation, go into slideshow mode, paste in your link into Google, bookmark it, and then pin it. Now your site will be ready to go in just a click when you open the Embedded Browser later!
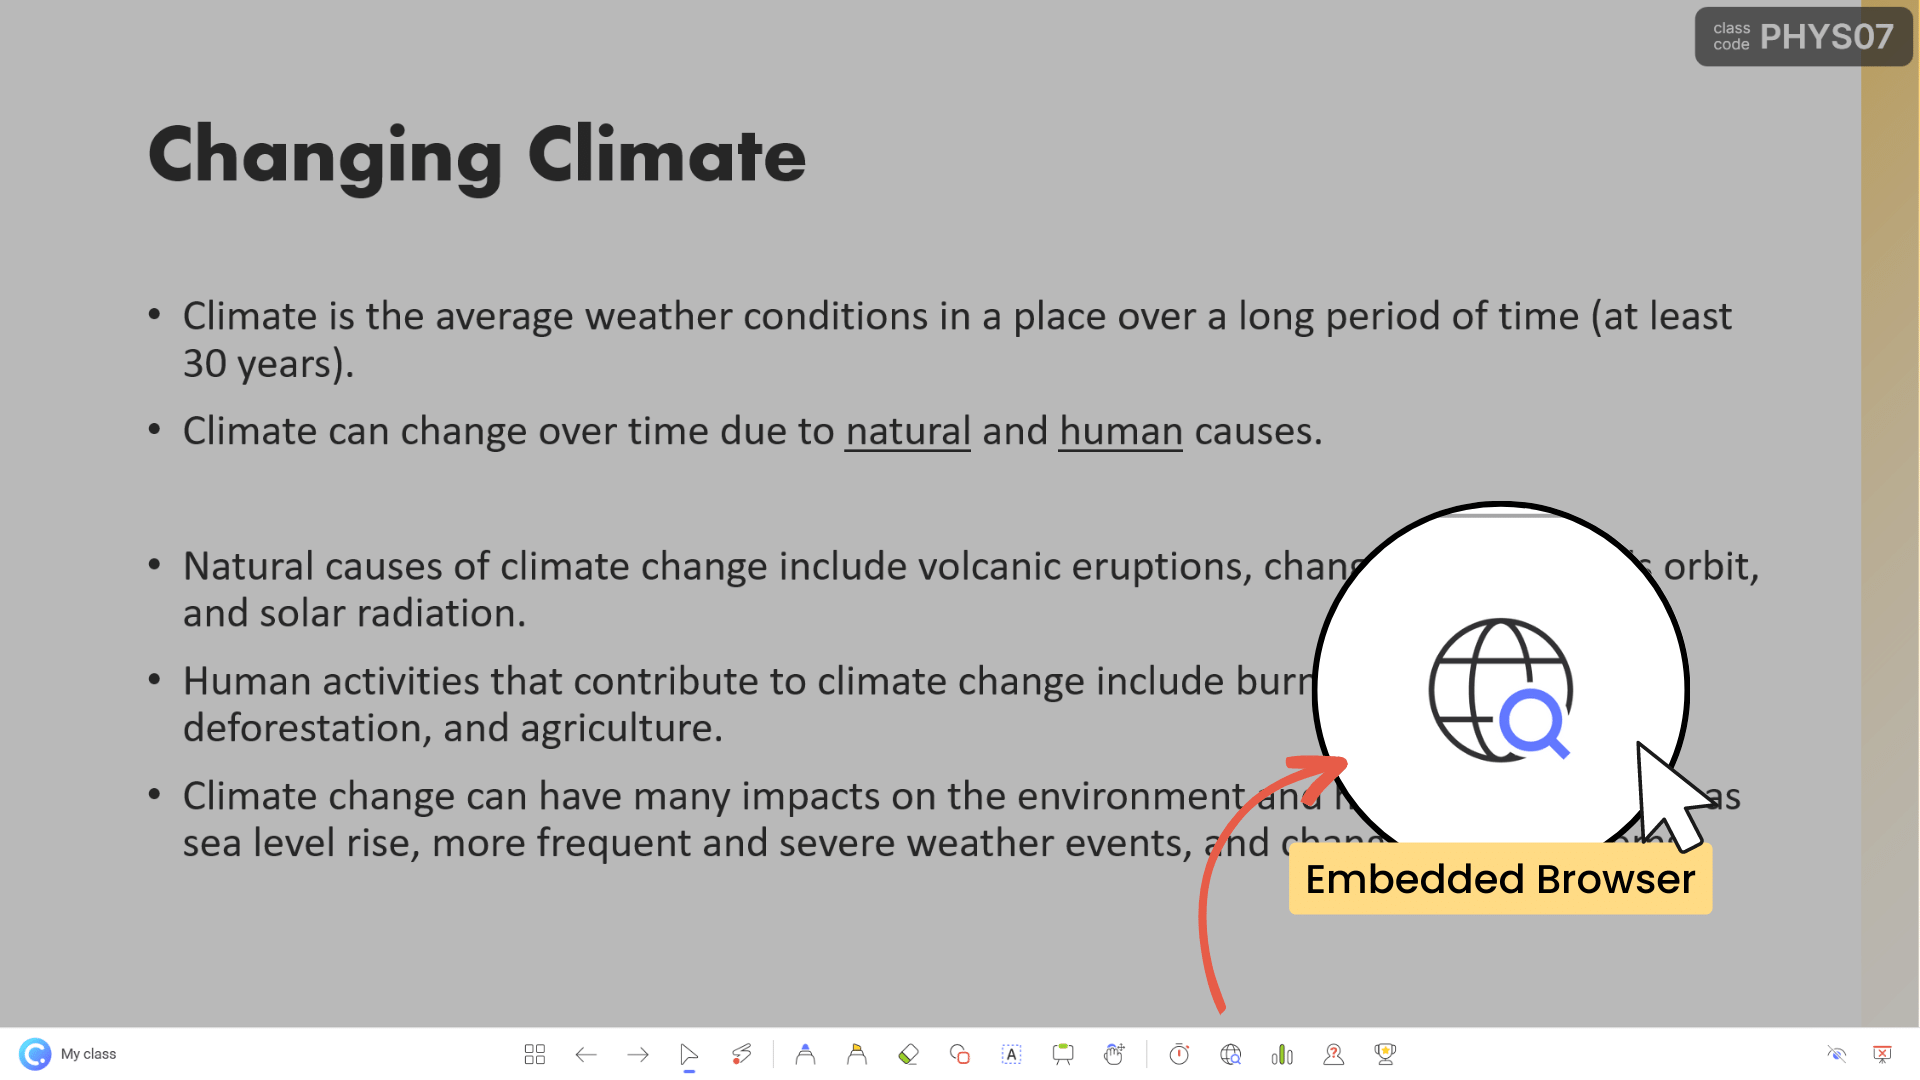
4. Insert the webpage and annotate on it
If you find an image, graph, map, etc. on a webpage that you would like to elaborate on, you can actually insert as a slide image into your PowerPoint, and annotate on it!
Next to the address bar on the top right of the internet browser, you can click insert as slide, the page you are on will be added as a slide in your presentation. Then Annotate on it with ClassPoint’s inking tools! And if you want to go back the browser, just click on the browser icon again, and your page will be there right where you left off.
If you’d like to learn more about ClassPoint’s Embedded Browser, check out this tutorial video ▶️
And, to learn more about the other presentation tools that come with ClassPoint, you can find them here. ⬇️
Examples of How Embedded Browser can be used During Presentations for Teachers
Teachers use the internet and educational websites in various ways during their lessons to enhance the learning experience for their students. Some common ways that teachers use the internet to present information during their lessons include:
1. Interactive simulations:
Some educational websites provide interactive simulations that allow students to explore and manipulate concepts in a hands-on way.
Example: A science teacher might use an interactive simulation from PhET Interactive Simulations to demonstrate how the properties of gases change as temperature and pressure are altered.
2. Infographics and data visualizations:
Many educational websites provide infographics and data visualizations to help students to better understand complex concepts or to see patterns in data.
Example: A history teacher might use an infographic from the National Archives to illustrate the causes and effects of a particular historical event.
3. Virtual field trips:
Websites such as Google Earth and Discovery Education provide virtual field trip experiences that allow students to explore and learn about different parts of the world without leaving the classroom.
Example: A social studies teacher might take their students on a virtual tour of historic sites or famous landmarks using Google Earth.
4. Videos:
Educational websites such as YouTube and Khan Academy provide teachers with access to a wealth of instructional videos that they can use to introduce new concepts, reinforce ideas, or provide additional examples.
Example: A math teacher might use a video from Khan Academy to explain how to solve a particular type of equation.
5. Research:
Teachers can use the internet to find additional information, answers, or references about a topic they are teaching. If a debate needs settling, or a question is posed the internet, just like in daily life, is a great resource for lesson support.
Example: A debate arises or a question is posed during class that needs settling. The teacher can quickly open Google to search the class’s question.
6. Games and Interactive activities:
The internet provides various interactive activities such as quizzes & games that teachers can use to engage their students and make learning fun. Educational websites such as EdPuzzle or PBS Learning Media provide games and interactive activities that help students to practice and reinforce concepts they are learning in class.
Example: An English teacher might use a game from Funbrain to help students practice identifying different parts of speech.
With ClassPoint’s Embedded Browser, you can search and use the internet without leaving your presentation and breaking your flow! This convenient presentation tool can also impresses your audience. And for teachers, incorporating the types of resources above, can help make their lesson more engaging and interactive for your students!
And, if you haven’t heard of ClassPoint yet, check it out! It’s an audience engagement tool designed to improve the experience of teaching and the productivity of presenting with PowerPoint! In addition the the embedded browser, ClassPoint adds an array of tools including a random name picker, timer, and interactive audience response questions that turn your audience members into participants. ✨
About Paige Puntillo
I’m Paige, a part of the global marketing team at ClassPoint. With education and experience in both marketing and education, EdTech is my jam! When I’m not working I’m probably starting new DIY projects or chilling with my cat!
Try ClassPoint for free
All-in-one teaching and student engagement in PowerPoint.
Supercharge your PowerPoint.
Start today.
500,000+ people like you use ClassPoint to boost student engagement in PowerPoint presentations.
Footer
The #1 teaching and student engagement tool in PowerPoint.