Безопасное извлечение съёмного носителя
При использовании внешних носителей информации, таких как USB-накопители перед отсоединением их от компьютера нужно выполнить безопасное извлечение. Если вы просто отсоедините носитель, существует риск того, что он в это время ещё используется каким-нибудь приложением. Это может привести к потере или повреждению файлов. При использовании оптического диска, например, CD или DVD, ту же процедуру можно выполнить для извлечения лотка с диском из привода.
Чтобы извлечь съёмный носитель:
- Используя Обзор , откройте приложение Файлы .
- Найдите устройство в боковой панели. Рядом с его именем должен быть небольшой значок для извлечения устройства. Нажмите на значок для безопасного удаления или извлечения устройства. Можно также нажать правой кнопкой на имени устройства в боковой панели и выбрать Извлечь .
Безопасное извлечение используемого устройства
Если любой из файлов на устройстве открыт и используется приложением, безопасно извлечь устройство будет невозможно. Будет выведено сообщение Том занят . Чтобы безопасно извлечь устройство:
- Нажмите Отменить .
- Закройте все файлы на устройстве.
- Нажмите значок извлечения для безопасного отключения или извлечения устройства.
- Можно также нажать правой кнопкой на имени устройства в боковой панели и выбрать Извлечь .
Также можно выбрать Всё равно извлечь чтобы извлечь устройство, не закрывая файлов. Это может привести к ошибкам в тех приложениях, с помощью которых были открыты эти файлы.
Как монтировать и размонтировать файловые системы в Linux
В операционных системах Linux и UNIX вы можете использовать команду mount для подключения (монтирования) файловых систем и съемных устройств, таких как флэш-накопители USB, в определенной точке монтирования в дереве каталогов.
Команда umount отсоединяет (размонтирует) смонтированную файловую систему от дерева каталогов.
В этом руководстве мы рассмотрим основы подключения и отключения различных файловых систем с помощью команд mount и umount .
Как вывести список подключенных файловых систем
При использовании без аргументов команда mount отобразит все подключенные в данный момент файловые системы:
mountПо умолчанию вывод будет включать все файловые системы, включая виртуальные, такие как cgroup, sysfs и другие. Каждая строка содержит информацию об имени устройства, каталоге, в который оно смонтировано, типе файловой системы и параметрах монтирования в следующей форме:
device_name on directory type filesystem_type (options) Чтобы отобразить только определенные файловые системы, используйте параметр -t .
Например, чтобы распечатать только разделы ext4, которые вы должны использовать:
mount -t ext4Монтирование файловой системы
Чтобы смонтировать файловую систему в указанном месте (точке монтирования), используйте команду mount в следующей форме:
mount [OPTION. ] DEVICE_NAME DIRECTORY После присоединения файловой системы точка монтирования становится корневым каталогом смонтированной файловой системы.
Например, чтобы смонтировать файловую систему /dev/sdb1 каталог /mnt/media вы должны использовать:
sudo mount /dev/sdb1 /mnt/mediaОбычно при монтировании устройства с общей файловой системой, такой как ext4 или xfs команда mount автоматически определяет тип файловой системы. Однако некоторые файловые системы не распознаются и требуют явного указания.
Используйте параметр -t чтобы указать тип файловой системы:
mount -t TYPE DEVICE_NAME DIRECTORY Чтобы указать дополнительные параметры монтирования , используйте параметр -o :
mount -o OPTIONS DEVICE_NAME DIRECTORY Несколько вариантов могут быть представлены в виде списка, разделенного запятыми (не вставляйте пробел после запятой).
Вы можете получить список всех вариантов монтирования, набрав в терминале man mount .
Монтирование файловой системы с помощью / etc / fstab
Предоставляя только один параметр (каталог или устройство) команде mount , она будет читать содержимое файла конфигурации /etc/fstab чтобы проверить, указана ли указанная файловая система в списке или нет.
Если /etc/fstab содержит информацию о данной файловой системе, команда mount использует значение другого параметра и параметры монтирования, указанные в fstab .
Файл /etc/fstab содержит список записей в следующем виде:
[File System] [Mount Point] [File System Type] [Options] [Dump] [Pass] Используйте команду mount в одной из следующих форм, чтобы присоединить файловую систему, указанную в /etc/fstab :
mount [OPTION. ] DIRECTORY mount [OPTION. ] DEVICE_NAME Установка USB-накопителя
В большинстве современных дистрибутивов Linux, таких как Ubuntu, USB-накопители автоматически монтируются, когда вы их вставляете, но иногда вам может потребоваться вручную смонтировать диск.
Чтобы вручную подключить USB-устройство, выполните следующие действия:
-
Создайте точку монтирования:
sudo mkdir -p /media/usbsudo mount /dev/sdd1 /media/usbЧтобы узнать тип устройства и файловой системы, вы можете использовать любую из следующих команд:
fdisk -lls -l /dev/disk/by-id/usb*dmesglsblk
Чтобы смонтировать USB-накопители в формате exFAT, установите бесплатный модуль и инструменты FUSE exFAT .
Монтирование файлов ISO
Вы можете смонтировать файл ISO с помощью устройства loop, которое представляет собой специальное псевдоустройство, которое делает файл доступным как блочное устройство.
-
Начните с создания точки монтирования, это может быть любое место, которое вы хотите:
sudo mkdir /media/isosudo mount /path/to/image.iso /media/iso -o loopМонтирование NFS
Чтобы смонтировать общий ресурс NFS, в вашей системе должен быть установлен клиентский пакет NFS.
-
Установите клиент NFS в Ubuntu и Debian:
sudo apt install nfs-commonsudo yum install nfs-utilsВыполните следующие действия, чтобы смонтировать удаленный каталог NFS в вашей системе:
-
Создайте каталог, который будет точкой монтирования для удаленной файловой системы:
sudo mkdir /media/nfssudo nano /etc/fstabДобавьте в файл следующую строку, заменив remote.server:/dir IP-адресом сервера NFS или именем хоста и экспортированным каталогом:
/ etc / fstab
# remote.server:/dir /media/nfs nfs defaults 0 0sudo mount /media/nfsОтключение файловой системы
Чтобы отсоединить смонтированную файловую систему, используйте команду umount после которой укажите либо каталог, в котором она была смонтирована (точка монтирования), либо имя устройства:
umount DIRECTORYumount DEVICE_NAME
Если файловая система используется, команда umount не сможет отсоединить файловую систему. В таких ситуациях вы можете использовать команду fuser чтобы узнать, какие процессы обращаются к файловой системе:
fuser -m DIRECTORYКак только вы определите процессы, вы можете остановить их и размонтировать файловую систему.
Ленивое отключение
Используйте параметр -l ( —lazy ), чтобы отключить занятую файловую систему, как только она больше не будет занята.
umount -l DIRECTORYРазмонтировать принудительно
Используйте параметр -f ( —force ), чтобы принудительно размонтировать. Этот параметр обычно используется для отключения недоступной системы NFS.
umount -f DIRECTORYОбычно не рекомендуется принудительное отключение, так как это может повредить данные в файловой системе.
Выводы
К настоящему времени вы должны хорошо понимать, как использовать команду mount для присоединения различных файловых систем к вашему дереву каталогов и отсоединения монтирования с помощью команды umount .
Чтобы узнать больше о параметрах команд mount и umount , см. Соответствующие страницы руководства.
Introduction
This page explains how to use USB drives, like external hard disks and USB flash drives (aka USB sticks, thumb drives, pen drives, etc). The material here also applies to flash cards (like in your digital camera).
USB storage devices have the enormous advantage that for the most part they use a standard set of protocols. Thus, instead of needing individual drivers, as does much computer hardware, a standard driver permits access to the devices, making them very portable and able to easily work on many platforms.
For help with internal hard drives, see Fstab and MountingWindowsPartitions.
Automounting
Mounting
By default, storage devices that are plugged into the system mount automatically in the /media/ directory, open a file browser window for each volume and place an icon on your desktop. The rationale for this slight change of behavior can be found here. If you plug in a usb hard disk with many partitions, all of the partitions will automatically mount. This behaviour may not be what you want; you can configure it as shown below.
If the volumes have labels the icons will be named accordingly. Otherwise, they will be named «disk», «disk-1» and so on.
To change the volume label see RenameUSBDrive.
Configuring Automounting
To enable or disable automount open a terminal and type:
dconf-editor
Browse to org.gnome.desktop.media-handling.
The automount key controls whether to automatically mount media. If set to true, Nautilus will automatically mount media such as user-visible hard disks and removable media on start-up and media insertion.
Another key, org.gnome.desktop.media-handling.automount-open, controls whether to automatically open a folder for automounted media.
If set to true, Nautilus will automatically open a folder when media is automounted. This only applies to media where no known x-content type was detected; for media where a known x-content type is detected, the user configurable action will be taken instead. This can be configured as shown below.
Configuring Program Autostart
To control which programs automatically start when you plug in a device, go to System-Settings — Details — Removable Media.
For more complex scenarios, see UsbDriveDoSomethingHowto.
Unmounting/Ejecting
- Right-click the desktop icon and select «Unmount» (or in some cases, «Eject»).
- In the file manager window, click on the «eject» button next to the name of the mounted volume.
- Right-click the icon in the launcher and select «Unmount».
Auto-mounting (Ubuntu Server)
By default, disk drives do not auto-mount in Ubuntu Server Edition. If you are looking for a lightweight solution that does not depend on HAL/DBUS, you can install «usbmount».
Manually Mounting
Using Disks
Disks (the GNOME disk utility) is an application for visually managing disk drives and media. When you run it, you will see a list of your drives, including USB drives. If you click a drive on the list, you can view its details, and you can click the triangle-shaped button (Play button) to mount the drive. (This method works even when the drive does not auto-mount.)
Using mount
Get the Information
Sometimes, devices don’t automount, in which case you should try to manually mount them. First, you must know what device you are dealing with and what filesystem it is formatted with. Most flash drives are FAT16 or FAT32 and most external hard disks are NTFS. Type the following:
sudo fdisk -l
Find your device in the list. It is probably something like /dev/sdb1. For more information about filesystems, see LinuxFilesystemsExplained.
Create the Mount Point
Now we need to create a mount point for the device. Let’s say we want to call it «external». You can call it whatever you want, but if you use spaces in the name it gets a little more complicated. Instead, use an underscore to separate words (like «my_external»). Create the mount point:
sudo mkdir /media/external
Mount the Drive
We can now mount the drive. Let’s say the device is /dev/sdb1, the filesystem is FAT16 or FAT32 (like it is for most USB flash drives), and we want to mount it at /media/external (having already created the mount point):
sudo mount -t vfat /dev/sdb1 /media/external -o uid=1000,gid=1000,utf8,dmask=027,fmask=137
The options following the «-o» give you ownership of the drive, and the masks allow for extra security for file system permissions. If you don’t use those extra options you may not be able to read and write the drive with your regular username.
Otherwise, if the device is formatted with NTFS, run:
sudo mount -t ntfs-3g /dev/sdb1 /media/external
Note: You must have the ntfs-3g driver installed. See MountingWindowsPartitions for more information.
Unmounting the Drive
When you are finished with the device, don’t forget to unmount the drive before disconnecting it. Assuming /dev/sdb1 is mounted at /media/external, you can either unmount using the device or the mount point:
sudo umount /dev/sdb1
sudo umount /media/external
You cannot unmount from the desktop by right-clicking the icon if the drive was manually mounted.
Using pmount
There is a program called pmount available in the repositories which allows unprivileged users to mount drives as if they were using sudo, even without an entry in /etc/fstab. This is perfect for computers that have users without RootSudo access, like public terminals or thin clients.
pmount can be used with the same syntax as mount (but without sudo), or quite simply as follows:
pmount [ label ]
pmount /dev/sdb1 flash_drive
If you leave off the label option, it will mount by default at /media/device.
To unmount the device, use pumount, like so:
pumount
pumount /dev/sdb1
For more help, see the man pages for pmount and pumount.
The Importance of Unmounting
Before disconnecting devices, you must unmount them first. This is similar to «Safely Remove» in Windows in that the device won’t unmount until data is finished being written to the device, or until other programs are finished using it. This applies to all types of storage devices, including flash drives, flash cards, external hard drives, ipods and other media players, and even remote storage like Samba or NFS shares.
Failure to unmount before disconnecting the device can result in loss of data and/or a corrupted file system. There are no exceptions to this rule. Be safe — unmount your drives before disconnecting them!
Other Useful Commands
To see a list of your USB devices (the vendor and device ID’s), run:
lsusb
To see all attached storage devices and their partitions, run:
sudo fdisk -l
To see information about currently mounted systems, simply run:
mount
Troubleshooting
Presented here are some common problems users encounter.
Interfering services
Two services/programs responsible for automounting might interfere and thereby prevent a successful automount and permission setting.
Example: Activating the Automount function of Nautilus while using pmount will result in read-only permissions for normal users. Either disable Nautilus’ Automount function or deinstall pmount.
Unclean LogFile
If you are mounting drives formatted with NTFS (like most external USB hard disks are), you must first have the ntfs-3g driver installed. This is done automatically in newer versions of Ubuntu. You should also install ntfs-config and enable mounting, which is not done automatically. For ntfs-3g and ntfs-config, see MountingWindowsPartitions.
When a drive is not Safely Removed from a Windows machine (or a forced shutdown occurs from Windows), you may get an error like this when you plug in your drive:
$LogFile indicates unclean shutdown (0, 0) Failed to mount '/dev/sda1': Operation not supported Mount is denied because NTFS is marked to be in use. Choose one action: Choice 1: If you have Windows then disconnect the external devices by clicking on the 'Safely Remove Hardware' icon in the Windows taskbar then shutdown Windows cleanly. Choice 2: If you don't have Windows then you can use the 'force' option for your own responsibility. For example type on the command line: mount -t ntfs-3g /dev/sda1 /media/sda1/ -o force
The best option is Choice 1, but you can force the mount by running Choice 2 with sudo. You must then manually unmount it from the terminal (you can’t right click the desktop icon):
sudo umount
After that the drive should automount normally again.
User Privileges
If your usb device doesn’t appear on your desktop, you should check that your user has the correct privileges. Go to System->Administration->User and Groups, choose the user, click on «Properties», then go to the «User Privileges» tab. You should have the «Access external storage devices automatically» option checked.
Preferences
- Navigate to System->Preferences->Removable Drives and Media
- Verify that all «Mount removable drives when. » are checked.
NOTE: This does not seem to apply to Hardy Heron.
USB 2 Issues
old kernels workaround
If you encounter problems using your USB device with USB 2 (i.e. ‘high speed’ mode), you can revert to the ‘full speed’ mode (slower) by unloading ehci_hcd. To do that, type in a terminal:
sudo rmmod ehci_hcd
before plugging in your device.
recent kernels workaround, from Karmic
-
Determine your device id using
lsusb
pushd /sys/bus/pci/drivers/ehci_hcd > /dev/null for bus in 0000. ; do echo "ehci_hcd bus $bus" pushd $bus/usb1 > /dev/null for dev in ?-?; do idVendor=`cat $dev/idVendor` idProduct=`cat $dev/idProduct` echo "ehci_hcd bus $bus: device $dev = $idVendor:$idProduct" done popd > /dev/null done popd > /dev/null
sudo sh -c 'echo -n "0000:00:xx.x" > unbind'
Buffer I/O Errors
If you see errors related to Buffer I/O when attaching a USB storage device, there are two ways to work around it. First, try using varying max_sectors settings, as such:
sudo sh -c "echo 120 > /sys/block/sda/queue/max_sectors_kb"
Try values of 120, 64 and 32.
If this does not resolve the issue, then you may need an unusual_dev entry for your device. It would look something like this:
UNUSUAL_DEV(0x03eb , 0x2002, 0x0100, 0x9999, "Generic", "MusicDrive", US_SC_DEVICE, US_PR_DEVICE, NULL, US_FL_IGNORE_RESIDUE),
The vendor and device IDs can be obtained from the output of «lsusb». The entry would be placed in drivers/usb/storage/unusual_devs.h. If you cannot compile your own kernel, please file a bug report, and we’ll attempt to compile a test module for you.
Device suddenly becomes read-only
If your device changes suddenly to read-only mode, and you see this kind of error:
[17183798.908000] FAT: Filesystem panic (dev sda1) [17183798.908000] fat_get_cluster: invalid cluster chain (i_pos 0) [17183798.908000] File system has been set read-only
This might be the sign of an unclean device. You should check your device. Try TestingStorageMedia to do so. Or use «Disk Utility» (under System, Administration), find your device, unmount it, check the file system, then mount it again.
USB-Device is or becomes read-only without errors
If you see «Write Protect is off» and no errors in your logfiles, than you should set filesystem type specific mount options (FS_MOUNTOPTIONS) in /etc/usbmount/usbmount.conf. Wrong gid causes mounting read only.
General tip
When you encounter problems with USB devices, the first thing to do is to check the latest debug information generated from the kernel just after you plug in your device and/or just after you encounter the problem.
To do that, open a terminal and type :
dmesg
Check the latest messages; they should be related to your problem.
Seeking Further Help
The best place to get help with almost any Ubuntu problem is on the Ubuntu Forums. The Absolute Beginner Talk section is best for beginners.
Other Resources
- RenameUSBDrive
- BootFromUSB
- UsbDriveDoSomethingHowto
- http://en.wikipedia.org/wiki/USB_flash_drive
- DebuggingUSBStorage
Mount/USB (последним исправлял пользователь CPE503955526a2d-CM503955526a2a 2015-06-02 00:24:50)
The material on this wiki is available under a free license, see Copyright / License for details
You can contribute to this wiki, see Wiki Guide for details
How To Mount/Unmount USB Drive On Ubuntu And Other Linux Distros?
I s your USB drive not showing on your Linux system? Are you unable to access your external disk drive? By mounting your USB drive to the Linux filesystem, you can resolve this issue. In this article, let’s look at how to mount and unmount the USB flash drives or external hard disks in Linux.
This article will go through both command line and graphical user interface (GUI) methods. The former method for mounting a USB drive works on all Linux distributions. However, if you’re a beginner and use Ubuntu or Ubuntu-based distributions, you can mount using the GUI application.
Why Is USB Not Detected In Linux?
If you plug in your USB device (aka USB sticks, thumb drives, and Pendrive) for the first time, Linux usually mounts it automatically. But sometimes, Linux fails to recognize and mount a USB drive to its filesystem. This is why you find the USB not showing on the Linux operating system.
Linux filesystem follows a tree directory structure with all files and folders attached to a single root directory. So, if you want to access and use external storage devices, first, you have to mount it to the Linux filesystem.
To mount a USB drive in Linux using a terminal, follow the step-by-step instructions given below. If you’re using Ubuntu Linux and aren’t familiar with the command line, skip the first method to the next one and mount and unmount the USB drive using the Ubuntu GUI application.
How To Mount USB Drive In Linux Using Command Line
1. Detect Plugged In USB Device
Once you plug in your USB device to your system USB port, run the following command to locate the USB device:
sudo lsblk
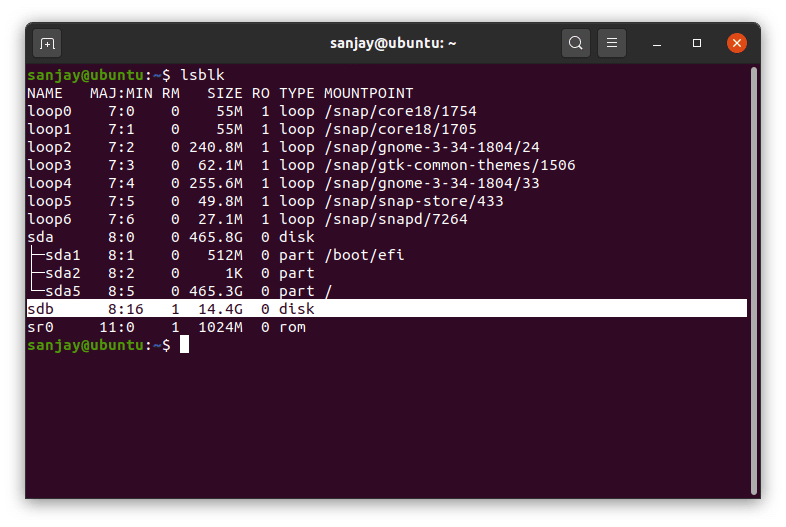
Now you can see the detected USB device named ‘sdb.’ Your device name may differ from mine, so you can find the device name matching its size.
You can also notice that the device ‘sdb’ has no mount point here. If you also find the same, it means the USB drive is not mounted to the Linux system. Hence, you can’t access your drive files and folders.
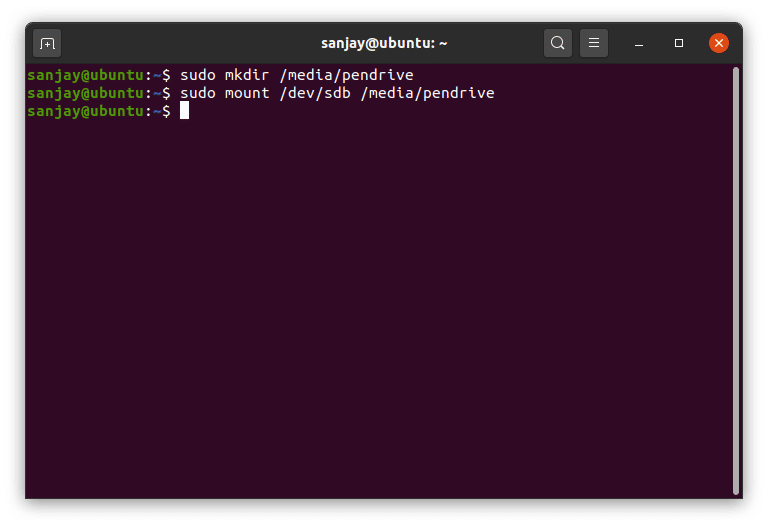
2. Create a Mount Point
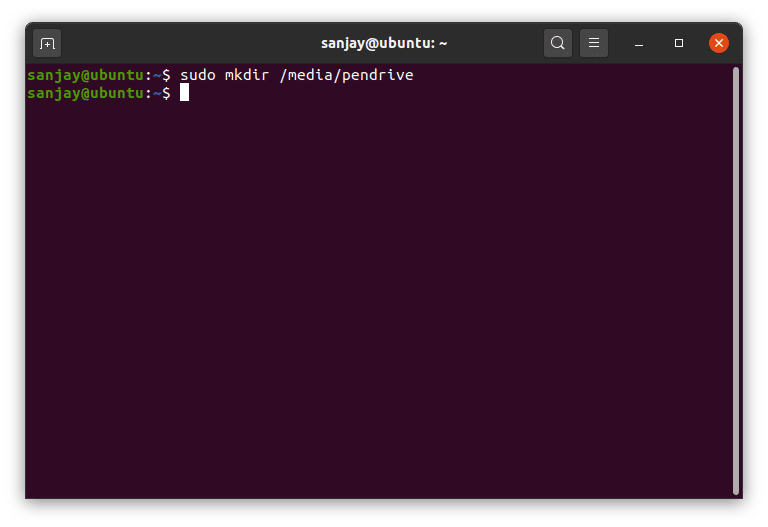
To access the USB drive data, we’ve to create a directory that will act as a mount point in the Linux filesystem. Here, I’m creating a new directory at ‘/media’, where we’ll mount the device later.
sudo mkdir /media/pendrive
However, creating a directory to mount and access a drive is an optional step; you can also directly attach it to the ‘/media’ directory.
3. Mount USB Drive To Mount Point
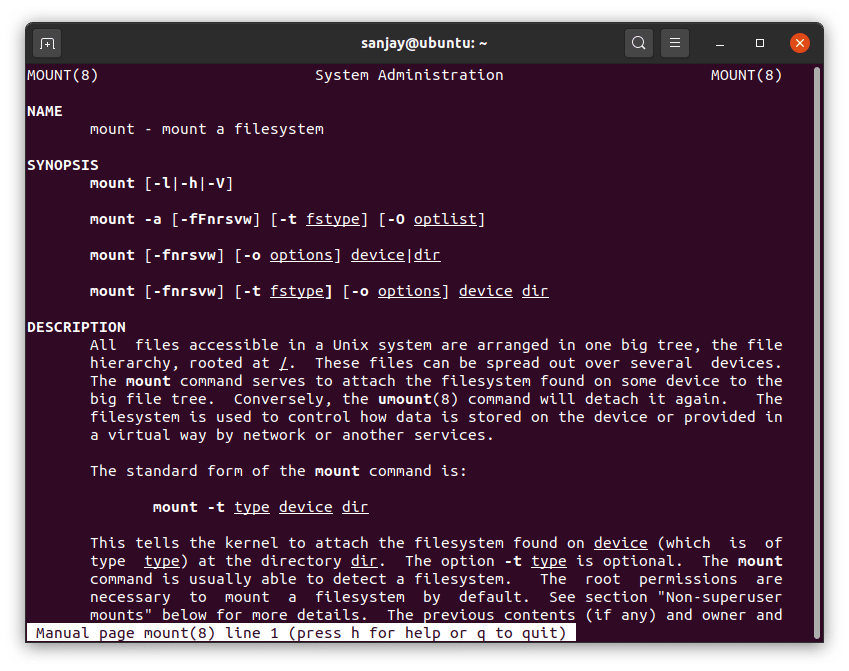
We’re now ready to link the USB device to the Linux filesystem and access its data. We’ll use the ‘mount’ utility program to do the same. If you want to know about ‘mount,’ read its manual using:
man mount
If your USB disk drive has a FAT16 or FAT32 file system, you can mount the device by running the command:
sudo mount /dev/sdb /media/pendrive
Replace ‘sdb’ with your device name.
Most USB flash drives use FAT16 or FAT32, while some external hard disks use NTFS. If you have a file system other than FAT, use a flag to specify file system type like ntfs-3g for NTFS.
sudo mount -t ntfs-3g /dev/sdb /media/pendrive
4. Check For The Device Mounted
If all goes well with the previous steps, you can now access your USB drive file and folders. You can check the status of the device using the same ‘lsblk’ command:
sudo lsblk
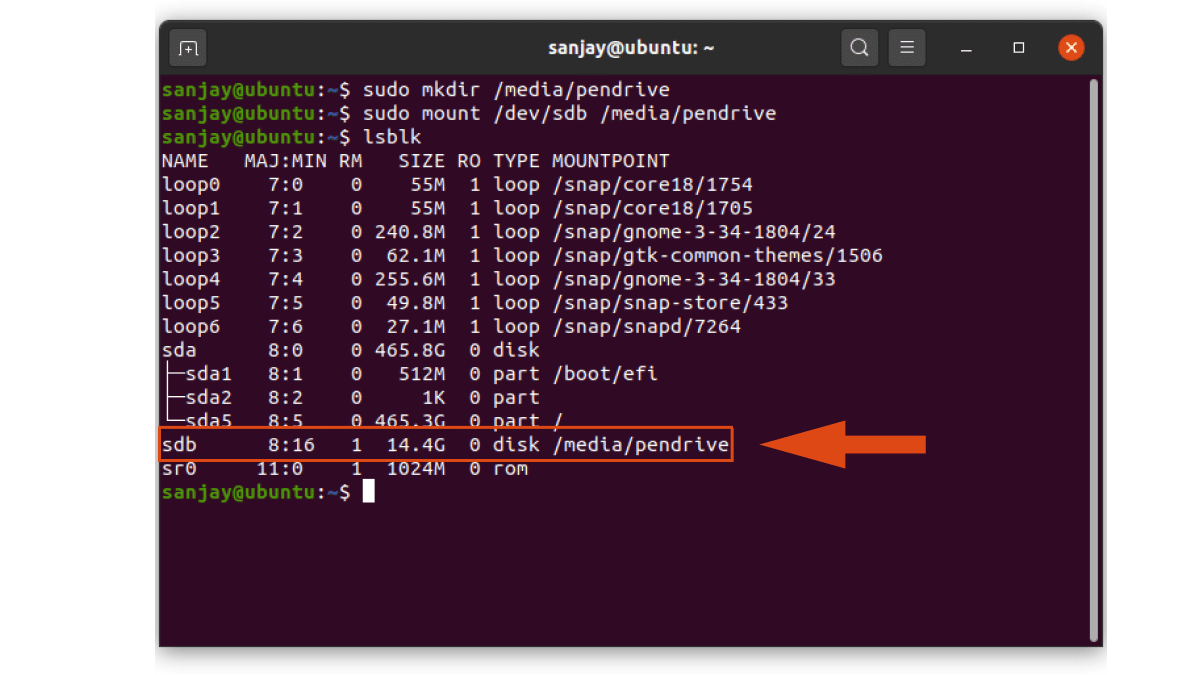
As you can see, the USB drive ‘sdb’ now has a mount point which means it is mounted at that location. So, navigate to the directory (mount point) where you can access your drive data.
cd /media/pendrive/
How to Unmount USB Drive In Linux Using Command Line
Unmounting the USB device is just a one-line command using ‘umount’:
sudo umount /media/pendrive
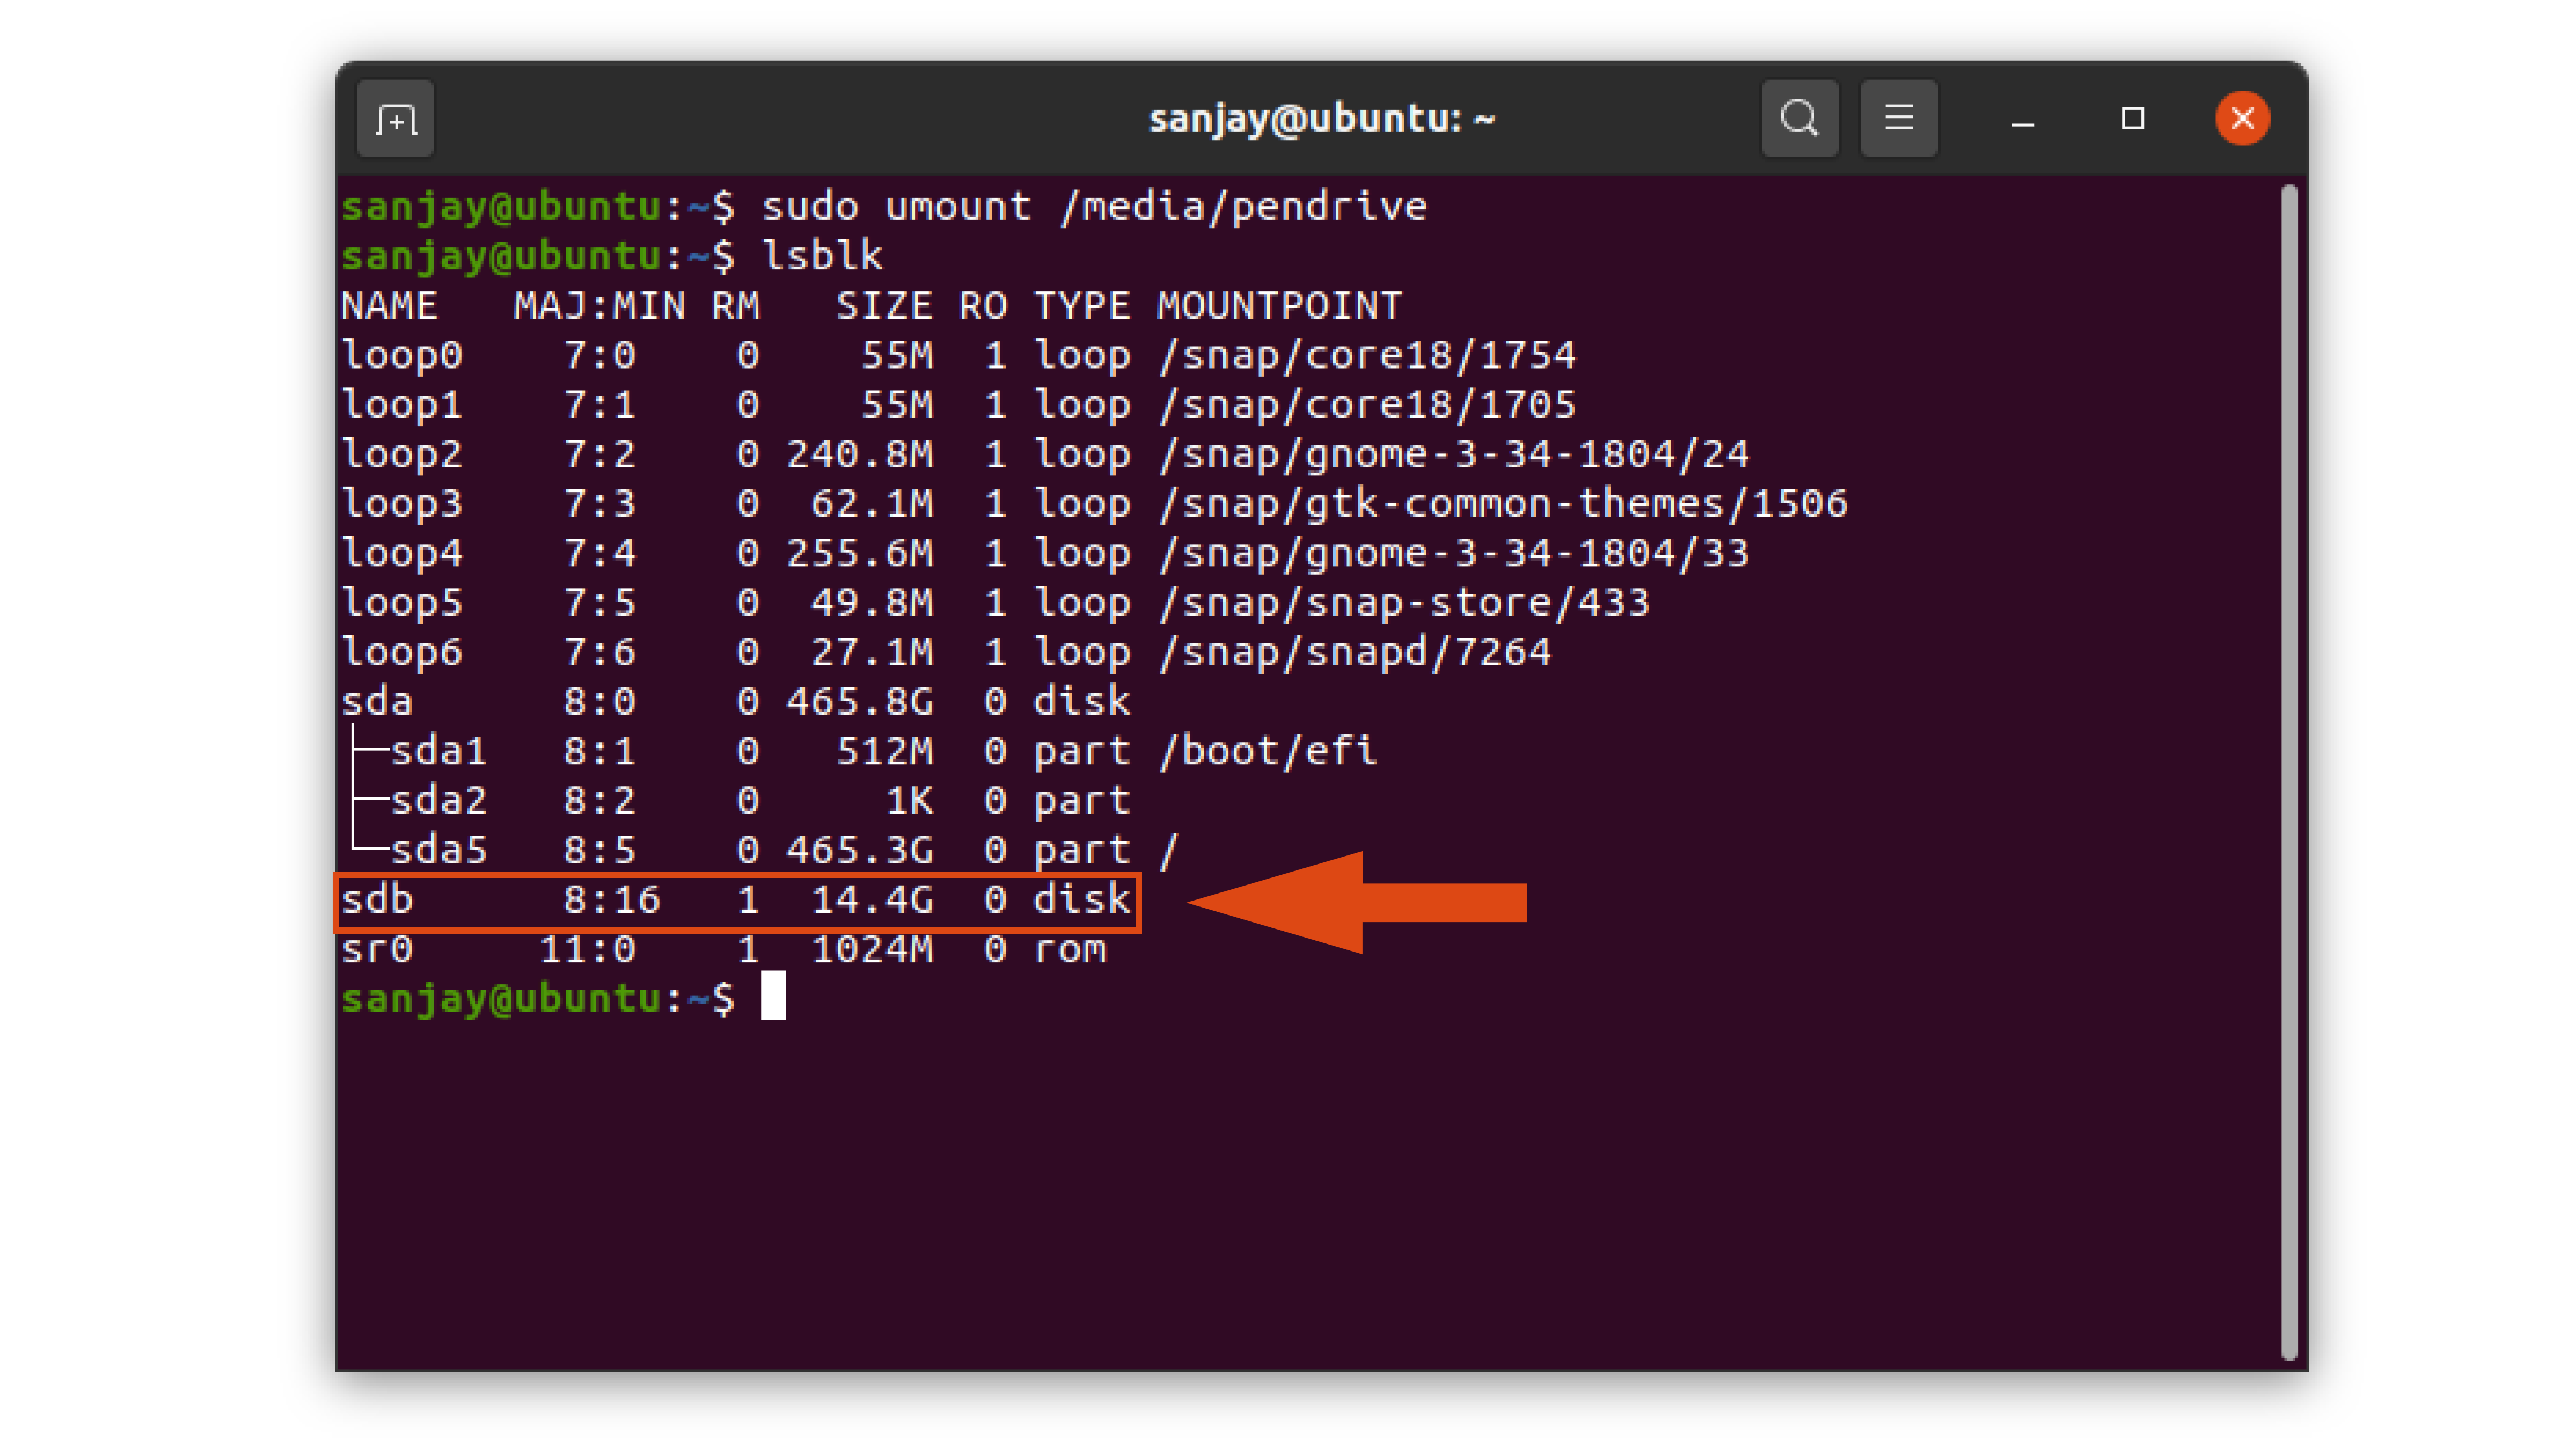
You can see that the mount point has been removed, and you can again no longer access your USB drive.
Note: Most Linux distros configure the settings to automount the same USB drive to the system for future use. But if you’re again unable to access your USB device, you can either perform the same steps or manually set the device to automount. You can follow our article on how to automount partitions on boot.
How To Mount USB Drive On Ubuntu Using GUI
Mounting an external drive or USB flash drive using the GUI application is pretty straightforward. Several Linux distros already offer GUI applications for the same. Here, I’ll guide you to mount/unmount a USB drive on Ubuntu using the GUI application.
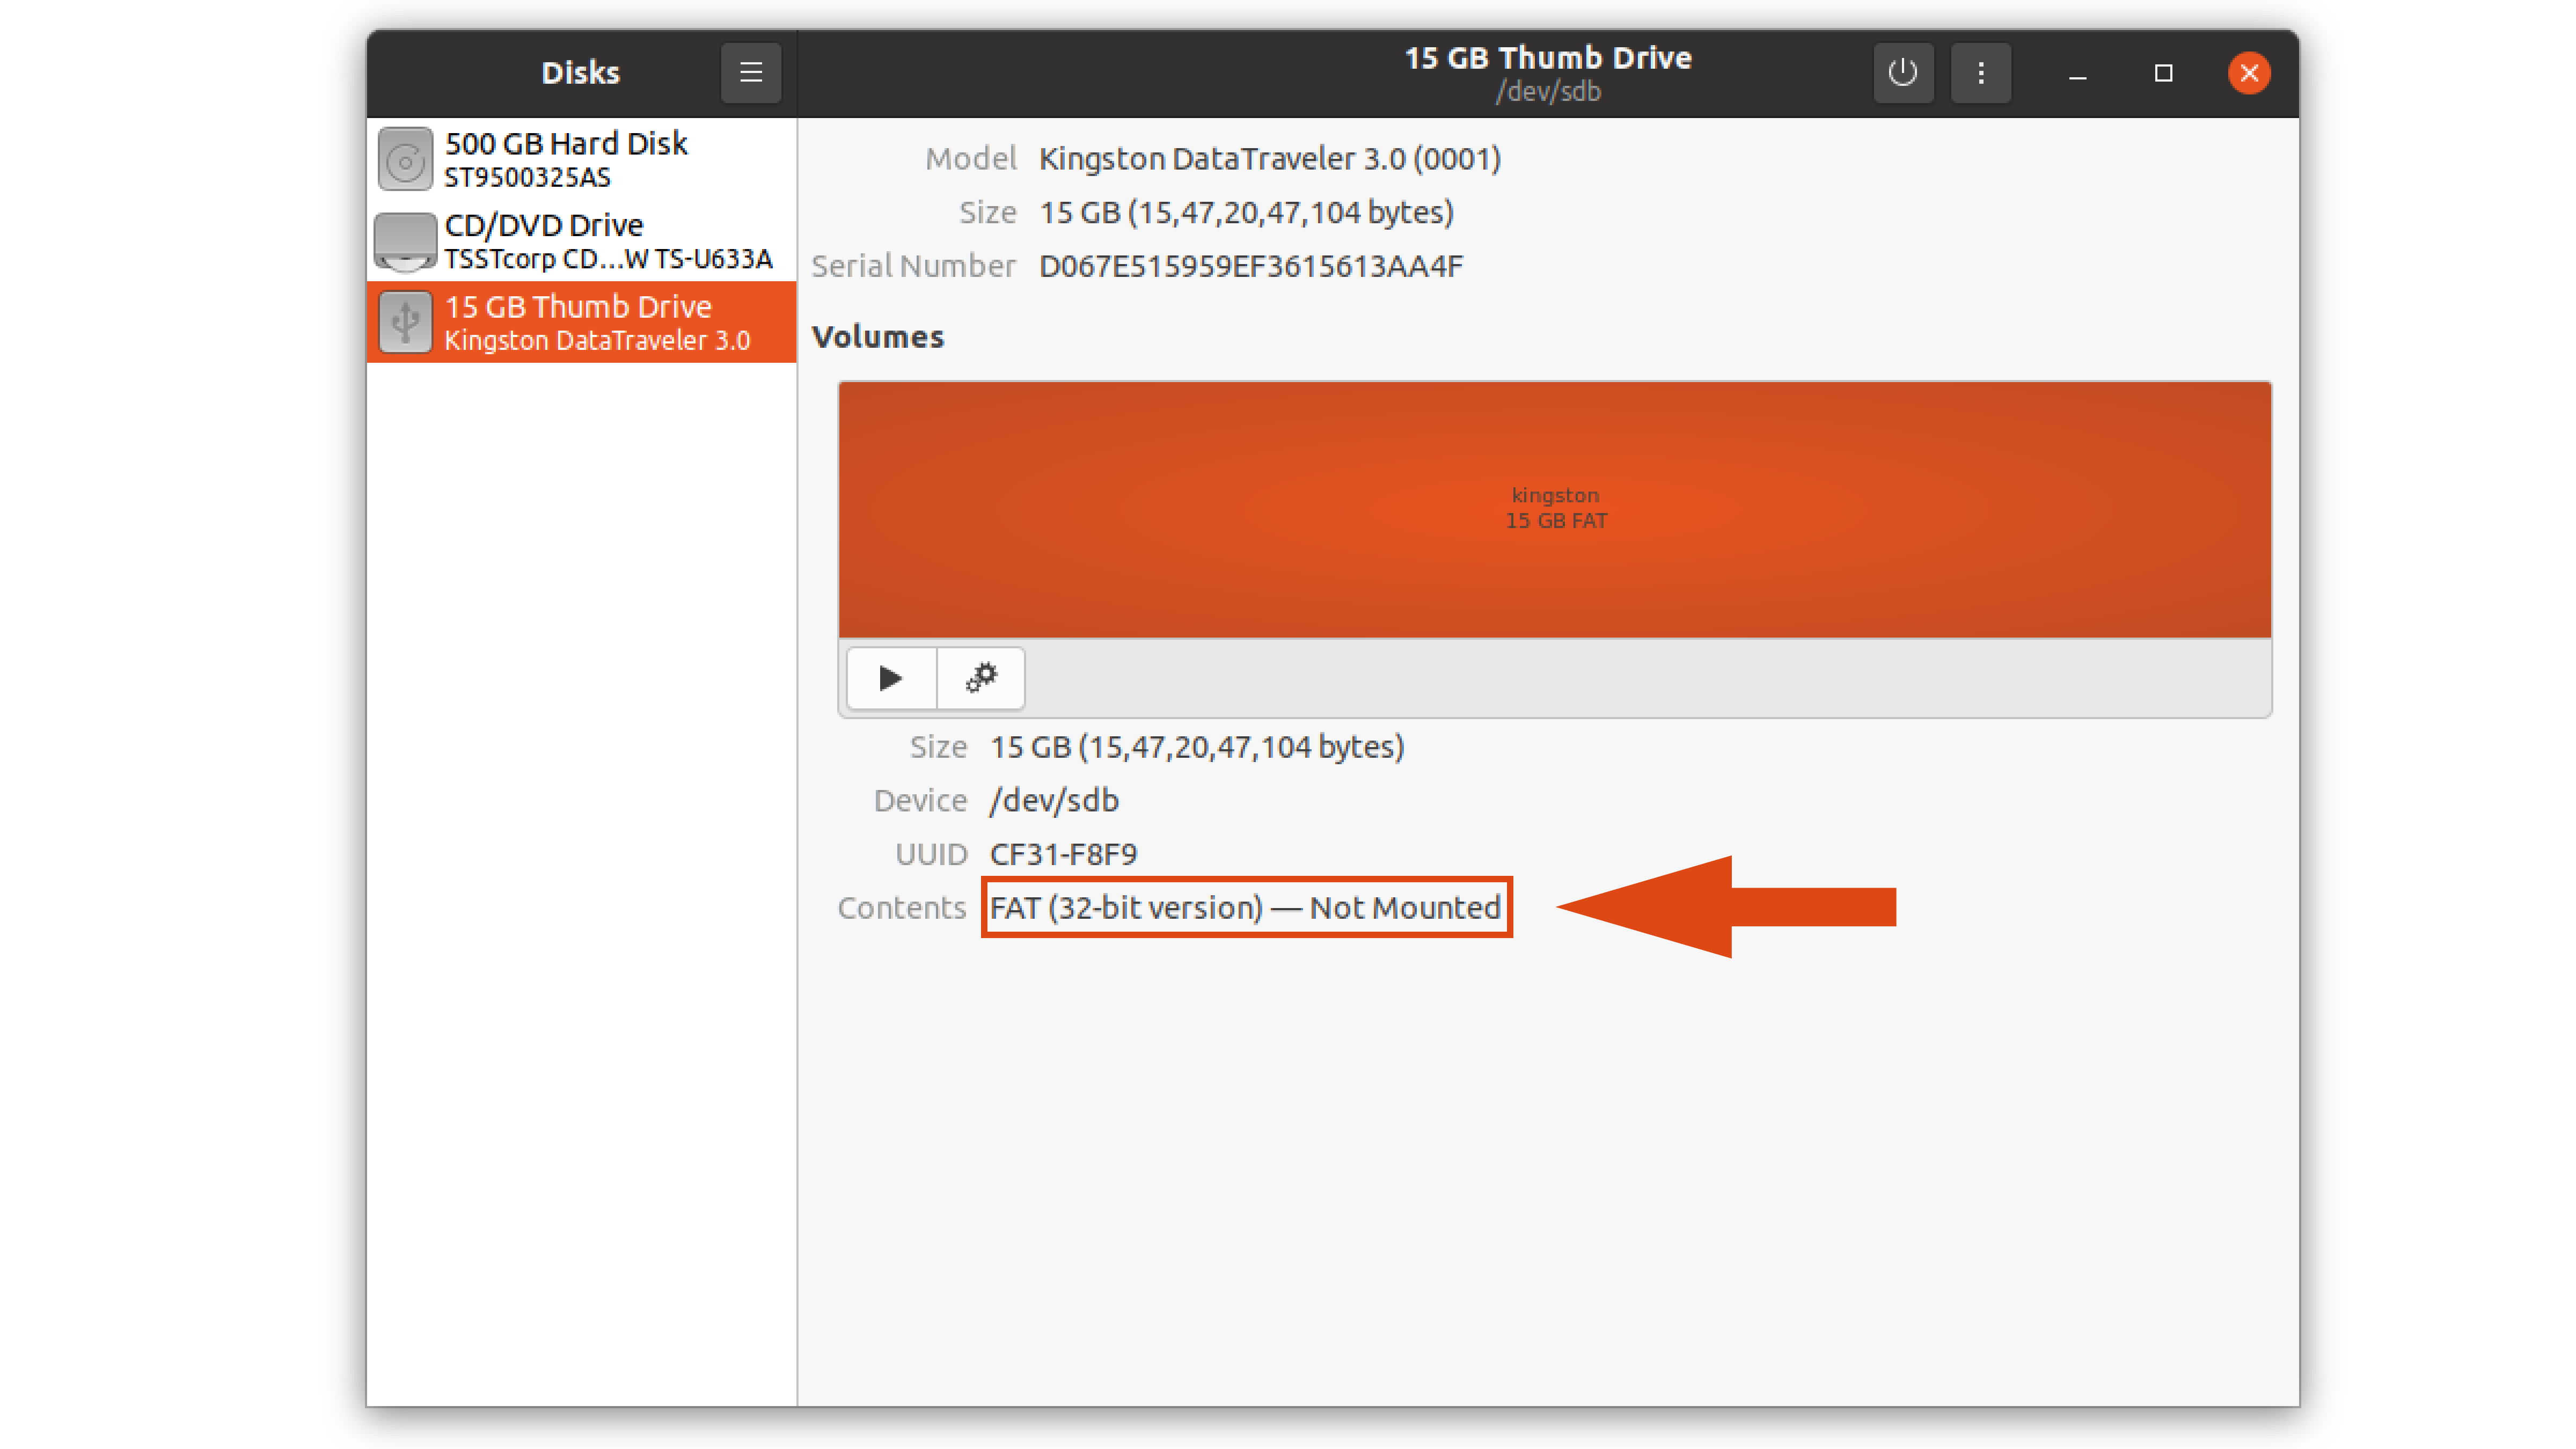
1. Open Disks Application
Open the Activities overview from the top left corner and search for the ‘Disks’ application.
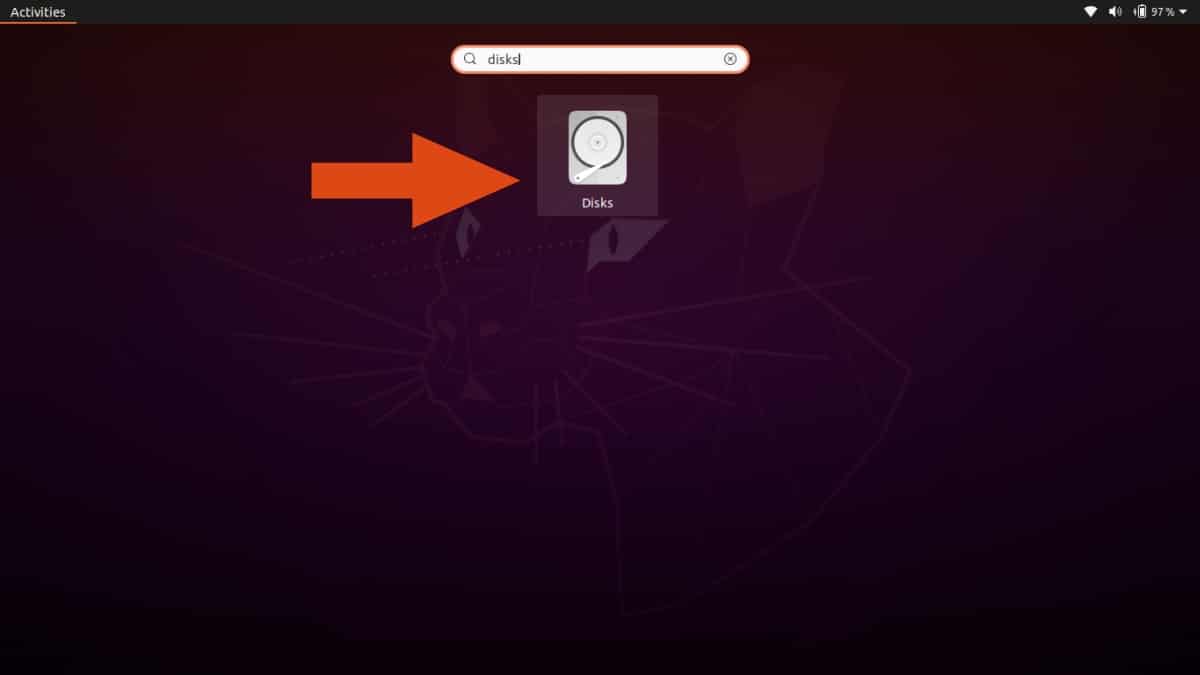
Click to open the app, and you will notice that it automatically displays the ‘Not Mounted’ status for connected USB devices.
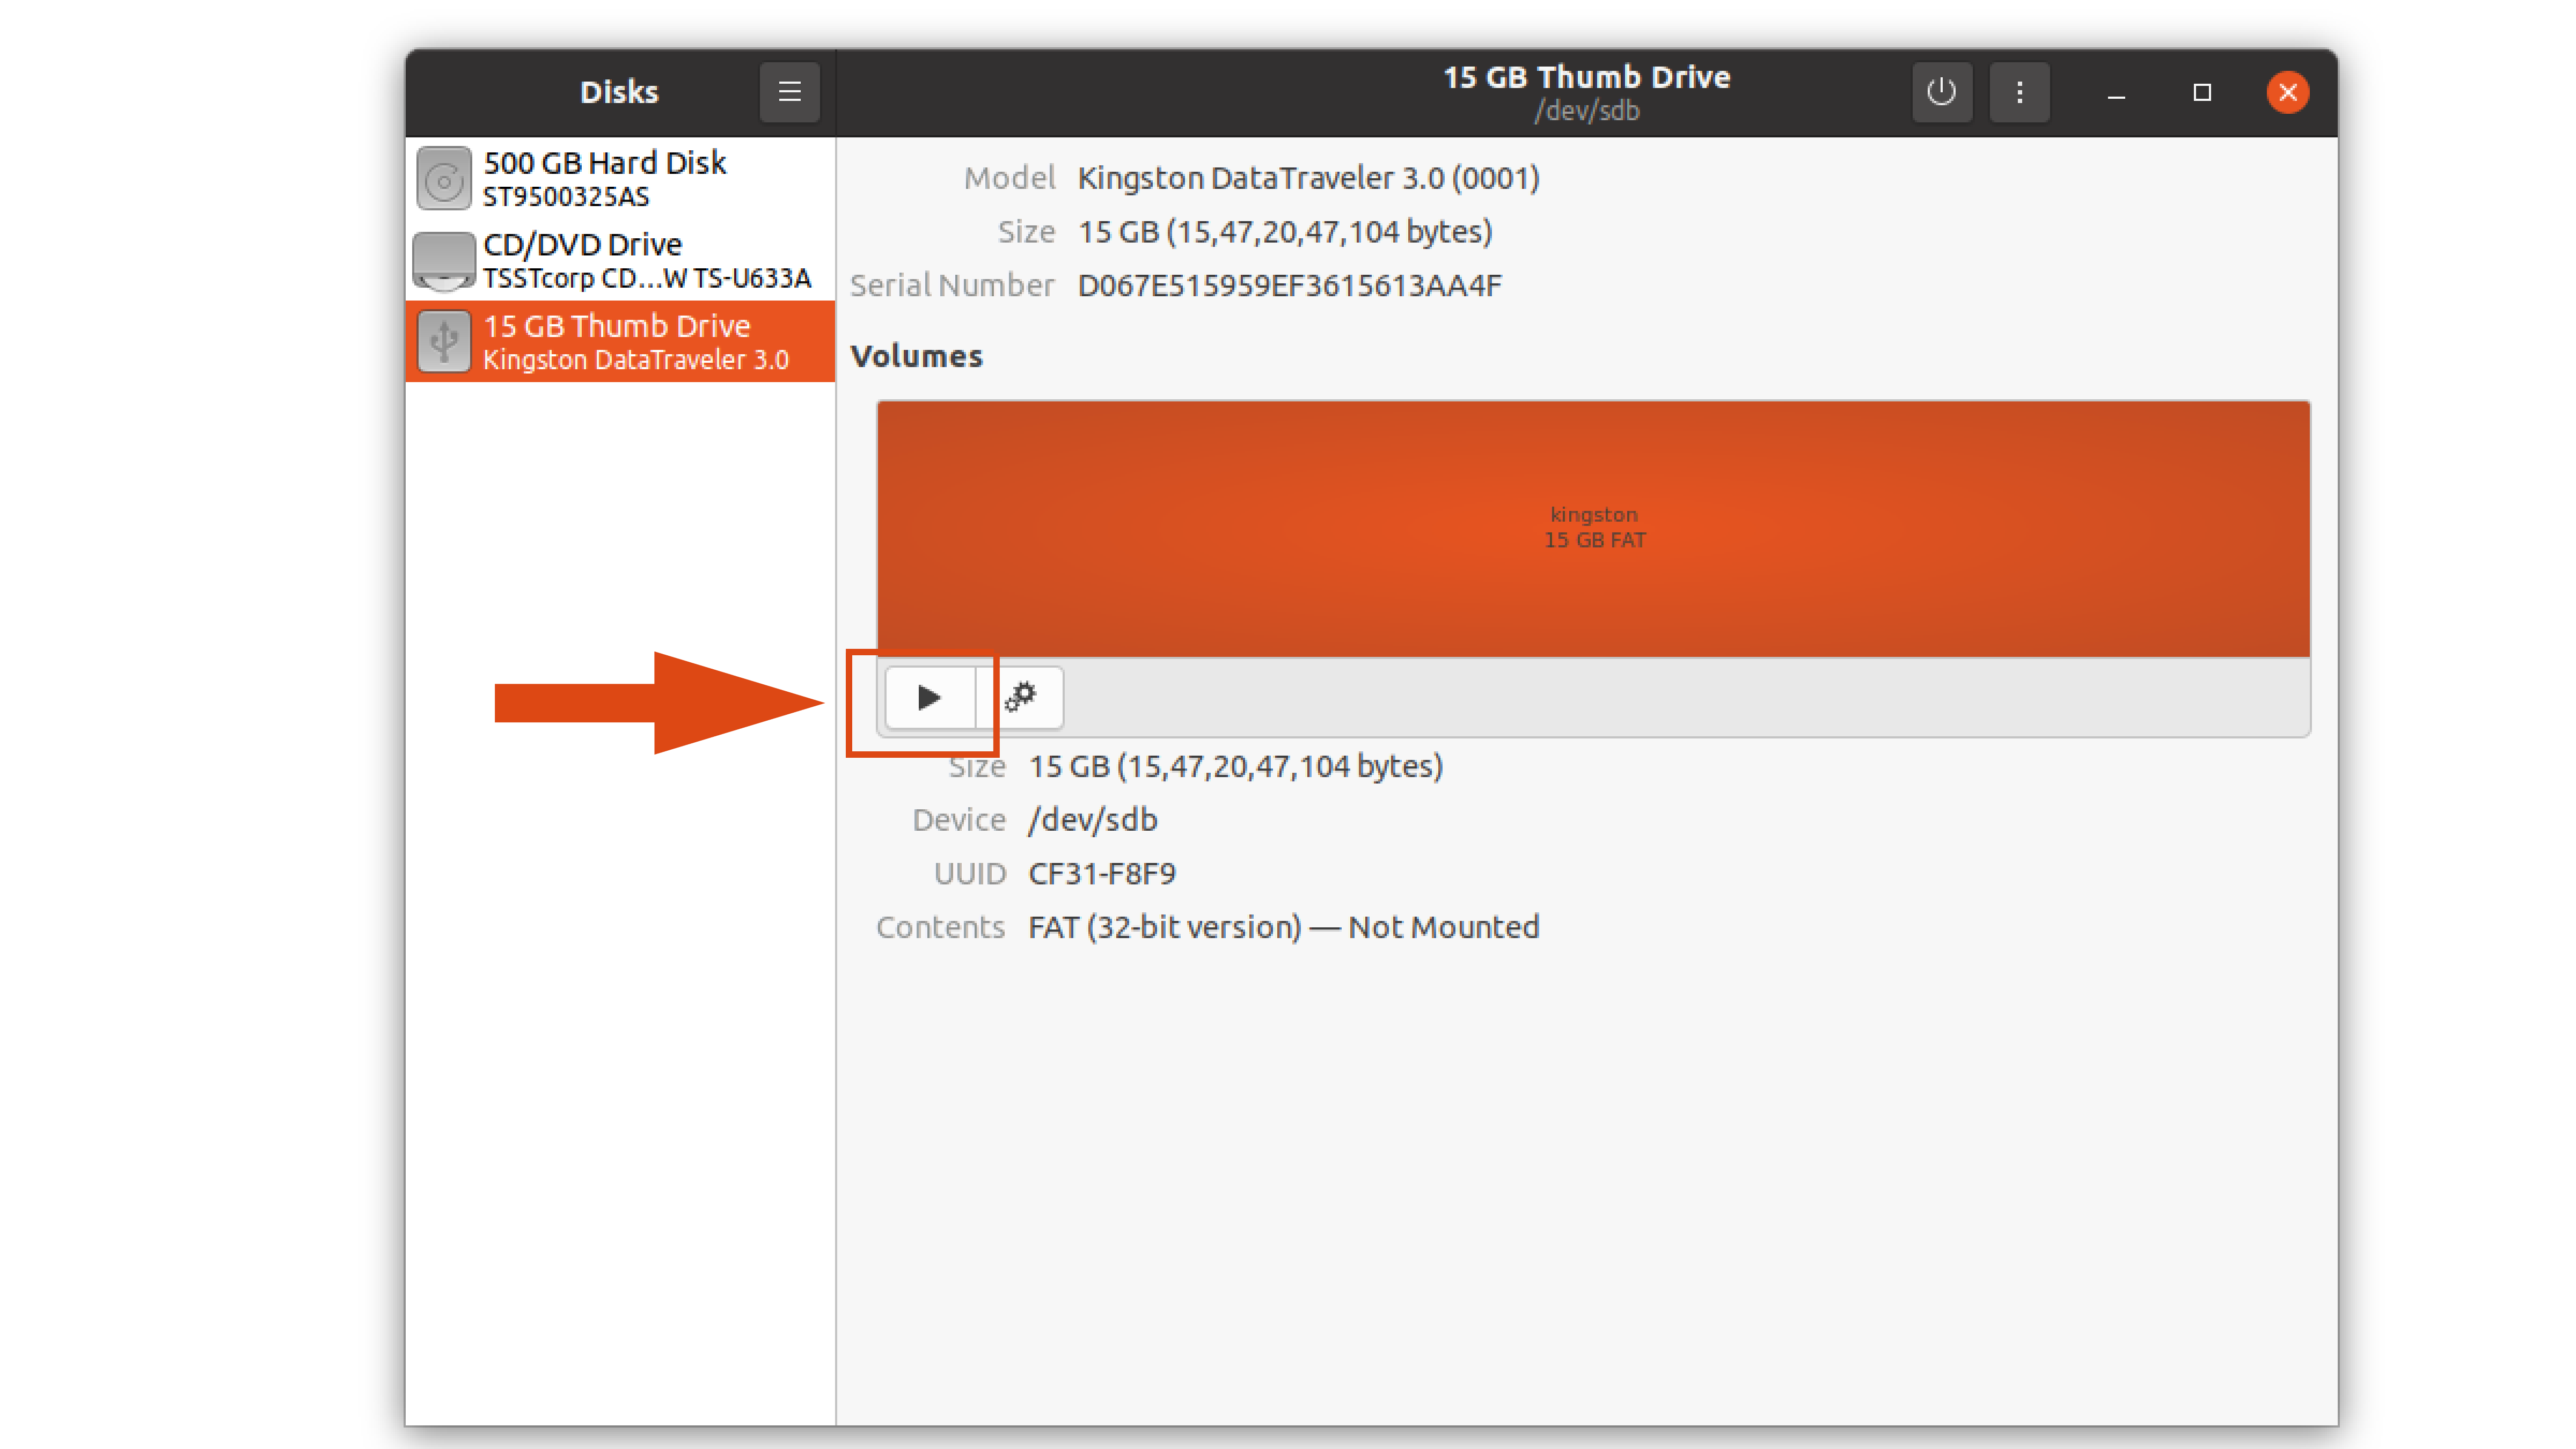
2. Mount A USB Device To Ubuntu Linux Filesystem
Just click on the play button to mount the USB drive, as pointed out in the picture below. It will automatically create a mount point and attach the device to it.
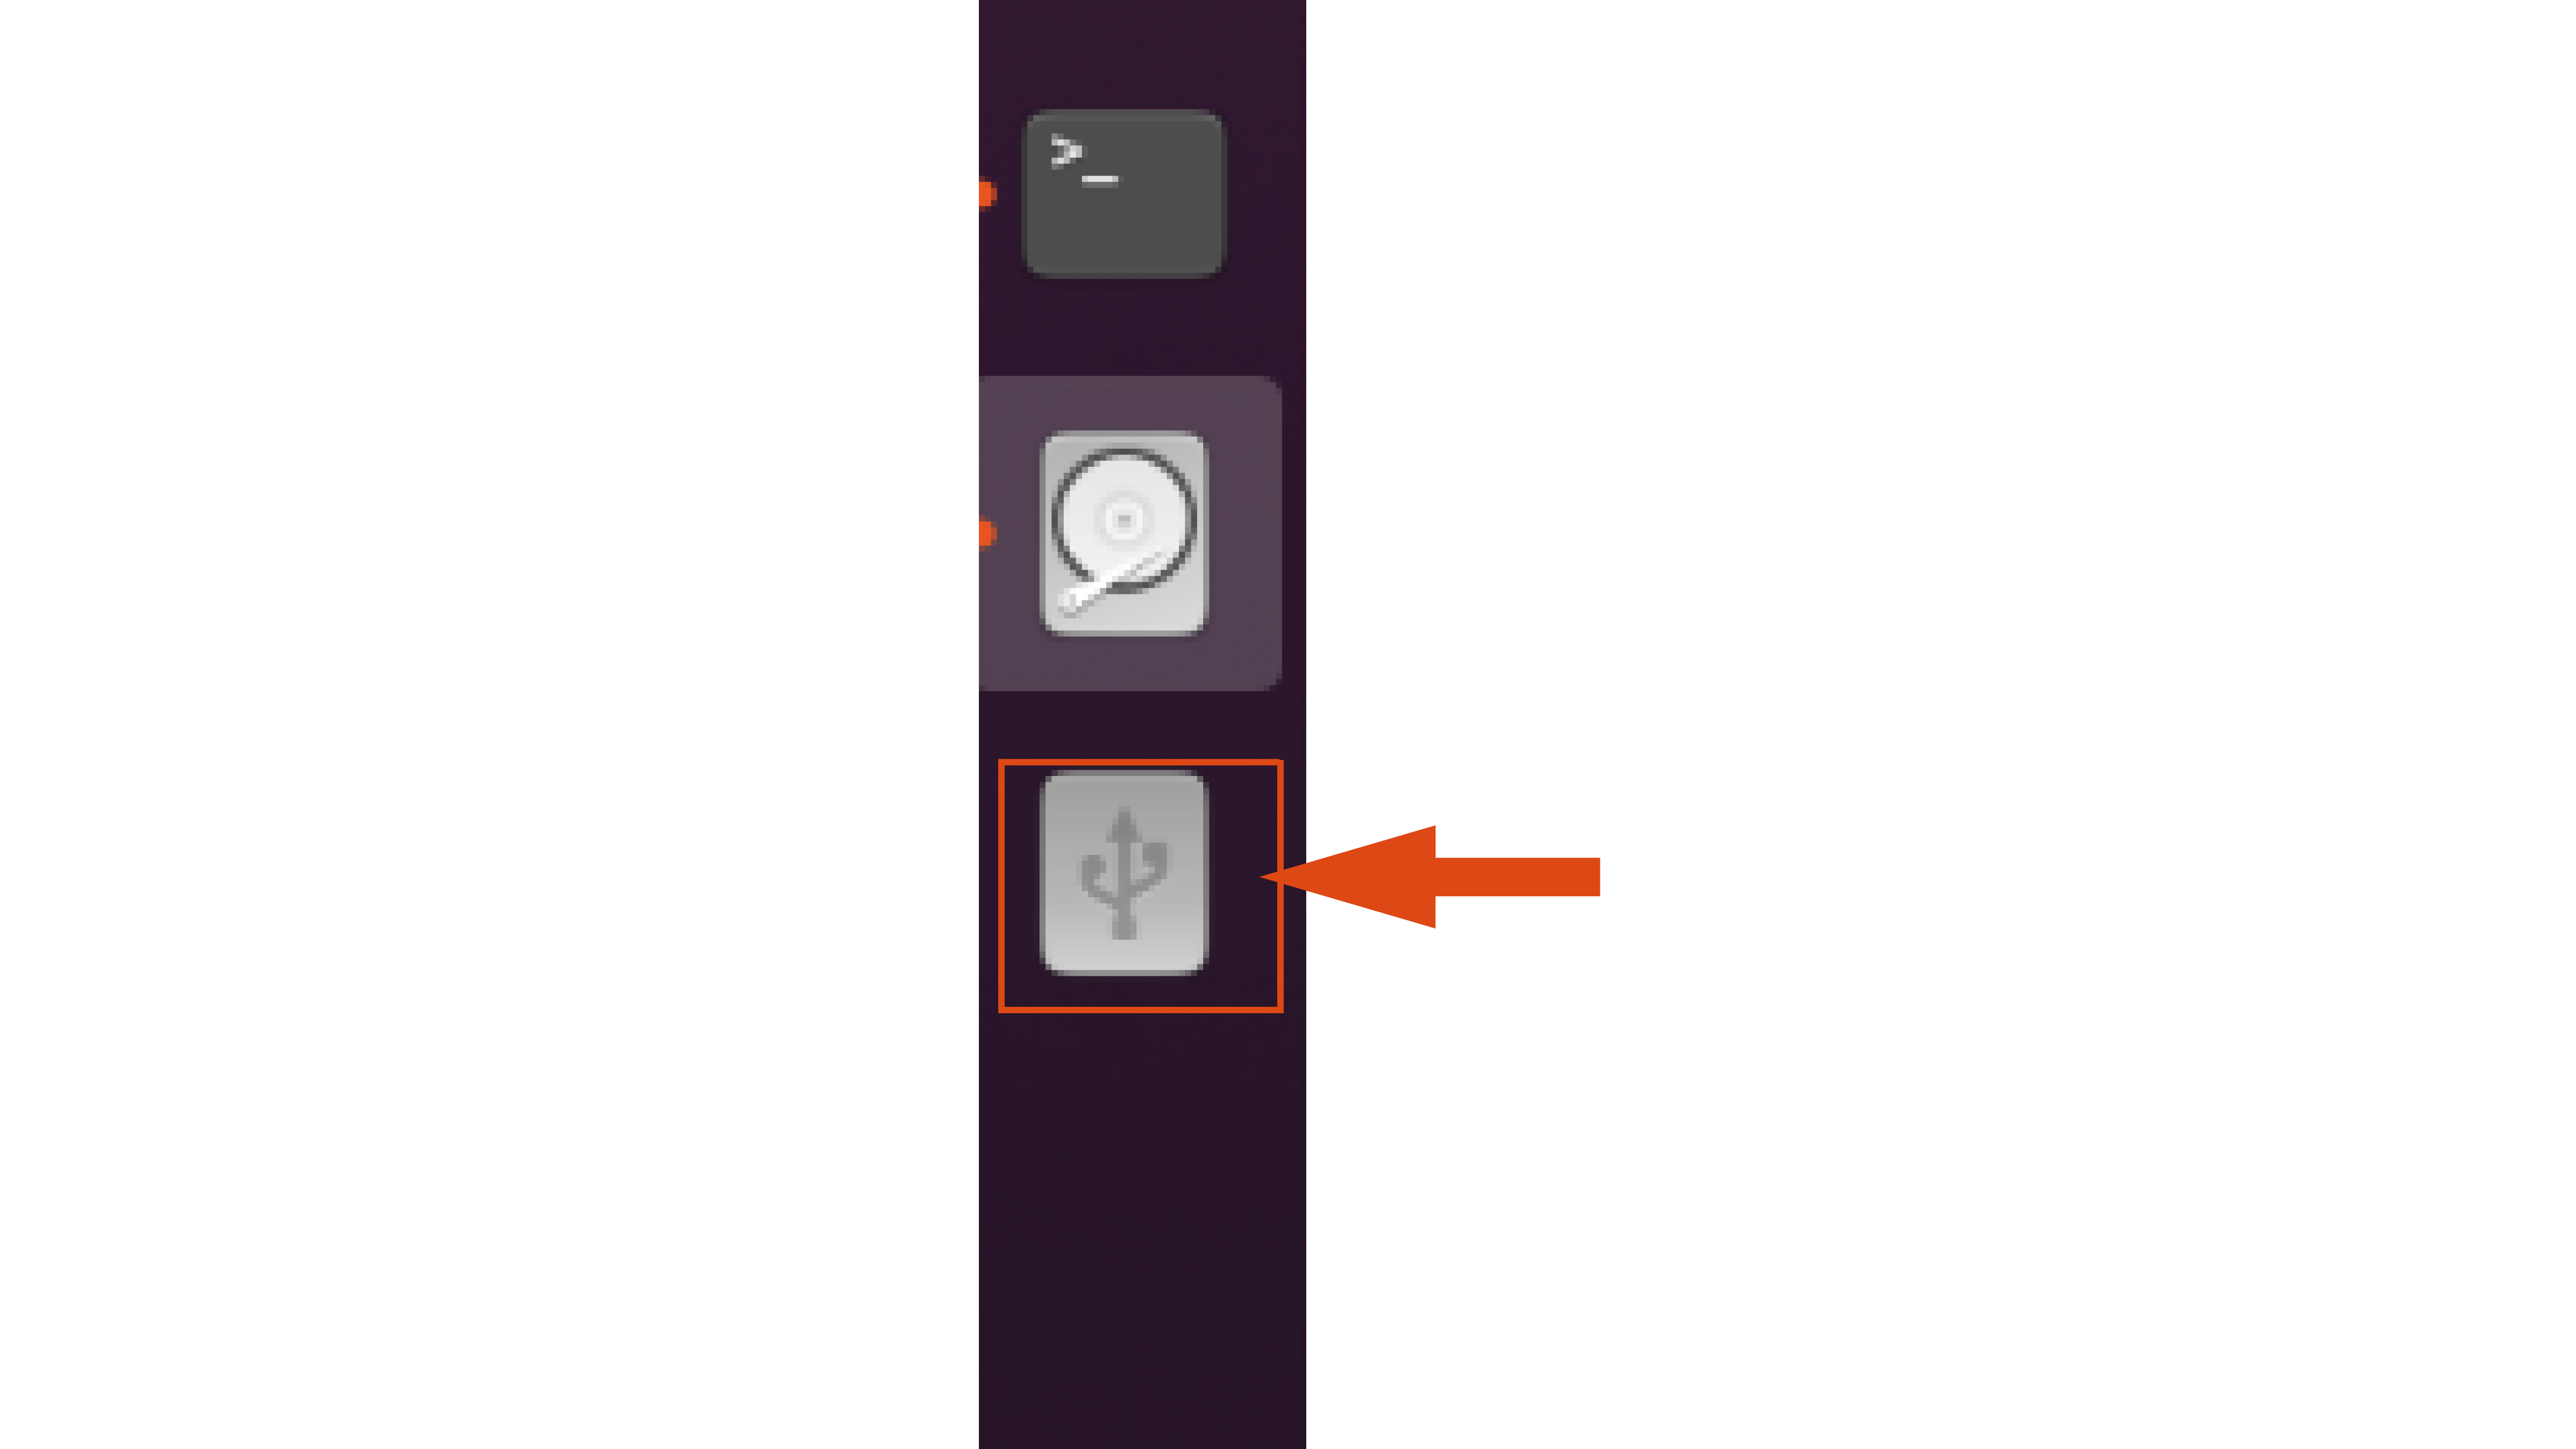
3. Check For The Mounted Device
The moment you click on the play button, you’ll notice a drive icon pop up in your dock.
If you click on the icon, it will open the USB drive in the file manager, where you can access all your drive data.
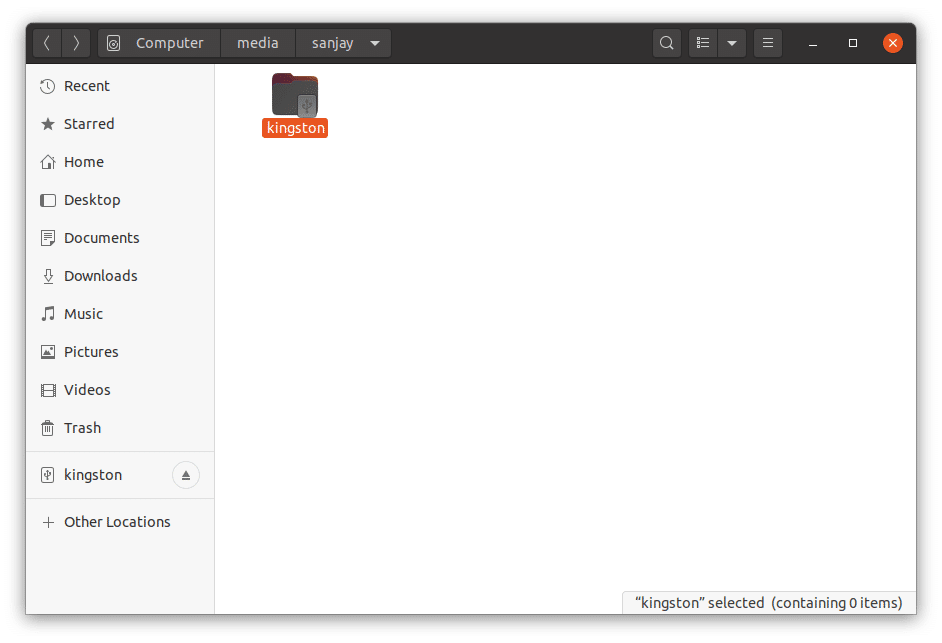
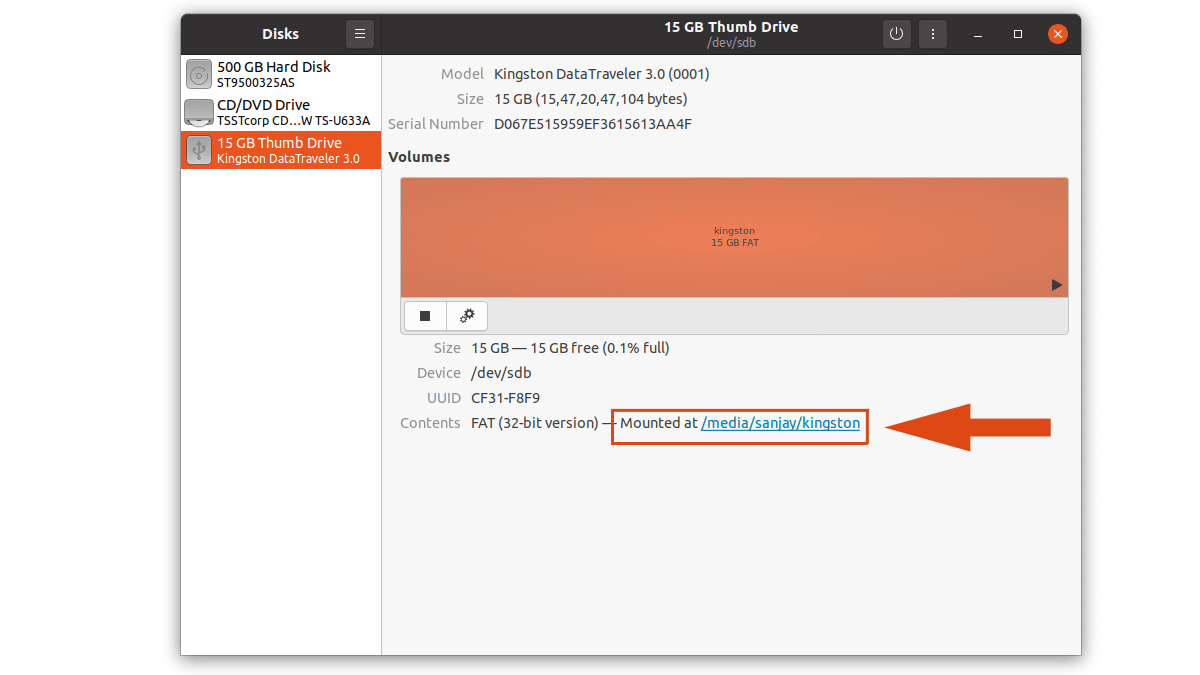
You can also see the USB drive status ‘Mounted’ with mount point location at ‘/media//’.
4. Unmount USB drive On Ubuntu
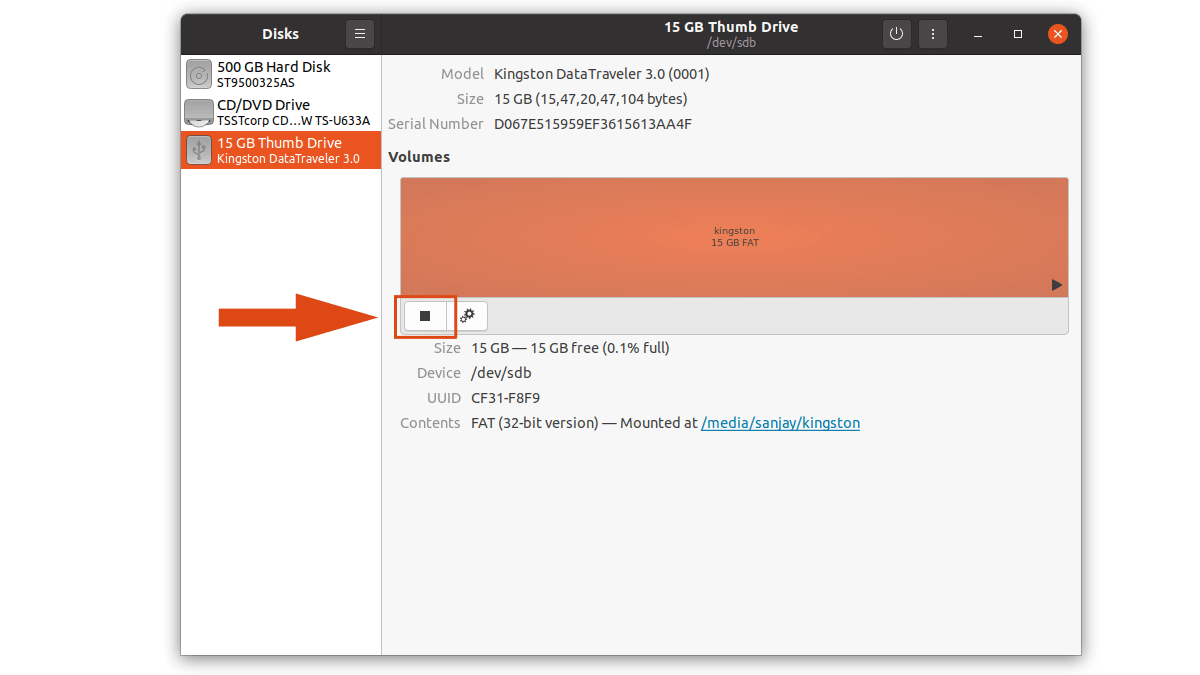
Lastly, click on the same play button to detach or unmount the USB drive from the Ubuntu Linux system.
So, that was how you could mount/unmount USB drives on Ubuntu and other distros using the Terminal and GUI. If you have any questions or find the guide difficult to follow, let us know in the comments section below.

Sarvottam Kumar is a software engineer by profession with interest and experience in Blockchain, Angular, React and Flutter. He loves to explore the nuts and bolts of Linux and share his experience and insights of Linux and open source on the web/various prestigious portals.