How to Fix “It Looks like Windows didn’t Load Correctly” Error (12 Ways)
You will find the reasons for the «It looks like Windows didn’t load correctly» error and learn 12 fixes to get your computer back to normal as soon as possible. Keep reading to know more details.
by Clytze Updated on October 27, 2022
Share this:
Table of Contents
- User Case
- Why It Looks like Windows didn’t Load Correctly?
- 12 Ways to Fix It Looks like Windows didn’t Load Correctly
- Method 1. Enter Windows Safe Mode
- Method 2. uninstall recently installed drivers or applications
- Method 3. Checking disk drive status through security and maintenance
- Method 4. Implementation of the CHKDSK tool
- Method 5. Implementation of SFC and DISM tools
- Method 6. Turn off the hybrid sleep function
- Method 7. Reconstruction of BCD
- Method 8: Implementing a clean start
- Method 9. Reset this computer
- Method 10. restore Windows 10
- Method 11. fresh installation of Windows 10
- Method 12: System restore using third-party software
User Case
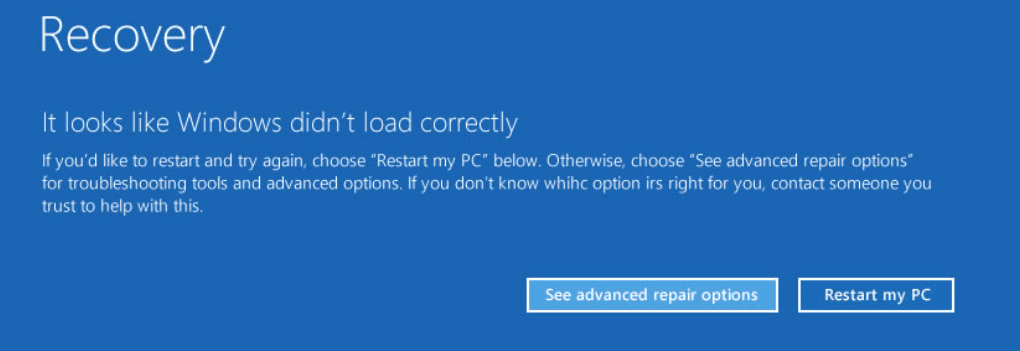
«My laptop was running fine until last night when it suddenly stopped working and displayed a blue screen. After I restarted the computer, the blue screen remained and displayed the error message: it looks like Windows isn’t loading correctly. It gave me a choice between looking at the advanced repair options and restarting the computer, but my mouse and keyboard wouldn’t respond at all, which means I’m stuck with this blue screen error screen. To make matters worse, my work isn’t done yet, can anyone help me fix this problem as soon as possible?»
Many users are exposed to computers for long periods of time in their work and life, and some of them will experience sudden blue screen issues during their use, and as the above case describes, you will not only see it in Windows 10, but in fact, this error can also happen in Windows 11 and Windows 8.1.
In some cases, you may also receive other variants of the «It looks like Windows is not loading correctly» error, such as Windows not starting correctly. Your computer does not start correctly or Windows does not restart correctly, etc. Although each error will provide you with detailed additional information, fixing these errors is not a simple task, first you need to understand the cause of the error.
Why It Looks like Windows didn’t Load Correctly?
Many users ignore the cause and think that they just need to know how to fix it. But in fact, the exploration of the cause of the error can also help you fix the error to some extent. Here are the common causes of «It looks like Windows is not loading correctly» in Windows 10.
- The system files are corrupted: This will be the direct cause of the blue screen error.
- Windows Boot Configuration Data (BCD) is corrupt or missing: This is usually due to disk write errors. Sudden power failure. A virus in the boot sector or a manual BCD configuration error.
- File system integrity is compromised: If the computer shuts down suddenly while critical data is being written to the boot sector, this is what causes file system integrity to be compromised.
12 Ways to Fix It Looks like Windows didn’t Load Correctly
How to fix «It looks like Windows is not loading correctly»? After understanding the cause, please refer to the following 12 ways to fix it to ensure that your computer is back to normal.
- Entering Windows Safe Mode
- Uninstall a recently installed driver or application
- Checking disk drive status through security and maintenance
- Implementing the CHKDSK tool
- Implementation of SFC and DISM tools
- Turn off the hybrid sleep function
- Reconstruction of BCD
- Perform a clean start
- Reset this computer
- Restore Windows 10
- New installation of Windows 10
- Using third-party software for system restore
Method 1. Enter Windows Safe Mode
Safe Mode starts Windows in its base state (a limited set of files and drivers), and if the computer does not get the «It looks like Windows is not loading correctly» error in Safe Mode, it means that the preset settings and base device drivers are correct. You can troubleshoot through Safe Mode, which will help fix the above error.
1. Enter the Windows Recovery Environment (Windows RE) by forcibly shutting down and then rebooting the computer twice.
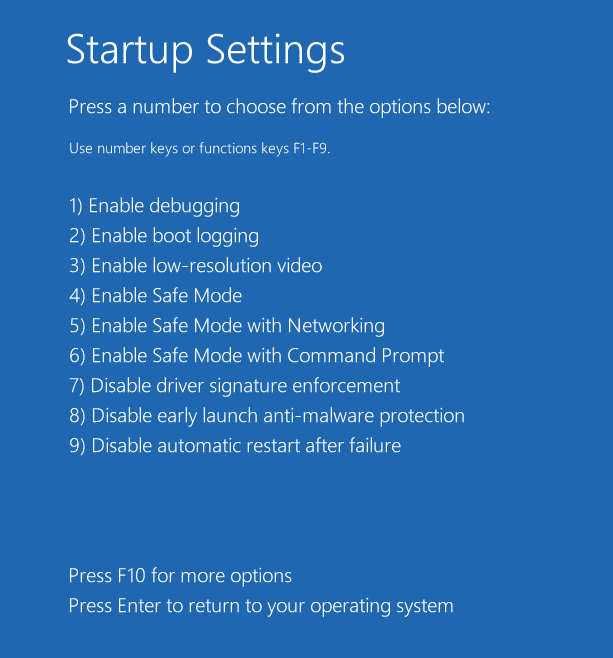
2. In the Select Options window, tap Troubleshoot>Advanced Options>Startup Settings>Restart in order.
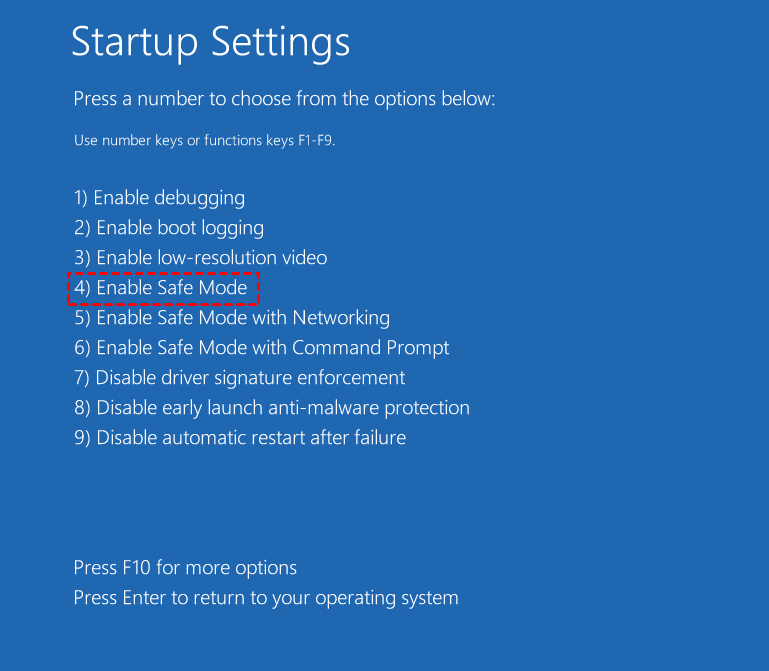
3. After the computer restarts, press F4 or the number key 4 to start Windows Safe Mode.
4. If the computer does not show the above error, the driver or application is working properly. If the above error still occurs, consider uninstalling the most recently installed driver or application.
Method 2. uninstall recently installed drivers or applications
Failure to install drivers or applications correctly can also lead to the «It looks like Windows is not loading correctly» error, so when your computer suddenly shows the above error, try uninstalling the recently installed drivers or applications to fix it.
1. Enter Windows Safe Mode (with networking features), right-click the Start button on the far left side of the taskbar, and select Device Manager from the expanded menu.
2. Find and expand the most recently installed device driver, right-click on it, select Uninstall device in the expanded menu, and confirm uninstall, wait for the process to complete.
Note: If you want to install the driver again, just right-click on the computer name and select Scan for hardware changes.
3. Use Windows+I to open Windows Settings and tap Apps.
4. In the right panel of the Apps & features tab, find the most recently installed application according to the installation time, select Uninstall and confirm this action, then follow the prompts to uninstall this application.
Method 3. Checking disk drive status through security and maintenance
When the disk is corrupted, it may also cause the error «It looks like Windows is not loading correctly». Therefore, you need to check the status of the disk drive with the built-in maintenance tools of Windows to confirm whether the disk is corrupted or not.
1. Enter Windows Safe Mode, use Windows + S to open the search box, type control panel and press Enter.
2. Click System and Security first, then Security and Maintenance.
3. tap Maintenance and expand it, and view Drive Status.
If there is no problem with displaying the disk drive status, then the above error is caused by something else and go to the next method; if there is a problem with displaying the disk drive status, get it fixed as soon as possible.
Method 4. Implementation of the CHKDSK tool
The CHKDSK tool is designed to help you check the current status of the disk and repair errors or bad tracks on the disk, so when you encounter the «It looks like Windows is not loading correctly» error, you can run the CHKDSK tool to fix it.
1. Enter Windows Safe Mode (with command prompt characters), use Windows + S to open the search box, type cmd, and select Run as administrator.
2. In the command prompt character window, type chkdsk C: /f /r /x and press Enter to execute the command. Replace C with the drive letter of the local disk on which the system files are installed.
3. Press the Y button again to confirm the check at the next system reboot.
Method 5. Implementation of SFC and DISM tools
The combination of System File Checker (SFC), which repairs system files, and Deployment Image Services and Management (DISM), which repairs system images, will help fix the «It looks like Windows isn’t loading correctly» error.
1. Enter Windows Safe Mode (with command prompt characters), use Windows+S to open the search box, type cmd, and select Run as administrator.
3. At the command prompt character window, type sfc /scannow and press Enter.
4. Enter the following commands in turn and press Enter separately to execute the command.
Dism /Online /Cleanup-Image /ScanHealth
Dism /Online /Cleanup-Image /CheckHealth
Dism /Online /Cleanup-Image /RestoreHealth
Method 6. Turn off the hybrid sleep function
Feedback from some users suggests that the Hybrid Sleep feature can also be a trigger for the «It looks like Windows isn’t loading correctly» error, so you can try disabling Hybrid Sleep to fix it when you encounter this error.
1. Enter Windows safe mode, right-click the Start button on the far left of the taskbar, and select Power Options from the expanded menu.
2. Under Related Settings, locate and tap the Other Power Settings button.
3. Depending on the power plan currently in use, locate and tap Change plan settings next to it.
4. Tap Change advanced power settings again to open the Power Options window.
5. Tap and expand Sleep, then tap and expand Allow hybrid sleep, change On to Off, and tap the OK button.
Method 7. Reconstruction of BCD
When the BCD is corrupted or missing, it will cause the error «It looks like Windows is not loading correctly», so we can try to rebuild the BCD to fix this error.
1. Enter the Windows recovery environment and tap Troubleshoot>Advanced Options>Command Prompt in sequence.
2. In the Command Prompt window, enter the following commands in sequence and press Enter to execute the commands separately.
bootrec.exe /fixmbr
bootrec.exe /fixboot
bootrec.exe /rebuildbcd
3. Type exit again and press Enter to exit the command prompt character.
Method 8: Implementing a clean start
Clean Start is a special Windows diagnostic mode, similar to Safe Mode, except that you need to manually disable third-party applications and services. This method will also help you fix the «It looks like Windows is not loading correctly» error. Please note that this method requires you to enter Windows normally.
1. Use Windows+R to open the Execute window, type msconfig and press Enter.
2. Switch to the Services tab at the top of the System Configuration window, check the Hilde all Microsoft services checkbox in the lower left corner, and then tap the Disable all button.
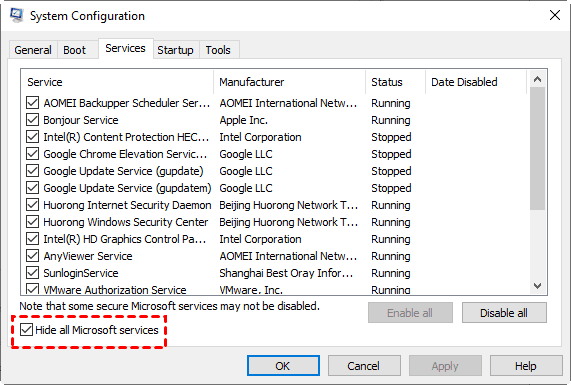
Note: If you have deepfreeze installed, please uncheck the DFServ service.
3. Switch to the Startup tab again and tap on the Open Task Manager button.
4. In the Startup tab list, select each startup item in turn and tap the Disable button in turn, then close Task Manager.
Return to the System Settings startup tab again and tap the OK button.
Method 9. Reset this computer
Both Windows 10 and Windows 11 provide you with a convenient one-click restore feature and allow you to choose whether to keep your personal files or not, which is great for beginners. So when you’re at your wits’ end with the «It looks like Windows isn’t loading correctly» error, consider resetting your computer to fix it.
1. Enter the Windows recovery environment and click Troubleshoot > Reset this PC in order.
2. You can choose to Keep my files or Remove everything depending on your needs, usually the first option is recommended.
Note: The system will install the driver automatically if the network is open, but sometimes there will be an error.
3. Finally, tap the Reset button and wait for the computer to finish resetting automatically.
Method 10. restore Windows 10
In addition to resetting your computer, you can also choose to restore your Windows 10 or Windows 11 system to a previous state, but this requires that you have created the system restore point before the «It looks like Windows is not loading correctly» error. To use this restore feature.
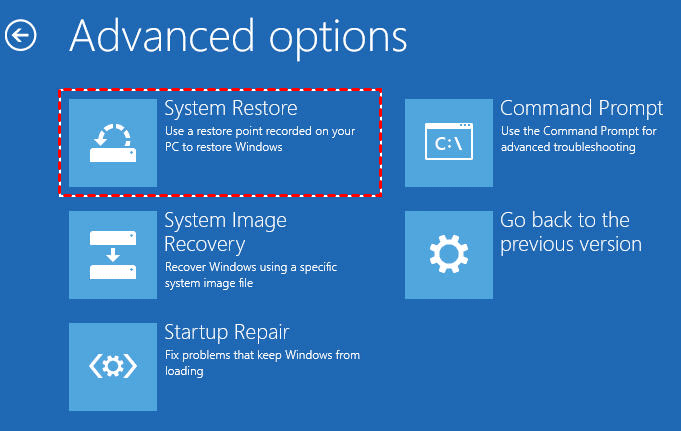
1. Enter the Windows recovery environment and click Troubleshoot > Advanced Options > System Restore in order.
2. Select your user account and enter your password, select the previously created system restore point based on the time, then follow the prompts and wait for this process to complete.
Method 11. fresh installation of Windows 10
If you have not created a system restore point before the error appeared and you think that resetting your computer is too much of a hassle (automatically installed drivers can sometimes be wrong), then it is recommended that you simply reinstall Windows 10, which is the most effective fix. The next steps will use Windows 10 as an example, but if your computer is Windows 11 then you can also use it as a reference, the actual steps are not very different.
1. Reboot the computer and enter the BIOS to set the optical drive or portable disk as the first priority. Please note that different brands of motherboards have different methods of entering the BIOS.
2. The computer will reboot at this point, wait for the reboot to complete and then simply press any key to execute the Windows 10 installer.
3. Set the language and input method in order>Install Now>Enter the product key (you can also skip it)>Select the version of Windows 10 you want to install>Accept the license terms>Select the Windows installation type, here it is recommended to select Custom: Install Windows only ( You can also skip it>Select the version of Windows 10 you want to install>Accept the license terms>Select the Windows installation type, here it is recommended to select Custom: Install Windows only ( Advanced).
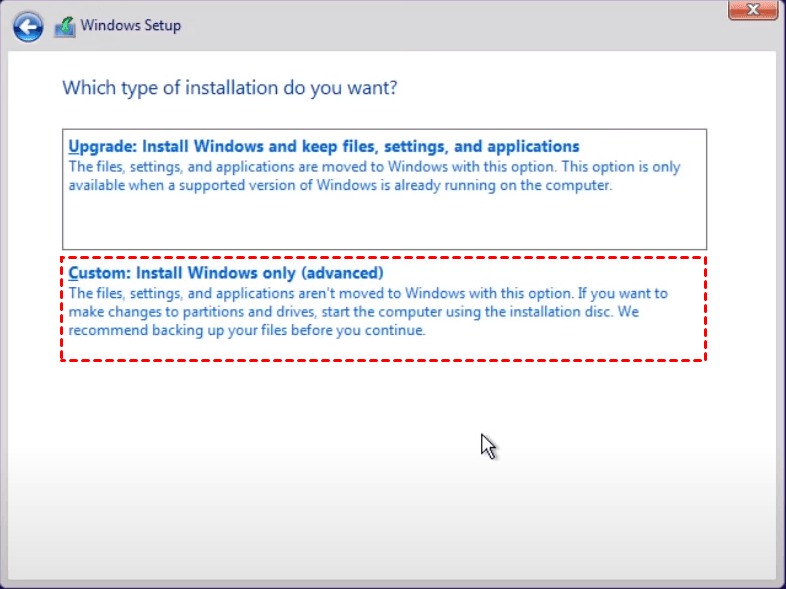
4. Next, you need to select the disk on which you want to install Windows 10, tap Next, wait for the installer to complete, and finally follow the prompts to set it up.
Method 12: System restore using third-party software
Windows System Restore cannot recover user data, and reinstalling Windows 10 is too troublesome and will take a lot of your time and effort, so you can use the Universal Restore feature of AOMEI Backupper Professional to fix the «It looks like Windows didn’t load correctly» error. It not only saves more time than reinstalling the system but also can recover user data completely.
AOMEI Backupper allows you to use the Universal Restore feature on multiple versions of Windows 11/10/8.1/8/7, just create bootable media first, and then you can easily restore system image from one computer to another, not only can you quickly migrate the complete system, but also can be used to repair the system that crashed due to blue screen error.
- First, open AOMEI Backupper Professional on another computer that is running normally and make a system backup, then create bootable media.
- You will need to download the free trial version of AOMEI Backupper Professional software on your local computer and on another computer.
Secure Download
1. Boot the local computer using Windows 10 bootable media and change the boot priority in the BIOS.
2. After waiting for AOMEI Backupper Professional to run automatically, switch to the Restore tab in the left panel and tap Select Task. You can also select the image file and select the system backup file (with the suffix . adi), but in any case, you need to make sure that the device with the system backup when is successfully connected.
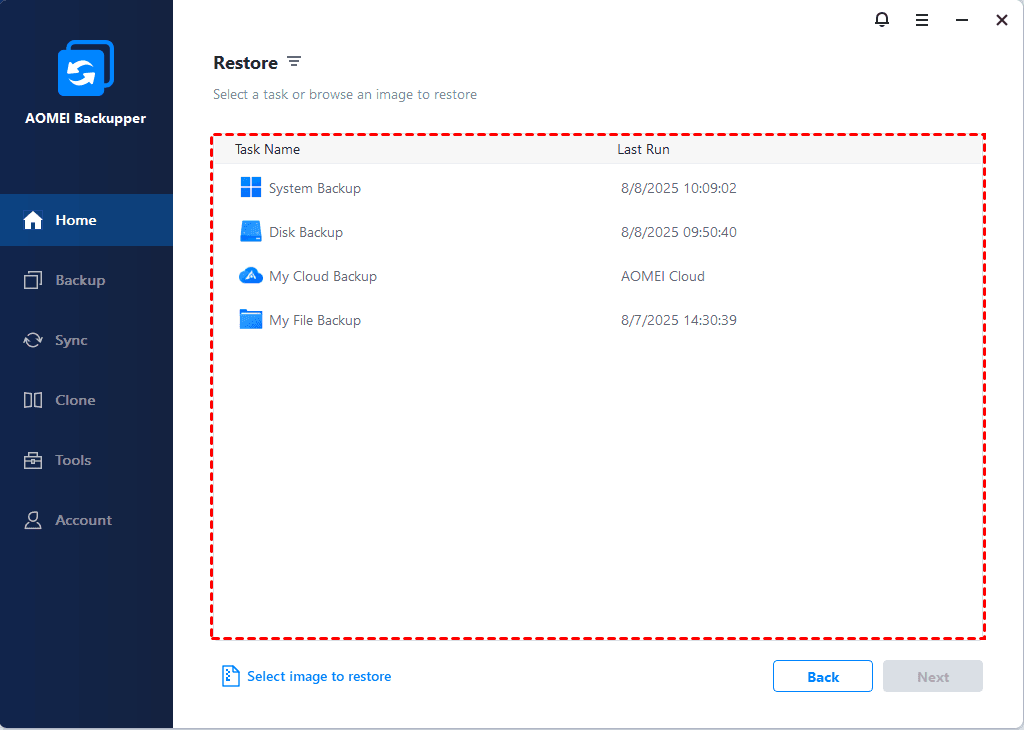
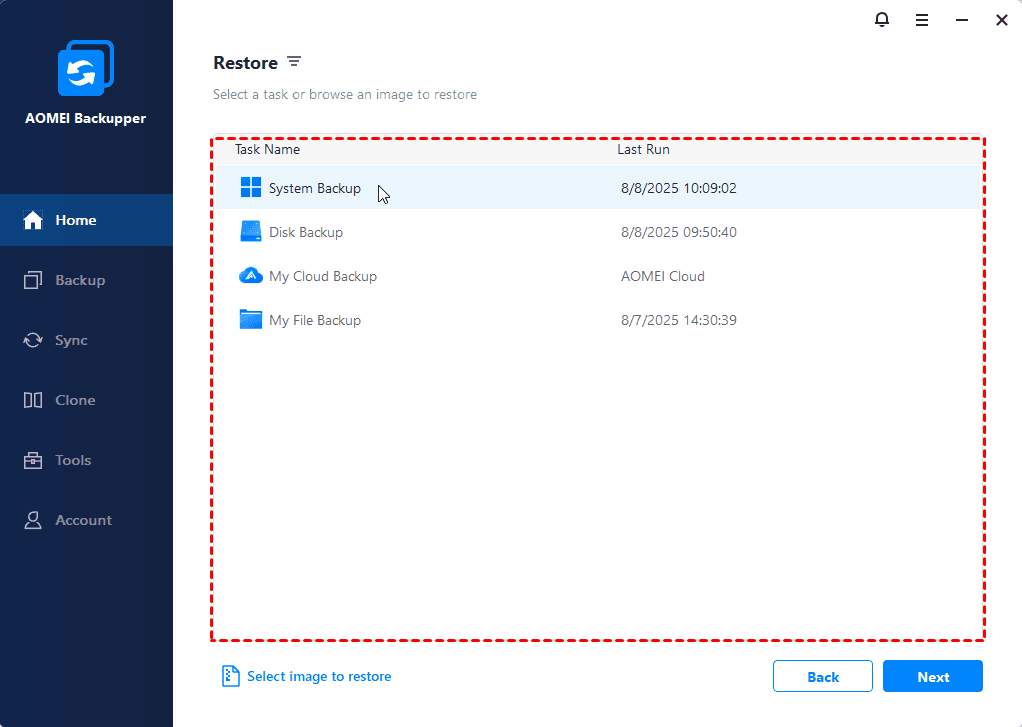
3. In the Backup list window, select the system image you need to restore and tap Next. If you have more than one system image, select the most suitable one according to the time.
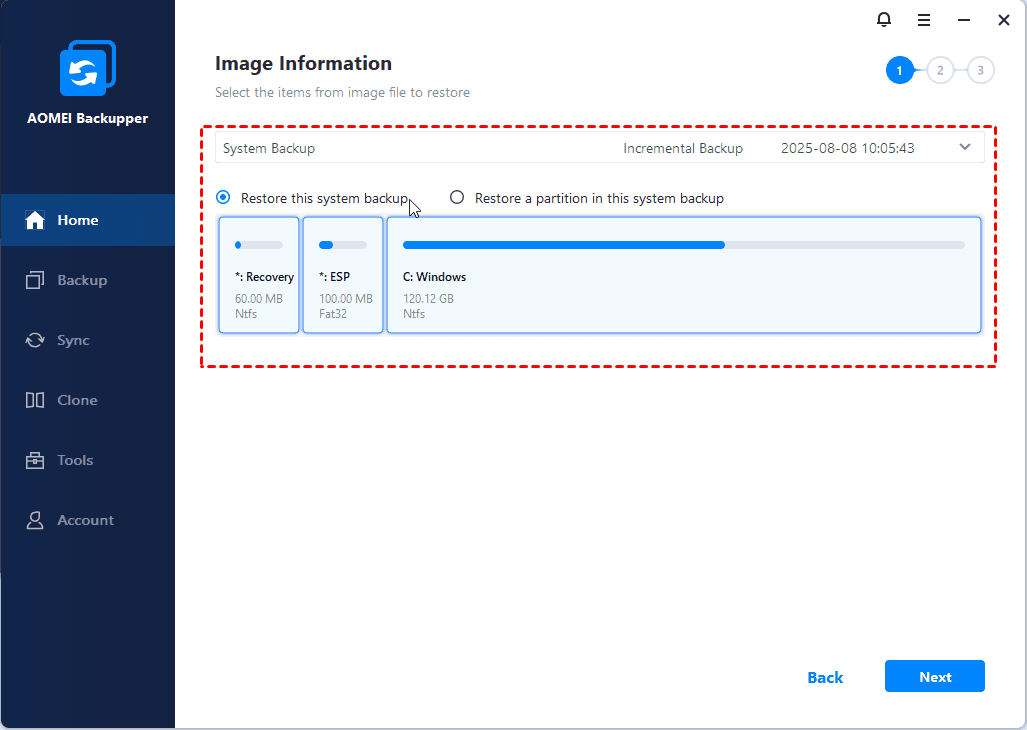
4. In the image information window, select Restore this system or Restore a partition from this system backup, as appropriate, and click Next. If you want to restore the system image to a new hard drive, check the Restore system to another location checkbox.
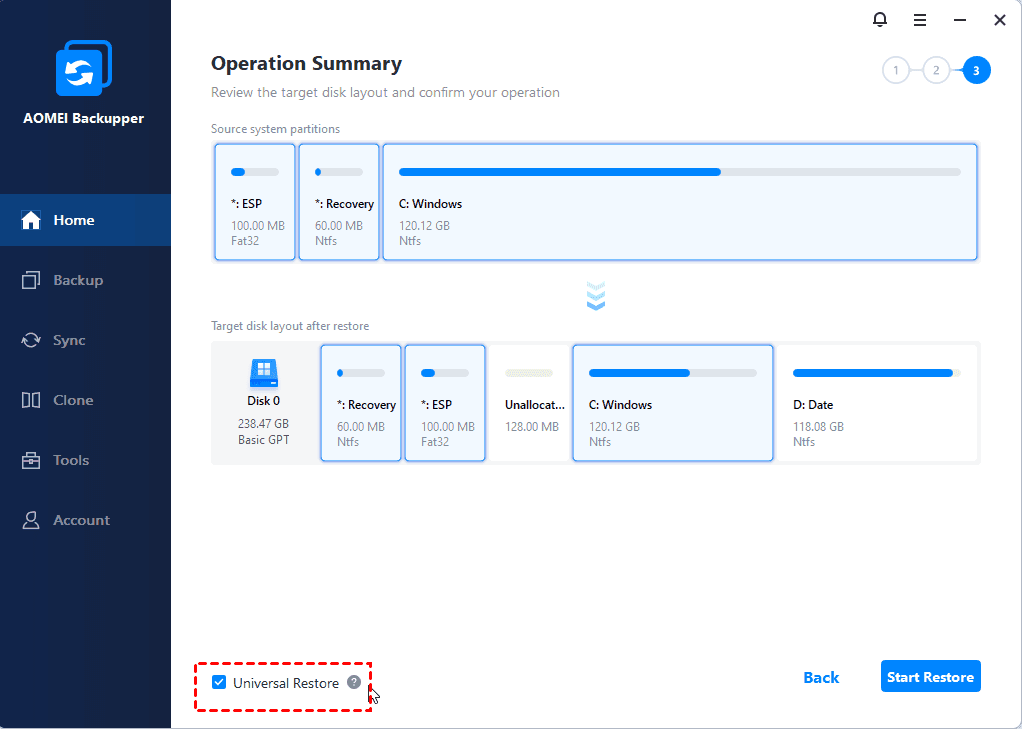
5. First confirm the restore operation, then confirm whether the checkbox of Universal Restore is checked (it is automatically checked by default), then tap the Start Restore button and wait for the process to complete.
Conclusion
If you are suffering from the “It looks like Windows didn’t load correctly” error, please read this article in detail and try the 12 methods mentioned in the article in order, I believe these methods can effectively fix this error. Compared with System Restore and System Reinstall, we recommend you to use the Universal Restore function of AOMEI Backupper Professional to restore the whole Windows system and ensure the new system can boot normally.
AOMEI Backupper Professional has a clear and easy-to-use interface and works with several versions of Windows, so you can restore a complete system from another computer to your own in a few simple steps, so even beginners can get started quickly. In addition, the software offers other features that may interest you, such as File Backup, Disk Clone, File Restore, etc, for all your computer backup and restore needs.
Clytze, an editor at AOMEI Technology, is passionate about safeguarding your digital world. She dedicates her expertise to empower users like you in data security and recovery. She firmly believes that everyone should have the tools and knowledge to protect their digital assets through computer backup, seamless disk cloning, and efficient file synchronization. Clytze is your trusted guide on the journey to data safety.
Related Articles
Quick Fix: Cloned SSD Won’t Boot in Windows 11, 10, 8, 7
Read this article to learn how to fix cloned SSD won’t boot on Windows 11/10/8/7. If you don’t want to get trapped, try an alternative in Windows to clone HDD to SSD without booting problem.
Solved: Windows 10 File Sharing Not Working [4 Ways + 1 Tip]
What to do when Windows 10 file sharing not working? Try 5 solutions or its alternative to fix it easily.
How to Fix Windows 10 Reset Failed (6 Effective Ways)
Windows 10 reset failed with a prompt saying there was a problem resetting your PC? It may be caused by following reasons, keep reading and try coping solution to fix it.
Компьютер запущен некорректно при загрузке Windows 11 — как исправить?

При очередном запуске компьютера или ноутбука вы можете столкнуться с сообщением об ошибке «Автоматическое восстановление. Компьютер запущен некорректно» — причины чего не всегда ясны.
В этой инструкции подробно о различных сценариях появления экрана «Компьютер запущен некорректно» в Windows 11 и способах исправить проблему.
Простые варианты решения

Обычно сообщение «Компьютер запущен некорректно» появляется после нескольких неудачных попыток системы запуститься (причины могут быть разными): например, если вы дважды принудительно выключите компьютер кнопкой питания в процессе включения, на третий раз вы увидите рассматриваемую ошибку.
Сначала о некоторых сравнительно простых случаях, когда исправление ошибки «Компьютер запущен некорректно» оказывается не сложным:
Ещё один вариант, который не в полной мере относится к «простым», однако его следует вынести отдельно: если вы сталкиваетесь с ошибкой «Компьютер запущен некорректно» после других сбоев (обычно — синих экранов с разными кодами ошибок) и многократных выключений, в первую очередь стоит найти решение для соответствующей ошибки, используя поиск по коду ошибки в Интернете или на этом сайте.
Действия в «Дополнительные параметры» (среде восстановления)
Многие действия для восстановления запуска системы, в случае если предыдущие варианты не подходят к вашему случаю, можно выполнить, нажав кнопку «Дополнительные параметры» на экране с ошибкой — это откроет среду восстановления, где доступны ряд опций, позволяющих решить проблему.
Особые варианты загрузки
Прежде всего попробуйте использовать «Параметры загрузки» в дополнительных параметрах:
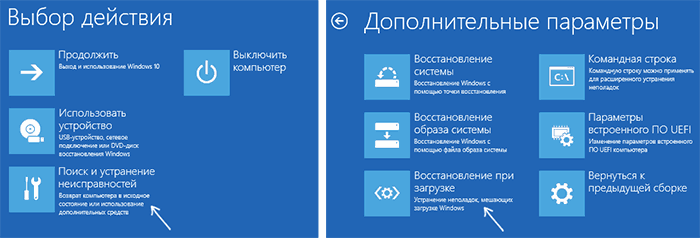
- На экране с ошибкой нажмите «Дополнительные параметры».
- Перейдите в «Поиск и устранение неисправностей» — «Дополнительные параметры». Выберите пункт «Параметры загрузки» и нажмите кнопку «Перезагрузить».

- После этого вы попадаете на экран с выбором вариантов загрузки. Для выбора нужного варианта достаточно нажать клавишу с цифрой или клавиши F1-F9 с номером, соответствующим нужному пункту.
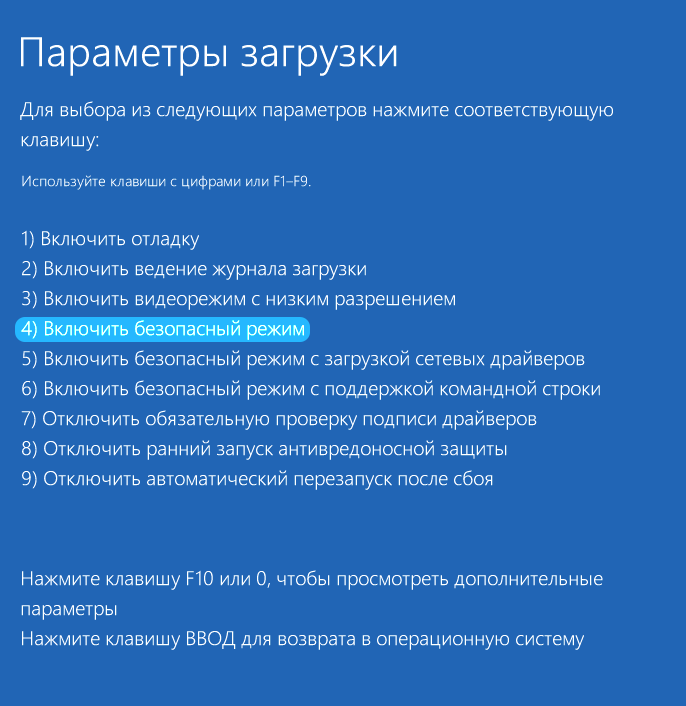
- Прежде всего проверьте, будет ли работать загрузка в безопасном режиме — если это сработало, вы сможете откатить изменения, которые привели к проблеме и выполнить другие действия: например, восстановление системных файлов или использование точек восстановления.
- Если безопасный режим не сработал, проверьте, запустится ли безопасный режим с поддержкой командной строки. Если запуск удался, в командной строке по порядку выполните следующие команды (переключение языка ввода клавишами Alt+Shift):
dism /Online /Cleanup-Image /RestoreHealth sfc /scannow shutdown -r
Восстановление системы
Ещё одна полезная опция, способная сработать в «Дополнительных параметрах» в разделе «Поиск и устранение неисправностей» — «Восстановление системы».
Попробуйте выбрать это пункт: это откроет список доступных точек восстановления. Если они есть в наличии, попробуйте использовать точку восстановления системы на дату, которая предшествовала появлению ошибки: с большой вероятностью это поможет решить проблему.
Командная строка
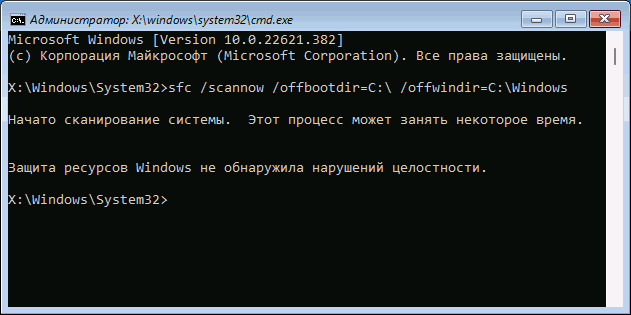
С помощью командной строки, также доступной в среде восстановления, вы можете выполнить проверку целостности и восстановление системных файлов с помощью следующей команды:
sfc /scannow /offbootdir=C:\ /offwindir=C:\Windows
Дополнительно, если есть основания полагать, что сбой происходит из-за ошибок диска, вы можете проверить диск на ошибки файловой системы:
chkdsk C: /f
Иногда при использовании командной строке в среде восстановления буквы дисков отличаются от тех, которые им назначает исправно работающая система. Узнать актуальные буквы разделов вы можете, по порядку выполнив следующие три команды:
diskpart list volume exit
в результате чего вы увидите полный список разделов дисков и их букв.
Восстановление системных файлов
Описанные в этом разделе действия следует выполнять лишь в том случае, если вы не смогли использовать соответствующие команды в среде восстановления, как это было описано выше.
- Если у вас есть возможность создать загрузочную флешку с WinPE на другом компьютере, используйте инструкции Восстановление системных файлов Windows 11 и Windows 10 с использованием WinPE.
- Если такой возможности нет, но в наличии есть загрузочный установочный накопитель, вы можете использовать его для восстановления хранилища компонентов Windows 11 и восстановления системных файлов Windows 11.
Дополнительные варианты решения
В завершение несколько дополнительных возможных причин сбоя «Компьютер запущен некорректно» и вариантов решения:
Если ошибка была исправлена — отлично! Если нет, используйте комментарии ниже и опишите в деталях, как именно и при каких условиях проявляется сбой «Компьютер запущен некорректно», что предшествовало его появлению — не исключено, что решение найдется.
А вдруг и это будет интересно:
- Лучшие бесплатные программы для Windows
- Не удалось запустить службу Windows Audio на Локальный компьютер — как исправить?
- Ошибка DXGI ERROR DEVICE HUNG — как исправить?
- Как сбросить Windows на заводские настройки в командной строке
- Как создать отчет о работе Wi-Fi сети в Windows 11 и 10
- Устройство tap0901 — что это и как установить драйвер?
- Windows 11
- Windows 10
- Android
- Загрузочная флешка
- Лечение вирусов
- Восстановление данных
- Установка с флешки
- Настройка роутера
- Всё про Windows
- В контакте
- Одноклассники
-
Алёна 11.01.2024 в 20:23
- Живые обои на рабочий стол Windows 11 и Windows 10
- Лучшие бесплатные программы на каждый день
- Как скачать Windows 10 64-бит и 32-бит оригинальный ISO
- Как смотреть ТВ онлайн бесплатно
- Бесплатные программы для восстановления данных
- Лучшие бесплатные антивирусы
- Средства удаления вредоносных программ (которых не видит ваш антивирус)
- Встроенные системные утилиты Windows 10, 8 и 7, о которых многие не знают
- Бесплатные программы удаленного управления компьютером
- Запуск Windows 10 с флешки без установки
- Лучший антивирус для Windows 10
- Бесплатные программы для ремонта флешек
- Что делать, если сильно греется и выключается ноутбук
- Программы для очистки компьютера от ненужных файлов
- Лучший браузер для Windows
- Бесплатный офис для Windows
- Запуск Android игр и программ в Windows (Эмуляторы Android)
- Что делать, если компьютер не видит флешку
- Управление Android с компьютера
- Не удалось запустить службу Windows Audio на Локальный компьютер — как исправить?
- Как автоматически скрывать строку меню и Dock в MacOS
- Ошибка DXGI ERROR DEVICE HUNG — как исправить?
- Как сбросить Windows на заводские настройки в командной строке
- Как создать отчет о работе Wi-Fi сети в Windows 11 и 10
- Устройство tap0901 — что это и как установить драйвер?
- Клавиши Alt и Win поменялись местами — как исправить?
- Ошибка 0x80072efd — как исправить?
- AV Block Remover — убираем блокировку антивирусов и сайтов майнером
- Ошибка 0x80070643 при обновлении KB5034441 — как исправить?
- Загрузочная флешка или карта памяти в balenaEtcher
- RtkAudUService64.exe — что это в автозагрузке и списке процессов?
- Как включить звонки по Wi-Fi на iPhone
- Использование Kaspersky Rescue Disk для удаления вирусов с компьютера
- Как извлечь иконки из EXE и DLL файлов
- Windows
- Android
- iPhone, iPad и Mac
- Программы
- Загрузочная флешка
- Лечение вирусов
- Восстановление данных
- Ноутбуки
- Wi-Fi и настройка роутера
- Интернет и браузеры
- Для начинающих
- Безопасность
- Ремонт компьютеров
- Windows
- Android
- iPhone, iPad и Mac
- Программы
- Загрузочная флешка
- Лечение вирусов
- Восстановление данных
- Ноутбуки
- Wi-Fi и настройка роутера
- Интернет и браузеры
- Для начинающих
- Безопасность
- Ремонт компьютеров
Восстановление загрузчика Windows 10

Если после установки второй ОС, попыток воспользоваться свободным местом на скрытых разделах диска или их форматирования, в случае системных сбоев, при экспериментах с EasyBCD и в других случаях вы столкнулись с тем, что Windows 10 не загружается, сообщая «An operating system wasn’t found», «No bootable device found. Insert boot disk and press any key», то, возможно, вам требуется восстановление загрузчика Windows 10, о чем и пойдет речь ниже.
Вне зависимости от того, UEFI у вас или BIOS, установлена ли система на GPT диск со скрытым FAT32 разделом EFI загрузки или на MBR с разделом «Зарезервировано системой», действия по восстановлению будут одинаковыми для большинства ситуаций. Если ничто из нижеописанного не помогает, попробуйте Сброс Windows 10 с сохранением данных (третьим способом). Примечание: ошибки, подобные указанным выше, необязательно вызваны поврежденным загрузчиком ОС. Причиной может оказаться вставленный компакт-диск или подключенный USB-накопитель (попробуйте вынуть), новый дополнительный жесткий диск или проблемы с имеющимся жестким диском (прежде всего взгляните, а виден ли он в БИОС).
- Автоматическое восстановление загрузчика Windows 10
- Простое восстановление вручную
- Второй метод восстановить загрузчик Windows 10 вручную
- Видео инструкция
Автоматическое восстановление загрузчика
Среда восстановления Windows 10 предлагает опцию восстановления при загрузке, которое работает на удивление хорошо и в большинстве случаев оказывается достаточным (но не всегда). Чтобы восстановить загрузчик данным способом, проделайте следующие действия.
- Загрузитесь с диска восстановления Windows 10 или загрузочной флешки с Windows 10 в той же разрядности, что и ваша система (диска). Для выбора накопителя для загрузки можно использовать Boot Menu.
- В случае загрузки с установочного накопителя, на экране после выбора языка внизу слева нажмите пункт Восстановление системы.
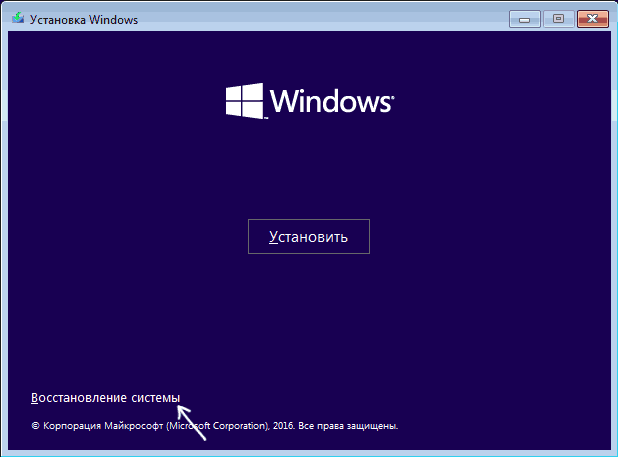
- Выберите пункт Поиск и устранение неисправностей, а затем — Восстановление при загрузке. Выберите целевую операционную систему. Дальнейший процесс будет произведен автоматически.
По завершении вы либо увидите сообщение о том, что восстановление не удалось, либо компьютер автоматически перезагрузится (не забудьте вернуть загрузку с жесткого диска в БИОС) уже в восстановленную систему (но не всегда).
Если описанный способ не помог решить проблему, переходим к более результативному, ручному способу.
Процедура восстановления вручную
Следующий этап — загрузиться с указанного носителя, поставив загрузку с него в БИОС (UEFI), либо используя Boot Menu. После загрузки, если это установочная флешка или диск, на экране выбора языка нажмите клавиши Shift + F10 или Shift+Fn+F10 на некоторых ноутбуках (откроется командная строка). Если это диск восстановления в меню выберите Диагностика — Дополнительные параметры — Командная строка.
В командной строке введите по порядку три команды (после каждой нажимаем Enter):
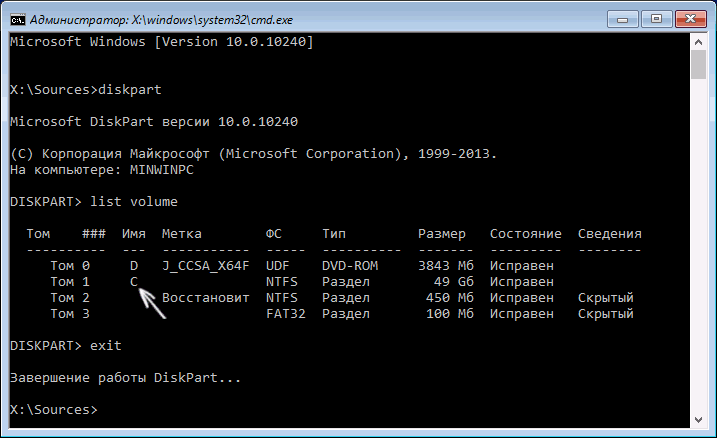
В результате выполнения команды list volume, вы увидите список подключенных томов. Запомните букву того тома, на котором располагаются файлы Windows 10 (в процессе восстановления это может быть не раздел C, а раздел под какой-либо другой буквой).
В большинстве случаев (на компьютере только одна ОС Windows 10, скрытый раздел EFI или MBR в наличии), для того, чтобы восстановить загрузчик, достаточно после этого выполнить одну команду:
bcdboot C:\windows (где вместо C может потребоваться указать другую букву, о чем было сказано выше).
Примечание: если на компьютере несколько ОС, например, Windows 10 и 8.1, вы можете выполнить эту команду дважды, в первом случае указав путь к файлам одной ОС, во втором — другой (не сработает для Linux и XP. Для 7-ки зависит от конфигурации).
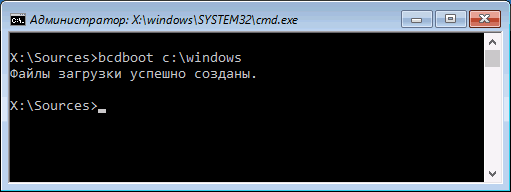
После выполнения этой команды вы увидите сообщение о том, что файлы загрузки успешно созданы. Можно попробовать перезагрузить компьютер в обычном режиме (вынув загрузочную флешку или диск) и проверить, загружается ли система (после некоторых сбоев загрузка происходит не сразу после восстановления загрузчика, а после проверки HDD или SSD и перезагрузки, также может проявиться ошибка 0xc0000001, которая в этом случае также обычно исправляется простой перезагрузкой).
Второй способ восстановить загрузчик Windows 10
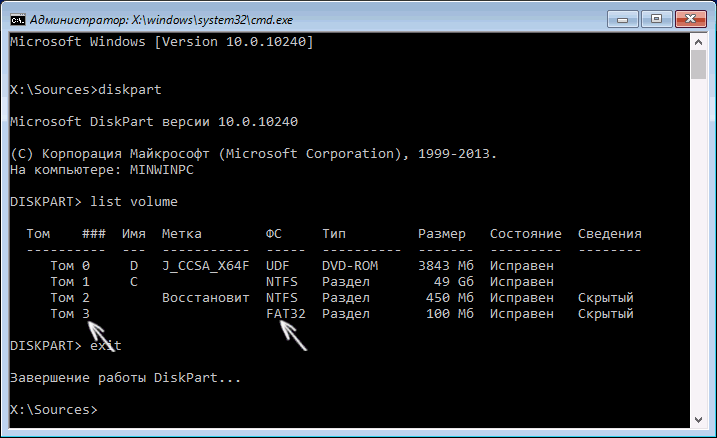
Если вышеописанный способ не сработал, то возвращаемся в командную строку так же, как делали это ранее. Вводим команды diskpart, а потом — list volume. И изучаем подключенные разделы дисков.
Если у вас система с UEFI и GPT, в списке вы должны увидеть скрытый раздел с файловой системой FAT32 и размером 99-300 Мб. Если же BIOS и MBR, то должен обнаружиться раздел размером 500 Мб (после чистой установки Windows 10) или меньше с файловой системой NTFS. Вам требуется номер этого раздела N (Том 0, Том 1 и т.д.). Также обратите внимание на букву, соответствующую разделу, на котором хранятся файлы Windows.
Введите по порядку следующие команды:
- select volume N
- format fs=fat32 или format fs=ntfs (в зависимости от того, какая файловая система на разделе).
- assign letter=Z (присваиваем букву Z этому разделу).
- exit (выходим из Diskpart)
- bcdboot C:\Windows /s Z: /f ALL (где C: — диск с файлами Windows, Z: — буква, которую мы присвоили скрытому разделу).
- Если у вас несколько ОС Windows, повторите команду для второй копии (с новым расположением файлов).
- diskpart
- list volume
- select volume N (номер скрытого тома, которому мы присваивали букву)
- remove letter=Z (удаляем букву, чтобы том не отображался в системе, когда мы перезагрузимся).
- exit
По завершении, закрываем командную строку и перезагружаем компьютер уже не с внешнего загрузочного накопителя, проверяем, загружается ли Windows 10.
Видео инструкция
А вдруг и это будет интересно:
- Лучшие бесплатные программы для Windows
- Не удалось запустить службу Windows Audio на Локальный компьютер — как исправить?
- Ошибка DXGI ERROR DEVICE HUNG — как исправить?
- Как сбросить Windows на заводские настройки в командной строке
- Как создать отчет о работе Wi-Fi сети в Windows 11 и 10
- Устройство tap0901 — что это и как установить драйвер?
- Windows 11
- Windows 10
- Android
- Загрузочная флешка
- Лечение вирусов
- Восстановление данных
- Установка с флешки
- Настройка роутера
- Всё про Windows
- В контакте
- Одноклассники
-
Аноним 03.09.2023 в 15:09
- Dmitry 07.09.2023 в 19:16
It Looks Like Windows Didn’t Load Correctly Windows 11/10? 8 Ways
“Recovery it looks like Windows didn’t load correctly” is a common error message during the PC startup process in Windows 11/10. If you are hit by this issue when booting your Dell or Lenovo, take it easy and MiniTool collects multiple methods to fix it easily.
It Looks Like Windows Didn’t Load Correctly Windows 11/10 Dell/Lenovo
According to users who are using a Dell or Lenovo, the error message “Recovery it looks like Windows didn’t load correctly” appears on your computer when trying to boot or recover the PC. Sometimes your PC accidentally stops working with a blue screen and after a restart, you get the error. Sometimes Windows not loading correctly appears randomly. See an example from a Windows 11 user:
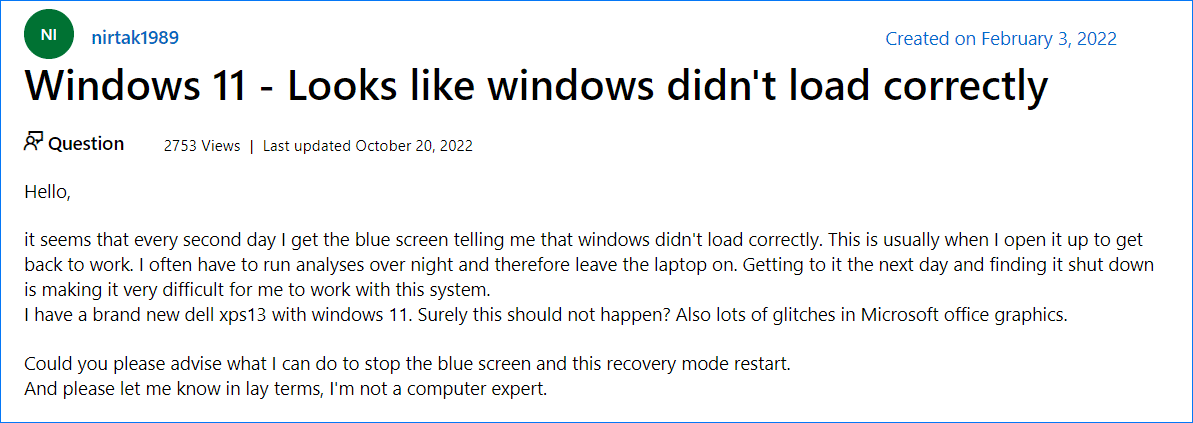
The screen gives you two options – See advanced repair options and Restart my PC. To troubleshoot the issue, click the first one. If you would like to restart and try again, click the second one. The error screen is shown below:
This issue is mainly triggered by damaged Windows files, missing/corrupt BCD, compromised system integrity, etc. It usually happens on Windows 11, 10, and 8. After knowing the reasons to some extent, you can find out how to fix them. Of course, some other solutions are also can help. Now, let’s go to the next part to figure out what you should do.
Tips:
Sometimes you see another error when performing an automatic repair – “Automatic Repair, Your PC did not start correctly.» To find solutions, refer to this post — 7 Solutions: Your PC Did Not Start Correctly Error in Windows 10.
Fixes for It Looks Like Windows Didn’t Load Correctly Dell/Lenovo
Enter Safe Mode
Safe Mode is a diagnostic mode in Windows and it boots the system with the minimum drivers and services. When it comes to PC troubleshooting, entering Safe Mode is a safe and reliable way. If you are plagued by the issue of Windows not loading correctly, try this way.
How to Start/Boot Windows 11 in Safe Mode? (7 Ways)
How to start or boot Windows 11 in Safe Mode for troubleshooting? This post gives a detailed guide focusing on 7 simple ways to enter Safe Mode.
Step 1: On the Recovery page, click on See advanced repair options to enter the troubleshooting interface. Alternatively, you can restart your PC several times when seeing the Windows logo to enter the WinRE page.
Step 2: Click Troubleshoot > Advanced options and you can see several options.
Step 3: Click Startup Settings > Restart. Then, you see the following figure and press F4 or F5 to open Safe Mode.
In Safe Mode, you can run a quick diagnostic, for example, uninstall suspicious software or a recently installed driver. To uninstall the driver, go to Device Manager, locate the driver, and right-click on it to choose Uninstall device. To uninstall an app, go to Control Panel > Uninstall a program, right-click on the program and choose Uninstall.
After that, restart your Dell or Lenovo PC to see if the error “it looks like Windows didn’t load correctly” is fixed. If not, continue the troubleshooting.
Turn Off Hybrid Sleep
According to some users, the Hybrid Sleep feature can cause the error of Windows not loading correctly in Windows 10/11. To fix this issue, make sure you disable Hybrid Sleep and see how to do it:
Step 1: In Safe Mode, type Control Panel into the search box and click this app to open it. View items by large icons.
Step 2: Click Power Options > Change plan settings.
Step 3: Click the Change advanced power settings link to open the Advanced settings tab.
Step 4: Expand Sleep > Allow hybrid sleep and then change On to Off.
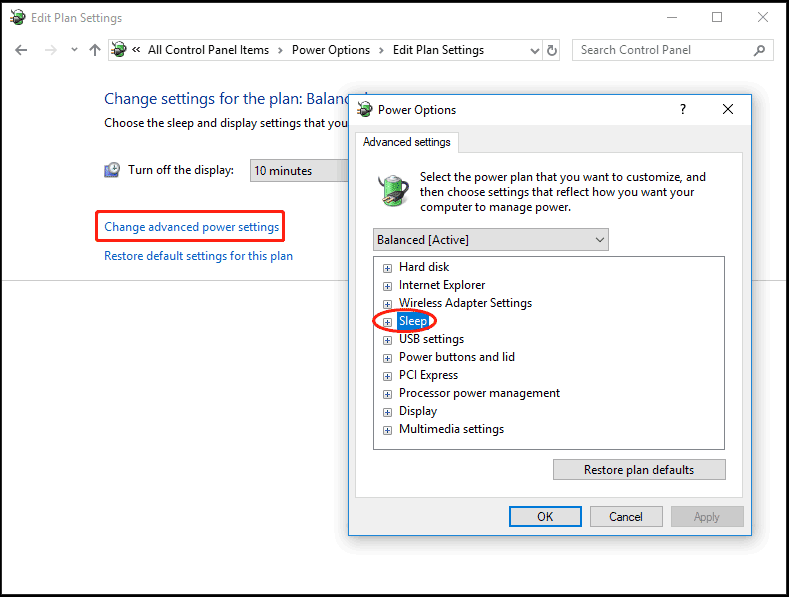
Step 5: Click Apply > OK.
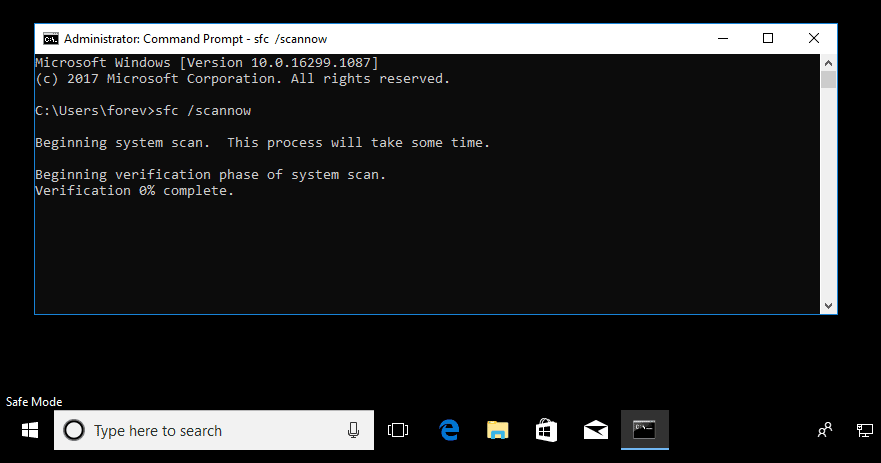
Run SFC and DISM Scans
Sometimes Windows not loading correctly is triggered by corrupted system files. To get rid of this issue from Windows 10/11, you need to fix the corruption in the Windows system. To do this work, System File Checker (SFC) is helpful. Besides, you can run a DISM scan to repair bad system images. See how to do the scans:
Step 1: In Safe Mode, type cmd to the search box, right-click on Command Prompt, and choose Run as administrator. Alternatively, you can boot the PC to WinRE and go to Troubleshoot > Advanced options > Command Prompt.

How to Access Advanced Startup Options (WinRE) on Windows 11?
This post shows you how to open Advanced Startup Options on your Windows 11 computer using different methods.
Step 2: Type sfc /scannow and press Enter to begin the scan. This scan will take some time and wait patiently.
Tips:
SFC isn’t always working and sometime it may get stuck. If you encounter this issue, go to find solutions from our previous post — Windows 10 SFC /Scannow Stuck at 4/5/30/40/73, etc.? Try 7 Ways.
Step 3: After the SFC scan, run a DISM scan. Just execute these commands one by one, as shown below. Remember to press Enter after each one.
Dism /Online /Cleanup-Image /ScanHealth
Dism /Online /Cleanup-Image /CheckHealth
Dism /Online /Cleanup-Image /RestoreHealth
Run CHKDSK
Sometimes the file system is corrupted or there are bad blocks on the hard drive, as a result, “Recovery it looks like Windows didn’t load correctly” appears on your Windows 11/10 PC. In this case, it is necessary to run the CHKDSK scan.
Step 1: Open Command Prompt (as shown in the above way).
Step 2: Type chkdsk /f /r and press Enter to check for file system errors and hard drive errors, and then fix the found errors and recover the readable information from the bad sectors.
Tips:
If you want to know the difference between chkdsk /f and /r, refer to this article — CHKDSK /F or /R | Difference Between CHKDSK /F and CHKDSK /R.
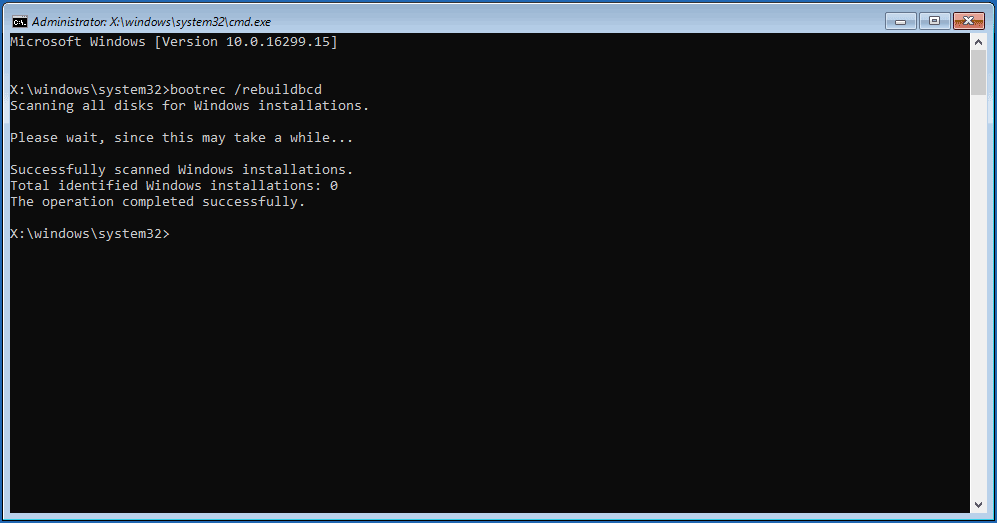
Rebuild BCD
If the BCD files in Windows 11/10 are missing or corrupted, the error “it looks like Windows didn’t load correctly” may appear on the screen. To fix it, try to rebuild BCD. In WinRE, go to Troubleshoot > Advanced options > Command Prompt. After opening Command Prompt, type bootrec /rebuildbcd and press Enter.
4 Ways to Fix Boot Configuration Data File Is Missing
Here are 4 ways to fix “Boot Configuration Data file is missing some required information” and shows how to recover data from a PC encountering this issue.
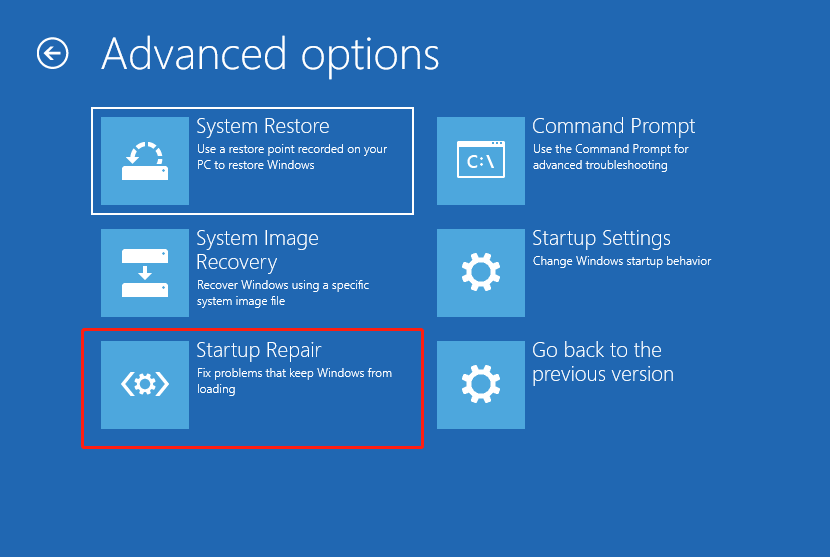
Run Startup Repair
Some users recommend running Startup Repair in Windows Recovery Environment. When seeing the error “Recovery it looks like Windows didn’t load correctly”, click See advanced repair options. Then, go to the Advanced options page and click Startup Repair.
Perform System Restore
If you have a habit of backup via System Restore, you can use a restore point to revert Windows 11/10 to an earlier state to fix Windows not loading correctly on Dell, Lenovo, etc. PC.
Step 1: Click System Restore in WinRE.
Step 2: You can use the recommended restore point or choose to use a different restore point.
Step 3: Then, click Finish to start the restoration operation.
If there are no restore points created previously, this way cannot fix your issue.
Reset Your PC
If all of the above ways fail to solve your issue, the last resort to remove “it looks like Windows didn’t load correctly” from Windows 10/11 is PC resetting. This operation can help to reinstall your system.
Windows 11 gives you an option to keep your personal files during the resetting process. But if you save some important files on your desktop, we still recommend you to back up them in advance to avoid unexpected data loss.
Back up Data Before You Do
To back up significant files/folders, you can seek help from a piece of professional and free backup software. MiniTool ShadowMaker is worth trying. This backup program allows you to easily create a system image, back up your important data via image backup or sync, and clone a hard drive for disk upgrade/disk backup.
To back up your files when encountering the error “it looks like Windows didn’t load correctly”, it is a bit difficult but you can use MiniTool ShadowMaker to create a bootable USB drive on a working PC and boot the unbootable PC from that drive. Then, back up data with the Bootable Edition of this backup software.
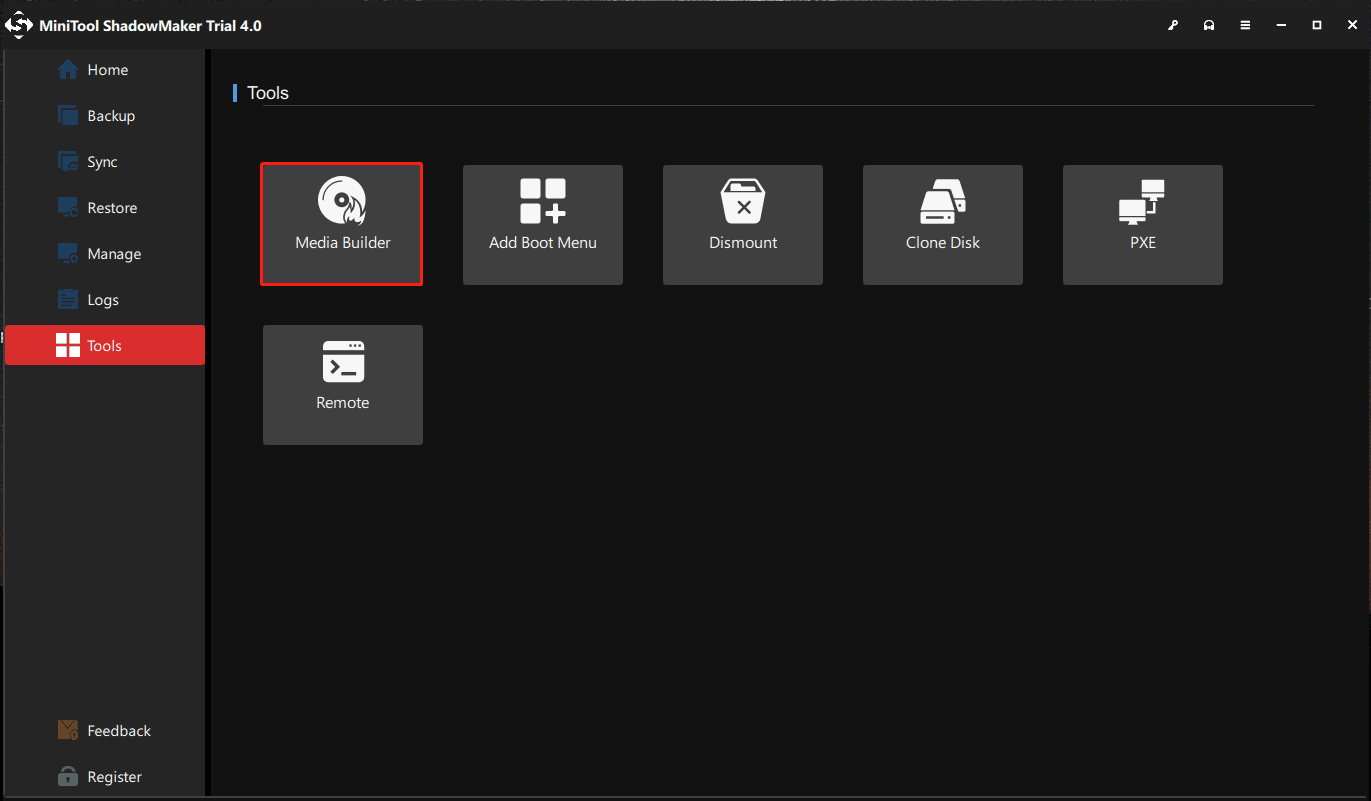
Step 1: Download and install MiniTool ShadowMaker on another PC. Then, launch it to the Tools interface and click Media Builder to create a bootable USB drive.
Step 2: On your problematic PC, go to BIOS, change the boot sequence to let Windows start up from the bootable drive, and then enter the MiniTool recovery environment.
Step 3: Launch MiniTool ShadowMaker to its Backup page, choose files/folders you want to back up, specify a storage path and click the Back up Now button to execute the data backup.
To know more information about the backup steps, refer to our previous post – How to Back up Data without Booting Windows? Easy Ways Are Here.
Reset Your PC
After finishing the file backup, follow the steps below to reset the PC with the error Windows not loading correctly.
Step 1: Boot your PC to WinRE by restarting the machine several times when seeing the Windows logo.
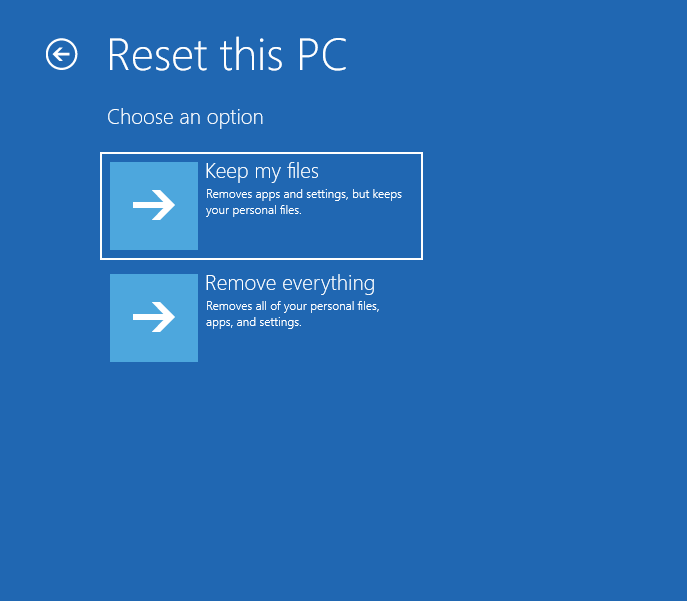
Step 2: Go to Troubleshoot > Reset this PC.
Step 3: Choose the Keep my files option to continue.
Step 4: Select Cloud download or Local reinstall. If you don’t know which one to choose, refer to this post – Cloud Download vs Local Reinstall: Differences on Win 10/11 Reset.
Step 5: Continue the resetting operation by following the on-screen wizards.
Recover Data from Your Unbootable PC
Sometimes when encountering the situation – it looks like Windows didn’t load correctly Windows 11/10, you choose to recover data before fixing it to avoid additional trouble. Well then, how to do this task? Data recovery is not easy but things can turn simple if you use professional data recovery software – MiniTool Power Data Recovery.
It enables you to recover files from a variety of situations like an unbootable PC, inaccessible hard drive, formatted/lost/deleted/RAW partition, Windows update, etc. In case of Windows not loading correctly, you can also easily get your data from the hard disk.
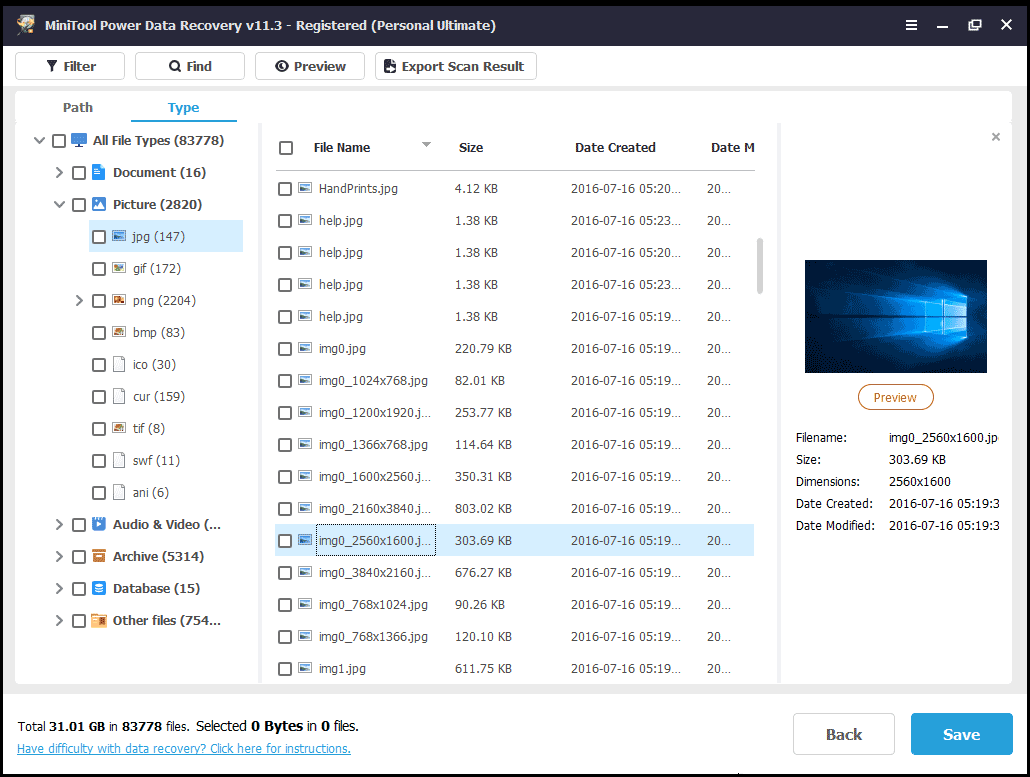
Just get a paid edition like Personal Ultimate to create a bootable USB drive by clicking the CD icon and then run the machine from that drive. Launch the bootable edition of this program for data recovery. Just go to the Devices tab and click Scan after hovering your mouse over the system disk. Wait some time until the scan finishes. Then, find what you want to recover, choose them and click Save.
How to Recover Data When PC Won’t Boot (Works 100%)
SEE! Here’s how to effectively recover data when PC won’t boot and how to fix the “PC won’t boot” issue.
Bottom Line
Run your PC but get a blue screen saying “Recovery it looks like Windows didn’t load correctly” in Windows 11/10? To remove this error from your Lenovo or Dell computer, you can try the above solutions collected by us. Just have a shot one by one by following the steps. Of course, if you figure out some other workarounds, welcome to share them with us. Thanks a lot.
It Looks Like Windows Didn’t Load Correctly FAQ
What to do when it says it looks like Windows didn’t load correctly?
There are many solutions you can try:
- Enter Safe Mode
- Turn off Hybrid Sleep
- Run SFC and DISM Scans
- Run CHKDSK
- Rebuild BCD
- Perform Startup Repair
- Run System Restore
- Reset PC
What causes Windows to not start correctly?
File system corruption, missing/corrupt BCD, compromised system integrity, a buggy driver and software, and more can cause Windows to not load correctly.