Flashing Arduino Nano Bootloader from Arduino Uno
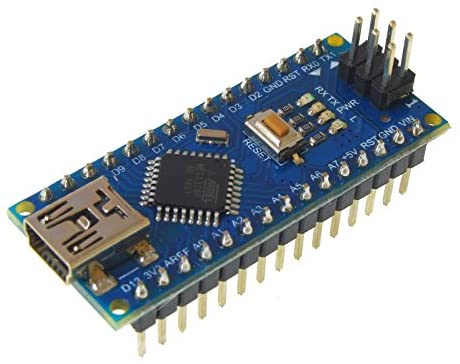
How to flash the Aruduino Nano bootloader and what to do if it doesn’t work.
I recently obtained an Arduino Nano unit from my Dad ( he’s 82 and loves playing with gadgets and electronics! ) and decided to have a play with it but I found it wouldn’t take a sketch, it refused to accept the upload of sketch code. Turns out cheaper non-genunine Arduino boards are sometimes shipped without bootloaders. Sounds like a serious issue but not at all, the designers of the Arduino system thought about this.
What is the Arduino bootloader?
The Arduino bootloader is a small piece of code, as the name suggests, that allows the compiled sketch code to be installed and started. It’s 512 bytes in size and sits in an area of «memory» within the 328P microprocessor chip.
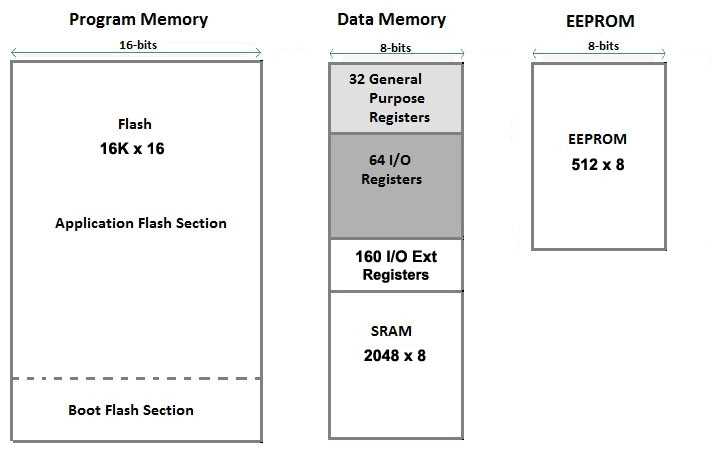
Believe it or not, there’s actually not a lot to an Arduino board and you can simply buy an ATmega328P microprocessor chip and flush a bootloader to it if you wish! The Arduino system is mainly about the supporting boards that hold the processor chips, the processor chips on the boards are, well, cheap as chips!
A special piece of code that is executed at every reset of the microcontroller and that looks for a sketch to be uploaded from the serial/USB port using a specific protocol and speed. If no connection is detected, the execution is passed to the code of your sketch. This little (usually 512 bytes) piece of code is called the «Bootloader» and it is in an area of the memory of the microcontroller — at the end of the address space — that can’t be reprogrammed as a regular sketch and had been designed for such purpose.
Use an Arduino Uno to ReProgram An Arduino Nano
So you’ll need the following:
- Working Arduino Uno board
- Arduino Nano board
- Jumper wires with pins
- 10uF Capacitor ( must be 10uF )
- Breadboard if you have one
First you need to do is to flash a specific sketch, supplied from within the standard Arduino IDE, to the Arduino Uno.
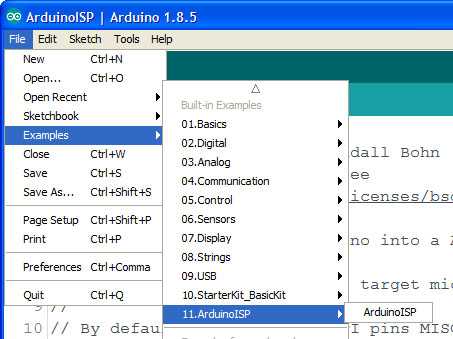
Plugin the Arduino Uno and from the Examples menu locate the «ArduinoISP» sketch, upload it to the Arduino Uno.
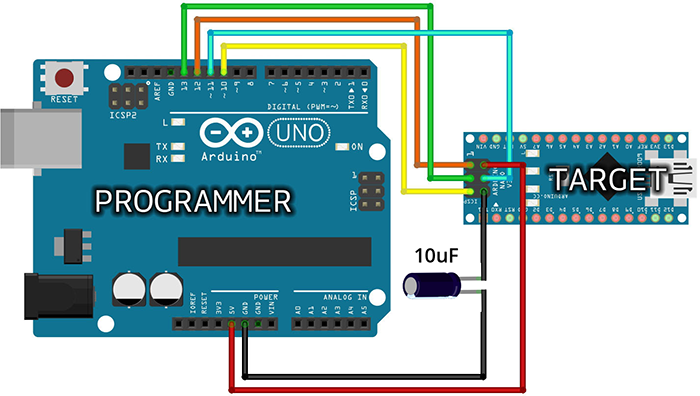
Disconnect the Uno from the USB and wire it up as shown below. Note the use of the capacitor slotted into the line to GND.
Most boot flashing tutorials and diagrams will simply show the GND being wired up between the two board but note that if you attempt to flash the bootloader with just the lines you may find it will fail. The line is hot and when you go to flash the target board needs its reset line hit and dropped, if the line is simply hot the reset not happen and the reprogram will fail. The capacitor is put in line to drop the voltage and pull the line back up when the flash is started this triggers the Uno to Nano reset and the Nano will be open to accept the boot flash. It needs to be 10uF anthing bigger or smaller will take too long to pull the reset.
Once you have this wired up as shown the next step is to flip the Arduino IDE into a programmer using the Uno as the hardware programmer passing through to the Nano.
Plug the USB into the Arduino UNO board NOT the Nano, the Uno is a programmer and will instruct the Nano.
- You need the board set to the target, the Nano.
- You need the chip set to ATMega328P. ( pre 2018 this would be «old bootloader» )
- Port is set to the Uno’s USB link.
- Select «Arduino as ISP» from the Programmer options.
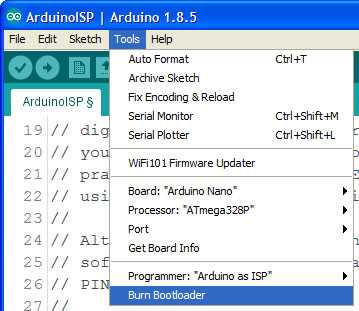
Finally hit Burn Bootloader.
What Happens if it Doesn’t Work?
One issue I had with my Nano board was that it would not take the bootloader when I first tried and I kept getting failures. It took me 2 days to find the proble,.
If you see this:
1avrdude: stk500_recv(): programmer is not responding 2avrdude: stk500_getsync() attempt 1 of 10: not in sync: resp=0x03 You may see this:
1avrdude: Yikes! Invalid device signature. 2 Double check connections and try again, or use -F to override 3 this check. 4 5Error while burning bootloader. I was also seeing random signatures from the Nano board!
1Reading | ################################################## | 100% 0.05s 2 3 avrdude: Device signature = 0x000000 4 avrdude: Yikes! Invalid device signature. 5 Double check connections and try again, or use -F to override 6 this check. All these errors mean one thing, you have bad wiring! The lines between the boards must be good and you will need to ensure the cap in the GND line is good.
It turned out in my case that the VCC pin on my Nano board had a bad solder joint and it was joined to the pin next door to it. This meant the second it was flashed the VCC bled over and reset the board and kept producing random signatures. 5 secs with the soldering iron to clean up the bad solder joint and the flash worked perfect.
Moral of the Story
Genuine Arduino boards will have a higher quality check from the factory but clones may not be subject to quite such high standards. You can get 5 Nano boards for £10 from Amazon, well worth buying the clone boards as they’re far cheaper than the genuine boards, but just be sure that your ready to check them over and you’re ready to dig deeper into the Arduino guts when things don’t work out of the box.
George Johnson
Coder, photographer, author, technologist and perpetual student. My website to dump interesting info and titbits.
Featured Posts
- How-To : Build a Docker Host Using Ubuntu Server
- Powershell — Find All File and Folder Names with Non-ASCII Characters
- Go — EXIF Scanner and Extractor
Recent Posts
- How-To : Build a Docker Host Using Ubuntu Server
- Powershell — Find All File and Folder Names with Non-ASCII Characters
- Go — EXIF Scanner and Extractor
Как прошить плату Arduino с помощью другой Arduino (ArduinoISP)

Как прошить плату Arduino Uno с помощью другой Arduino?
Теория
КОМПОНЕНТЫ
ARDUINO
- Что такое Arduino?
- Среда разработки Arduino IDE
- Сравнение плат Arduino. Какую выбрать?
- Как прошить плату Arduino с помощью другой Arduino (ArduinoISP)
- Онлайн-сервис TinkerCAD – эмулятор Arduino
- Визуальная среда разработки Mixly для Arduino
- Настройка поддержки чипа STM32F103C8T6 средой Arduino IDE
RASPBERRY
ИНТЕРФЕЙСЫ ПЕРЕДАЧИ ДАННЫХ
Почти любая плата Arduino может стать ISP-программатором, для этого нужно просто загрузить в неё скетч ArduinoISP:
- Например, если необходимо с помощью платы Arduino Uno прошить другую плату Uno, соберите следующую схему:
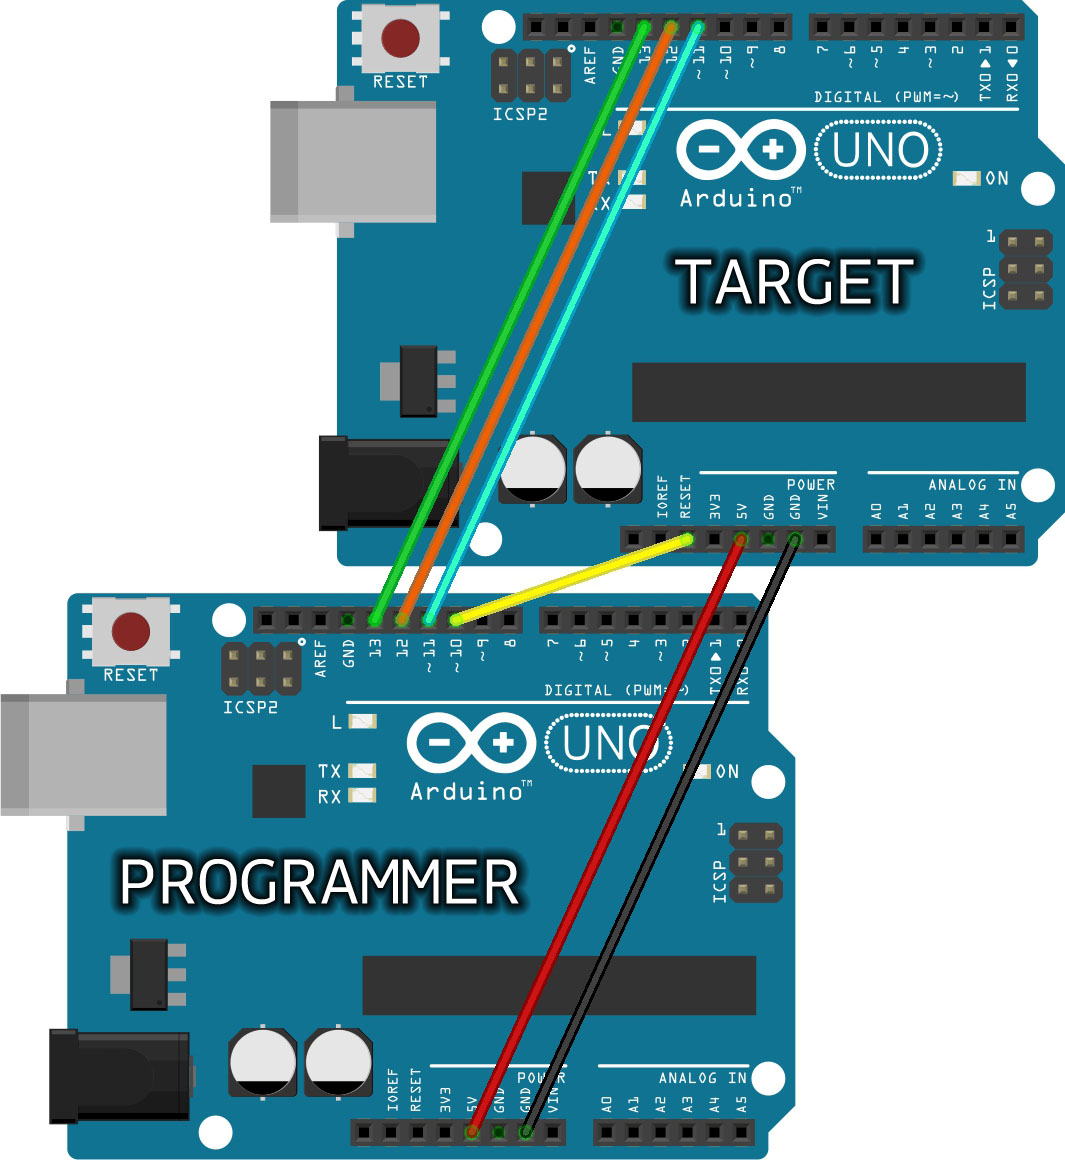
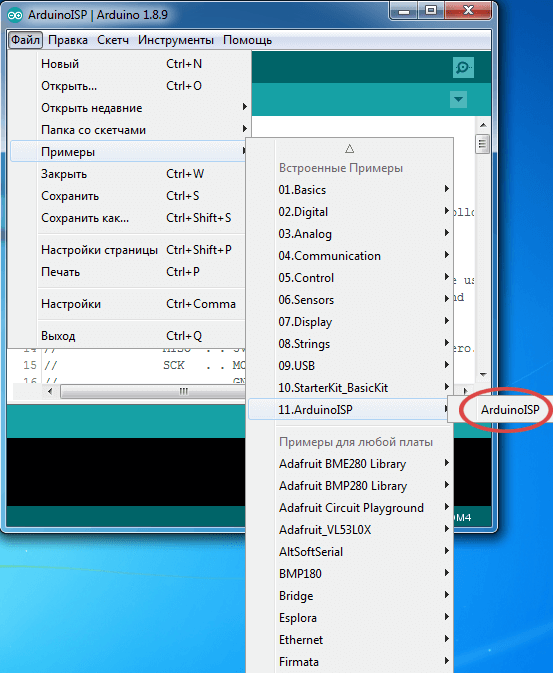
- Открыть и загрузить в плату-загрузчик скетч Файл >Примеры >11. ArduinoISP >ArduinoISP
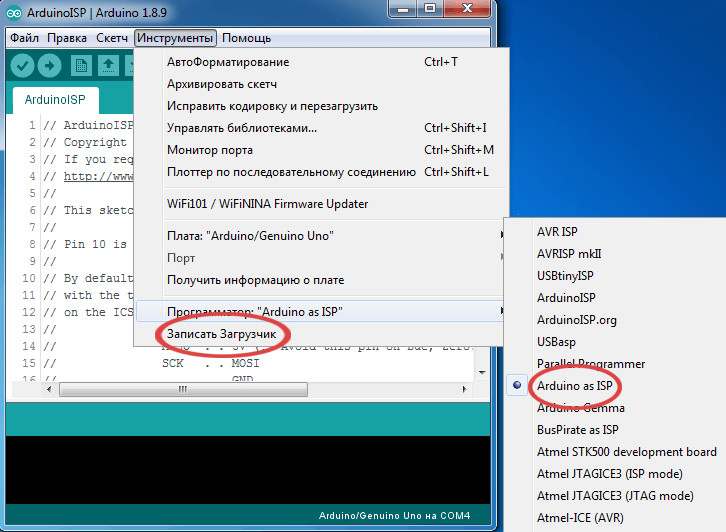
- Всё! Ваша Arduino теперь стала ISP программатором. Выбираем Arduino as ISP в Инструменты >Программатор и нажимаем Записать загрузчик.
Нюансы
Для прошивки микроконтроллера, тактирующегося низкой частотой (менее 1 МГц внутренний клок):
Arduino ISP: нужно изменить частоту загрузки прошивки в скетче Arduino ISP и снова прошить его в ардуино-программатор (см. строку в скетче 45 и ниже).
На платах семейства MKR вместо D10 используйте D6 для сброса (см. строку в скетче 73).
How to Program an Arduino Nano Using an Arduino Uno
This site contains affiliate links to products. We may receive a commission for purchases made through these links.
The Arduino Nano has been designed to offer a cost-effective and practical solution to all DIY projects, which requires a robust and small board that is fully compatible with Arduino Nano pinout and form factor.
Table of Contents:
- Requirements
- Programming Arduino Nano using Arduino Uno
- What are the differences between Arduino Uno and the Arduino Nano board?
- Final verdict
On the other hand, Arduino Uno is an open-source microcontroller board that utilizes the ATmega328P microcontroller. Both Nano and Uno are Arduino boards, which are an open-source electronic platform that is based on easy-to-use software and hardware, just any other model of an Arduino board.
With an Arduino board, you can tell it what to do by just sending a set of instructions to a microcontroller on an Arduino board. Using an Arduino board is relatively easy and does not require much explanation. However, in this article, we shall be discussing how to program Arduino Nano using Arduino Uno.
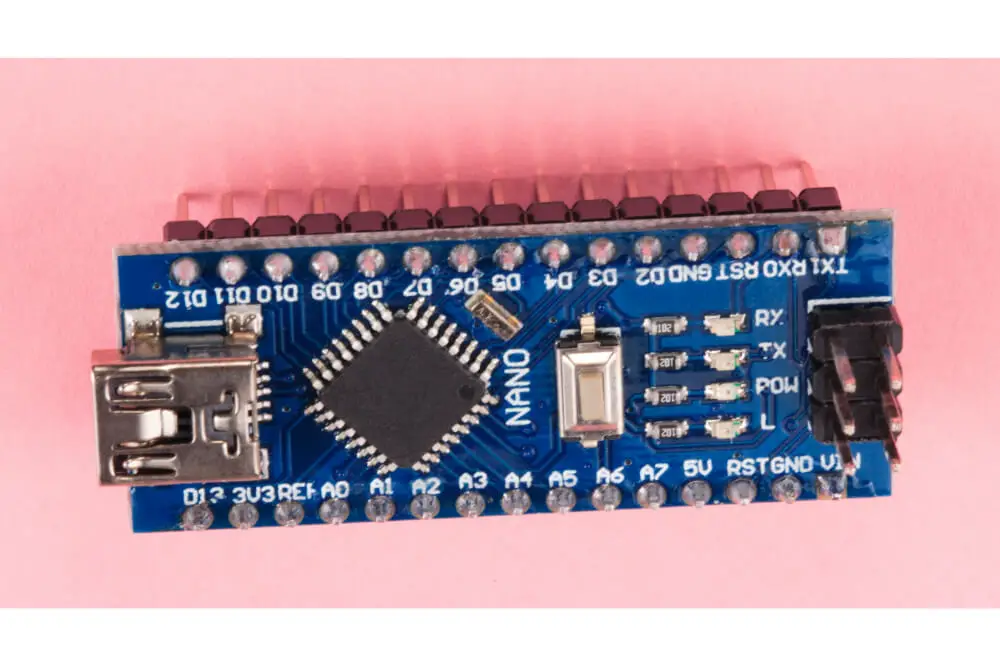
Requirements
Programming Arduino Nano using Arduino Uno is a pretty much straightforward process. To achieve that, you will require these vital tools:
- Arduino Nano board that will be programmed.
- Arduino Uno board that will act as a programmer.
- Jumper Cables with some male-male and male to female
- Breadboard.
Programming Arduino Nano using Arduino Uno
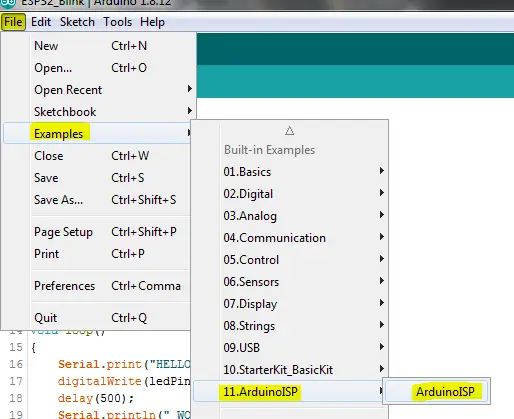
The first thing you will have to do is attach the Arduino Uno to your PC and then go to file and then examples and then go to ArduinoISP and then click on the ArduinoISP to open a sketch. Once the sketch is open, you will go ahead and upload it to your Arduino Uno. Once the uploading process is done, you will unplug your Arduino Uno from the PC.
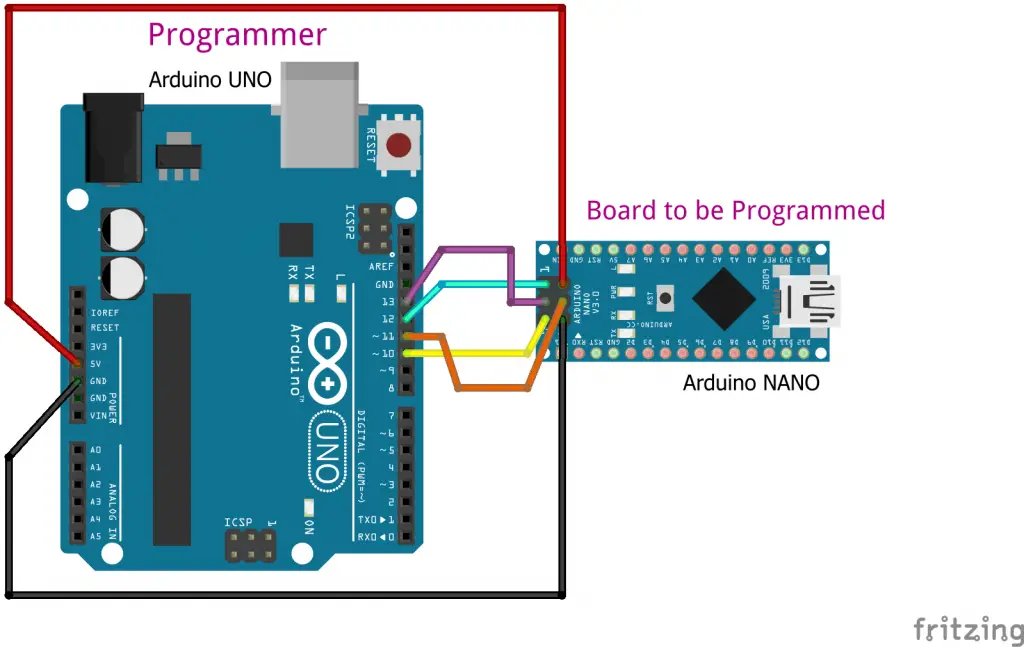
You will then go ahead and attach the Arduino Uno board and the Arduino Nano board that you would like to program using a jumper cable. You should note that when connecting the board that operates using 3.3 volts, you should consider connecting it to the 3.3-volt pin rather than the 5-volt pin.
When connecting the pins, ensure that it looks something like this:
- GND pin connected to GND pin
- D12 pin connected to MISO
- D13 pin connected to SCK
- D10 pin connected to RST
- D11 pin connected to MOSI
- 5-volt pin connected to VIN
Connect the components! ��
Once you are done connecting the hardware, you will go ahead and start preparing the software using the Arduino IDE software. When it comes to the IDE software, you will first go to tools and then click on board and select the Arduino Nano.
In the processor, you will go ahead and select ATmega328. On the other hand, you will select Arduino as an ISP in the programmer. While doing so, you should note that Arduino as ISP does not mean ArduinoISP.
Once you are done with the settings, you will go ahead and open up your sketch that you would like to upload to your Arduino Nano. Go to the Menu bar and then go to Sketch and select Uploading using a programmer.
With that done, the Arduino IDE software will automatically compile your sketch and then upload it to the Arduino Nano board. RX TX LEDs will start blinking rapidly on both the Nano and Uno Arduino boards, and you will be able to see once the uploading process is completed. However, if the process is not completed, you should consider rechecking all the wiring along with the settings.
You should note that the Arduino family of boards features 3.3-volt and 5-volt devices. Therefore, when using an Arduino board that isn’t tolerant to 5 volts as a programmer, ensure that you don’t expose any of the pins to a 5-volt power source.
This means that you will go ahead and connect it to a 3.3-volt power source. This is a vital piece of information that you need to remember when you are programming your Arduino Uno using an Arduino Uno board.
What are the differences between Arduino Uno and the Arduino Nano board?
Choosing an Arduino board can be a bit challenging, especially for newbies. However, by understanding their differences, you will be able to settle for an Arduino board that will best suit your needs. Some of the differences between an Arduino Uno and Arduino Nano board include:
- An Arduino Nano features a compact size along with a mini USB cable compared to an Arduino Uno. However, you might consider using an Arduino Nano, preferably an Arduino Uno board, since both of them operate on a microcontroller ATmega328p.
- An Arduino Uno board is easily available, unlike its counterpart, the Arduino Nano. Furthermore, an Arduino Uno board is said to be a standard board that is available in today’s market, which is relatively easy to use for newbies or starters out there.
- Arduino Nano is also available in Plastic Dual-Inline Package or PDIP, while the Arduino Uno board is available in plastic Quad Flat Pack or TQFP.
- An Arduino Uno board is equipped with six analog pin inputs along with 14 digital pins, one USB connector, ICSP, or In-Circuit Serial Programming header and a power jack. On the other hand, an Arduino Nano is equipped with an I/O pin that is set for 14 digital pins as well as eight analog pins. Additionally, it is fitted with six power pins along with two reset pins.
Both Arduino Uno and Arduino Nano boards are of high-quality and very effective, and choosing between the two will highly depend on your preference and the type of project you are working on.
Final verdict
There is no doubt that programming an Arduino Nano using an Arduino Uno is relatively easy and can be achieved by any individual irrespective of their skill level. By adhering to the tips discussed in this article, you will come to find out the whole process is pretty much straightforward and does not require any advanced skills.
Once you have all the requirements in place, you will be good to go. As we come to a conclusion, we hope that you have this article helpful and that it has helped in answering the question; how to program Arduino Nano using Arduino Uno?
Burning a bootloader to an Arduino Nano using another Arduino
Recently I have bought a cheap clone of Arduino Nano from the Chinese site Deal Extreme. Unfortunately, that product (SKU 81877) comes without a bootloader. The main sign that indicates you that the Arduino doesn’t have a bootloader is that the “L” LED, next to the Power LED, doesn’t blink when the Arduino is connected to the power source or when the Reset button is pressed.
It is possible to use your Arduino without a bootloader, but it won’t work with the Arduino IDE and you will need an external AVR Programmer like this one in order to upload sketches.
So I needed to follow two main steps in order to get my Arduino Nano working without buying an AVR programmer:
- Solder the six ICSP pins. These pins are provided in the same package, but you need to solder them to the Arduino board.
- Use another Arduino (a working one) as an ISP programmer in order to burn a bootloader onto the non-working one. I borrowed another Arduino Nano from my friend Nahuel (let me say thank you to him and Dani, who helped me with all of this), but other models shoud work too.
The Arduino board I bought looked like this. Notice that the ICSP header slot, highlighted in red, doesn’t have any pins soldered to it:

And this is my board after soldering the pins:

So it was time for the second step: to burn the bootloader using another Arduino as an ISP programmer.

First of all, connect the working Arduino (the one you will be using as the programmer) to your computer with the USB cable and launch the Arduino IDE. From the Tools menu select the right Serial Port and Board ( the one that corresponds to the Arduino that you are using as the programmer; in this case, Arduino Nano w/Atmega 328) and then load the “ArduinoISP” sketch from the File->Examples menu. Compile it and upload it to the working Arduino.
Then you need to connect the two Arduinos. The ICSP pin header of the Arduino without bootloader must be connected to the regular pins of the Arduino that will be used as the programmer.
I found here a way to do the connection. Basically, you have to connect them this way:
Arduino without | Arduino as ISP bootloader | programmer __________________|________________ ICSP pin#1 (MISO) | D12 ICSP pin#2 (+5V) | 5V ICSP pin#3 (SCK) | D13 ICSP pin#4 (MOSI) | D11 ICSP pin#5 (RST) | D10 ICSP pin#6 (GND) | GND __________________|________________
In case you need it, this is the ICSP pinout (use the number “1” printed on the Arduino board next to the ICSP header slot as a reference):

Here you have a couple of pictures of the two Arduinos connected (yes, cables got a bit messy �� ). The Arduino connected to the white USB cable is the one used as the programmer, while the other one is the Arduino that came without its bootloader.


After wiring the Arduinos, connect the one that is used as the programmer to your computer again. This time, In the Tools -> Board menu select the item that corresponds to the Arduino in which you are going to burn the bootloader (in this case, Arduino Nano w/Atmega 328 again). Then go to the Tools->Programmer menu, and select “Arduino as ISP” instead of the default “AVRISP mkII”:

Finally, click in the Tools -> Burn Bootloader menu item. After some seconds of flashy LED blinking, the brand new Arduino is ready to use! Have fun! ��
Share this:
Like Loading.
Related
41 thoughts on “ Burning a bootloader to an Arduino Nano using another Arduino ”
Ecoharpo says:
Thanks Fransisco, for your clear instructions.I was able to burn the bootloader onto my Arduino Nano (yes from DealExtreme) from my Uno. However I was unable to use the Arduino SDK to upload any sketches to the Nano. So I switched to Eclipse with the AVR plugin. Then I was able to successfully upload the Blink sketch and the LED started blinking, I was surprised that it was red, but hey, who’s complaining? I am not sure why the Arduino SDK is unable to upload to the newly burned Nano, but I mainly use Eclipse now anyway.
I have the same problem with the same board with the same seller. I’ve just follow this post with another arduino (Uno R3) and it works. ��
The first time i burned the bootloader have the same problem that Ecoharpo, and the serial port not recognized by IDE. I burned for a second time, and all works fine!! Thanks!! I ��
Thank you .
Wonderful instruction!
This has saved my project! i just used a Uno had borrowed to program my Nano. I just used some jumper leads without any soldering. Any your pin diagram was super helpful because I actually got it wrong the first time.
Thanks, this helped me very far, but I got a connection error when trying to burn the bootimage. Checked every connection and could not find any problems. Uploading sketches through the ISP worked fine. To fix the problem I used this sketch:
https://github.com/adafruit/ArduinoISP/blob/master/ArduinoISP.ino Had to use the “slow speed chip erase and fuse burning” as described in the large comment on top. After erasing, fuse burning and re-uploading the ISP sketch without slow mode, burning the bootimage worked from the Arduino IDE �� BTW: If you use a different Arduino board to program the nano, you should select that board when uploading the Sketch, and Nano as board when burning (with Programmer > Arduino as ISP).
Lukas says:
GREAT. I damaged bootloader in my Arduino Nano and original arduinoISP sketch does not work for me. This one works significantly better. Thank you very much, it saves me a lot of time. ��
Geovane says:
Thanks dude! It seems to have worked here ^^
..but I’m still having a problem.. my Nano ATmega328 isn’t recognized both in Windows and Linux
Thank you very much! You helped me sooooo much!
I got the uploader working but it won’t recognize the serial port. What should I do?
sorry boot loader*
Just a heads up, if you’re using a Mac with OSX Lion or Mountain Lion, make sure you download and install the latest FTDI drivers (the chip used for serial communication via USB on the nano) and relaunch the IDE or you will not be able to recognize the board via USB. HTH
Just wanted to say thanks! Your article assisted me and i managed to deploy bootloader.
Eduardo B(Brasil) says:
Tks a lot Guy, very good work. I got a new one from DX and spend hours seachiing why didn´t work( comm, config,drivers, java and IDE version,and etc,etc and etc) and than at dx site someone gave me your safer link. tks
I had the D8 problem on 2 Nano’s from marcmart.home via eBay over a year ago but only just been brought into service. After a lot of reading it was clear a new bootloader with correct fuse configuration was needed. Your instructions were excellent, I used one Nano to fix the other, then vice versa, some sync problems during the programming but upgrading to Arduino 1.0.5 fixed it, so both Nano’s are fully working again.
Thank you hugely for this, your great write-up was very much appreciated!!
Mike in the UK.
Thank you. I used a Mega to bootload a dx.com Nano using this guide. Great writeup!
Renan says:
Hi, i’m having the follow problem (last step):
avrdude: usbdev_open(): did not find any USB device “usb” Help me. Thanks
Gerardo says:
Thank you! This works perfectly. I got my Arduino uno working again!
Peter Tosh says:
Thanks, dude for this good and clear instructiona. I used a Duemillanove which fortunately had bootloader and connected it one after the other with two of these “deaf” Nano V3 boards. Additonally I connected the three LEDs mentioned in the program header comment. They go from pins 9, 8, 7 over 220 Ohm to Gnd indicating operation (9), error (8), programming (7) and are giving a lot of insight what’s going on. While the upload to the first board went smoothly, the error LED indicated some problems with the second board. It needed two retries but finally did it. After that I could upload programs to both nano boards using the Arduino IDE.
Randy says:
thanks! Very easy to follow.
xalpage says:
Dude your are awsome!! I had my old arduino nano broken. Bought two chinesse without bootloader. Than after some time I purchased a new arduino nano and with than I burn the boodloader to all. Now i have 4 arduino nano all thanks to your post. Very easy to do with that!
I use Arduino Leonardo to raise Arduino Nano. When I run the boot loader displays an error
avrdude: stk500_getsync(): not in sync: resp=0x00
how to fix it? Regards
Chirantan Kansara says:
Is it possible to load the bootloader using arduino UNO as programmer. I think, as nano and uno are not pin compatible will it create any probles if i load the bootloader, during further applications using newly burned MUC.
ArduinoUser02 says:
Excellent Man!! Worked like a charm! Thanks .
is it possible to burn a bootloader into a bare atmega368 IC using a working arduino NANO .
Great job. Love it.
Thanks a lot
Hi, I got 2 very cheap Nano clones from aliexpress, neither of which will connect to my iMac (no USB in /dev). So, I assumed no bootloader. So I tried your very nice procedure. The ArduinoISP sketch ran for a while and then produced the following error messages (P.S.: I have a valid port for the host)– avrdude: stk500_recv(): programmer is not responding
processing.app.debug.RunnerException
at cc.arduino.packages.uploaders.SerialUploader.burnBootloader(SerialUploader.java:291)
at processing.app.Editor$47.run(Editor.java:2569)
at java.awt.event.InvocationEvent.dispatch(InvocationEvent.java:209)
at java.awt.EventQueue.dispatchEventImpl(EventQueue.java:715)
at java.awt.EventQueue.access$400(EventQueue.java:82)
at java.awt.EventQueue$2.run(EventQueue.java:676)
at java.awt.EventQueue$2.run(EventQueue.java:674)
at java.security.AccessController.doPrivileged(Native Method)
at java.security.AccessControlContext$1.doIntersectionPrivilege(AccessControlContext.java:86)
at java.awt.EventQueue.dispatchEvent(EventQueue.java:685)
at java.awt.EventDispatchThread.pumpOneEventForFilters(EventDispatchThread.java:296)
at java.awt.EventDispatchThread.pumpEventsForFilter(EventDispatchThread.java:211)
at java.awt.EventDispatchThread.pumpEventsForHierarchy(EventDispatchThread.java:201)
at java.awt.EventDispatchThread.pumpEvents(EventDispatchThread.java:196)
at java.awt.EventDispatchThread.pumpEvents(EventDispatchThread.java:188)
at java.awt.EventDispatchThread.run(EventDispatchThread.java:122)
Caused by: processing.app.debug.RunnerException: Problem uploading to board. See http://www.arduino.cc/en/Guide/Troubleshooting#upload for suggestions.
at cc.arduino.packages.Uploader.executeUploadCommand(Uploader.java:111)
at cc.arduino.packages.uploaders.SerialUploader.burnBootloader(SerialUploader.java:284)
… 15 more — Any suggestions?
I just wanted to say thanks. I was trying to burn bootloader and was having errors. I checked a bunch of sites. but yours was the only one that I saw that said to switch the Tools >> Programmer. This did the trick. Thanks again!
You can skip soldering of ISP connector and use directly pins as follows:
ICSP PIN Signal Arduino Nano pin
1 MISO D12 (15)
2 VCC VIN (30)
3 SCK D13 (16)
4 MOSI D11 (14)
5 RESET RESET (28)
6 GND GND (29)
Purevkhuu says:
Thank you. I burned bootloader to Arduino Mega2560 using Arduino Mega2560.
Alberto says:
June 8 2015 I bought two Nanos from Deal extreme, as they say ~ you get what you pay for….. cheap and trash..
no bootloader and after many tries finally look like I’m had burned the loader to find out that the
FTDI chip is bad…. Dealer tremendous will make good ? Of course not!! Ah!! At the same time I’m had
purchased two video cameras and they shipped only one. No body should be buying from this outfit.
Yaniv says:
Thanks! worked easily for me to get my nano (#81877) from dx to work
This article is incomplete..hat do u mean your Ard Mini ready to use? Say i want to load a blink code into the handicap mini ? Whats the next step to do that ?
Francisco, thanks for sharing this knowledge.
It helped me to “repair” one of the 5 Arduino Nano’s I ordered from Ebay.
Apparently this one was not loaded with the bootloader and the blink sketch like the other 4 boards.
Thanks again!

Claudio Ikeda says:
Hello dear, thank you and you really deserve a BIG thank you! You saved my board, its bootloader became corrupted suddenly. Best regards!
My Nano3 has a red blkining LED besides the POWER led. Does it automatically mean there is a bootloader? I installed CH340 driver (that’s the chip on that board) but still windows won’t detect it. I’m starting to doubt the cable (I use one that shipped as a battery charger for my drone). My other Arduinos work fine Any insight?
Sam dam says:
hey bro., firstly thank you very much , your post helps a lot , i bought an arduino clone withaut bootloader ,i tried but does’nt get any solution for that and now after seeing your post i follow the steps and now i fix it ,my arduino realy works ,sorry for poor english

Hitachi Uchiha says: