Полная инструкция по ошибке 0x80072f8f 0x20000
Ошибка 0x80072f8f 0x20000 появляется при двух распространенных ситуациях. Первая из них – при обновлении с Windows 7 до более свежей версии или просто при установке Windows 10. Вторая частая ситуация заключается в появлении ошибки при запуске Media Creation Tool. Причины появления, как и особенности проявления в каждой них, будут разными. Но есть и хорошая новость, она заключается в том, что есть довольно четкое представление об ошибке и эффективное решение к каждой вариации проблемы.
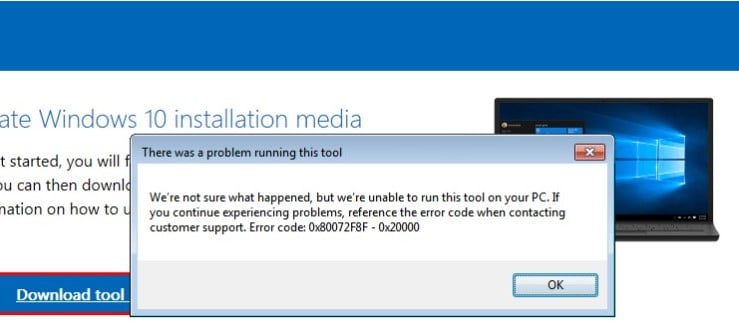
Почему появляется ошибка 0x80072f8f 0x20000?
Нам придется разделять две ситуации появления ошибки. Хотя они и имеют идентичный код, но во всем остальном сильно отличаются. Основная причина сбой с кодом 0x80072f8f 0x20000 при установке Windows 10 – отсутствие поддержки протоколов безопасности TLS. В Windows 7 Service Pack 1 по умолчанию включена поддержка только TLS 1.0. Сейчас же сервера Microsoft более не поддерживают столь устаревший стандарт. Требуется версия TLS 1.1 и TLS 1.2, которые по умолчанию отключены в старой операционной системе Windows 7. Их включение должно исправить проблему.
Если ошибка появляется при обновлении Windows, в основном через официальную утилиту Media Creation Tool, то проблема в некорректных файлах обновления. Видимо, система пыталась загрузить файлы для апдейта, но они оказались поврежденными. Нужно принудительно удалить их.
Как исправить ошибку 0x80072f8f 0x20000 при установке Windows 10?
Как мы и писали, нам нужно заставить Windows 7 работать с TLS 1.1 и TLS 1.2. Это вполне реально сделать, если подкорректировать реестр операционной системы. Можно запустить Windows в безопасном режиме и сделать необходимые изменения. Это можно сделать вручную, но есть и более быстрый способ – запустить файл. Нам нужен один из файлов Microsoft, вот ссылка. Скачиваем его, запускаем и через пару секунд исправления должны быть внесены. Можно перезагружать ПК и снова пытаться установить Windows 10.
Что нужно сделать вручную:
- Нажимаем комбинацию Win + R, вводим regedit и нажимаем Enter.
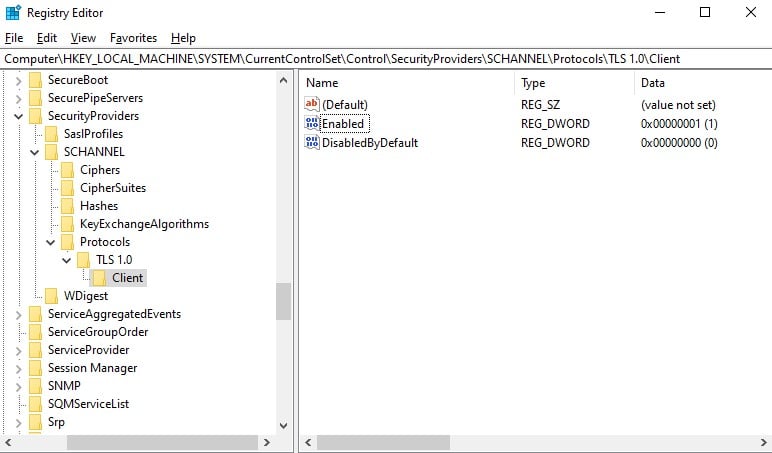
- Идем по пути HKEY_LOCAL_MACHINE\SYSTEM\CurrentControlSet\Control\SecurityProviders\SCHANNEL\Protocols\TLS 1.1\Client.
- Изменяем значение параметра DisabledByDefault на 0 (если его нет, то просто создаем его).
- Переходим в ветку HKEY_LOCAL_MACHINE\SYSTEM\CurrentControlSet\Control\SecurityProviders\SCHANNEL\Protocols\TLS 1.2\Client.
- Тоже создаем или изменяем существующий параметр DisabledByDefault в значение 0.
Важно! Есть еще один интересный способ – запустить установку через ISO. Для этого нужно войти на сайт Microsoft с клиентом Windows и скачать его. Обязательно следует использовать для этого телефон. Затем передаем файл на ПК и запускаем его. У многих такое решение сработало.
Как исправить ошибку при обновлении через Media Creation Tool?
Для решения проблемы нужно зачистить файлы в одной из важных директорий, а также запустить обновление другим способом.
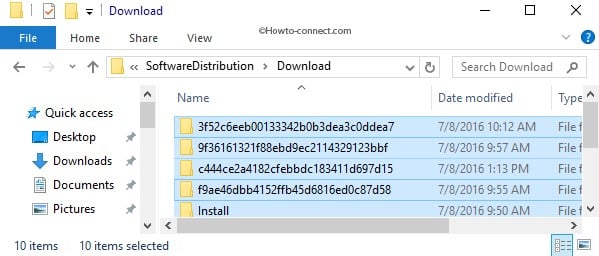
- Переходим по пути C:\Windows\SoftwareDistribution\Download.
- Удаляем все файлы, которые хранятся в этой папке.
- Кликаем правой кнопкой мыши по Пуску и выбираем «Командная строка (администратор).
- Вводим команду wuauclt.exe /updatenow.
Теперь вы знаете, что делать, если появляется ошибка 0x80072f8f 0x20000 при разных обстоятельствах. Включение поддержки TLS 1.1 и новее поможет успешно завершить установку операционной системы, а очистка файлов и обновление через консоль избавит от неполадки при апдейте Windows.
Будем рады увидеть ваши комментарии в отношении данной ошибки. Давайте вместе сделаем статью максимально полной.
Ошибка 0x80072f8f — варианты решения
При обновлении Windows 7 или Windows 10 до новой версии, использовании Media Creation Tool или вы можете столкнуться с ошибкой «По неизвестной причине запуск этого средства на вашем компьютере не удался» с кодом 0x80072f8f или 0x80072F8F – 0x20000. Эта же ошибка может возникать при активации.
В этой инструкции подробно о том, чем может быть вызвана ошибка 0x80072f8f и как её исправить, в зависимости от конкретного сценария возникновения.
Проблемы с подключением к серверам Майкрософт как причина ошибки 0x80072f8f
Самая частая причина ошибки 0x80072f8f — наличие проблем с подключением к серверам Майкрософт, с которых загружаются необходимые файлы. Возможные причины этих проблем:
- Настройка блокировок серверов обновления, активации и телеметрии Windows с использованием сторонних программ — частое явление для нелицензионных Windows.
- Отключенные протоколы безопасности TLS 1.1 и TLS 1.2
- Использование VPN-сервисов, прокси. По состоянию на сегодняшний день для установки обновлений Windows VPN не требуется, несмотря на ограничения со стороны Майкрософт, а вот помешать его использование может.
- Проблемы с Интернет-соединением: очень медленный или отсутствующий Интернет, в некоторых случаях мешать установке соединения могут сторонние антивирусы или файрволлы.
- Неправильно настроенное время на компьютере — при установке защищенного соединения с серверами для загрузки необходимых файлов один из факторов, влияющих на возможность соединения — установленное время, стоит его проверить и исправить, если оно настроено неправильно.
Теперь по порядку по каждому из пунктов и необходимых шагах, чтобы исправить проблему.
Отключение блокировки серверов Майкрософт
Если ранее вы использовали какие-либо средства для отключения «слежки» Windows, либо у вас установлена нелицензионная система с принудительно отключенными обновлениями, рекомендую выполнить следующие шаги:
- Если вы действительно использовали какие-то программы для блокировки соединения с серверами Майкрософт, можно использовать их же для отмены этих блокировок.
- Проверьте содержимое файла hosts — в нем не должны быть заблокированы какие-либо серверы Майкрософт, то есть не должно быть строк, содержащих перенаправления для этих серверов, при наличии их следует удалить. Здесь могут помочь инструкции Файл hosts Windows 11, Файл hosts Windows 10. Для других версий системы действия будут теми же.
- Правила запрета доступа к серверам Майкрософт могут присутствовать и в брандмауэре, можно попробовать временно его отключить. Как отключить брандмауэр Windows 11 (для предыдущих версий тоже сработает).
TLS 1.1 и TLS 1.2
Проверьте, включены ли протоколы TLS 1.1 и TLS 1.2, для этого:

- Нажмите клавиши Win+R на клавиатуре (Win — клавиша с эмблемой Windows), введите inetcpl.cpl и нажмите Enter.
- Перейдите на вкладку «Дополнительно» и включите TLS 1.1, TLS 1.2 и TLS 1.3, если какой-то из компонентов отключен.
- Нажмите «Ок».
Отключение VPN, файрволла, антивируса, прокси
Если на компьютере включен VPN, есть сторонний файрволл или антивирус, попробуйте временно отключить их, используя настройки соответствующей программ.
Также зайдите в свойства браузера (Win+R — inetcpl.cpl), перейдите на вкладку «Подключения», нажмите кнопку «Настройка сети» и отключите прокси, в том числе снимите отметку «Автоматическое определение параметров».

Настройки времени и даты на компьютере
Как было отмечено, неправильно заданные время, дата и часовой пояс также могут влиять на возможность установки соединения и скачивания файлов обновления. Проверьте, правильно ли они настроены. В Windows 11 и Windows 10 это можно сделать в «Параметры» — «Время и язык» — «Дата и время».

При этом лучше включить автоматическую настройку времени и часового пояса, но если это дает неправильный результат, выполните настройку вручную.
Во всех версиях Windows, в том числе 11, 10 и 7 — доступна настройка даты, времени и часового пояса и в Панели управления, пункт «Дата и время»:

Сброс параметров сети
Если предыдущие шаги не помогли, попробуйте выполнить сброс параметров сети:
- Запустите командную строку от имени администратора.
- По порядку введите следующие команды, нажимая Enter после каждой и перезагрузив компьютер после их выполнения:
ipconfig /flushdns netsh winsock reset netsh int ip reset
Также можно попробовать вручную задать серверы DNS, например 4.2.2.1 и 4.2.2.2, для этого:
- Нажмите клавиши Win+R на клавиатуре, введите ncpa.cpl и нажмите Enter.
- В открывшемся списке подключения нажмите правой кнопкой мыши по вашему Интернет-подключению и откройте его свойства.
- Выберите «IP версии 4» и нажмите кнопку «Свойства».

- Установите отметку «Использовать следующие адреса DNS-серверов» и укажите серверы 4.2.2.1 и 4.2.2.2 или 8.8.8.8 и 8.8.4.4, примените настройки.

- В командной строке от имени администратора введите команду
ipconfig /flushdns
Проверьте, была ли решена проблема.
Другие способы исправить ошибку 0x80072f8f
В случае, если причина оказалась не в подключении, можно попробовать следующие методы:
- Установите обновления Windows, если система давно не обновлялась, особенно обновления безопасности.
- Выполните чистую загрузку Windows без сторонних служб и программ и проверить, удастся ли выполнить обновление в этом случае.
- Исправьте ошибки центра обновлений Windows и очистите кэш обновлений.
- Не уверен в работоспособности метода, но одна из рекомендаций для ошибки 0x80072f8f при активации — зайти в редактор реестра (Win+R — regedit), перейти к разделу
HKEY_LOCAL_MACHINE/Software/Microsoft/Windows/CurrentVersion/Setup/OOBE
дважды нажать по параметру MediaBootInstall и изменить его значение на 0 (при условии, что текущее значение — 1). Параметр отвечает за то, была ли получена система путем чистой установки или с помощью обновления. После изменения, в командной строке, запущенной от имени администратора, выполните команду
slmgr /rearm

а затем перезагрузите компьютер.
И, наконец, если цель — выполнить обновление системы до новой версии, при этом при попытке обновления в Media Creation Tool возникает ошибка 0x80072f8f, вы можете:
- При обновлении Windows 7 до Windows 10 — создать загрузочную флешку с Windows 10 и выполнить чистую установку Windows 10 с ключом от Windows 7.
- Создать ISO с нужной версией системы с помощью Media Creation Tool, либо другими способами, после чего смонтировать его в системе (подключить как диск) и запустить файл setup.exe с подключенного образа — это будет аналогично процессу обновления.
А вдруг и это будет интересно:
- Лучшие бесплатные программы для Windows
- Не удалось запустить службу Windows Audio на Локальный компьютер — как исправить?
- Ошибка DXGI ERROR DEVICE HUNG — как исправить?
- Как сбросить Windows на заводские настройки в командной строке
- Как создать отчет о работе Wi-Fi сети в Windows 11 и 10
- Устройство tap0901 — что это и как установить драйвер?
- Windows 11
- Windows 10
- Android
- Загрузочная флешка
- Лечение вирусов
- Восстановление данных
- Установка с флешки
- Настройка роутера
- Всё про Windows
- В контакте
- Одноклассники
-
Vikkor 11.10.2023 в 11:51
Ошибка 0x80072f8f 0x20000 при создании флешки с Windows
Если вы столкнулись с ошибкой 0x80072f8f 0x20000 при создании загрузочной флешки Windows 10 через официальную утилиту Media Creation Tool, то вероятнее всего у вас установлена Windows 7 либо Windows 8.
Она возникает из-за того что данные версии Windows уже не поддерживаются и необходимо создать загрузочную флешку другим способом.
В данной инструкции мы подробно распишем что необходимо делать в таком случае.
А так-же программа для того чтобы записать этот образ на флешку мы сделаем это на примере одной из самых популярных программ Rufus – https://github.com/pbatard/rufus/releases/download/v3.22/rufus-3.22.exe
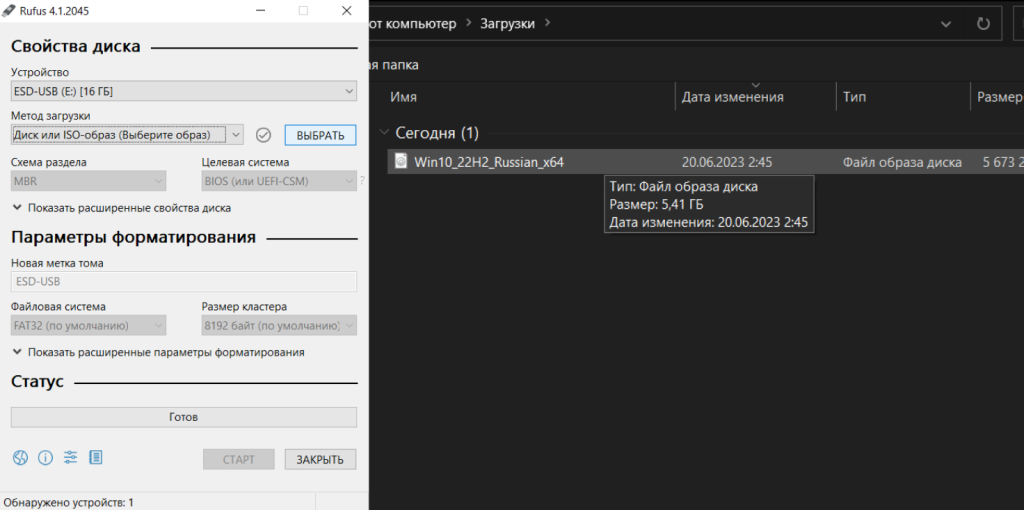
После того как скачается образ запускаем программу, в пункте «Устройство» необходимо выбрать флешку размером от 8ГБ (рекомендуем 16). Обратите внимание что она будет форматироваться, поэтому сохраните все важные файлы. Так-же не рекомендуем использовать внешний жесткий диск, так как часто возникают ошибки при установке с них.
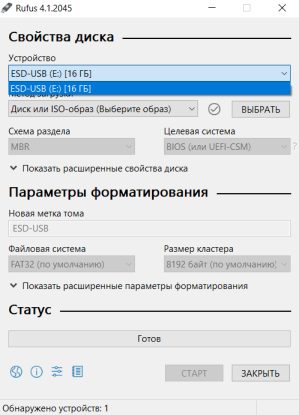
Далее в разделе «Метод загрузки» нажимаем «Выбрать» и находим скачанный образ. Все остальные пункты оставляем по умолчанию.
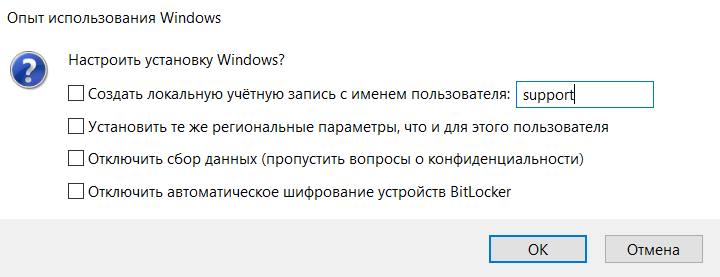
На данном этапе вы можете выбрать дополнительные параметры установки системы, которые упростят процесс установки, выбирайте их на ваше усмотрение.
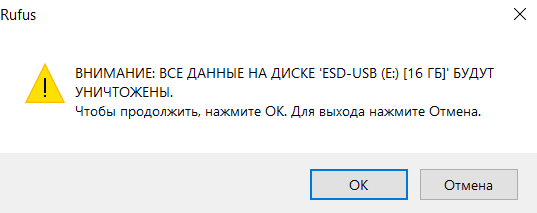
Здесь программа сообщает нам о том, что флешка будет форматирована.
Теперь дожидаемся окончания создания, в конце статус изменится на «ГОТОВ». После этого можно закрывать программу.
How to Resolve Windows Media Creation Tool Error Code: 0X80072F8F – 0X20000
The error may arise due to essential services not starting correctly, various application conflicts, and interference from third-party antivirus software, which prevents the installation of Windows. The most common contributing factors that can trigger the 0X80072F8F – 0X20000 error are as follows:
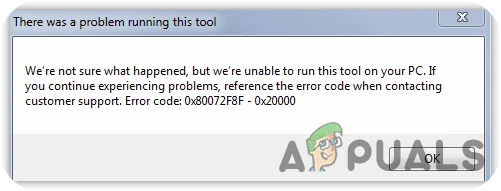
Further reasons contributing to this issue include:
- Lack of Administrator Privileges – Without appropriate administrator privileges, you may be unable to install Windows, as significant changes to the system cannot be made without these privileges.
- Disabled TLS 1.1 and TLS 1.2 – TLS safeguards data sent to internet applications. If TLS 1.1 and TLS 1.2 are disabled, you may encounter Error Code 0X80072F8F – 0X20000 when updating Windows.
- Incompatible System Requirements – Conflicting system requirements can also lead to this issue; ensure your system meets all necessary requirements to avoid problems.
- Non-Startup of Essential Services – If crucial Windows services fail to start properly at startup, it may result in issues including this error code.
- Unstable Internet Connection – An unstable internet connection can cause errors like this. If an internet issue is at fault, you should wait until the connection is stable before proceeding.
1. Check Minimum Requirements
This error may occur due to incompatible system specifications. Confirm that your system meets the minimum requirements for the operating system you are trying to install. You can find the minimum requirements by searching online.
2. Ensure the Internet Connection is Stable
An unstable or slow internet connection can trigger this error. Check your internet speed using a web browser; if it is below 2 Mbps, the network connection is poor. Once the speed is acceptable, you may proceed with other solutions; otherwise, wait until the internet connection stabilizes.
3. Run as Administrator
Significant changes to a computer system require administrator privileges. When users do not have administrator rights on their accounts, they may be unable to complete critical tasks.
To run the programs in administrator mode, follow these steps:
Right-click on the Media Creation Tool and select Run as Administrator from the listed options.

4. Edit Registry File
Editing registry files is a potential fix for eliminating Error Code 0X80072F8F – 0X20000, according to forum discussions. To do this, you must navigate to the Registry Editor—a database for the operating system’s low-level settings. It’s best to create a registry backup before making changes, ensuring you can restore the previous state if necessary. Follow these steps:

- Press Windows + R keys simultaneously to open the Run dialog.
- Type regedit and press Enter.
- Once the Registry Editor opens, navigate to the path:
Computer\HKEY_LOCAL_MACHINE\SOFTWARE\Microsoft\Windows\CurrentVersion\WindowsUpdate\Auto Update


5. Perform Clean Boot
A clean boot helps eliminate software conflicts and starts Windows with the necessary services and minimum drivers. This process can help resolve Error Code 0X80072F8F – 0X20000. Here’s how to perform a clean boot:
- Click the Start Menu and type msconfig in the search bar.

- In the System Configuration window, select the Selective Startup option and untick Load startup items.

- Go to the Services tab, tick the Hide all Microsoft services checkbox, click Disable all, then press OK.
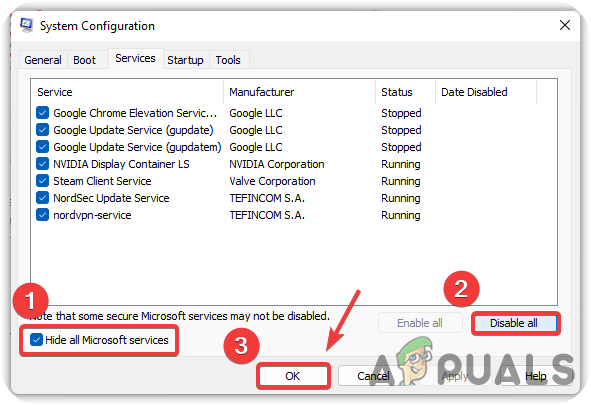
- Restart your computer and verify if the issue has been resolved.
6. Clear the Software Distribution Folder
The Software Distribution folder stores temporary Windows files necessary for installing Windows updates. If the system cannot access these files, Error Code 0X80072F8F – 0X20000 may occur. Clearing the Software Distribution folder may help resolve the issue. Follow these steps:
- Press the Windows + R keys at the same time to open the Run dialog.
- Type or copy and paste the following path:
C:\Windows\SoftwareDistribution\Download


wuauclt.exe /updatenow

and hit Enter.
7. Enable TLS 1.1 and TLS 1.2
TLS or Transport Layer Security 1.1 and 1.2 are the security protocol versions used to establish encrypted connections to send data into the applications over the network. It has been seen that the error can occur due to disabled TLS 1.1 and TLS 1.2. To fix this, you must enable it by following the instructions below:-
- Create a Registry Backup first, then open the notepad and paste the code mentioned below
Windows Registry Editor Version 5.00 [HKEY_LOCAL_MACHINE\SOFTWARE\Microsoft\Windows\CurrentVersion\Internet Settings\WinHttp] "DefaultSecureProtocols"=dword:00000a00 [HKEY_LOCAL_MACHINE\SOFTWARE\Wow6432Node\Microsoft\Windows\CurrentVersion\Internet Settings\WinHttp] "DefaultSecureProtocols"=dword:00000a00 [HKEY_LOCAL_MACHINE\SYSTEM\CurrentControlSet\Control\SecurityProviders\SCHANNEL\Protocols\TLS 1.1\Client] "DisabledByDefault"=dword:00000000 "Enabled"=dword:00000001 [HKEY_LOCAL_MACHINE\SYSTEM\CurrentControlSet\Control\SecurityProviders\SCHANNEL\Protocols\TLS 1.2\Client] "DisabledByDefault"=dword:00000000 "Enabled"=dword:00000001


8. Restart Relevant Windows Services
Another solution for this is restarting the Windows update service. If the Windows Update service gets stopped due to a conflict of services, this error may appear on the screen. Below are the steps to restart the Windows update:-
- Press Windows + R keys to open the Run Dialog Box
- Type services.msc and press Enter

- Once the service page opened, please scroll down to Windows Update service and right-click on it to select Properties
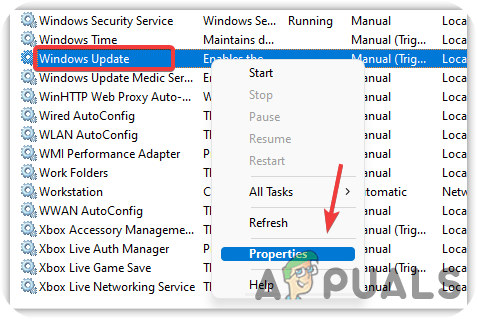
- Now change the startup type from Manual to Automatic
- If the service is stopped, click on the Start button, then click Apply and press OK
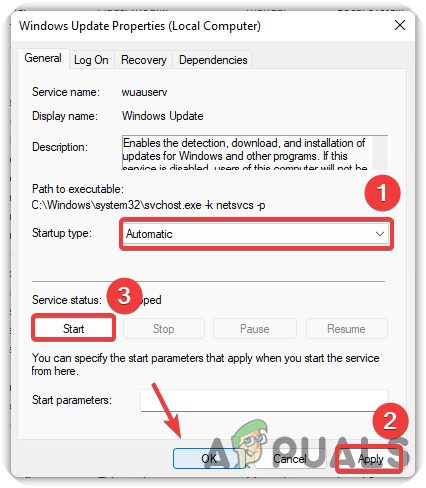
- Now repeat the same process for the mentioned services below
Background Intelligent Transfer Service Server Workstation TCP/IP NetBIOS Helper IKE and AuthIP IPsec Keying Modules
9. Reset Windows Update Component Services
If none of the methods worked, you could try resetting the Windows Update Component, which is used to update the operating system. Follow the steps to reset Windows component services:-
- Click Start Menu, and type Command Prompt
- Right-click on the command prompt and choose Run as Administrator
- Now insert the following commands to reset Windows services
net stop bits net stop wuauserv net stop appidsvc net stop cryptsvc
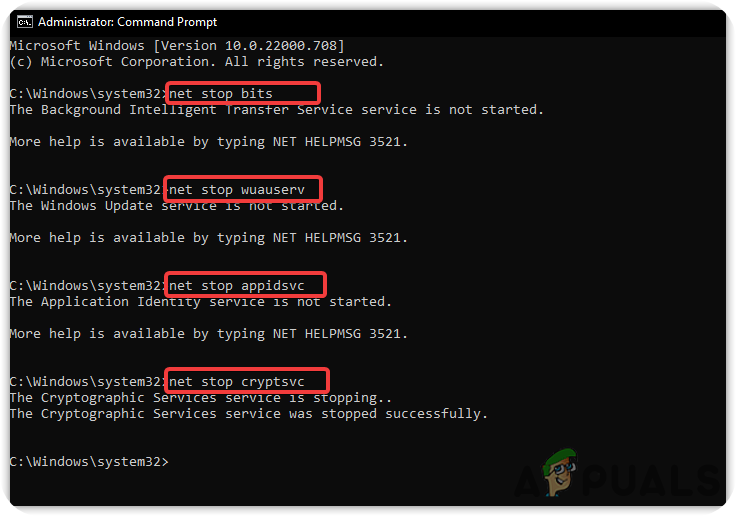
10. Run Disk Cleanup
Disk Cleanup is a utility introduced to counter any corruption in Windows that may lead to errors. It is also used to free up the space by removing the unnecessary files, cache files and the files you rejected, which end up in the recycle bin. Below are the steps to run the Disk Cleanup utility.
- Open File Explorer and right-click on C Drive
- Select Properties from the options menu

- Click Disk Cleanup and wait for the page to load up
- Check mark all the files and press OK to delete
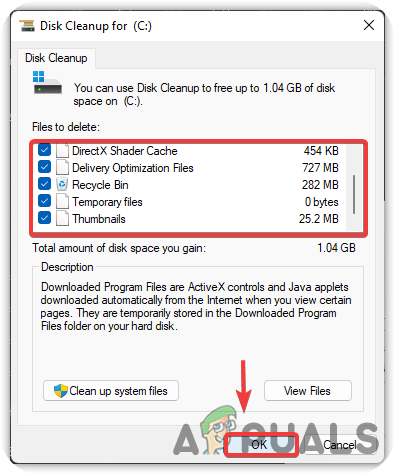
- Once done, check if the issue persists.
11. Download Windows ISO File
Another solution for this issue is downloading the ISO file from the official website. Downloading the Windows IS0 file will fix this issue. below are the steps that will help you in this:-

- Download the ISO file of the operating system from the Windows Media Creation Tool
- Once the download is finished, right-click on it and select Mount
- Now run the Windows setup as an administrator, and this will start upgrading Windows to the latest.
12. Install Windows Using External Device
You can install Windows from an external device such as a mobile, laptop or computer. We have mentioned the steps for both devices, that may help you to install Windows through external devices.
12.1. Install Windows Using Mobile Phone
- Download Windows Media Creation Tool
- Once the downloading is finished, run the media creation tool
- Accept the notices and license terms, then select the radio option named Create Installation Media for Another PC and press Next

- On the next screen, make sure the option Use the recommended options for this PC is checked, then click Next

- Select the option named IOS File and click Next
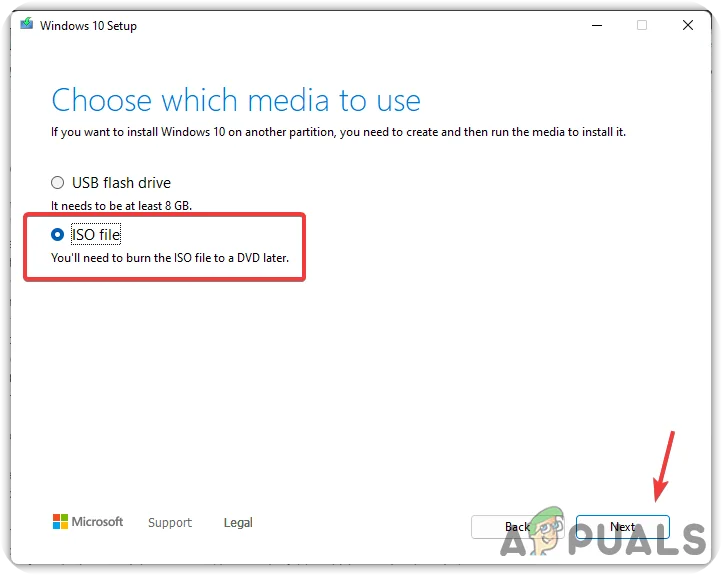
- Choose the destination where you want to install Windows ISO File

- Once done, click Save, and it will start creating Windows ISO.
- Now it’s time to transfer the Windows ISO file to your mobile phone. Use the USB cable to transfer the file to an easily remembered folder.
- Once you transfer it, download DriveDroid

- Open the DriveDroid, and it will request the root access that you will grant

- Now tap on CONFIGURE IMAGE DIRECTORY and select the folder where you copied the Windows ISO file

- Now connect your mobile phone to your computer and choose the Standard Android Kernel

- On the next screen, select Android Shows Up On OS and click Next
 Note: If the device does not appear on your computer, then select Choose a Different USB System and try again
 - Select Booted Successfully using DriveDroid then click Next. Again click Next to finish the process
- Now go back to the homepage where Windows 10 ISO might already feature. If not, then tap the Gear Icon from the top right corner and select Image Directories

- Select the last directory and tap the red circle icon from the bottom right corner then browse the folder which contains the ISO file. Select ISO file.

- Go back to the DriveDroid homepage
- Then, select the Windows ISO file and choose Host Image Using CD-ROM

- After that, connect your device to the computer with the USB cable and shut down your computer
- Now turn on the computer and enter a boot menu by pressing the shortcut keys. Usually, F10, F11, F12, and Delete keys are used to access the boot menu
- Note: If you cannot find it, you may need to visit the manufacturer’s website.
- When the boot menu opens, select the boot device named similar to Linux File-CD Gadget, or it can be named as your mobile name
- After that, Windows will boot normally, and you can install a clean version of your Windows.

12.2. Install Windows from the other Computer
- Download Windows Media Creation Tool and run it on your computer
- Accept the terms and conditions and select Create Create Installation Media for Another PC and press Next
- Make sure the option named Use the recommended options for this PC is checked
- Leave the USB Flash Drive is selected and press Next
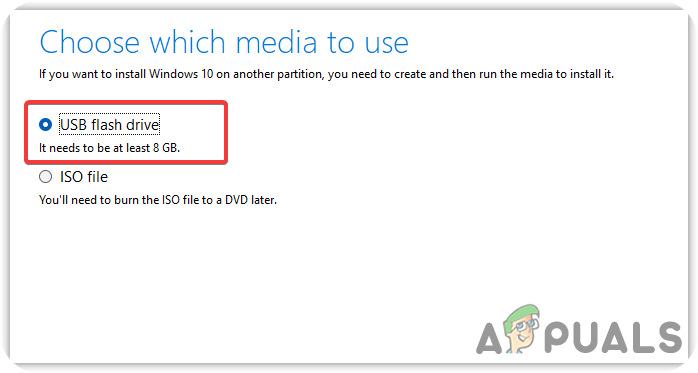
- It should Start downloading Windows OS. Once done, unplug the USB flash drive from the computer and plug it into the problematic computer
- Shutdown, the computer, then turn it on
- Once the loading screen appears, press the Boot Menu keys on the keyboard, such as F12 and Delete. If you are not sure, you can go to your manufacturer’s website
- Once the boot menu loads up, select the USB pen driver

- Then Window will boot, and you can install a clean version of the Windows OS.
13. Disable Third-Party Antivirus Software
Third-party antivirus programs can sometimes interfere with Windows updates or the Media Creation Tool. Try disabling your antivirus temporarily before attempting the update again.

- Right-click the antivirus icon in the system tray and look for the option to disable or turn it off temporarily.
- Choose the time frame for which you want the antivirus disabled (if prompted).
- Attempt the Windows update or the use of the Media Creation Tool once more.
- If the update is successful, remember to re-enable your antivirus software to keep your system protected.
14. Adjust Date and Time Settings
Incorrect date and time settings can lead to synchronization issues and may cause the 0X80072F8F – 0X20000 error. Make sure your computer’s date and time are accurate.

- Right-click on the date and time displayed on your taskbar and select Adjust date/time.
- Ensure the Set time automatically and Set time zone automatically options are turned on.
- If the error persists despite correct settings, try turning these options off and then back on again to force a synchronization.
- After adjusting the settings, try updating Windows or running the Media Creation Tool again.
15. Use the Windows Update Troubleshooter
Windows has a built-in tool to troubleshoot and resolve update-related issues. Running the Windows Update Troubleshooter might help fix the error.
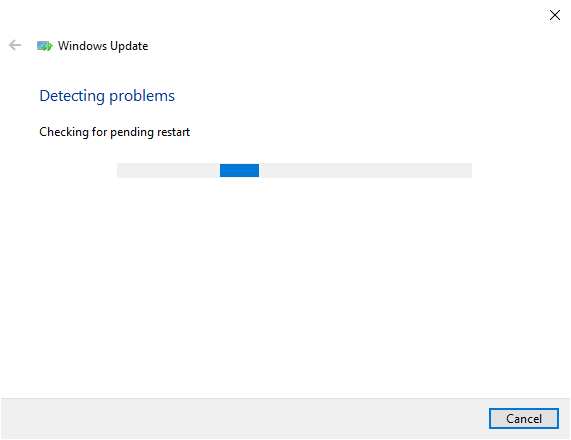
- Go to Settings >Update & Security >Troubleshoot.
- Click on Windows Update and then select Run the troubleshooter.
- Follow the on-screen prompts to let the troubleshooter detect and fix issues.
- Once completed, attempt the Windows update or Media Creation Tool process again.
16. Reset Windows Update Components Manually
If the previous methods have not succeeded, manually resetting the Windows Update components might resolve the problem.
- Launch Command Prompt as an Administrator.
- Stop the BITS service, the Windows Update service, and the Cryptographic service using the following commands:
net stop bits net stop wuauserv net stop appidsvc net stop cryptsvc
Del "%ALLUSERSPROFILE%\Application Data\Microsoft\Network\Downloader\qmgr*.dat"
sc.exe sdset bits D:(A;;CCLCSWRPWPDTLOCRRC;;;SY)(A;;CCDCLCSWRPWPDTLOCRSDRCWDWO;;;BA)(A;;CCLCSWLOCRRC;;;AU)(A;;CCLCSWRPWPDTLOCRRC;;;PU) sc.exe sdset wuauserv D:(A;;CCLCSWRPWPDTLOCRRC;;;SY)(A;;CCDCLCSWRPWPDTLOCRSDRCWDWO;;;BA)(A;;CCLCSWLOCRRC;;;AU)(A;;CCLCSWRPWPDTLOCRRC;;;PU)
Ren %systemroot%\SoftwareDistribution SoftwareDistribution.old Ren %systemroot%\System32\catroot2 Catroot2.old
sc.exe sdset bits D:(A;;CCLCSWRPWPDTLOCRRC;;;SY)(A;;CCDCLCSWRPWPDTLOCRSDRCWDWO;;;BA)(A;;CCLCSWLOCRRC;;;AU)(A;;CCLCSWRPWPDTLOCRRC;;;PU) sc.exe sdset wuauserv D:(A;;CCLCSWRPWPDTLOCRRC;;;SY)(A;;CCDCLCSWRPWPDTLOCRSDRCWDWO;;;BA)(A;;CCLCSWLOCRRC;;;AU)(A;;CCLCSWRPWPDTLOCRRC;;;PU)
net start bits net start wuauserv net start appidsvc net start cryptsvc
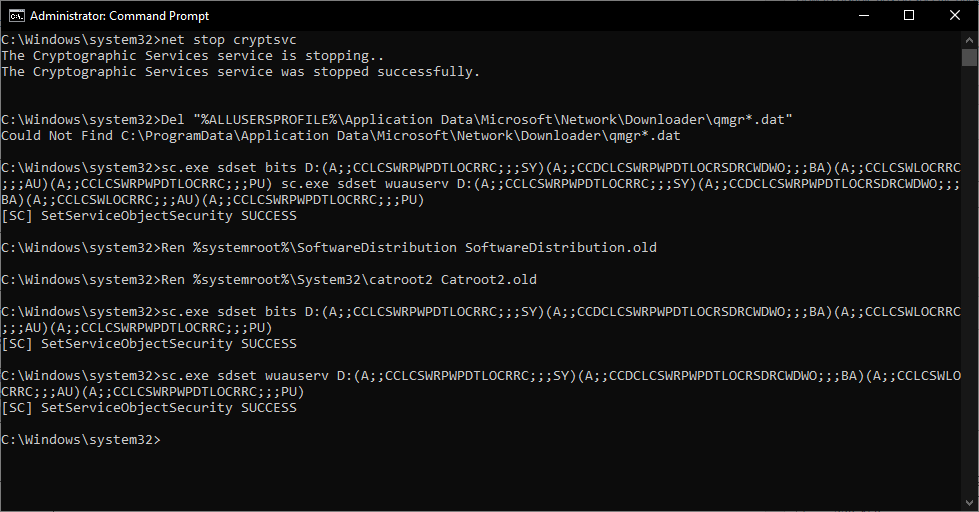
By executing these steps, you will have manually reset the components related to Windows Update, which might resolve any persistent issues you’ve been facing.