Как в Microsoft Word убрать разрыв страницы
В программе MS Word существует два типа разрывов страницы. Первые из них вставляются автоматически, как только написанный текст достигает конца страницы. Разрывы этого типа удалить невозможно, собственно, в этом нет никакой необходимости.
Разрывы второго типа создаются вручную, в тех местах, где необходимо перенести тот или иной фрагмент текста на следующую страницу. Ручной разрыв страницы в Ворде можно убрать, и сделать это, в большинстве случаев, очень просто.
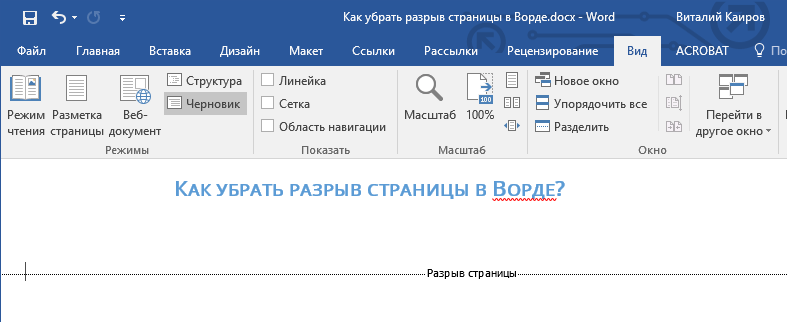
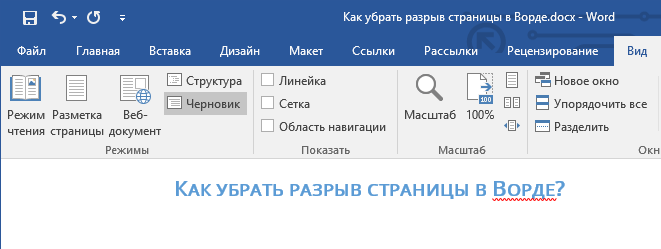
Примечание: Просматривать разрывы страниц в режиме «Разметка страницы» неудобно, лучше для этого переключиться в режим черновика. Для этого откройте вкладку «Вид» и выберите «Черновик»
Удаление ручного разрыва страницы
Любой вставленный вручную разрыв страницы в MS Word можно удалить.
- Чтобы сделать это необходимо переключиться из режиме «Разметка страницы» (стандартный режим отображения документа) в режим «Черновик».
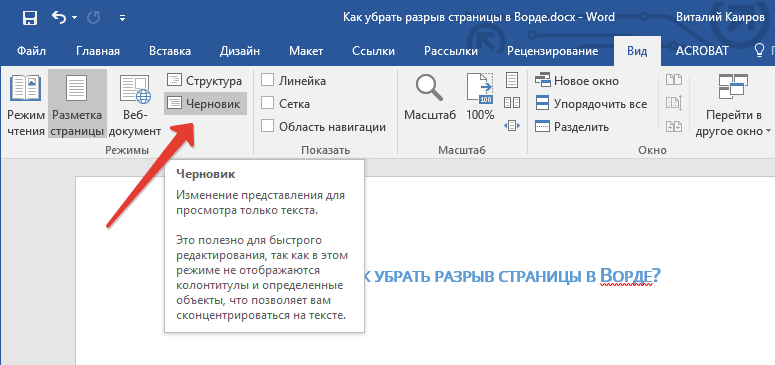 Сделать это можно во вкладке «Вид».
 - Выделите этот разрыв страницы, кликнув мышкой на его границе около пунктирной линии.
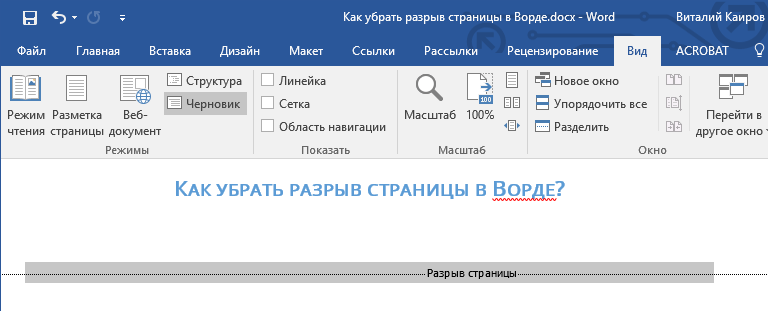
- Нажмите «DELETE».
Разрыв удален. Однако, иногда сделать это не так просто, так как разрывы могут возникать в неожиданных, нежелательных местах. Чтобы удалить такой разрыв страницы в Ворде, сначала нужно разобраться с причиной его возникновения.
Интервал до или после абзаца
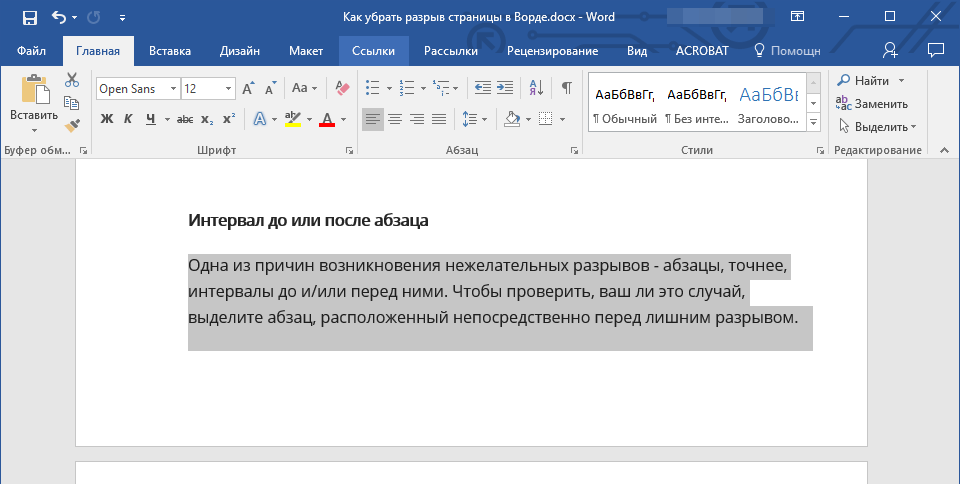
Одна из причин возникновения нежелательных разрывов — абзацы, точнее, интервалы до и/или после них.
-
Чтобы проверить, ваш ли это случай, выделите абзац, расположенный непосредственно перед лишним разрывом.
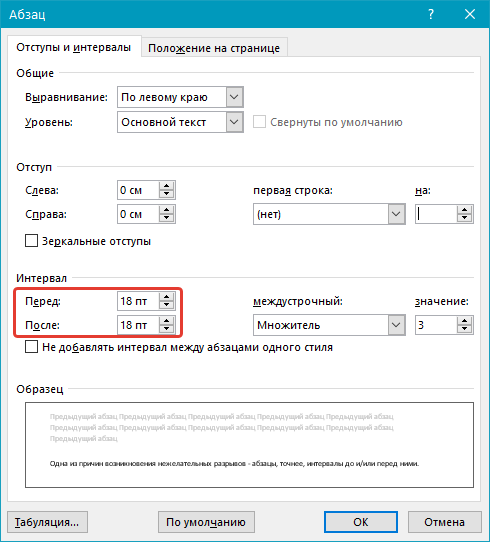 Установите желаемое значение (меньше указанного) или выберите значения по умолчанию, чтобы избавиться от разрыва страницы, вызванного большими интервалами до и/или после абзаца.
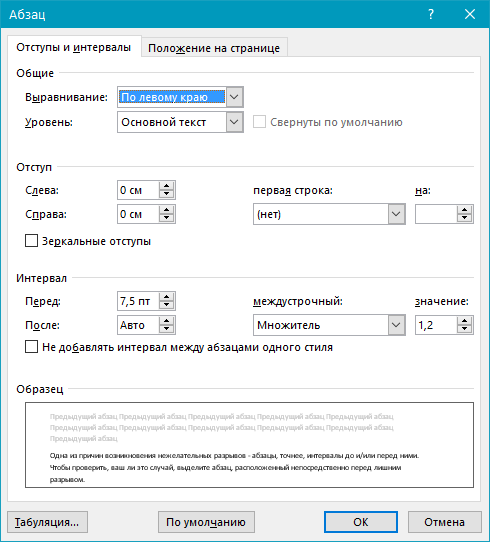
Разбивка предыдущего абзаца на страницы
Еще одна из возможных причин возникновения нежелательного разрыва страницы — разбивка на страницы предыдущего абзаца.
- Чтобы проверить, так ли это, выделите первый абзац на странице, следующей сразу за нежелательным разрывом.
- Перейдите во вкладку «Макет» и в группе «Абзац» разверните соответствующее диалоговое окно, переключившись на вкладку «Положение на странице».
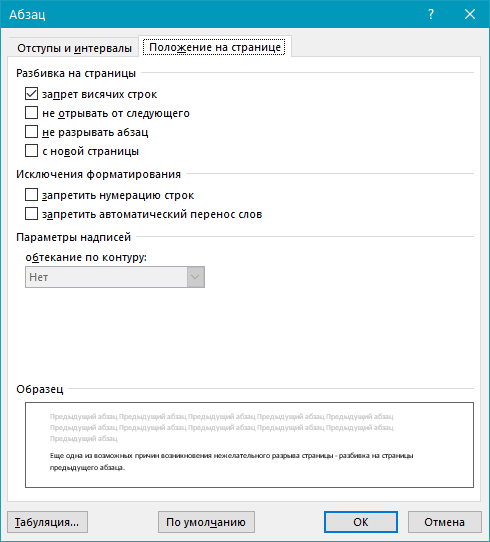
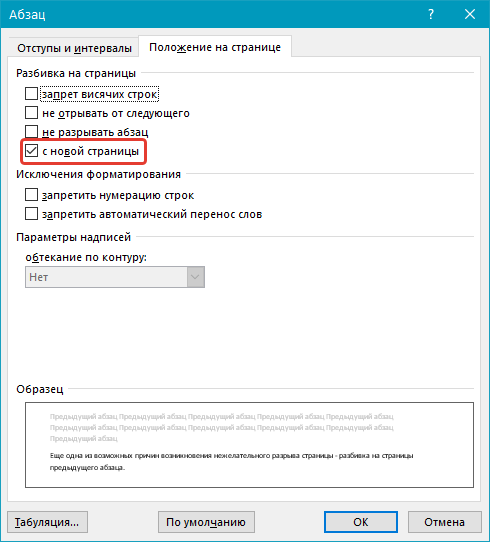 Если у вас в пункте «Разбивка на страницы» установлена галочка «с новой страницы» — это и есть причина нежелательного разрыва страницы. Уберите ее, при необходимости поставьте галочку «не разрывать абзацы» — это предотвратит возникновение аналогичных разрывов в дальнейшем.
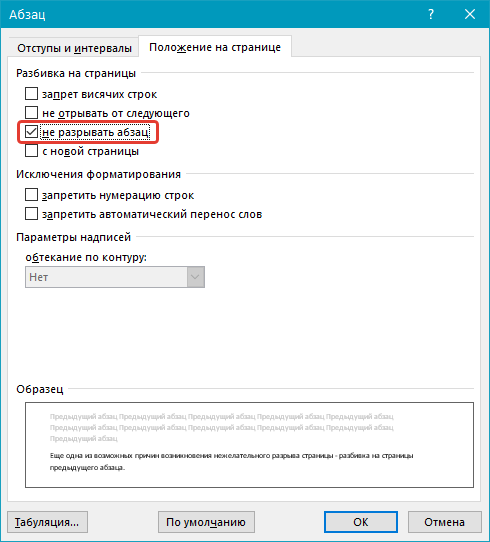

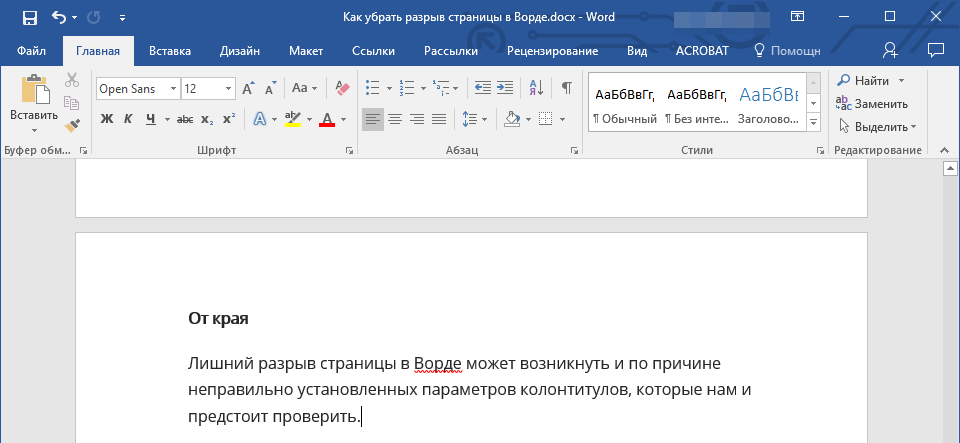
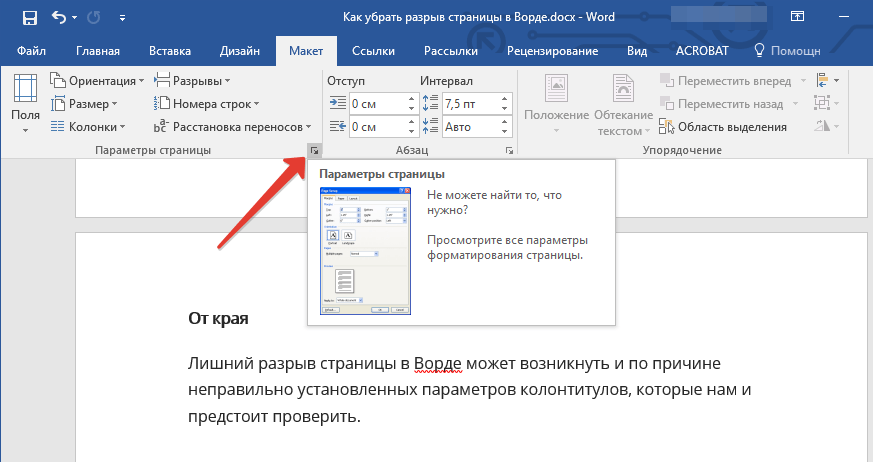
От края
Лишний разрыв страницы в Ворде может возникнуть и по причине неправильно установленных параметров колонтитулов, которые нам и предстоит проверить.
- Перейдите во вкладку «Макет» и разверните диалоговое окно в группе «Параметры страницы».
- Перейдите во вкладку «Источник бумаги» и проверьте напротив пункта «от край» значение колонтитулов: «до верхнего колонтитула» и «до нижнего колонтитула».
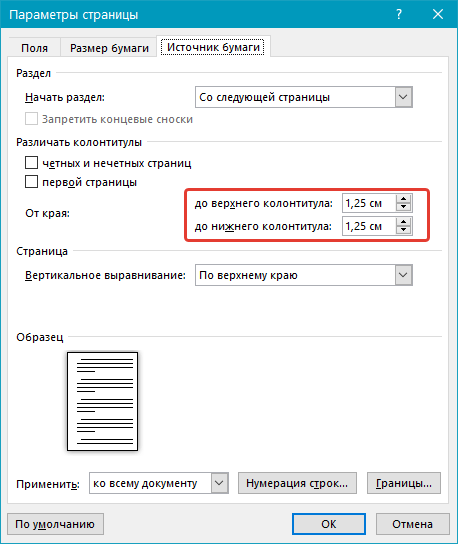
- Если эти значения слишком велики, измените их на желаемые или установите настройки «По умолчанию», кликнув по соответствующей кнопке в левой нижней части диалогового окна.
Примечание: Данный параметр определяет расстояние от края страницы, места, где MS Word начинает печать текста колонтитулов, верхних и/или нижних. Значение по умолчанию — 0,5 дюйма, что составляет 1,25 см. Если же этот параметр больше, уменьшается допустимая область печати (а вместе с ней и отображения) для документа.
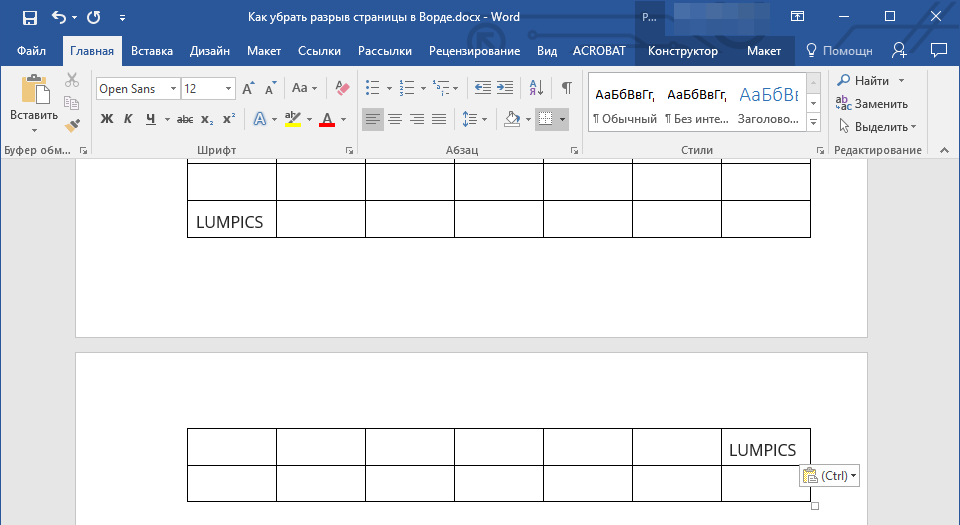
Таблица
Стандартные параметры Майкрософт Ворд не предоставляют возможностей для вставки разрыва страницы непосредственно в ячейке таблицы. В случаях, когда таблица не полностью помещается на одной странице, MS Word автоматически помещает всю ячейку на следующую страницу. Это тоже приводит к разрыву страницы, а для того, чтобы его убрать, необходимо проверить некоторые параметры.
- Кликните по таблице, в основной вкладке «Работа с таблицами» перейдите во вкладку «Макет».
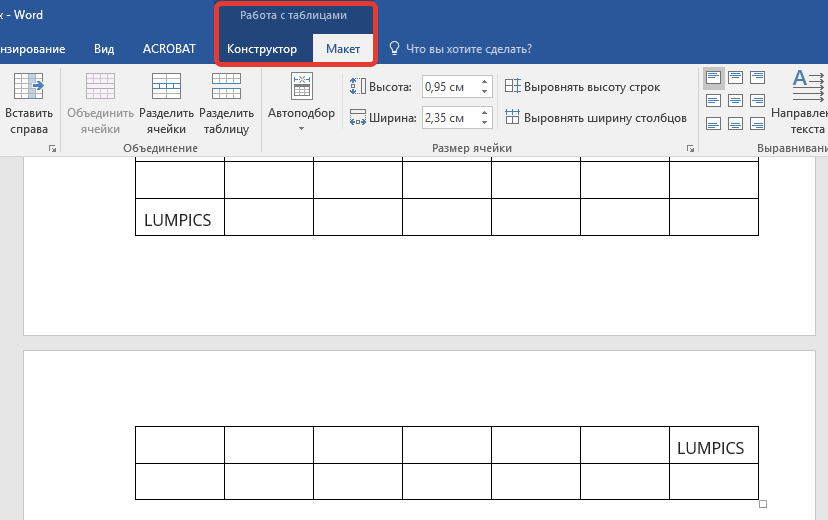
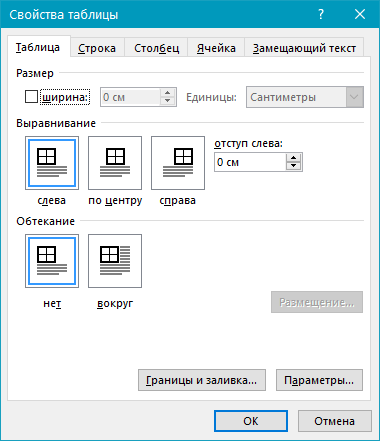
- Вызовите «Свойства» в группе «Таблица».
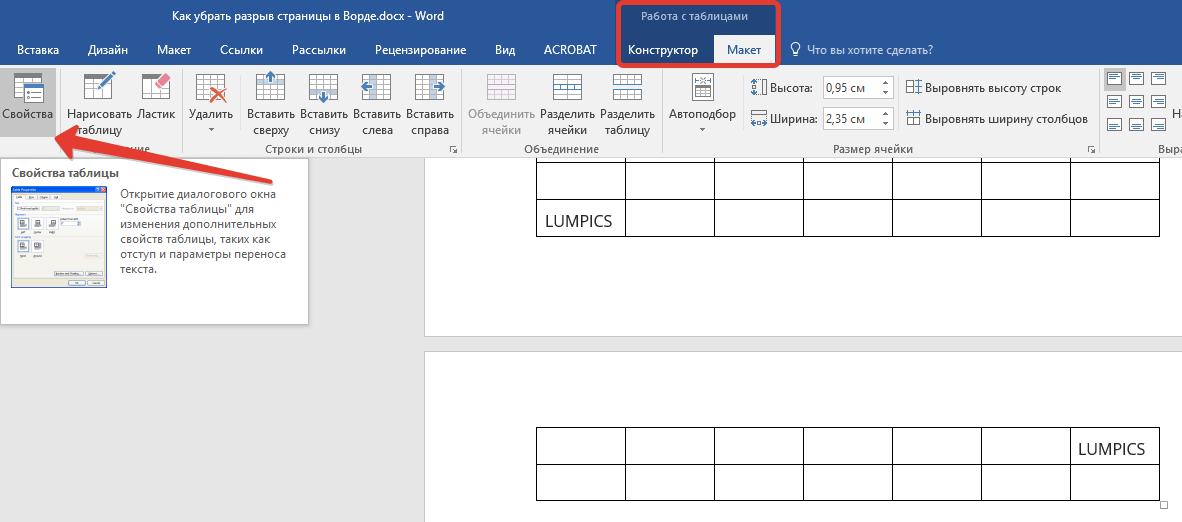
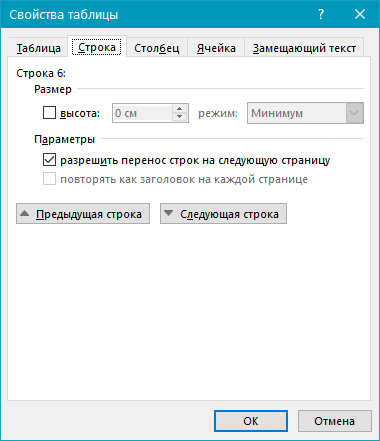
- Появится следующее окно, в котором необходимо переключиться на вкладку «Строка».
- Здесь необходимо «разрешить перенос строк на следующую страницу», установив соответствующую галочку. Данный параметр задает разрыв страницы для всей таблицы.
Жесткие разрывы
Бывает и так, что разрывы страниц возникают из-за их ручного добавления, посредством нажатия комбинации клавиш «Ctrl+Enter» либо же из соответствующего меню на панели управления в Microsoft Word.
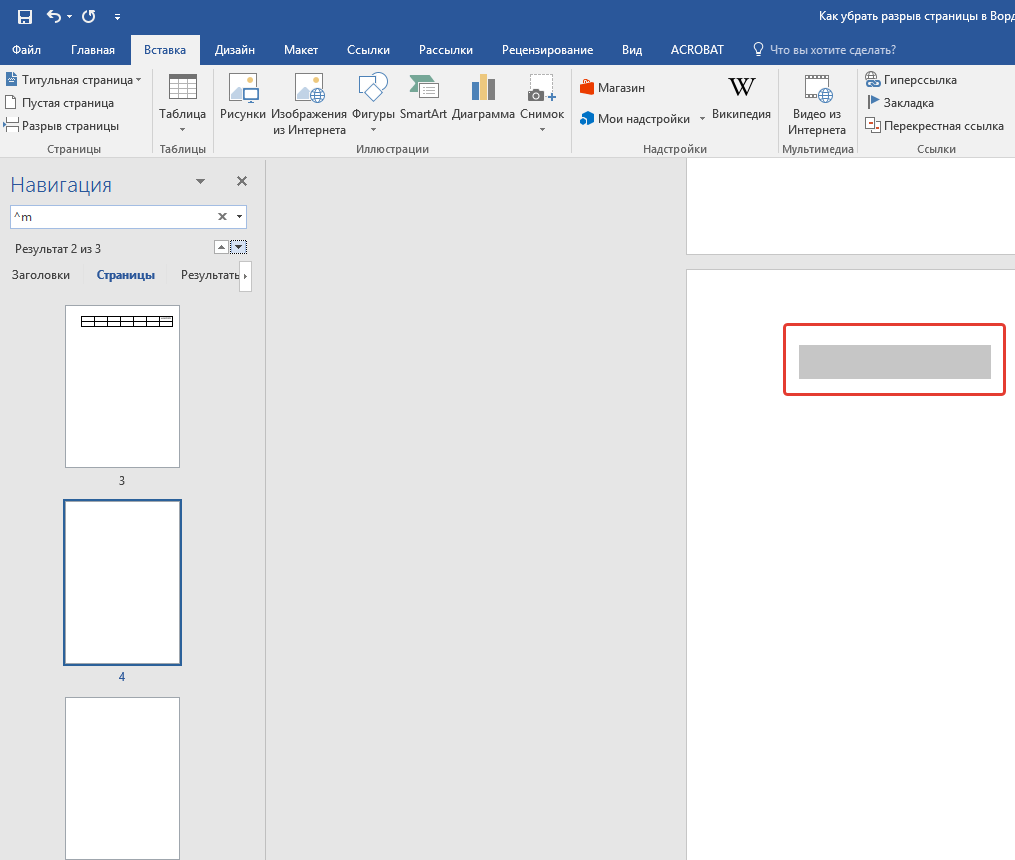
Для удаления так называемого жесткого разрыва можно использовать поиск с последующей заменой и/или удалением.
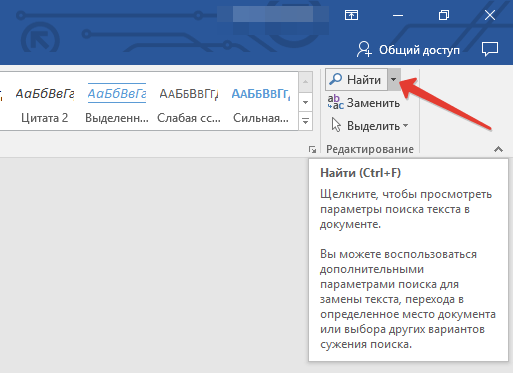
- Во вкладке «Главная», группа «Редактирование», нажмите на кнопку «Найти».
- В появившейся строке поиска введите «^m» без кавычек и нажмите Enter.
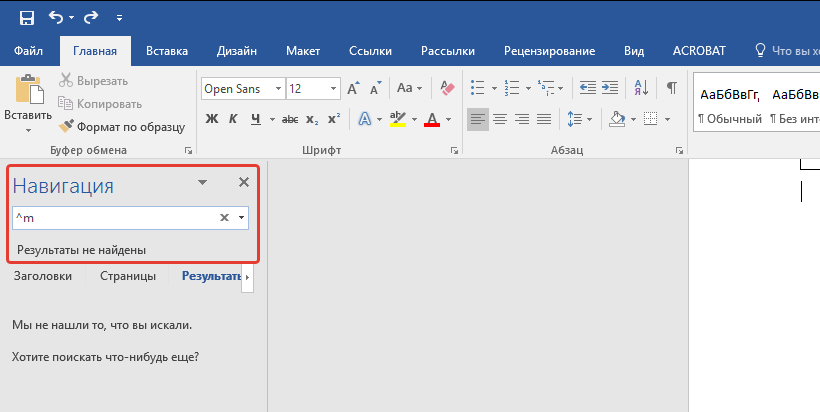
- Вы увидите разрывы страниц, вставленные вручную, и сможете их удалить простым нажатием клавиши «DELETE» на выделенном месте разрыва.
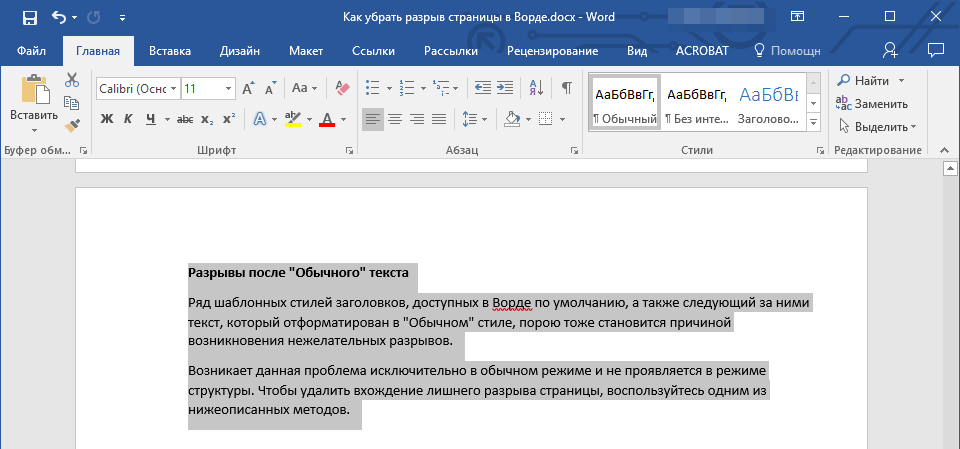
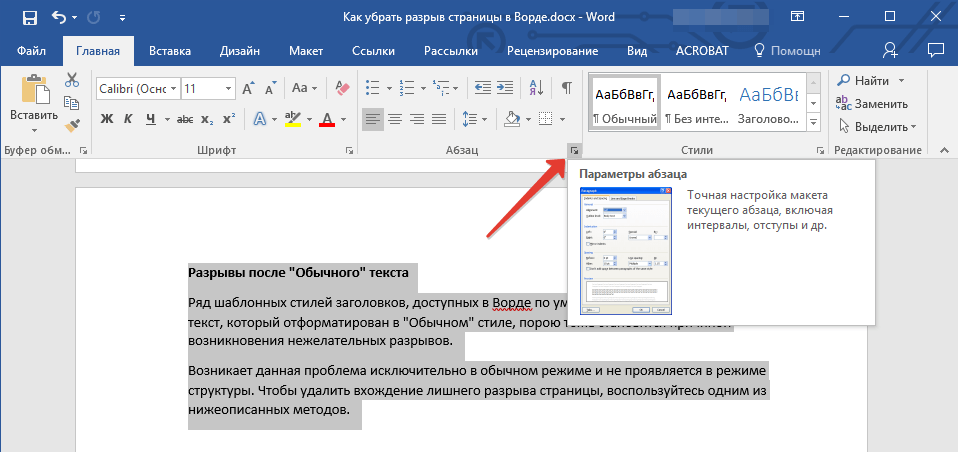
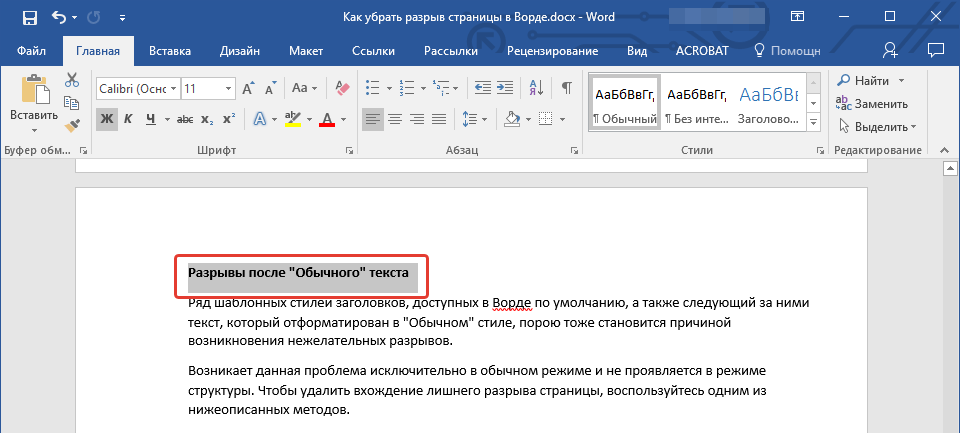
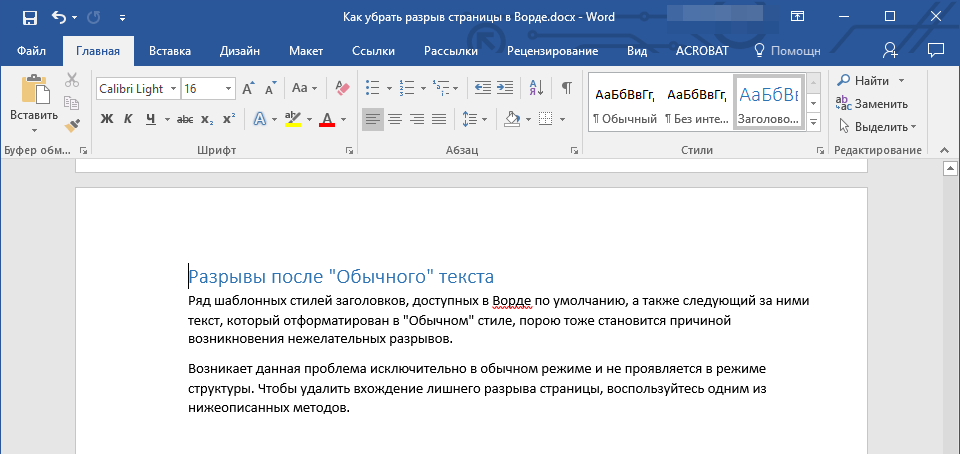
Разрывы после «Обычного» текста
Ряд шаблонных стилей заголовков, доступных в Ворде по умолчанию, а также следующий за ними текст, который отформатирован в «Обычном» стиле, иногда тоже становится причиной возникновения нежелательных разрывов.
Возникает данная проблема исключительно в обычном режиме и не проявляется в режиме структуры. Чтобы удалить вхождение лишнего разрыва страницы, воспользуйтесь одним из нижеописанных методов.
Метод первый: Используйте к обычному тексту параметр «Не открывать следующего»
- Выделите «обычный» текст.
- Во вкладке «Главная», группа «Абзац», вызовете диалоговое окно.
- Поставьте галочку напротив пункта «Не отрывать от следующего» и нажмите «ОК».

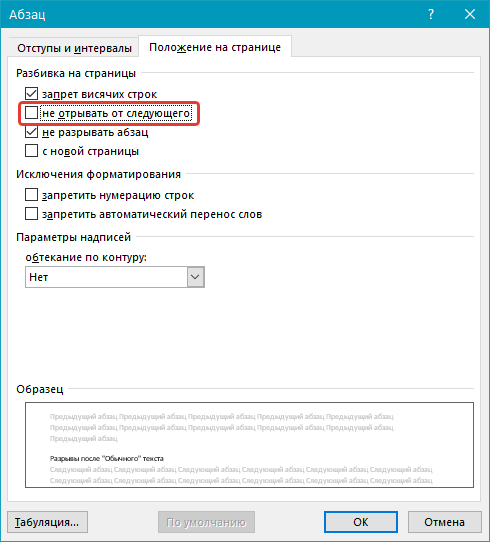
Метод второй: Уберите «не отрывать от следующего» в заголовке
-
Выделите заголовок, который предшествует тексту, отформатированному в «обычном» стиле.

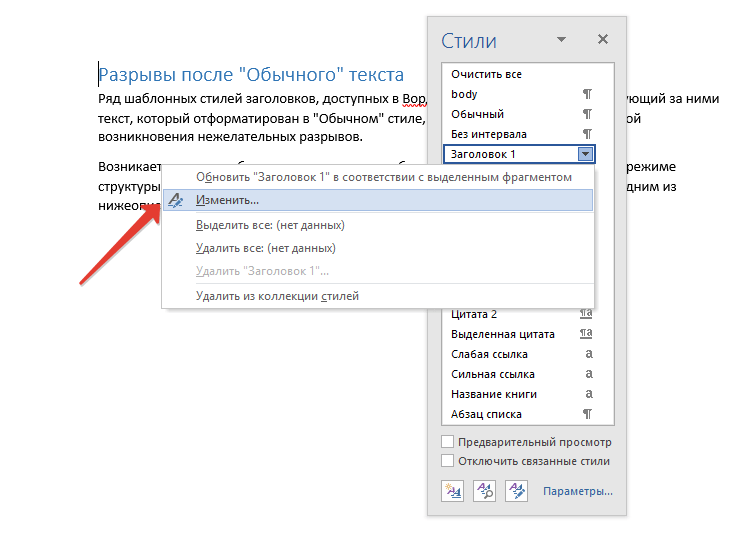
Метод третий: Изменить вхождения ненужных разрывов страниц
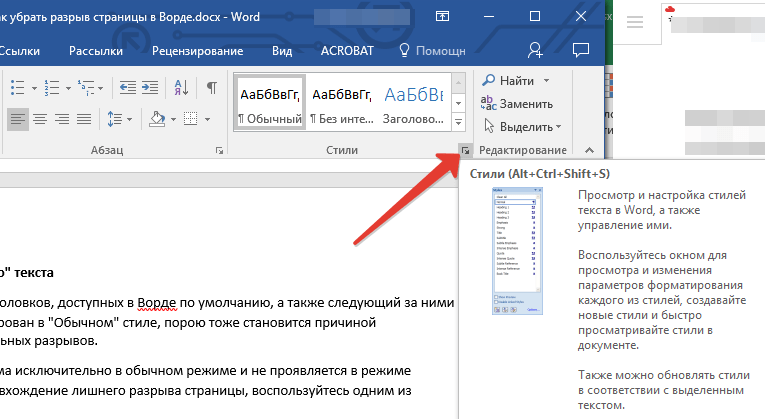
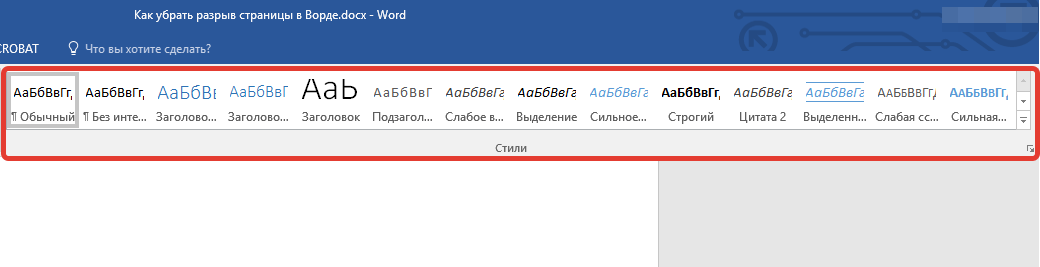
- В группе «Стили», расположенной во вкладке «Главная», вызовите диалоговое окно.
- В появившемся перед вами списке стилей кликните по «Заголовок 1».

- Кликните по данному пункту правой кнопкой мышки и выберите «Изменить».
- В появившемся окне нажмите на кнопку «Формат», расположенную снизу слева, и выберите пункт «Абзац».
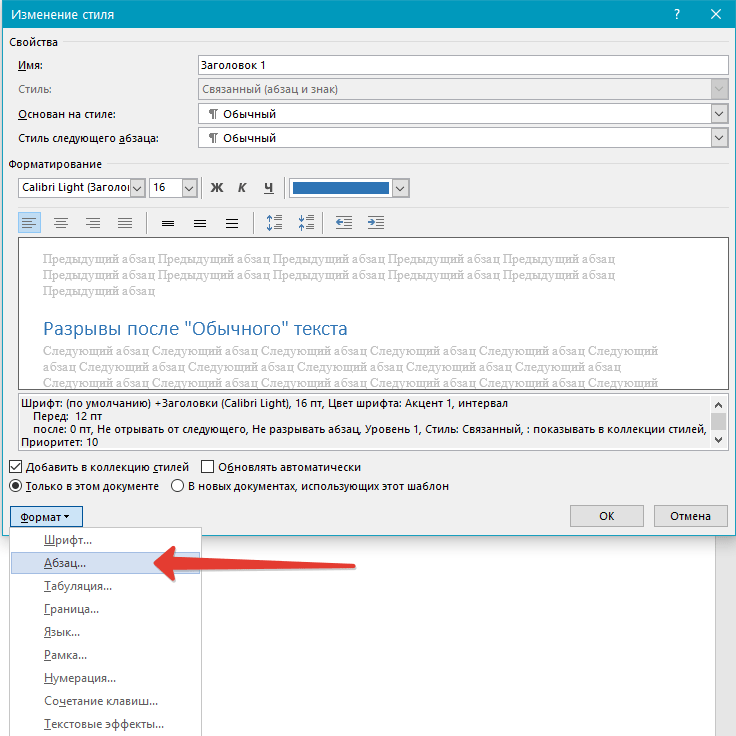
- Переключитесь на вкладку «Положение страницы».
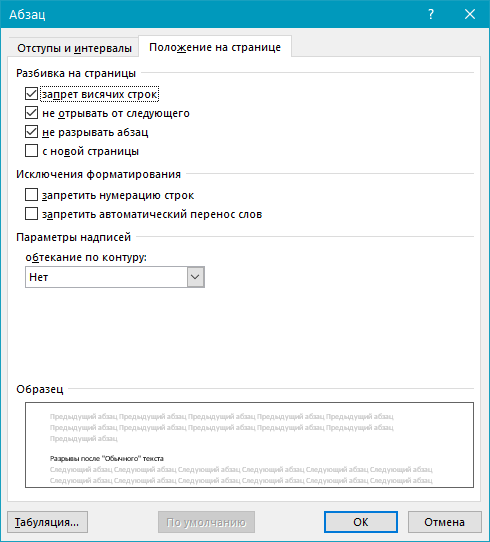
- Уберите галочку с пункта «не отрывать от следующего» и нажмите «ОК».
- Для того, чтобы внесенные вами изменения стали постоянными для текущего документа, а также для последующих документов, создаваемых на основе активного шаблона, в окне «Изменение стиля» установите флажок напротив пункта «В новых документах использующих этот шаблон». Если же вы этого не сделаете, внесенные вами изменения будут применены только к текущему фрагменту текста.
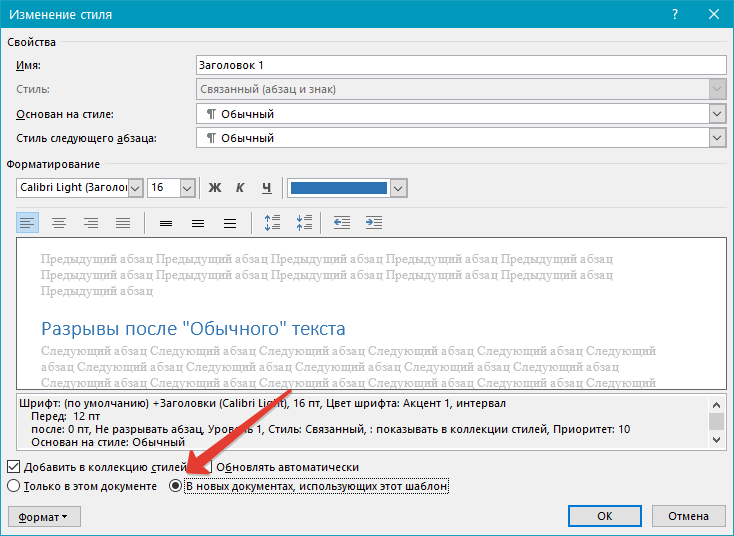
- Нажмите «ОК», чтобы подтвердить изменения.
На этом все, мы с вами узнали о том, как убрать разрыв страницы в Ворде 2003, 2010, 2016 или других версиях этого продукта. Нами были рассмотрены все возможные причины возникновения лишних и нежелательных разрывов, а также предоставлено эффективное решение для каждого случая. Теперь вы знаете больше и можете работать с Microsoft Word еще продуктивнее.
How To Remove Section Break In Microsoft Word
When working with documents in Microsoft Word, it is common to encounter section breaks. These breaks are used for various reasons, such as changing page orientation or formatting. But sometimes you need to get rid of them for a smoother document flow or other needs.
Here’s what to do:
- Find the section break: First, you must find the exact spot of the section break in your document. Activate the ‘Show/Hide’ option in the ‘Home’ tab. Section breaks appear as a double line with “Section Break” on it.
- Select and remove: Place your cursor at the end of the section break and press the ‘Delete’ key. This will make the section break go away without affecting your content.
- Use Find and Replace: When dealing with many section breaks, use the Find and Replace function. Press ‘Ctrl + H’. Type “^b” (without quotes) in the ‘Find what’ field. Leave the ‘Replace with’ empty and click ‘Replace All’.
What is a section break in Microsoft Word?
Microsoft Word’s section break is a formatting tool. It divides your document into sections, each with its own formatting. This is useful when you want to change margins, page orientation, headers, footers, or numbering in parts of your document.
Here’s how to work with section breaks in Microsoft Word:
- Inserting a Section Break:
- Put your cursor at the end of the text where you want to start a new section.
- Go to the “Layout” tab.
- Click on the “Breaks” button in the “Page Setup” group.
- Choose the type of section break: Next Page, Continuous, Even Page, or Odd Page.
- Different Formatting Options:
- After inserting a section break, you can adjust formatting.
- Double-click the header or footer area to edit it.
- Customize headers and footers for each section.
- Change margins in “Layout” > “Margins”.
- Deleting Section Breaks:
- Put your cursor just before the section break.
- Press “Backspace” or “Delete”.
- The text from both sections will become one, with the preceding section’s formatting.
Here’s a story about section breaks. A couple of years ago, I was finishing a research paper. I put a continuous section break instead of a next page break. This messed up my document, with wrong page numbering and formatting. It took me hours to figure out and fix the issue. I learned the importance of choosing the right type of section break in Word.
Why would you want to remove a section break?
Sometimes, you need to remove a section break in Microsoft Word. This can be to change formatting for the whole doc, merge sections, or collaborate with others. Here are some reasons why:
- Mistakenly inserted section break disrupting formatting.
- Combining multiple sections into one.
- Someone else has inserted a section break that is impeding your editing/formatting.
- Changing page orientation/numbering for the entire document.
Remember, always review changes before finalizing them. Also, make sure to create a backup copy of your original doc in case something goes wrong!
How to identify section breaks in Microsoft Word
How to Spot Section Breaks in Microsoft Word
Section breaks in Microsoft Word are used to divide a document into different sections, allowing for individual formatting and page layout. Identifying these section breaks is essential for making changes or removing them. Here’s a step-by-step guide on how to identify section breaks in Microsoft Word:
- Open the document in Microsoft Word.
- Go to the “Home” tab in the toolbar.
- Click on the “Show/Hide” button in the “Paragraph” section. It resembles a paragraph symbol (��) or can be labeled as “Symbol” or “Formatting Marks”.
Once the “Show/Hide” feature is activated, you’ll be able to see a dotted line indicating every section break in your document. This way, you can easily locate and manage section breaks accordingly.
Furthermore, it’s important to note that section breaks can greatly impact the layout and formatting of your document. Removing them without careful consideration may cause unintended changes to your document’s structure. Therefore, always make sure to review the content before removing section breaks.
In terms of the history of section breaks in Microsoft Word, they have been a standard feature since the introduction of Microsoft Word 97. This innovative feature revolutionized document formatting and layout options, allowing users to have more control over the appearance and organization of their documents.
In summary, identifying section breaks in Microsoft Word is a vital skill when it comes to managing the structure and formatting of your document. By following the steps mentioned above, you’ll be able to easily locate and work with section breaks, ensuring effective document editing and formatting.
Peek-a-boo! Just like finding hidden treasure, locating section breaks in your Word document is like playing hide-and-seek with an invisible friend.
Viewing Section Breaks in the document
- Open the Microsoft Word document, then click the “View” tab at the top.
- In the “Show” group, find the “Navigation Pane” option. This will list the headings and pages.
- To view section breaks, click the arrow next to any heading.
Section breaks have a purpose. They create distinct sections for different chapters or topics, plus they keep structure and coherence. Knowing where one section ends and another begins helps with revisions and formatting.
Understand this Microsoft Word feature. It’ll make navigating through documents easier, and can improve workflow and productivity. So master it and become a word processing expert!
Different types of Section Breaks
Section breaks are vital in Microsoft Word. They let you divide your document into parts. There are various types of breaks that serve different purposes. Utilizing them properly can give your work a professional and organized look.
Next Page break starts the new section on the next page. It’s great for docs with multiple chapters or sections that need different formatting. You can change page orientation, use different headers/footers, or adjust margins.
Continuous break starts the next section below the current one. This is perfect for modifying formatting within one page, like columns or certain paragraphs.
Even Page/Odd Page breaks make sure the new section starts on an even/odd-numbered page. This is useful for printed docs like books or reports with specific chapter pages.
I once utilized section breaks to save myself from embarrassment during a client presentation. My lengthy proposal had several sections needing distinct formatting. I’d added Next Page breaks – but some pages were blank due to varying content lengths. I replaced them with Continuous breaks. This gave me seamless transitions and no awkward blank pages. It made a big difference in maintaining professionalism and preventing confusion.
How to remove a section break in Microsoft Word
Removing a section break in Microsoft Word is a simple and straightforward process. Follow these steps to get rid of a section break in your document:
- Open your Microsoft Word document.
- Click on the “Home” tab at the top of the screen.
- Locate the section break that you want to remove.
- Place your cursor just before the section break.
- Press the “Delete” key on your keyboard.
By following these steps, you can easily remove a section break in Microsoft Word without any complications.
It is important to note that section breaks can be useful in separating different sections of your document, but if you want to remove a specific section break or merge two sections together, these steps will come in handy.
Now that you know how to remove a section break in Microsoft Word, you can efficiently manage the formatting and layout of your documents.
In a similar vein, it’s worth mentioning that section breaks have been a feature of Microsoft Word for many years, allowing users to structure their documents effectively. However, the exact history behind the introduction of section breaks is not widely known. Nonetheless, it remains an essential tool for document organization and formatting in Microsoft Word.
Break-ups are hard, but removing a section break in Microsoft Word is as easy as selecting it.
Step 1: Select the section break
Unlock the secret of removing a section break in Microsoft Word! Follow these steps:
- Open the document in Microsoft Word.
- Go to the Home tab.
- Click the arrow in the “Find” option in the editing section.
- Choose “Advanced Find” from the drop-down menu.
- Type “^b” in the “Find what” field.
These magical characters (“^b“) are the key to removing section breaks.
Did you know that Microsoft Word included section breaks from version 2007? (Source: support.microsoft.com)
Step 2: Delete the section break
Ready to delete a section break in Microsoft Word? Here’s how:
- Open your document.
- Go to the page with the section break.
- Put your cursor after the break.
- Press “Delete” once.
- Check that both sections blend together perfectly.
Note: Deleting a section break will join the content of both sections – so watch out for important info!
Fun fact: Section breaks let you create separate sections in a document, like chapters or different formatting styles.
Additional tips and considerations
Before removing section breaks in Microsoft Word, double-check your document. Preserve formatting and use caution with larger documents. Make a backup copy. Utilize the Navigation Pane for easy movement between sections and to identify breaks. Adjust spacing and margins after removal. Get help if needed. Take time to understand how section breaks work and be careful when removing them.
Enjoy a seamless editing experience – remove section breaks with ease!
Conclusion
Remove a section break in Microsoft Word? Easy! Just go to the “Layout” tab, click on “Breaks” and select “Next Page.” Also, use the shortcut key “Ctrl + Shift + Enter.” Note: Removing a section break can affect document formatting. Check any headers, footers or page numbers that may be affected.
Want to delete a page break? Put your cursor just before the page break and press “Delete” on your keyboard. This will merge the content from both pages.
Remember: To ensure a professional-looking document, understanding how to remove section and page breaks is key. Follow the steps above and you’ll be good to go.
Pro Tip: Always save a backup copy of your document before removing any breaks. That way, you can always revert back to the original formatting if needed.
Удаляем разрывы разделов в Word
Любой раздел в Word можно удалить вручную – делается это по следующей инструкции:
- Перейдите в раздел меню «Главная», нажмите на кнопку «Отобразить все знаки» в блоке «Абзац». Все пробелы, разрывы, табуляции, переносы строк и прочие невидимые символы должны отобразиться.

- Найдите строку «Разрыв раздела», установите курсор перед ней, нажмите на клавишу «Del».
Обратите внимание! После избавления от разрыва объединённый раздел примет форматирование части текста, последующей за удалённым разрывом.
Способ 2: Использование средства замены
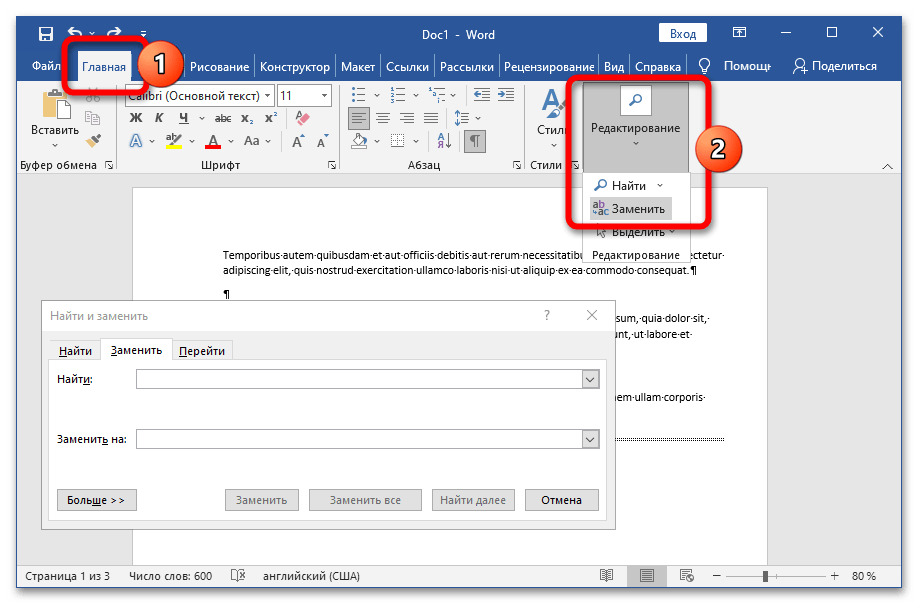
Если нужно удалить сразу все разрывы в объёмном документе, можно воспользоваться функцией «Найти и заменить»:
- Кликните по кнопке «Заменить» во вкладке «Главная» или воспользуйтесь сочетанием клавиш Ctrl + H.
- В графу «Найти» вставьте набор символов «^b», поле «Заменить на» оставьте пустым. Нажмите на кнопку «Заменить все».
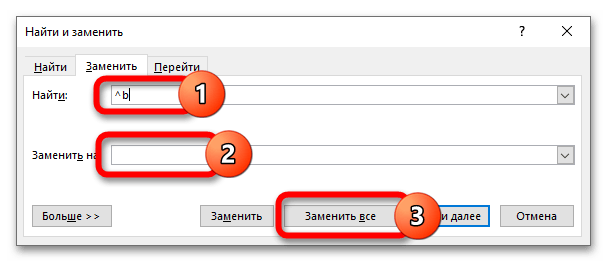
После завершения работы Word выведет информацию о количестве удалённых разделов.
Способ 3: Создание макроса
Для ускорения процедуры удаления разделов можно создать специальный макрос, который в дальнейшем будет доступен для использования в любом документе:
- Перейдите во вкладку «Вид», нажмите на кнопку «Макросы». Задайте имя макроса, нажмите на «Создать». Для быстрого доступа можно использовать комбинацию клавиш Alt + F11.
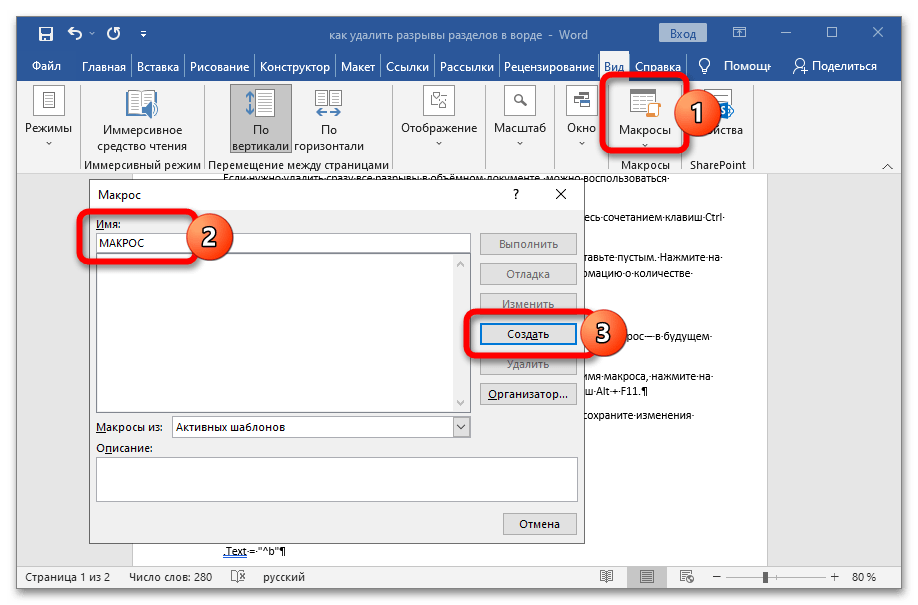
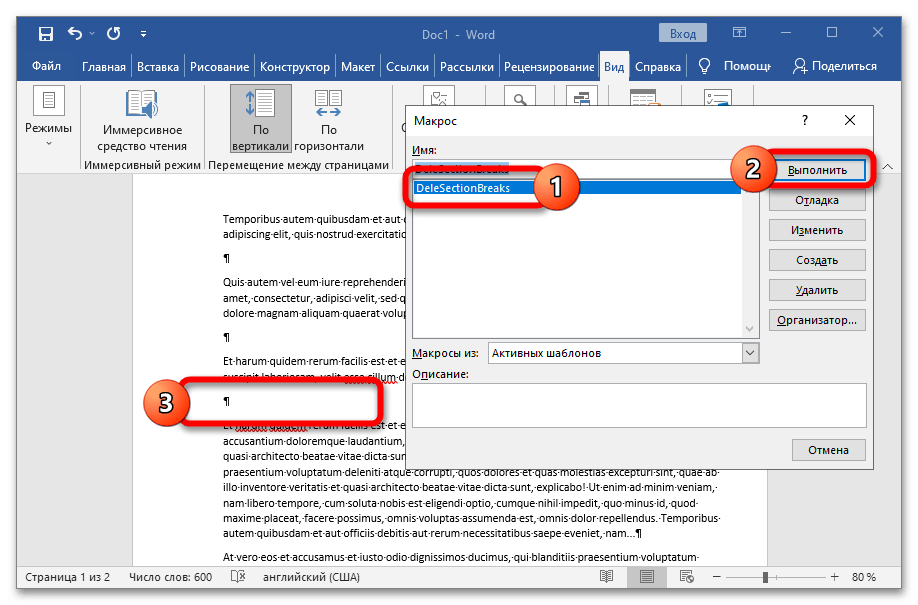
- Вставьте предложенный ниже код в область редактирования макроса, сохраните изменения нажатием на соответствующую кнопку. Sub DeleSectionBreaks()
Selection.Find.ClearFormatting
Selection.Find.Replacement.ClearFormatting
With Selection.Find
.Text = «^b»
.Replacement.Text = «»
.Forward = True
.Wrap = wdFindContinue
.Format = False
.MatchCase = False
.MatchWholeWord = False
.MatchByte = False
.MatchAllWordForms = False
.MatchSoundsLike = False
.MatchWildcards = False
.MatchFuzzy = False
End With
Selection.Find.Execute Replace:=wdReplaceAll
End Sub
- Воспользуйтесь комбинацией клавиш Alt + F8 для вызова окна работы с макросами. Выберите только что созданную задачу, нажмите на «Выполнить» — все разделы автоматически удалятся.
How to remove a section break in Microsoft Word
Facebook Email icon An envelope. It indicates the ability to send an email.
Email Twitter icon A stylized bird with an open mouth, tweeting.
Twitter LinkedIn icon The word «in».
LinkedIn Link icon An image of a chain link. It symobilizes a website link url.
Save Article Icon A bookmark
Redeem now
- Section breaks in Word allow you to break your document into separate sections.
- You can remove a section break in Word by showing the page break icons, and then deleting them.
- You can also remove several or all at once using the Find and Replace dialogue box.
Advertisement
In Microsoft Word, you can insert section breaks to divide your document into sections and apply formatting to specific blocks of text.
For example, you can have a section with different margin sizes, sections with different headers and footers, and more.
Note: Section breaks differ from page breaks, which move the content after a page break to the beginning of the next page.
When you delete a section break, the text before and after the break combines into one section, which takes on the formatting of the latter section.
Here’s how to remove section breaks from your Word document.
Advertisement
How to remove a section break in Word
Whether you’re using Microsoft Word on Windows or Mac, the steps for removing section breaks are the same.
1. Select the Home tab if it isn’t already selected for the document.
2. Select Show/Hide ¶ to show the section breaks in your document.
3. Click the area just before the section break you want to remove, then hit the Delete key.
Make sure Track Changes is disabled or you won’t be able to remove section breaks. Select the Review tab and click Track Changes to expand the dropdown. Then, click Track Changes in the dropdown to disable the feature.
Advertisement
How to remove several or all section breaks at once
If you have multiple sections breaks in a Microsoft Word document, it can be tedious to remove them one by one. Luckily, there’s a way to remove several or all of them at once.
1. Select the Home tab if it isn’t already selected in your document.
2. Click Replace to bring up the Find and Replace dialogue box.
3. Click More >> on the bottom left.
4. At the bottom of the dialogue box, click Special to expand the dropdown and select Section Break. You will see that ^b will appear in the Find what text box.
Quick tip: Make sure the Replace with text box is empty. If there’s anything in there, delete it, otherwise Word will replace the section breaks with whatever is in the text box.
5. Click Find Next until you find the section break you want to remove and then click Replace. Do this until you’ve removed the ones you want. Alternatively, you can remove all section breaks at once by clicking Replace All.
Abigail Abesamis Demarest
Abigail Abesamis Demarest is a contributing writer for Insider based in New York. She loves a good glazed donut and nerdy deep dives into the science of food and how it’s made.