Create a bootable installer for macOS
You can use an external drive or secondary volume as a startup disk from which to install the Mac operating system.
These advanced steps are primarily for system administrators and other experienced users who are familiar with entering commands in Terminal.
You don’t need a bootable installer to upgrade macOS or reinstall macOS, but it can be useful if you want to install macOS on multiple computers without downloading the installer each time, or you’re unable to install a compatible macOS from the Finder or macOS Recovery.
What you need to create a bootable installer
- A USB flash drive or other secondary volume with at least 14GB of available storage, formatted as Mac OS Extended
- A full macOS installer
To download a full installer, your Mac must be using macOS High Sierra or later, the latest version of macOS Sierra, or the latest version of OS X El Capitan. Your Mac must also be compatible with the macOS that you’re downloading. Enterprise administrators: download from Apple, not a locally hosted update server.
Use Terminal to create the bootable installer
- Plug the USB flash drive into your Mac.
- Open Terminal, which is in the Utilities folder of your Applications folder.
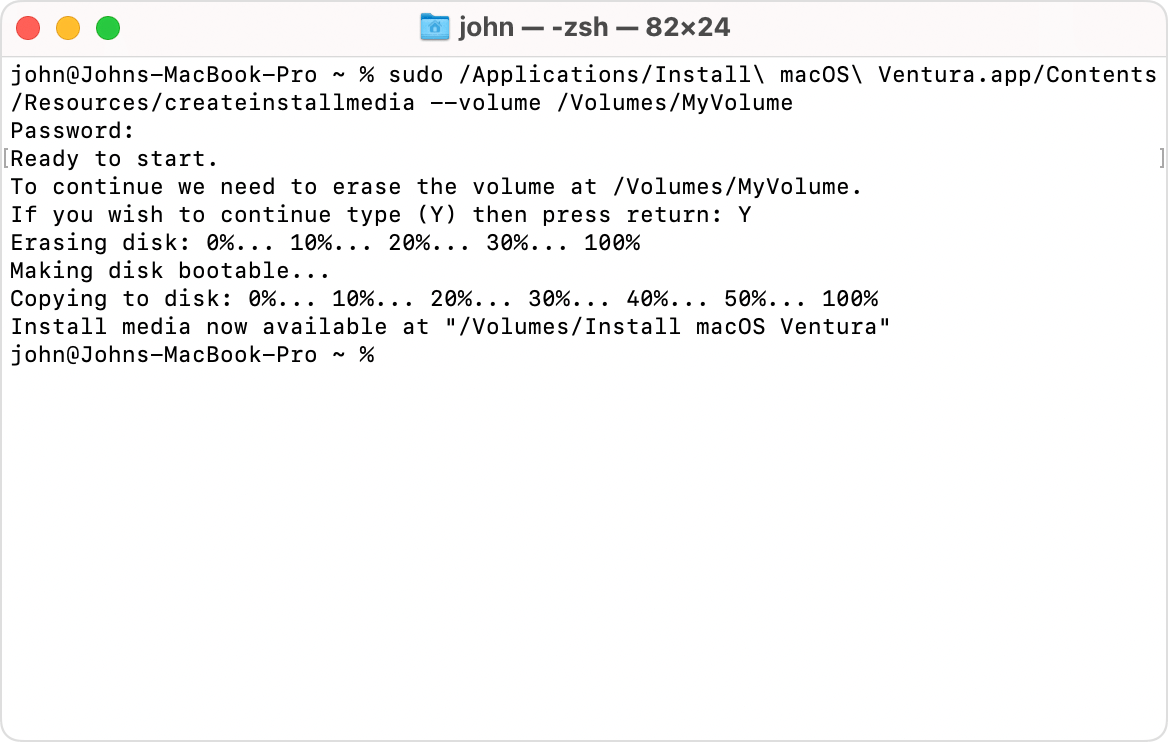
- Type or paste one of the commands below into Terminal, then press Return to enter the command. Each command assumes that the installer is in your Applications folder, and MyVolume is the name of the USB flash drive or other volume you’re using. If the volume has a different name, replace MyVolume in the command with the name of your volume.
- When prompted, type your administrator password. Terminal doesn’t show any characters as you type. Then press Return.
- When prompted, type Y to confirm that you want to erase the volume, then press Return. Terminal shows the progress as the volume is erased.
- After the volume is erased, you may see an alert that Terminal would like to access files on a removable volume. Click OK to allow the copy to proceed.
- When Terminal says that it’s done, the volume will have the same name as the installer you downloaded, such as Install macOS Sonoma. You can now quit Terminal and eject the volume.
Commands
Depending on which macOS you downloaded, enter one of the following commands in Terminal as instructed above.
- Remember to replace MyVolume in the command with the name of your volume.
- If your Mac is using macOS Sierra or earlier, append —applicationpath to your command, followed by the appropriate installer path, similar to what is shown in the command below for El Capitan.
Sonoma
sudo /Applications/Install\ macOS\ Sonoma.app/Contents/Resources/createinstallmedia —volume /Volumes/MyVolume
Ventura
sudo /Applications/Install\ macOS\ Ventura.app/Contents/Resources/createinstallmedia —volume /Volumes/MyVolume
Monterey
sudo /Applications/Install\ macOS\ Monterey.app/Contents/Resources/createinstallmedia —volume /Volumes/MyVolume
Big Sur
sudo /Applications/Install\ macOS\ Big\ Sur.app/Contents/Resources/createinstallmedia —volume /Volumes/MyVolume
Catalina
sudo /Applications/Install\ macOS\ Catalina.app/Contents/Resources/createinstallmedia —volume /Volumes/MyVolume
Mojave
sudo /Applications/Install\ macOS\ Mojave.app/Contents/Resources/createinstallmedia —volume /Volumes/MyVolume
High Sierra
sudo /Applications/Install\ macOS\ High\ Sierra.app/Contents/Resources/createinstallmedia —volume /Volumes/MyVolume
El Capitan
sudo /Applications/Install\ OS\ X\ El\ Capitan.app/Contents/Resources/createinstallmedia —volume /Volumes/MyVolume —applicationpath /Applications/Install\ OS\ X\ El\ Capitan.app
Use the bootable installer
Determine whether you’re using a Mac with Apple silicon, then follow the appropriate steps. Remember that the Mac you’re starting up with the bootable installer must be compatible with the macOS on the bootable installer. If not, the Mac might start up to a circle with a line through it.
Mac with Apple silicon
- Plug the bootable installer into a Mac that is connected to the internet and compatible with the version of macOS you’re installing. A bootable installer doesn’t download macOS from the internet, but it does require an internet connection to get firmware and other information specific to the Mac model.
- Turn on the Mac and continue to hold the power button until you see the startup options window, which shows your bootable volumes.
- Select the volume containing the bootable installer, then click Continue.
- When the macOS installer opens, follow the onscreen installation instructions.
Any other Mac
- Plug the bootable installer into a Mac that is connected to the internet and compatible with the version of macOS you’re installing. A bootable installer doesn’t download macOS from the internet, but it does require an internet connection to get firmware and other information specific to the Mac model.
- Turn on your Mac, then immediately press and hold the Option (Alt) key.
- Release the Option key when you see a dark screen showing your bootable volumes.
- Select the volume containing the bootable installer. Then click the onscreen arrow or press Return.
- If you’re using a Mac with the Apple T2 Security Chip and you can’t start up from the bootable installer, make sure that Startup Security Utility is set to allow booting from external or removable media.
- Choose your language, if prompted.
- Select Install macOS (or Install OS X) from the Utilities window, then click Continue and follow the onscreen instructions.
Learn more
For information about the createinstallmedia command and the arguments you can use with it, make sure that the macOS installer is in your Applications folder, then enter the appropriate path in Terminal:
/Applications/Install\ macOS\ Sonoma.app/Contents/Resources/createinstallmedia
/Applications/Install\ macOS\ Ventura.app/Contents/Resources/createinstallmedia
/Applications/Install\ macOS\ Monterey.app/Contents/Resources/createinstallmedia
/Applications/Install\ macOS\ Big\ Sur.app/Contents/Resources/createinstallmedia
/Applications/Install\ macOS\ Catalina.app/Contents/Resources/createinstallmedia
/Applications/Install\ macOS\ Mojave.app/Contents/Resources/createinstallmedia
/Applications/Install\ macOS\ High\ Sierra.app/Contents/Resources/createinstallmedia
/Applications/Install\ OS\ X\ El\ Capitan.app/Contents/Resources/createinstallmedia
Create a bootable installer for macOS
You can use an external drive or secondary volume as a startup disk from which to install the Mac operating system.
These advanced steps are primarily for system administrators and other experienced users who are familiar with entering commands in Terminal.
You don’t need a bootable installer to upgrade macOS or reinstall macOS, but it can be useful if you want to install macOS on multiple computers without downloading the installer each time, or you’re unable to install a compatible macOS from the Finder or macOS Recovery.
What you need to create a bootable installer
- A USB flash drive or other secondary volume with at least 14 GB of available storage, formatted as Mac OS Extended
- A full macOS installer
To download a full installer, your Mac must be using macOS High Sierra or later, the latest version of macOS Sierra or the latest version of OS X El Capitan. Your Mac must also be compatible with the macOS that you’re downloading. Enterprise administrators: download from Apple, not a locally hosted update server.
Use Terminal to create the bootable installer
- Plug the USB flash drive into your Mac.
- Open Terminal, which is in the Utilities folder of your Applications folder.
- Type or paste one of the commands below Each command assumes that the installer is in your Applications folder and MyVolume is the name of the USB flash drive or other volume you’re using. If the volume has a different name, replace MyVolume in the command with the name of your volume.
- When prompted, type your administrator password. Terminal doesn’t show any characters as you type. Then press Return.
- When prompted, type Y to confirm that you want to erase the volume, then press Return. Terminal displays the progress as the volume is being erased.
- After the volume has been erased, you may see an alert stating that Terminal would like to access files on a removable volume. Click OK to allow the copy to proceed.
- When Terminal says that it’s finished, the volume will have the same name as the installer you’ve downloaded, such as Install macOS Sonoma. You can now quit Terminal and eject the volume.
Commands
Depending on which macOS you downloaded, enter one of the following commands in Terminal as instructed above.
- Remember to replace MyVolume in the command with the name of your volume.
- If your Mac is using macOS Sierra or earlier, append —applicationpath to your command, followed by the appropriate installer path, similar to what is shown in the command below for El Capitan.
Sonoma
sudo /Applications/Install\ macOS\ Sonoma.app/Contents/Resources/createinstallmedia —volume /Volumes/MyVolume
Ventura
sudo /Applications/Install\ macOS\ Ventura.app/Contents/Resources/createinstallmedia —volume /Volumes/MyVolume
Monterey
sudo /Applications/Install\ macOS\ Monterey.app/Contents/Resources/createinstallmedia —volume /Volumes/MyVolume
Big Sur
sudo /Applications/Install\ macOS\ Big\ Sur.app/Contents/Resources/createinstallmedia —volume /Volumes/MyVolume
Catalina
sudo /Applications/Install\ macOS\ Catalina.app/Contents/Resources/createinstallmedia —volume /Volumes/MyVolume
Mojave
sudo /Applications/Install\ macOS\ Mojave.app/Contents/Resources/createinstallmedia —volume /Volumes/MyVolume
High Sierra
sudo /Applications/Install\ macOS\ High\ Sierra.app/Contents/Resources/createinstallmedia —volume /Volumes/MyVolume
El Capitan
sudo /Applications/Install\ OS\ X\ El\ Capitan.app/Contents/Resources/createinstallmedia —volume /Volumes/MyVolume —applicationpath /Applications/Install\ OS\ X\ El\ Capitan.app
Use the bootable installer
Determine whether you’re using a Mac with Apple silicon, then follow the appropriate steps. Remember that the Mac you’re starting up with the bootable installer must be compatible with the macOS on the bootable installer. If not, the Mac may start up to a circle with a line through it.
Mac with Apple silicon
- Plug the bootable installer into a Mac that is connected to the internet and compatible with the version of macOS you’re installing. A bootable installer doesn’t download macOS from the internet, but it does require an internet connection to get firmware and other information specific to the Mac model.
- Turn on the Mac and continue to hold the power button until you see the startup options window, which shows your bootable volumes.
- Select the volume containing the bootable installer, then click Continue.
- When the macOS installer opens, follow the onscreen installation instructions.
Any other Mac
- Plug the bootable installer into a Mac that is connected to the internet and compatible with the version of macOS you’re installing. A bootable installer doesn’t download macOS from the internet, but it does require an internet connection to get firmware and other information specific to the Mac model.
- Turn on your Mac, then immediately press and hold the Option (Alt) key.
- Release the Option key when you see a dark screen displaying your bootable volumes.
- Select the volume containing the bootable installer. Then, click the onscreen arrow or press Return.
- If you’re using a Mac with the Apple T2 Security Chip and you can’t start up from the bootable installer, make sure that Startup Security Utility is set to allow booting from external or removable media.
- Choose your language, if prompted.
- Select Install macOS (or Install OS X) from the Utilities window, then click Continue and follow the onscreen instructions.
Learn more
For information about the createinstallmedia command and the arguments you can use with it, make sure that the macOS installer is in your Applications folder, then enter the appropriate path in Terminal:
/Applications/Install\ macOS\ Sonoma.app/Contents/Resources/createinstallmedia
/Applications/Install\ macOS\ Ventura.app/Contents/Resources/createinstallmedia
/Applications/Install\ macOS\ Monterey.app/Contents/Resources/createinstallmedia
/Applications/Install\ macOS\ Big\ Sur.app/Contents/Resources/createinstallmedia
/Applications/Install\ macOS\ Catalina.app/Contents/Resources/createinstallmedia
/Applications/Install\ macOS\ Mojave.app/Contents/Resources/createinstallmedia
/Applications/Install\ macOS\ High\ Sierra.app/Contents/Resources/createinstallmedia
/Applications/Install\ OS\ X\ El\ Capitan.app/Contents/Resources/createinstallmedia
Установка Mac OS X с флешки

В сети сейчас полно копипастов, по сути одной и той же статьи, про установку MacOS X на хакинтош примерно с таким же заголовком. Я же расскажу как поставить Mac OS X с флешки именно на mac.
Сложного тут ничего нет, однако же не все являются профи, да и переустановка системы на mac — вещь довольно редкая, это вам не Windows. Когда это бывает нужно? В моем случае понадобилось обновиться со старой версии Mac OS X Leopard (10.5) до следующей Mac OS X Snow Leopard (10.6).
Спрашивается зачем писать про такое старьё, когда на подходе OS X 10.9, однако тему новизны сегодня оставим в покое, суть вопроса от этого не меняется. Образ диска OS X Snow Leopard Install DVD 10.6.3 Retail я взял с торрента inmac.org.
Вообще, установить с флешки можно и OS X Lion (10.7) и Mountain Lion (10.8). Легально приобрести OS X Mountain Lion можно в App Store (цена вопроса всего 625 рублей).
После завершения загрузки в папке «Программы» появится утилита установка Mac OS X Mountain Lion.
Кликаем правой кнопкой мыши на установщике и выбираем «Показать содержимое пакета». Далее копируем из папки «SharedSupport» в любое удобное место образ ОС InstallESD.dmg.
Создание загрузочной флешки или диска Mac OS X
Для записи образа Mac OS X Snow Leopard требуется DVD диск двойной плотности (6,3 Gb на обычную болванку никак не влезет), да и привода для записи этого хозяйства тоже не имелось. Я и не расстроился. В то время, когда космические корабли бороздят… использовать компакт-диски моветон.
Втыкаем подходящую флешку в компьютер и запускаем Приложения > Утилиты > Дисковая утилита.

- Первым делом форматируем нашу флешку. Во вкладке «Стереть» указываем новое имя (например MAC_OS_X) и файловую систему Mac OS Extended (журнальный).
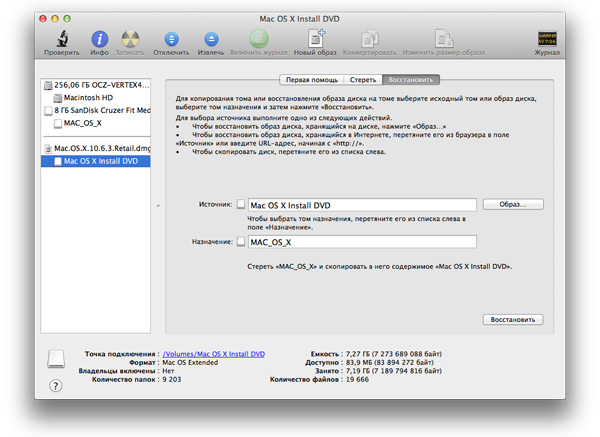
- Монтируем образ будущей системы, дважды кликнув по файлу образа. В моем случае это Mac.OS.X.10.6.3.Retail.dmg (или InstallESD.dmg о чем писалось выше). Образ появится в левой панели Дисковой Утилиты.
- Переходим во вкладку «Восстановить». С боковой панели Дисковой Утилиты в поле «Источник» перетягиваем (Mac OS X Install ESD). В поле «Назначение» перетягиваем созданный раздел на флешке (MAC_OS_X).
- Жмем кнопку «Восстановить». Процесс этот не быстрый, так что придется немного подождать.
Загрузка Mac с флешки
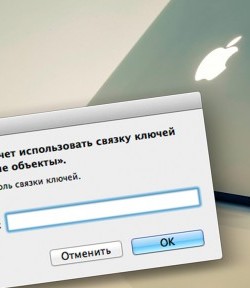
Загружаем систему, удерживая клавишу Alt (она же Option ) до появления выбора вариантов загрузки. Ну а дальше остается следовать указаниям установщика.

Кстати, все пользовательские данные, вплоть до заставки рабочего стола, при переходе с одной версии Mac OS X на другую остались не тронутыми. Хотя в момент установки, одинокий холодный муравей пробежал по спине, когда вдруг выяснилось, что у пользователя часть документов хранилась не на сервере и резервных копий не делалось. Так что, рекомендую не лениться и, на всякий случай, создать резервную копию важных документов заранее.
Прочитать обновленную статью про создании загрузочной флешки с macOS HighSierra, Sierra или El Capitan можно по ссылке — Чистая установка macOS на новый диск.
Подписывайтесь на канал
Яндекс.Дзен и узнавайте первыми о новых материалах, опубликованных на сайте.
Если считаете статью полезной,
не ленитесь ставить лайки и делиться с друзьями.


Комментариев: 14
- 2013-08-15 в 20:10:08 | Alexander У меня при удерживании альта только можно вайфай сеть выбрать и все почему то, флешка с осью вставлена до включения, ничего не понимаю. как быть?
- 2013-09-21 в 13:11:40 | Александр Нужно извлечь InstallESD.dmg. Правой кнопкой мыши на .app и идем по пути: Contents/SharedSupport/InstallESD.dmg Все теперь пишем этот файл на флешку и загружаемся.
- 2014-05-13 в 12:13:23 | Антон Купил флешку с предварительно установленной системой для установки с Ebay. http://www.ebay.com/itm/171325244140?ssPageName=STRK:MESELX:IT&_trksid=p3984.m1555.l2649
- 2015-10-13 в 03:17:56 | Spektr Online Ребята огромное человеческое спасибо! Благодаря вашей статье перехал на 10.6 c 10.5.8, качается комбо апдейт 10.6.8!
- 2015-12-23 в 04:21:11 | Дмитрий Спасибо за инструкцию, сделал флешку и установил с неё ОС 🙂
- 2016-12-02 в 08:29:17 | Хер Охуенная статья. Устанвока мак ос из под мак ос. А из под виндоус соабо блять написать. Идиоты
- 2017-12-18 в 14:40:40 | Дмитрий Установил. Только при загрузке не выбирал откуда грузиться с Alt, система сама определила откуда грузиться. Ставил macOS Hight Sierra
- 2018-02-12 в 17:48:32 | Дамир спасибо автору ) помог
- 2018-02-16 в 05:48:36 | Aleksey
[Инструкция] Установка macOS с флешки
Случилось страшное. ушёл к своим цифровым праотцам SSD в моём Mac mini. Благо, бэкап всего самого ценного у меня был (научен горьким опытом), а информацию с которой работаю ежедневно держу в облаке — часть в iCloud Drive, а часть на Яндекс.Диск. Кому интересно, может почитать как хранить шифрованные данные в облаке средствами Mac OS X.
Взамен умершего OCZ Vertex был приобретен новенький Samsung SSD 850 EVO на 240 GB с технологией памяти 3D V-NAND. По заверениям производителя один из самых надежных на сегодняшний день на рынке. Что-ж, поживем — увидим, а пока поверим на слово и результатам тестов из интернет.
Вы наверняка знаете, что на любой современный Мак можно спокойно накатить систему прямо из сети, когда система восстановления на загрузочном диске недоступна, но скачиваться и устанавливаться будет та версия, с которой он шел изначально во время покупки. Подробнее с этим вопросом можно ознакомиться на сайте Apple: ОС OS X: сведения о восстановлении ОС OS X.
Установить более позднюю версию OS X можно только после завершения установки, зайдя в App Store. Оно конечно правильно, и в этом есть своя логика, однако если вам хочется сразу установить последнюю версию системы, или сделать «чистую установку», то читаем далее.
Создание загрузочной флешки El Capitan, Yosemite и Mavericks
Ранее, на страницах блога я уже рассказывал про установку Mac OS X с флешки, но тогда речь шла о более ранних версиях OS X Snow Leopard, Lion, Mountain Lion. Сегодня расскажу о том как сделать аналогичную флешку с El Capitan, Yosemite и Mavericks из командной строки.
Иногда меня спрашивают откуда я знаю, то о чем пишу. На самом деле всё просто, надо уметь находить и читать инструкции. К примеру, о создании установочной флешки написано в расширенной документации для администраторов на сайте Apple: Создание загружаемого установщика для ОС OS X.
Нам понадобится флешка объемом не менее 8GB, компьютер на базе OS X и установочный пакет OS X El Capitan, предварительно скачиваем его в App Store (вместо El Capitan может быть Yosemite или Mavericks по желанию).
- Открываем дисковую утилиту и форматируем флешку в формате Mac OS Extended (журнальный) со схемой разделов GUID. В поле «Имя» пишем любое название, например «ElCapitan».
- Запускаем терминал и даем команду: sudo /Applications/Install\ OS\ X\ El\ Capitan.app/Contents/Resources/createinstallmedia —volume /Volumes/ElCapitan —applicationpath /Applications/Install\ OS\ X\ El\ Capitan.app
На первый взгляд выглядит страшно, но по сути тут всё просто. Из скачанного пакета установщика El Capitan /Applications/Install\ OS\ X\ El\ Capitan.app мы переносим инсталлятор на нашу флешку /Volumes/ElCapitan (название раздела мы задавали на стадии форматирования). Дожидаемся завершения копирования:
Подписывайтесь на канал
Яндекс.Дзен и узнавайте первыми о новых материалах, опубликованных на сайте.
Если считаете статью полезной,
не ленитесь ставить лайки и делиться с друзьями.


Комментариев: 3
- 2016-10-24 в 11:33:58 | Ирина Спасибо. Сделала по аналогии установочную флешку с ОС Sierra. Всё замечательно установилось 🙂
- 2017-09-26 в 16:41:22 | Анатолий High Sierra работает аналогично. Решил сделать «чистую установку». Всё получилось
- 2019-02-15 в 20:40:24 | x64 Можно просто вытащить карту памяти, чтоб случайно не перепутать.