Локальный веб-сервер в Linux с использованием VirtualBox
Затея может показаться странной, ведь в Linux можно сразу очень легко настроить веб-сервер. Но иногда нужно сделать именно изолированную среду веб-разработки. Во-первых, так можно настроить её совершенно иначе. Во-вторых, это возможность легко откатываться до любого состояния, используя снимки.
В качестве основной рабочей системы у меня Elementary OS, которая постоена на базе Ubuntu. Установить в неё VirtualBox можно из штатного AppCenter, либо, если хочется новейшую версию, тогда следуя инструкциям с официального сайта. В качестве системы для веб-сервера традиционно Debian. Я использовал для установки образ debian-*-netinst.iso . Найти его или другой подходящий вам можно здесь.
В предыдущей статье я уже описывал настройку веб-сервера на Debian, установленный в VirtualBox. Тогда в качестве основной системы была Windows 10. В этой статье я не буду повторяться. Цель приследуется аналогичная. Установка Debian в виртуальную машину — один к одному. Поэтому все подробности там. Здесь я уделю внимание лишь деталям, которые имеют место именно в случае работы под Linux. Итак, порядок будет такой:
- Устанавливаем Debian на вартуальную машину. Всё как и в предыдущей статье, но немного по-другому настраиваем проброс портов. Смотрите ниже.
- Настраиваем в виртуальной машине доступ по SSH для root, устанавливаем дополнения гостевой ОС, появляется общая папка. Настраиваем веб-сервер и т.д. Внутри виртуальной машины ничего нового, всё аналогично можно делать! В том числе аналогично размещаются и настраиваются ваши локальные сайты. Едиственное, я сейчас начал использовать PHP7, вместо PHP5. Если для вас это актуально, то тоже смотрите ниже.
- Настройка основной системы Linux, чтобы в ней без шаманств открывались сайты, работающие на локальном веб-сервере виртуальной машины.
Hosts-файл
В основной системе Linux ваши локальные сайты нужно будет прописывать в файл /etc/hosts в таком виде:
127.0.1.1 webdev.loc 127.0.1.1 d1mon.loc 127.0.1.1 other-site.loc
Оно сразу начинает работать.
Проброс портов
В Linux не получится пробросить для web из VirtualBox порт с 80 на 80. Точнее, это можно сделать, но для этого потребуется каждый раз запускать VirtualBox с правами root. Конечно, такое нафиг не надо, поэтому пробрасываем порт с 80 на 3080:
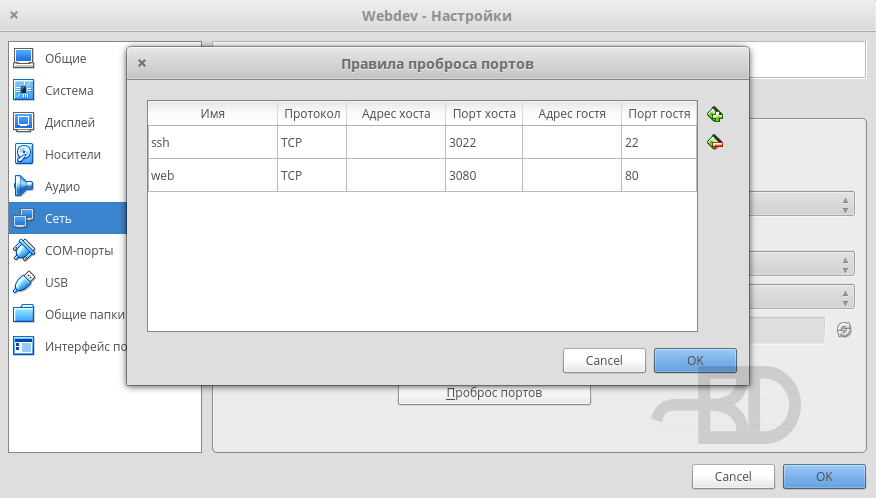
С такими настройками сайты, работающие на локальном веб-сервере виртуальной машины, можно сразу открывать. Для этого достаточно дописать порт в конце их адреса:
http://d1mon.loc:3080Чтобы этого не делать и открывать локальные сайты просто по адресу потребуется настроить для них прокси в Nginx. Обращаю внимание, что речь идет об Nginx в основной системе, а не в виртуальной. Чтобы не мучиться с sudo сразу:
sudo suapt install nginxСоздаём файл /etc/nginx/sites-available/webdev с настройками:
server < listen 80; server_name webdev.loc d1mon.loc other-site.loc location / < proxy_pass http://127.0.0.1:3080; proxy_redirect off; proxy_set_header Connection close; proxy_set_header Host $host; >>Таким образом, для всех своих локальных сайтов прописываем настройки прокси в одном файле. Подключаем настройки:
ln -s /etc/nginx/sites-available/webdev /etc/nginx/sites-enabled/webdev/etc/init.d/nginx restartВсе! Теперь локальные сайты должны открываться по простому адресу.
HTTPS
Что делать если хочется, чтобы локальные сайты работали по https? Решение тоже довольно простое. Первое — нужно создать самоподписанный SSL-сертификат. О том, как это делается в Debian я писал в этой статье. Обратите внимание, что этот сертификат мы будем подключать в основной системе! Я сгенерировал сертификат в виртуальной машине, где у меня Debian, а потом скопировал созданные файлы в основную систему, в каталоги:
/etc/ssl/certs/server.crt /etc/ssl/private/server.keyВторое — в файле /etc/nginx/sites-available/webdev , где мы настраивали прокси, добавляем отдельно настройки для сайта, работающего по https. Просто ниже первых настроек пишем:
server < listen 443; server_name https-site.loc; ssl on; ssl_protocols SSLv3 TLSv1; ssl_certificate /etc/ssl/certs/server.crt; ssl_certificate_key /etc/ssl/private/server.key; location / < proxy_pass http://127.0.0.1:3080; proxy_redirect off; proxy_set_header Connection close; proxy_set_header Host $host; >>Соответственно надо добавить сайт https-site.loc в файл /etc/hosts основной системы, также, как мы делали это выше. Ну и, конечно, этот сайт должен быть у вас настроен на веб-сервере в виртуальной машине. Там это обычный сайт http. Совсем не обязательно настраивать ещё и там его, как https. Не забывайте перезапускать Nginx после редактирования настроек. Из основной системы сайт должен открываться по двум ссылкам:
http://https-site.loc:3080 https://https-site.locПри такой настройке сайт будет открываться по https, но разные скрипты и т.д. будут считать, что он работает по http. В ряде случаев это не то, что требуется при разработке. Чтобы от этого избавиться придется дополнительно настроить https на веб-сервере в виртуальной машине. Также потребуется пробросить порт 443 на 3443 ну и чуть подправить под это настройки прокси.
PHP 7
За PHP 7 будущее и сайты на нём работают гораздо быстрее. Поэтому его стоит однозначно использовать для новых сайтов и, по возможности, переводить на него старые. Сейчас актуален PHP 7.1. Эта версия ещё отсутствует в репозиториях Debian 8.7.1, поэтому его установка чуточку сложнее. Ещё я сразу предупреждаю, что в отношении других пакетов, которые вы будете ставить на веб-сервер, тоже не помешает проявлять осторожность. Связанные с PHP пакеты из репозитория актуальной версии Debian по умолчанию будут пытаться установить вам заодно PHP 5, ведь они будут видеть, что его нет в вашей системе. В приципе, таких пакетов обычно не много, и эту небольшую сложность тоже вполне можно пережить. Перед установкой:
apt install apt-transport-https lsb-release ca-certificates wget -O /etc/apt/trusted.gpg.d/php.gpg https://packages.sury.org/php/apt.gpg echo "deb https://packages.sury.org/php/ $(lsb_release -sc) main" > /etc/apt/sources.list.d/php.list apt updateЯ не рекомендую производить установку PHP 7.1 одной командой:
apt install php7.1Она сделает всё верно, но установит заодно и всякий хлам, типа Apache. А он нафиг не нужен на современном веб-сервере, использующем Nginx и php-fpm. Поэтому ставим только то, что реально нужно:
apt install php7.1-fpm php7.1-cgiТребуемые дополнительно модули PHP устанавиливаются, как и раньше, просто везде добавляется 7.1, например:
apt install php7.1-gd php7.1-xmlЧтобы на ваших локальных сайтах работал PHP 7.1 нужно немного изменить их конфиги Nginx. Вот простейший пример из предудущей статьи:
server < listen 80; server_name site.loc; root /var/www/site.loc; index index.php; location / < try_files $uri $uri/ =404; >location ~ \.php$ < include snippets/fastcgi-php.conf; fastcgi_pass unix:/var/run/php5-fpm.sock; >access_log /var/log/nginx/site.loc_access.log; error_log /var/log/nginx/site.loc_error.log; >Меняем одну строчку, было:
fastcgi_pass unix:/var/run/php5-fpm.sock;fastcgi_pass unix:/var/run/php/php7.1-fpm.sock;После не забудьте перезапустить Nginx.
SSHFS
SSHFS — это Secure SHell FileSystem, программа позволяющая монтировать удаленную файловую систему. Это можно использовать вместо «Общих папок» в VirtualBox.
Работает это очень быстро. Хотя у меня и случались проблемы, когда смонтированный каталог отваливался. Обычно это происходило, когда я начинал работать с каталогом, в котором очень много файлов. Типа проекта на 1С-битрикс, где порядка 500 тысяч файлов.
sshfs -o uid=1000 -o workaround=truncate:rename -o reconnect kornev@192.168.0.100:/var/www /home/kornev/Webdev/wwwВажно указать uid — это id вашего пользователя. В данном случае нет никаких проблем с записью. В смонтированном каталоге можно спокойно работать.
fusermount -u /home/kornev/Webdev/wwwNFS
NFS — это Network File System, протокол распределенной файловой системы, позволяющий получить доступ к файлам по сети. Смысл тот же. Можно использовать вместо «Общих папок» в VirtualBox.
sudo mount -t nfs 192.168.0.157:/var/www /home/kornev/Webdev/wwwsudo umount -f -l /home/kornev/Webdev/wwwHow to Install Ubuntu Server on VirtualBox
In this post I’ll show you how to install Ubuntu Server 22.04 LTS (Jammy Jellyfish) on Oracle’s VirtualBox. I’ll also demonstrate how to connect to the Ubuntu instance via SSH, as well as how to run VirtualBox in headless mode.
Let’s get started!
Note: this post was updated on 28 th May, 2022 to use the latest versions of Ubuntu Server and VirtualBox.
What Is VirtualBox?
VirtualBox is a software virtualization package that you can install on your operating system (just as you would a normal program). It supports the creation and management of virtual machines into which you can install a second operating system.
In VirtualBox terminology, the operating system on which you install VirtualBox (i.e. your regular OS) is called the host. The operating system you install within VirtualBox (i.e. inside the virtual machine) is called the guest.
For this tutorial, I’ll be using Linux Mint 20.3 as the host OS, but there’s no reason you couldn’t use a different Linux distro, or macOS, or Windows (if you’re so inclined).
Install VirtualBox
The first thing to do is to get VirtualBox installed. I’ll not go into much detail here, as there are comprehensive instructions for all of the main operating systems on the project’s homepage.
Personally, I downloaded and installed the deb package for Ubuntu 20.04. This is because the VirtualBox version in the Mint repos is slightly outdated and I wanted to be running the latest version.
Download Ubuntu Server
The next thing to do is to grab a copy of Ubuntu Server. You can do this from their download page. Select option 2 (Manual server installation) which will download a 1.37GB ISO file to your PC.
At the time of writing the current LTS version is Ubuntu Server 22.04 and this is what I’ll be using. It’s supported until April 2025 and is available 64-bit.
Create a New Virtual Machine
Start up VirtualBox. This should open the VirtualBox Manager, the interface from which you will administer all of your virtual machines.
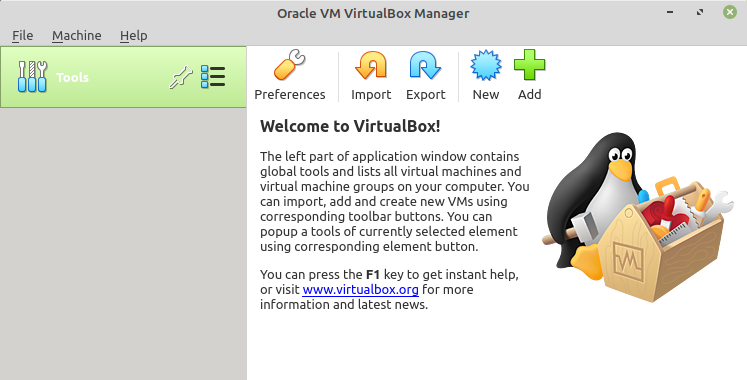
Next Click on New (in the top right of the VirtualBox Manager), give your virtual machine a name and the two drop down menus should automatically update.

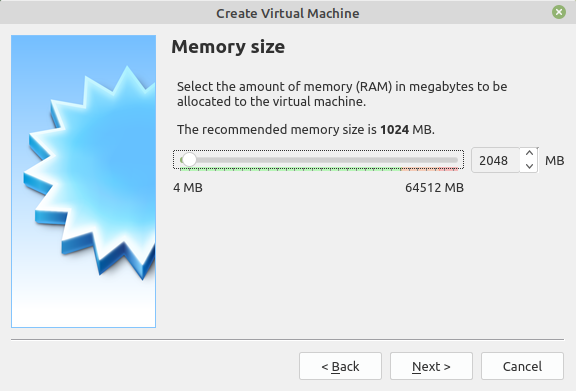
Click Next. The wizard will now ask you to select the amount of memory (RAM) in megabytes to be allocated to the virtual machine. I chose 2GB (2048 megabytes).
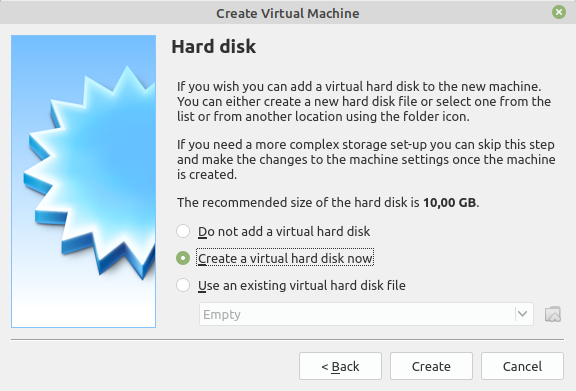
Click Next and you will be prompted to add a virtual hard disk to the new machine. Make sure that Create a virtual hard disk now is selected, then press Create.
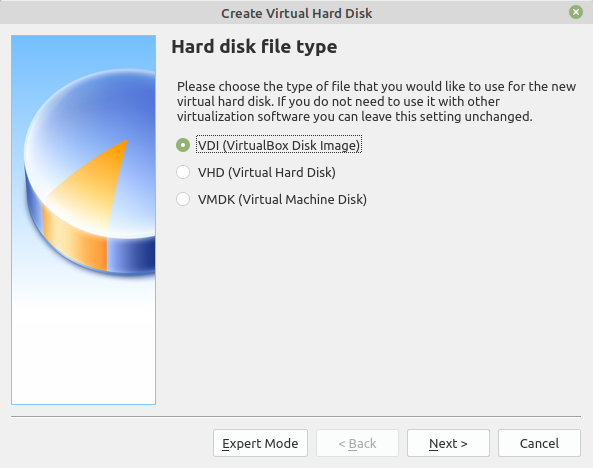
Now we need to choose the file type for the new virtual hard disk. Make sure that VDI (VirtualBox Disk Image) is checked and press Next.
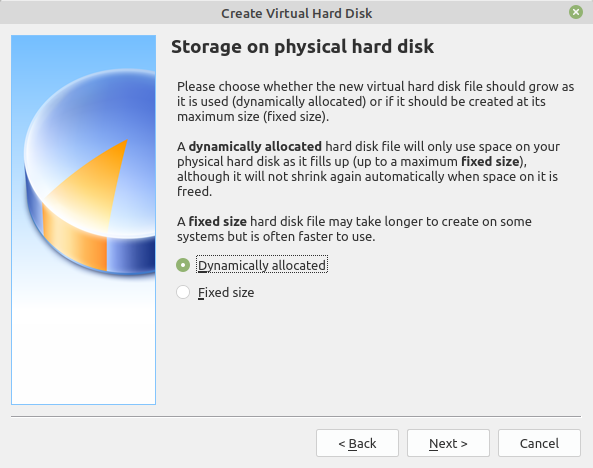
On the next screen you will be asked whether the new virtual hard disk should grow as it is used (dynamically allocated) or if it should be created at its maximum size. Make sure that dynamically allocated is selected, then click Next.
Finally, select the size of the virtual hard disk in megabytes. The default size of 10GB should be plenty, but feel free to increase this as you see fit. Then click Create.

The hard disk should now be created and you should find yourself back in the VirtualBox Manager. You should be able to see your newly created virtual machine listed on the left.
Install Ubuntu Server in the Virtual Machine
Make sure your virtual machine is selected and press Start. VirtualBox Manager will ask you to select a virtual optical disk file or a physical optical drive to start the virtual machine from. Click on the folder with the upwards arrow on the right side of the dialogue, select the ISO file you downloaded previously and press Start.

The Ubuntu installation process will now begin. It consists of multiple steps and is quite painless.
The Welcome Screen
Here you should select your preferred language. I’m using English.

Installer Update
If an installer update is available, you can choose to install it or ignore it. I chose to install the update.
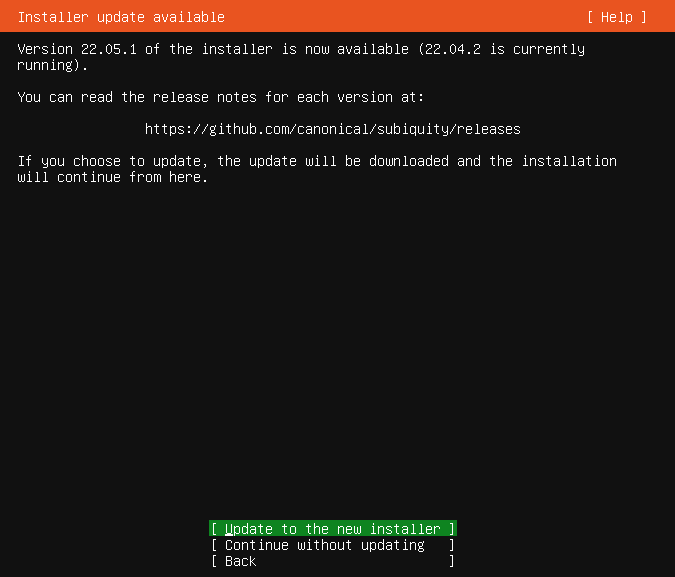
This will download the update, then restart the installer.
Keyboard Configuration
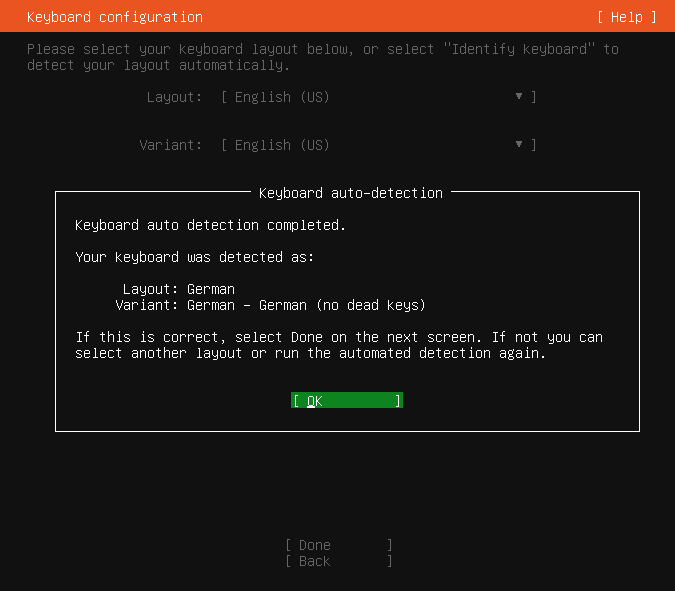
Here you should select a keyboard layout. As I’m using a German keyboard, I asked Ubuntu to detect my layout, which it did with a couple of simple questions.
Type of Install
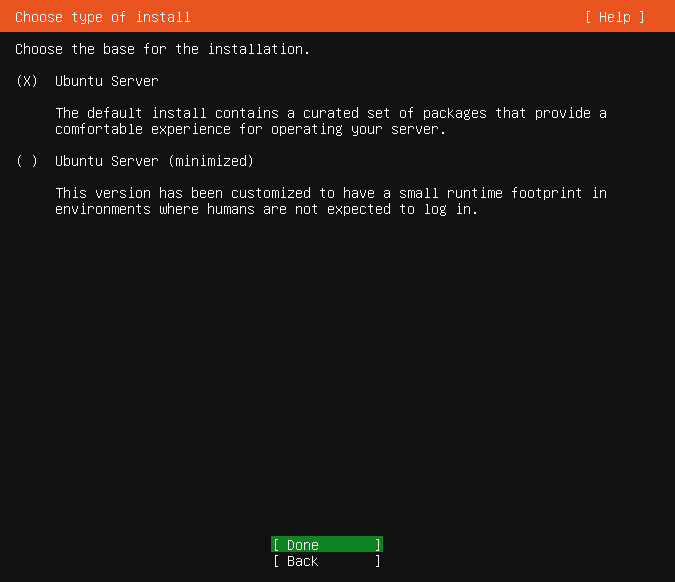
Next you should choose between the default install that contains a curated set of packages and a minimized version, which has been customized to have a small runtime footprint. Choose the default option.
Network Connections
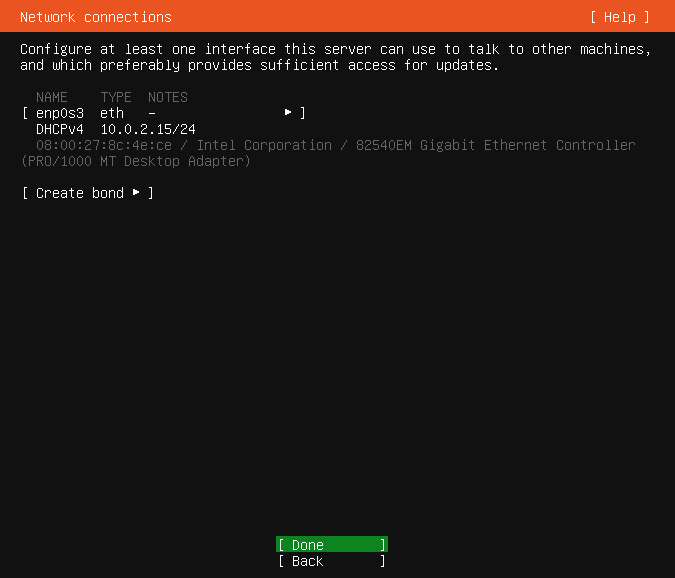
Here Ubuntu will attempt to configure the standard network interface. Normally you can just accept the default and select Done.
Configure Proxy
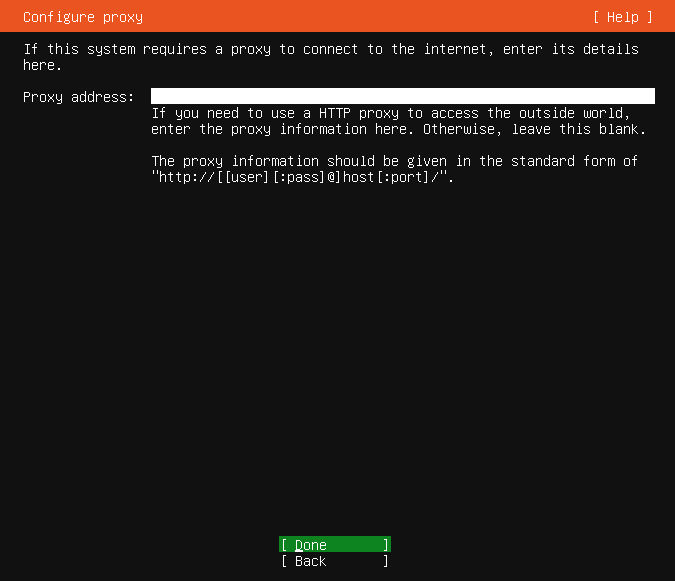
If your system requires a proxy to connect to the internet (mine doesn’t), enter its details in the next dialogue. Then select Done.
Configure Ubuntu Archive Mirror
If you wish to use an alternative mirror for Ubuntu, you can enter the details here. Otherwise accept the default mirror by selecting Done. I accepted the default.

Guided Storage Configuration
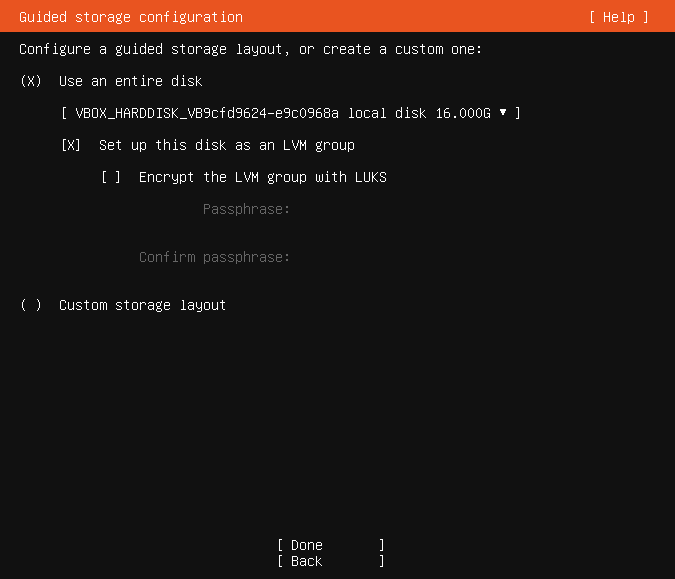
The installer can guide you through partitioning an entire disk or, if you prefer, you can do it manually. If you choose to partition an entire disk you will still have a chance to review and modify the results before Ubuntu is installed. I selected Use An Entire Disk.
You can optionally instruct the installer to set up the disk as an LVM group, as well as to encrypt it using LUKS. I chose to go with the LVM setup, as LVM offers a number of benifits, such as allowing easier backups of a running server. You can read more about LVM here: What is LVM and what is it used for?
Storage Configuration Summary
The next screen summarizes the choices you made in the previous step. If you are happy with everything, select Done.
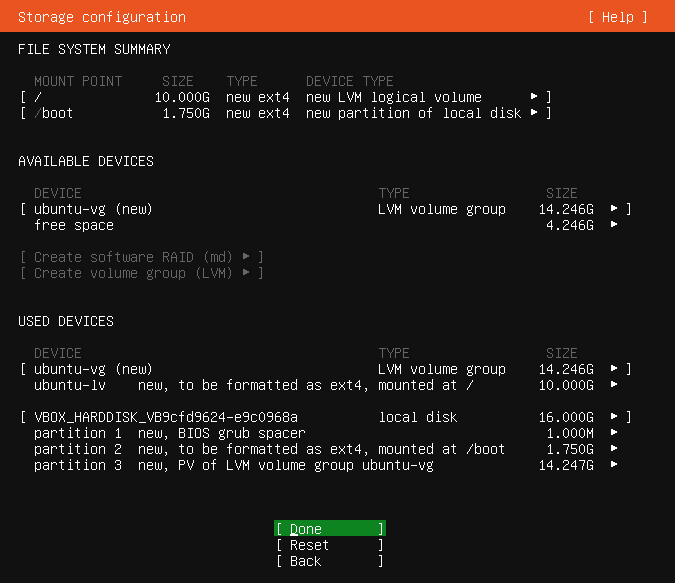
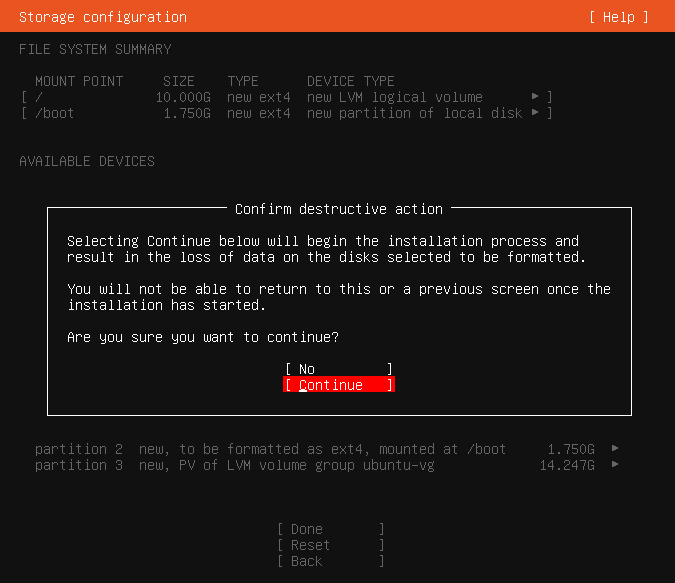
As this is a “destructive action”. I was asked to confirm my choice with Continue.
Profile Setup
Here you are required to enter:
- Your (real) name
- Your server’s name
- Your username
- Password
Fill these details out as you see fit.

SSH Setup
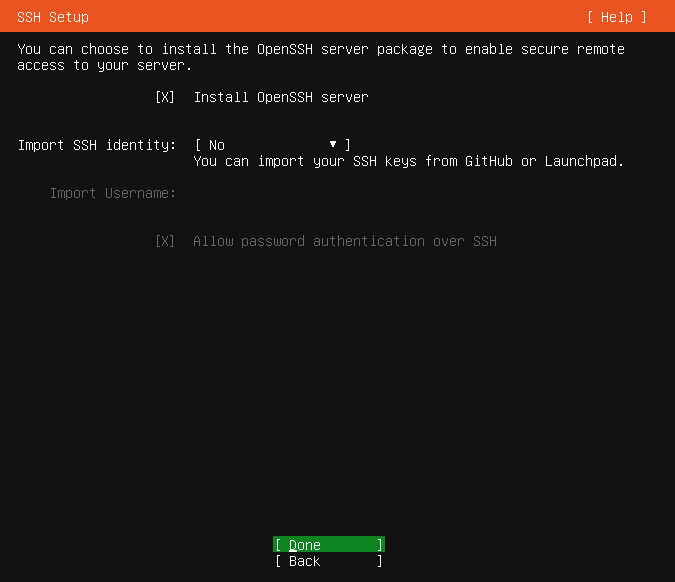
Here we have a chance to install the OpenSSH server package. We’ll need this to connect to the virtual machine via SSH later on, so ensure that you select it.
You also have the opportunity to import your SSH keys from GitHub or Launchpad. I selected No for this option.
Featured Server Snaps
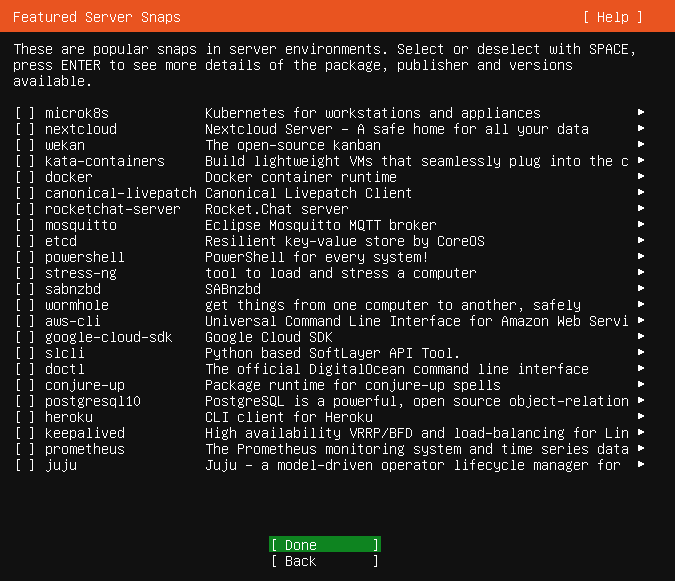
Here you can select from a list of popular snaps to install on your system. Snaps are self-contained software packages that work across a range of Linux distributions. I didn’t select any.
Install and reboot
And that’s it, the installaler will now install Ubuntu 22.04. Once it is finished you should select Reboot Now
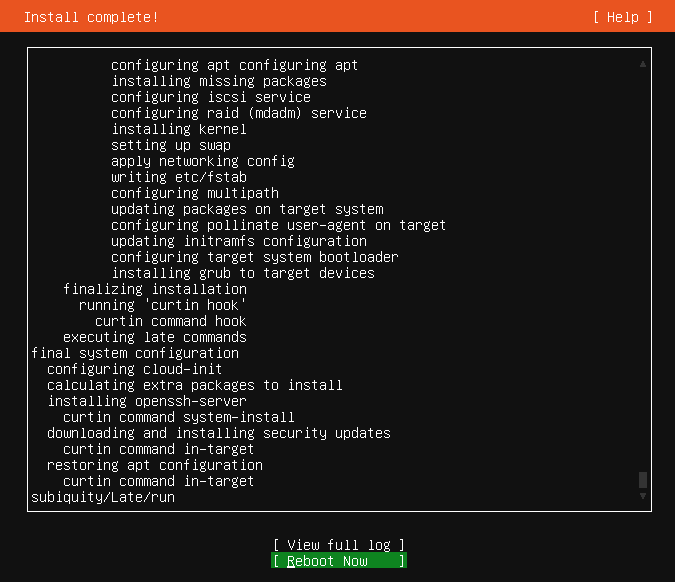
Ubuntu will ask you to remove the installation medium and press Enter . You can remove the disk via_Devices_ > Optical Drives > Remove disk from virtual drive. You will need to put a check mark next to ubuntu-22.04-live-server-amd64.iso if it is not selected already.
Up and Running with SSH
Once your virtual machine has rebooted and you have logged in, you’ll probably notice that some packages can be updated.
sudo apt update sudo apt upgrade If you see a Daemons using outdated libraries dialogue asking you which services should be restarted, just accept the defaults and navigate to OK by pressing TAB .
Now let’s double check that SSH is installed (it should be if you selected the option Install OpenSSH server during instalation).
jim@odin:~$ ssh usage: ssh [-46AaCfGgKkMNnqsTtVvXxYy] [-b bind_address] [-c cipher_spec] [-D [bind_address:]port] [-E log_file] [-e escape_char] [-F configfile] [-I pkcs11] [-i identity_file] [-J [user@]host[:port]] [-L address] [-l login_name] [-m mac_spec] [-O ctl_cmd] [-o option] [-p port] [-Q query_option] [-R address] [-S ctl_path] [-W host:port] [-w local_tun[:remote_tun]] [user@]hostname [command] If you get a “command not found” error, you can install it with:
sudo apt-get install openssh-server The next step is to give our Ubuntu server an IP address on our local network. To do this, power off the virtual machine using sudo poweroff or Machine > ACPI Shutdown.
Then, in VirtualBox Manager, make sure your machine is selected and click Settings. Click on Network on the left and change the setting Adapter 1 > NAT_ to “_Bridged Adapter“_ and click OK.
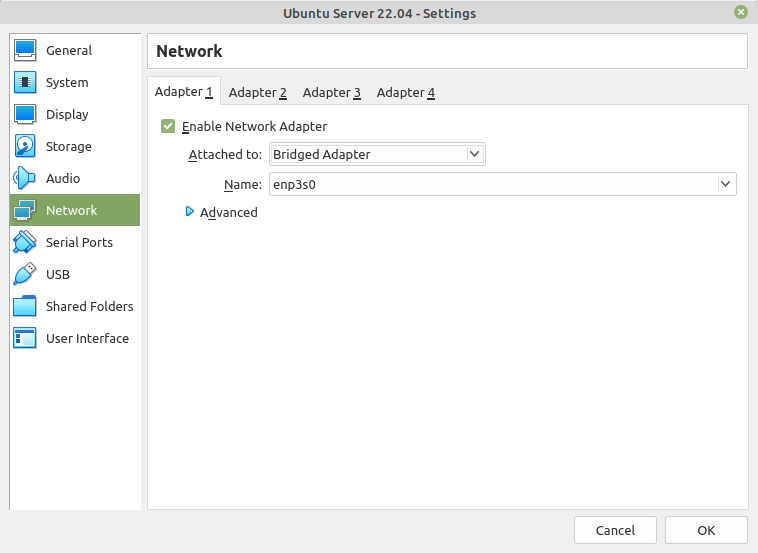
Start up your virtual machine, then enter ip address (in the guest) and note the IP address assigned to your main network adapter. In my case this was 192.168.178.40 .
Note: it is also possible to stick with the original NAT interface and SSH into the guest using port forwarding. You can read more about that here. You can find information on all of the VBox network settings in this comprehensive guide.
Starting and Stopping VirtualBox in Headless Mode
You might have noticed, working with the VirtualBox Manager and the guest OS is a bit of a pain. If you’re going to continue doing this, you should at least install the guest additions, as well as enable clipboard support.
There is a slightly nicer way however — you can start and stop the virtual machine using the VBoxManage command from your terminal.
VBoxManage startvm "Ubuntu Server 22.04" --type headless And to power off:
VBoxManage controlvm "Ubuntu Server 22.04" poweroff Where “Ubuntu Server 22.04” is whatever you called your virtual machine (the name it has in the VirtualBox Manager GUI).
Connecting to the Ubuntu Server
Let’s go ahead and start the Ubuntu server in headless mode, before connecting to it via SSH.
Note: The following commands should be run on your host.
On most *nix systems, the SSH client software should be part of the default installation. If you don’t have it available, you should be able to grab it from the repos, like so:
sudo apt install openssh-client or just hit DuckDuckGo.
Then (ensuring that you replace “jim” and the IP address with your corresponding values) you can connect like so:
ssh jim@192.168.178.40 This will give you a warning that the host’s authenticity cannot be established and ask you if you want to continue connecting. Answer “yes”.
Next, it will prompt you for your password. Enter it and you will be connected to your Ubuntu server from your host OS.

For Windows Users
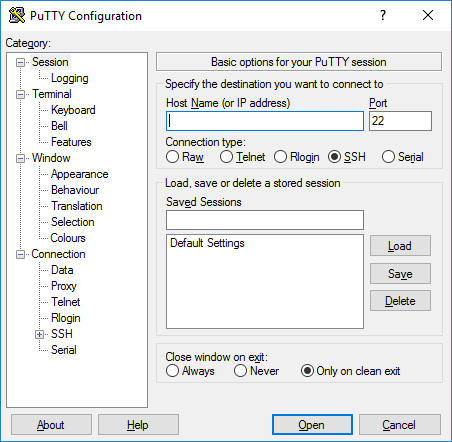
If you’re running Windows you’ll need to install a SSH client such as PuTTY.
When PuTTY starts, a window titled PuTTY Configuration should open. This window has a configuration pane on the left, a Host Name field and other options in the middle, and a pane for saving session profiles in the lower right area.
For simple use, all you need to do is to enter the IP address of the host you want to connect to in the Host Name field and click Open.
Generate and Install a SSH Key Pair
SSH keys offer a secure manner of logging into a server without the need of a password.
In a nutshell, this depends upon you generating a public and a private SSH key pair. The private key is kept on your PC (and should be guarded carefully). The public key is copied over to the server you wish to connect to.
SSH keys are a complex subject and as such, out of the scope of this tutorial. If you’d like to find out more, I recommend looking for a dedicated tutorial (such as this one).
Generate the Keys
On *nix systems (Windows users see the next section), you can generate your key pair with the following command:
ssh-keygen -o -b 4096 -t rsa The -o option instructs ssh-keygen to store the private key in the new OpenSSH format instead of the old (and more compatible PEM format). This is advisable, as the new OpenSSH format has an increased resistance to brute-force password cracking.
The -b option is used to set the key length to 4096 bits instead of the default 1024 bits for security reasons.
In the following dialogue you will be required to answer a couple of questions:
- Where to save the newly generated key pair
- Which passphrase to use
Here you can accept the default location and leave the passphrase blank by pressing Return .
ssh-keygen will then output a summary of what it has done:
Generating public/private rsa key pair. Enter file in which to save the key (/home/jim/.ssh/id_rsa): Created directory '/home/jim/.ssh'. Enter passphrase (empty for no passphrase): Enter same passphrase again: Your identification has been saved in /home/jim/.ssh/id_rsa. Your public key has been saved in /home/jim/.ssh/id_rsa.pub. The key fingerprint is: SHA256:sx5uJeVdH/cT/1+GxsSWYzmjf5hUaE33f/e57EbqBfY jim@fitz The key's randomart image is: +---[RSA 4096]----+ | | | o| | +o| | . .+==| | So . =@oB| | .oo o*+BB| | oo ..*EX| | o.. +=+=| | .o ..+=+| +----[SHA256]-----+ Copy the Public Key to the Ubuntu Server
To copy the public key to the Ubuntu server use:
ssh-copy-id -i ~/.ssh/id_rsa.pub jim@192.168.178.40 Where ~/.ssh/id_rsa.pub is the path to your public key, taken from the output above. And where jim@192.168.178.40 should be altered to reflect your details.
The command will run and you should be asked for your server password. Enter it, then attempt to log into the server like so:
ssh jim@192.168.178.40 This time you should be in without a password.
For Windows Users
You should be able to use a tool like PuTTYgen to achieve the same thing. Here is a tutorial on using PuTTYgen to create a new key pair for authentication.
You will have a little more leg work when it comes to copying the key to the server, where you will need to add the public key to a ~/.ssh/authorized_keys file.
You can do that like so (on the guest):
cd mkdir .ssh cd .ssh nano authorized_keys This will create the appropriate file, then open the nano editor into which you can copy your newly generated public key.
When you’re done, press Ctrl + X to save your changes and exit nano.
Conclusion
This has been quite a long post, but by the end of it you should have a working installation of Ubuntu Server running on VirtualBox that you can connect to from your host operating system via SSH.
If you have any questions or feedback, I’d be glad to hear your from you in the comments.
How to Create a Server on VirtualBox

Learn how to configure and launch generic test servers on VirtualBox, for cluster software evaluation
This tutorial shows you how to set up a desktop Linux virtual machine as a generic server that can be used as a Kubernetes manager or worker node, or for other kinds of “big software” testing. You can use a VM, set up exactly this way, when evaluating Mirantis products like Mirantis Kubernetes Engine and k0s – zero friction Kubernetes.
Prerequisites
To follow this tutorial, you’ll need a laptop or desktop Windows, Mac, or indeed Linux machine with internet access — for example, a desktop Linux development environment as described in this tutorial. You’ll also need sufficient resources — either on your local host or on another computer (or computers) connected to your local network — to run the ‘server’ virtual machines you’ll be building. Your LAN can be wired or wireless.
Note: a few old laptops worth of resources will let you build virtual servers to host reasonably performant configurations of any Mirantis product (e.g., k0s, Mirantis Kubernetes Engine) except for Mirantis Container Cloud — a system explicitly designed for managing consistent Kubernetes for production across multiple “big” infrastructures (e.g., VMware, OpenStack, AWS, Equinix Metal, etc.).
Step 1: Install VirtualBox on your server host
VirtualBox is “free as in beer” proprietary desktop virtualization software from Oracle that runs on Linux, Mac, and Windows. You’ll use it to host your ‘server’ VMs — the targets of your eventual “big software” deployment.
To install VirtualBox, just visit virtualbox.org, click the download link, and launch the executable. When you first start VirtualBox, it should automatically offer to download its Extensions Pack — do this, and install it.
Step 2: Download Ubuntu Desktop
Download a copy of Ubuntu Server 18.04.5 LTS, which is a recent version of Ubuntu Server supported by Mirantis for all of its products.
Step 3: Create and configure a new VirtualBox virtual machine
Start VirtualBox, and click on the top menu: Machine>New (or press CTRL-N).

Select Linux and Ubuntu (64-bit) from the popdowns. Give your machine a generic name that identifies it by operating system and version. You’ll use this initial VM image to create new VMs as you need them (a process called “cloning”).
Click Next, and assign a reasonable amount of RAM to your VM. Since we’re building servers for hosting (for example) Kubernetes manager or worker nodes, we usually want to set RAM to be as large as practical — understanding that this needs to be a compromise based on other resource demands on the host (including the presence of other running virtual machines). For what it may be worth, on a 32GB Windows laptop, you have enough room to run two virtual servers with 12GB RAM each (12GB = 12228MB, as shown below in the context of VirtualBox’s memory allocator), while also leaving enough room for Windows and basic applications. These two servers are sufficiently resourced to host, for example, a Mirantis Kubernetes Engine manager and worker node, which is enough for basic evaluation and even laboratory use of this powerful Kubernetes/Swarm platform.

On the next screen, select the radio button to create a virtual hard disk file.

And select the radio button to use VDI format for the virtual disk.

On the next screen, determine if you want to create a dynamically-sized or fixed virtual hard disk file. Dynamic disks grow as they get filled up, so consume less of your mass storage. Fixed-size disks consume all their allocated space immediately, but run a little faster. If you plan on building a lot of containers, you may find the extra speed useful and worth the mass storage cost. Likewise, if you’re deploying infrastructure nodes (e.g., Kubernetes workers) that will then run workloads of their own, the extra speed of a fixed-size disk may be desirable, if you have the SSD space to spare.

Finally, pick the size of your virtual hard disk. 10GB — the default — is sufficient for most projects. Kubernetes nodes may require 25GB or more.

Click Create to tell VirtualBox to create your virtual hard disk.
Next, click to highlight your new VM in the left-hand menu and select Settings>System>Processor. A typical server VM will profit by being given two or more virtual CPUs (vCPUs). A Kubernetes node can use more, if your physical CPU has sufficient cores available.

Next, click the Network tab. VirtualBox offers many options for networking. VMs for cloudy work, however, have some special requirements:
- They need to conveniently access other VMs running on your local host.
- They may need to conveniently access VMs running on other VirtualBox hosts on the same wired or wireless LAN (for example, many people use old and spare laptops, all attached to the same LAN, to build home labs).
- You may need to access this VM from your host or vice-versa.
- All these machines are somewhat protected behind a home router and NAT (unless you’ve pinholed the router to enable access to a webserver VM — a popular application).
- You don’t want to mess with networking any more than you need to.
For this reason, we recommend using VirtualBox “bridged” networking unless you know you have reason not to do so. This networking mode gives each virtual machine you start a class C LAN IP address (i.e., 192.168.x.x) assigned by your local DHCP server (usually that home router), which is reachable from your host and any other machine (or similarly-configured VM) on your local network. Most home routers will, by default, reserve assigned IP addresses for long periods of time unless reset. So for all but the most long-term projects, this setup gives you directly-accessible IPs for all your VMs (no need for local tunneling or other shenanigans), and you can trust those IPs to stay the same, even when you power down VMs for periods of time.
Note: Ubuntu Server classically requires a cabled Ethernet connection for installation, because it doesn’t deploy by default with WiFi drivers enabled. This isn’t a worry when configuring VMs, because the hypervisor fakes the cable connection. So your physical host actually can be connected to network via WiFi. See the ‘Cable Connected’ field, which VirtualBox normally checks by default.

Finally, click the Storage tab. Here, you’re going to click on the icon of the CD-ROM drive (which is now empty) and use the popdown menu on the right (little CD icon) to ‘Choose a disk file …’ to browse to your newly-downloaded Ubuntu Desktop .iso. The popdown will also display links to install disk files you’ve used before.

Step 4: Install Ubuntu Server
Now you’re ready to install Ubuntu to the virtual drive of your VM. Double-click the VM’s name in the left-hand menu to start it. It will work for a while, then display Ubuntu install options. Pick the option that says “Install Ubuntu.”
Thereafter, Ubuntu Server will take you through a fairly quick group of setup screens. You’ll need to confirm the kind of keyboard you’re using, determine the scope of the installation, determine whether you want to apply all recent updates during installation, pick a username and password, and confirm that you want to install Ubuntu to the VM’s hard disk, erasing its current contents (of which there aren’t any). At a certain point, the installer may ask if you want to install certain default applications: OpenSSH server is a good application to install.
Ubuntu Server usually installs without a hiccup. Your VM will automatically restart when installation is complete. You’ll be prompted to remove the boot disk (the CD ROM in this case), but you can just press any key to pass this prompt. Log in with your username and password.
Step 5: Update your server
Unless updates were applied during installation, next step is to update your server with recent patches and software improvements.
sudo apt-get update sudo apt-get upgradeStep 6: Passwordless sudo
By default, Ubuntu Server sets up to insist that you enter a password before executing commands in sudo mode. This can be annoying. If you’d like to enter sudo without being asked for a password, here’s how to fix it. Note: on some cloud platforms, like Amazon Web Services EC2, Ubuntu is preconfigured with passwordless sudo for the administrative user by default.
sudo visudoThis loads the sudo configuration file in the system default editor (nano). At the bottom of this file, add the line:
$USER ALL=(ALL) NOPASSWD: ALL … where $USER is a system-created shell variable that contains your username.
Save and exit. Then log out of the machine:
log out and back in. You should now be able to perform sudo actions as your administrative user, without providing your password.
Step 7: Fix vi
The vi editor is a very crude line editor that’s often used to make changes in configuration files. The benefit of vi is that it’s preinstalled on pretty-much any Linux server, so it’s always available. The nano editor — a little bit less crude — is usually also preinstalled for making quick file changes.
vi has a little problem on standard Ubuntu installations, which is that it doesn’t, in its default configuration, recognize the arrow keys on standard keyboards. This makes it impossible to drive the cursor around to navigate within a file.
This is easy to fix. First, open a terminal (CTRL-ALT-T).
You should already be in your home directory. Now enter:
sudo vi /etc/hosts… you should be able to move around with the arrow keys. Exit vi (without saving changes) by pressing ESC, then entering :q! (colon, the letter q, and the exclamation point).
Step 8: Enable SSH
You’ll need OpenSSH server active in order to be able to log into your server remotely. Various deployer software (e.g., Mirantis Launchpad) also requires SSH to connect with and install software on servers.
Determine your VM’s local IP address by entering:
ip addrYou’ll see the local IP in the list — if things on your LAN are set up conventionally and you chose “bridged” networking, this will be a Class C address (e.g., 192.168.x.x). Write this down.
Then start OpenSSH server:
sudo systemctl start sshOn new Ubuntu Server installs, the ssh service normally enables itself at installation, so if you restart this VM, ssh accessibility will come back.
At this point, you can try logging into the server from your host or workstation VM:
You’ll need to provide your password.
Step 9: Upload a public key to your server for passwordless SSH
Many deployment systems (Mirantis Launchpad, Ansible, etc.) use SSH to remotely configure servers. It’s usually preferable (and sometimes required) to enable SSH on target machines to permit login with a private SSH key, instead of a password. The public key — the other part of a ‘keypair’ — is stored on the server to authenticate.
This is easy to set up. Our tutorial How to Generate an SSH Keypair shows you how, and how to upload the public key to your server. Once you’ve done this, you should be able to log into your server from your desktop using your private key, which is stored in /home/user/.ssh, as follows, where id_rsa is the name of the private key file:
ssh -i /home/user/.ssh/id_rsa @
For test servers, it’s usually not necessary to further complicate the process by turning off regular login with passwords. Having this still available means you can still SSH in with a password if you don’t have your private key — handy, in some circumstances.
Step 10: Snapshot and clone your server VM
At this point, it makes sense to ensure that you can always return your VM to its current known good state. To do this, first power down the VM (don’t restart), whose VirtualBox window will close. Then select the VM in the left-hand menu, and click the green plus sign (+, also marked “Take”) in the upper bar. In just a second or so, you’ll be able to name your snapshot, and see it recorded in this VM’s list of available snapshots. Thereafter, if your VM gets broken for some reason, you can return it to this known good state by powering it down, right-clicking this snapshot, and selecting ‘Restore.’
You can also clone the snapshot to create new, clean servers for each new project you begin. It’s preferable to use VirtualBox’s “Full Clone” option for this (vs. “Linked Clone,” which creates a dependency between the original and cloned VMs’ virtual hard disks), and to remember to create new network-card MAC IDs for clones, so they don’t fight over IP addresses. You may also need to adjust hostnames so they’re distinct.
Step 11: Adjust VM hostnames
This is pretty simple. Three tasks are required to change the hostname of an Ubuntu server:
First, edit the file /etc@sol;hosts using sudo vi.
sudo vi /etc/hosts Change the hostname as represented in the second line of this file.
127.0.1.1 old_hostname # change 'old_hostname' to the new hostnameSave the file (exit vi with ESC, followed by :wq — colon, ‘w’, ‘q’). Then edit the file /etc/hostname the same way:
sudo vi /etc/hostnameand change the old hostname to the new hostname, there, saving the file once you’ve done so.
Finally, either issue a hostname command to update the hostname within the current shell session:
sudo hostname my_new_hostnameor simply log out and back in.
Step 11: Install curl
Curl is a much-used and much-loved application for interacting with web services and efficiently downloading binary and text content from websites. Curl is required on target servers by some Mirantis deployment workflows (e.g., the one described in Download k0s – Zero Friction Kubernetes). So it makes sense to install curl on your server (if it’s not already there). To do this, enter:
sudo apt-get install curlStep 13: Next steps
At this point, your server is pretty-well tuned up and ready for real work. You should be ready to start using it as a target host for Mirantis Kubernetes products, like Mirantis Kubernetes Engine and k0s – zero friction Kubernetes.
Локальный веб-сервер — VirtualBox, Debian, Nginx+php-fpm, MySQL
Создавая недавно новый сайт на Yii2 я прилично помучился из-за различий рабочего окружения, которые обеспечивают локальный Open-Server на Windows и реальный сервер с Debian. Это вынудило меня настроить правильный локальный сервер, используя VirtualBox. В статье я расскажу, как это сделать.
Задача
Есть компьютер с Windows 10, где установлен VirtualBox. Создадим виртуальную машину в VirtualBox, установим на неё Debian. Затем настроим на этой машине веб-сервер и установим некоторый софт, необходимый для веб-разработки. Дополнительно настроим общую папку, чтобы удобно работать в ней с кодом сайтов в любимом редакторе под Windows. Открываться сайты тоже будут под Windows.
Виртуалка и Debian
Скачиваем новейший образ для установки Debian. Даю ссылку на страницу с образами, предназначенными для сетевой установки. Они маленькие, не имеют ничего лишнего, хорошо подходят для веб-сервера. Я использую 64-битный образ. На момент написания статьи актуален Debian версии 8.5.
Создаём виртуальную машину:
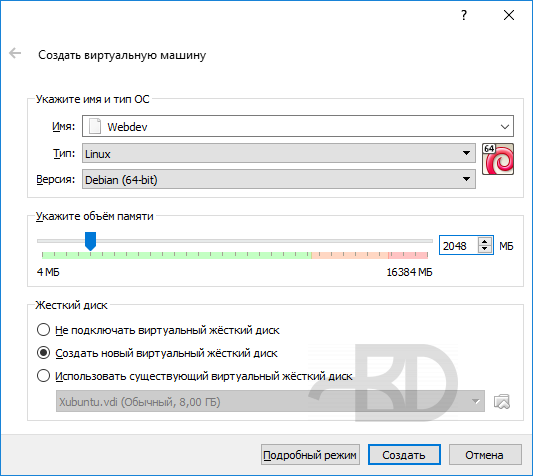
Объём памяти и диска по своему усмотрению.
Диск особо расходоваться не будет, т.к. мы будем работать с сайтами в общей папке, которая будет подключается к Debian как дополнительный носитель. Тип основного диска по умолчанию, динамический.
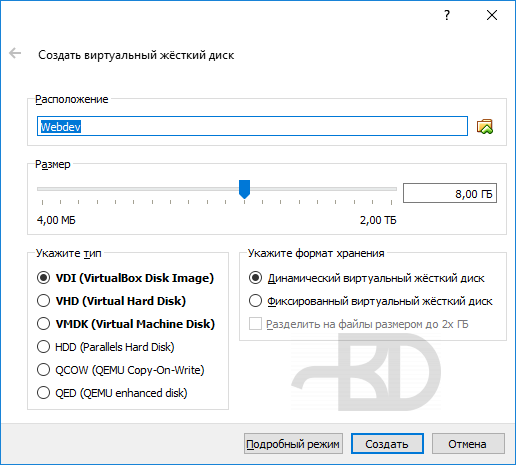
Машина подготовлена. Пока не включаем. Заходим в свойства машины, подключаем скаченный установочный образ на CD/DVD:
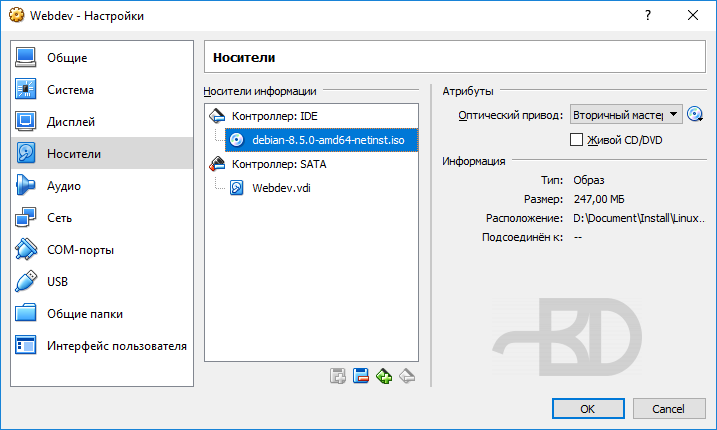
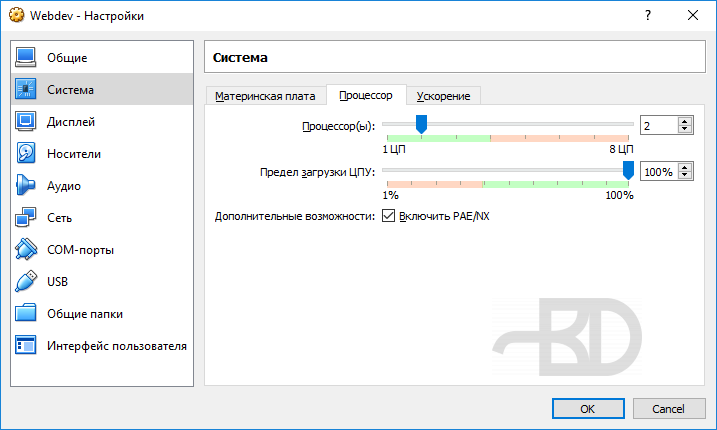
Пройдёмся по другим настройкам.
Число ядер процессора выбирайте сами, в зависимости от возможностей и потребностей. Обязательно установите отметку «Включить PAE/NX».
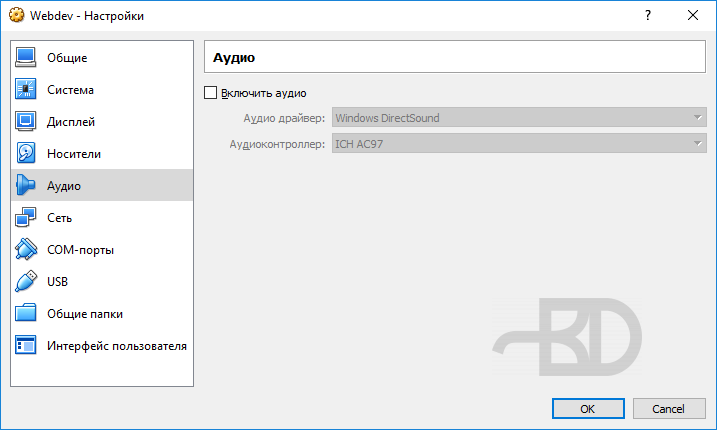
Можно выключить разные ненужные вещи, типа удаленного доступа по RDP, звуковой карты, порта USB стандарта 2.0 и т.д.
В сетевых адаптерах выбираем тип подключения «NAT», ниже тут же кликаем «Дополнительно» и заходим в «Проброс портов».
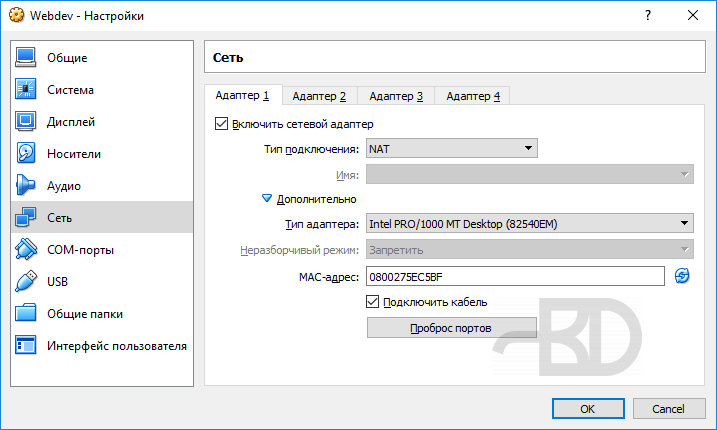
Здесь для SSH указываем порты 3022 и 22, для веба 80 и 80. Остальное заполнять не надо. Этого достаточно.
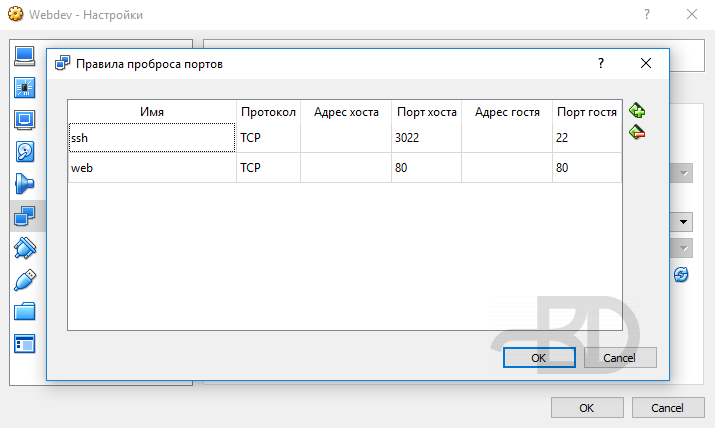
Почему именно «NAT»? Виртуальную машину сможете использовать только вы, она не будет видна в вашей локальной сети и никак на неё не повлияет. Для меня это важно.
Если вы хотите, чтобы ваша виртуальная машина полноценно добавлялась в вашу локальную сеть, то выбирайте тип подключения «Сетевой мост». Другие компьютеры в вашей локальной сети тоже смогут обращаться к вашей виртуальной машине.
В завершении добавляем общую папку:
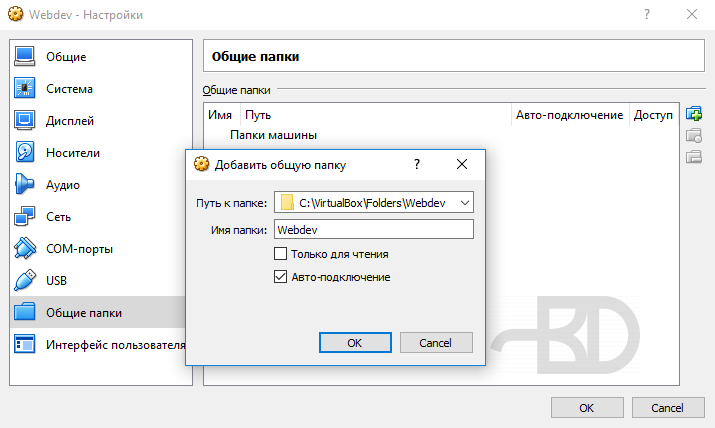
Выходим из настроек.
Запускаем машину, устанавливаем Debian.
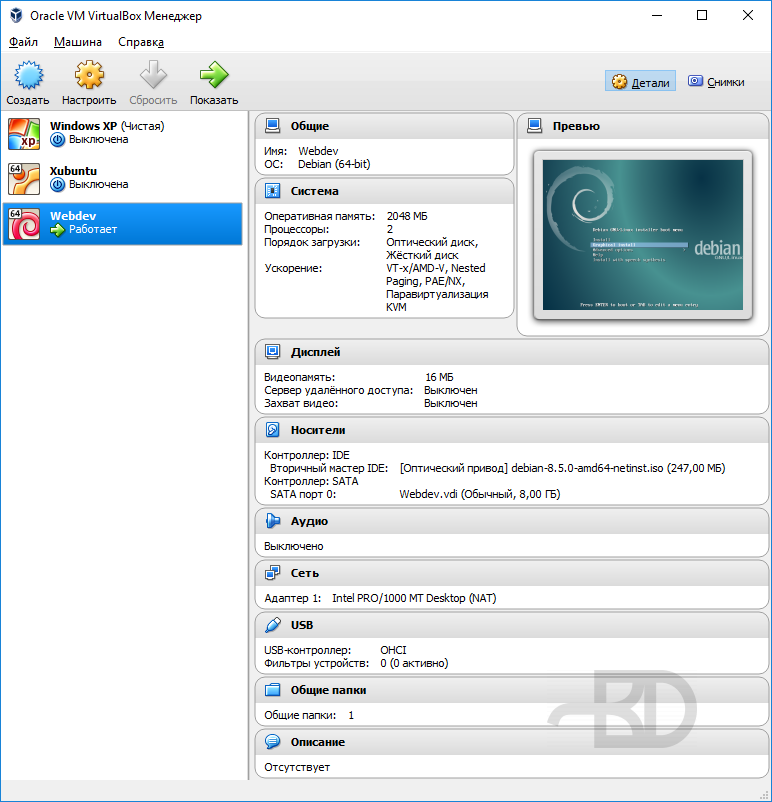
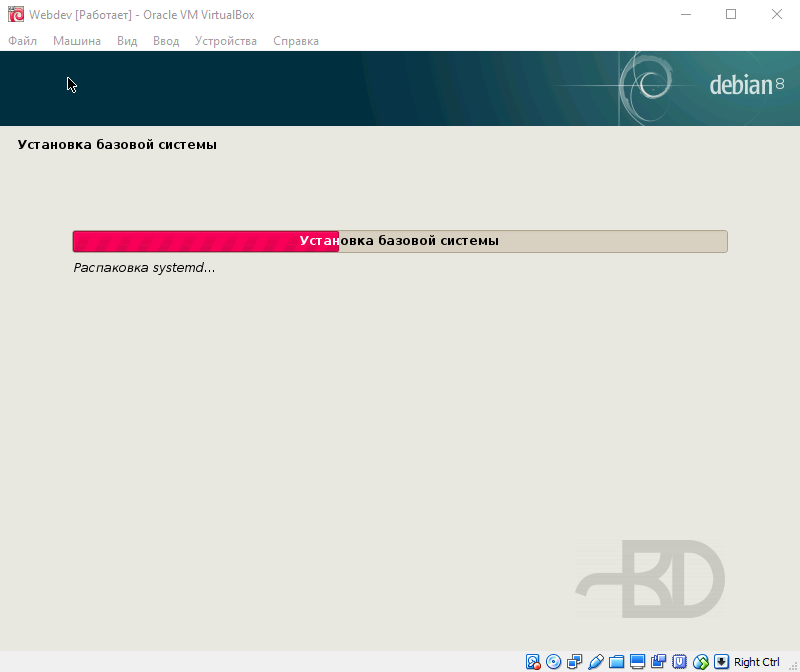
Процедура установки Debian ничем особо непримечательна. Выбираем вначале обычную установку, я предпочитаю с графическим интерфейсом. По ходу выбираем всякие параметры. Запасаемся терпением.
Ближе к концу установки надо будет выбрать компоненты, которые требуется установить. Рабочий стол и прочий мусор нам на веб-сервере не нужен, снимаем везде отметки. Оставляем только SSH-сервер и стандартные системные утилиты.
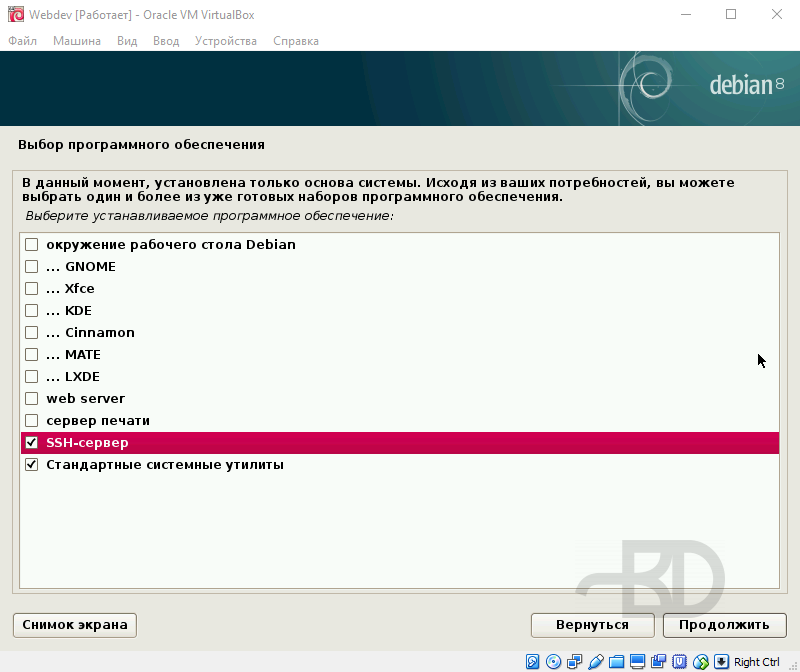
Предлагаемый в списке «web server» я тоже предпочитаю не ставить, т.к. там будет Apache, который в современном мире нафиг не нужен. Лучше установить потом самому именно те программы, какие нужны.
В общем, установка завершается, машина перезапускается.
Входим под root-ом:
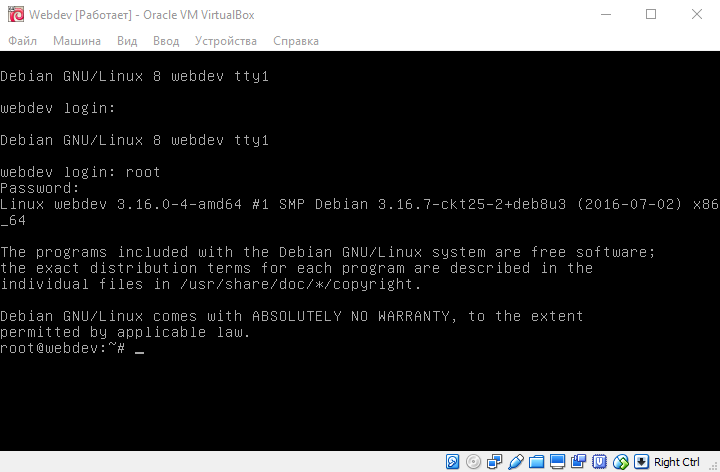
Всё ок? Небольшая рекомендация. Делайте «снимки» машины на разных этапах настройки и использования. Это полезно! Если в процессе каких-то настроек или других действий что-то пойдёт не так, то вы сможете откатиться к предыдущему состоянию.
Вот сейчас машина успешно стартовала. Выключите её, сделайте снимок. Это займет от силы минуту.
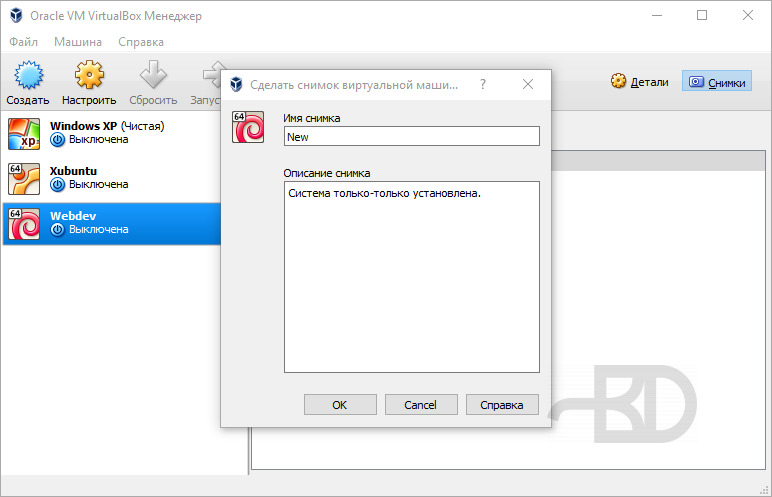
Чтобы выключить машину можно написать poweroff , чтобы перезапустить — reboot .
Настройки
Пока продолжаем работать с созданной машиной через окно VirtualBox. К подключению по SSH вернёмся чуть позже.
В процессе установки Debian, кроме root, обязательно создаётся дополнительный пользователь. Если он совсем вам не нужен, то его можно удалить:
userdel -r имя_пользователяДополнительный пользователь иногда полезен. Например, когда вы будете работать с Composer. Этот менеджер пакетов считает, что работа под root небезопасна и выдаёт предупреждение, хотя и продолжает исправно работать.
По умолчанию Debian не позволяет подключиться по SSH, используя пользователя root. Выглядит это так:
login as: root root@127.0.0.1's password: Access deniedДополнительным пользователем подключаться можно сразу.
Чтобы по SSH можно было зайти root-ом редактируем файл /etc/ssh/sshd_config .
PermitRootLogin without-passwordPermitRootLogin yesЧтобы изменения вступили в силу перезагружаем машину.
Для подключений по SSH в Windows удобно использовать PuTTY. Адрес машины 127.0.0.1, порт 3022:
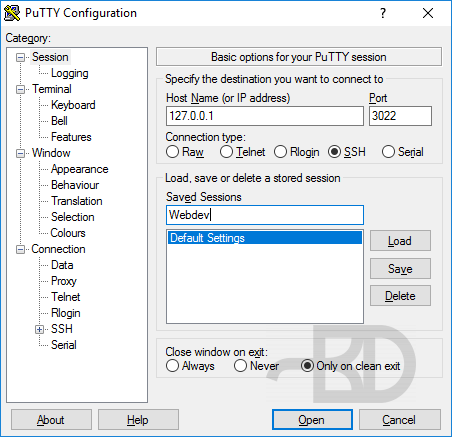
Теперь уже можно большую часть времени работать с виртуальной машиной через SSH. Оно удобнее, чем через окно VirtualBox. Окно PuTTY можно свободно растягивать и его содержимое будет под это подстраиваться. В вашем распоряжении буфер обмена и даже мышь.
Чтобы работала общая папка требуется установить дополнения гостевой ОС.
Для начала подключаем образ:
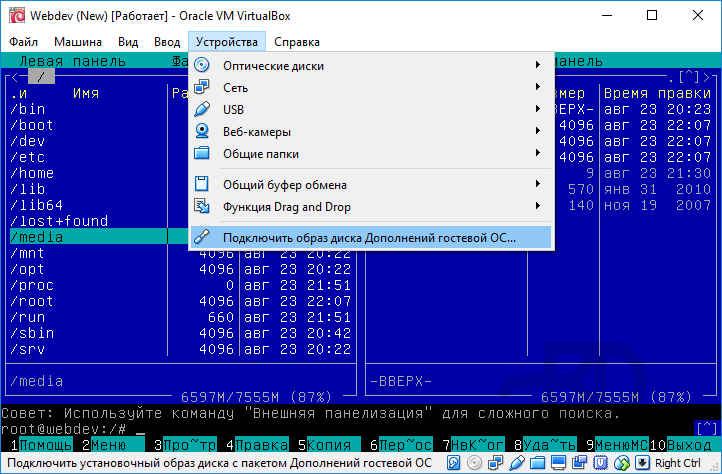
Теперь монтируем его:
mount /dev/cdrom /media/cdromПредварительно устанавливаем требуемые пакеты:
apt-get install build-essential module-assistantm-a prepareТеперь сама установка дополнений:
sh /media/cdrom/VBoxLinuxAdditions.runРезультат успешной установки:
root@webdev:~# sh /media/cdrom/VBoxLinuxAdditions.run Verifying archive integrity. All good. Uncompressing VirtualBox 5.1.2 Guest Additions for Linux. VirtualBox Guest Additions installer Copying additional installer modules . Installing additional modules . vboxadd.sh: Building Guest Additions kernel modules. update-initramfs: Generating /boot/initrd.img-3.16.0-4-amd64 vboxadd.sh: Starting the VirtualBox Guest Additions. Could not find the X.Org or XFree86 Window System, skipping. root@webdev:~#Перезапускаем машину и радуемся. Теперь у нас заработала общая папка. В виртуальной машине в моём случае это: /media/sf_Webdev . На основной машине она соответствует: c:\VirtualDub\Folders\Webdev .
Работа с общей папкой в виртуальной машине осуществляется из под пользовательской группы vboxsf . Это означает, что если пользователь (под которым вы работаете) не входит в эту пользовательскую группу, то он не сможет записывать в общую папку. Для него в папке по умолчанию режим «readonly».
Чтобы добавить пользователя в эту группу выполняем:
usermod -aG vboxsf имя_пользователя usermod -aG vboxsf root usermod -aG vboxsf www-dataПользователь www-data по умолчанию используется Nginx.
Веб-сервер
Переходим к настройке веб-сервера:
apt-get install nginx apt-get install php5-fpm php5-cgiВ общей папке создадим папку первого сайта: /media/sf_Webdev/site.loc .
Соответственно она появится и на основной машине. В эту папку поместим тестовый файл index.php с кодом:
Не имеет значения, как именно вы создаёте папки и файлы в общей папке. Можете всё это делать уже из вашей основной системы.
Создадим символическую ссылку для каталога сайта:
ln -s /media/sf_Webdev/site.loc /var/wwwСоздадим для сайта файл настроек Nginx /etc/nginx/sites-available/site.loc .
server < listen 80; server_name site.loc; root /var/www/site.loc; index index.php; location / < try_files $uri $uri/ =404; >location ~ \.php$ < include snippets/fastcgi-php.conf; fastcgi_pass unix:/var/run/php5-fpm.sock; >access_log /var/log/nginx/site.loc_access.log; error_log /var/log/nginx/site.loc_error.log; >Подключим файл настроек:
ln -s /etc/nginx/sites-available/site.loc /etc/nginx/sites-enabled/site.loc/etc/init.d/nginx restartТеперь в основной системе отредактируем hosts-файл c:\Windows\System32\drivers\etc\hosts .
В него надо добавить строчку:
127.0.0.1 site.locВсё! Настало время в веб-браузере основной системы попробовать открыть сайт http://site.loc . Если всё в порядке, то вы увидите информацию по PHP виртуальной машины.
Если сайт не открылся, вы получили белую страницу, то скорее всего у вас в основной системе уже используется каким-то приложением порт 80. Соответственно проброс этого порта из виртуальной системы в основную не удался и ничего не работает.
Чтобы выяснить, выключите пока виртуальную машину. В основной системе откройте консоль:
Выполняем в ней:
netstat -an -p tcp -o | findstr 80Получим примерно такое:
C:\Users\kodmg>netstat -an -p tcp -o | findstr 80 TCP 0.0.0.0:80 0.0.0.0:0 LISTENING 5684 TCP 0.0.0.0:7680 0.0.0.0:0 LISTENING 1000 TCP 0.0.0.0:49664 0.0.0.0:0 LISTENING 580 TCP 0.0.0.0:49665 0.0.0.0:0 LISTENING 980 TCP 192.168.1.210:56543 77.234.45.61:80 ESTABLISHED 1736 TCP 192.168.1.210:56793 5.45.58.148:80 CLOSE_WAIT 1736 TCP 192.168.1.210:56800 52.20.134.145:443 CLOSE_WAIT 7036 TCP 192.168.1.210:57180 95.213.255.17:443 ESTABLISHED 8616 TCP 192.168.1.210:57288 188.43.75.80:80 TIME_WAIT 0 TCP 192.168.1.210:57309 104.27.186.197:80 ESTABLISHED 8616 TCP 192.168.1.210:57340 23.43.134.135:80 TIME_WAIT 0Здесь первая строка с адресом 0.0.0.0:80 – это признак, что 80-ый порт в настоящее время используется. В конце этой строки цифры, в примере это 5684 . Данный номер — это ID процесса приложения.
Чтобы узнать, что это за приложение, открываем диспетчер задач:
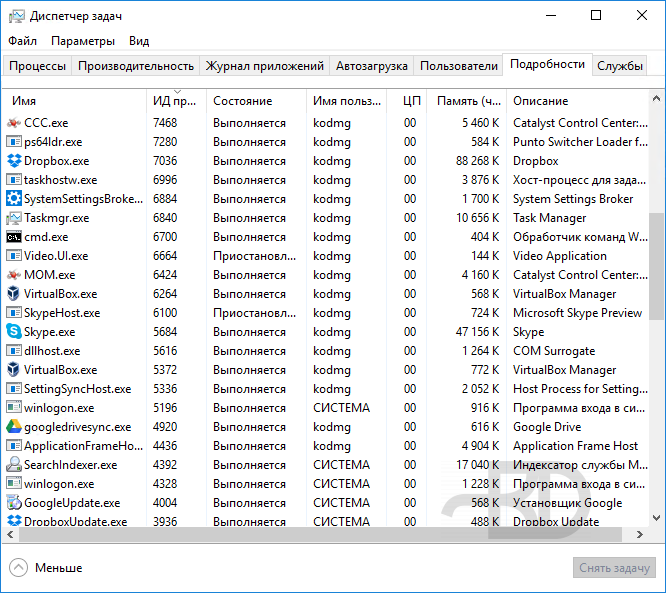
На вкладке «Подробности» делаем сортировку по колонке «ИД процесса» и ищем нужный номер. В моём случае это оказался Skype.
По умолчанию Skype использует именно 80-ый порт для соединений, но это можно изменить в его настройках. Убираем галочку «Для дополнительных входящих соединений следует использовать порты 80 и 443». Выходим из настроек, перезапускаем Skype.
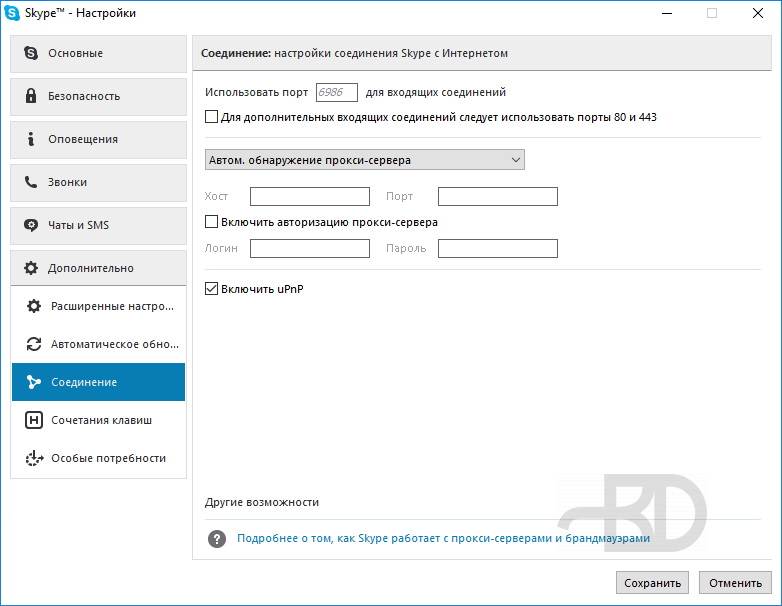
Той же командой в консоли ещё раз делаем проверку:
C:\Users\kodmg>netstat -an -p tcp -o | findstr 80 TCP 0.0.0.0:7680 0.0.0.0:0 LISTENING 1000 TCP 0.0.0.0:49664 0.0.0.0:0 LISTENING 580 TCP 0.0.0.0:49665 0.0.0.0:0 LISTENING 980 TCP 192.168.1.210:56543 77.234.45.61:80 ESTABLISHED 1736 TCP 192.168.1.210:56793 5.45.58.148:80 CLOSE_WAIT 1736 TCP 192.168.1.210:56800 52.20.134.145:443 CLOSE_WAIT 7036 TCP 192.168.1.210:57180 95.213.255.17:443 ESTABLISHED 8616 TCP 192.168.1.210:57309 104.27.186.197:80 ESTABLISHED 8616 TCP 192.168.1.210:57340 23.43.134.135:80 TIME_WAIT 0Теперь 80-ый порт никем не используется. Запускаем обратно виртуальную машину и снова пробуем открывать сайт. Теперь, если вы всё делали по инструкции, то он точно должен открыться!
Nginx
При подобном использовании веб-сервера внутри VirtualBox есть одна особенность с Nginx. Файлы сайтов получается будут лежать и модифицироваться в общей папке. Система внутри VirtualBox не будет знать, когда файлы в этой папке были модифицированы, отсюда проблема. Nginx думает, что файлы не менялись и добросовесно отдаёт старые их версии, закешированные.
Очень многие сталкиваются с этими граблями. Типичный случай: вы изменили файл CSS или JS, а на сайте не видно этих изменений, файл используются старый.
Мне помогло решить проблему включение в конфиг Nginx параметра:
if_modified_since off;Некоторым помогает ещё этот дополнительный параметр:
sendfile off;Поскольку проблема может быть актуальна для всех сайтов, работающих на веб-сервере виртуальной машины, то правильнее включить эти параметры в общем файле /etc/nginx/nginx.conf .
Дополнительная информация по теме.
База
Вместо обычного MySQL я предпочитаю Percona Server. Многие рекомендуют этот продукт, благодаря скорости и дополнительным фичам. Я использую Percona Server не менее 2 лет и тоже могу его рекомендовать. Для сайта, для любого сайтового движка — это будет просто MySQL, они не увидят разницы.
Я не делал сравнений. Просто однажды перешел на Percona Server и все. Никаких проблем никогда не было. Если при этом есть хоть небольшой прирост скорости, оно стоит того.
Установка Percona Server:
wget https://repo.percona.com/apt/percona-release_0.1-4.$(lsb_release -sc)_all.deb dpkg -i percona-release_0.1-4.$(lsb_release -sc)_all.debapt-get updateapt-get install percona-server-server-5.7В процессе установки потребуется указать пароль для root-пользователя базы. Не путайте с root-пользователем системы.
Установим дополнительно phpMyAdmin. Последнее время я предпочитаю это делать через Composer. Так проблем меньше, да и версия точно будет новая. Вначале установим сам Сomposer:
cd /usr/src apt install curl curl -sS https://getcomposer.org/installer | php -- --install-dir=/usr/local/bin --filename=composerДля рабочего софта лучше создать отдельный локальный сайт, пример webdev.loc . Это будет каталог /var/www/webdev.loc . Настройка Nginx аналогична той, что была выше. Пробрасывать этот каталог в основную систему не нужно.
В этом каталоге запускаем установку phpMyAdmin:
cd /var/www/webdev.loc composer create-project phpmyadmin/phpmyadmin --repository-url=https://www.phpmyadmin.net/packages.json --no-devОн установится в каталог /var/www/webdev.loc/phpmyadmin .
Теперь из основной системы phpMyAdmin можно открыть: http://webdev.loc/phpmyadmin .
Workbench
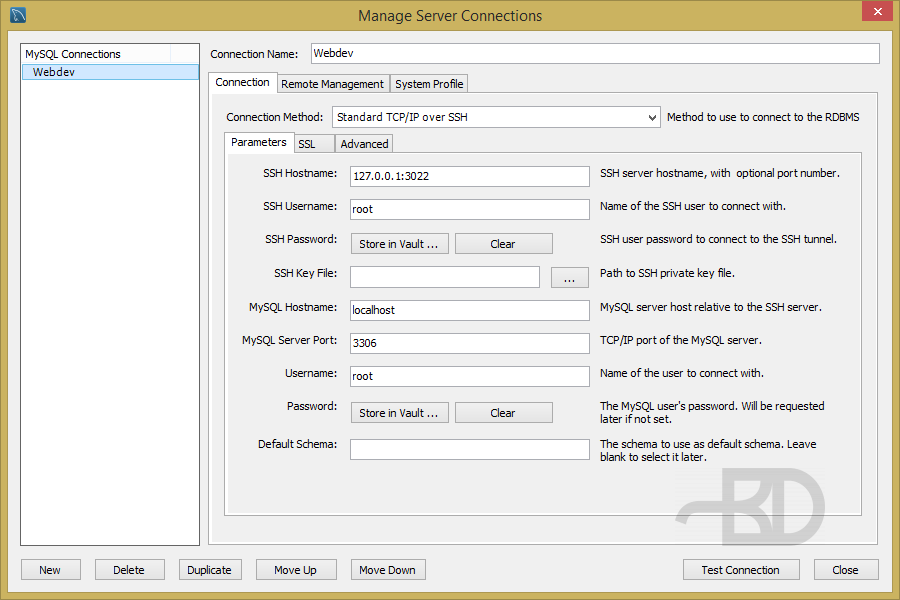
Приложение MySQL Workbench — это удобный инструмент для работы с базой. Устанавливать его нужно на основной машине. Для подключения к базе MySQL на виртуальной машине можно использовать SSH. При создании подключения просто устанавливаем параметр «Connection Method» в состояние «Standard TCP/IP over SSH» и далее вписываем уже знакомые параметры:
Рабочий софт
Установка Composer уже была выше. Остальное по желанию.
curl -sL https://deb.nodesource.com/setup_6.x | bash - apt-get install nodejsapt-get install npm npm i -g gulpЕсли будут предупреждения:
a RegExp DoS issue npm WARN deprecated minimatch@0.2.14: Please update to minimatch 3.0.2 or higher to avoid a RegExp DoS issue npm WARN deprecated graceful-fs@1.2.3: graceful-fs v3.0.0 and before will fail on node releases >= v7.0. Please update to graceful-fs@^4.0.0 as soon as possible. Use 'npm ls graceful-fs' to find it in the tree.Тогда надо установить предложенное, пример далее. В вашем случае версии могут быть другие, обратите на это внимание.
npm install -g minimatch@3.0.2 npm install -g graceful-fs@^4.0.0npm install -g lessVagrant
Это такая вспомогательная программа для VirtualBox. Хотя, работает и с другими системами виртуализации. Позволяет легко и быстро автоматизированно создавать виртуальные машины. Можно создать наподобие той, которую мы уже создали. Работать с Vagrant необходимо из командной строки.
Пишу это здесь просто для информации, что такое есть.
Я пробовал Vagrant. Да, действительно программа делает своё дело. Но мне показалось это лишним и не совсем тем, что надо. Мои соображения на этот счёт:
- Такое полезно тому, кто создаёт виртуальные машины пачками. Не мой случай. Возможно, пока.
- Виртуальные машины при помощи Vagrant создаются на основе готовых образов (боксов), список которых есть на официальном сайте. Они в случае необходимости автоматически загружаются. Честно говоря, я не сильно доверяю этим боксам. Считаю, что безопаснее создать своё. Тем более это не сложно.
В принципе, боксы для Vagrant — это созданные и специально настроенные виртуальные машины VirtualBox. Мы, вот, создали свою виртуальную машину. Её, в теории, можно немного допилить, чтобы использовать в качестве бокса Vagrant. Бокс может быть локальным.
Я когда начал изучать информацию по Vagrant, то меня напугали все эти инструкции в интернете. В каждой автор начинает разбирать конфигурационный файл виртуальной машины, и это поначалу выглядит дико и совсем непросто. Спешу успокоить новичков! Этот файл создается автоматически самим Vagrant-ом. Вы (при желании) можете внести в него дополнительные параметры, а можете и не вносить! Машина просто получит настройки по умолчанию. Часто этого достаточно.
Далее простой пример, как можно создать с помощью Vagrant тот же веб-сервер на базе Debian 8.
Перед тем как начать скачиваем Vagrant с официального сайта и устанавливаем его в любую папку. Важно, чтобы в пути к этой папке не было русских символов.
Открываем консоль в Windows:
Скачиваем нужный бокс и убеждаемся, что он попал в список доступных локально боксов:
vagrant box add cimmwolf/jessie64-lemp vagrant box listДля первой команды название бокса я нашёл в списке по запросу «debian 8 lemp». Вот информация по нему, где автор советует перед использованием бокса выполнить установку плагина:
vagrant plugin install vagrant-vbguestТакая команда выполняется единожды, если ранее данный плагин ещё не инсталлировался. Плагин позволяет автоматически устанавливать в виртуальную машину дополнения гостевой ОС.
Создаём каталог и переходим в него, например:
mkdir c:\VMs\Deb8lemp cd c:\VMs\Deb8lempИнициализация виртуальной машины:
vagrant init cimmwolf/jessie64-lempПри этом у нас появляется в этом каталоге файл Vagrantfile . Он содержит конфигурацию будущей машины. Как я уже сказал, настройки можно оставить по умолчанию. Устанавливаем виртуальную машину:
vagrant upВсё! Через некоторое время машина будет готова.
При установке машины автоматически устанавливаются все актуальные обновления Debian. При каждом старте монтируется общая папка.
Для входа по SSH используем адрес 127.0.0.1, порт 2222, пользователя vagrant , пароль vagrant .
Таким образом, всего несколько команд в консоли и у нас готовая для работы виртуальная машина.
Последующий запуск машины из консоли происходит быстро:
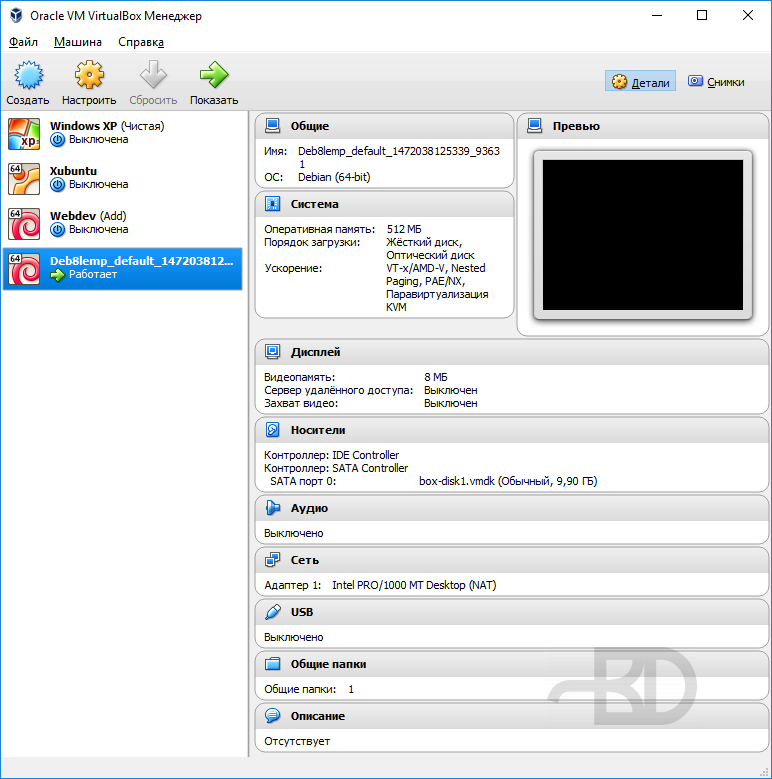
C:\VMs\Deb8lemp>vagrant up Bringing machine 'default' up with 'virtualbox' provider. ==> default: Checking if box 'cimmwolf/jessie64-lemp' is up to date. ==> default: Clearing any previously set forwarded ports. ==> default: Clearing any previously set network interfaces. ==> default: Preparing network interfaces based on configuration. default: Adapter 1: nat ==> default: Forwarding ports. default: 22 (guest) => 2222 (host) (adapter 1) ==> default: Booting VM. ==> default: Waiting for machine to boot. This may take a few minutes. default: SSH address: 127.0.0.1:2222 default: SSH username: vagrant default: SSH auth method: private key ==> default: Machine booted and ready! [default] GuestAdditions 5.1.2 running --- OK. ==> default: Checking for guest additions in VM. ==> default: Mounting shared folders. default: /vagrant => C:/VMs/Deb8lemp ==> default: Machine already provisioned. Run `vagrant provision` or use the `--provision` ==> default: flag to force provisioning. Provisioners marked to run always will still run.В VirtualBox машину тоже видно:
Docker
Это ещё один альтернативный вариант.
По своей сути Docker предлагает уже не виртуализацию, а создание изолированных контейнеров поверх вашей основной системы. Таких контейнеров на одной системе можно запускать множество. Приложения в каждом из них работают полностью независимо.
Из-за того, что здесь нет полноценной виртуализации, то нет и расхода лишних ресурсов на виртуальные операционные системы. Процессор, диск, память расходуются исключительно на установленные в контейнерах приложения.
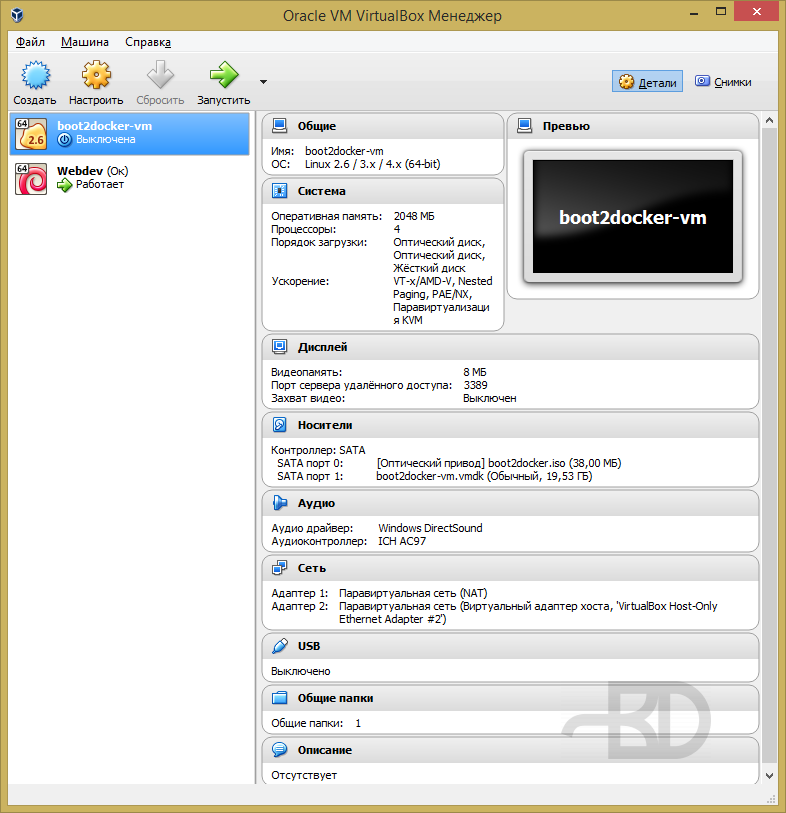
Docker предназначен для Linux и использует для создания контейнеров специфику ядра этой операционной системы. В Windows использовать Docker можно двумя способами. Во-первых, есть Boot2docker, который автоматически создаёт, опять же, в VirtualBox виртуальную машину и уже там запускает контейнеры. Во-вторых, можно самостоятельно создать виртуальную машину с Linux и там разворачивать контейнеры.
Автоматически созданная машина Boot2docker-ом:
Помимо уже сказанного есть ещё одна очень весомая фишка.
Мы создаём для разработки сайта один или несколько контейнеров Docker. Зависит от его сложности и масштабов. Потом, когда сайт будет готов, то мы именно эти же контейнеры просто переносим на хостинг! Получается, что сайт продолжает работать в своём родном окружении, уже на совсем другой площадке.
На мой взгляд Docker интересен, но только если вы работаете именно в Linux. Использование контейнеров через виртуализацию трудно назвать изящным вариантом. Поэтому я, как пользователь Windows, отказался от Docker. Во всяком случае, нет пока необходимости.