Как правильно подсоединить warning canceller
What is a warning canceler on headlights? The HID Warning Canceller, also known as HID Error Message Canceller, HID Decoder and HID Anti Flicker Capacitor… Подробнее » Как правильно подсоединить warning canceller
Как правильно заматывать провода
- автор: admin
- 27.07.2023
Соединение проводов в автомобиле. Скрутка. Пожалуй, каждый автолюбитель хоть раз в жизни сталкивается с необходимостью соединения проводов – то ли проводка сгнила, то ли крыса… Подробнее » Как правильно заматывать провода
Как правильно использовать антистатический браслет
- автор: admin
- 27.07.2023
Особенности антистатических браслетов При работе с электроприборами используются специальные защитные браслеты, предназначенные избавить от статического электричества. Такие изделия простые в использовании, а за счет доступной… Подробнее » Как правильно использовать антистатический браслет
Как почистить фильтр в стиральной машине
- автор: admin
- 27.07.2023
Как почистить сливной фильтр в стиральной машине Для сложной бытовой техники, к которой относится стиральная машина, необходима профилактика. Иначе активная эксплуатация быстро выведет машинку из… Подробнее » Как почистить фильтр в стиральной машине
Как починить кнопку на телефоне нокия 2760
- автор: admin
- 27.07.2023
Как починить кнопку на телефоне нокия 2760 В этой статье мы рассмотрим ремонт клавиатуры мобильного телефона. Если у Вас современный смарт, то и не должно… Подробнее » Как починить кнопку на телефоне нокия 2760
How To Install Warning Cancellers For Led
![]()
How to install Warning Error Canceller Capacitor Anti flicker Xenon HID Light
How to install a HID / Xenon kit with Anti Flicker Capacitors/ Error Code Canceller STEALTH AUTO
What is warning cancellers on LED headlights?
Warning cancellers on LED headlights are devices that are installed in the headlight housing that cancel out the warning message that may appear on the vehicle’s dash when LED headlights are installed.
How do you install an anti flicker harness?
Most headlights these days are LED, which means they don’t flicker like traditional halogen bulbs. However, if you’re driving an older car with halogen headlights, you might notice them flickering when you start the engine. This is because the alternator charges the battery at a higher voltage than the battery itself, and this can cause the current to fluctuate.
See also How To Fix Carpet Fuzzing
To install an anti flicker harness, you’ll need to splice the positive and negative wires from the harness into the corresponding wires from the headlight. It’s important to get the polarity right, or the headlight will not work. Once the wires are Spliced, you can use electrical tape or heat shrink tubing to insulate the connection and prevent any shorts.
Do I need anti flicker for LED headlights?
There is no simple answer to this question since it depends on a number of factors, including the specific LED headlights in question and the local regulations where the vehicle will be driven. In some cases, anti flicker may be required while in others it may not be necessary. For example, if the LED headlights are not compatible with the existing electrical system in the vehicle, then anti flicker may be needed to prevent flickering or other issues. Alternatively, if the LED headlights are designed for use with a specific type of electrical system, then they may not require anti flicker. Ultimately, it is advisable to consult with an expert to determine whether or not anti flicker is required for LED headlights.
FAQ
What tools do I need to install warning cancellers for led lights on a car?
There are a few tools that you will need in order to install warning cancellers for your LED lights. You will need a drill, a screwdriver, and a wire stripper. You will also need some wire, electrical tape, and zip ties.
How do I prepare the car for installation?
Assuming you are referring to a car stereo:
See also How To Fix A Hole In A Lead Acid Battery
1. Disconnect the negative terminal of the car battery. This will prevent any electrical shorts while you are working on the car stereo.
2. Unscrew and remove the console panels and dashboards around the factory stereo. Be careful not to lose any screws.
3. Use a stereo removal tool to disconnect the factory stereo from the car.
4. Connect the new car stereo to the car.
5. screw in the new car stereo and reattach the console panels and dashboards.
6. Reconnect the negative terminal of the car battery.
How do I install the warning cancellers?
Assuming you would like instructions on how to install a LED Flasher or Turn Signal Fixer:
1. Read the instructions that come with the flasher. It is important to note the type of vehicle you are working on so you can wire it correctly.
2. On most cars, the turn signals share the same fuse with the hazard lights. This means that if the fuse is blown, neither the turn signals nor the hazards will work. Check the fuse first and replace it if necessary.
3. Locate the turn signal relay. On many cars, it is located in the fuse box. Others may have it under the dash or in the engine compartment. The relay controls the turn signals. When the turn signal switch is turned on, it completes the circuit and powers the turn signals.
4. Unplug the relay and plug in the LED flasher unit in its place. If the flasher unit has a built-in relay, there will only be two wires to connect. Otherwise, you will need to wire the unit to the existing relay.
5. Test the turn signals to make sure they are working properly.
See also How To Fix Crosstalk In Vlsi
What are some tips for troubleshooting the installation process?
What are some tips for troubleshooting the installation process?
There are a few things you can do to troubleshoot the installation process:
1. Check the requirements: Make sure that your system meets the minimum requirements for the software you’re trying to install.
2. Try a different method: If you’re having trouble installing the software using the default method, try an alternate method (e.g. if you’re trying to install software from a disc, try downloading it from the internet instead).
3. Get help from the manufacturer: If you’re still having trouble, contact the software manufacturer for help. They may have specific instructions or a troubleshooting guide that can help you get past the installation issue.
How do I know if the warning cancellers are working properly?
There are a few things you can do to test if your warning cancellers are working properly.
One way is to drive in an area with a lot of streetlights at night. If the light from the streetlights is cancelling out the light from your headlights, then the warning cancellers are likely working properly.
Another way to test is to use a reflector board. When you shine your headlights on the board, you should see four distinct light beams. If you see two light beams, that means that the warning cancellers are not working properly.
You can also test the warning cancellers by honking your horn. If the sound is clear and not distorted, that means the cancellers are likely working properly.
Related Posts
- How To Install The Third Nail
- How To Change Clock On Vw Passat
- How To Install Natural Gas Line To Fire Pit
- How To Fix Breast Implant Displacement
- How To Change Banking Details For Sassa
- How To Install Fire Pit Wind Guard
- How To Install Chains On Tractor Tires
- How To Change 2021 Toyota Startup Screen
- How To Fix Eps Light Hyundai Elantra
- How To Fix A Cookie Scoop
Installation Guide for Dual Beam LED Headlights with Warning Cancellers
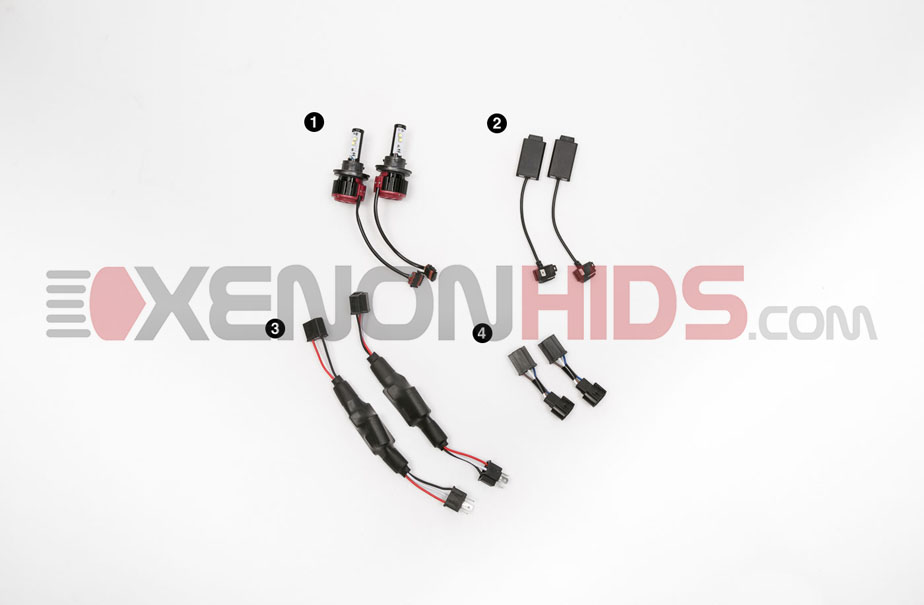
Below is what you will find included in your LED Headlight Conversion Kit with Warning Cancellers.
NOTE: This installation guide uses a 9005 LED Headlight Conversion Kit.
- Two (2) x Cree LED Bulbs
- Two (2) x Canbus LED Controllers
- Two (2) x Warning Cancellers
- Two (2) x Factory Harness Adapters
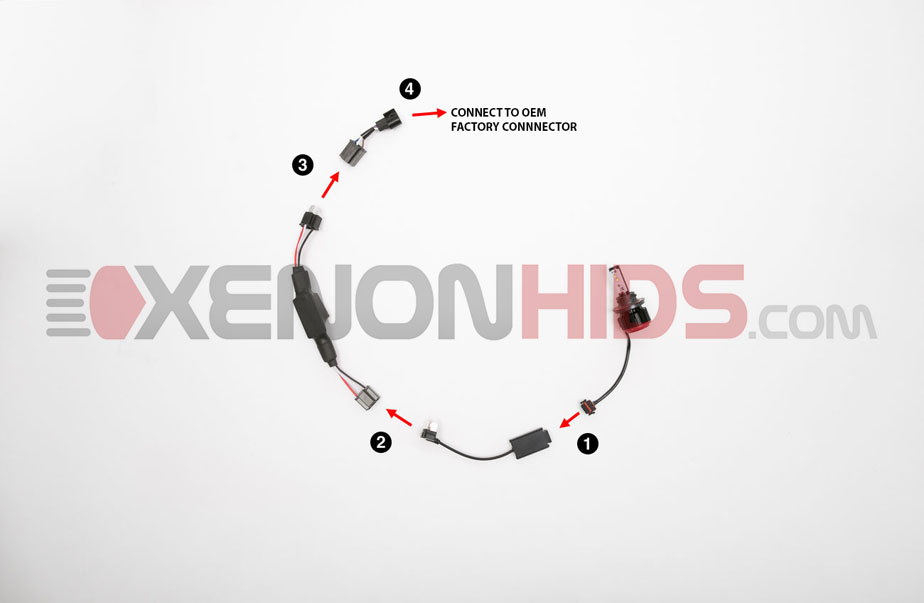
Installation Steps
Below are the simple steps to connect your LED Headlight Conversion Kit. The diagram outlines the connection for one bulb and one controller. Repeat the exact steps for the second headlight.
- Connect the LED Bulb to the LED Controller.
- Connect the LED Controller to the Warning Canceller.
- Connect the Warning Canceller to the Factory Adapter Harness.
- Plug the Factory Adapter Harness to your vehicle’s OEM factory connector.
NOTE: The Factory Adapter Harness must be installed as per the diagram for the kit to function correctly.
NOTES AND WARNINGS
- High voltage can easily give you an electric discharge or even burn you.
- When turning the power of the bulb on and off, do not touch it.
- Never look directly into the LED bulb because the light emitted can be very bright and hurt your eyes.
- If an accident occurs, make sure to shut the power supply off.
- We do not take any responsibility if a customer attempts to assemble or disassemble parts that are broken.
- If you ever need professional help for repairs or a replacement, make sure to visit your local garage.
- Our products must stay away from any kind of flammable content such as Diluting Agents, Spray Paint, Paper, Oil, etc.
- Never adjust your LED lights to point upwards because you might diminish the visibility of other drivers on the road.
- To avoid short circuiting your LED bulb, make sure to turn them on only once your vehicle has been started.
How to install Warning Error Canceller Capacitor Anti flicker Xenon HID Light

This is a Quick Video to show how to install HID Warning Canceller Capacitor for HID Kit. This Warning Error Decoder Canceller Anti-Flicker For Xenon HID Light is compatible with all cars later from 2005, which consist of Head lamp Warning/ Flickering Indication option. You can get the Anti Flickering Capactior from: Bangood : https://bit.ly/2JfDRZU Ebay : https://ebay.to/2su06Fn Thank you. Subscribe for more future Videos. Subscribe Here: https://bit.ly/2JHtlyc . . . . . . . . . . _______________________________________________________________ Imaginary by Broken Elegance & Nomyn https://soundcloud.com/brokenelegance Creative Commons — Attribution 3.0 Unported— CC BY 3.0 http://creativecommons.org/licenses/b . Music promoted by Audio Library https://youtu.be/CMLnB526kkY
Показать больше
Войдите , чтобы оставлять комментарии