Run WebStorm for the first time
You can use the Toolbox App to run any JetBrains product. In case of a standalone installation, running WebStorm depends on the operating system:
To run WebStorm, find it in the Windows Start menu or use the desktop shortcut. You can also run the launcher batch script or executable in the installation directory under bin .
Run the WebStorm app from the Applications directory, Launchpad, or Spotlight.
Run the webstorm.sh shell script in the installation directory under bin . You can also use the desktop shortcut if it was created during installation.
For more information about running WebStorm from the command line, refer to Command-line interface.
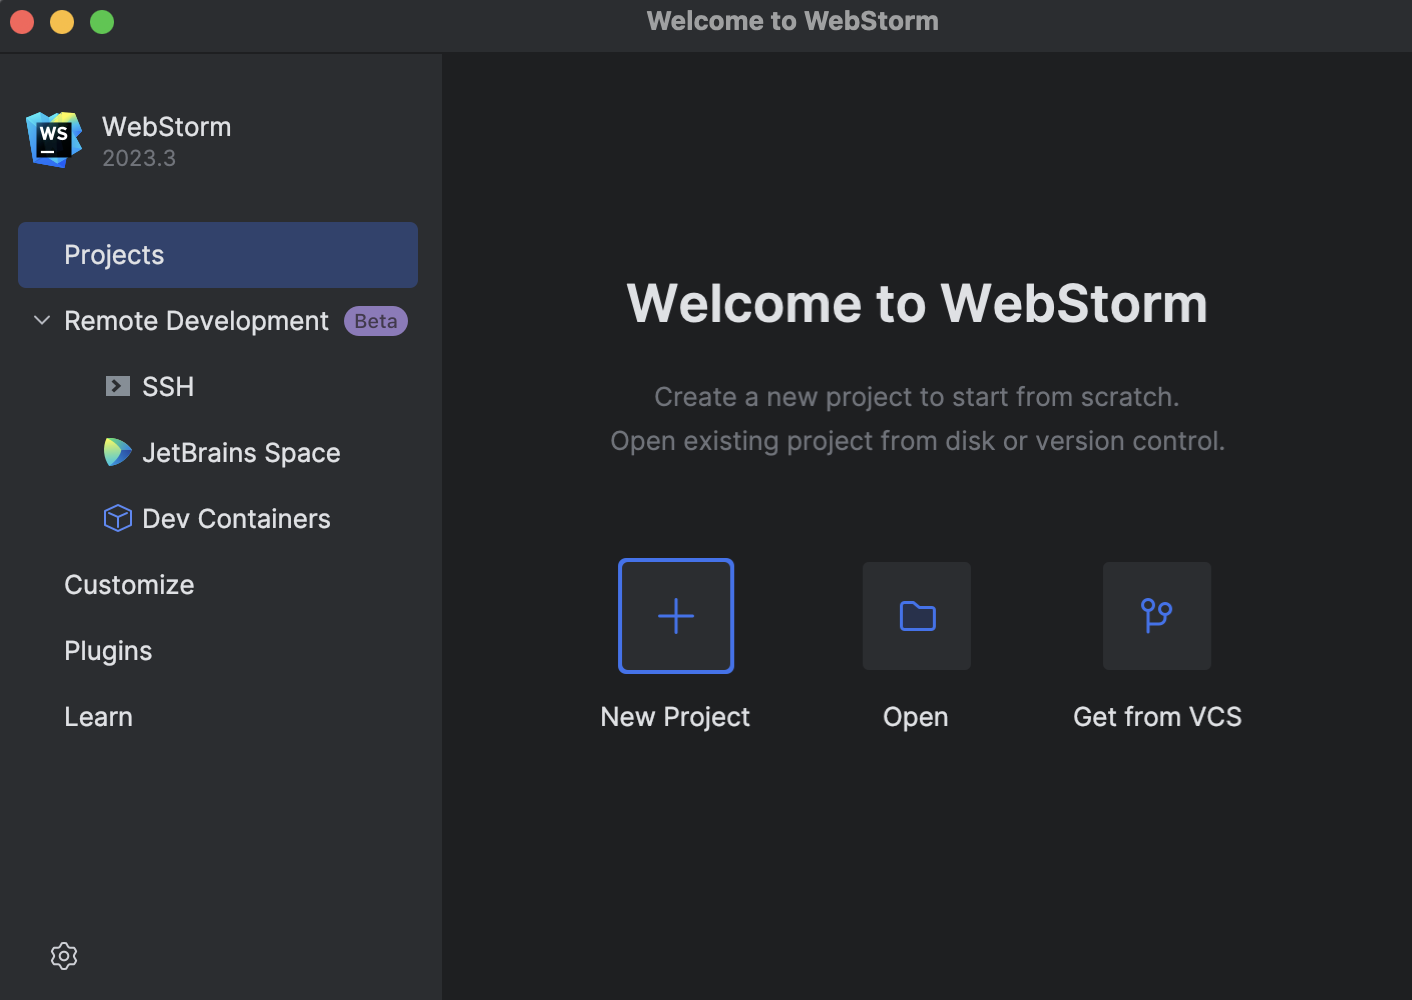
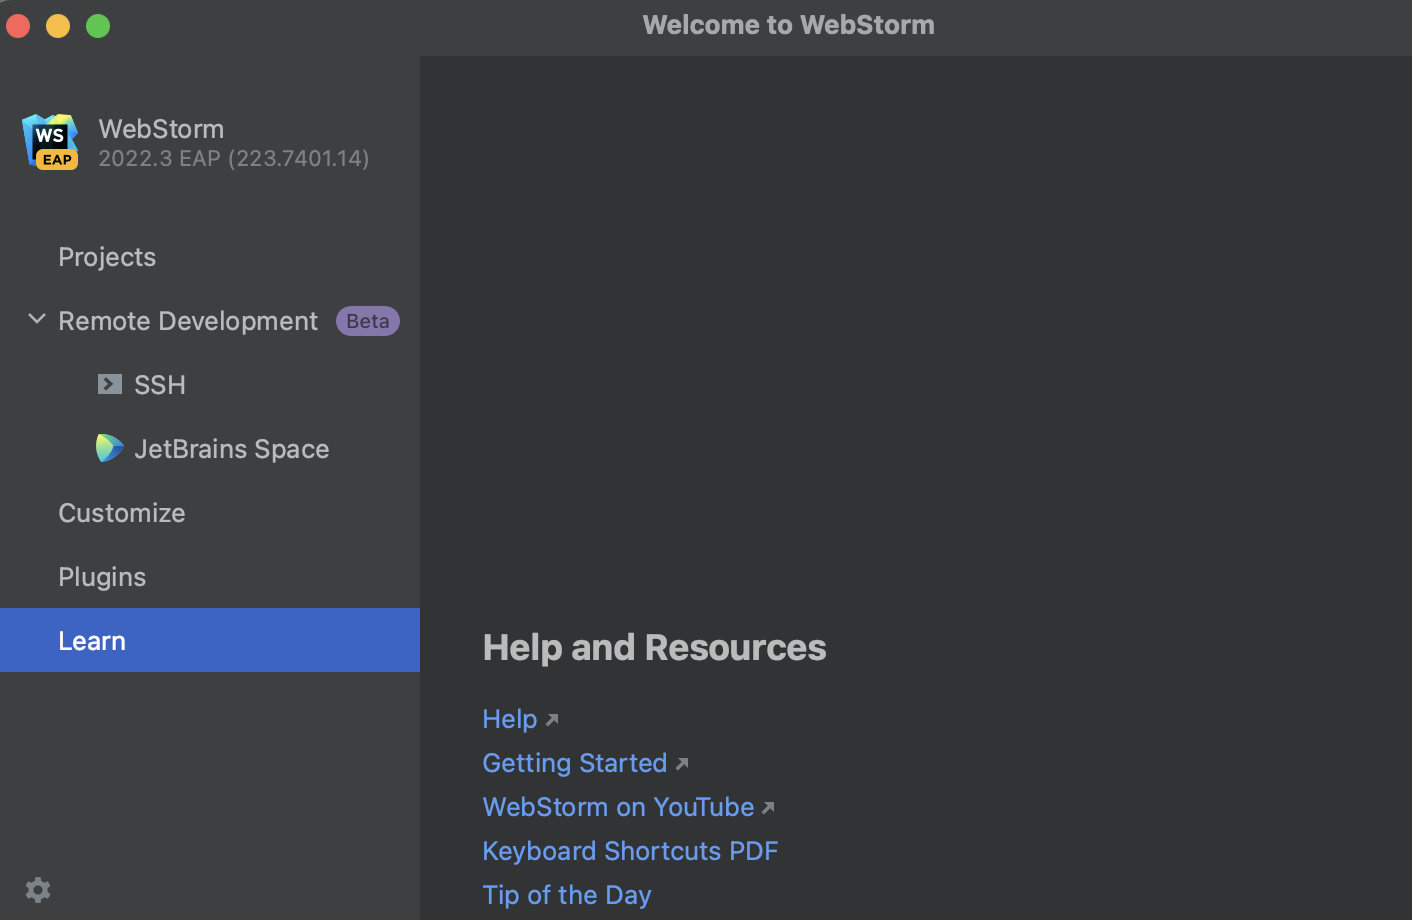
Once you launch WebStorm, you will see the Welcome screen, the starting point to your work with the IDE, and configuring its settings. This screen also appears when you close all opened projects. Use the tabs on the left side to switch to the specific welcome dialog.
Customize the IDE appearance
Click Customize and select another color theme or select the Sync with OS checkbox to use your system default theme. Here you can also configure accessibility settings or select another keymap.
Try the new WebStorm user interface.
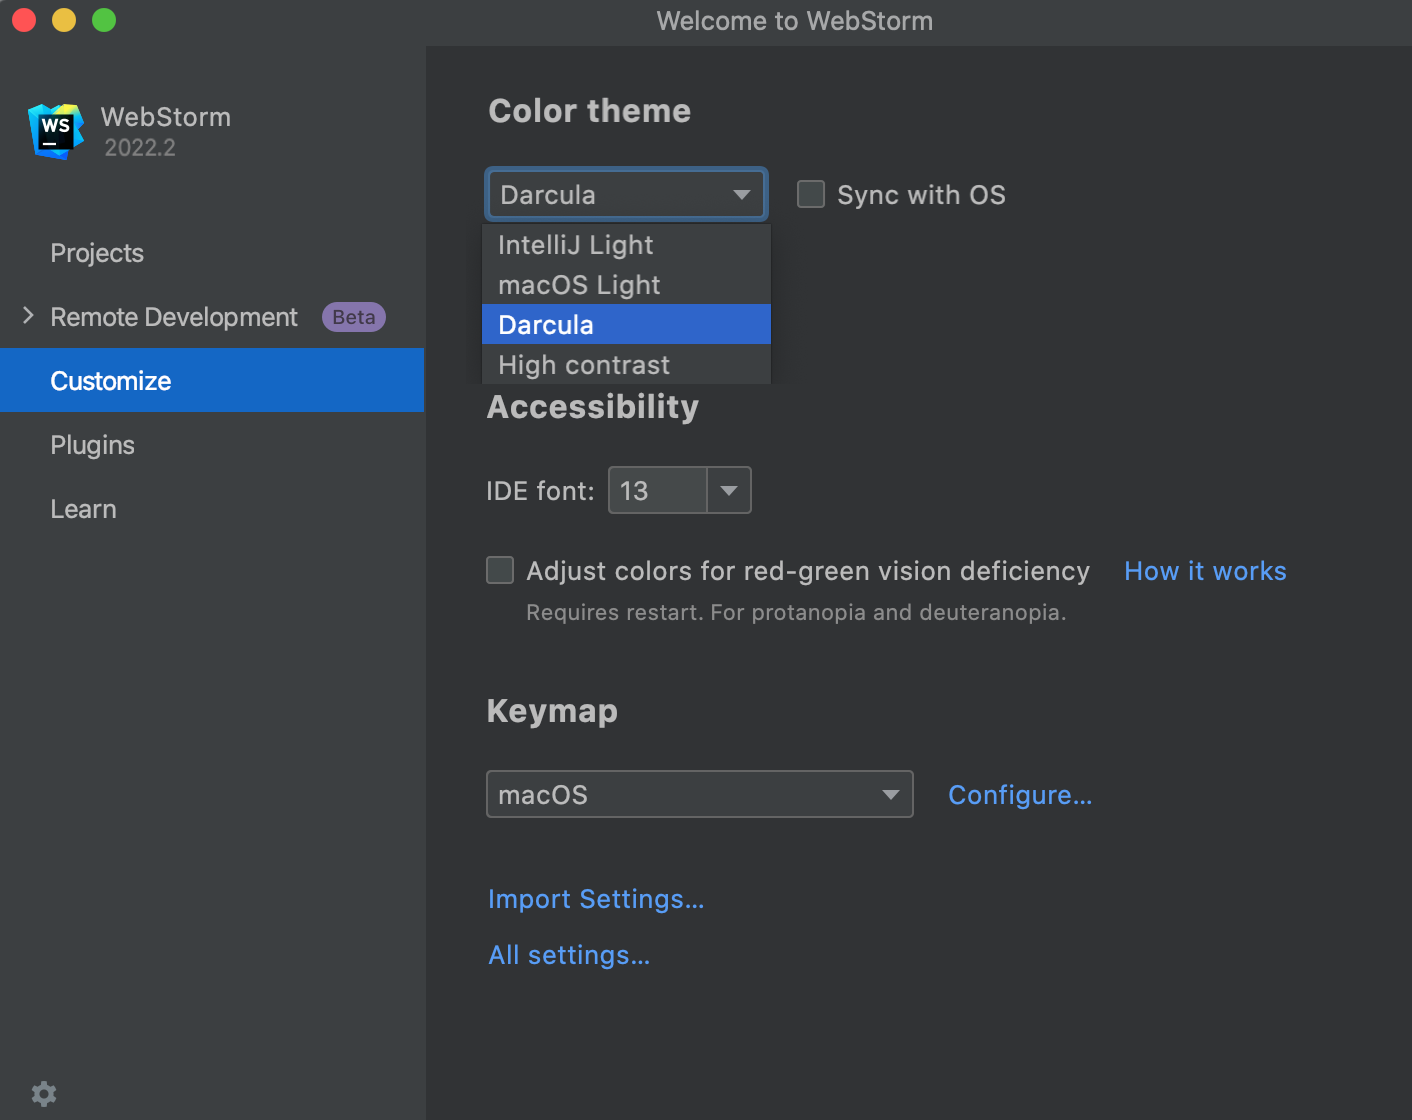
You can change the theme at any time later in the Switch popup ( Control+` ). For more information, refer to User interface themes.
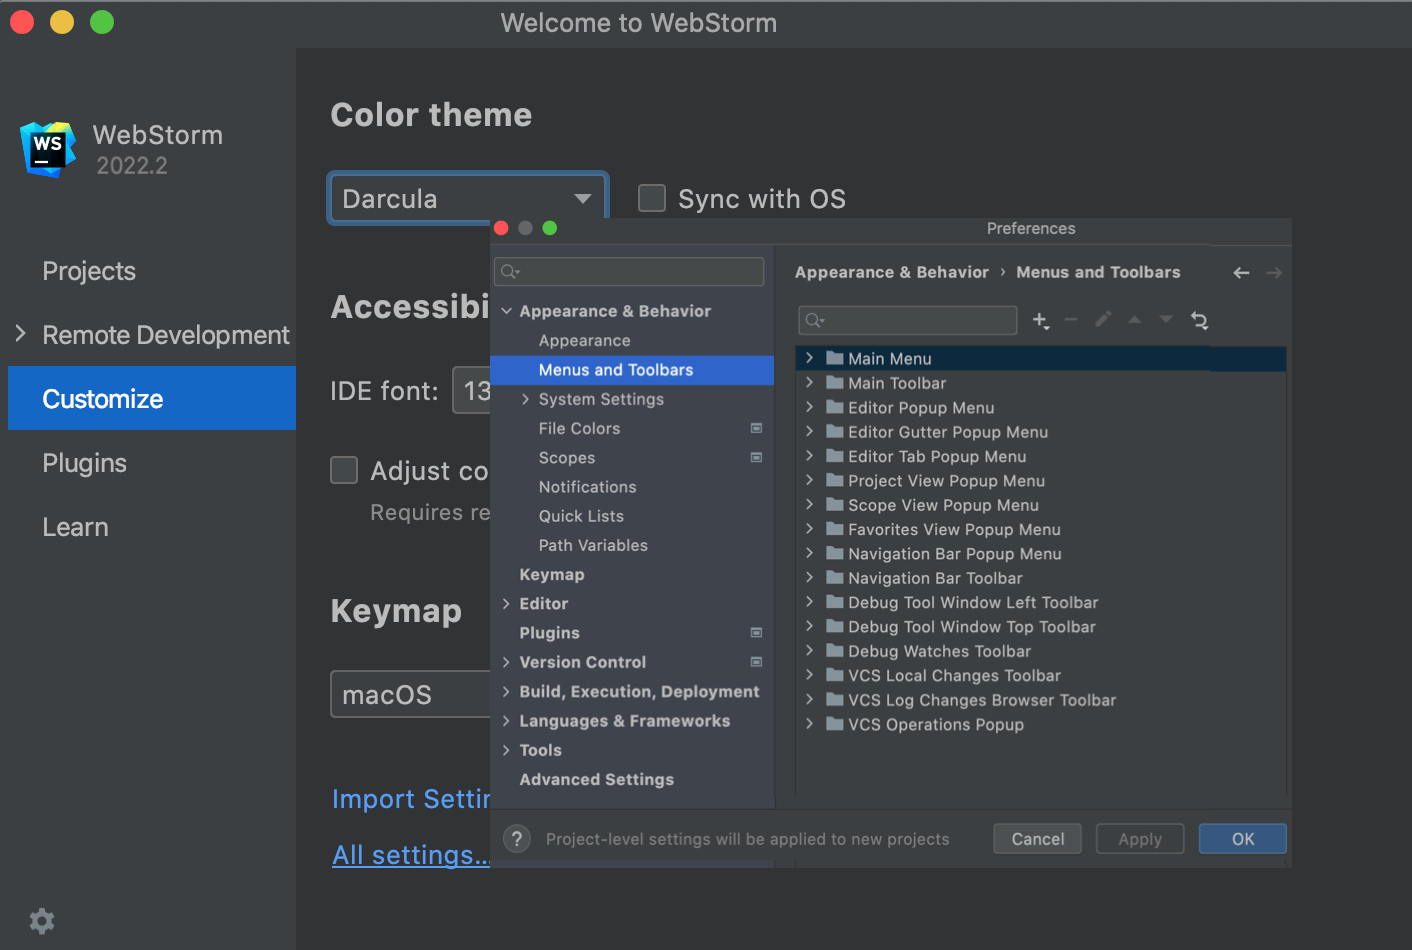
Configure the default settings
Click Customize and select Import Settings if you already have a copy of the required settings that you want to apply.
Alternatively, click All settings to open the settings dialog. The settings that you modify at this moment will become the new default configuration for your projects and the IDE.
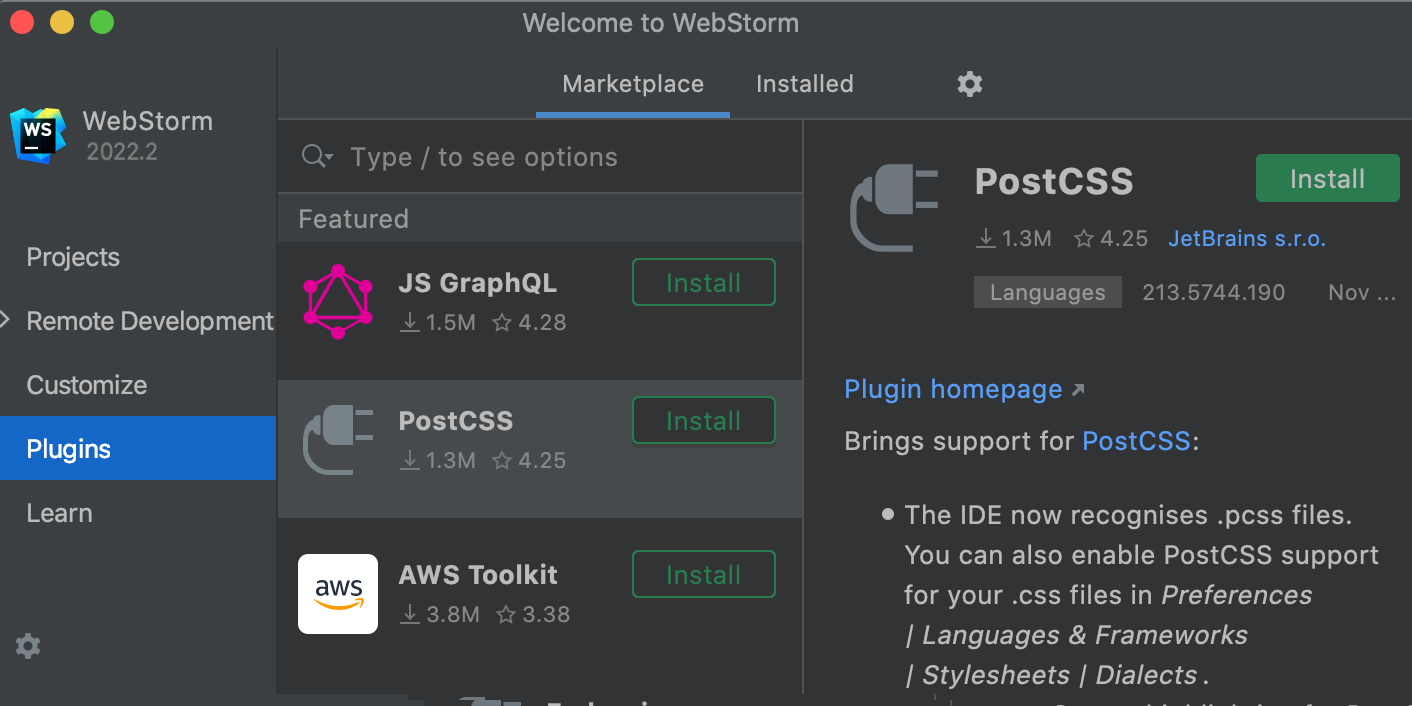
Install additional plugins
Click Plugins in the left pane and download and install additional plugins from JetBrains Marketplace.
Learn WebStorm
- If you are new to WebStorm, it is recommended that you go through Getting started with WebStorm.
- You can also try the Learning plugin for WebStorm.
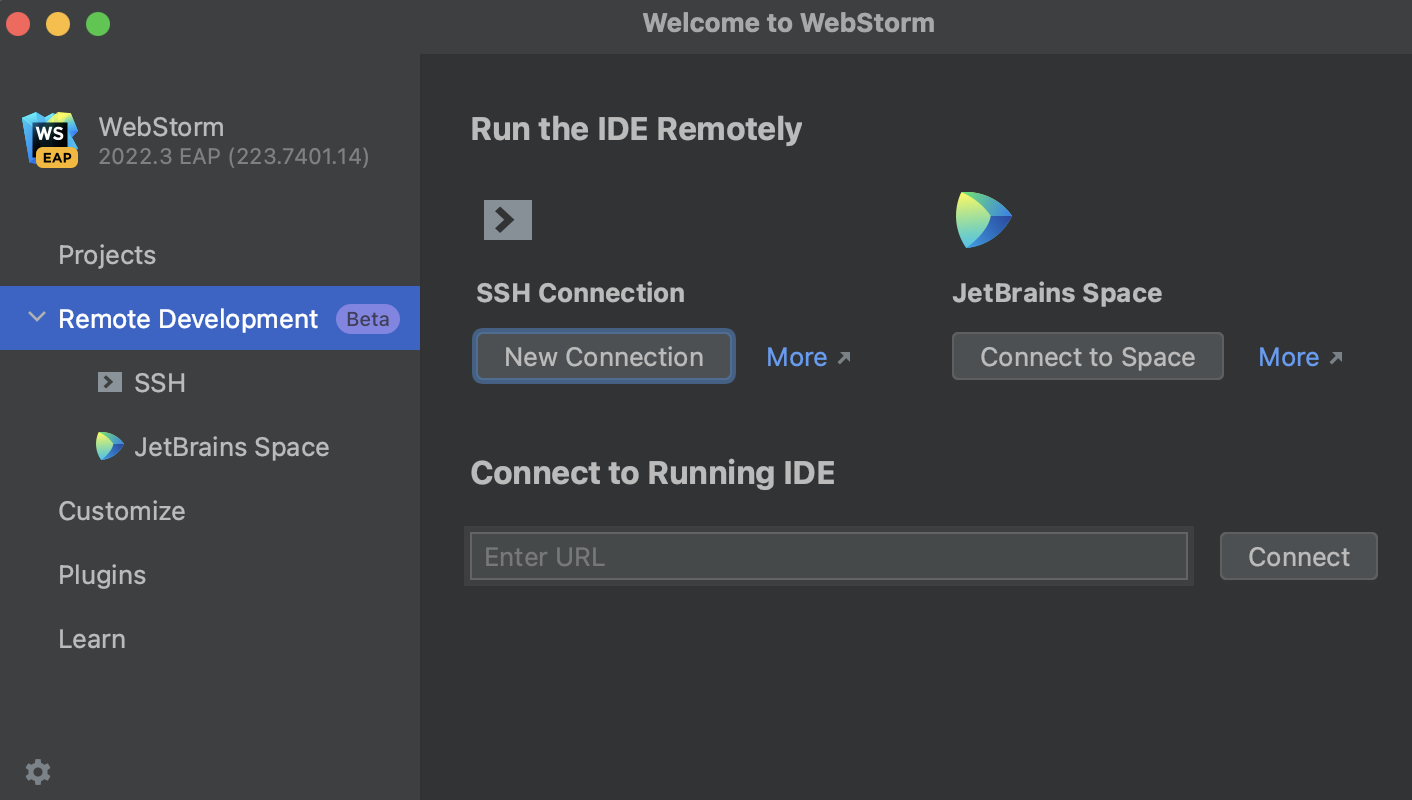
Develop your applications remotely
Click Remote Development to configure an entry point to connect to a remote server and code, run, debug, and deploy your projects remotely. For more information, refer to Connect to a remote server from WebStorm.
Start a project in WebStorm
When you start WebStorm, it will show you the Welcome screen .
From the Welcome to WebStorm dialog, you can do the following:
- Create a project from existing local sources
- Get a project from a version control system
User interface
When you open a project in WebStorm, the default user interface looks as follows:
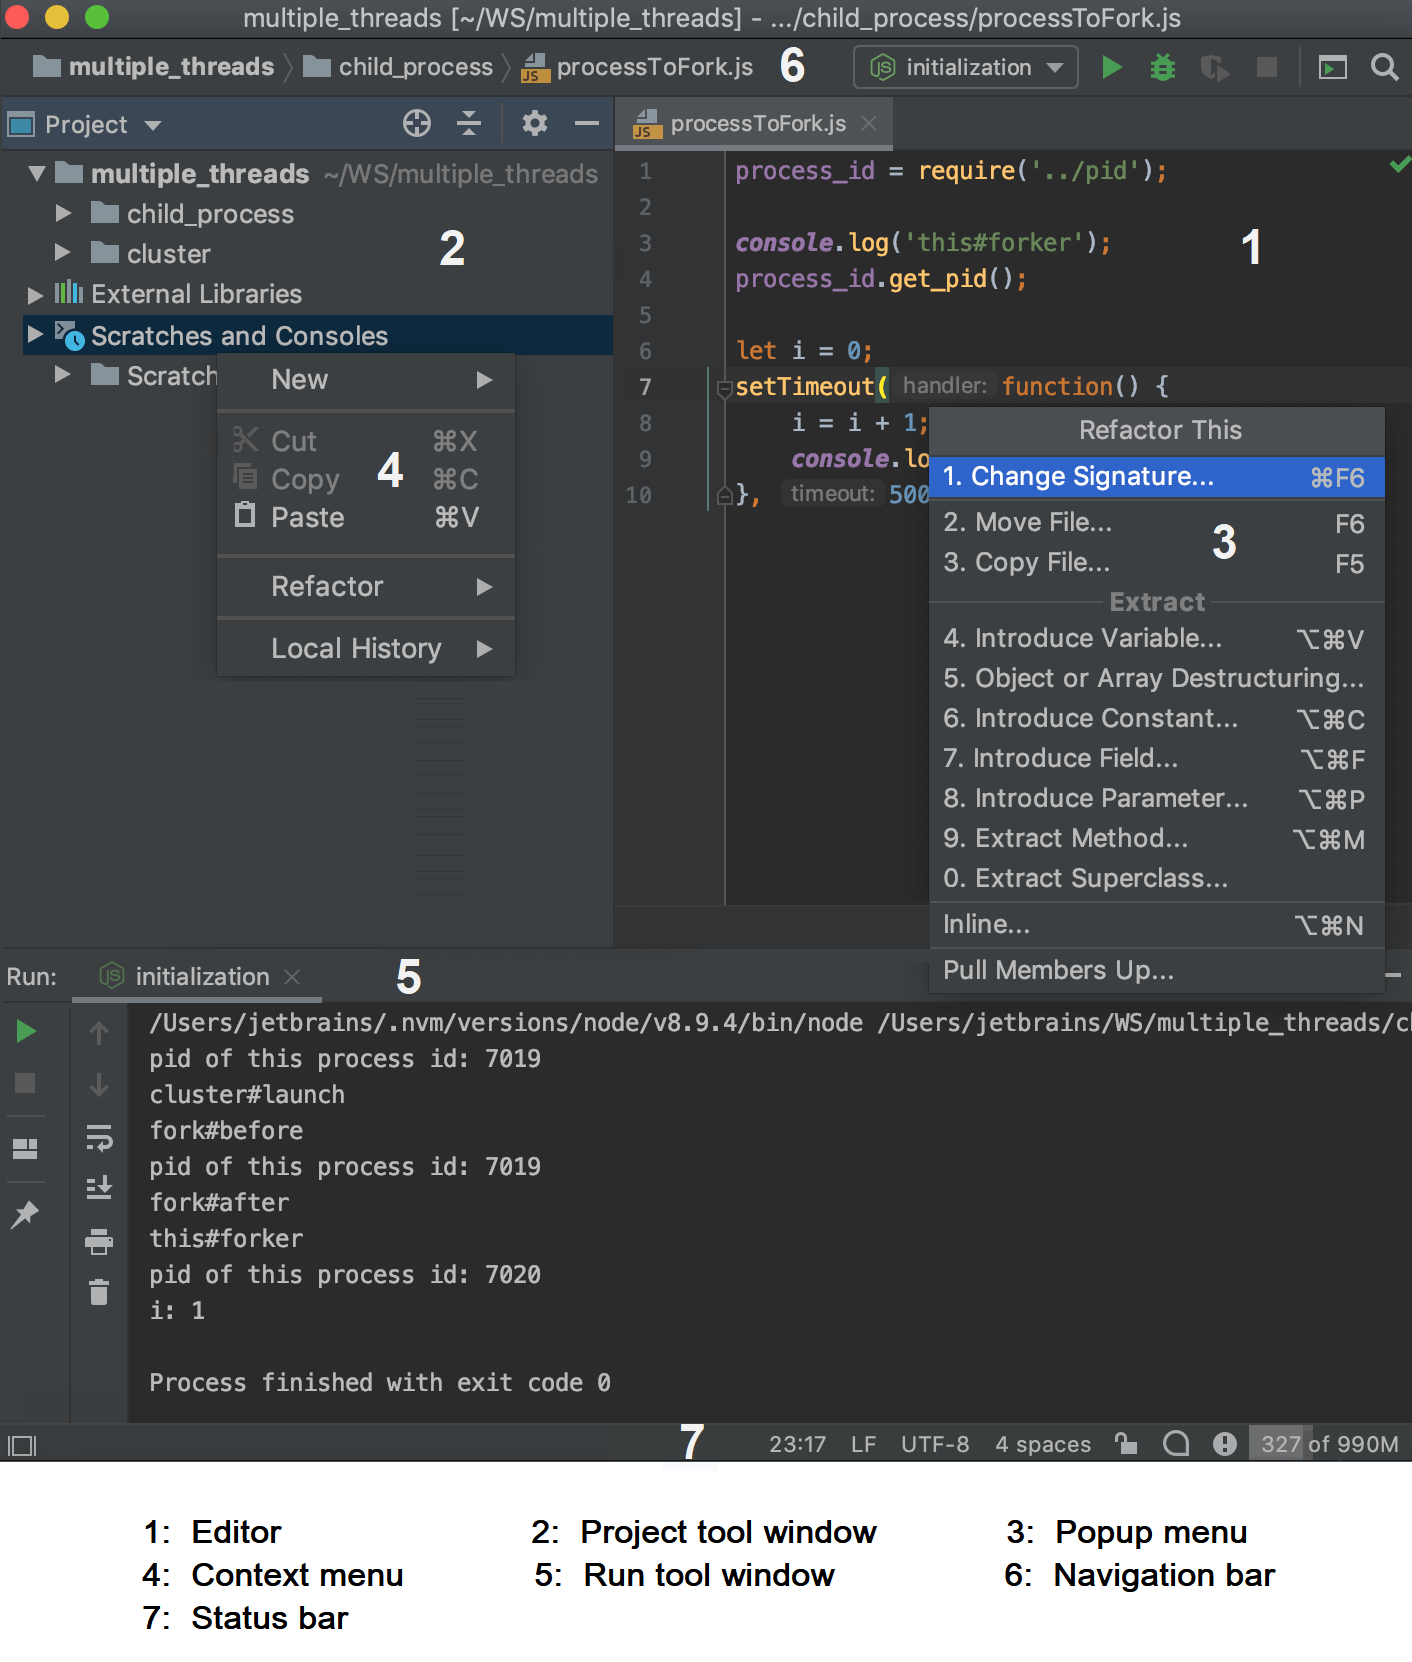
Depending on the set of plugins and configuration settings, your IDE may look and behave differently.
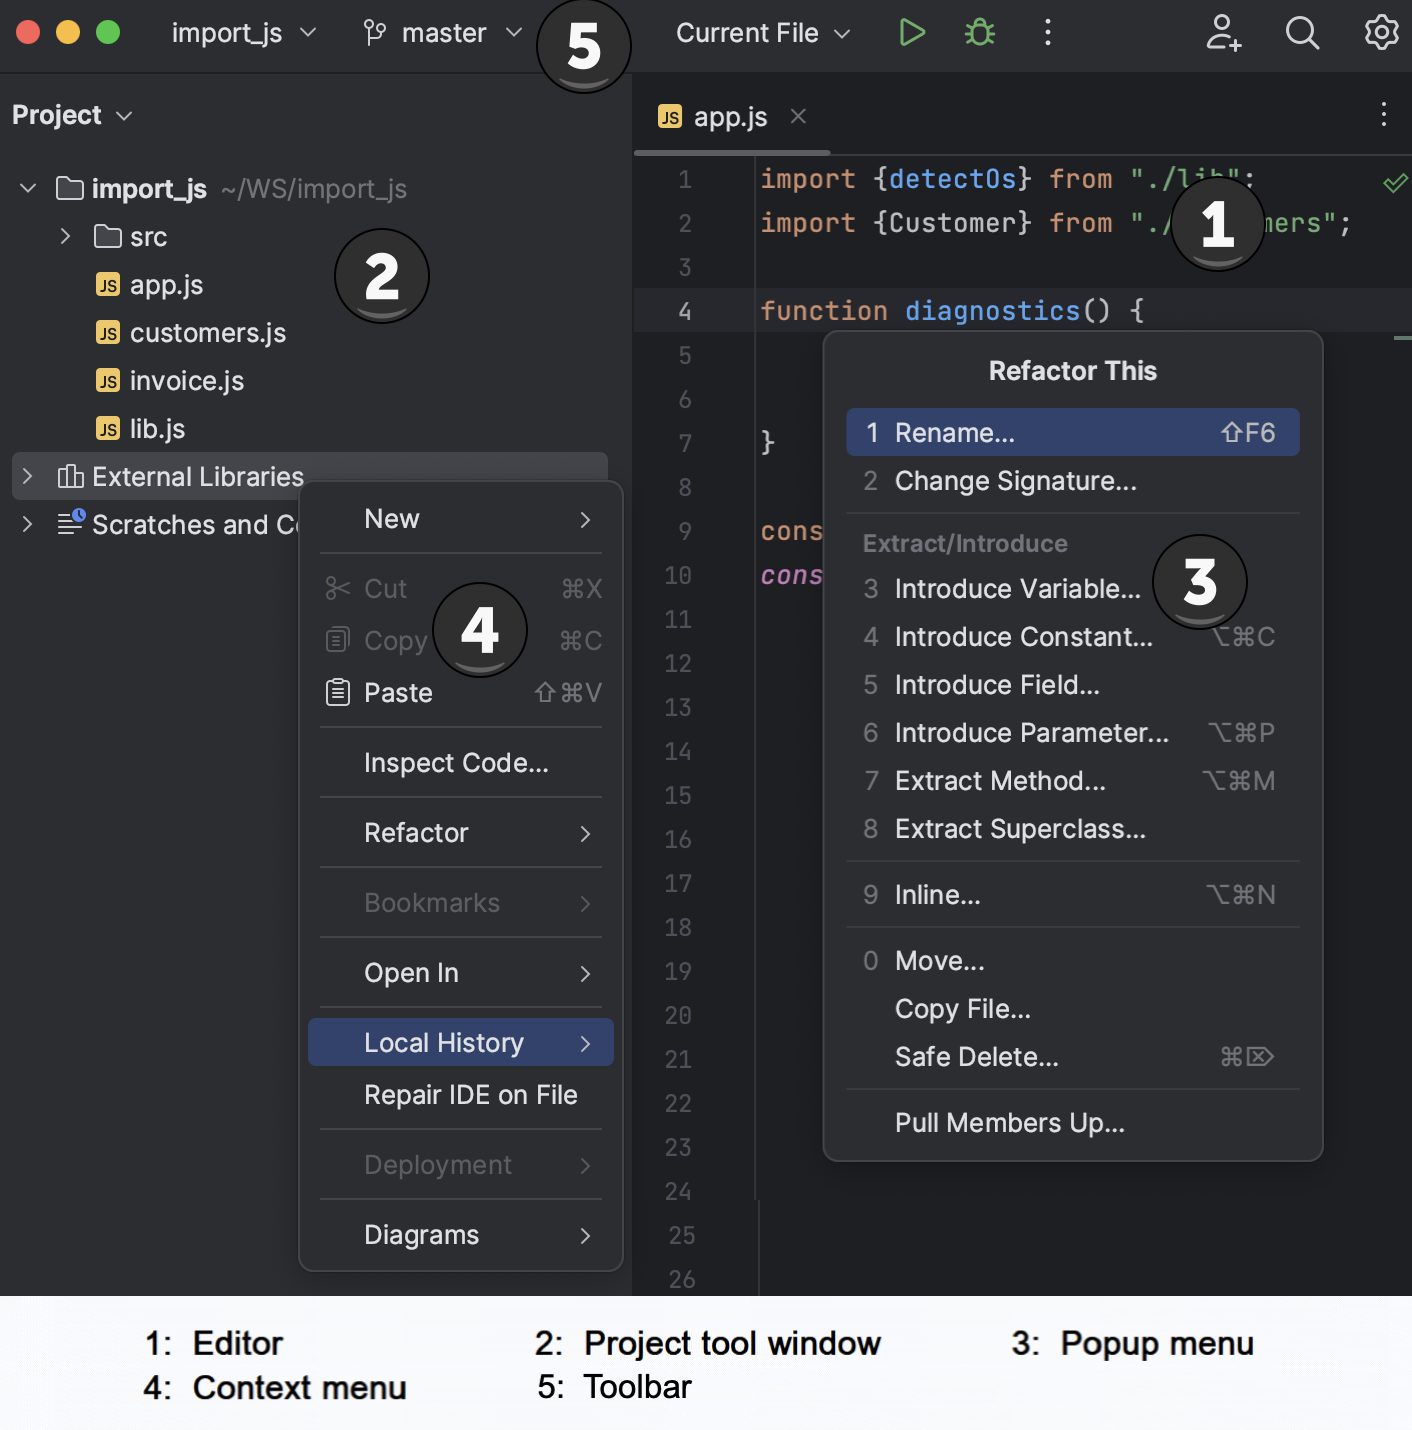
Editor
Use the editor to read, write, and explore your source code .
Action indicators and action list
Open the list of available actions: Alt+Enter
Various icons that appear in the gutter, for example, , help you notice quick-fixes and other actions. Clicking such action indicator or pressing Alt+Enter opens an action list with all quick-fixes and other actions that are available at the current caret position.
Navigation bar
Show/hide: View | Appearance | Navigation Bar
The navigation bar at the top is a quick alternative to the Project view, where you can go through the structure of your project, open specific files, and jump to specific code elements in the current file.
If VCS integration is enabled, items in the navigation bar are highlighted according to VCS file status colors.
Use the buttons to the right of the navigation bar to run and debug your application, and perform basic version control operations (if the version control integration is configured). It also contains buttons to Run Anything (press Control twice) and Search Everywhere (press Shift twice).
The main toolbar with buttons for opening and saving files, undo and redo actions is hidden by default. To show it, select View | Appearance | Toolbar .
Status bar
Show/hide: View | Appearance | Status Bar
The left part of the status bar at the bottom of the main window shows the most recent event messages and descriptions of actions when you hover over them with the mouse pointer. Click a message in the status bar to open it in the Notifications tool window. Right-click the message in the status bar and select Copy to paste the message text when you are searching for a solution to a problem or need to add it to a support ticket or to the WebStorm issue tracker.
Use the quick access button or to switch between tool windows and hide the tool window bars.
The status bar also shows the progress of background tasks. You can click to show the Background Tasks manager.
The right part of the status bar contains widgets that indicate the overall project and IDE status and provide access to various settings. Depending on the set of plugins and configuration settings, the set of widgets can change. Right-click the status bar to select the widgets that you want to show or hide.
The blinking in the corner indicates that internal IDE errors have occurred. Click to view the error descriptions and submit reports.
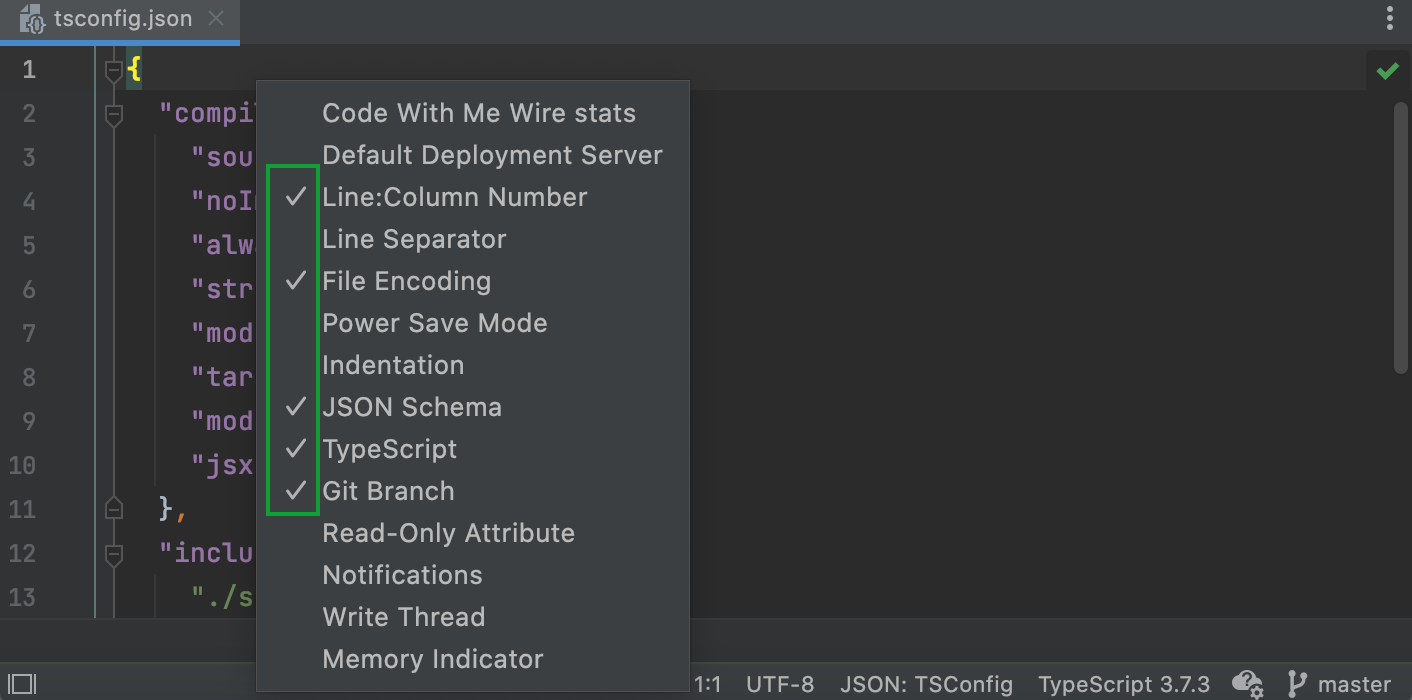
Shows the line and column number of the current caret position in the editor. Click the numbers to move the caret to a specific line and column. If you select a code fragment in the editor, WebStorm also shows the number of characters and line breaks in the selected fragment.
Shows the line endings used to break lines in the current file. Click this widget to change the line separators.
Shows the encoding used to view the current file. Click the widget to use another encoding.
Indicates that the column selection mode is enabled for the current editor tab. You can press Alt+Shift+Insert to toggle it.
Click to lock the file from editing (set it to read-only) or unlock it if you want to edit the file.
The widget appears on the Status bar when a JSON file (for example, package.json or tsconfig.json ) is opened in the active editor tab. The widget shows the schema that is used in this JSON file. Learn more from JSON.
The widget is shown on the Status bar all the time after you have opened a TypeScript file in the editor. Use the widget to compile TypeScript and to configure or restart the TypeScript Language Service. Learn more from TypeScript and Compiling TypeScript into JavaScript.
If version control integration is enabled, this widget shows the current VCS branch. Click it to manage VCS branches.
Shows the indent style used in the current file. Click to configure the tab and indent settings for the current file type or disable indent detection in the current project.
Shows the amount of memory that WebStorm consumes out of the total amount of heap memory. For more information, refer to Increase the memory heap.
Click to set any of the configured deployment servers or server groups as default for performing deployment operations.
Tool windows
Show/hide: View | Tool Windows
Tool windows provide functionality that supplements editing code. For example, the Project tool window shows you the structure of your project, and the Run tool window displays the output of your application when you run it.
By default, tool windows are docked to the sides and bottom of the main window. You can arrange them as necessary, undock, resize, hide, and so on. Right-click the title of the tool window or click in the title for its arrangement options.
You can assign shortcuts to quickly access the tool windows that you frequently use. Some of them have shortcuts by default. For example, to open the Project tool window, press Alt+1 , and to open the Terminal tool window, press Alt+F12 . To jump from the editor to the last active tool window, press F12 .
Context menus
You can right-click various elements of the interface to see the actions available in the current context. For example, right-click a file in the Project tool window for actions related to that file, or right-click in the editor to see actions that apply to the current code fragment.
Most of these actions can also be performed from the main menu at the top of the screen or the main window. Actions with shortcuts show the shortcut next to the action name.
Popup menus
Popup menus provide quick access for actions related to the current context. Here are some useful popup menus and their shortcuts:
- Alt+Insert opens the Generate popup for generating boilerplate code based on the context.
- Control+Alt+Shift+T opens the Refactor This popup with a list of contextually available refactorings.
- Alt+Insert in the Project tool window opens the New popup for adding new files and directories to your project.
- Alt+` opens the VCS Operations popup with contextually available actions for your version control system.
You can create custom popup menus using quick lists of actions that you often use.
Main window
The main window lets you work with a single WebStorm project. You can open multiple projects in multiple windows . By default, the window header displays the name of the project and the name of the currently open file. If there are multiple modules, it will also show the name of the relevant module.
To show the full path to the project and to the current file, select Always show full paths in window header on the Appearance & Behavior | Appearance page of the IDE settings Control+Alt+S .
Getting started with WebStorm
WebStorm is an integrated development environment (IDE) by JetBrains. It includes everything you need for JavaScript and TypeScript development and lets you get straight to coding. WebStorm also makes it easy to tackle the most challenging tasks. Whether you’re resolving Git merge conflicts or renaming a symbol across multiple files, it takes just a few clicks.
You can switch between two versions of WebStorm User Interface — the Classic UI and the New UI. The New UI reduces visual complexity and provides easy access to essential features. Learn more from New UI.
Open, check out, or create a project
A project in WebStorm is a folder with the source code you edit, the libraries and tools you use (for example, in the node_modules subfolder), and various app configuration files (for example, package.json or .eslintrc ).
Once you have opened a folder in WebStorm, the .idea subfolder is added to it where WebStorm stores its internal configuration settings, for example, for the project code style or the version control system.
You can open, check out, and create projects from the WebStorm Welcome screen.
To open a project
- On the Welcome Screen , click Open and then select the folder with your application in the dialog that opens.
To check out a project from a version control system
- Click Get from VCS on the Welcome screen. Alternatively, select File | New | Project from Version Control or Git | Clone… or VCS | Get from Version Control from the main menu. Instead of Git in the main menu, you may see any other Version Control System that is associated with your project. For example, Mercurial or Perforce .
- In the dialog that opens, select your version control system from the list and specify the repository to check out the application sources from. For more information, refer to Check out a project (clone).
To create an empty WebStorm project
- Click Create New Project on the Welcome screen or select File | New | Project from the main menu. The New Project dialog opens.
- In the left-hand pane, choose Empty Project . In the right-hand pane, specify the application folder and click Create .
You can also generate a project from a template. For more information, refer to Generating framework-specific projects.
To create a new file in a project
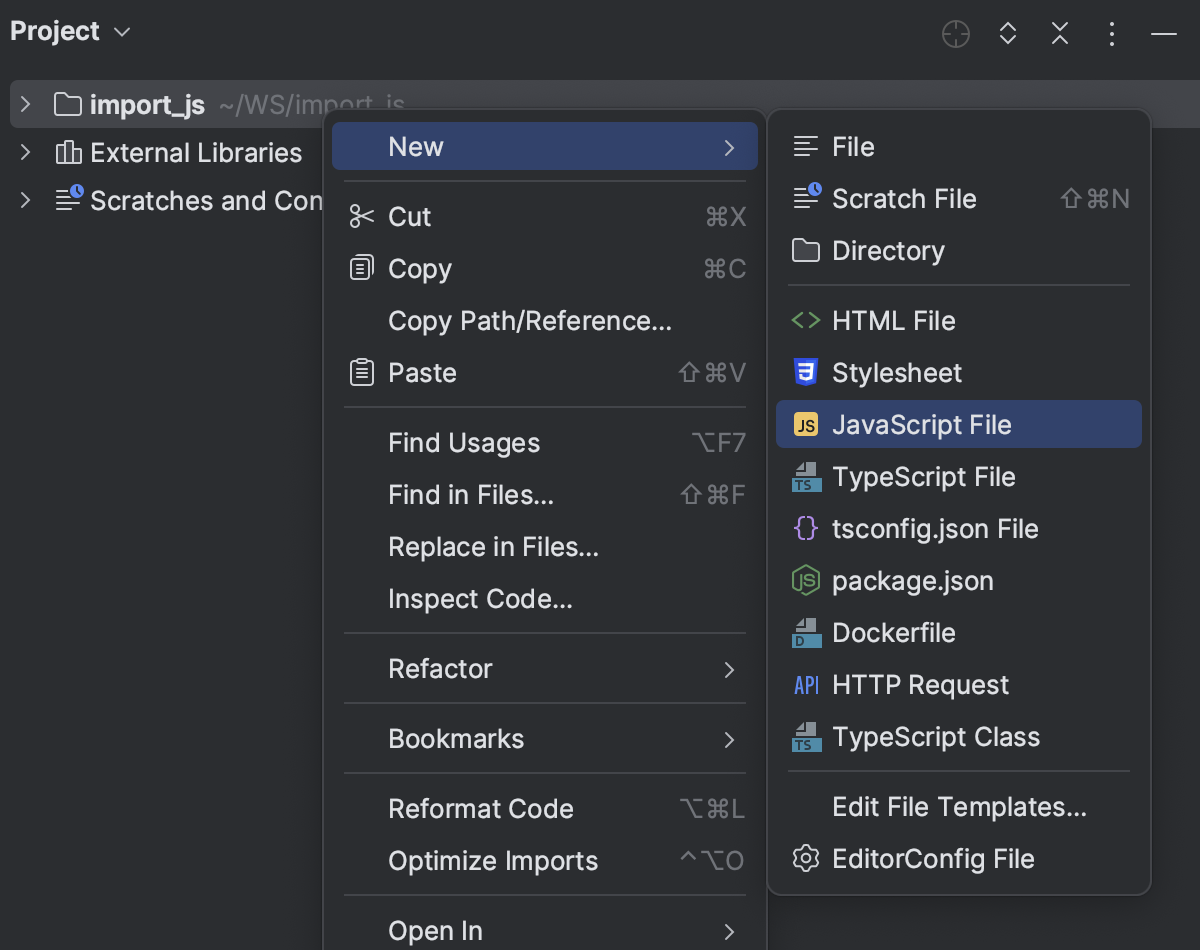
- In the Project tool window, select the folder where you want to create a new file and press Alt+Insert .
- Alternatively, choose New from the context menu of the selection and then choose the file type from the list:
Get familiar with the WebStorm user interface
The WebStorm window consists of the Editor where you read, create, and modify your code, menus and toolbars, a navigation bar, a status bar, and a number of WebStorm tool windows. These secondary windows are attached to the bottom and to the sides of your workspace and let you debug your code, run tests, interact with your version control system, and so on.
You can organize the layout of WebStorm as you like. For example, if you want to focus on writing your code, try the Distraction Free Mode. It removes all toolbars, tool windows, and editor tabs, so you have more free space. To switch to this mode, choose View | Appearance | Enter Distraction Free Mode from the main menu.
An alternative to the Distraction Free Mode may be hiding all tool windows by pressing Control+Shift+F12 . You can restore the layout to its default by pressing this shortcut once again.
When the tool windows are hidden, you can access any of them via a shortcut — the input focus moves to the tool window and you can use any keyboard command in its context. To get back to the editor, just press Escape . When a tool window is visible, pressing its shortcut just brings the focus to it.
Below is a list of shortcuts that invoke the tool windows you will most often need:
In most tool windows and popups, WebStorm supports speed search which lets you filter a list or navigate to a particular item by using a search query.
Find your way through
WebStorm comes with a set of search and navigation features that will help you find your way through any code no matter how tangled it is. See details in Source code navigation.
Find usages of your project symbols
To find where a particular symbol is used in your project, WebStorm suggests full-scale search via Find Usages Alt+F7 :
Find your project symbols by their names
You can navigate to a Class Control+N , a File Control+Shift+N , or a Symbol Control+Alt+Shift+N by its name, refer to Search for a target by name (Search everywhere).
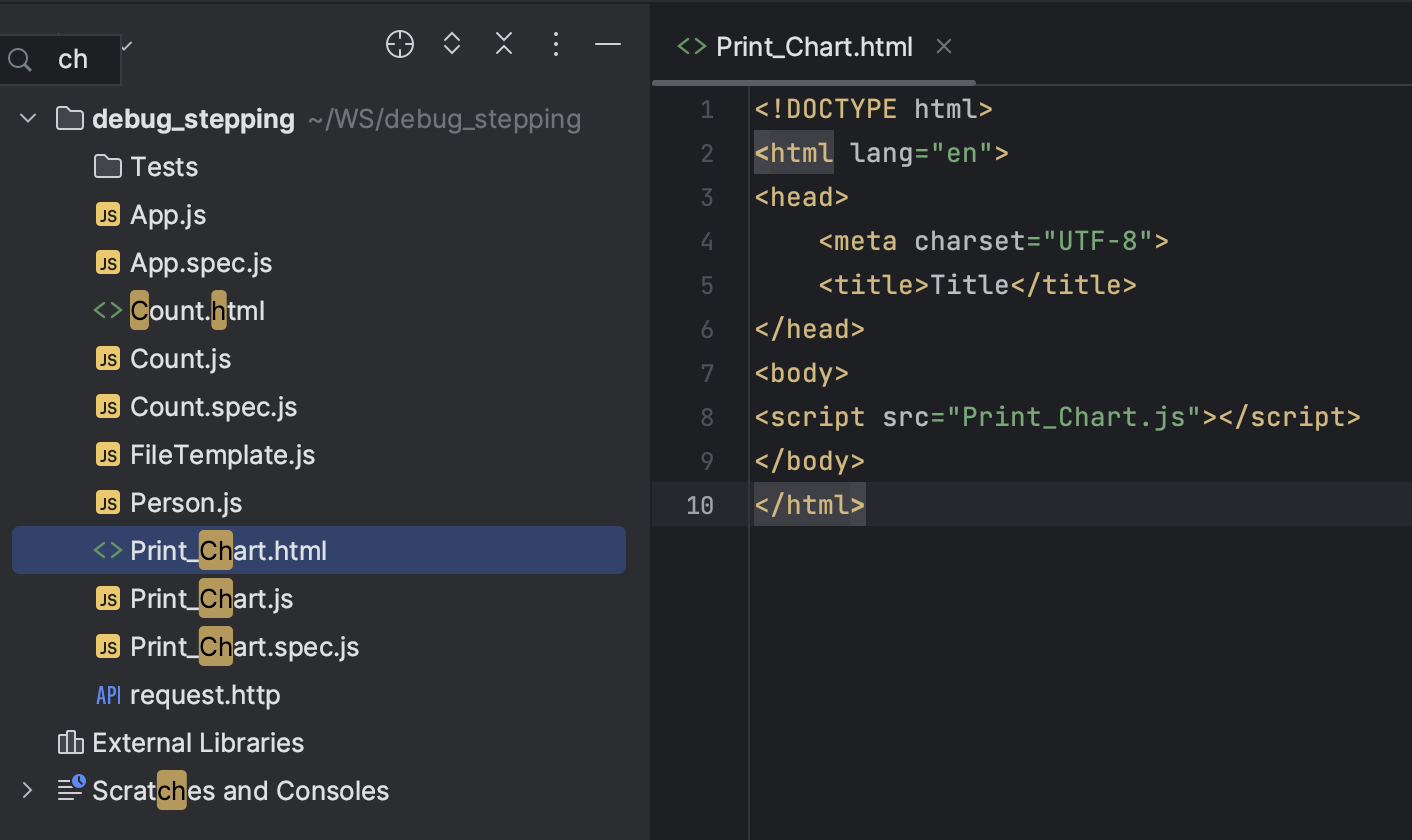
Search for text fragments
- To find a text fragment in the current file, press Control+F and type the search pattern.
- To search within a directory, any arbitrary scope, or the entire project, press Control+Shift+F and specify the search pattern and the scope.
Go to declaration of a symbol
Go to Declaration ( Control+B , Control+LeftClick brings you to the location where a particular symbol is first declared. This type of navigation works from any place in the source code.
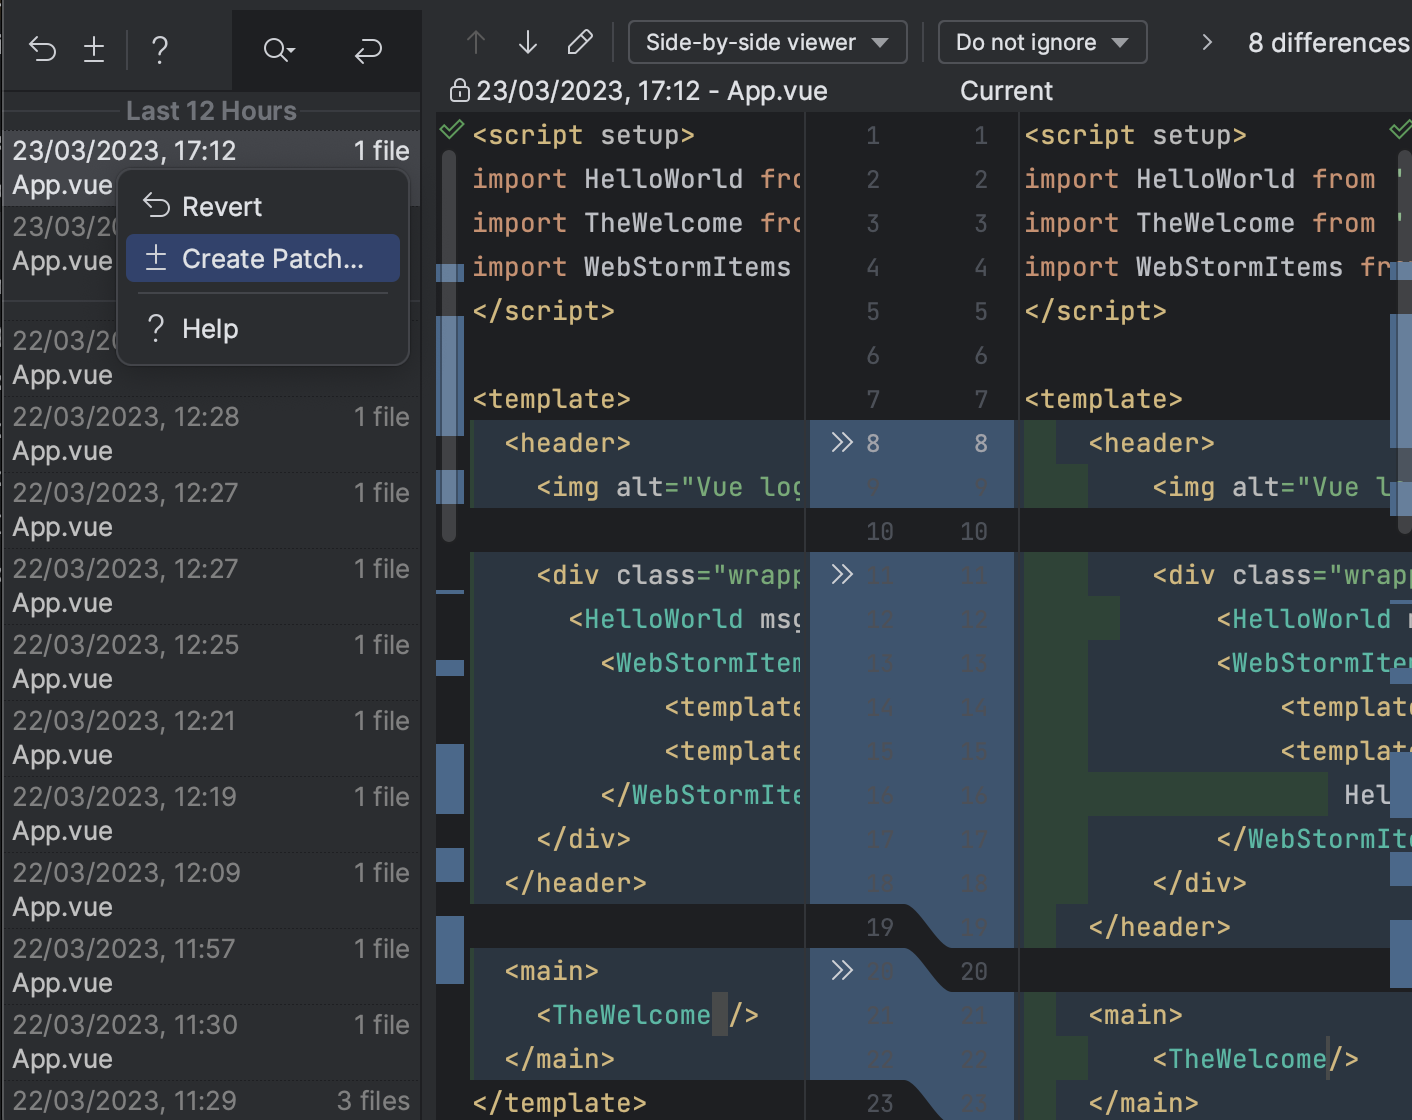
Navigate through the timeline
WebStorm automatically keeps track of the changes you make to the source code, the results of refactoring, and so on in the Local History . To view it for a file or a folder, choose VCS | Local History | Show History from the main menu. Here you can review the changes, revert them , or create a patch :
Complete your code
WebStorm automatically completes keywords, symbols from standard language API’s and from the project dependencies. Press Control+Space to get the code completion options for the current context, the icon next to each suggested member indicates its type:
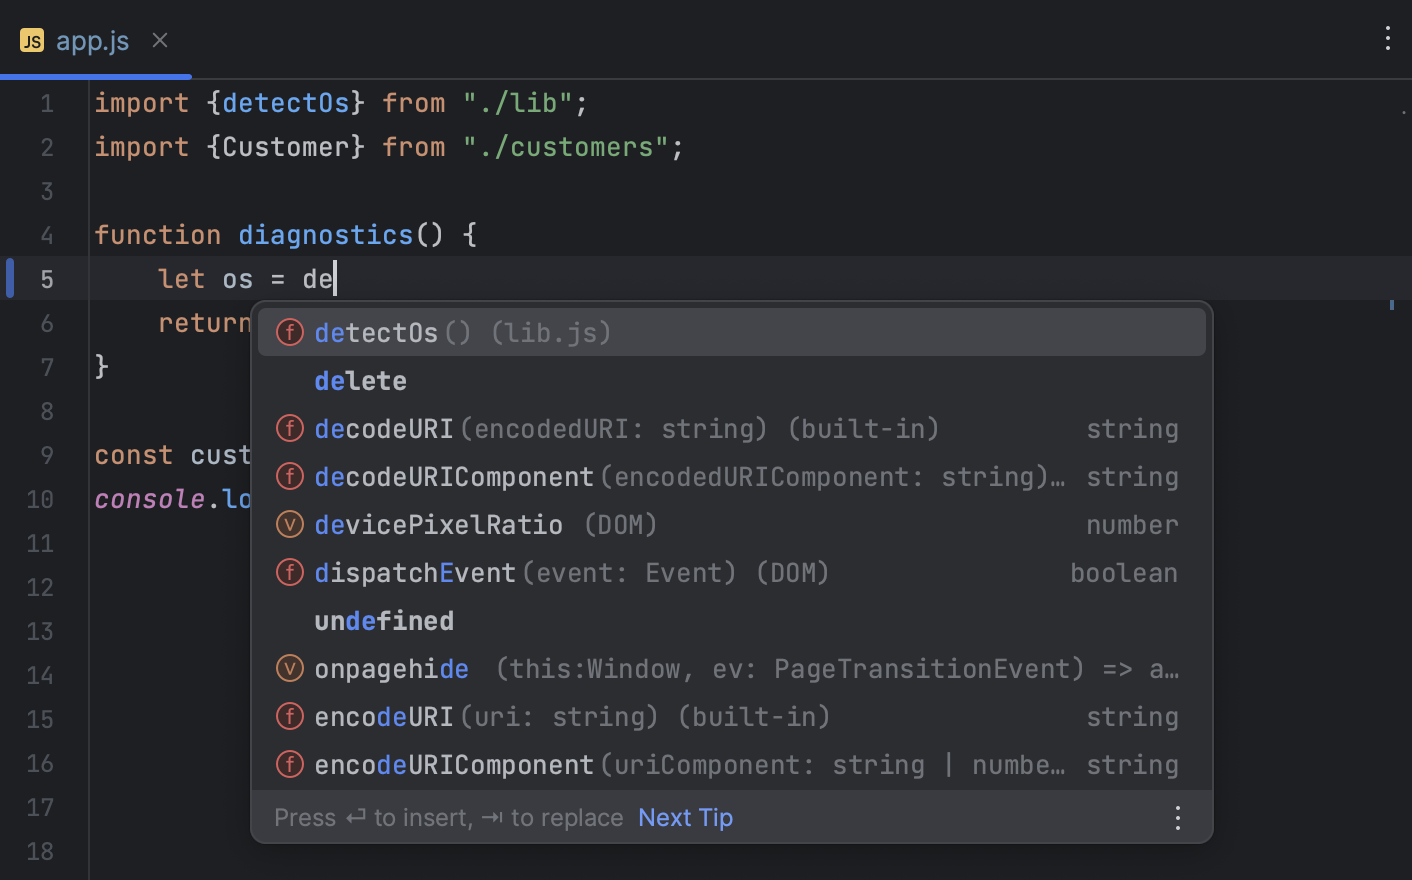
To have more variants shown, press Control+Space once again.
By default, completion suggestions in JavaScript and TypeScript files are sorted by their relevance based on machine-learning algorithms. To turn off this sorting, open the Settings dialog ( Control+Alt+S ), go to Editor | General | Code Completion , and clear the Sort completion suggestions based on machine learning checkbox. Learn more from Sort suggestions based on Machine Learning.
Inspect and fix your code on the fly
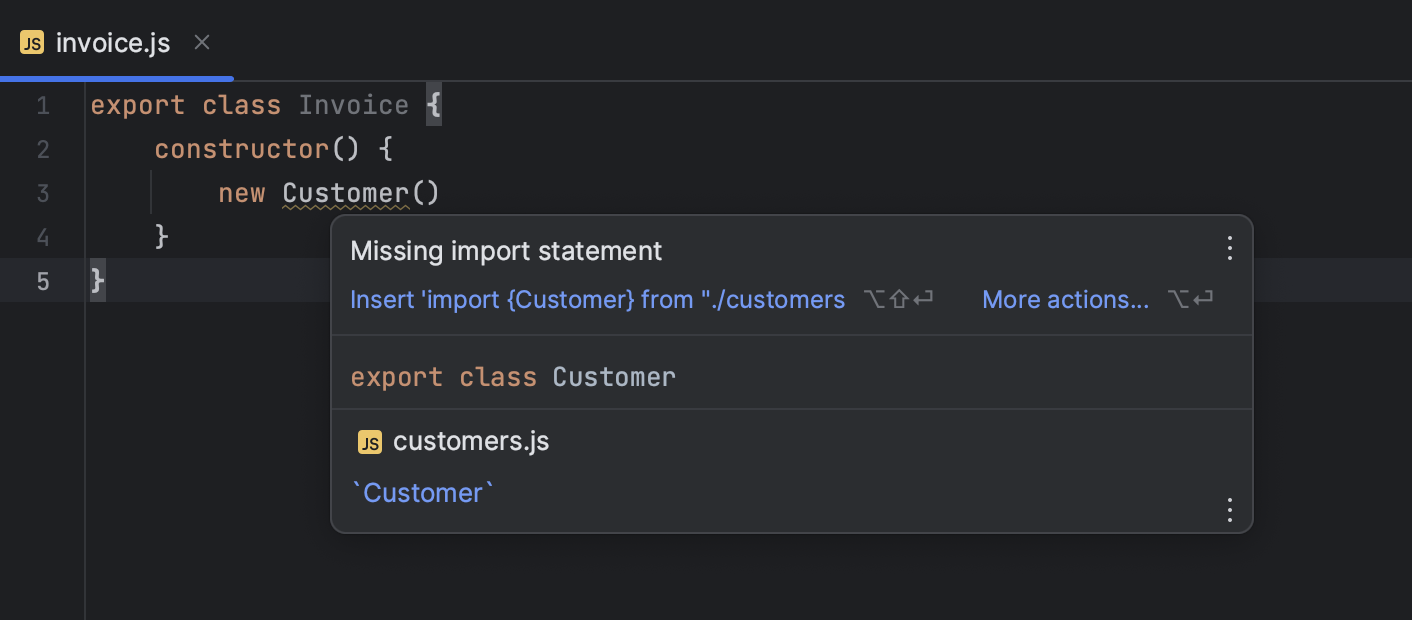
WebStorm monitors your code and tries to keep it accurate and clean. It detects potential errors and problems and suggests quick-fixes for them. Every time WebStorm finds unused code, an endless loop, a missing import statement for a symbol, and many other things that probably require your attention, you’ll see a highlight and a light bulb. Click this bulb or press Alt+Enter to apply a fix.
You forgot an import statement? WebStorm marks the symbol as unresolved and shows a tooltip with the suggested quick-fix:
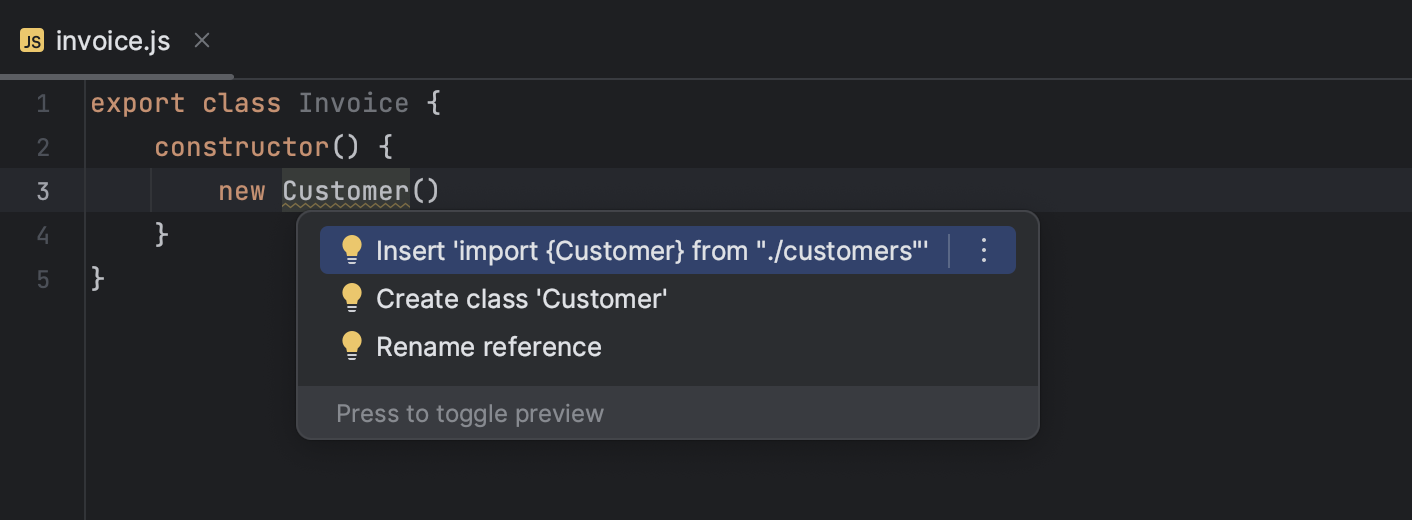
Alternatively, press Alt+Enter and click Insert ‘import «Customer»‘ :
For ES6 and TypeScript symbols, WebStorm can add missing import statements on code completion:
To see the full list of available inspections , in the Settings dialog Control+Alt+S , click Inspections under Editor . You can disable some of them, or enable others, plus you can adjust the severity of each inspection. You decide whether it should be considered an error or just a warning.
Refactor your code
Refactoring means updating the source code without changing the behaviour of the application. Refactoring helps you keep your code solid, dry, and easy to maintain. WebStorm ensures that after refactoring the code works in the same way as before it, because changes are made smartly to the whole project. For example, if you rename a class, WebStorm automatically renames all its usages and import statements.
- In the editor or in the Project tool window, select the expression or symbol to refactor, and press Control+Alt+Shift+T
- From the Refactor This list, choose the required refactoring.
Run and debug your application
In WebStorm, the entry point to running or debugging an application is a run/debug configuration. WebStorm comes with a number of predefined run/debug configuration templates for different types of applications and files. The information you need to provide in a configuration depends on its type, it can be a file to run or a test. Some configurations can attach to already running applications, in this case you need to specify the URL and port to attach to.
To run your application
- Create a run configuration of the type that fits your app and click .
- In some cases, you can run your app or file without creating a run configuration, WebStorm can do it for you. For example, to run any file with Node, just choose Run on its context menu or press Control+Shift+F10 . This also works for an HTML file, WebStorm just opens it in the browser.
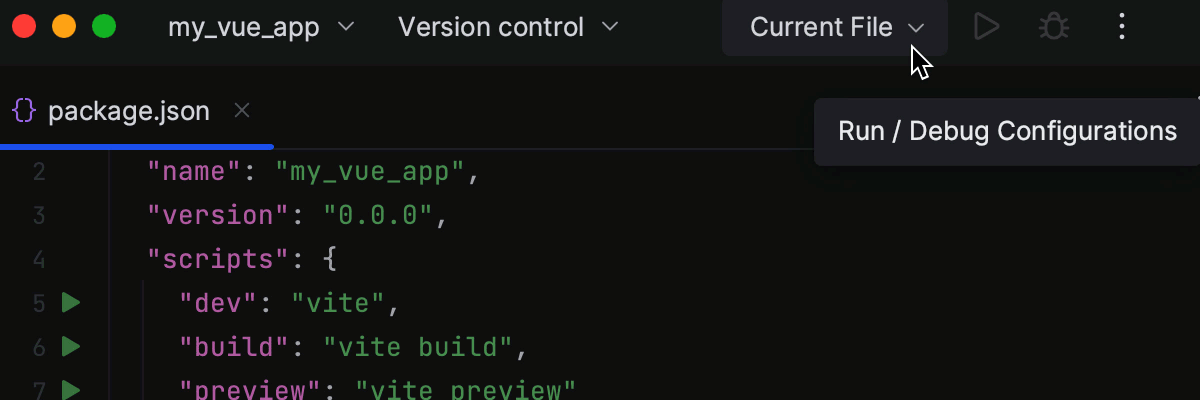
- If your project has an npm script that starts your application in the development mode or builds it, just open your project package.json in the editor, click in the gutter next to the start task, and choose Run ‘start’ from the list:
To start debugging
With WebStorm, you can debug various kinds of applications — client-side applications, Node.js applications, tests, and so on. Here’s how you can debug client-side JavaScript running on an external development web server, for example, powered by Node.js.
- Set the breakpoints in the JavaScript code, as required.
- Run the application in the development mode , possibly with npm start as described above, and copy the URL address at which the application is running in the browser.
- Go to Run | Edit Configurations . Alternatively, select Edit Configurations from the list on the toolbar. In the Edit Configurations dialog that opens, click the Add button () on the toolbar and select JavaScript Debug from the list. In the Run/Debug Configuration: JavaScript Debug dialog that opens, specify the URL address at which the application is running. This URL can be copied from the address bar of your browser as described in Step 2 above.
- From the Select run/debug configuration list on the toolbar, select the newly created configuration and click next to it. Alternatively, hold Control+Shift and click the application URL link in the Run tool window. The URL address specified in the run configuration opens in the browser and the Debug tool window appears.
- In the Debug tool window, proceed as usual: step through the program, stop and resume the program execution, examine it when suspended, view actual HTML DOM, run JavaScript code snippets in the Console, and so on.
WebStorm has a built-in web server that can be used to preview and debug your application in a web browser or IDE’s built-in browser. This server is always running and does not require any manual configuration. For more information, refer to Debugging an application running on the built-in server.
Follow your code style standards
WebStorm automatically formats all the new code according to the code style settings that are specific to each language. These settings are also applied during refactoring.
You can configure the code style yourself or let Prettier take care of that.
Keep your source code under Version Control
If you are keeping your source code under version control, you will be glad to know that WebStorm integrates with many popular version control systems, like Git (or GitHub), GitLab, Mercurial, Perforce, Subversion, and CVS. In most cases WebStorm detects your VCS automatically. To specify your credentials and any settings, go to the Version Control page of the Settings dialog Control+Alt+S .
The VCS menu will give you hints about what commands are available. In the Commit tool window Alt+0 , you can view and track the changes you and your teammates make, create changelists, commit and push your changes, and much more.
The most used operations, like Commit, Push, and View History are also available from the VCS Operations popup Alt+` .
See Version control for more information.
Customize your environment
Make WebStorm your own with different themes, fonts, and keymaps. You can also add extra functionality with hundreds of plugins from our marketplace.
Appearance
The first thing to fine-tune is the general «look and feel». The default WebStorm theme is Dark . If you prefer a lighter environment, in the Settings dialog Control+Alt+S , click Appearance under Appearance and Behavior , and then choose Light .
Editor
You can also adjust every aspect of the editor’s behavior, for example, enable or disable Drag’n’Drop, customize the behavior of editor tabs, configure highlighting for each supported language, edit the code folding settings, change the code completion policy, and much more. To customize an editor’s feature, press Control+Alt+S and in the Settings dialog, choose the relevant page under Editor .
Keymap
WebStorm is a keyboard-centric IDE, which means that almost any action in it is mapped to a keyboard shortcut. WebStorm comes with a default keymap which you can always change it to fit your habits as described in Configure keyboard shortcuts, just press Control+Alt+S and choose Keymap under Appearance and Behavior .
WebStorm: обзор редактора кода и полезных фишек для веб-разработчиков и не только
WebStorm – один из множества редакторов кода для профессиональной разработки. Используется преимущественно фронтенд-разработчиками, которым нужно больше работать с JavaScript или Python, чем со стандартными CSS и HTML. Хотя с ними редактор кода тоже неплохо справляется. Отличительной особенностью является формат “все в коробке”. Это значит, что разработчику не нужно устанавливать никаких дополнений – редактор кода будет отлично работать со всеми технологиями прямо после установки.
Далее рассмотрим основные особенности WebStorm, а также несколько неочевидных вещей.
Дополнения не нужны
Первое и самое мощное конкурентное преимущество этого редактора кода – это отсутствие в необходимости установки каких-то дополнений, чтобы полноценно работать с проектами. По умолчанию сюда встроены все основные плагины, фреймворки, продвинутый анализатор, удобная среда для тестирования кода, отладчик. Более подробно с функционалом можно ознакомиться на официальном сайте разработчиков.
А еще WebStorm кроссплатформенное решение, а значит пойдет практически на любом компьютере. Это очень удобно, когда нет доступа к основной рабочей машине, но нужно срочно внести в проект какие-нибудь правки. Редактор кода быстро устанавливается даже на слабые компьютеры, а как-либо настраивать его не требуется. Все что вам потребуется в таком случае, помимо скачивания и установки редактора кода, это загрузить файлы проекта и открыть его в интерфейсе WebStorm.
Большинство других редакторов не могут похвастаться подобным функционалом. Да, там будет минимальный набор необходимых инструментов, но их будет недостаточно для корректной работы с серьезными проектами. С WebStorm такой проблемы нет – максимум, что вам придется настраивать, так это интерфейс.
Однако это не значит, что у WebStorm нет никаких дополнений и плагинов – вы можете добавить их при необходимости. Просто все те инструменты, которые используются большинством разработчиков, работающих с JavaScript, здесь уже реализованы. Если вам чего-то все-таки недостает или вы работаете с очень сложными проектами, то плагины можно скачать.
Кастомизируемый интерфейс
Первое, с чем сталкивается пользователь любой программы – это интерфейс. В целом, внешний вид рабочей среды WebStorm не имеет существенных отличий от многих других редакторов кода: слева находится панель с файлами и папками проекта, в верхней части вкладки для быстрого переключения между открытыми файлами и меню программы, снизу панель состояний.
Если вас не устраивает стандартное расположение элементов интерфейса, то их можно поменять, в том числе и расположить важные компоненты в произвольном порядке, а не так, как это изначально задумывалось разработчиками. Интерфейс может настраиваться как глобально, так и под один конкретный проект. Например, в одном проекте вы делаете упор на разработку интерфейса с использованием SASS и других препроцессоров. В настройках WebStorm можно вынести необходимые инструменты на отдельную панель для конкретного проекта, а для других применить стандартные или другие индивидуальные настройки.
Стандартный интерфейс WebStorm
Рабочее пространство можно также делить на несколько функциональных зон. Актуально для больших проектов, когда одновременно нужно вносить изменения в несколько файлов, а постоянно переключаться между ними в верхней панели или с помощью сочетаний клавиш неудобно. В раздел “View” есть пункт переключения на несколько функциональных окон. Очень удобно, когда есть несколько мониторов – на одном-двух пишите код, а на другом проводите отладку.
Другая противоположность расширенным настройкам интерфейса – Zen-режим. Вы полностью убираете все пункты меню, вкладки, кнопки и прочее. Остается только окошко, в котором пишется код. Очень удобно для тех, кто хочет минимизировать количество отвлекающих факторов, а при работе с кодом привык пользоваться горячими клавишами. Без их использования будет очень неудобно работать в Zen-режиме.

WebStorm в Zen-режиме. Нет ничего, кроме кода и кнопок для быстрой проверки в браузере
Горячие клавиши
Часто при работе с кодом удобнее использовать горячие клавиши, чем подводить курсор к нужному компоненту интерфейса. В программу уже внесено несколько комбинаций горячих клавиш, но вы можете расширить их, добавляя свои собственные сочетания.
Вот основные сочетания клавиш для работы с файлами:
- Ctrl+F. Стандартная комбинация для большинства программ. Отвечает за открытие поисковой строки по текущему файлу.
- Ctrl+Shift+F. Отвечает за вызов поискового интерфейса по всему проекту. Можно найти как конкретный файл/папку, так и какое-то ключевое слово.
- Ctrl+Shift+N. Поиска файла по древу проекта.
- Alt+. Отвечает за переключение по открытым вкладкам. < – переключение влево, >– переключение вправо.
- Shift+F6 – быстрое переименование открытого файла.
- Ctrl+Alt+Shift+T. Отвечает за быстрое открытие инструментов рефакторинга.
- Double Shift. Поиск по названием файлов и функций.
- Ctrl+Tab. Тоже переключение между файлами в проекте.
А вот основной набор клавиш для удобного редактирования текста:
- Ctrl+Shift+↓/↑. Быстрое перемещение по блокам кода вверх или вниз в зависимости от направления стрелки. Перемещение происходит в пределах выбранной вложенности или выделенного куска кода.
- Ctrl+Alt+L. Включает/отключает стандартное форматирование кода WebStorm. Очень удобно, если форматирование сбилось или вы допустили где-то ошибку.
- Alt+клик. Проставляет мульти курсор, то есть вы одновременно можете работать с несколькими строками. Пример на картинке ниже.
- Alt+Enter. Выведение окошка с рекомендациями по улучшению выбранного куска куда, которое предлагается программой. Обычно, чтобы получить его достаточно навести на пиктограмму лампочки около нужного отрезка.
- Ctrl+D. Создает дубликат строки, на которой в данный момент расположен курсор мыши.
- Зажатое колесо мыши выделяет повторения кода, идущие друг за другом.
- Ctrl+/. Быстрое внесение комментария к коду или удаление текущего комментария.
Ну и пара встроенных сочетаний для работы с Git:
- Ctrl+K. Делает коммит проекта в систему контроля версий.
- Ctrl+Shift+K. Делает пуш проекта в систему контроля версий.
Это не все сочетания клавиш, встроенные в WebStorm по умолчанию, но ими чаще всего пользуется большинство разработчиков. Также вы можете составлять свои сочетания клавиш, чтобы сделать процесс работы с кодом более удобным и кастомизированным под свои потребности.
Разделение интерфейса
По умолчанию рабочий интерфейс WebStorm мало отличается от аналогов, но его можно настроить. В том числе доступно необычное, но достаточно удобное решение по разделению рабочего пространства – табличное деление. Вместо вкладок сверху у вас будет таблица сбоку, где в одной вкладке будут расположены все файлы и проекты, а в соседней файлы выбранного проекта.
Такой подход подходит тем, у кого появляется множество открытых вкладок, отвлекающих внимание.
Еще в WebStorm есть история взаимодействия с файлами. Она вызывается сочетанием клавиш Ctrl+E.

Альтернативный вариант взаимодействия с файлами в WebStorm
Сообщество
У WebStorm есть собственный форум, где можно найти решение большинства проблем. Причем разработчики обсуждают не только работу с редактором, но и вообще проблемы, которые могут возникнуть при написании кода проекта.
Создатели WebStorm тоже активно взаимодействуют с аудиторией проекта. Если вы не нашли ответ на свой вопрос на форуме, то добавьте свой вопрос в баг-трекер. В нем собираются все жалобы пользователей. Вопрос, конечно же, должен касаться исключительно работы самого WebStorm, а не проблем с проектом или каким-то сторонним плагином.
Уникальные проблемы попадают в общий список и выставляются на голосование пользователей – когда баг набирает много голосов, команда WebStorm начинает работать над его устранением. В следующем обновлении, скорее всего, этого бага больше не будет. Если же проблема не настолько серьезная, чтобы из-за нее вносить изменения в работу WebStorm, то разработчики предложат вам ветку форума с решением похожей проблемы или статью на других ресурсах, если на форуме подобная проблема не обсуждалась ранее. В любом случае вам попытаются оказать хоть какую-то помощь.
Баг-трекер, кстати, можно использовать не только для отправки ошибок и жалоб, но и предложений для улучшения работы редактора или добавления в него новых возможностей. Вот пример: до 2020 года в WebStorm не было режима совместной работы над кодом нескольких разработчиков. В баг-трекер ранее добавлялось предложение о внедрении этой возможности, но некоторое время оно оставалось вне внимания сообщества – голоса уходили на другие позиции. Когда возникла острая необходимость в удаленной работе за внедрение режима командной разработчики проголосовало большинство членов комьюнити. В итоге, этот режим был введен максимально оперативно – в следующем обновлении программы.
У WebStorm активное сообщество, готовое всегда прийти на помощь, а также активно участвовать в развитии редактора кода – предлагать новые функции, помогать искать баги и так далее. Еще здесь отзывчивые разработчики, которые стараются оперативно решать проблемы и реагировать на запросы сообщества.
Добавление плагинов
В WebStorm уже по умолчанию есть все необходимое для комфортной разработки с использованием JavaScript или Python. Тем не менее, здесь предусмотрен собственный магазин плагинов. При первом запуске WebStorm как раз открывается раздел с выбором плагинов. Там представлены самые популярные варианты. Большинство из них бесплатны. Добавление плагина происходит нажатием по соответствующей кнопке.
Также у разработчиков WebStorm есть собственный онлайн-магазин с большой базой плагинов. Большая часть из них бесплатна. Для добавления плагина из веб-магазина нужно:
- Выбрать нужную позицию и нажать на нее, чтобы перейти непосредственно на страницу плагина.
- Далее кликните по кнопке “Get”. После этого откроется история версий плагина. Удобно, что вы можете выбрать конкретную версию, а не ту, какую посчитает нужной разработчик.
- После скачивания у вас появится инструкция по установке плагина на английском языке. Обычно там нужно выбрать IDE и затем в его настройках указать расположение файла плагина на диске. Иногда этот файл требуется вручную перенести в корневую папку WebStorm.

Онлайн-магазин плагинов WebStorm
Создание файлов
Создать файл можно с помощью открытия специального меню создания. Кликните правой кнопкой мыши по папке в левой части, где хотите добавить дополнительный файл. Откроется меню, в котором предлагается выбрать, что требуется создать: файл или папку. В первом случае также доступны варианты выбора типа файла. По умолчанию доступны только типы файлов, которые используются в веб-разработке. Этот список может быть расширен за счет добавления плагинов. Также можно создать простой файл без расширения и задать его вручную при сохранении.

Доступные варианты расширений создаваемых файлов в WebStorm
Работа с проектами
Вы можете как создать новый проект, сделав папку в интерфейсе WebStorm, так и открыть уже готовый проект. Открытие стандартное – либо через верхнее меню “Файл” и далее “Открыть”, либо через кнопку “Открыть” на экране приветствия. Далее открывается “Проводник”, в котором и выбирается папка проекта. Также эту папку можно просто перетащить в окно WebStorm.
Все открытые проекты по умолчанию отображены в левой панели. Если вы завершили работу с конкретным проектом, то можете удалить его из панели.
Условия использования
WebStorm – платный редактор кода. В базовой версии за годовую подписку просят 70 долларов. В расширенной 298 долларов. Цена написана с учетом НДС в 20%. Чем дольше вы будете пользоваться редактором, тем ниже будет цена. Например, с 3-го года использования стоимость базовой подписки составит всего 42 доллара с учетом НДС. Доступна также ежемесячная оплата.

Цены на годовую подписку WebStorm для частных лиц
Есть спецпредложения, по которым WebStorm можно приобрести бесплатно или с очень серьезной скидкой. Обычно они касаются образования, стартапов, OpenCode-проектов, некоммерческих организаций.
Для тестирования WebStorm доступен бесплатный месяц. После этого доступ потребуется либо купить на общих условиях, либо получить бесплатно, если вы подходите под особые условия.
Заключение
WebStorm – продвинутый платный редактор кода, идеально подходящий для веб-разработчиков, которые часто взаимодействуют с JavaScript. Главное удобство в том, что рабочая среда уже полностью настроена – все, что вам остается просто открыть нужный проект. Однако, каких-либо интересных функций, которых нет и невозможно реализовать в бесплатных аналогах WebStorm предложить не может.