Что делать? This host supports Intel VT-x
![]()
Привет, друг! Если ты читаешь эту статью, то скорее всего столкнулся с ошибкой VT-x/AMD-V hardware acceleration is not available on your system когда пробовал создать виртуальную машину в Virtual Box, или такой ошибкой при работе с VMWare: This host supports Intel VT-x, but Intel VT-x is disabled или чем-то похожим при работе с другой средой виртуализации. Продолжай читать и ты обязательно найдёшь причину!

Для начала, позволь вкратце объяснить, что такое VT-x и AMD-V.
VT-x – это технология, разработанная компанией Intel в 2005 году, которая позволила процеcсорам (CPU) данного производителя поддерживать аппаратную виртуализацию. Грубо говоря, появилась возможность имея один компьютер, создать другой внутри него и даже с другой операционной системой!
AMD-V — это технология аппаратной виртуализации от компании AMD. Первые процессоры от производителя AMD появились на рынке годом позже, в 2006 году.
Итак, теперь вот тебе топ 3 причин, по которым ты мог встретить вышеупомянутые ошибки:
- Процессор твоего «комплюктера» попросту не поддерживает технологии виртуализации VT-x/AMD-V.
Возможно ты являешься обладателем очень старого или наоборот крайне специфичного девайса, CPU которого просто не умеет в виртуализацию. В таком случае, ты не сможешь устранить те ошибки и запустить виртуалку в любой среде виртуализации. Но не огорчайся, есть масса способов покрутить виртуалки, например, воспользоваться услугами VDS/VPS хостера!
- VT-x/AMD-V отключила Hyper-V.
Hyper-V это проприетарная технология виртуализации от Microsoft, которая по умолчанию вырубает поддержку VT-x/AMD-V, чтобы избежать конфликтов. Короче придётся выбирать между Hyper-V и другой конфликтующей средой виртуализации.
- Технология VT-x или AMD-V просто выключены и их нужно включить.
По умолчанию, поддержка виртуализации выключена в BIOS и чтобы победить ошибки из начала статьи и, наконец запустить заветную виртуалку, тебе нужно просто зайти в BIOS и включить VT-x/AMD-V!
В зависимости от производителя твоего компьютера, может быть несколько вариантов перехода в BIOS. Обычно, тебе нужно просто перезагрузить компьютер и дождаться на экране надписи: Press to enter BIOS, а вот какая-то кнопка может быть разной.
Вот тебе несколько примеров для разных производителей:
- Asus, Lenovo, DELL
- Как правило просят нажать F2
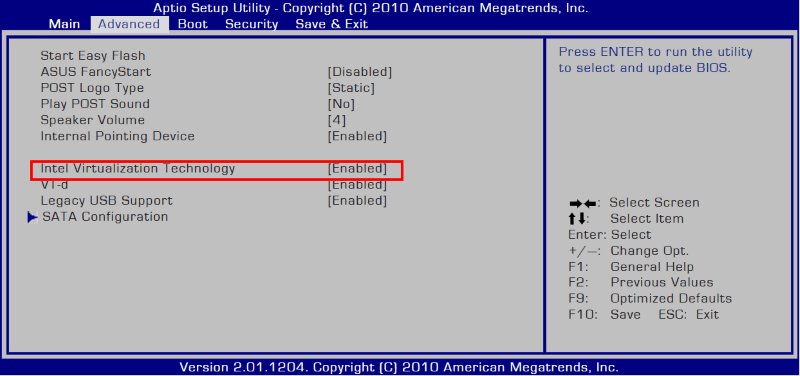
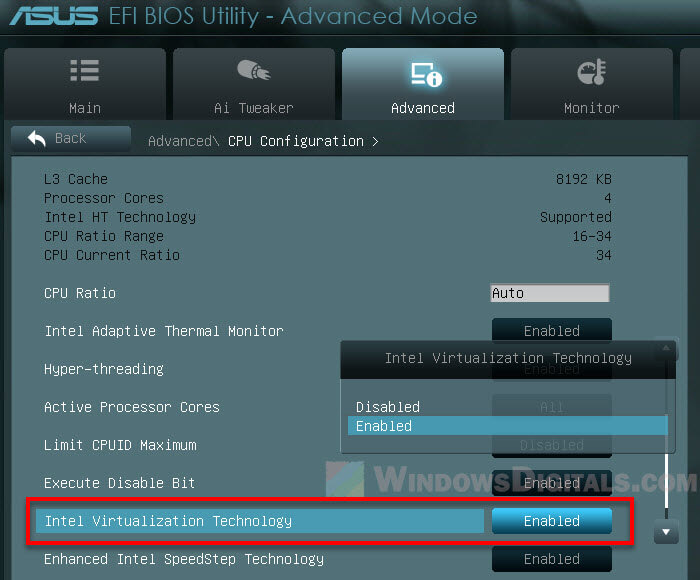
- Перейти на вкладку Advanced, выбрать Virtualization Technology и нажать Enter
- Сменить состояние строки с Disabled на Enabled после чего нажать F10, чтобы сохранить изменения и перезагрузить компьютер
- Acer, HP
- Как правило просят нажать F2 ну или F1 или же CTRL+ALT+ESC или F10
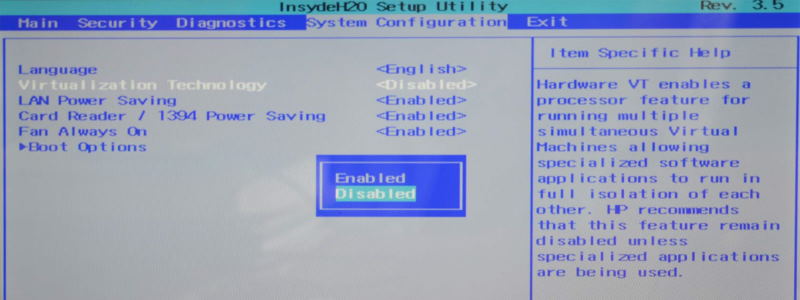
- Нажать на правую стрелку и перейти на вкладку System Configuration, выбрать Virtualization Technology и нажать Enter
- Сменить состояние строки с Disabled на Enabled после чего нажать F10, чтобы сохранить изменения и перезагрузить компьютер
- Компьютеры с процессорами AMD
- Как правило просят нажать F2
- Выбрать вкладку Advanced затем CPU Configuration, после чего выбрать SVM Mode и нажать Enter
- Сменить состояние строки с Disabled на Enabled после чего нажать F10, чтобы сохранить изменения и перезагрузить компьютер

How to Enable Intel VT-X & AMD Virtualization on PC, VMware, VirtualBox?

In this article, we will learn How to Enable Intel VT-X & AMD Virtualization on PC, VMware, VirtualBox.
Most computers today have hardware virtualization features, which have lots of benefits. For example, server consolidation means you can run ten server apps on one machine or testing & development. It can help us tackle OS testing & deployment by enabling virtualization, which improves system reliability. Virtualization also helps avoid system crashes caused by memory corruption caused by software.
Not only do we get these advantages, but setting up IO virtual machines on your PC is also made easier by this. That’s why I’m here to show you how to enable VT-X & AMD virtualization so you can run IO virtual machines on your PC, VMware/Virtualbox, and more!
Virtualization technology allows one to have more than one computer operating system on a single machine simultaneously. It is primarily used to run applications on any operating system while using the same hardware. This allows developers to test software on different platforms without needing additional equipment and enables business owners with diverse needs to use the software best suited for their needs.
Let’s directly move on to the guide: How to Enable Intel VT-X & AMD Virtualization on PC, VMware, VirtualBox.
Table of Contents
How to Enable Intel VT-X Virtualization on PC
We can enable Intel VT-X Virtualization on PC in 2 ways. First, from the UEFI Firmware settings, and the second one is from the BIOS menu directly.
From UEFI Firmware Settings
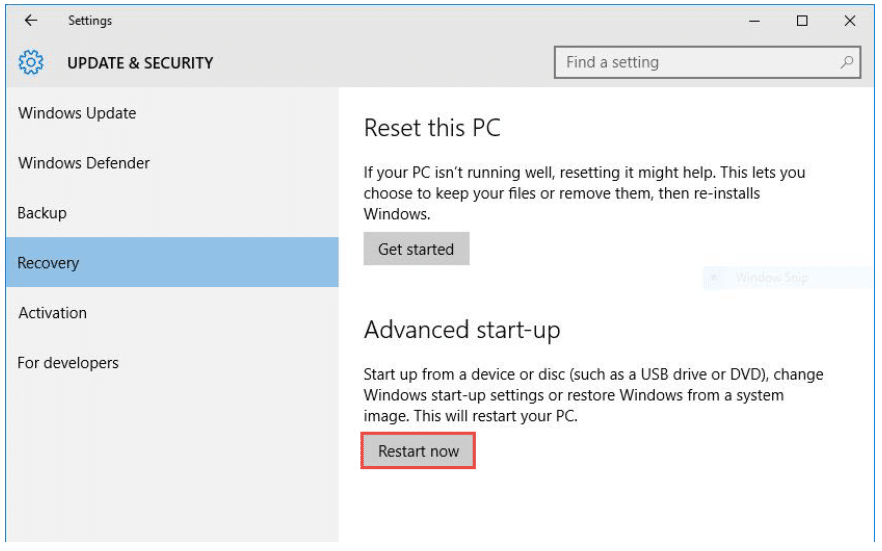
1.Click on Settings> Update & Security> Recovery to find the Restart Now option.
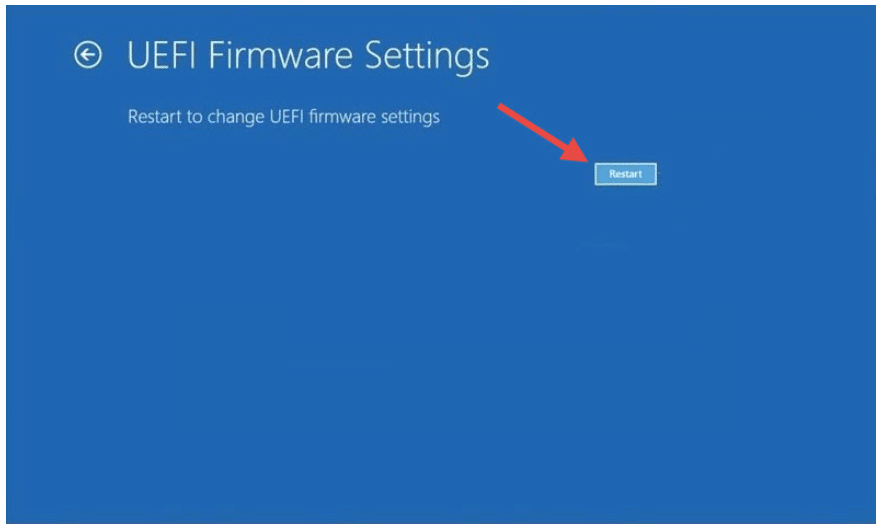
2. While restarting your computer, choose Troubleshoot> Advanced option> UEFI Firmware settings> click Restart.
Note: If you don’t have UEFI Firmware settings, then no problem. Check for VT-x virtualization in your BIOS or boot menu.
3. You will find Intel Virtualization Technology listed on the boot menu. Press F6 to enable it.
From BIOS Directly
1. Simply, restart your computer, and as the system boots, press one of the following keyboard buttons to enter the BIOS menu. The key will vary from brand to brand.
Here is the BIOS Key for your computer:
| Manufacturer | BIOS/UEFI Key |
| ACER | Del, F2 |
| ASUS | F9 |
| COMPAQ | F10 |
| DELL | F2 |
| EMACHINES | Tab, Del |
| HP | Esc, F10, F1 |
| INTEL | F10 |
| LENOVO | F1, F2 |
| SAMSUNG | F2 |
| TOSHIBA | F1, F2, F3 |
| SONY | F1, Esc, F12 |
| PACKARD BELL | F1, Del |
| NEC | F2 |
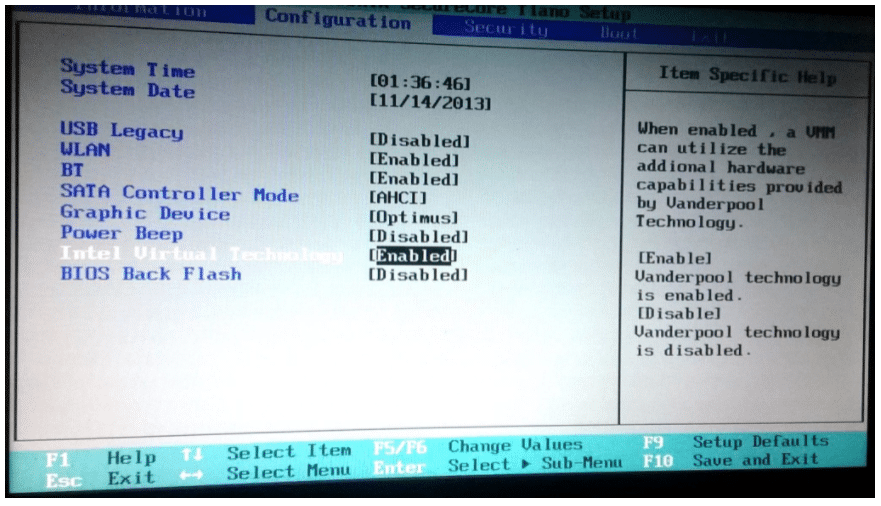
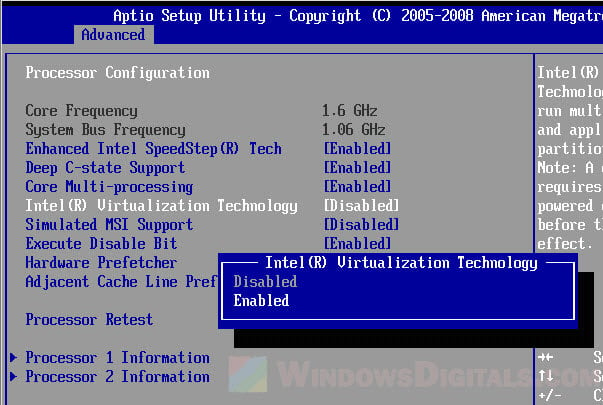
2. Once you are inside the BIOS menu. Go to System Configration> Intel Virtulization Technology.

3. Press the required keyboard button to enable this option.
Some settings might change if you are on Windows 11, here is a guide you can use to enable virtualization on Windows 11.
How to Enable Intel VT-X/AMD Virtualization on VMware
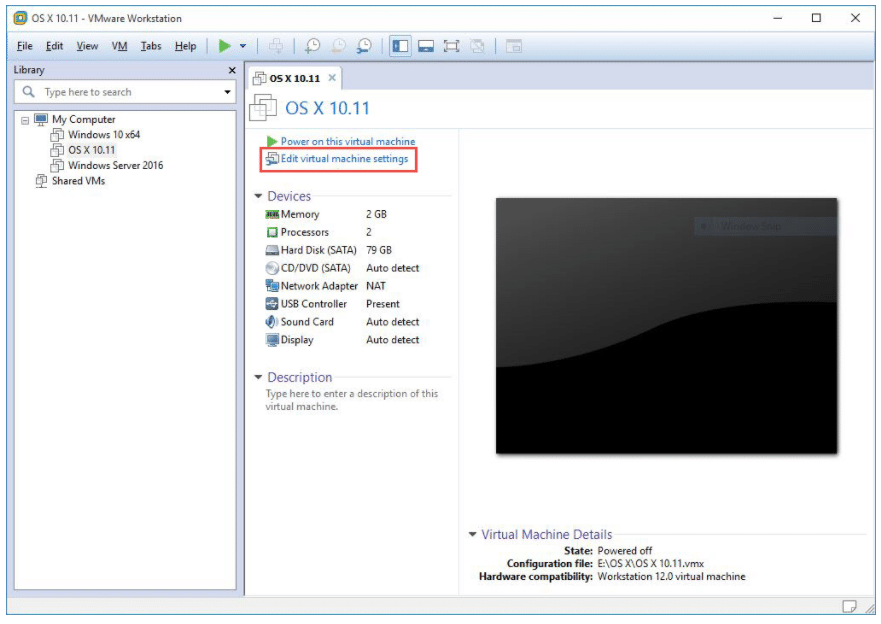
1. To enable Intel VT-X & AMD virtualization, open VMware and select the virtual machine you want to enable Intel & AMD virtualization for, then click on Edit virtual machine settings.
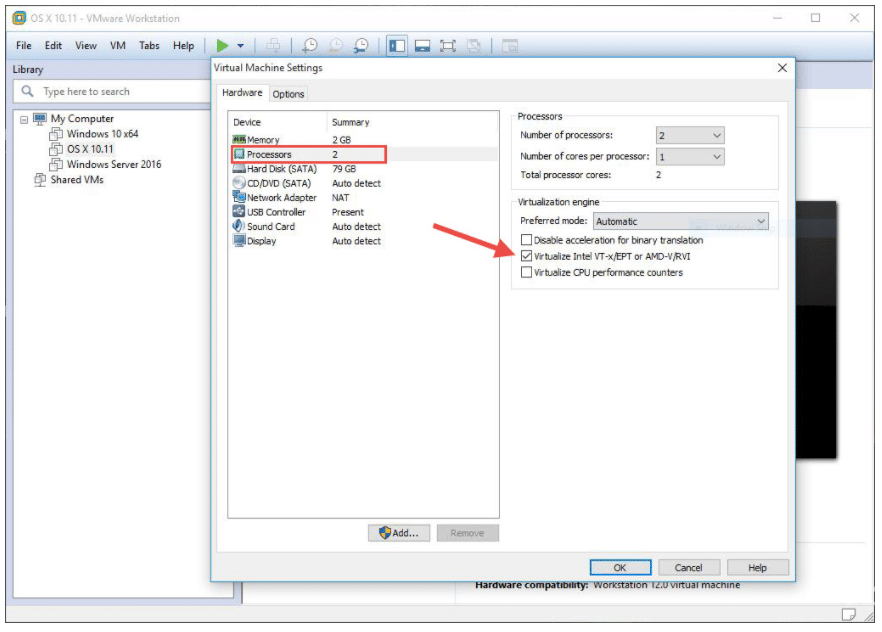
2. From the Processors screen, select Intel VT-X & AMD Virtualization and mark the option if desired. Remember to enable virtualization as well, or leave it on Automatic.
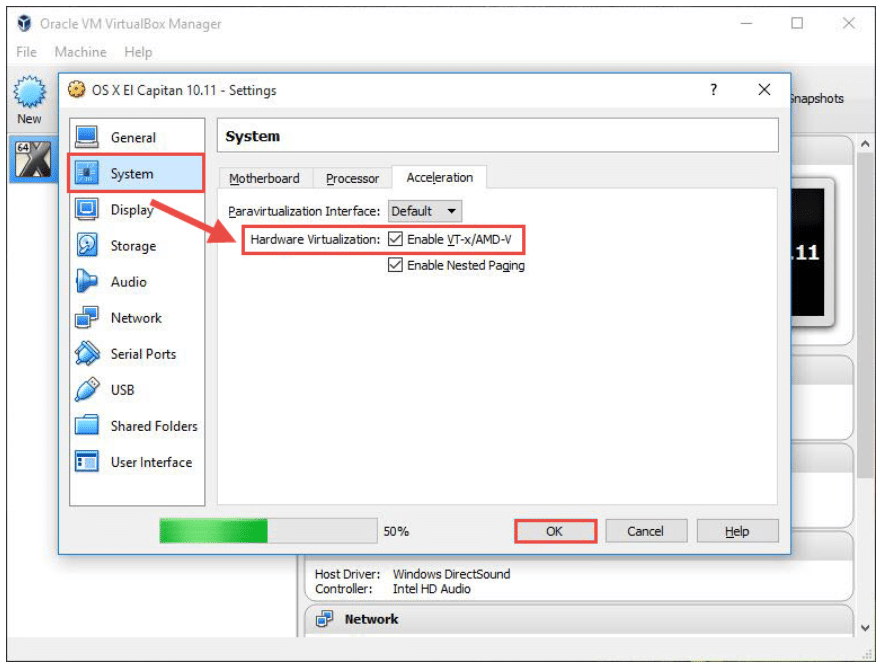
How to Enable Intel VT-x/AMD Virtualization on VirtualBox
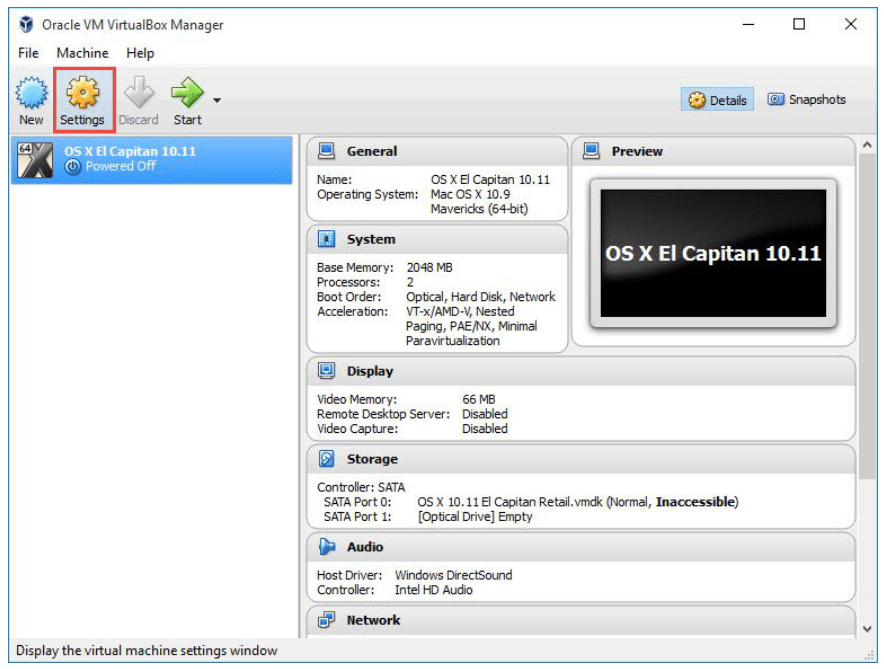
1. Open VirtualBox and select the virtual machine you want to enable Intel-AMD virtualization on, then click on Settings.
2. Here, click the System tab and select the Acceleration tab. Then you can enable Intel VT-x or AMD virtualization and click OK.
Conclusion:
I hope this guide on How to Enable Intel VT-X & AMD Virtualization on PC, VMware, VirtualBox was helpful. If you face any issues, please comment below. We will get back to you with a solution ASAP.
How To Enable Nested Virtualization (VT-x) On Hyper-V, VMWare, VirtualBox VMs In Windows

A Windows computer needs to support virtualization technology in order to run guest operating systems (virtual machines), Windows Subsystem for Linux (WSL), and Windows Subsystem for Android (WSA).
If your computer supports virtualization, then it can be enabled from the UEFI/BIOS settings. However, in the case of a Virtual Machine (VM), you cannot access its BIOS settings. However, one can need to run a VM, an Android application, or a Linux distro inside a VM. So what do you do then?
In such an instance, you must enable nested virtualization on a guest operating system. This is our topic for today, and this post gives you a step-by-step guide on how to enable nested virtualization on VMs configured on Microsoft Hyper-V, Oracle VirtualBox, and VMware Workstation on a Windows computer.
Note: Enabling nested virtualization for VMWare Workstation and Oracle VirtualBox on operating systems other than Windows is different. In this post, we have only discussed how to enable it if your host computer is running a Windows operating system.
Table of Contents
What is Nested Virtualization
Nested virtualization, often referred to as “nested VT-x,” is running a virtualized environment inside a device that is already virtualized. In other words, running a VM inside of another VM.
Download Windows 11 Development Env.
Please enable JavaScript
When enabling a nested virtualization environment, you are nesting a hypervisor. A hypervisor is software that runs and manages virtual machines on top of the host computer.
The hypervisor running the main virtual machine is considered a “Level 0 (L0)” hypervisor. The hypervisor running inside the VM is referred to as a “Level 1 (L1)” hypervisor. Further nested virtualization would result in a Level 2 (L2) hypervisor, and so on.
At this point, most users come to think “How many nested virtualization environments can you run simultaneously?” There is no definitive answer to this at the moment. However, it all depends on your system’s resources. If you have the CPU and the RAM, as well as the storage for it, you can run as many nested hypervisors as you want.
Prerequisites for Nested Virtualization
To enable nested virtualization, the hypervisor needs to support it. Hyper-V first supported nested virtualization in Windows 10/Windows Server 2016. Before that, this technology was not available in the Hyper-V hypervisor.
If you are using Oracle VirtualBox, versions 6.1 and above support nested virtualization.
Moreover, to be able to run nested virtualization, your processor must be an Intel processor with VT-x and EPT technology, or an AMD EPYC or Ryzen processor. You can verify this information by checking on the OEM website or checking hardware virtualization compatibility from Command Prompt.
Once it is confirmed that both your hardware and software are compatible, let us move on to enabling nested virtualization.
How To Enable Nested Virtualization (VT-x) On Hyper-V
To enable nested VT-x on a Hyper-V VM (or any other supported hypervisor), the VM must already be created and must be turned off before performing the steps below.
Make sure that the VM is shut down/powered off and note down the VM’s exact name.
Now run the following cmdlet to enable nested virtualization on the VM while replacing [NameOfVM] with the complete name of the virtual machine.

In the case you wish to disable nested virtualization, use this cmdlet in PowerShell while the VM is disabled:
How To Enable Nested Virtualization (VT-x) On VMWare WorkStation
Nested virtualization will now be enabled on the VM. You may now run another guest OS on top of that VM.
To disable nested VT-x on the VM, simply shut down the VM, return to the Processor settings page, and uncheck the box.
How To Enable Nested Virtualization (VT-x) On Oracle VirtualBox
Upon researching, we came to know that many people ran into this option because apparently, VirtualBox has not yet enabled it for Intel processors (we do not know why).
Using File Explorer, navigate to the path where VirtualBox is installed. By default, it has the following path:
C:\Program Files\Oracle\VirtualBox
Copy this path and then open an elevated Command Prompt. Use the “cd” cmdlet to change your directory to the VirtualBox folder. Use the copied path from File Explorer.

Now, run the following cmdlet while replacing [NameOfVM] with the name of the virtual machine on which you want to enable nested virtualization.
--nested-hw-virt on

Note that, like Hyper-V, this cmdlet will need to be run for each individual VM that you want to enable nested VT-x on.
After running the cmdlet in the steps above, nested virtualization is enabled by default. If you wish to disable it, simply uncheck the box next to “Enable Nest VT-x/AMD-V” on the Processor settings page.
Final Analysis
Virtual machines can be used for different purposes, like performing isolated tests, running special services and tasks, etc. However, if you want to perform virtualization-related tests, then we suggest you perform it on a VM inside another VM. This way, you won’t be putting the parent host computer in harm’s way.
Nested virtualization is another great way to use limited resources while achieving more. You can use the same VM, on a physical computer or on the cloud, create multiple VMs on it, and then distribute those VMs to your students/subordinates; all while only using one level 1 VM.
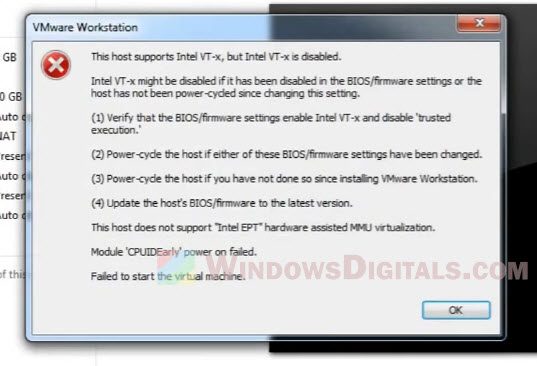
This host supports Intel VT-x, but Intel VT-x is disabled
VMWare Workstation is a popular virtualization software used for running multiple operating systems on a single host computer. However, users may sometimes encounter the “This host supports Intel VT-x, but Intel VT-x is disabled” error during the installation of VMWare Workstation or while powering on a virtual machine.
This error can occur regardless of the operating system you are using or the operating system of the virtual machine you are trying to power on, whether it be Windows 11, Windows 10 or older versions of Windows. The error arises when the Intel Virtualization Technology (VT-x) is not enabled on the host computer and the virtual machine requires it. In this article, we will discuss why this error occurs, what Intel VT-x is, and how to turn on VT-x on the host computer.
Why does the error occur?
Intel VT-x is a hardware-level virtualization technology that allows multiple operating systems to run on the same physical host machine. This technology is, in many cases, required to run virtual machines because it provides a secure and isolated environment for each virtual machine to run in.
If Intel VT-x is not enabled on your host computer, you will receive the error message “This host supports Intel VT-x, but Intel VT-x is disabled”. This error occurs because VMware cannot access the hardware-level virtualization technology, which is necessary to run virtual machines that require it.
What is Intel VT-x?
Intel VT-x (Virtualization Technology for Directed I/O) is a hardware-level virtualization technology developed by Intel. It allows multiple operating systems to run on the same physical host machine, providing each virtual machine with its own virtualized hardware environment. This technology is essential for running virtual machines and is supported by most modern Intel processors.
How do I turn on VT-x on the host computer?
To turn on Intel VT-x on your host computer, you need to access the BIOS settings and enable virtualization technology. The exact steps to do this will vary depending on your computer’s make and model. Here are the general steps:
- Restart your computer and press the key to enter the BIOS setup. The key to enter the BIOS setup is usually F2 , Del , or Esc , and it will be displayed on the screen when your computer starts.
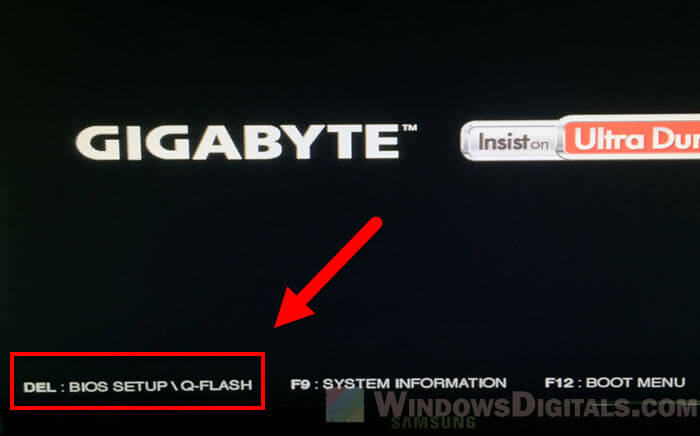
- Once you are in the BIOS setup, navigate to the Advanced, Security or Virtualization section. The section name will vary depending on the BIOS version, so you may need to consult your computer’s manual for specific instructions.
- Enable Intel VT-x or Intel Virtualization Technology.
- Save your changes and exit the BIOS setup.
- Restart your computer and try running the virtual machine on VMware again.
The steps to enable Intel VT-x on a host computer apply to most popular operating systems, including Windows 11 and Windows 10. The steps may vary slightly based on the specific laptop brand, such as Lenovo or HP, but the general process should be similar.
Warning: Please be careful when you change settings in the BIOS. If your BIOS settings are configured incorrectly, your computer may not function properly. In extreme cases, the computer may not even start up. When that happens, you will need to reset your BIOS to factory defaults via the BIOS interface or manually clear the CMOS.
Can I use VMware without Virtualization?
Virtualization is an important technology for running virtual machines on a host computer, and Intel VT-x is a hardware feature that provides this technology. However, it is not required to run VMware. If your host computer does not support Intel VT-x, you can still use VMware, but you will not be able to run virtual machines that require hardware virtualization.
For example, you may not be able to run 64-bit guest operating systems or use certain features that require hardware virtualization. If you are running a 32-bit guest operating system and do not need to use hardware virtualization features, you can still use VMware without Intel VT-x. However, it is recommended to have a host computer with Intel VT-x if you plan to use VMware to run virtual machines.
Importance of Intel VT-x
Intel VT-x is important for several reasons:
- Performance: Intel VT-x enables virtual machines to run faster and more efficiently, as the virtual machines have direct access to the host’s physical hardware. This results in improved performance compared to traditional software-level virtualization methods.
- Security: Intel VT-x provides a secure environment for virtual machines, as each virtual machine runs in its own isolated environment. This helps to prevent malicious software from affecting the host machine or other virtual machines running on the same host.
- Compatibility: Intel VT-x enables the host machine to run multiple operating systems and their applications, regardless of the host machine’s hardware configuration. This allows organizations to run legacy applications on new hardware, reducing the need to maintain legacy hardware.
Limitations of Intel VT-x
Despite its many benefits, Intel VT-x is not without its limitations. Some of the limitations of Intel VT-x include:
- Hardware compatibility: Intel VT-x requires support from the host machine’s processor and motherboard, so not all computers support this technology.
- BIOS compatibility: Intel VT-x requires support from the host machine’s BIOS, so some older computers may not be able to use this technology.
- Performance overhead: Intel VT-x adds some overhead to the host machine, as the virtualization layer adds an extra layer of abstraction between the virtual machine and the physical hardware.
To wrap things up
The error “This host supports Intel VT-x, but Intel VT-x is disabled” can appear when using VMware to run virtual machines. This error occurs because Intel VT-x is not enabled or not exist on the host computer when powering on a virtual machine that requires it.
To resolve the error, you can turn on Intel VT-x in the BIOS of your host computer. Having Intel VT-x enabled will allow you to use virtualization features, but if your host computer does not support it, you can still use VMware with limitations. To ensure a smooth virtualization experience, it is recommended to have a host computer with Intel VT-x.