Как добавить слой в gimp
Команда Создать слой… запускает диалог « Создать новый слой » , с помощью которого можно добавить новый пустой слой в стопку слоёв изображения, поверх активного слоя.
When a floating selection is present, this command will show up as To New Layer . Using this, will turn the floating selection into a normal layer without opening the New Layer dialog.
7.2.1. Активация команды
- Получить доступ к этой команде можно через меню изображения Слой → Создать слой… , или нажав на соответствующую кнопку в диалоге слоёв.
7.2.2. Описание диалога « Новый слой »
Рисунок 16.106. Диалог « Новый слой »
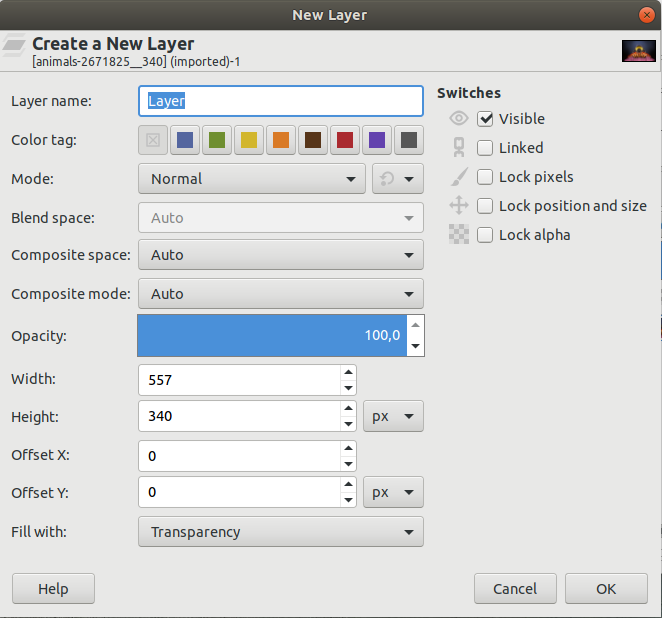
Below the title « Create a new layer » , the name of the image that this new layer will belong to, is displayed. To the right of the title a thumbnail of that image is shown. This will enable you to check that you are adding the layer to the correct image when there is more than one image open.
The name of the new layer. It does not have any functional significance; it is simply a convenient way for you to remember the purpose of the layer. The default name is « Layer » , but it remembers the last name you used. If a layer with the name you chose already exists, a number is automatically appended to it to make the name unique (e.g., « Layer #1 » ) when you click OK to create the layer.
If you click on one of these color buttons, the «Eye» icon box of the created layer will have this color. This can help you identify or group layers to make them easier to spot when you have a lot of layers in your image.
A layer’s mode determines how the layer is combined with the layers below it. The default is « Normal » . The drop-down list offers a wide choice of layer modes, also known as blend modes. On the right, there is another drop-down list to select between « Default » or « Legacy » layer modes.
Layer modes are described in more detail in Layer Modes and Legacy Layer Modes.
Пространство смешивания, Composite space
The color space used for blending or compositing the layer with the layers below it. « Blending » determines how the colors of the upper and lower layer are mixed together, and « compositing » how the upper and lower layer are merged together with respect to the transparency of each pixel.
Depending on the layer mode (see above) one or both of these settings may be disabled. It is only enabled for layer modes where setting this has any effect. When enabled, the default is Auto . The other choices are RGB (linear) and RGB (perceptual) . Note that what Auto translates to, depends on the chosen layer mode. It is not the same for all modes. Some use linear, others use perceptual.
The linear and perceptual encodings are described in choosing precision and encoding and in the Glossary.
When changing the layer mode, both Blend space and Composite space are always reset to Auto to make sure the settings make sense for that particular layer mode.
Режим совмещения
The layer Mode , sometimes referred to as its « blend mode » (Normal, Multiply, etc.), determines how the color values of the layer and its backdrop are combined (together with the Blend space setting). The composite mode of a layer determines how the alpha values of the layer and its backdrop are combined (together with the Composite space setting). The layer’s backdrop is the content against which the layer is composited; namely, it’s the combination of the layers below it.
There are two regions of interest when compositing the layer against its backdrop: the opaque region of the backdrop, and the opaque region of the layer. The layer’s blend mode determines how to combine the colors of the intersection of these two regions: i.e., the common opaque region of both the backdrop and the layer (pixels belonging to only one of these regions don’t need to be combined with anything, and retain their original color). The layer’s composite mode determines which part of these regions to keep, and which to discard.
The example images below show the composition of two layers — the bottom layer containing a red feathered circle, and the top layer containing a green feathered circle — using « Addition » mode, and different composite modes (applied to the top layer).
- Объединение : сохраняет непрозрачные области и слоя и его задника, т.е. объединяет их.
Глава 4. Инструменты GIMP 2.10
Профессиональная обработка изображений в любом продвинутом редакторе, в том числе GIMP, строится на работе со слоями. Представьте себе стол на котором лежит лист бумаги — это базовый слой называется фон или холст. Он есть в любом изображени и может быть любого цвета или даже фотографией. Создадим холст нажав CTRL+N.
Все слои изображения отображаются справа в одноимённом Диалоге.
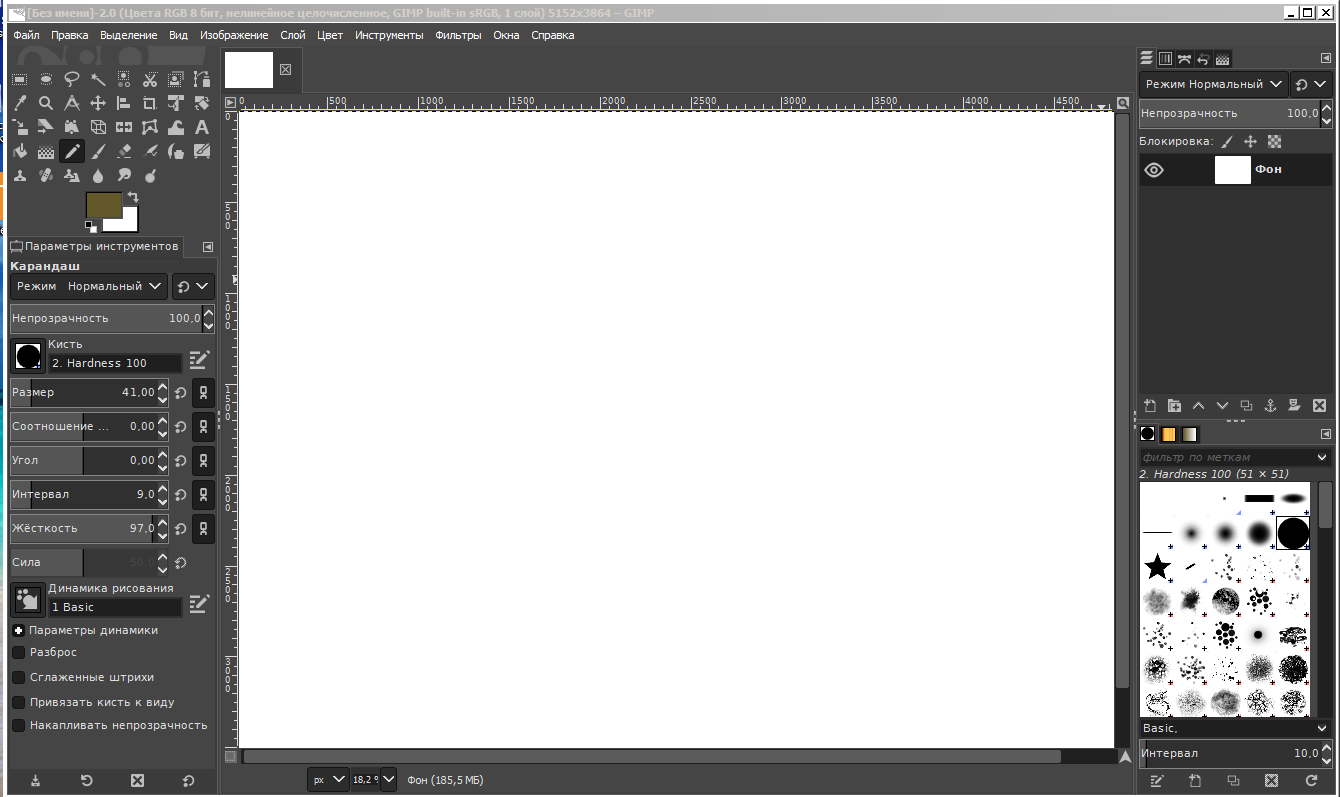
Мы хотим нарисовать рисунок, но не можем определиться в какой части изображения разместить объекты. Здесь и приходят на помощь слои. Их можно представить себе как пачку прозрачных плёнок лежащих на холсте. Количество плёнок не ограничено. Можно рисовать каждый объект на своей плёнке, а затем как угодно перемещать его или убирать совсем. Добавим новый слой в наше изображение и нарисуем на нём произвольный объект.
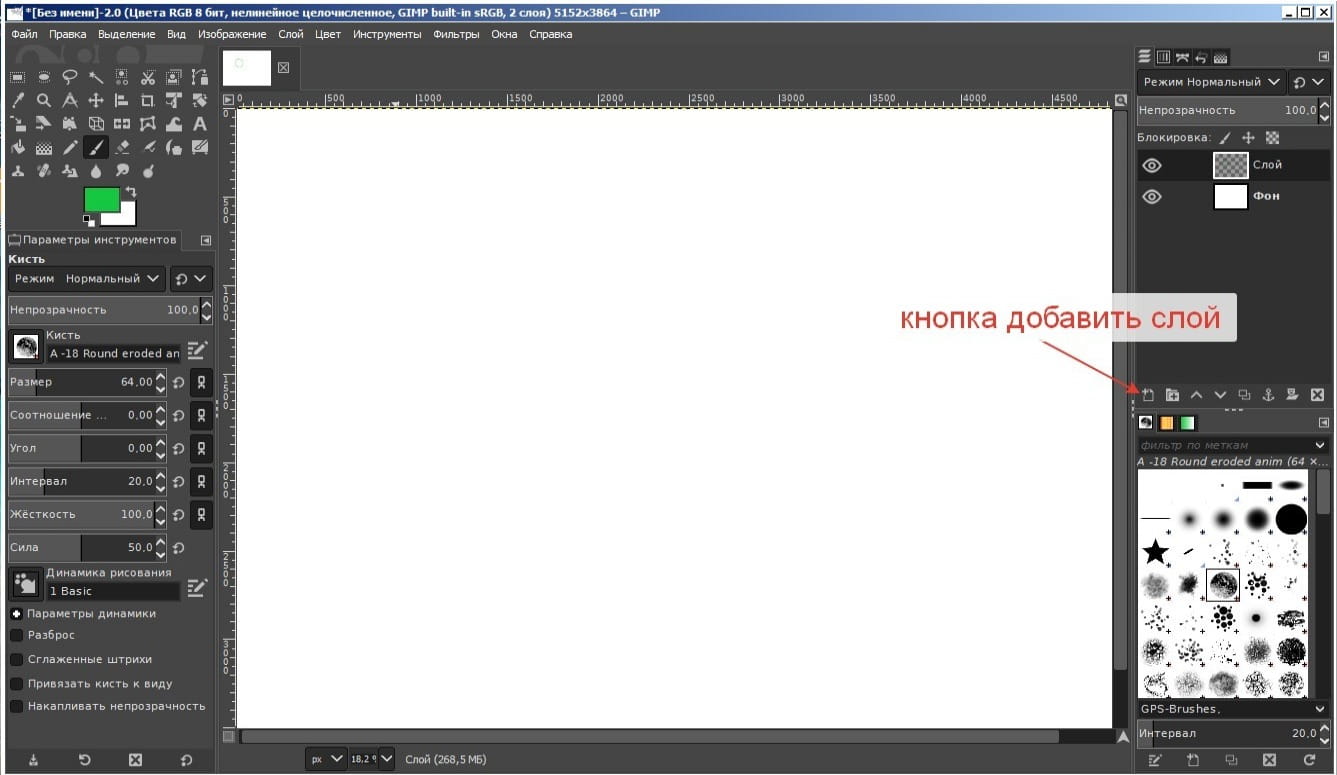
Нажимаем кнопку добавить слой, в появившемся окне, в поле Имя слоя напишем «Круг» и нажимаем ОК. Наш первый слой появился в диалоге слои. Теперь нарисуем зелёный круг. Для того, что бы в GIMP нарисовать круг правильной геометрической формы воспользуемся инструментом Эллиптическое выделение. Выберем этот инструмент в панели инструментов и начнем растягивать круг в рабочей области. Не отпуская левую кнопку мыши нажмём клавишу SHIFT. Круг примет правильльную форму. Отпускаем левую кнопку мыши и SHIFT. Получилось идеально круглое выделение.
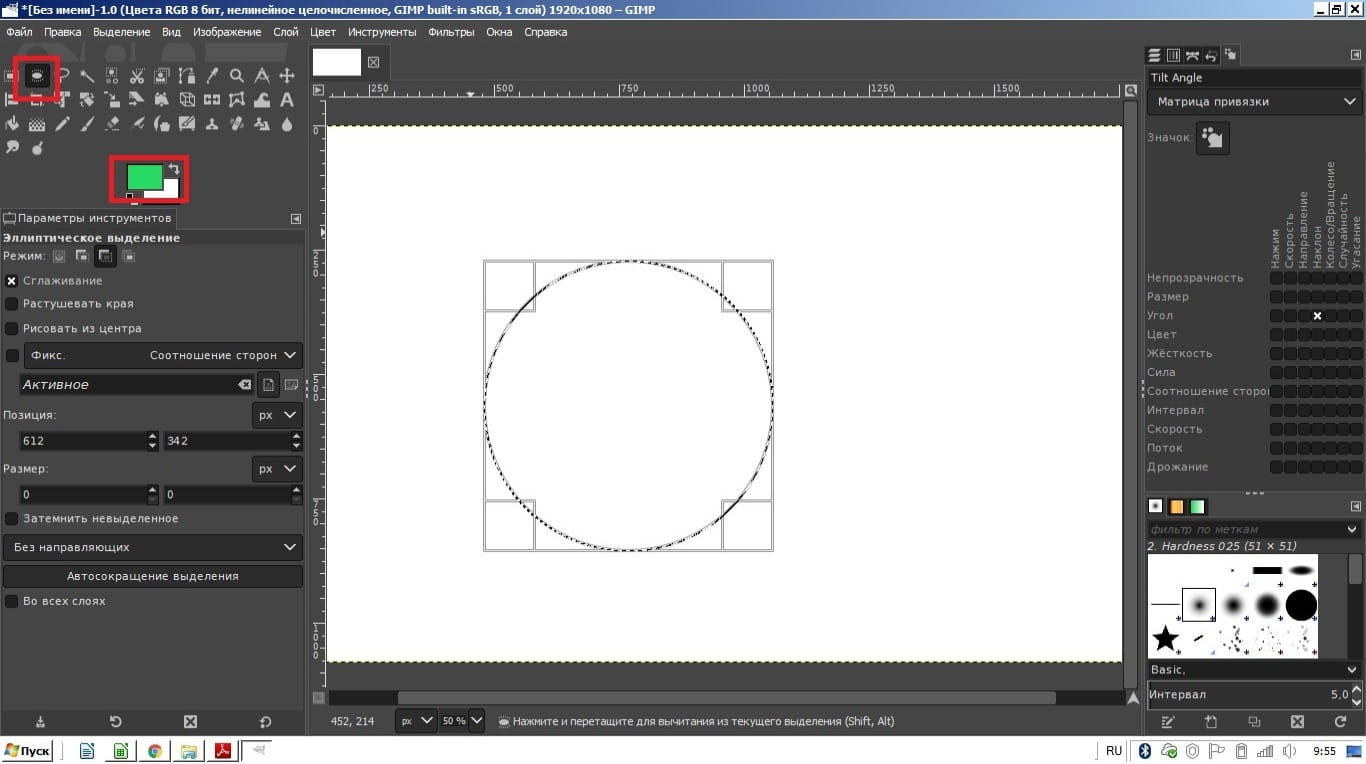
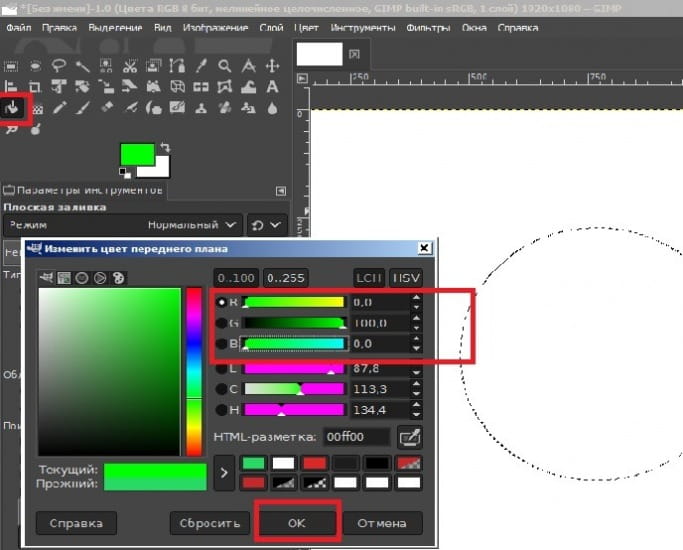
Теперь нужно закрасить круг зеленым цветом. Для такого рода задачь существует иструмент «Плоская заливка». Выберем этот инструмент. Затем ниже нажмём на кварат и настроем цвет переднего плана. Передвинем бегунок RGB, как показано на рисунке, R (red)- красный 0%, G (green) — зелёный 100%, B (blue) — синий 0%, тем самым получив чистый зелёный цвет. Нажмём ОК. Теперь курсор принял форму ведёрка, это говорит нам о том, что выбран инструмент «Заливка». Поместите его в выделеный круг и нажмите левую кнопку мыши.
Добавим ещё слой «Квадрат» и нарисуем в нём квадрат используя инструмент прямоугольное выделение.
Добавим слой «Треугольник» и нарисуем в нём треугольник используя свободное выделение.
Все инструменты расположениы подряд. При наведении мышки появляются подсказки с названием каждого инструмента. Для получения ровного квадрата и ровных линий сторон треугольнака используйте клавишу SHIFT.
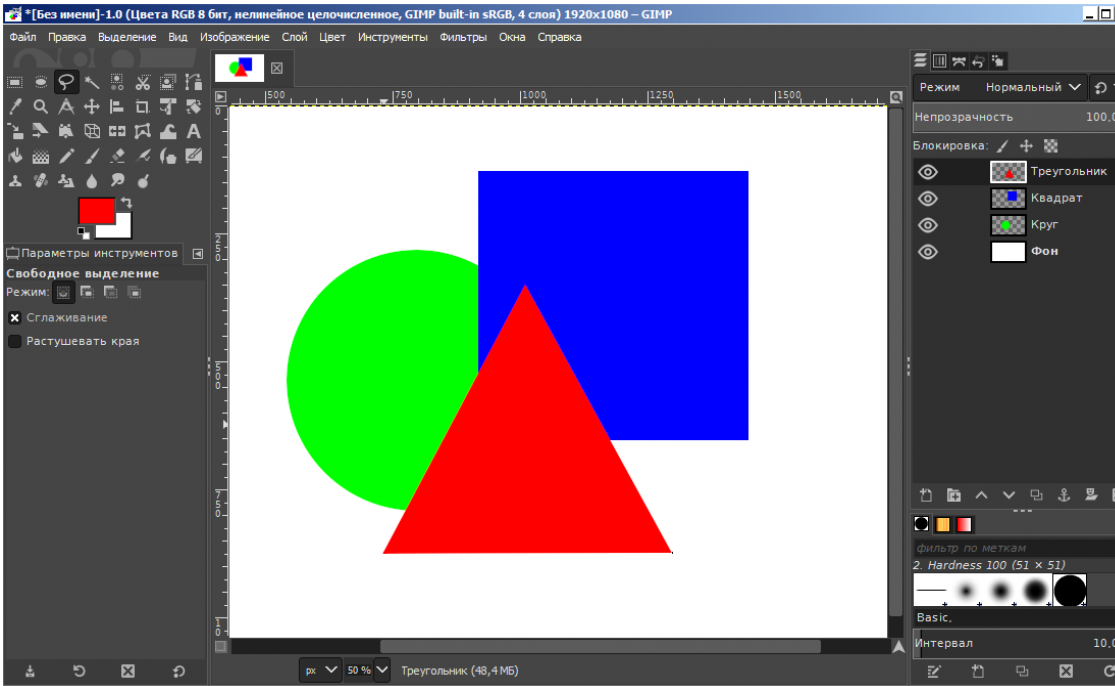
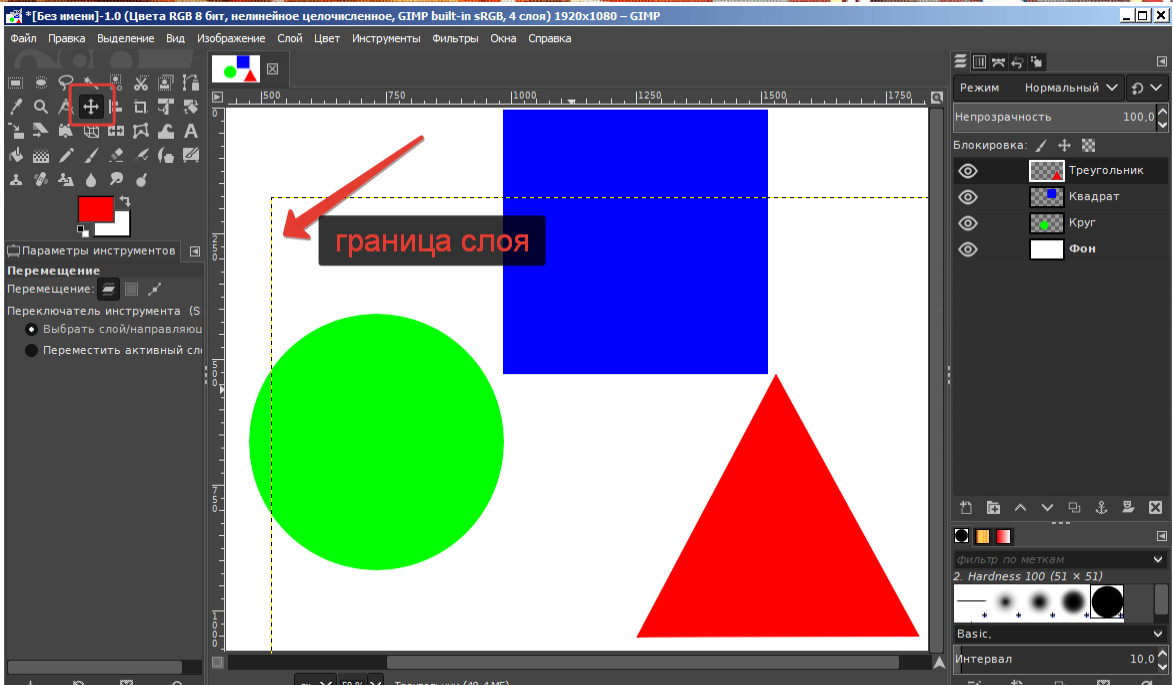
Теперь наше изображение состоит из 4-х слоев. Их можно менять местами передвигая мышью. Например на переднем плане сейчас красный треугольник, ухватите его мышью в Диалоге слоёв и переместите вниз, ближе к фону. Обратите внимание, что он теперь на заднем плане, а круг и квадрат на переднем. Т.е. мы, как будто, взяли плёнку с треугольником и положили её вниз стопки! Слои можно перемещать относительно друг друга. Для этого выберите в панели инструментов, которая расположена в левой части окна инструмент Перемещение (крестик со стрелками на концах), ухватите изображение круга, квадрата или треугольника и передвиньте. Обратите внимание, что двигается не сама фигура, а весь слой, о чем говорит появляющаяся пунктирная линия — Граница слоя.
Как сделать проздачный слой в GIMP
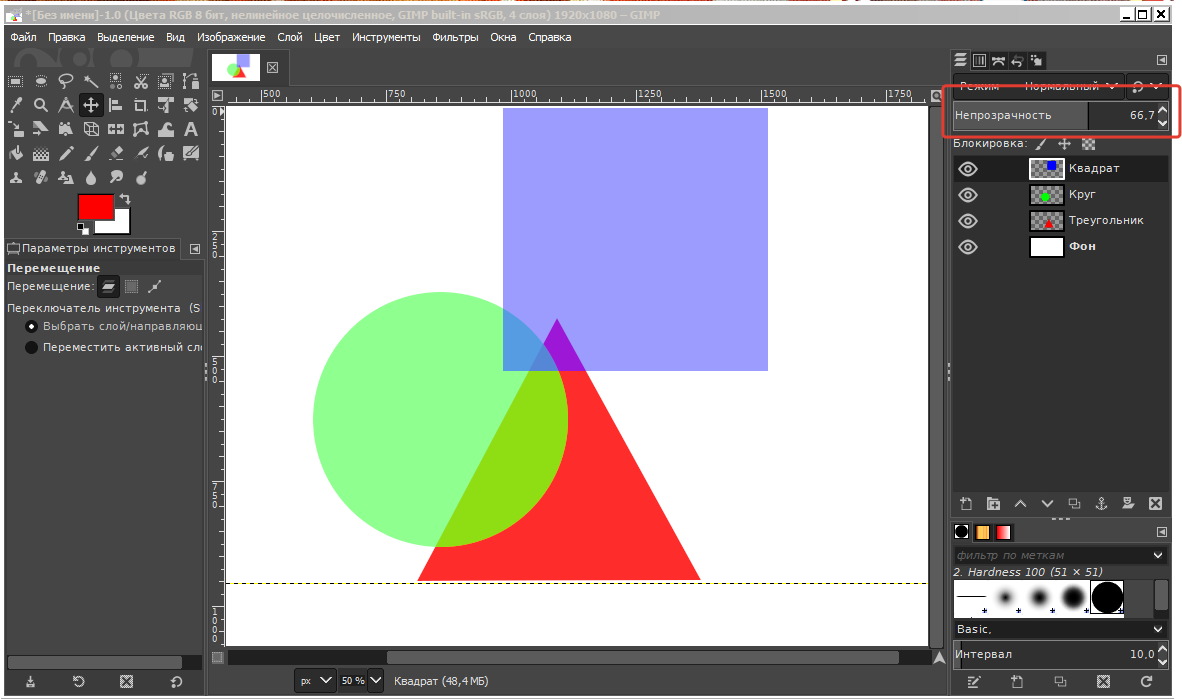
В GIMP каждый слой можно сделать прозрачным. Для этого необходимо выбрать слой и в панели диалогов настроить Непрозрачность.
Если при работе над изображением какой-то слой мешает, его можно скрыть нажав на значок в виде глаза, в диалоговом окне напротив слоя.
В GIMP существует 21 режим слоя. Их можно связывать и перемешивать между собой, менять размер, прозрачность и т.д. Всё это будет рассмотрено позже, когда нам понадобятся эти действия на практике.
Объединение слоёв
Соседние слои можно объединить в один. Для этого щёлкните правой кнопкой мышки по слою в диалоге слоёв и выберите Объединить с предидущим, т.е. с нижестоящим в списке.
Как добавить слой в gimp
Существует несколько способов создания нового слоя в изображении. Вот наиболее важные:
- Вызвать команду Слой → Создать слой… из меню изображения. Появится диалог, позволяющий указать основные свойства нового слоя. За дополнительной информацией обратитесь к главе Диалог нового слоя.
- Вызовите команду Слой → Создать копию слоя из меню изображения. Это создаст новый слой, который будет точной копией активного слоя, над активным слоем.
- Когда вы « вырезаете » или « копируете » что-нибудь, а потом вставляете с помощью клавиш Ctrl + V или команды Правка → Вставить , в результате получается « плавающее выделение » , которое можно расматривать, как временный слой. Прежде, чем с ним можно что-либо делать, его надо прикрепить к существующему слою или преобразовать в нормальный слой. Во втором случае, новый слой будет по размеру как раз, чтобы вместить вставленные данные.
Как добавить слой в gimp
The New Layer… command opens the “ Create a New Layer ” dialog that allows you to add a new, empty layer to the layer stack of the image, just above the active layer.
When a floating selection is present, this command will show up as To New Layer . Using this, will turn the floating selection into a normal layer without opening the New Layer dialog.
7.2.1. Activating the Command
- You can access this command from the image menubar through Layer → New Layer… , or by clicking on the dedicated button in the layer dialog.
7.2.2. Description of the “ New Layer ” Dialog
Figure 16.106. The “ New Layer ” dialog
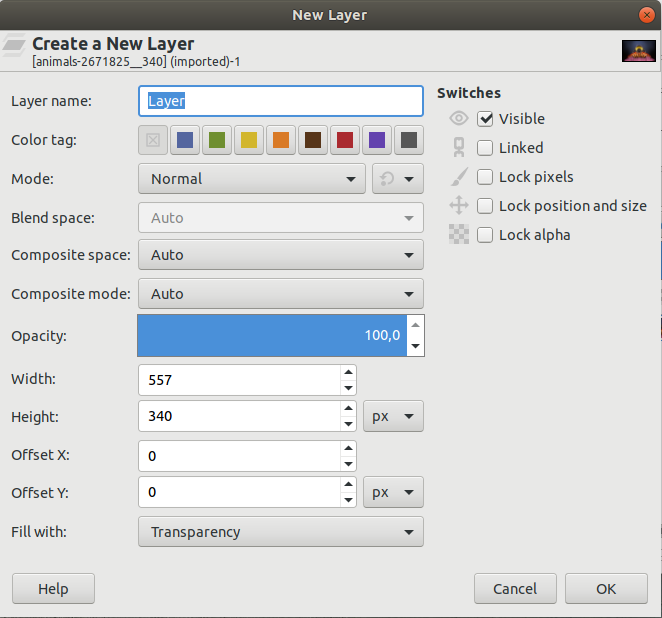
Below the title “ Create a new layer ” , the name of the image that this new layer will belong to, is displayed. To the right of the title a thumbnail of that image is shown. This will enable you to check that you are adding the layer to the correct image when there is more than one image open.
Layer Name
The name of the new layer. It does not have any functional significance; it is simply a convenient way for you to remember the purpose of the layer. The default name is “ Layer ” , but it remembers the last name you used. If a layer with the name you chose already exists, a number is automatically appended to it to make the name unique (e.g., “ Layer #1 ” ) when you click OK to create the layer.
If you click on one of these color buttons, the «Eye» icon box of the created layer will have this color. This can help you identify or group layers to make them easier to spot when you have a lot of layers in your image.
A layer’s mode determines how the layer is combined with the layers below it. The default is “ Normal ” . The drop-down list offers a wide choice of layer modes, also known as blend modes. On the right, there is another drop-down list to select between “ Default ” or “ Legacy ” layer modes.
Layer modes are described in more detail in Layer Modes and Legacy Layer Modes.
Blend space, Composite space
The color space used for blending or compositing the layer with the layers below it. “ Blending ” determines how the colors of the upper and lower layer are mixed together, and “ compositing ” how the upper and lower layer are merged together with respect to the transparency of each pixel.
Depending on the layer mode (see above) one or both of these settings may be disabled. It is only enabled for layer modes where setting this has any effect. When enabled, the default is Auto . The other choices are RGB (linear) and RGB (perceptual) . Note that what Auto translates to, depends on the chosen layer mode. It is not the same for all modes. Some use linear, others use perceptual.
The linear and perceptual encodings are described in choosing precision and encoding and in the Glossary.
When changing the layer mode, both Blend space and Composite space are always reset to Auto to make sure the settings make sense for that particular layer mode.
Composite mode
The layer Mode , sometimes referred to as its “ blend mode ” (Normal, Multiply, etc.), determines how the color values of the layer and its backdrop are combined (together with the Blend space setting). The composite mode of a layer determines how the alpha values of the layer and its backdrop are combined (together with the Composite space setting). The layer’s backdrop is the content against which the layer is composited; namely, it’s the combination of the layers below it.
There are two regions of interest when compositing the layer against its backdrop: the opaque region of the backdrop, and the opaque region of the layer. The layer’s blend mode determines how to combine the colors of the intersection of these two regions: i.e., the common opaque region of both the backdrop and the layer (pixels belonging to only one of these regions don’t need to be combined with anything, and retain their original color). The layer’s composite mode determines which part of these regions to keep, and which to discard.
The example images below show the composition of two layers — the bottom layer containing a red feathered circle, and the top layer containing a green feathered circle — using “ Addition ” mode, and different composite modes (applied to the top layer).
- Union : keeps the opaque regions of both the layer and its backdrop, i.e their union.