Как записать образ кали линукс на флешку
Our favourite way, and the fastest method, for getting up and running with Kali Linux is to run it “live” from a USB drive. This method has several advantages:
- It’s non-destructive — it makes no changes to the host system’s hard drive or installed OS, and to go back to normal operations, you simply remove the “Kali Live” USB drive and restart the system.
- It’s portable — you can carry Kali Linux in your pocket and have it running in minutes on an available system
- It’s customizable — you can roll your own custom Kali Linux ISO image and put it onto a USB drive using the same procedures
- It’s potentially persistent — with a bit of extra effort, you can configure your Kali Linux “live” USB drive to have persistent storage, so the data you collect is saved across reboots
In order to do this, we first need to create a bootable USB drive which has been set up from an ISO image of Kali Linux.
What You’ll Need
- A verified copy of the appropriate ISO image of the latest Kali build image for the system you’ll be running it on: see the details on downloading official Kali Linux images.
- If you’re running under Linux, you can use the dd command, which is pre-installed, or use Etcher.
- A USB thumb drive, 4GB or larger. (Systems with a direct SD card slot can use an SD card with similar capacity. The procedure is identical.)
Kali Linux Live USB Install Procedure
The specifics of this procedure will vary depending on whether you’re doing it on a Windows, Linux, or macOS/OS X system.
Creating a Bootable Kali USB Drive on Linux (DD)
Creating a bootable Kali Linux USB drive in a Linux environment is easy. Once you’ve downloaded and verified your Kali ISO file, you can use the dd command to copy it over to your USB drive using the following procedure. Note that you’ll need to be running as root, or to execute the dd command with sudo. The following example assumes a Linux Mint 17.1 desktop — depending on the distro you’re using, a few specifics may vary slightly, but the general idea should be very similar. If you would prefer to use Etcher, then follow the same directions as a Windows user. Note that the USB drive will have a path similar to /dev/sdb.
WARNING: Although the process of imaging Kali Linux onto a USB drive is very easy, you can just as easily overwrite a disk drive you didn’t intend to with dd if you do not understand what you are doing, or if you specify an incorrect output path. Double-check what you’re doing before you do it, it’ll be too late afterwards.
Consider yourself warned.
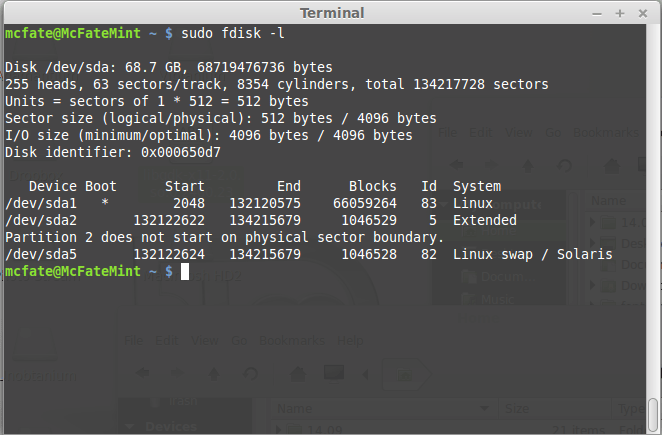
- First, you’ll need to identify the device path to use to write the image to your USB drive. Without the USB drive inserted into a port, execute the command sudo fdisk -l at a command prompt in a terminal window (if you don’t use elevated privileges with fdisk, you won’t get any output). You’ll get output that will look something (not exactly) like this, showing a single drive — “/dev/sda” — containing three partitions (/dev/sda1, /dev/sda2, and /dev/sda5):
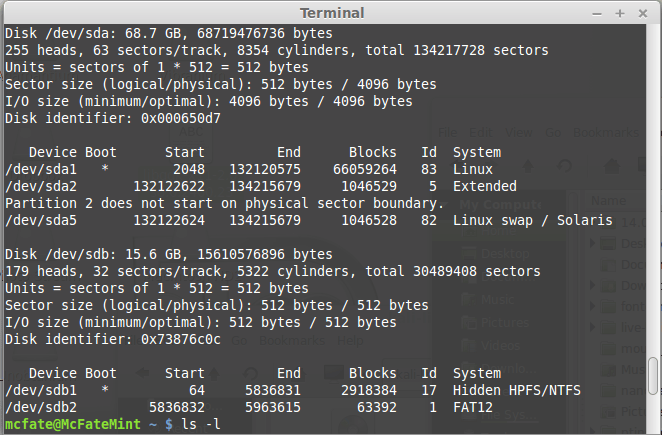
2. Now, plug your USB drive into an available USB port on your system, and run the same command, “sudo fdisk -l” a second time. Now, the output will look something (again, not exactly) like this, showing an additional device which wasn’t there previously, in this example “/dev/sdb”, a 16GB USB drive:
3. Proceed to (carefully!) image the Kali ISO file on the USB device. The example command below assumes that the ISO image you’re writing is named “kali-linux-2023.4-live-amd64.iso” and is in your current working directory. The blocksize parameter can be increased, and while it may speed up the operation of the dd command, it can occasionally produce unbootable USB drives, depending on your system and a lot of different factors. The recommended value, “bs=4M”, is conservative and reliable. Additionally, the parameter “conv=fsync” makes sure that the data is physically written to the USB drives before the commands returns:
While ‘/dev/sdX’ is used in the command, the ‘/dev/sdX’ should be replaced with the drive discovered previously. ‘/dev/sdX’ will not overwrite any devices, and can safely be used in documentation to prevent accidental overwrites. Please use the correct device name from the previous step.
Imaging the USB drive can take a good amount of time, over ten minutes or more is not unusual, as the sample output below shows. Be patient!
The dd command provides no feedback until it’s completed, but if your drive has an access indicator, you’ll probably see it flickering from time to time. The time to dd the image across will depend on the speed of the system used, USB drive itself, and USB port it’s inserted into. Once dd has finished imaging the drive, it will output something that looks like this:
That’s it, really!
Creating a Bootable Kali USB Drive on Linux (DD with status)
Alternatively there are a few other options available for imaging.
The first option is dd with a status indicator. This is only available on newer systems however. To do this, we simply add the status flag:
While ‘/dev/sdX’ is used in the command, the ‘/dev/sdX’ should be replaced with the proper device label. ‘/dev/sdX’ will not overwrite any devices, and can safely be used in documentation to prevent accidental overwrites. Please use the correct device label.
Another option is to use pv . We can also use the size flag here to get an approximate timer. Change the size depending on the image being used:
Creating a Bootable Kali USB Drive on Linux (Etcher)
- Download and run Etcher.
- Choose the Kali Linux ISO file to be imaged with “select image” and verify that the USB drive to be overwritten is the correct one. Click the “Flash!” button once ready.
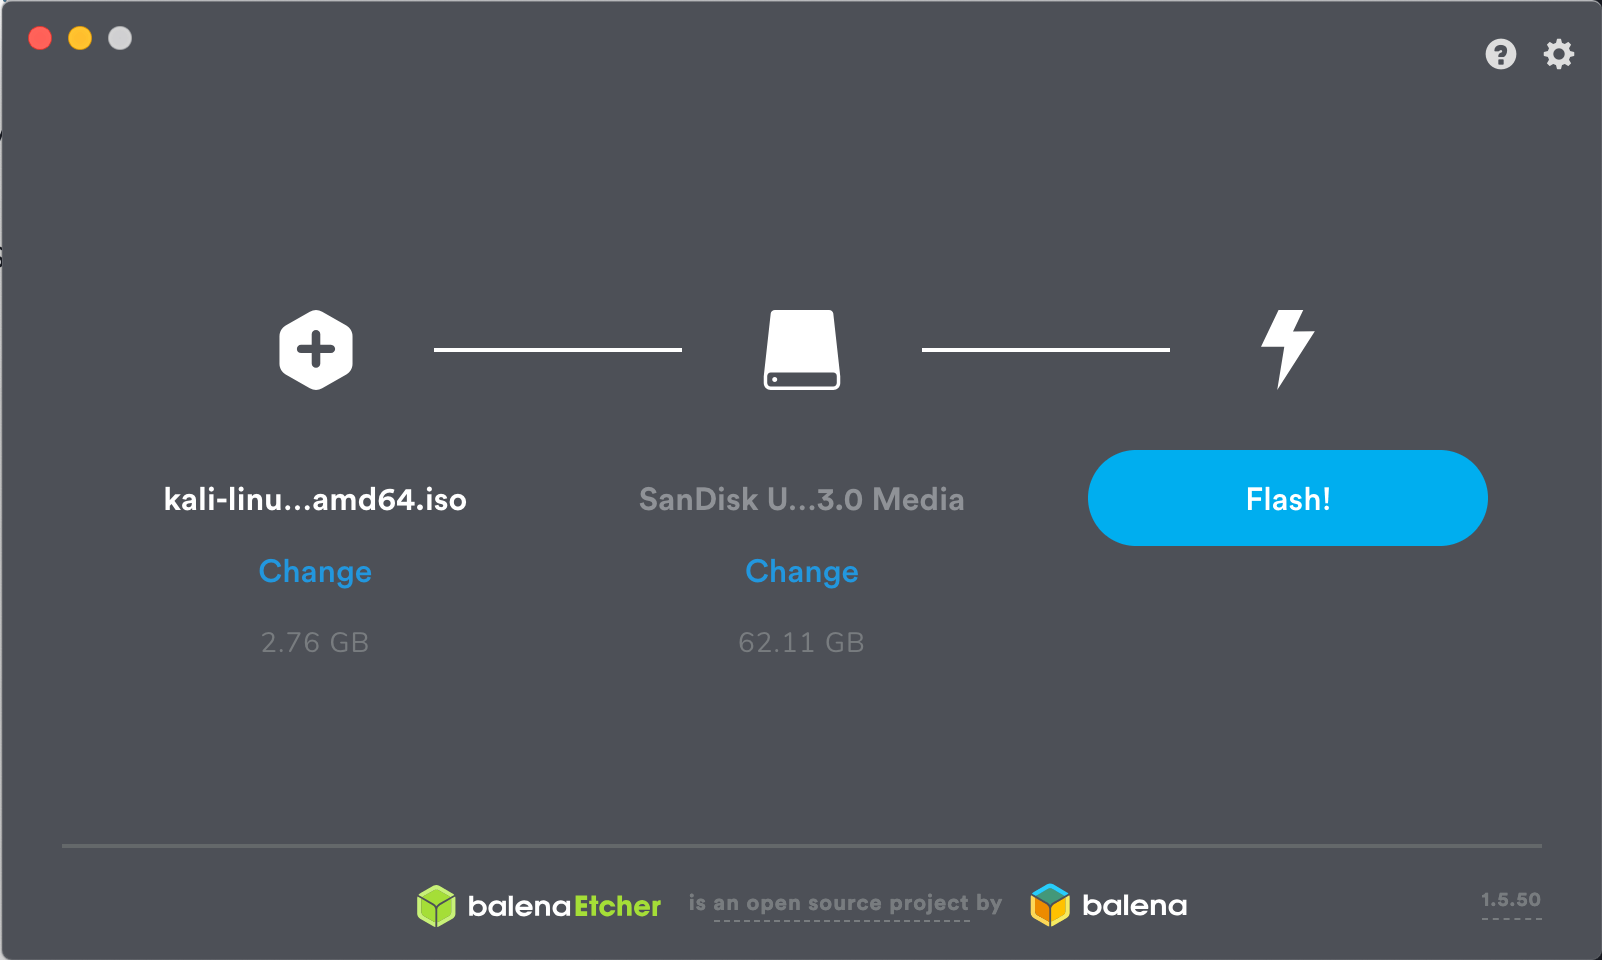
3. Once Etcher alerts you that the image has been flashed, you can safely remove the USB drive.
You can now boot into a Kali Live / Installer environment using the USB device.
Updated on: 2023-Dec-06
Author: g0tmi1k
Как записать образ кали линукс на флешку
One of the fastest method, for getting up and running with Kali Linux is to run it “live” from a USB drive. This method has several advantages:
- It’s non-destructive — it makes no changes to the host system’s hard drive or installed OS, and to go back to normal operations, you simply remove the Kali Live USB drive and restart the system
- It’s portable — you can carry Kali Linux in your pocket and have it running in minutes on an available system
- It’s customizable — you can roll your own custom Kali Linux ISO image and put it onto a USB drive using the same procedures
- It’s potentially persistent — with a bit of extra effort, you can configure your Kali Linux “live” USB drive to have persistent storage, so the data you collect is saved across reboots
In order to do this, we first need to create a bootable USB drive which has been set up from an ISO image of Kali Linux.
The specifics of this procedure will vary depending on whether you’re doing it on a Linux, macOS/OS X, or Windows system.
What You’ll Need
- A verified copy of the appropriate ISO image of the latest Kali build image for the system you’ll be running it on.
- If you’re running under Windows, there is not one tool that is considered the overall best for imaging. We recommend Etcher(installer or portable) as it is simpler to use, however Rufus is another popular option with its advance options. If one does not work for you, consider the other.
- A USB drive, 8GB or larger (Systems with a direct SD card slot can use an SD card with similar capacity. The procedure is identical.)
During this procedure, you might see some warnings telling you that Kali Linux contains malware, trojan, virus or whatever. This message usually comes from Windows Defender or USB Defender, or a third-party antivirus. Those warnings are expected: Kali Linux is packed with pentesting tools that are likely to be flagged as malware. Just ignore the warnings.
Creating a Bootable Kali USB Drive on Windows (Etcher)
- Plug your USB drive into an available USB port on your Windows PC, note which drive designator (e.g. “ G:\ ”) it uses once it mounts, and launch Etcher.
- Click Flash from file, and locate the Kali Linux ISO file to be imaged with.
- Click Select target and choose the USB drive you want to make bootable.
- Click the Flash! button once ready.
Note: You may get a UAC prompt asking for administrator privileges that you will need to accept.

5. Once Etcher alerts you that the image has been flashed, you can safely remove the USB drive and proceed to boot into Kali with it.
At the time of writing, Etcher will use MBR. This is to allow for the most hardware compatibility.
Creating a Bootable Kali USB Drive on Windows (Rufus)
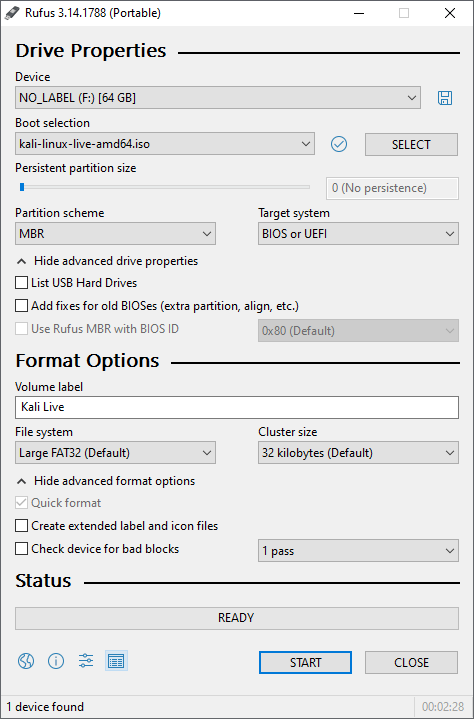
- Plug your USB drive into an available USB port on your Windows PC, note which drive designator (e.g. “ G:\ ”) it uses once it mounts, and launch Rufus.
- With Device, check the dropdown list of options for the USB drive (e.g. “ G:\ ” and size).
- Boot selection needs to point to point to the Kali Linux ISO file, which can be done by clicking the SELECT button
- Depending on your configuration, you can set the Partition scheme, as well as Target system. If you are not sure, leave it as the default values.
While you can easily create a persistent live usb with the integrated options in Rufus by increasing the persistence slider, this is not the officially supported method (check Adding Persistence to a Kali Linux Live USB Drive), as it doesn’t work for all images, like the Kali Everything Live ISO introduced in release 2022.1.
- Click the START button once ready.
6. You may get a prompt saying about ISOHybird image. Selecting ISO image, will allow you to edit the files from the Kali Linux ISO, but at the potential lose of hardware compatibility. As a result, we recommend selecting DD Image.
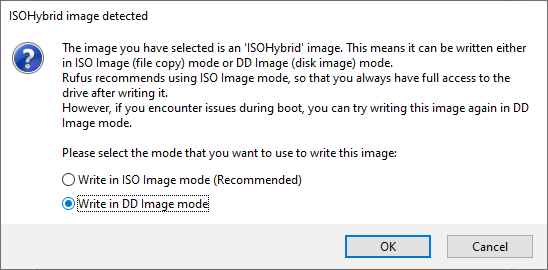
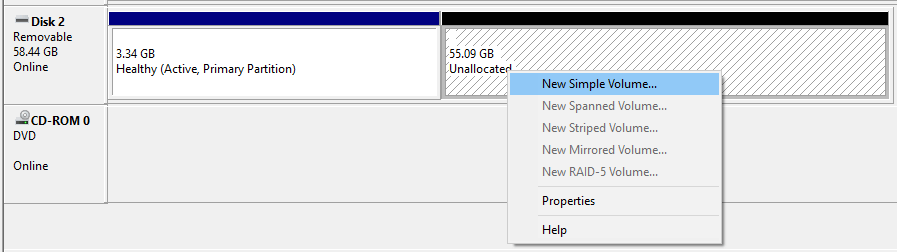
Note: If you select “DD Image” option, you can create another partition on the USB drive, allowing you to use the rest of the space. Start -> Run (Windows + R) -> diskmgmt.msc -> Locate the USB drive -> Right-click in “Unallocated” -> New Simple Volume -> Follow the rest of the wizard with next, next, next…
Booting A USB Drive In Windows
Depending on the system (such as BIOS or UEFI), as well as the version of Windows, and how they are each configured, you may need to re-image the USB drive.
- Master Boot Record (MBR) is often used on legacy systems that use BIOS as well as UEFI which has Compatibility Support Module (CSM) enabled
- GUID Partition Table (GPT) is required where UEFI has CSM disabled, forcing to use the modern standard
After writing the image to the USB drive, reboot Windows with the USB inserted. Depending on the motherboard manufacture, will also depend on the next stage. Some motherboard’s support a “temporary” boot menu, allowing for a one off selection. Others you need to enter BIOS/UEFI to configure it to try and boot from USB first. Entering either location, also depends on the motherboard. You can look up on the manufactures website and read the manual, try and read the screen when booting (however the text may be shown too quick or full logos used), or try common key combinations (such as ESC , F1 , F2 , F3 , F4 , F8 , F10 , F11 , F12 or DEL ).
Updated on: 2023-May-30
Author: g0tmi1k
Standalone Kali Linux 2021.4 Installation on a USB Drive, Fully Encrypted
Use cases are, for example, a tailored bootable Kali 2021.4 installation to be used as a repair, forensic or maintenance tool. If you wish to probe a network from the point of view of a specific machine, you usually need to reconfigure some switches to provide port mirroring and divert all traffic to a segment from where you can probe the it. Now there is an alternative. Simply reboot the relevant machine from your USB Kali installation, connect it to the network, and there you are, right with the usual hardware and the usual MAC address, but this time running Kali.
Also, if your main computer runs Windows or some other flavour of Linux, and you just occasionally require Kali, then you can avoid a dual-boot setup. Whenever you need Kali, simply boot from the USB drive, but otherwise leave your existing installation alone.
Of course, you use the subsequent instructions only if you know exactly what you are doing. You can easily make the harddisks of the machine on which you work, unreadable and thereby lose all your data.
Outline
Creating such an installation is a bit tricky and involves quite a bit of manual intervention:
- First, we partition our USB drive using an existing Linux installation, and we set up a number of partitions, some of which will be encrypted:
- A /boot partition with ext4 file system encrypted with luks, version 1. Fortunately, the boot loader grub2 can mount luks1 encrypted partitions and boot from them.
- A boot sector for grub2 to reside in.
- An EFI partition with vfat filesystem.
- A swap partition, encrypted with luks2.
- The root ( / ) partition of our installation with btrfs filesystem. Any more fine grained structure is achived by creating subvolumes.
- We also need a USB drive with the Kali “bare metal” installer. This is a Debian type installer. We need to interrupt the expert mode installation and intervene from the command line in order to mount the encrypted partitions of our target USB drive, then install Kali Linux 2021.4 on it, create an initial RAM disk on the /boot partition which contains the keys for grub2 in order to eventually be able to mount the encrypted partitions, but we must not install the grub2 boot loader at this stage. If we did, this might change the EFI boot information of the machine on which we are performing the installation and produce an unintended dual-boot setup, and so we are left with a complete installation that is merely lacking any boot loader.
- We then need a USB drive with a rescue system. I have not managed to do this with the Kali “bare metal” installer, but rather employ the “Xubuntu 20.04 LTS” live USB medium. With its help, we can install grub2 in —removable mode. This prevents grub2 from modifying the EFI boot information of the machine on which we are working, but rather affects only our target USB drive.
Preparation
Kali Linux 2021.4 Bare Metal Installer
First, we obtain the ISO image of the Kali Linux 2021.4 Bare Metal Installer. In my case, the ISO image file is called kali-linux-2021.4-installer-amd64.iso . We work on an existing Linux machine. In my case, this is an Ubuntu 20.04 LTS.
We insert a blank USB pen drive of at least 4GB and copy the image onto that pen drive as follows. Once we plug in the USB pen drive, we need to find out which block device it corresponds to. Usually this will be /dev/sdx where x is a one of the letters a , b , and so on. If our Linux distribution auto-mounts the USB pen drive, df , mount or lsblk will reveal the device file it is associated with. Then make sure the drive is unmounted before you proceed (e.g. sudo umount /dev/sdxn where n stands for the numbers of all partitions of the drive that have been auto-mounted). If the drive is not auto-mounted, ls /dev before and after plugging it in should reveal the device file name.
On my Xubuntu 20.04 LTS machine, the first USB pen drive is associated with /dev/sda , and so in order to copy the ISO image to the pen drive,
(Note that on Ubuntu like systems, rather than working under the root user, you can issue commands with root privileges by calling them via sudo )
Xubuntu 20.04 LTS Installer
We also need the ISO image of the Xubuntu 20.04 LTS Live Installer on a second USB pen drive. In my case, the ISO image file is called xubuntu-20.04-desktop-amd64.iso . In the same fashion, this goes to a second USB pen drive (at least 4GB in size). Unplug the first USB pen drive and plug in the second one:
Partitioning the Target USB Drive
Finally, we insert the USB drive on which we wish to perform the Kali Linux 2021.4 installation. I use a 128GB NVMe M.2 SSD in an USB 3.1 gen 2 enclosure for this purpose. Disconnect the second pen drive and connect the target USB drive. Similarly to the above, find out which device /dev/sdx the target USB drive corresponds to and make sure that none of its partitions are mounted. In my case, the target USB drive is again associated with /dev/sda .
We then use sudo gdisk /dev/sda in order to create the following partitions:
, type 8300, Linux filesystem, will be the main partition Here, I have allocated 8GB for swap which is sufficient for my purposes. Note that you will not be able to hibernate (suspend to disk) if this partition is too small. If you wish to connect your Kali Linux USB drive to different machines, you should probably forget about hibernation because your system would most likely not properly wake up on hardware different from where you put it to sleep.
The main partition can be as big as you like. If you require additional partitions, you can treat them all precisely as we treat /dev/sda5 in the present notes.
Rather than using gdisk , we can alternatively repartition the target USB drive from the command line:
(Note that the size hint :0 for partition 5 indicates that we request all the remaining free space)
Next, we set up luks encryption for the partitions 1,4 and 5. Note that the boot loader grub2 can mount only luks, version 1:
Since the keys to unlock partitions 4 and 5 will be placed in the initial RAM disk on the /boot partition, we can set the same passphrase for all three partitions. Using different phrases would not increase security. We now unlock the three partitions,
The command ls /dev/mapper then shows the three devices associated with the unlocked partitions. We can now format the partitions 1,3,4 and 5, aka create filesystems on them:
Finally, we remove the mapped devices (and our machine forgets how to decrypt the partitions):
Installation of Kali Linux 2021.4
Setting Up the Installer
Now setup the BIOS of your computer to boot from a USB drive. If we boot in EFI mode, we will eventually obtain a USB drive that boots only in EFI mode. If we boot in legacy BIOS mode, we will eventually produce a USB drive that boots both in legacy and in EFI mode.
Plug in the USB pen drive with the Kali 2021.4 installer and boot the machine. Note that we will require network access during installation.
Chose Advanced Options and Graphical Expert Install. Execute the following items of the installation menu (but none other than these):
- Choose language
- Configure the keyboard
- Detect and mount installation medium
- Load debconf preconfiguration file
- Load installer components from installation medium, select crypto-dm-modules , fdisk-udeb , mbr-udeb , parted-udeb , rescue-mode .
- Detect network hardware
- Configure the network, make sure that you have network access at this stage.
- Set up users and passwords, select shadow passwords and setup the main user that will be able to get root privileges via sudo .
- Configure the clock, note that when you choose ntp (the network time protocol), your machine will start polling once connected to a network which is perhaps undesirable for your installation
Do not execute Detect disks. Rather press [Ctrl]+[Alt]+[F3] and then [Enter] in order to open a text console with root privileges. Now Connect the target USB drive on which we will install Kali Linux 2021.4. Use ls /dev before and after connecting in order to discover which device files it is associated with. In my case, the USB pen drive from which I have booted, is /dev/sda , and the target USB drive becomes /dev/sdb .
We unlock the three encrypted partitions:
Partitioning
Now press [Ctrl]+[Alt]+[F5] and continue with the installation in graphical mode as follows.
Place the cursor on the line 4.3 GB . below LUKS_BOOT , press [Enter], use as Ext4 , format, mount at /boot , options noatime , and select Done setting up the partition. Place the cursor on the line below LUKS_ROOT , press [Enter], use as btrfs , format, mount at / , options noatime , and select Done setting up the partition. The partition LUKS_SWAP has already been recognized and marked as swap .
Select on Finish partitioning and write changes to disk.
Then we press [Ctrl]+[Alt]+[F3] in order to get to the root console again.
Calling df shows that the two non-swap encrypted partitions have been mounted at /target and /target/boot , respectively. If the machine was booted in EFI mode, there is also /target/boot/efi , but the wrong one, pointing to the EFI partition of the first internal harddisk. It rather ought to be the EFI partition on the target USB drive. See below for more details.
Btrfs Adjustments
The debian installer has created the subvolume @rootfs on the btrfs partition. We mount the top level subvolume, create further subvolumes, @ for the default subvolume, @home , @root , @snapshots and @var , and we set @ to be the default:
Here, the btrfs subvolume list shows the subvolume IDs on the current volume, and we use the number assigned to @ in the subsequent set-default command.
We have created the subvolume @ as the one to be mounted on / by default, follwing snapper naming conventions. It is a matter of taste how many further subvolumes to create. We go for @home , @root and @snapshots which we will later mount at /home , /root and /snapshots . Note that although some like /var on a seperate subvolume, this will not work below.
The File System Table
The umount /target/boot/efi is required only when the installation medium was booted in EFI mode. The key point here is that even though we are installing to a USB drive, the EFI partition mounted so far is the EFI partition of the internal harddisk of the computer. This wrong mount would cause serious trouble later when we install a boot loader.
Then we call blkid -s PARTUUID -o value /dev/sdb3 in order to find out the UUID of the EFI partition on the target USB drive and write it down on paper. We call vim /target/etc/fstab in order to adapt the file system table as follows.
Firstly, in the line for / , we change subvol=@rootfs to subvol=@ . We also add a line
with the UUID we just wrote down. This allows the installation to locate and mount the correct EFI partition irrespectively of any device number. Then we add lines in order to mount the btrfs subvolumes we just created. I have also added mount options that are useful for working with SSDs. In my case, the other lines thus read as follows:
(in which only one line says LUKS_BOOT instead of LUKS_ROOT ). In the editor nano , we press [Ctrl]+[o] in order to save the file, confirm with [Enter] and then [Ctrl]+[x] to quit the editor. Now we remove the top level subvolume and mount the correct EFI partition in the appropriate place:
If you have created further btrfs subvolumes that might be affected by the installation, mount them here as well.
Actual Installation
Again, [Ctrl]+[Alt]+[F5] gets us to the graphical screen, and we continue the installation as follows.
- Install the base system, select the kernel linux-image-5.14.0-kali4-amd64, generic initrd.
- Configure the package manager.
- Select and install software, we keep the defaults.
But then, do not install a boot loader, but rather
- Continue without boot loader
Some people who tried to install Linux on a portable drive report that the installation nevertheless modified the boot sectors of the internal harddisk of the machine they were working on. I suspect by mounting the correct partition at /target/boot/efi above, we would have avoided this. Nevertheless we cannot use the installation of grub2 that the installer would perform because it would lack the —removable flag. We therefore postpone the installation of the boot loader to a later stage.
Setting Up the Initial RAM Disk
Then back to the root console with [Ctrl]+[Alt]+[F3] in order to make sure that grub2 , when it is evetually installed, will be able to decrypt the boot partition.
We change root to the newly installed system, mount all partitions and subvolumes,
If the mount -a reports errors, this might be due to typos in the file system table we modified above.
The /etc/resolv.conf is there in order not to lose the DNS information that the installer obtained when we set up the network. On the target system, we install all tools in order to install and update grub2 as well as to add decryption tools to the initial RAM disk:
In the following, we create a random luks key file which is able to unlock the three encrypted partitions and set up a few configuration files before the initial RAM disk is composed:
>/etc/cryptsetup-initramfs/conf-hook $ echo "UMASK=0077" >>/etc/initramfs-tools/initramfs.conf $ mkdir -p /etc/luks $ dd if=/dev/urandom of=/etc/luks/boot_os.keyfile bs=4096 count=1 $ chmod u=rx,go-rwx /etc/luks $ chmod u=r,go-rwx /etc/luks/boot_os.keyfile $ cryptsetup luksAddKey /dev/sdb1 /etc/luks/boot_os.keyfile $ cryptsetup luksAddKey /dev/sdb4 /etc/luks/boot_os.keyfile $ cryptsetup luksAddKey /dev/sdb5 /etc/luks/boot_os.keyfile $ echo "LUKS_BOOT UUID=$(blkid -s UUID -o value /dev/sdb1) /etc/luks/boot_os.keyfile luks,discard" >>/etc/crypttab $ echo "LUKS_SWAP UUID=$(blkid -s UUID -o value /dev/sdb4) /etc/luks/boot_os.keyfile luks,discard" >>/etc/crypttab $ echo "LUKS_ROOT UUID=$(blkid -s UUID -o value /dev/sdb5) /etc/luks/boot_os.keyfile luks,discard" >>/etc/crypttab $ /usr/sbin/update-initramfs -u -k all During the boot process, grub2 will detect that there is an encrypted /boot partition. It will ask for a passphrase (the one that we associated with /boot right in the beginning). The /boot partition then contains a kernel with initial RAM disk that contains the key file we just created and which can be used to unlock all our encrypted partitions.
Cryptographically, the weakest link is the passphrase protection of the /boot partition. Should that be broken, the other partitions are compromised, too. And note that this is merely version luks1.
Finishing the Installation
Finally, we press [Ctrl]+[Alt]+[F5] go back to the graphical installer and
- Finish the installation with system clock set to UTC.
Eventually, we click Continue to boot the system, but we rather remove the USB pen drive and the USB installation target and turn off the computer.
Creation of a Boot Loader
Note that in order to produce an EFI bootable USB drive, when we next boot the computer, this has to be in UEFI mode. If required, go to the BIOS/UEFI Setup and switch it on.
Now we connect the USB pen drive that contains the Xubuntu 20.04.3 LTS live installation medium and boot from it, select Try Xubuntu wihout installing in order to get to the live system. Then we connect the USB drive that forms our installation target.
Make sure that the Xubuntu live system has network access (this is done by the NetworkManager in the graphical interface). Open a terminal and call ls /sys/firmware/efi/efivars in order to confirm that we are indeed in EFI mode. If this directory were missing, we would be in legacy BIOS boot mode.
Again use ls /dev and df in order to find out to which device /dev/sdx our installation target is associated. We know that the Xubuntu live image is mounted at /media/cdrom (so this is not it) and that our target USB drive contains the 5 partitions that we created. In the following, I assume that again /dev/sdb corresponds to the installation target.
Note that the Xubuntu live system will try to mount the three luks partitions. Click Cancel three times in order not to do so.
We unlock the encrypted partitions and mount the required ones by hand,
Then we change root to our new unfinished installation and mount everything:
Now we merely need to vim /etc/default/grub and add a line
Save the file by [Ctrl]+[o] and [Enter] and quit the editor by [Ctrl]+[x]. Then we install grub2 in removable mode by,
Presumably there is an error that there is no grub drive for the partition that carries the Xubuntu live system. We can safely ignore that. We press [Ctrl]+[d] in order to leave the chroot session and then use the graphical interface of Xubuntu in order to shut down the computer. The installation on our USB drive is complete.
Usage
How to Boot the New Kali Linux 2021.4 USB Drive
When we boot from our USB drive either in legacy or in EFI mode, grub2 asks for the passphrase (the one of the /boot ) partition and then boots right into our new Kali Linux 2021.4.
On some older UEFI machines, however, we are thrown into a grub2 shell. Nevertheless, we can simply type exit [Enter] and get to the prompt for the passphrase.
Kali and Networking
Kali Linux is very conservative about network connections, and so your new installation probably needs some further setup. If you intend to boot the USB drive on different machines, you will probably set up networking on a case by case basis.
If you wish to place WLAN under the control of the NetworkManager in the graphical interface, you need to sudo vim /etc/NetworkManager/NetworkManager.conf and under [ifupdown] set managed=true . I think sudo systemctl restart NetworkManager ought to suffice, but somehow I recall that it worked only after rebooting.
Hardware Limitations
I am not an expert on the Debian style installer that was used, but it seems that although it installs a full kernel with all modules, it copies only selected firmware drivers to the target installation. Apparently, the installer probes the hardware on which it is running and then installs the firmware appropriate for that very machine.
I performed a test installation on a Chinese made no-name Intel Core i5-10210U based laptop with integrated Intel graphics and sound, and I do have working sound on that machine. But when I boot the same installation on a Lenovo T14 AMD Gen 1 (AMD Ryzen 5 Pro 4650U with integrated Radeon graphics and Realtek ALC257 audio), then sound does not work. So you have to expect that some hardware specific manual configuration will be necessary. Fortunately, in my case, both ethernet and WLAN work out of the box on any hardware that I have tried so far.
Finally, although the installation allows to to /suspend to disk/ (/hibernate/), you cannot expect it to function when you put the system to sleep (/suspend/) on one hardware and then try to wake it up (/resume/) on a different machine.
Compilation of a Custom Kernel
Compilation of custom kernel works as described in these Kali instructions with only minor adjustments.
Starting with the installation performed so far, we need the following packages:
We install the current kernel sources and unpack them inside ~/src as follows,
If you have a custom kernel configuration file, copy it to ~/src/linux-source-5.15/.config . In order to use the configuration of the running kernel as a starting point, we obtain the configuration from the /boot partition,
The kernel is then configured as usual with
and compiled as follows. Note that we build the Debian style kernel packages here which automatically takes care of all patches, etc:
It suffices to install the newly created Debian kernel package. It includes an initial RAM disk which is able to decrypt the luks encrypted partitions and places everything on the /boot partition for grub2 to find. The precise version of the kernel depends on the update status of your Kali 2021.4 at the time when you last upgraded and unpacked the sources. The above ls ../*.deb command shows the full names of the produced Debian packages:
It is not necessary to re-install grub2 or to make any other manual adjustments. The encrypted boot procesudure still works.
Remarks on Cryptography
- To anyone who is able to examine your USB drive, it will be obvious that there is a grub2 boot partition, an EFI partition, as well as three luks encrypted partitions. There is no plausible deniability. This is because luks partitions have a standardized header.
- Note that the full AES keys for the encryption are also stored in this header, merely protected by a passphrase. So it is not even required to attack the AES key itself, but rather the data present in the luks header allow an attack on the passphrase. An attacker might transfer the luks headers to a data centre of his choice and run a massively parallel dictionary attack. This is no surprise because luks encryption uses only one factor, knowing the passphrase. If you wanted to improve on this, you might decide to store the AES keys on yet another medium in order to obtain a second factor, possession of the passphase-encrypted AES key. But this would no longer be bootable by grub2 .
- Also note that it is the passphrase of the /boot partition that it sufficies to attack, and that is only luks1.
- Encryption of the /boot partition substantially reduces the attack surface to an evil maid attack. Without encryption of /boot , an attacker who gets hold of your USB drive, can tamper with the kernel image and with the initial RAM disk stored on that /boot partition. This is no longer possible.
- It might still be possible to replace the grub2 boot loader by an alternative program that first asks for your passphrase, then has enough rights to access the network (on whatever machine you might be trying to boot from your USB drive) in order to exfiltrate your passphrase to the attacker, and which eventually uses your passphrase to boot your very Kali installation. You would not notice that this has happened.
- There is still another potential software based evil maid attack left. The maid who finds your USB drive in your hotel room might first extract a bitwise copy of its content. She might then try to boot from it and notice the exact form of the prompt for the passphrase. She might then overwrite your USB drive with another boot loader that prompts for your passphrase in exactly the same fashion and immediately afterwards does what she wants. So if you plug in your USB drive the next time and boot from it, you will give away your passphrase to her boot loader. If she can then somehow exfiltrate your passphrase (by WLAN?), she not only has a bitwise copy of your drive, but also your passphrase. But you will immediately notice that this has happened as she is unlikely to be able to mimick your exact Kali installation.
- You still need to trust the hardware on which you are running your USB drive.
Acknowledgements
The present instructions would not have been possible without
Как создать загрузочную флешку Кали Линукс?

В статье я покажу как быстро записать на флешку Кали Линукс, сделав её при этом загрузочной. Формат статьи основан на способах установки предыдущего поколения. Возможно, что сейчас разработчики представят обновлённый способ установки Кали на флешку. Работать будем, несмотря на формат блога, именно из Windows. Версия Windows значения не имеет, но именно она является подавляющим вариантом ОС на компьютерах пользователей. При этом, как и в случае с другими современными утилитами, записать загрузочную флешку Кали Линукс у нас с вами получится всего в несколько щелчков мышью. Специальных требований нет — от вас лишь потребуются права даминистратора в учётной записи Windows.
Что будем использовать?
- Бесплатную программу PowerISO для записи образа.
- Столь же бесплатную Rufus
- Флешка подходящего объёма (у меня 32 Гб и этого, кстати, может не хватить для последующих обновлений в режиме persistent).
- Скачанный из сети образ последней версии Кали Линукс.
Разобьём процесс в несколько этапов.
Сначала приобретаем образ. Советую воспользоваться самым быстрым и надёжным — официальный сайт. Туда вас и направляю:

По ссылке вы увидите несколько версий, начиная с самой полноценной для установки на прямую на диск. Там же версия, выпуск, размер, способ скачивания и разрядность процессора. Выбирайте под стать своей машине и ожидайте окончания загрузки.
ВНИМАНИЕ. На сегодняшний момент наиболее подходящим вариантом будет Live Boot, созданный для «живых» систем (Live CD).

Пока качается Кали, можно отправиться за PowerISO. Отправляю на официальный сайт:
Когда обе закачки на борту, устанавливайте вторую. У меня после запуска PowerISO вылезает 5-ти секундное окно с призывом приобрести ключ. Если у вас также — игнорируем его. Далее отправляемся по настройкам программы:

Выбираем панель Инструменты — > Создать загрузочный USB привод. Далее указываем на местонахождение только что скачанного образа Кали Линукс:

Теперь выставляем Прямую запись и не забудем указать на флешку:

Жмём Старт. О том, что данные на флешке затрутся, напоминать, думаю, не стоит?

Вобщем, статью писал дольше, чем записывал флешку. Запись шла менее пяти минут. Об успешном окончании записи сообщит следующее окно:

Из PowerISO выходим. Проверяем записанное. Для этого я перезагружу компьютер и после POST проверки из меню быстрого запуска (у меня на Lenovo это клавиша F12 сразу после включения) выберу загрузку с флешки. В меню Кали выберу Live amd64:


Всё работает, даже автоматически смонтированы все тома. Можете устанавливать на компьютер или использовать в таком виде.
Как создать загрузочную флешку Кали Линукс с помощью Rufus?
Очередная и почти всесильная утилита, которая также может помочь в записи Кали на флеш-носитель. Основные настройки программы можно выразить в следующем окне:

Важным этапом в настройке программы ползунок Постоянного размера раздела сдвинуть поближе к конечному объёму флешки. Пусть размер займёт чуть больше его половины: теперь ваша флешка будет комфортно работать в режиме persistence из меню, т.е. сохранять изменения после перезагрузки. Это значит, что можно обновлять систему, файлы, устанавливать скрипты. Ну, на ISO образ укажете сами, схема раздела — конечно, MBR. Если год выпуска машинки далеко не свежий — обратите внимание на пункт Добавить исправление для старых BIOS . Если программа попросит что-то доустановить, не мешайте:


В какой-то момент форматирование остановится на 100% — не торопитесь закрывать окно:


Следует учесть, что обновление такой флешки через apt-get идёт нестерпимо долго: на моём двухъядерном с 8 Гб RAM это заняло почти сутки. Так что не торопитесь расстраиваться из-за «остановившегося» в какой-то момент терминала при распаковке очередного пакета обновлений. Скорости через USB порты очень низкие.