Commands
Note: Tupperbox has a configurable prefix. In command examples below, replace tul! with your server’s Tupperbox prefix where necessary.
Getting Started
tul!register — Register a new tupper
tul!list — Get a detailed list of yours or another user’s registered tuppers
tul!remove — Unregister a tupper
tul!show — Show info about a particular tupper
Editing Tuppers
tul!avatar — View or change a tupper’s avatar
tul!birthday — View or change a tupper’s birthday
tul!brackets — View or change a tupper’s brackets
tul!describe — View or change a tupper’s description
tul!nick — Change a tupper’s nickname
tul!rename — Change a tupper’s name
tul!tag — Remove or change a tupper’s tag (displayed next to name when proxying)
tul!togglebrackets — Toggles whether the brackets are included in proxied messages for a tupper
Organization
tul!group — View or change your groups
tul!listng — Like list, but without showing group info
tul!find — Find and display info about tuppers by name
Configure
tul!auto — Configure auto-proxying
tul!proxy — Enable or disable proxying
tul!private — Configure privacy settings
tul!cfg — Configure server-specific settings
Proxies
tul!edit — Edit a proxied message you sent
tul!showuser — Show the user that sent a specific proxied message
Data Management
tul!import — Import your data from a file
tul!export — Export your data to a file
tul!purge — Remove all data
Get Help
tul!support — Get an invite to the support server
tul!help — Print this message, or get help for a specific command
tul!privacy — View my privacy policy
tul!stats — Show info about the bot
Tupperbox
Tupperbox lets you have many different profiles («Tuppers») which you can choose between easily with every message you send!
Why?
- Immersive roleplay as your favorite characters!
- For plural users, let your system members express themselves naturally!
- Play out scenarios as your DnD characters!
- Express your creativity by acting out scenes or making instant memes!
Create and edit Tuppers
A tupper is a fake Discord profile you can send messages through, as long as Tupperbox also has access to that channel.
You pick a tupper to use by writing its «brackets» around your message. It’s useful to think of the brackets as a special prefix for your tupper.
Tupper features
- Change your tuppers’ names or avatars
- Add nicknames and tags to customize your tuppers’ names
- Organize tuppers into groups
- Import tuppers from compatible bots like PluralKit
Web Dashboard
Manage your tuppers and groups with the new online dashboard!
- Reorder tuppers and groups
- Remove multiple tuppers
- Edit tupper and group info
Proxy Features
A proxy is a message sent through a tupper. You can interact with these messages through various reactions.
- React with ❌ to a proxy you’ve sent to delete it!
- React with ❓ to a proxy to show who sent it in DM!
- React with �� to edit a proxy you’ve sent!
Autoproxy
Set a tupper to autoproxy and every regular message you send will be from that tupper!
- Use «sticky mode» to autoproxy as the last tupper used!
- Turn on autoproxy in a specific server or even channel
- Start a message with \ to disable autoproxy for that message
- Start a message with \\ to clear a stickied tupper until next proxy
Logging
Set a log channel to have Tupperbox copy all proxied messages to it.
Ideal for moderators to quickly check what a user has said as a particular tupper. Works with Discord search bar!
Basics
Tupperbox is a bot that allows you to send messages that look like they came from other profiles.
Getting started is easy — you just need to know how to make a tupper and how to send a proxy.
Making a Tupper
A «tupper» is the default name for one of these profiles that you can send messages from.
There are two basic ways of making a new tupper:
- The dashboard (recommended)
- The tul!register command via the bot on Discord
Whichever one you use, you need two things: A name and some brackets.
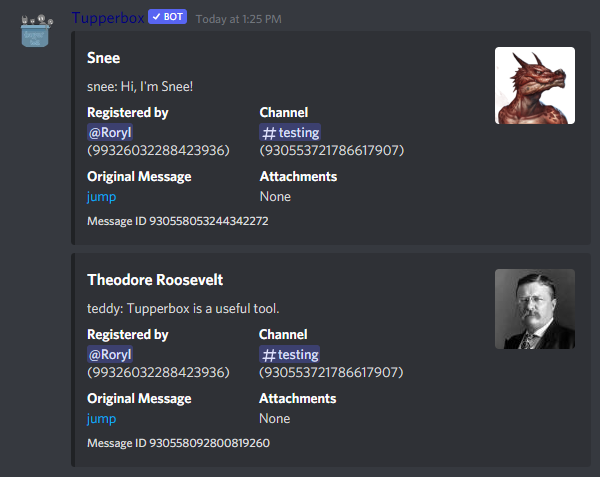
The name can be anything — in this example, we’ll use the name «Snee», the name of one of my tuppers demonstrated above.
The «brackets» are a special command that you use to summon your tupper. Example brackets are [text] , or guy:text — you can even use emojis. Anything you’d like.
The word «text» is required because it’s a placeholder for any message you’ll be sending; it tells Tupperbox «if I type these brackets, then my tupper will appear».
If that’s confusing, just keep reading — in this example, we’ll use the brackets snee:text .
Dashboard
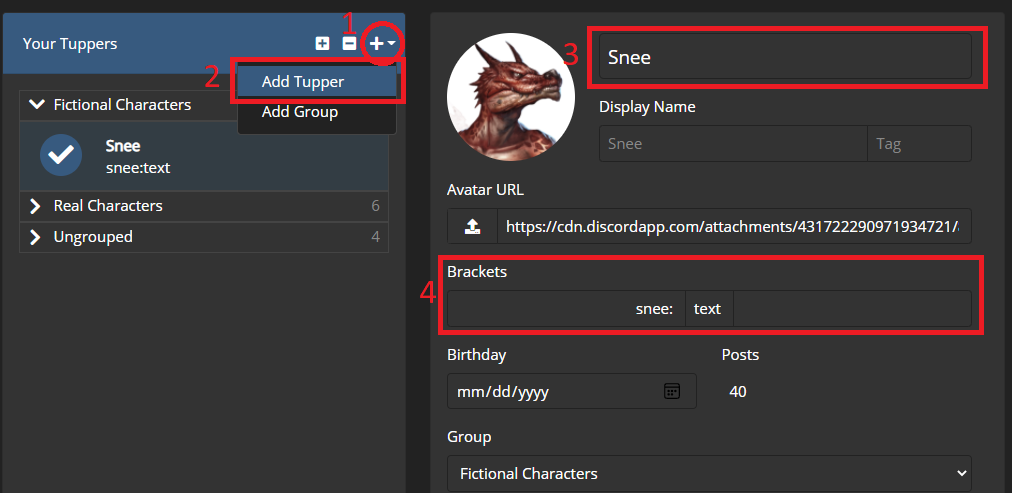
To make a tupper via the dashboard, visit this link and log in with Discord. Then, once you can see your list of tuppers, click the plus in the top right and choose «Add Tupper». Set a name and brackets for your tupper and then click «Save Changes». Take a look at the image below for a visual example.
Discord
To make a tupper via Tupperbox’s commands on Discord — in an available channel or in DMs — you’ll need to use tul!register .
For example, this will make the same tupper as shown above: tul!register Snee snee:text
Sending a Proxy
Once you have a tupper, you can send a proxy. A proxy is Tupperbox slang for «a message proxied through Tupperbox» — in other words, a message sent by a tupper.
If you haven’t already done so, join a server with Tupperbox or add it to one of your own. In any channel Tupperbox has access to, you can now send a proxy.
Proxying is easy:
- Look at your tupper’s brackets. They will look something like guy: text or .
- Write your brackets in a message, but replace the word «text» with what you want your tupper to say. For example, if your brackets are guy: text , you can make your tupper say «Hello!» by sending this message: guy: Hello! .
Setting an Avatar
Most people will want a more expressive avatar than the default Discord one. Tupperbox has you covered!
There are three main ways to set an avatar for your tupper:
- The dashboard (recommended)
- The tul!avatar command via the bot on Discord
- Uploading an image while using the tul!register command to create a tupper
The easiest way is to upload an image on the dashboard. This feature is Premium only. Simply visit the dashboard, select your tupper, and click its avatar or the upload button. Alternatively, you can simply paste an image link in the «Avatar URL» field on your tupper.
If you’d rather not use the dashboard, you can also set an avatar using the tul!avatar chat command. For example: tul!avatar «Snee» https://i.imgur.com/W5EWAiA.png
You can either provide an image link, like above, or upload the image while running the command instead of giving a link.
Finally, you can also upload an image while making a tupper with tul!register .
Limitations
There are two common pitfalls when working with tupper avatars.
The first is choosing an image that’s too large. Discord has certain size limits for webhook avatars that depend on a variety of factors. The safest thing to do is to try and choose an image with a resolution of about 500×500 and under 500kb in filesize.
The second is the image getting deleted. If you uploaded the image to Discord, and the message was deleted (or the channel, or the server), Discord will no longer host the image. It will be deleted off of Discord’s servers, and Tupperbox can no longer serve it.
Tupperbox Premium users have all of their avatars backed up and resized, so that you no longer need to worry about either of these pitfalls.
How To Make A Bot On Discord Tupperbox?
Discord is a popular communication platform for gamers and communities alike, and Tupperbox is a powerful bot that adds a whole new level of customization and functionality. With Tupperbox, you can create custom avatars, bios, and even personalities for your bot to use in Discord chats.
But how do you make a bot on Discord Tupperbox? Fear not, because in this guide, we’ll take you through the step-by-step process of creating your very own Tupperbox bot. Whether you’re a seasoned Discord user or a complete beginner, we’ll show you everything you need to know to get started on this exciting journey. So, let’s dive in and learn how to make a bot on Discord Tupperbox!
Discord Tupperbox is a useful bot that allows you to create and manage multiple characters or “tuppers” within your Discord server. To make a bot on Discord Tupperbox, simply go to the Tupperbox website and authorize the bot to your server. Then, create your first tupper and start customizing their appearance and settings. You can also use commands to switch between your different tupper characters and interact with other users.
How to Make a Bot on Discord Tupperbox?
Discord is a popular communication platform among gamers, with millions of active users worldwide. Tupperbox is a bot that can help you manage your Discord server by allowing you to create and use custom emojis and profiles. In this article, we will guide you through the process of making a bot on Discord Tupperbox.
Step 1: Creating a Bot Account
The first step to making a bot on Discord Tupperbox is to create a bot account. Follow these steps to create a new bot account:
1. Go to the Discord developer portal and log in with your Discord account.
2. Click on the “Applications” tab and then click on “New Application”.
3. Enter a name for your bot and click on “Create”.
4. Click on the “Bot” tab and then click on “Add Bot”.
5. Click on “Yes, do it!” to confirm.
Congratulations, you have successfully created a bot account on Discord!
Step 2: Inviting the Bot to Your Server
Now that you have created a bot account, the next step is to invite the bot to your server. Follow these steps to invite the bot:
1. Go to the “OAuth2” tab in the Discord developer portal.
2. Select the “bot” scope and then select the permissions you want your bot to have.
3. Copy the URL generated under “Scopes” and paste it into a new browser tab.
4. Select the server you want to invite the bot to and click on “Authorize”.
Congratulations, you have successfully invited the bot to your server!
Step 3: Setting Up Tupperbox
Now that you have invited the bot to your server, the next step is to set up Tupperbox. Follow these steps to set up Tupperbox:
1. Go to the Tupperbox website and log in with your Discord account.
2. Select the server you want to set up Tupperbox on.
3. Click on “Add Profile” to create a new profile.
4. Enter the name and description for your profile and then click on “Create”.
5. Click on the “Emojis” tab and then click on “Add Emoji” to create a custom emoji.
6. Enter the name and URL for your custom emoji and then click on “Create”.
Congratulations, you have successfully set up Tupperbox on your server!
Benefits of Using Tupperbox
Tupperbox is a powerful bot that can help you manage your Discord server more efficiently. Here are some of the benefits of using Tupperbox:
1. Custom Emojis: Tupperbox allows you to create custom emojis for your server, giving you more control over the look and feel of your server.
2. Profiles: Tupperbox allows you to create and use custom profiles, making it easier for your users to identify themselves on your server.
3. Easy to Use: Tupperbox is easy to set up and use, even for beginners.
Tupperbox vs. Other Discord Bots
There are many Discord bots available, but Tupperbox stands out for its unique features and ease of use. Here are some of the reasons why Tupperbox is better than other Discord bots:
1. Custom Emojis: Tupperbox allows you to create custom emojis, something that many other bots do not offer.
2. Profiles: Tupperbox allows you to create and use custom profiles, making it easier for your users to identify themselves on your server.
3. Easy to Use: Tupperbox is easy to set up and use, even for beginners.
In conclusion, Tupperbox is a powerful bot that can help you manage your Discord server more efficiently. By following the steps outlined in this article, you can set up Tupperbox on your server and start enjoying its many benefits.
Frequently Asked Questions
Discord Tupperbox is a popular bot used by many Discord servers. It allows users to create and store multiple personas (also known as Tupperware) within a server. Here are some common questions and answers related to creating a bot on Discord Tupperbox.
What is Discord Tupperbox?
Discord Tupperbox is a bot that allows users to create, store, and use multiple personas within a Discord server. This means that users can switch between different identities or personas while chatting with others in the server. The bot also allows users to customize their personas by adding profile pictures, bios, and more.
To use Discord Tupperbox, you need to add the bot to your server. You can do this by visiting the Discord Tupperbox website, selecting your server, and authorizing the bot to access your server.
How do I create a persona on Discord Tupperbox?
To create a persona on Discord Tupperbox, you need to use the Tupperbox command. Type “!tb help” in your Discord server’s chat to view the list of available commands. Once you have the list, use the “!tb new” command to create a new persona. You can then customize the persona with a name, profile picture, and bio.
You can create as many personas as you like on Discord Tupperbox, and switch between them while chatting in the server. This is a great way to keep different aspects of your online identity separate, or to have fun with your friends by pretending to be different characters.
Can I customize my persona on Discord Tupperbox?
Yes, you can customize your personas on Discord Tupperbox. Use the “!tb profile” command to view and edit your persona’s profile information, including their name, profile picture, and bio. You can also use the “!tb tag” command to add custom tags to your persona, which can be used to trigger specific responses from the bot.
Customizing your personas on Discord Tupperbox is a fun way to express your personality and have fun with your friends in the server.
How do I use my personas on Discord Tupperbox?
To use your personas on Discord Tupperbox, simply switch between them using the “!tb switch” command. This will allow you to chat in the server using a different persona. You can also use the “!tb reset” command to reset your persona back to its default settings.
Using multiple personas on Discord Tupperbox can be a fun and creative way to interact with others in the server, and to express different aspects of your personality.
Are there any other features on Discord Tupperbox?
Yes, there are several other features available on Discord Tupperbox. For example, you can use the “!tb remember” command to store information or notes about your server members or other personas. You can also use the “!tb reaction” command to add custom reaction images or gifs to your persona’s responses.
Exploring the different commands and features on Discord Tupperbox is a great way to get the most out of the bot and have fun with your friends in the server.
In conclusion, making a bot on Discord Tupperbox is a great way to enhance your Discord server experience. With just a few simple steps, you can create a bot that can perform a variety of tasks, from managing roles to sending automated messages. It’s a fun and easy way to add some personality to your server and make it more engaging for your members.
Remember, the key to a successful bot is to make it user-friendly and easy to navigate. Keep it simple and focus on the features that will be most useful to your server. And always be open to feedback from your members, so you can continue to improve and refine your bot over time.
So, what are you waiting for? Put your coding skills to the test and create your very own bot on Discord Tupperbox today. Your members will thank you for it, and you’ll have a lot of fun in the process!