How to create a Google form for registration
This page will show you how to create a registration form, collect participants to a Google Sheet and then send updates and reminders to the participants later.
First, go to Google Forms website (https://docs.google.com/forms/ ). You should be logged in with your Google account.
Suppose we want to create a registration form for a training workshop. We want to make it easy for the registrants to complete the form. So, the only information that we will ask is the name, email, and phone number.
Demo video
Create a new form
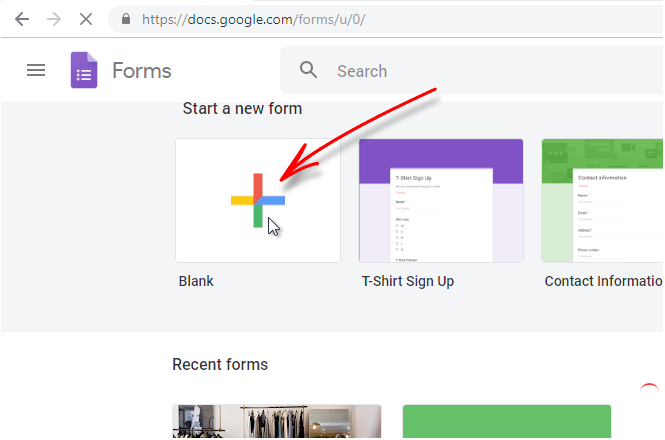
Press the new blank form button:
Give a name to the form
Give a name to the form. Give a brief description of your workshop/program Enter instructions to the user.

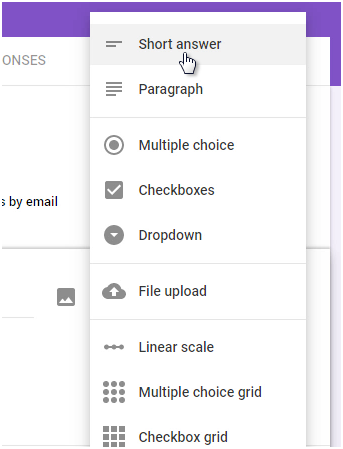
Add the Fields
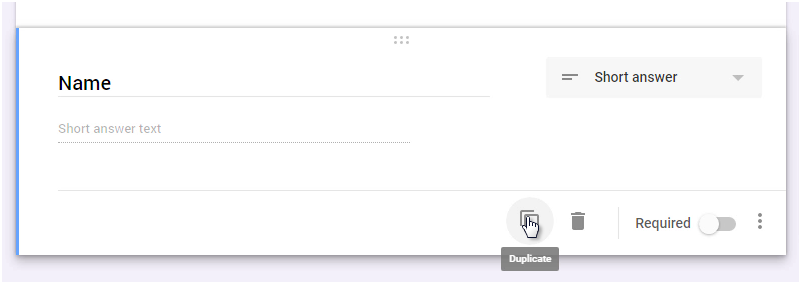
Add Name and Phone fields. Select the type Short Answer from the dropdown menu

Click on the ‘clone’ icon to quickly duplicate the current field and make the “Phone” field.
We don’t have to add the email field because if you select a setting, Google forms will automatically add an email field.
Settings
Go to the settings by clicking on the ‘settings’ icon on the top right
![]()
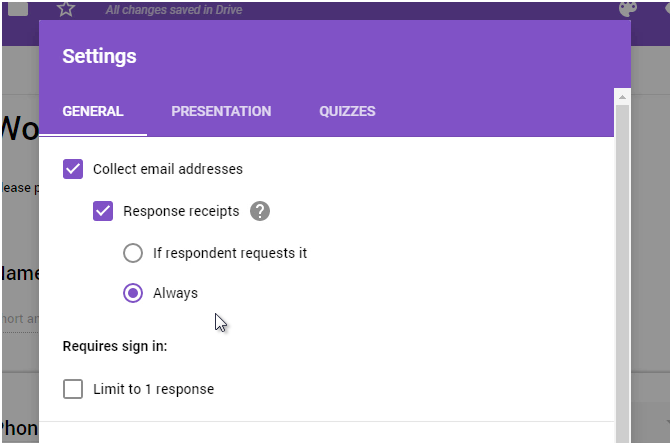
This opens the Forms settings box
Check the “Collect email address” option and “Always send response receipts” options. I will explain what does it do, in a moment.
Test the form
Now that we have added the fields, you can preview the form and see how it will look like to the user.
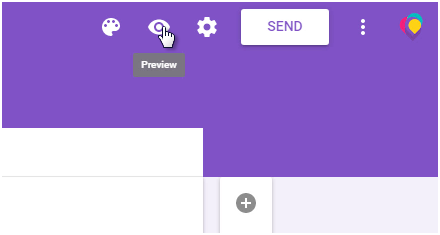
Press the Preview button
Customize form style to match your theme
![]()
Click on the customize theme icon:
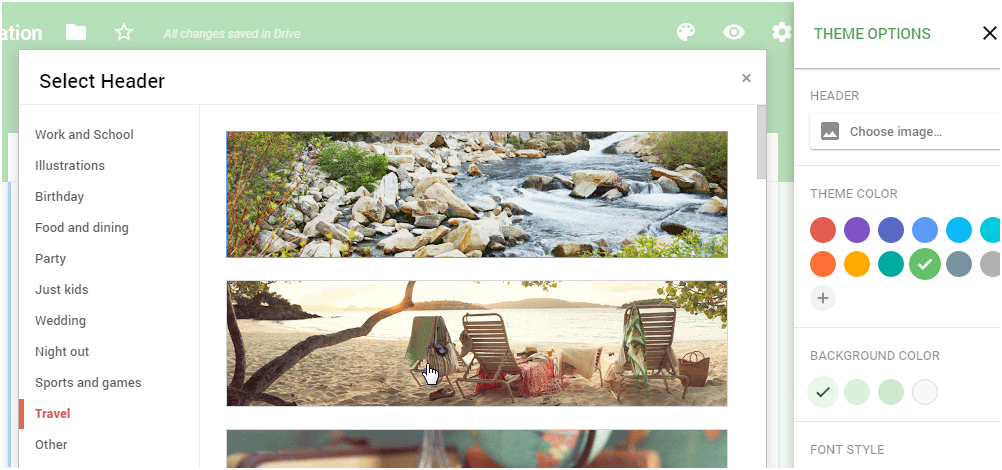
You can customize the colors, the background and the header image here.
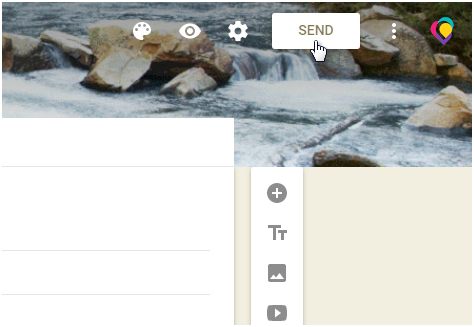
Create a link to the form
We need a shareable link to the form so that we can send it by email or share it through social media. In order to create the form’s shareable link, click on the “send” button.
Then select the link tab and copy the short link for the form. You can send this link to your email list or share it on social media.
Users who don’t have Google account or users who haven’t logged in also can fill the form.
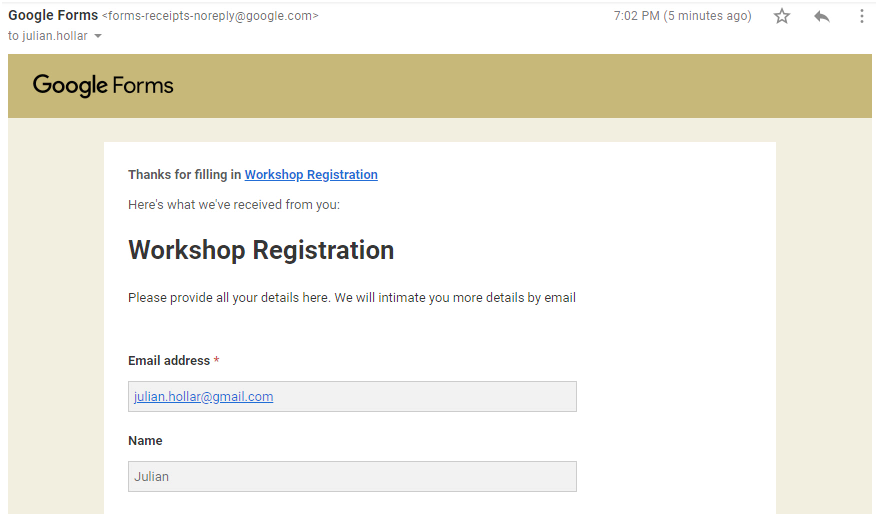
Test your form
Use the form link you created to open the form in another browser window. Make a test submission. Submit your email address.
Check your email. You should see a receipt from the form.
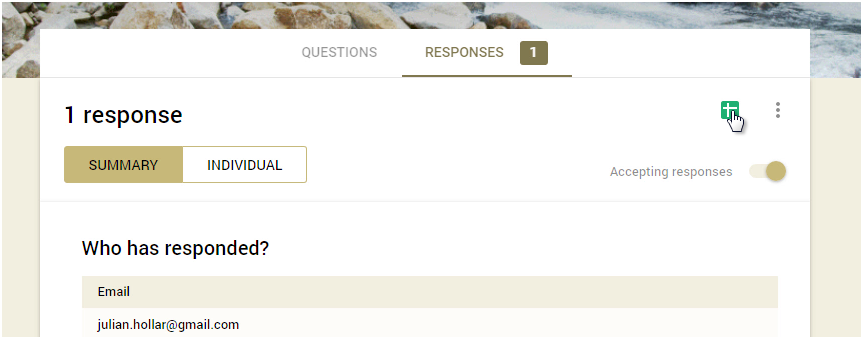
Come back to your form editor. In the “Responses” tab, you should see a new response.
You can save the form submissions to a Google Sheet. Press the Google Sheet icon
Categories
- Calculation Forms
- HTML Forms
- PHP Form Handling
- Form Action
- Contact Forms
- Code Snippets
- Best Practices
- HTML5 Forms
- Form Widgets
- jQuery Form Handling
- Email Forms
- Form Mail
- Web Forms
- Checkboxes
- File Upload
- Google Forms
How to create google form for event registration
It is quite easy to set up a registration form for the event you are organizing, using Google forms. The best part is, Google forms is free and comes with your Google/Gmail account.
First, go to Google Forms website (https://docs.google.com/forms/ ). You should be logged in with your Google account.
Let’s create a new blank form: Press the new blank form button:
Give a name to the form
Give a name to the form. Give a brief description of your event. Also, don’t forget to enter instructions to the user.
Add the Fields
Add Name and Phone fields. Select the type Short Answer from the dropdown menu
Quick tip Click on the ‘clone’ icon to quickly duplicate the current field and make the “Phone” field.
Settings
Go to the settings by clicking on the ‘settings’ icon on the top right
![]()
This opens the Forms settings box
Check the “Collect email address” option.
Test the form
Now that we have added the fields, you can preview the form and see how it will look like to the user.
Press the Preview button
Customize form style to match your theme
![]()
Click on the customize theme icon:
You can customize the colors, the background and the header image here.
Create a link to the form
We need a shareable link to the form so that we can send it by email or share it through social media. In order to create the form’s shareable link, click on the “send” button.
Then select the link tab and copy the short link for the form.
Test your form
Use the form link you created to open the form in another browser window. Make a test submission. Submit your email address.
Check your email. You should see a receipt from the form.
Come back to your form editor. In the “Responses” tab, you should see a new response.
You can save the form submissions to a Google Sheet. Press the Google Sheet icon
Invite your contacts to register for the event
The next step is to invite attendees to the event.
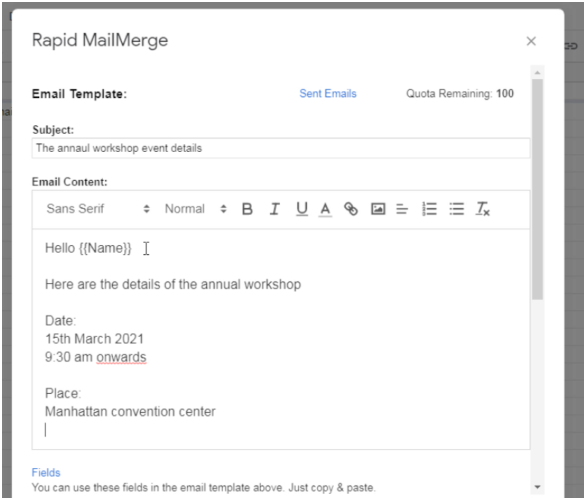
The easiest way would be to collect all your invitees into a Google Sheet. Then use Rapid MailMerge add-on to send emails to all the invitees.
Here are the steps.
Sending event invites
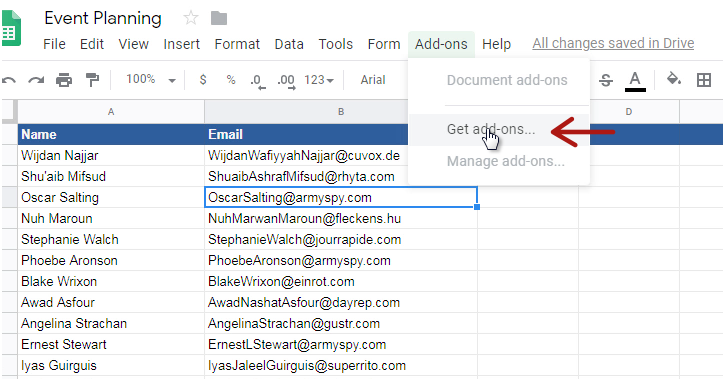
Open the Google Sheet where you have all your invitees.
If you don’t have Rapid MailMerge add-on (open Add-on menu in Google Sheet and look for Rapid Mail merge) install the add-on.
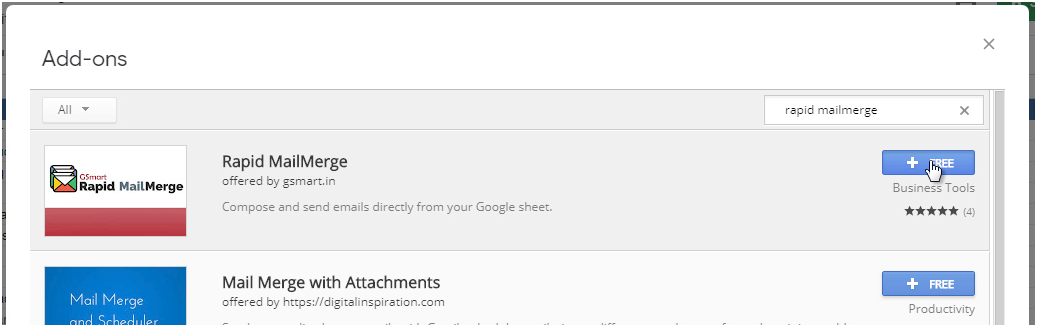
Install Rapid MailMerge add-on
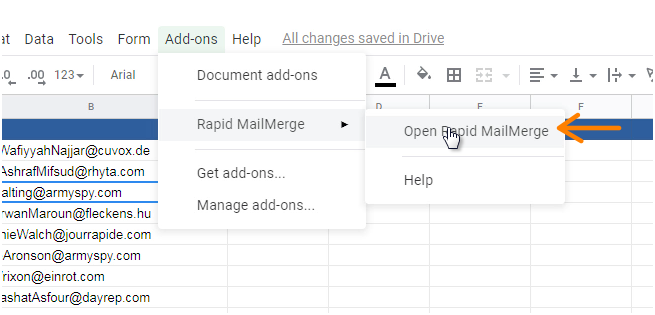
Once installed, open Rapid MailMerge from the add-ons menu
Compose your invitation and send email to all the invitees in the Google Sheet in a single step. Don’t forget to add the link to your event registration form.
Following up with the registered participants
In a previous step, you had enabled saving new registrations to a Google Sheet. This will be handy when you want to coordinate the event. You can quickly send announcements using the Rapid MailMerge add-on from the Google Sheet directly.
Demo video
Here is a quick video demo that will help you build the form.
See Also
- How to check google form responses
- How to make a Google form survey anonymous
How to Use Google Forms for Registration? [6-Steps Guide]
There are plenty of ways to make good use of Google Forms. The most obvious ones are surveys, tests, and quizzes, but apart from that, you can also use forms for creating event registrations or such cases. This post will tell you how to use Google Forms for registration for webinars or any events.
You can create Google forms for registration for various different reasons like registering your attendees for an event or understanding your attendees’ preferences, etc.
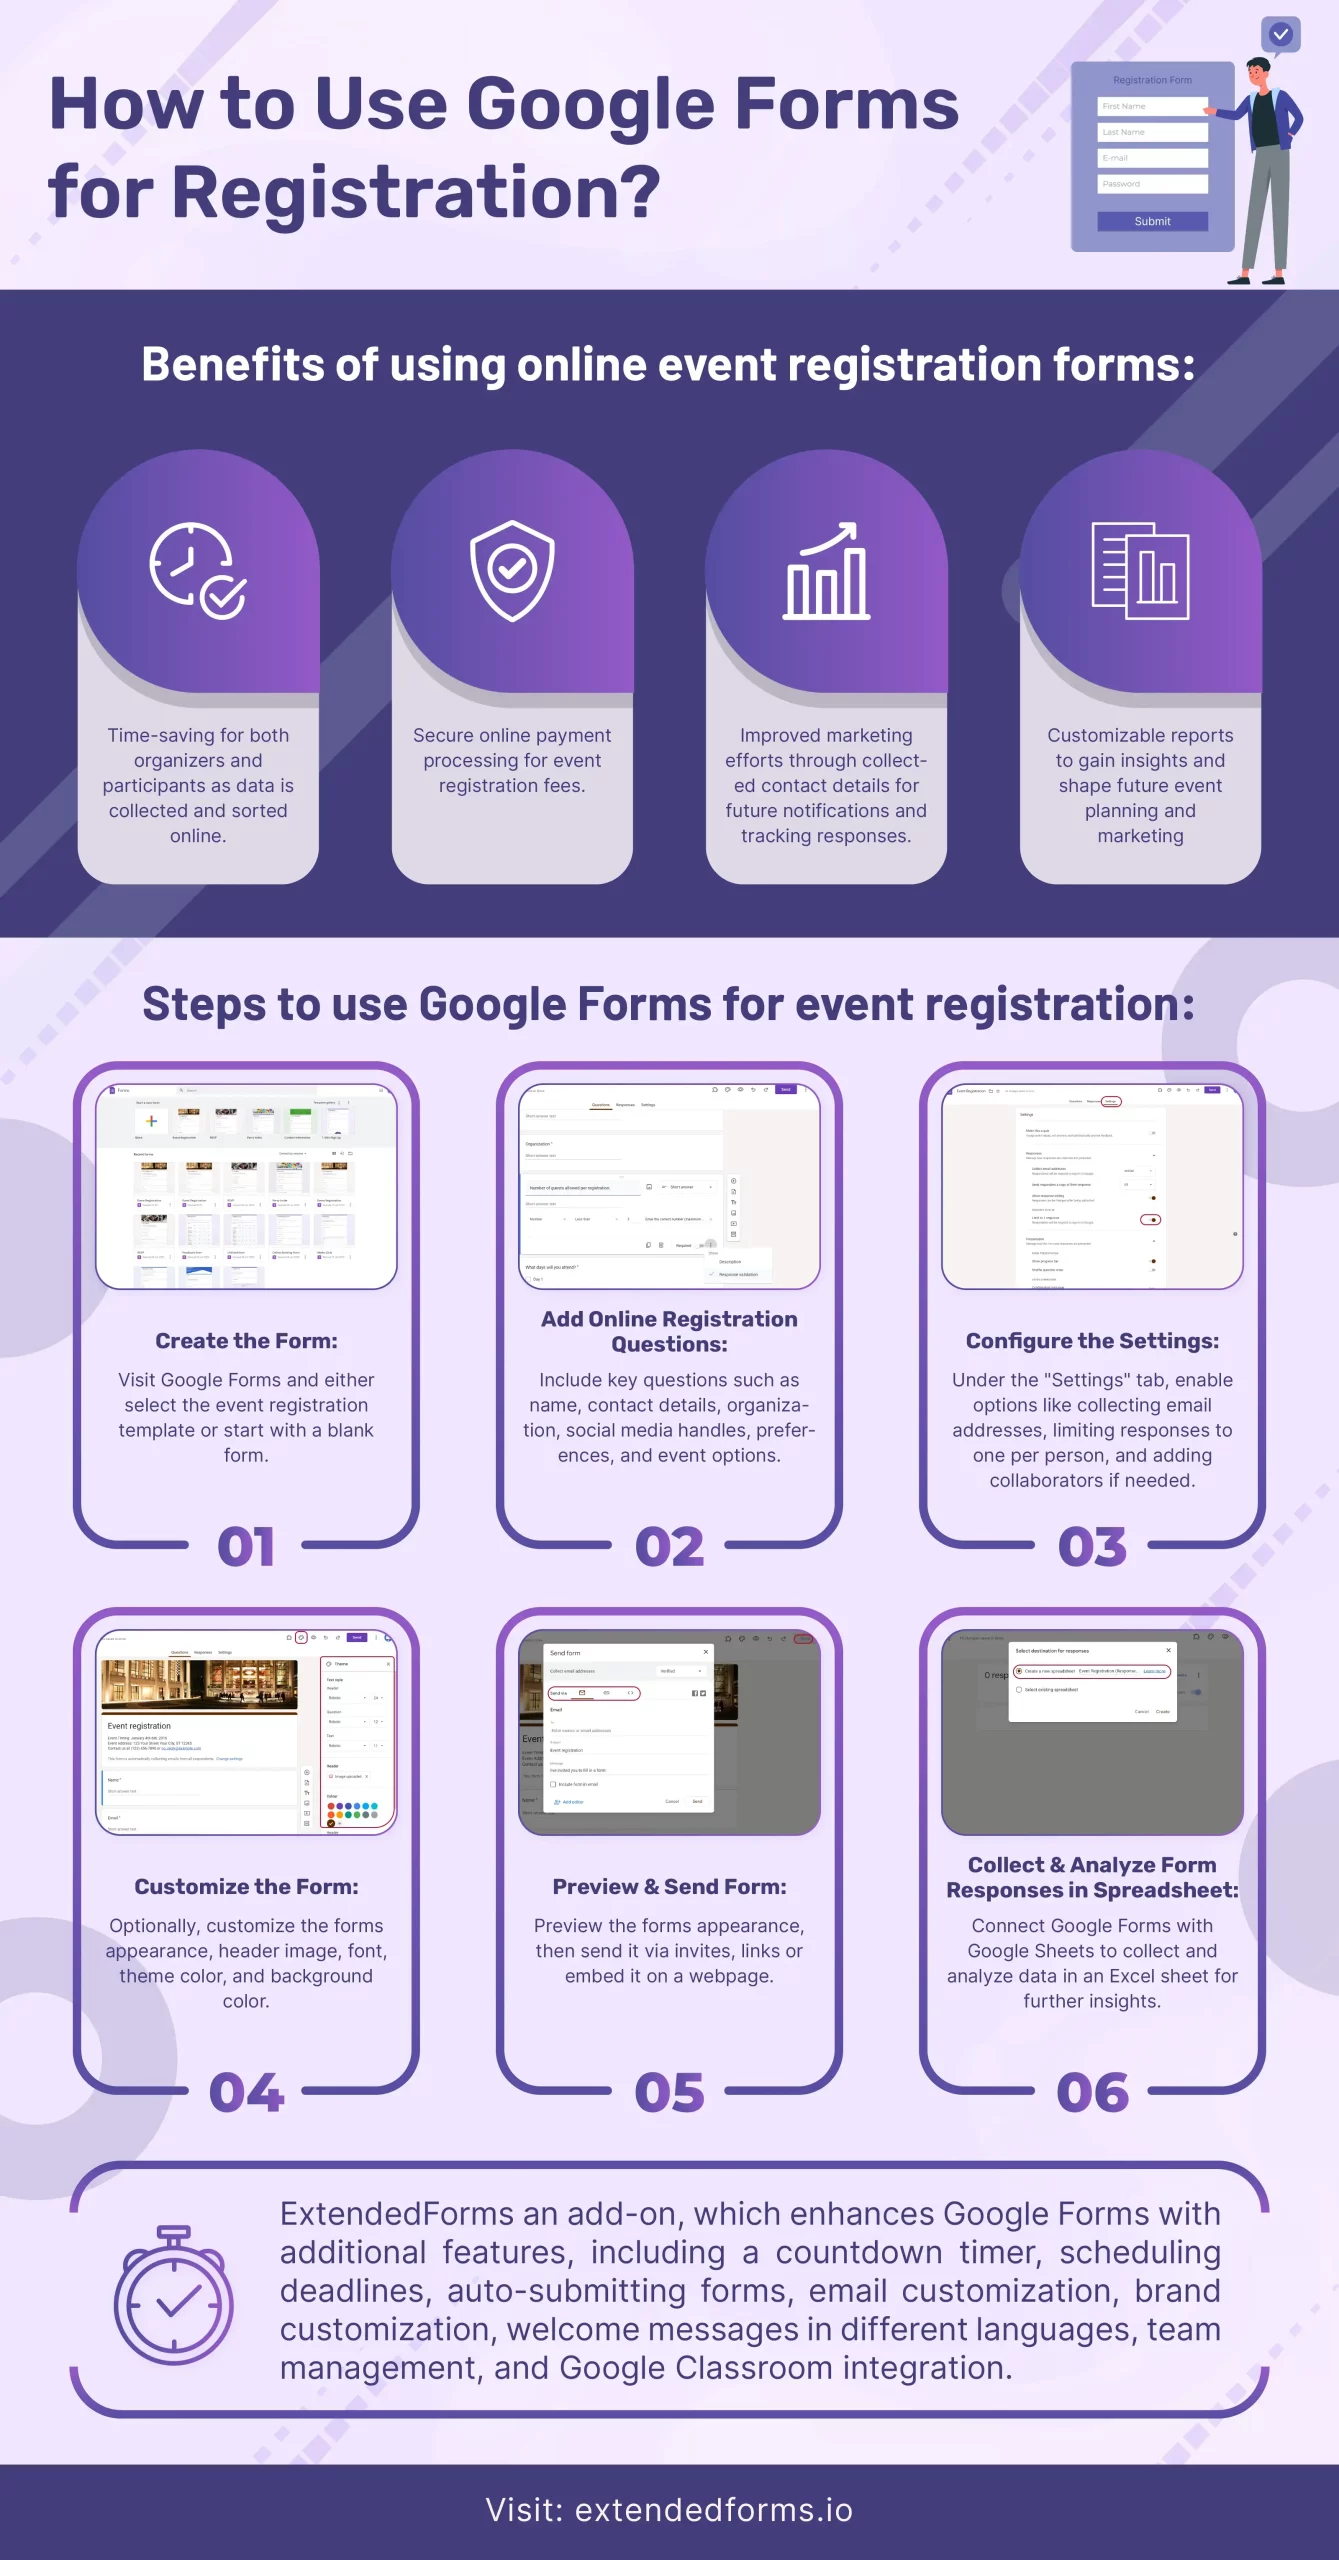
Google Forms is a great online form builder for various things and using Google Forms for registration is one of them. We will discuss the benefits of online registration and the process to create one in 6 easy steps guide, so let’s get into the article.
In this Article
Guide on How to Use Google Forms for Registration
Here are the steps to follow if you want to use Google Forms for registrations;
1. Create the Form
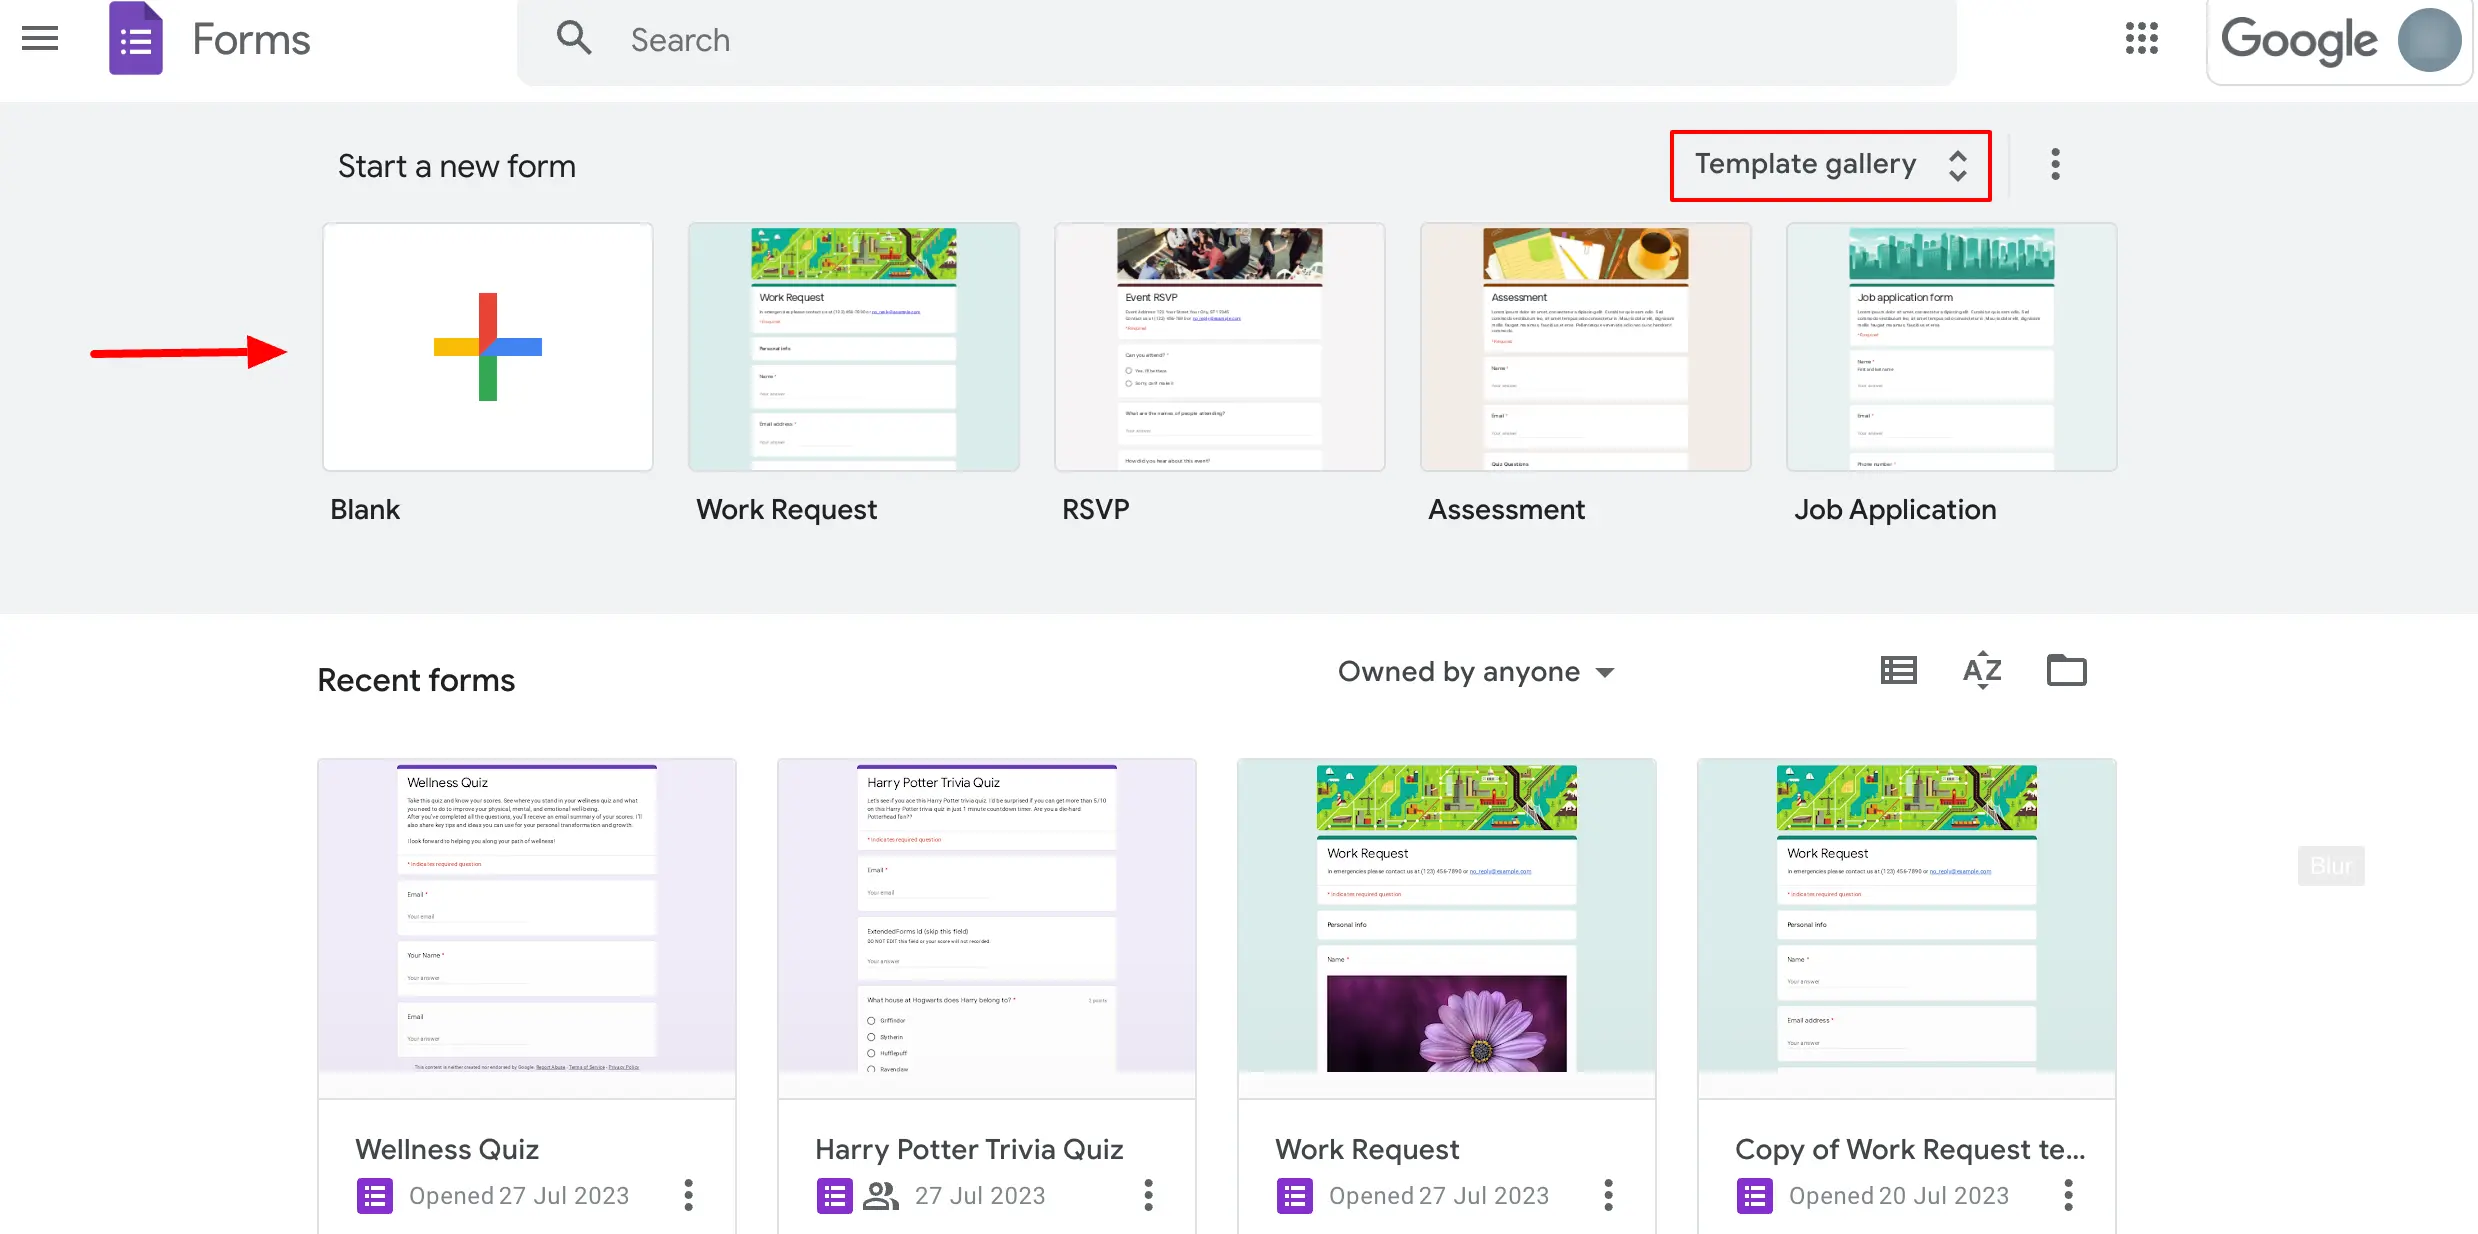
To create Google Forms for registration you must navigate to Google Forms site, or go through the G-Drive > Google Forms and select the event registration form template.
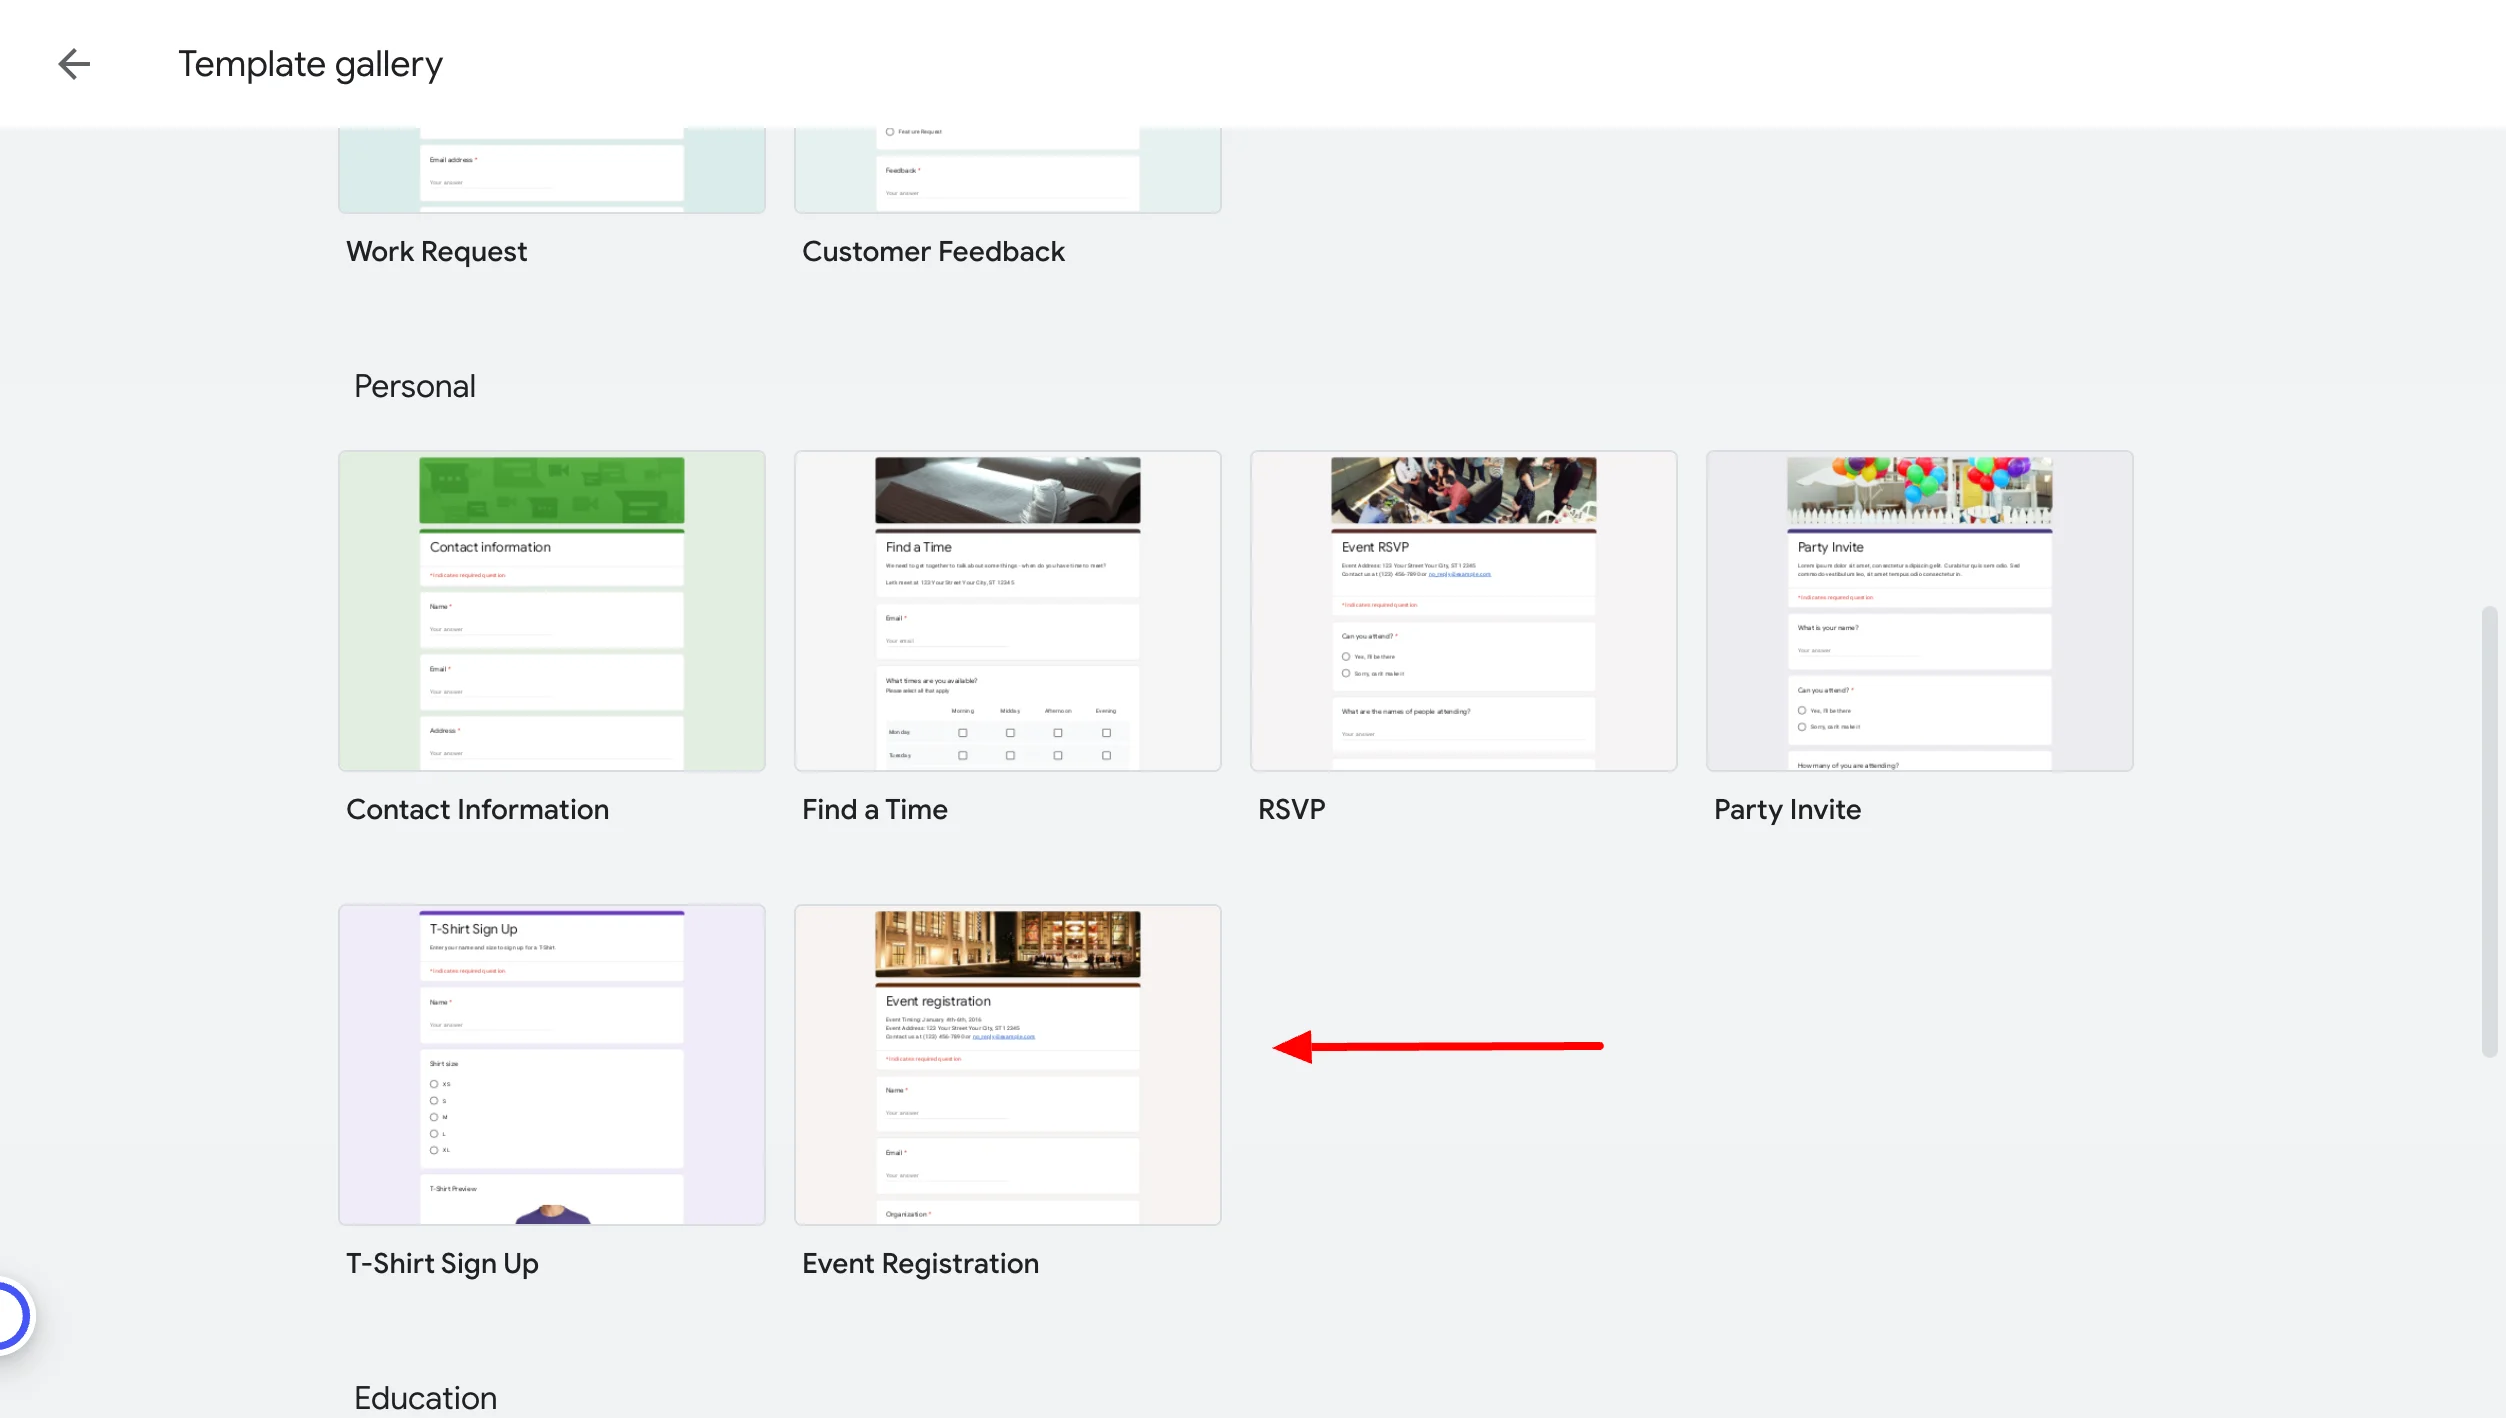
- Alternatively, you can even choose a ‘Blank Form’ for that matter, by clicking on the ‘Blank” below ‘start a new form.’
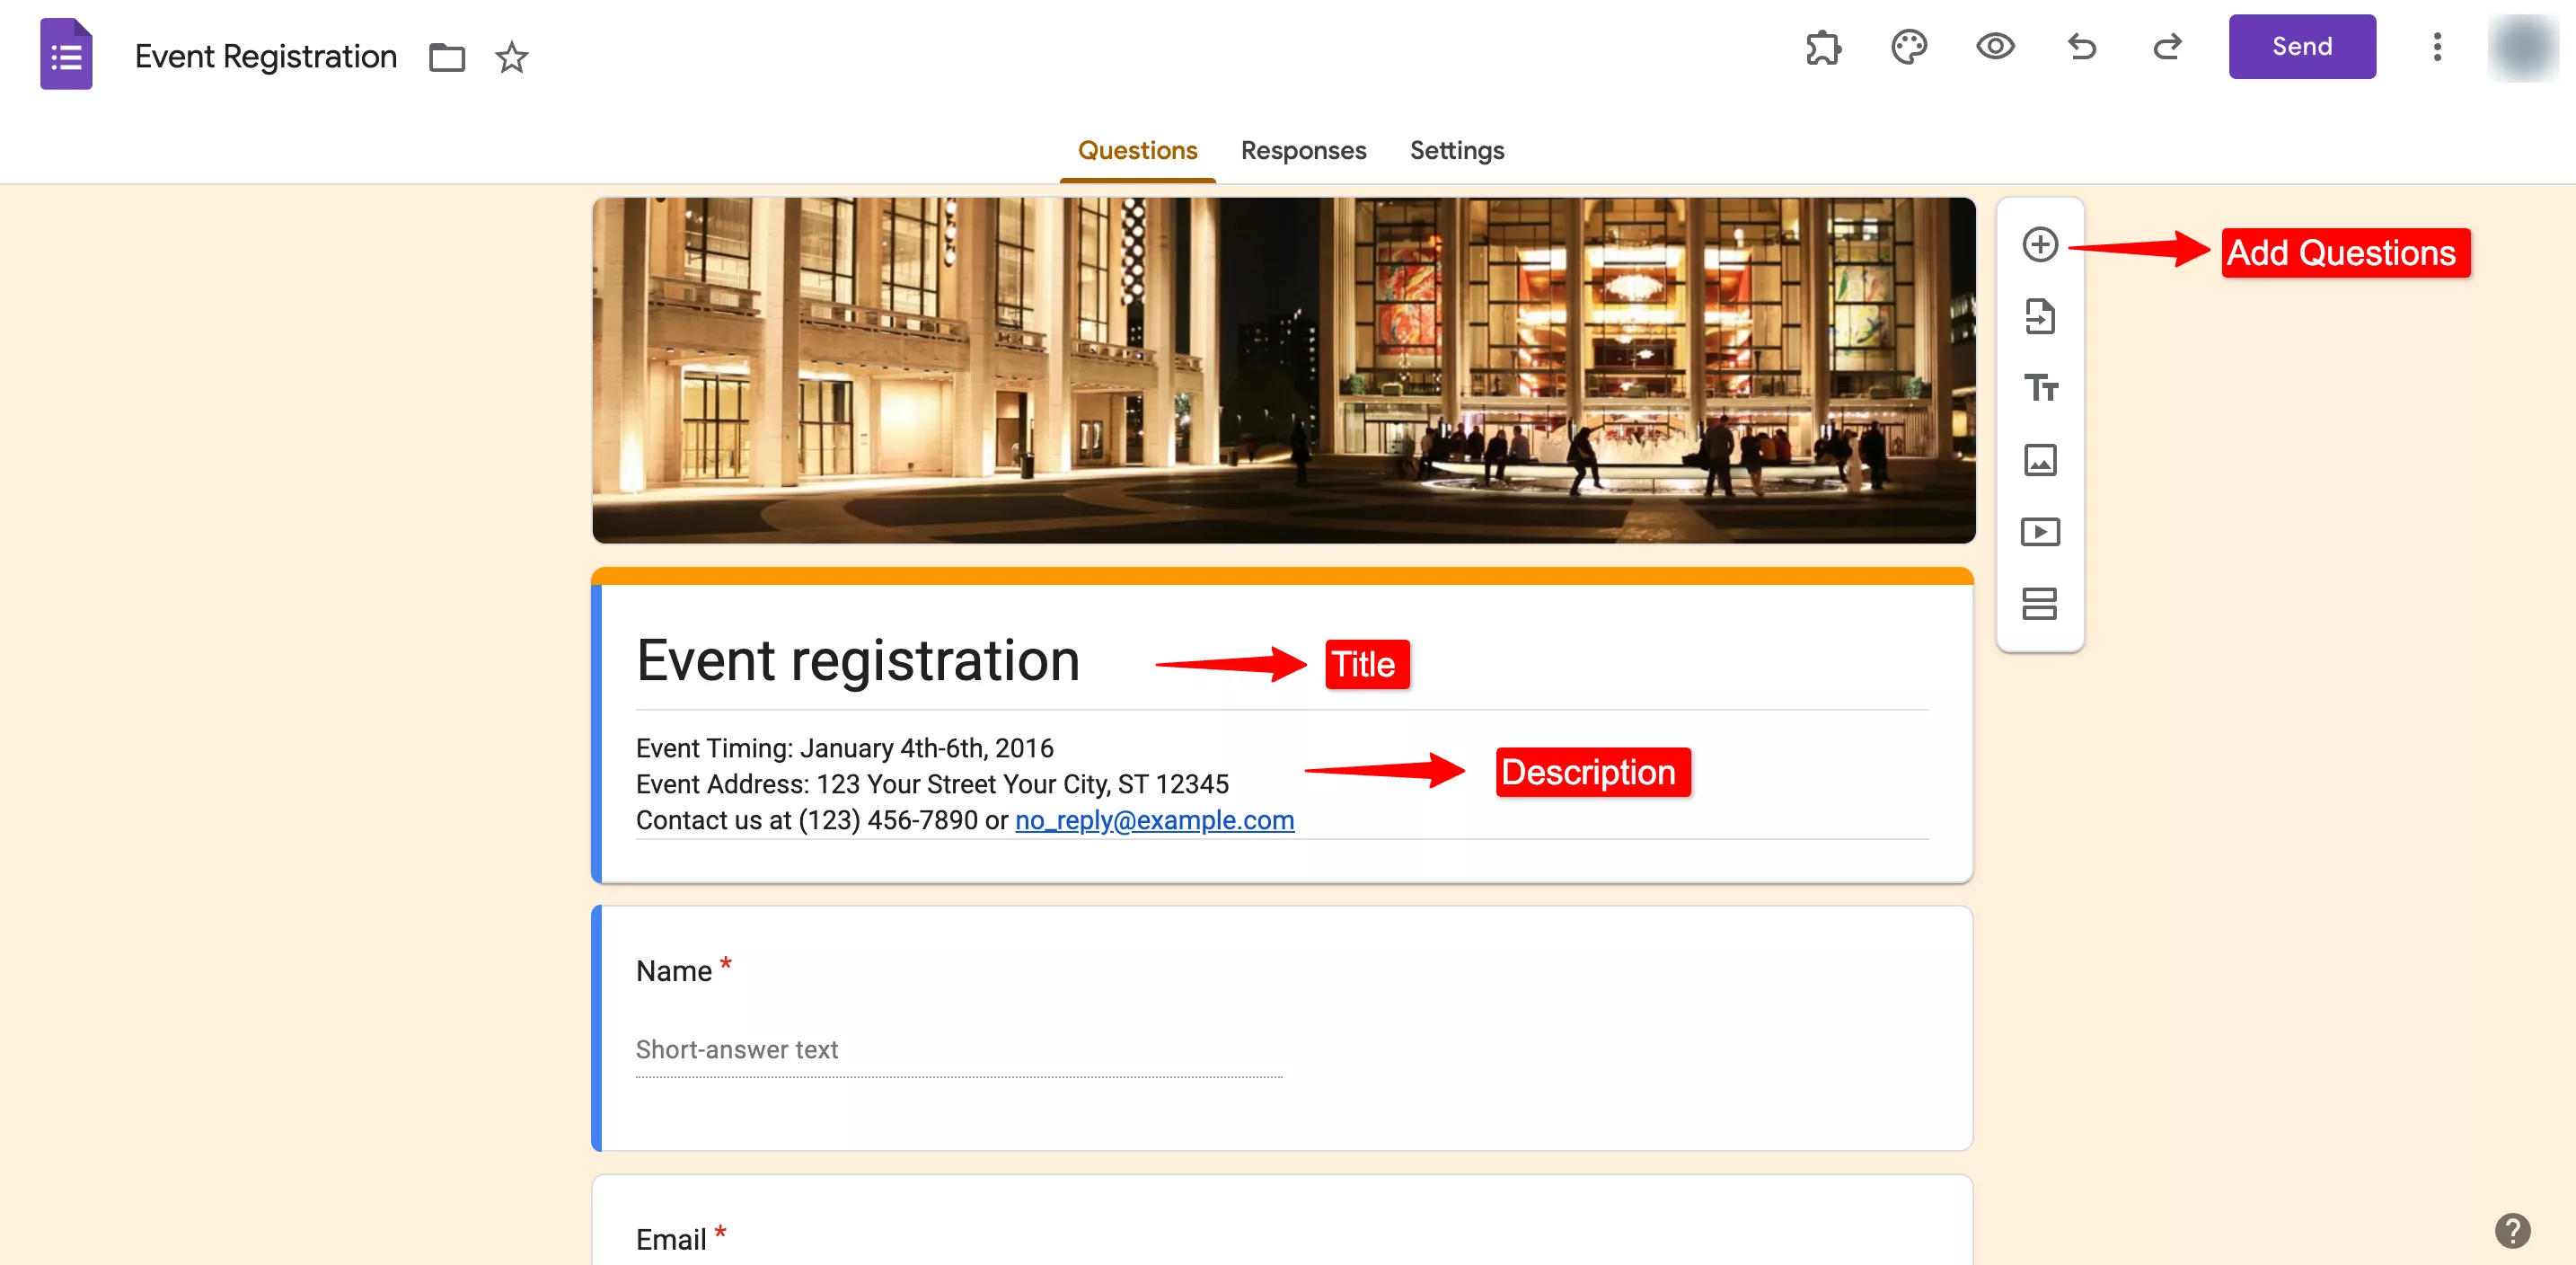
It will open up a form with pre-made questions and a header image that you can modify easily. I will explain that in further steps.
2. Add Online Registration Questions
So, the next step is to add questions to a registration form. If you have selected the online registration Google Forms template then you will see a few basic questions pre-added. If you find them appropriate then that’s perfect, you can add more.
Enter an appropriate title and description that’s relevant to your event. However, here are some key questions to consider if you want to collect the information for webinars or any event.
Question Types for Event Registration Form
- First & Last Name
- Contact Details – Mobile No. & Email-id
- Name of their organization
- Social media handles
- Any food allergies or dietary restrictions?
- Session and event preferences
- Which event will you be attending/participating in? (if there is more than one event happening)
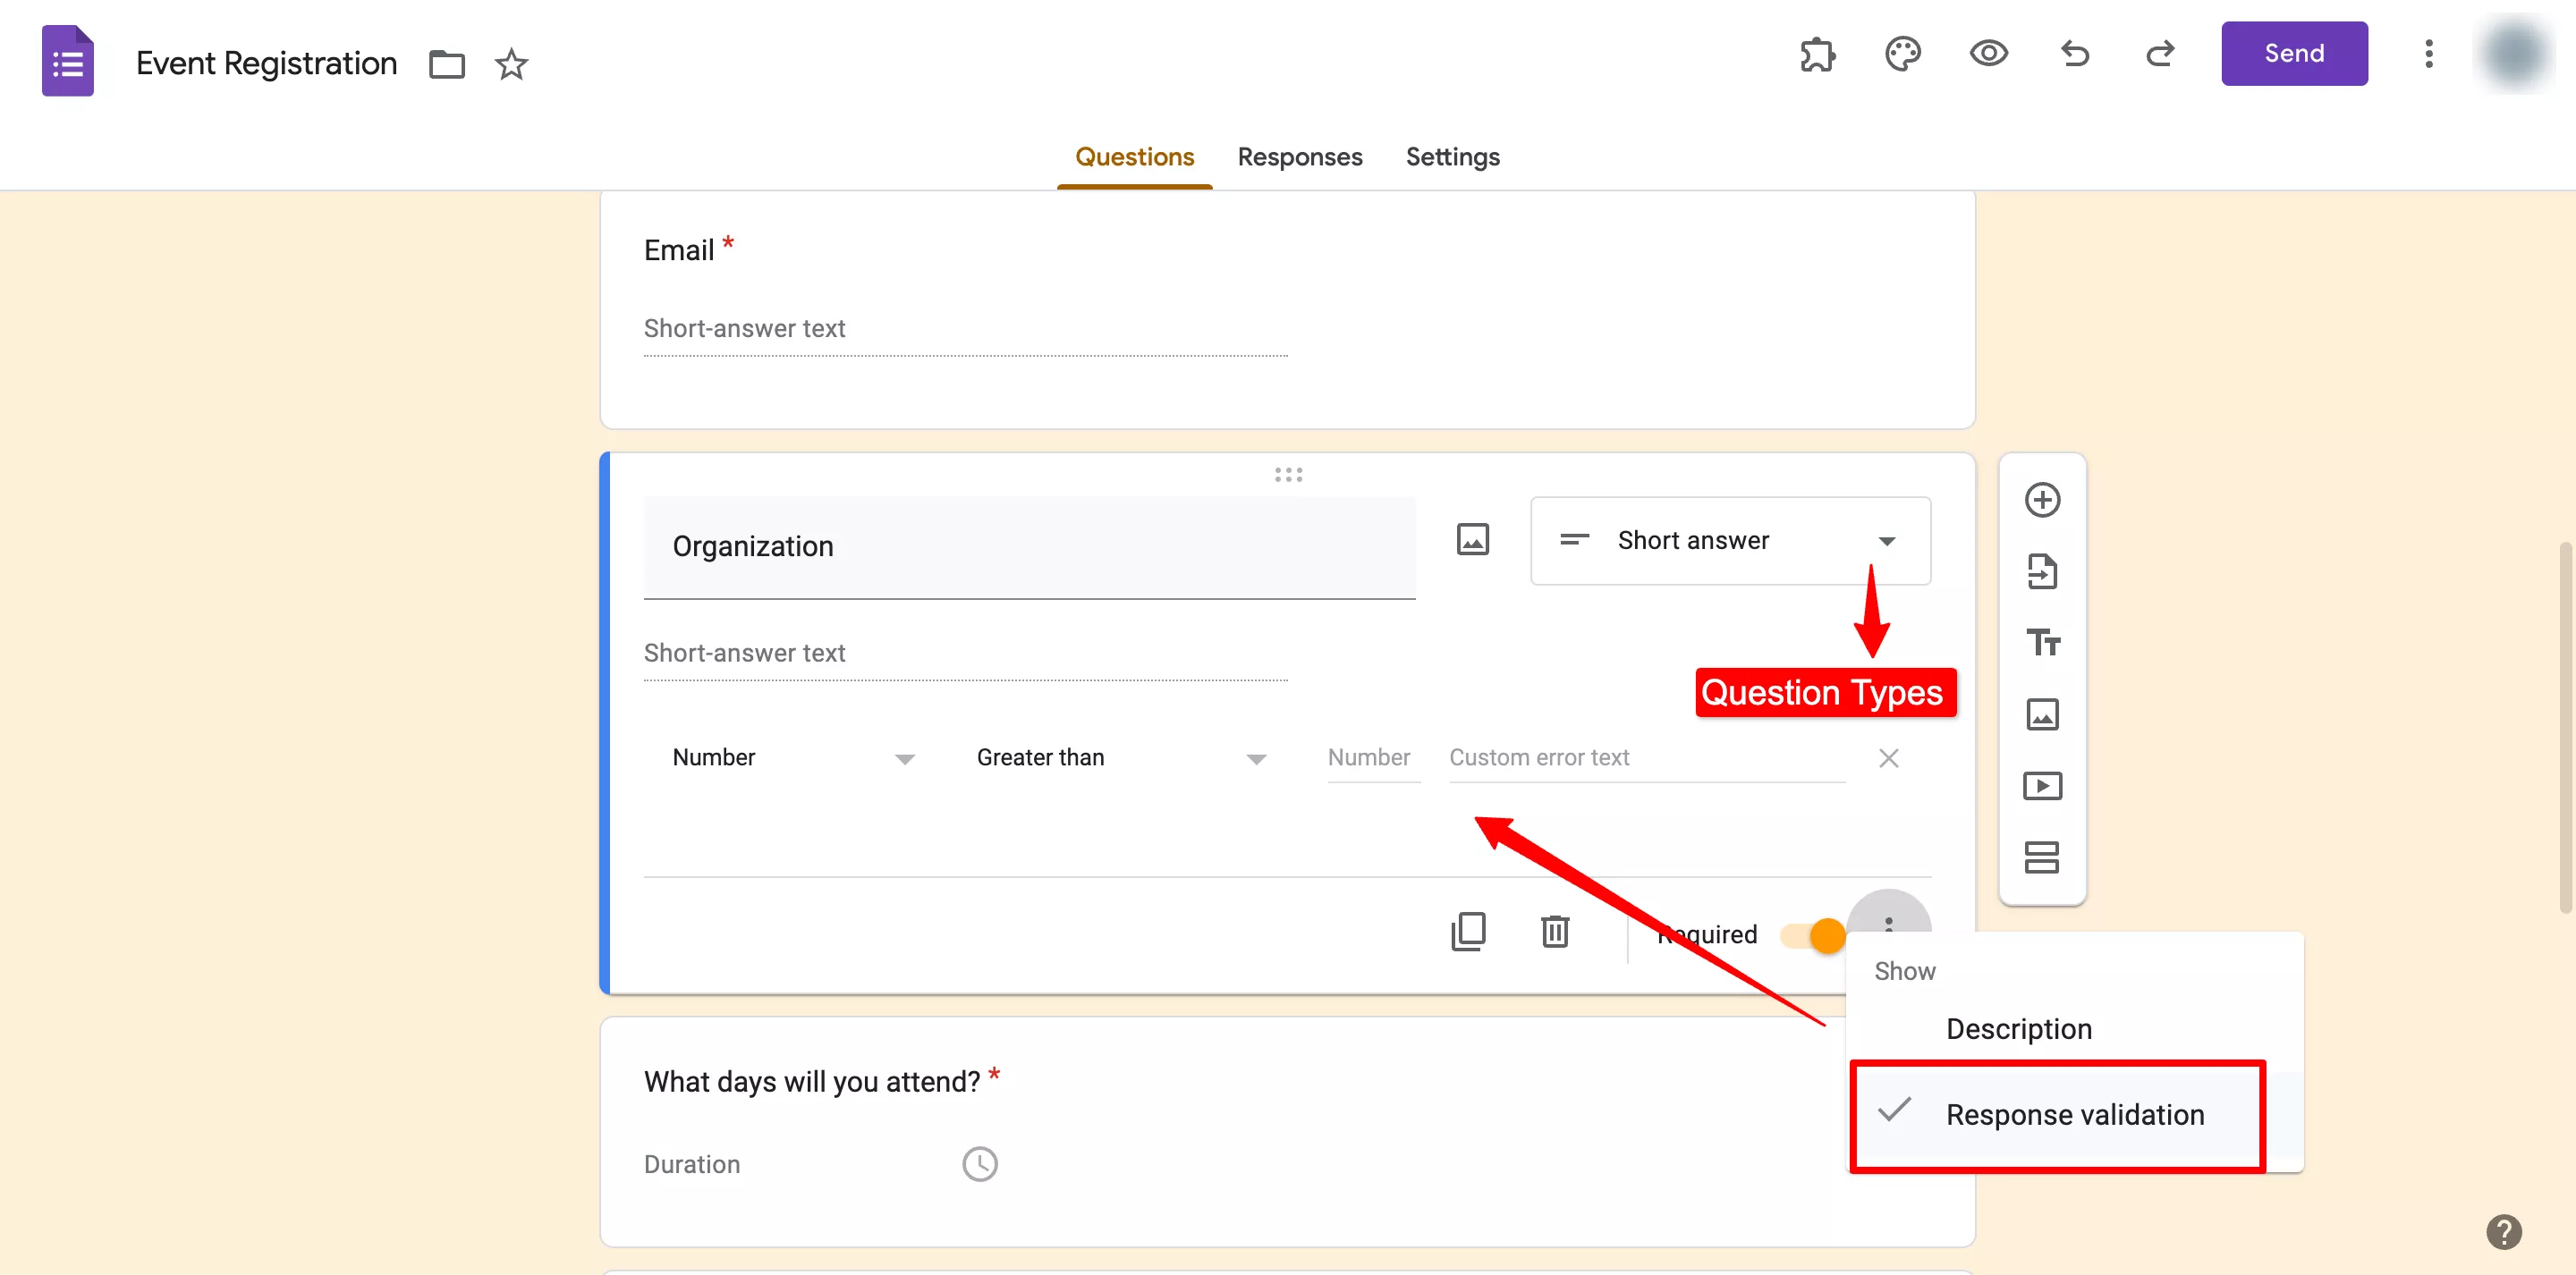
For questions, click on the specific question tab and it will expand & give you options to modify. Select the question and make your changes.
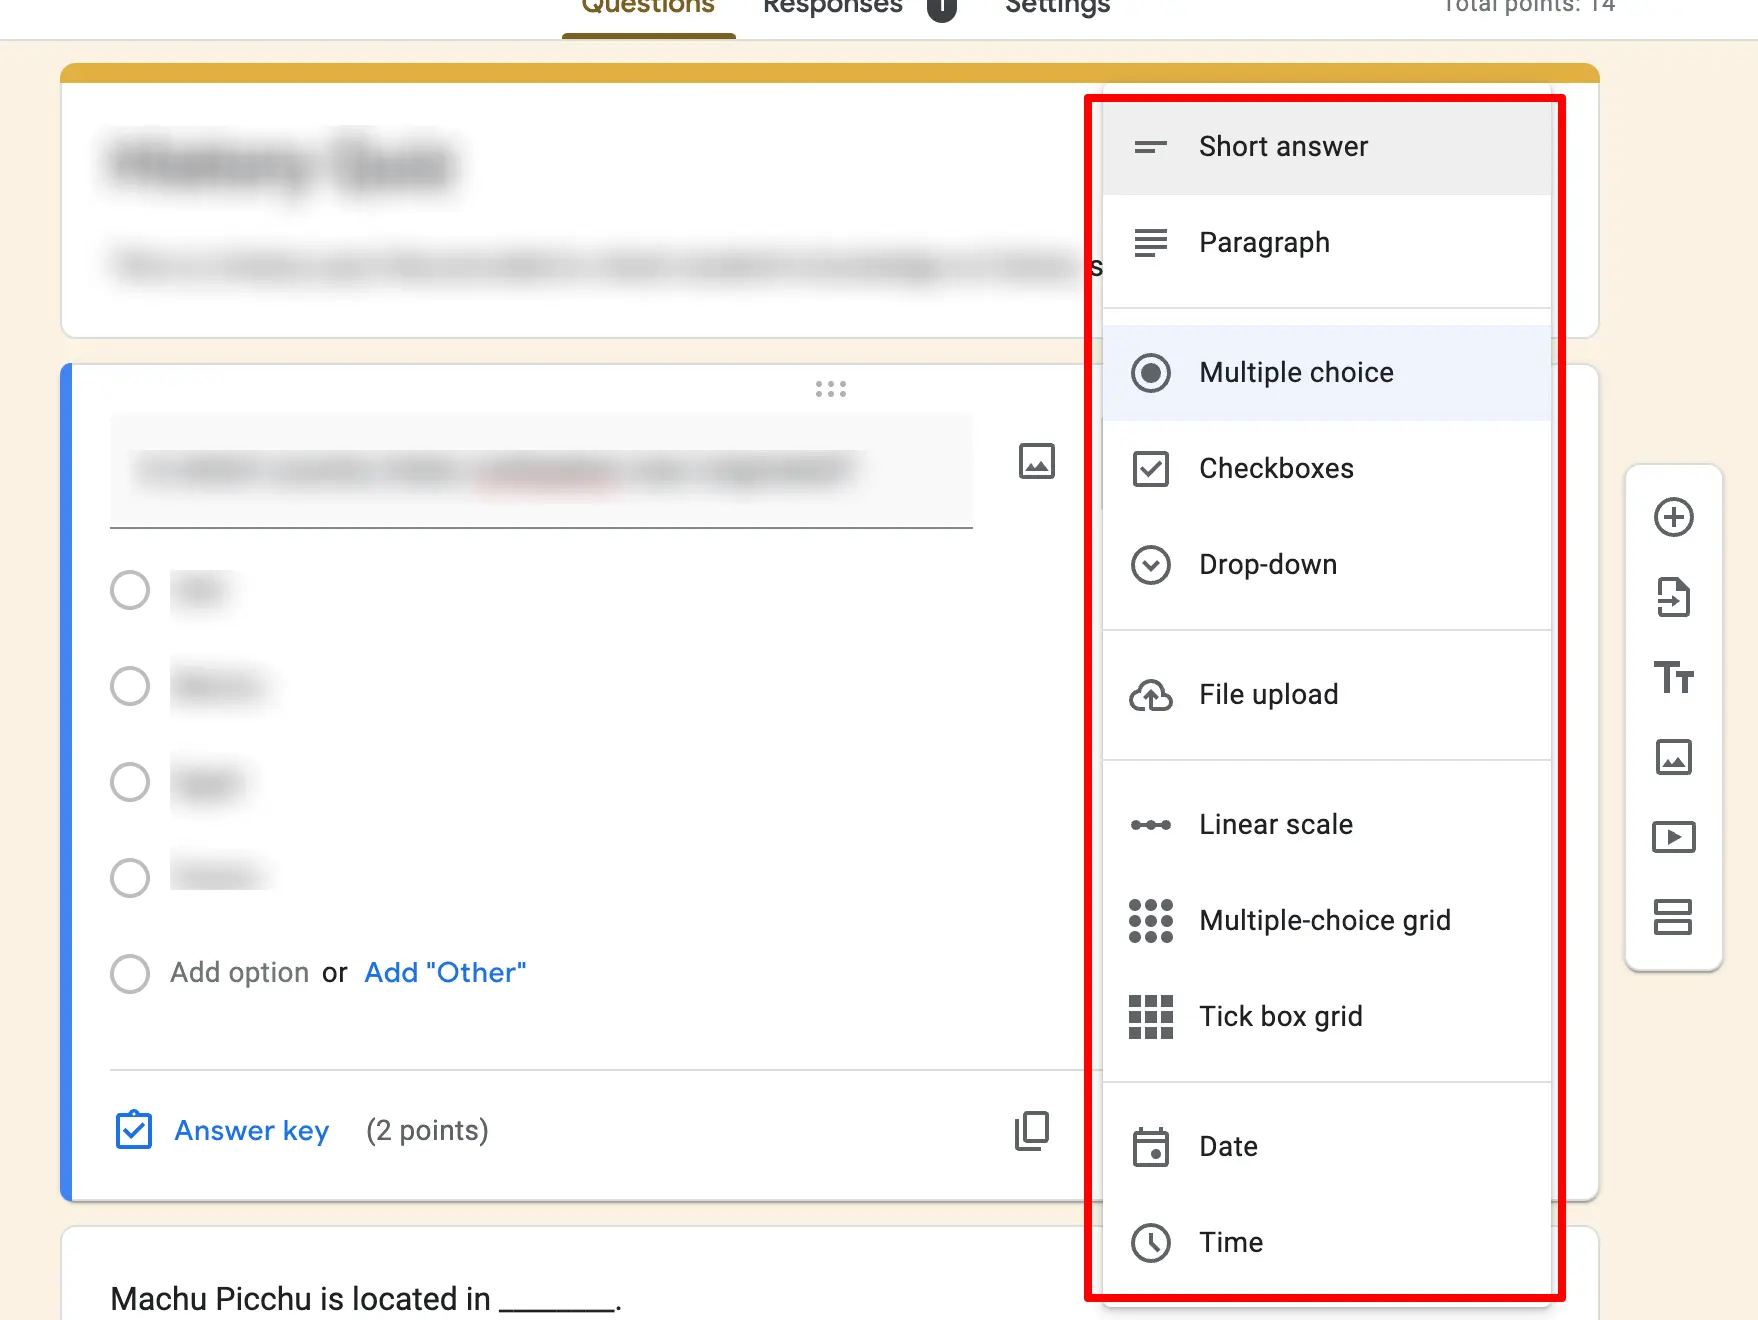
To add a new question click on “Add new question” (⨁ icon) on the floating menu next to the question tab. Google Forms provides various question formats that you can view in the dropdown in the question tab.
Google automatically selects the answer type based on your question but you can change it from the dropdown menu.
Further, you can duplicate the questions, trash them, and even make them required. Apart from that, you can ‘response validate’ your short/long paragraph questions.
You can create answer validation for numerical, text, regular expression, or length and add custom error text that will be seen by your respondents if they don’t write answers based on a certain category. Click on the ‘፧’ at the bottom and select ‘Response Validation.’
3. Configure Settings
Once you are done adding questions, it’s time to tweak the settings of Google Forms for registration. Go to the ‘Settings’ tab, from there you can configure all the form settings. Like, under the ‘Responses’ option, enable the ‘collect email addresses’ option because they are needed for further communication.
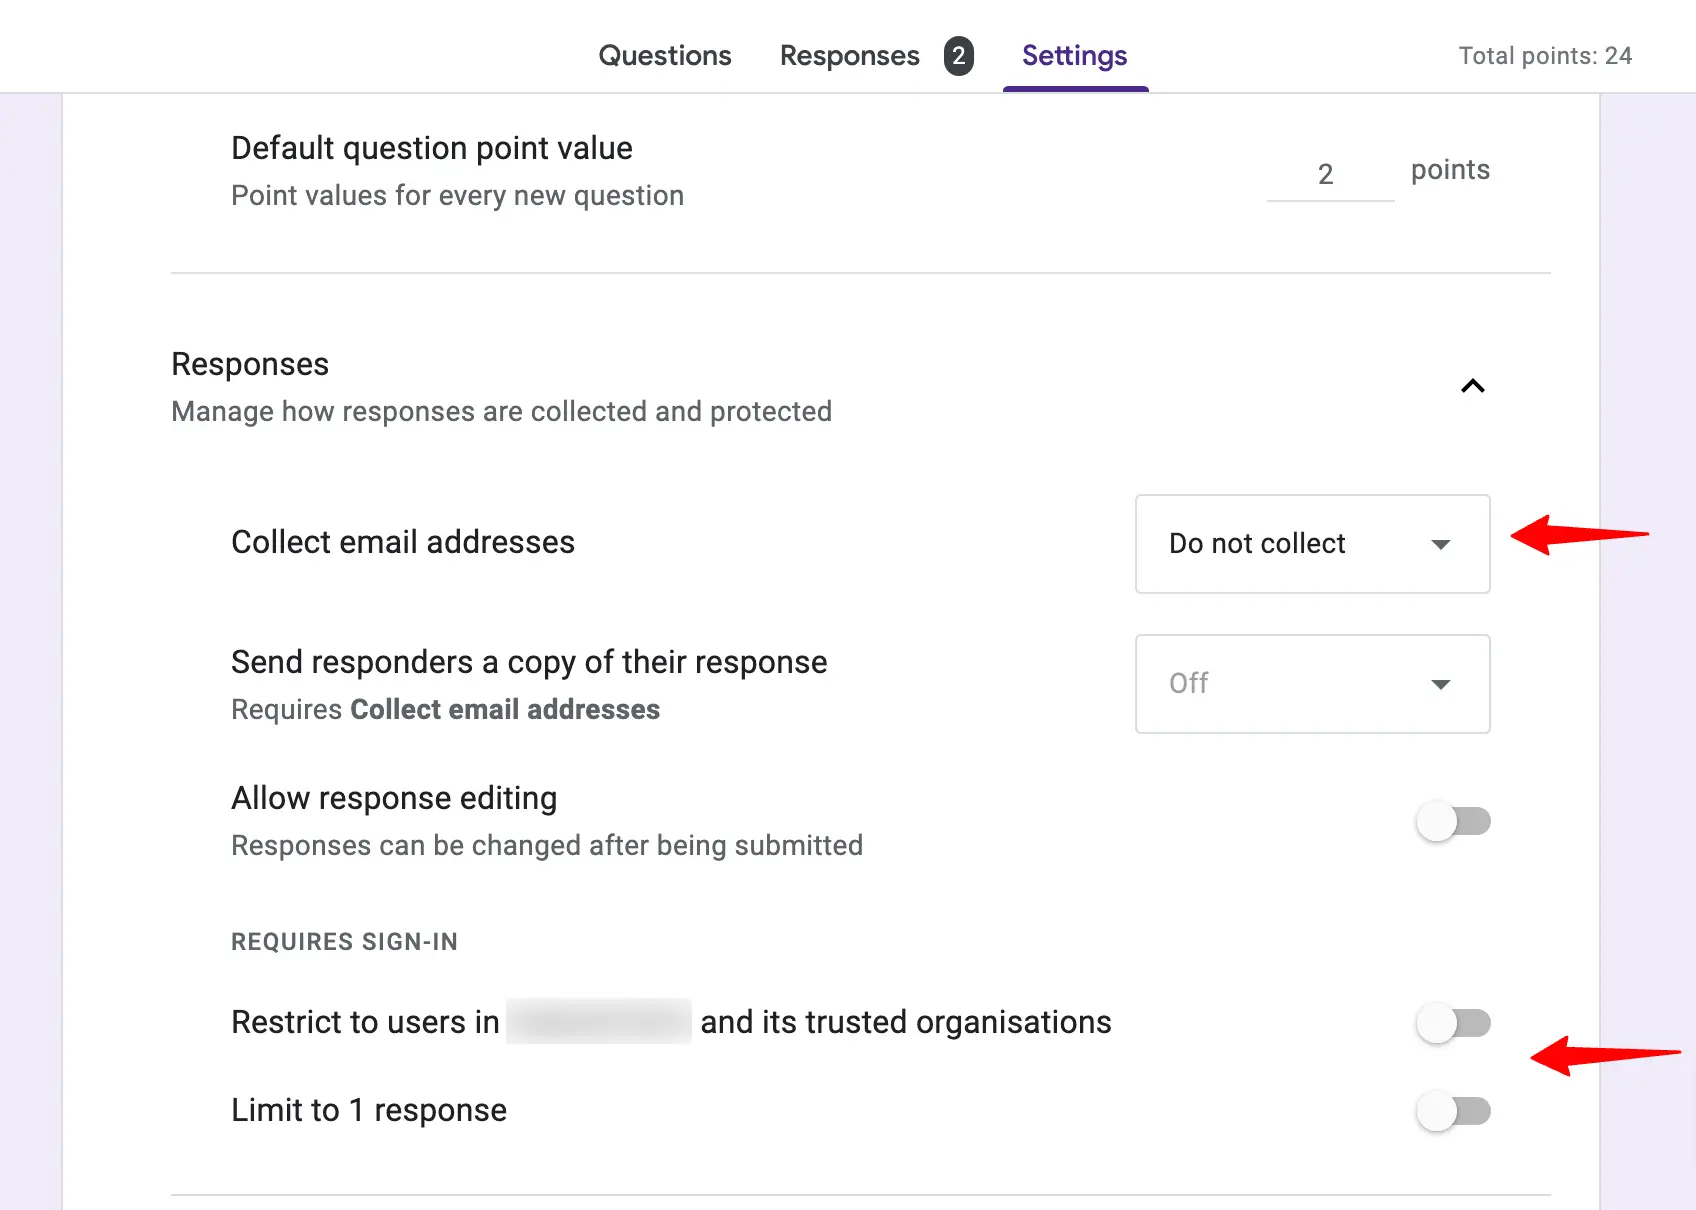
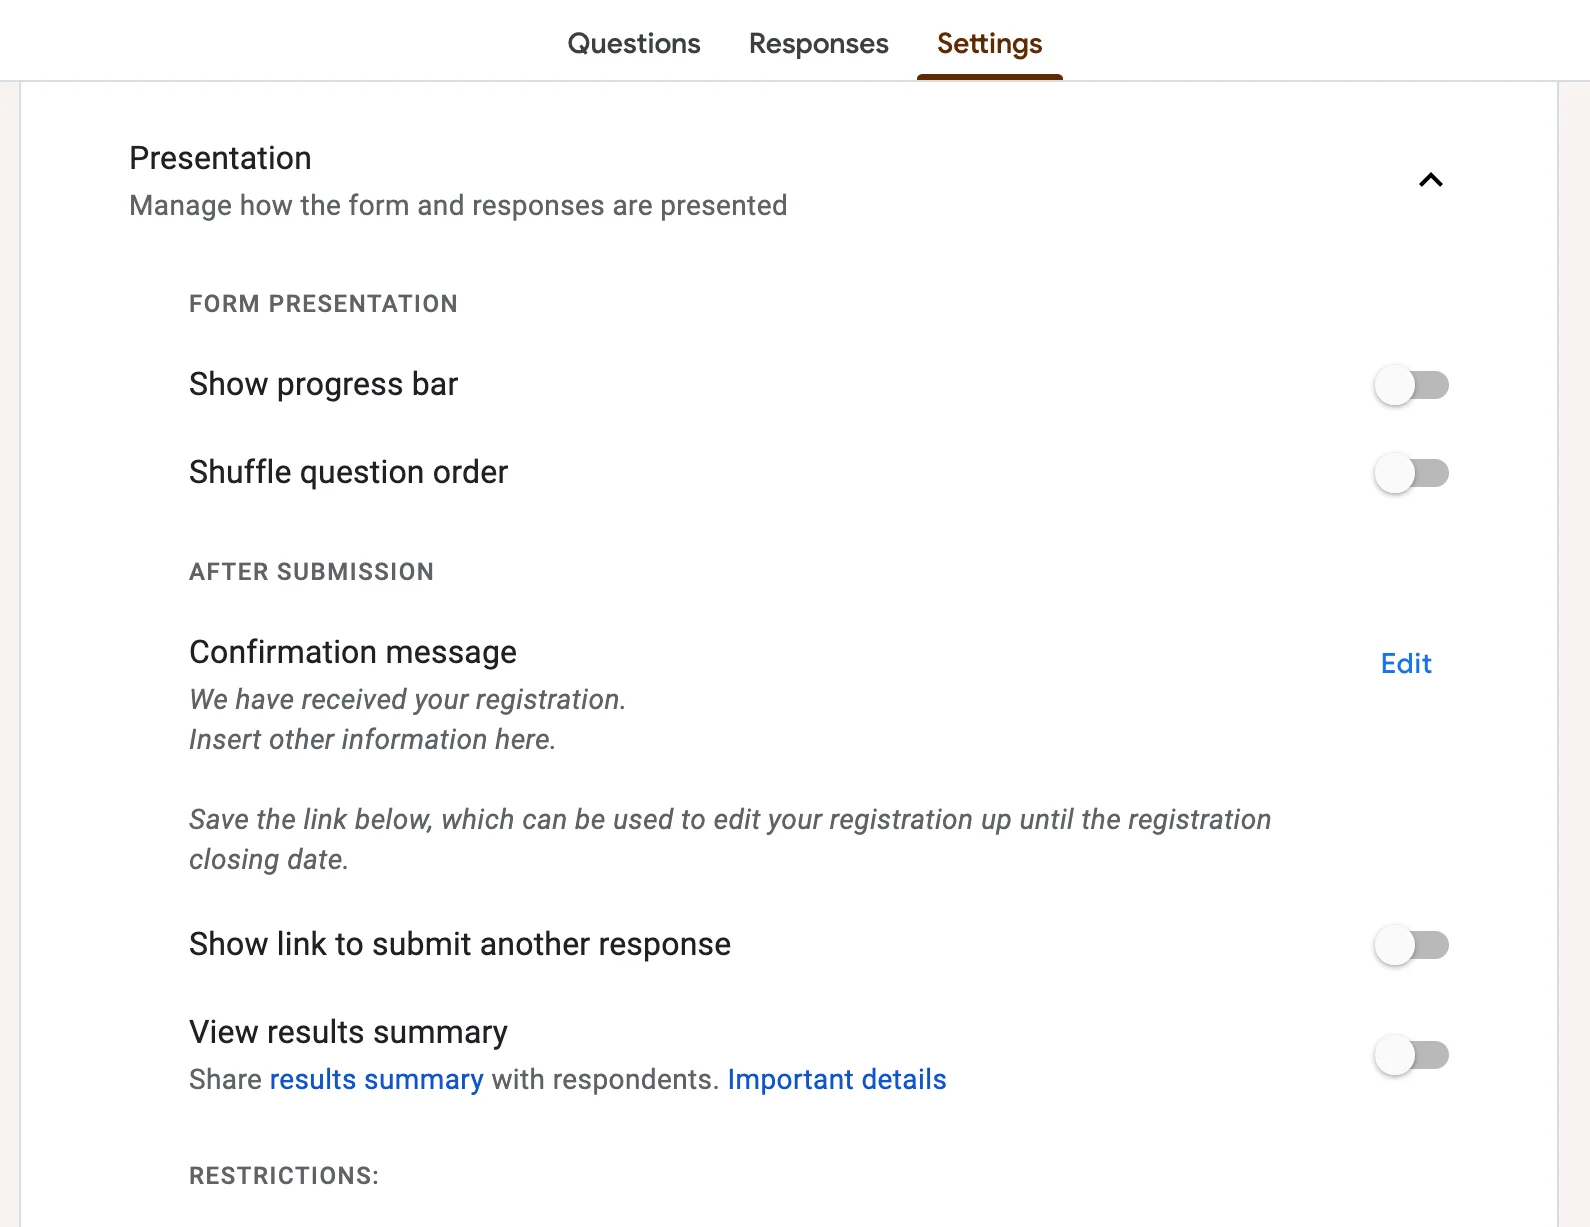
Then, you can enable the ‘limit to 1 response’ option as well. Under the ‘Presentation’ option you can edit the ‘confirmation message which will be seen after submitting the form. You can also make all your questions default by enabling the same option.
4. Customize Forms
This is an optional step, Google Forms for registration template is quite well-built in itself. However, if you want to make changes to the form like header image, and theme color, then you can do so under the ‘Customize Forms’ option.
Click on the Customise Theme at the top bar in the color palette icon. A theme dialogue box will appear on the right side. From there, you can choose the text style and font size for the header, questions, and text (description), there are limited fonts to choose from.
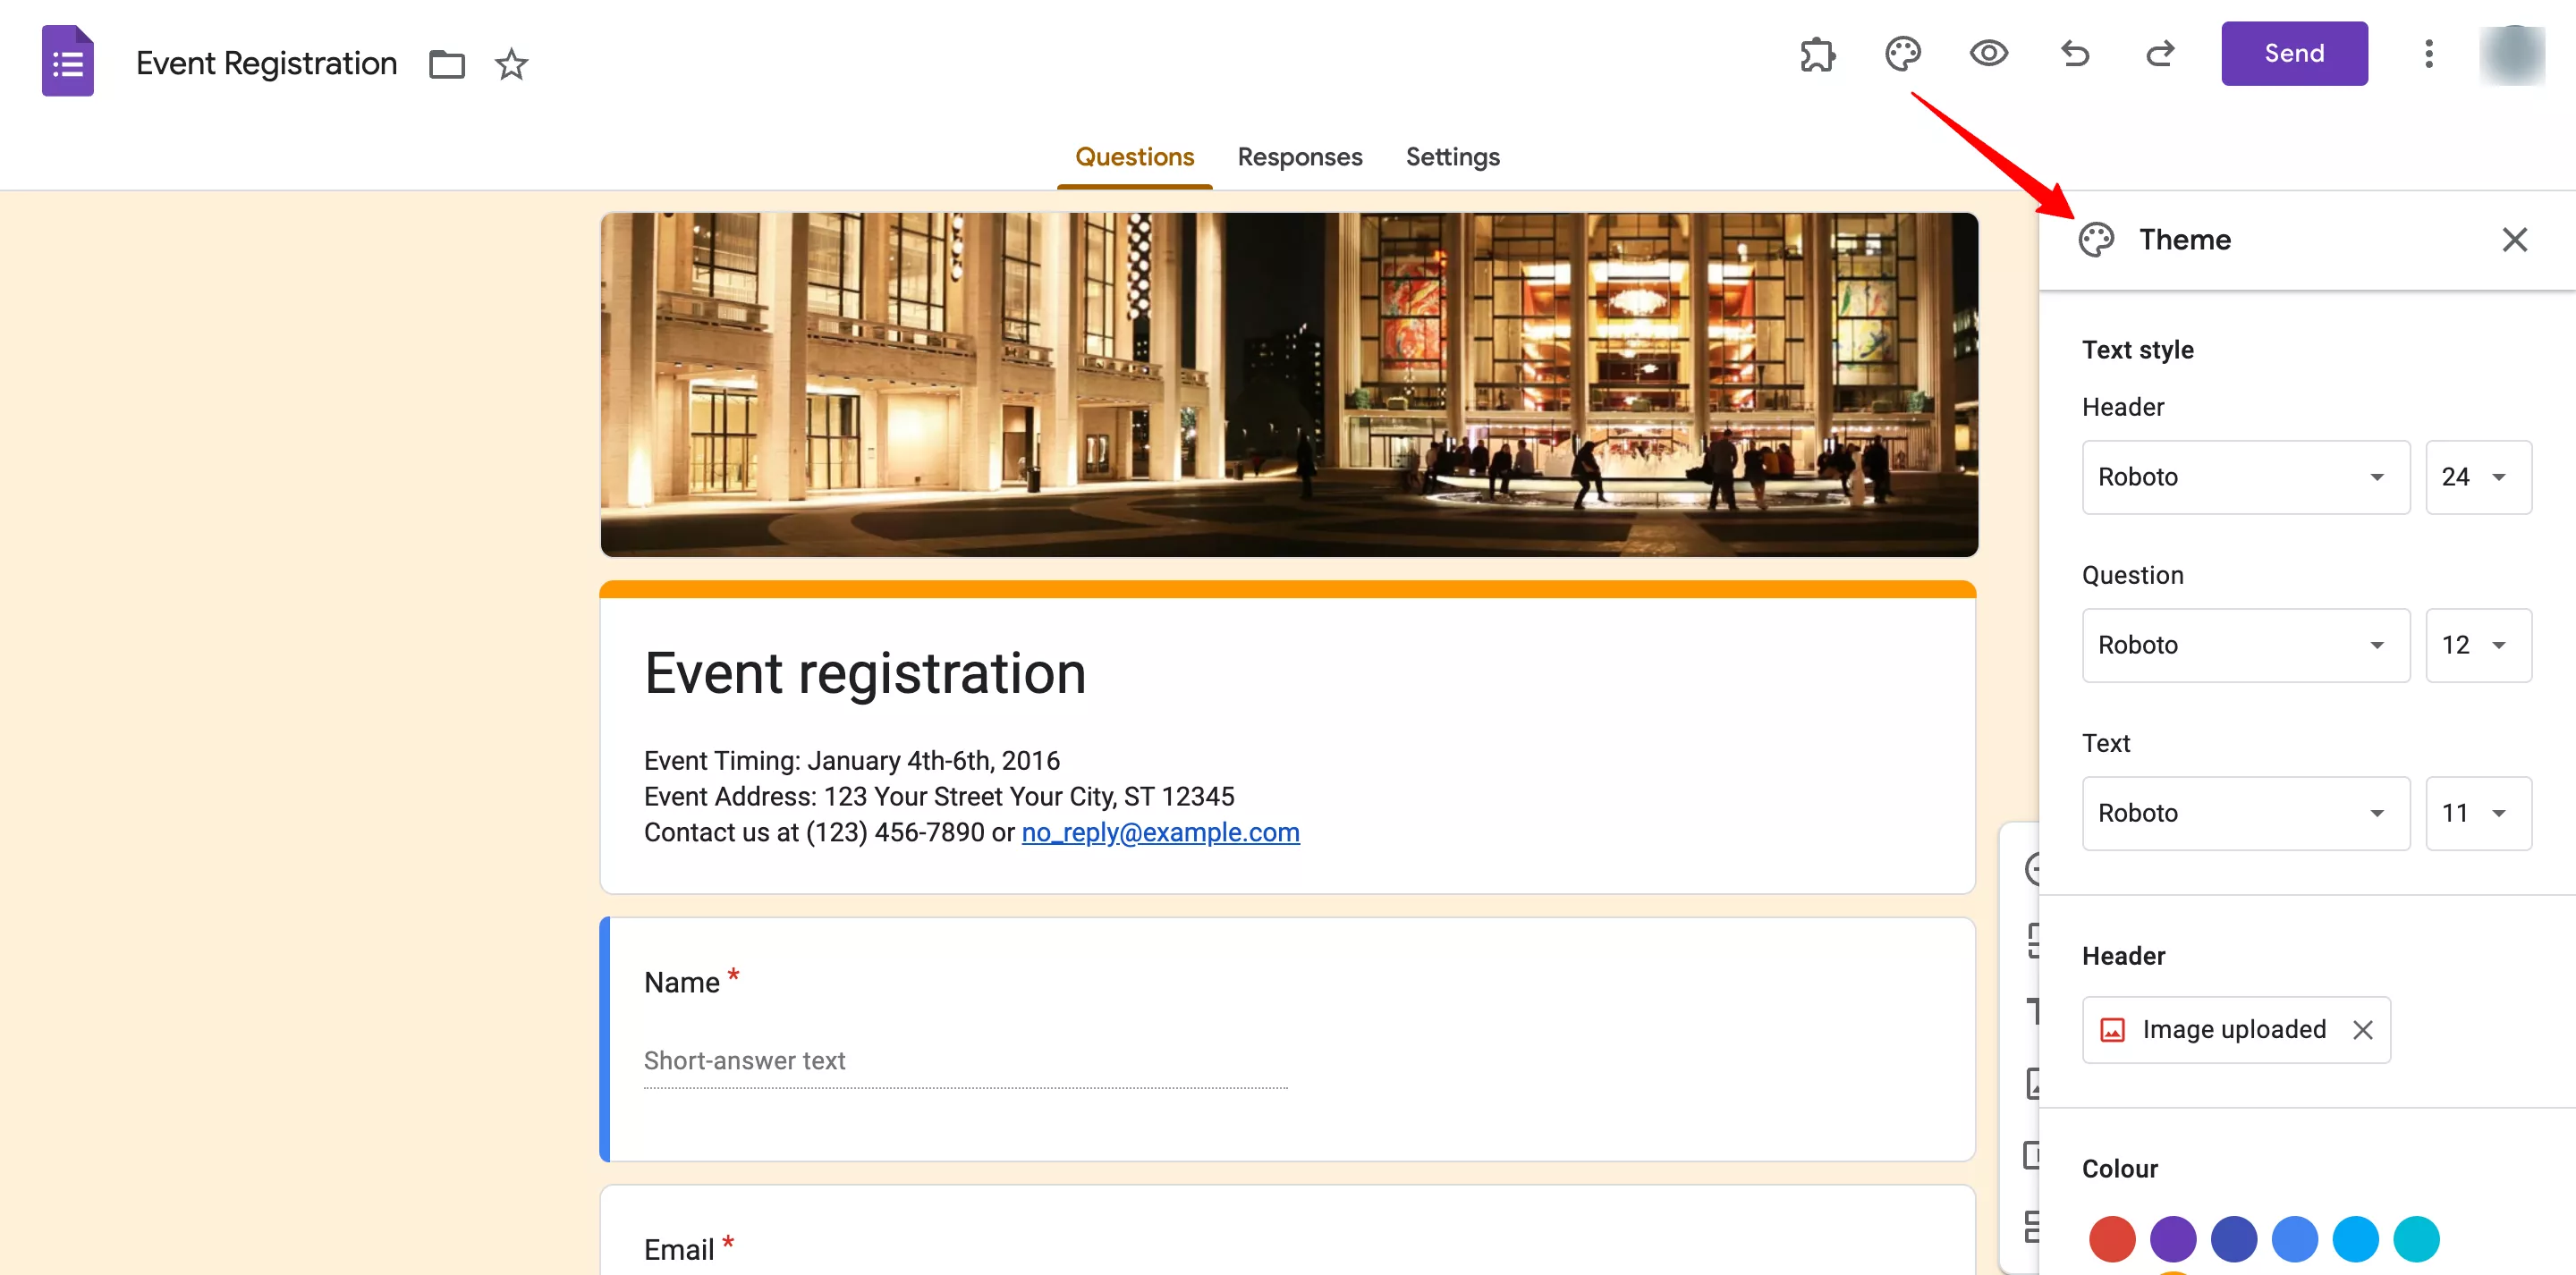
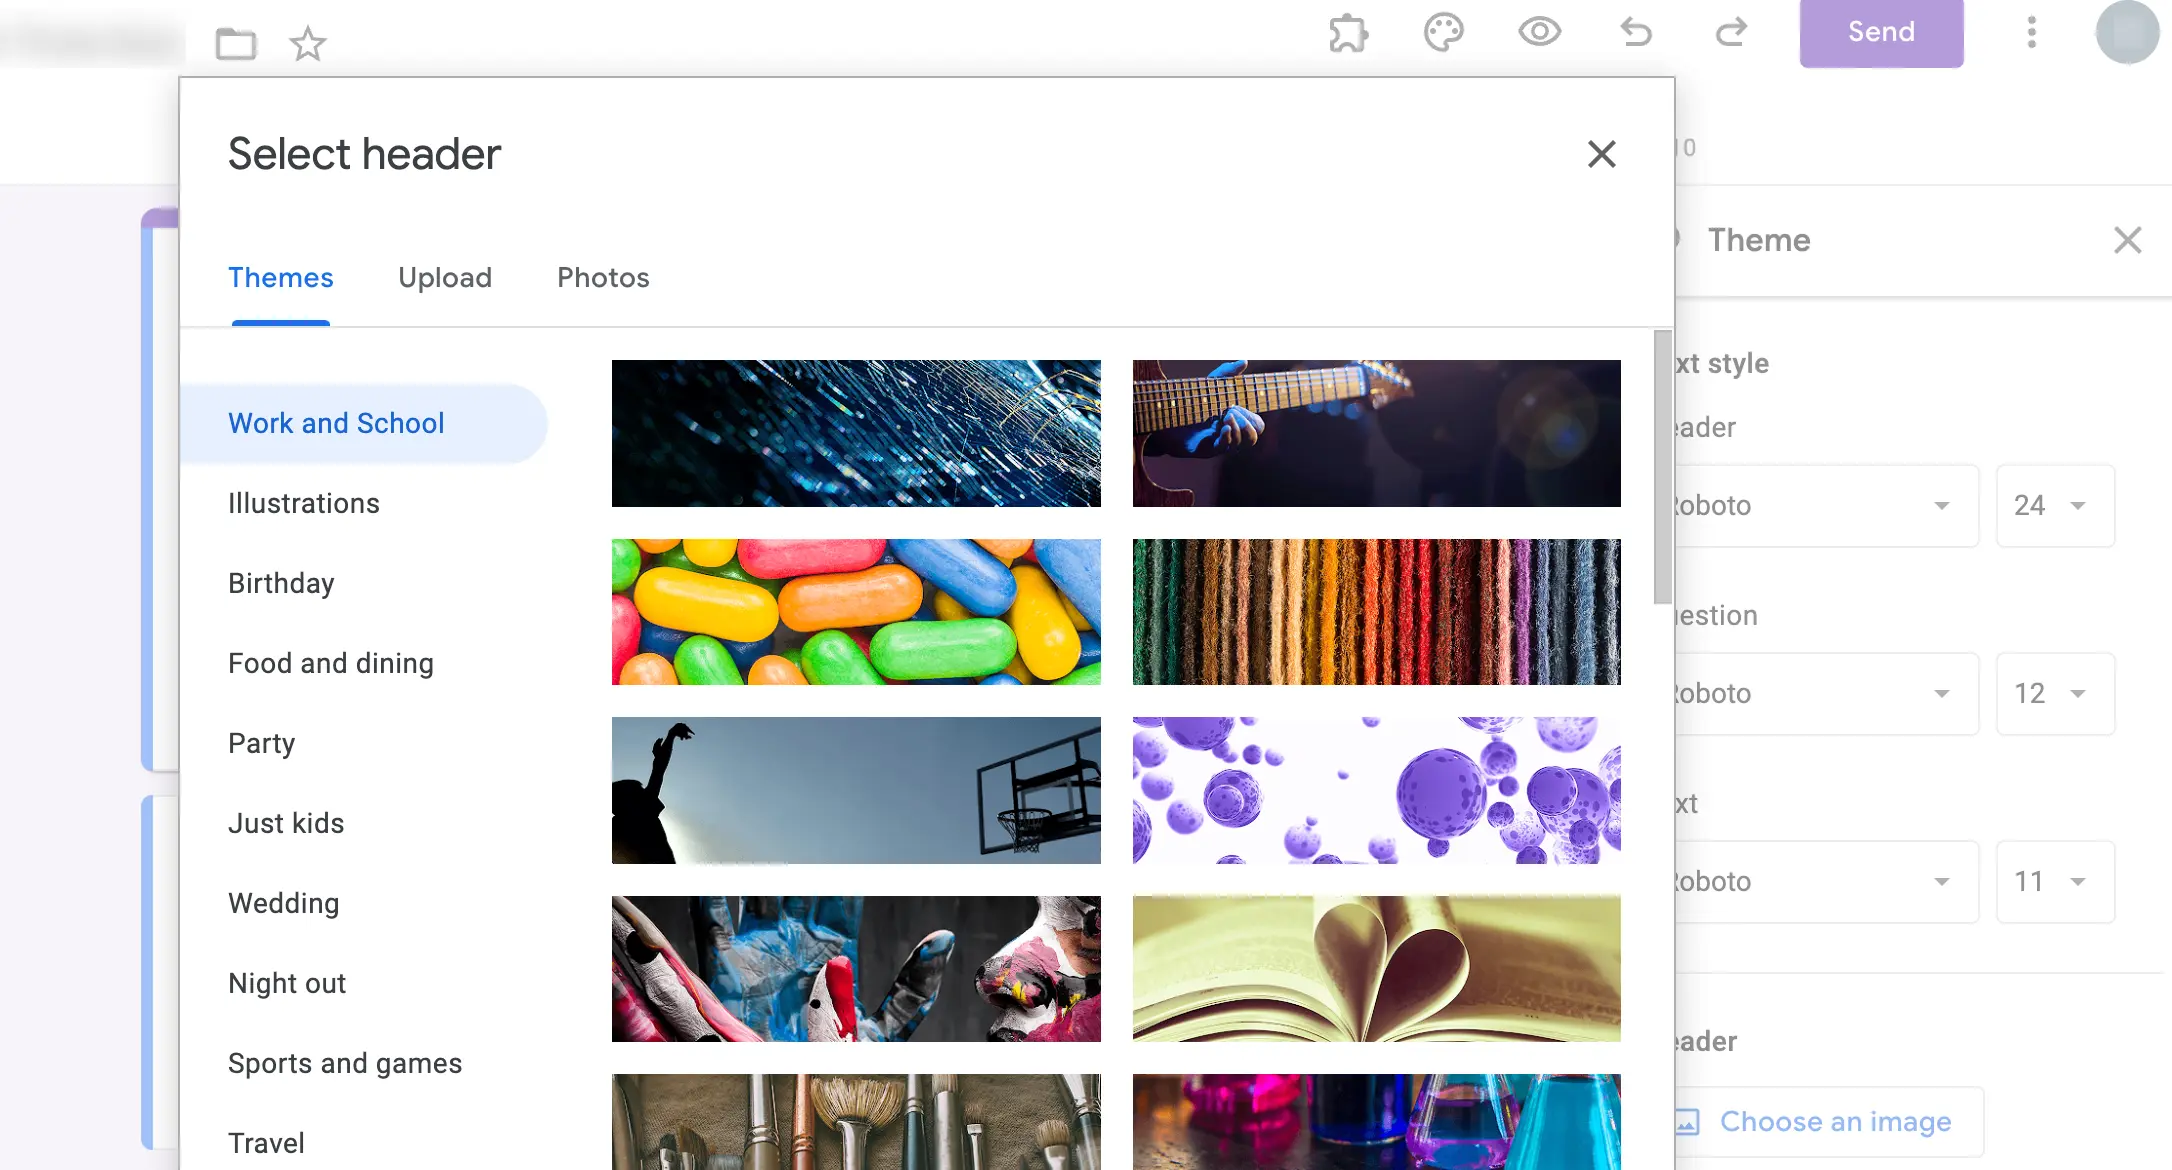
Furthermore, you can choose your own header image, either selecting it from the present theme options or uploading it from your device. Then, add a custom theme color and background color effect.
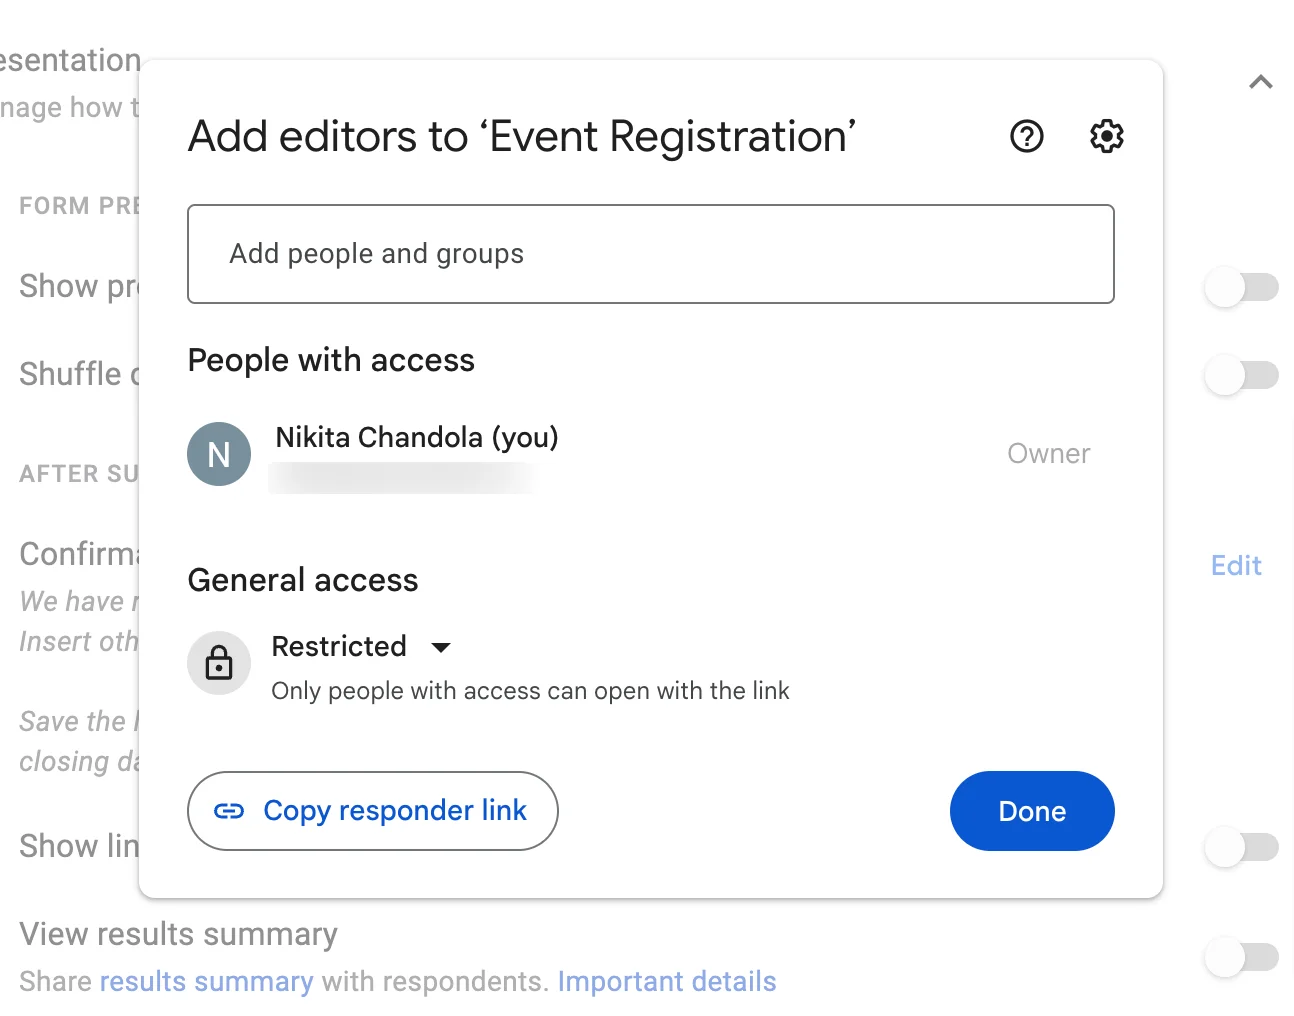
Further, if you have a team for an event/webinar and want to share the form responses with them you can add them as a collaborator.
To do so, go to the ‘More’ option at the top right corner with this icon – ‘፧’ and click on ‘Add Collaborators.’ Add people with Google accounts and then they will also be able to access your form.
5. Preview & Send Forms
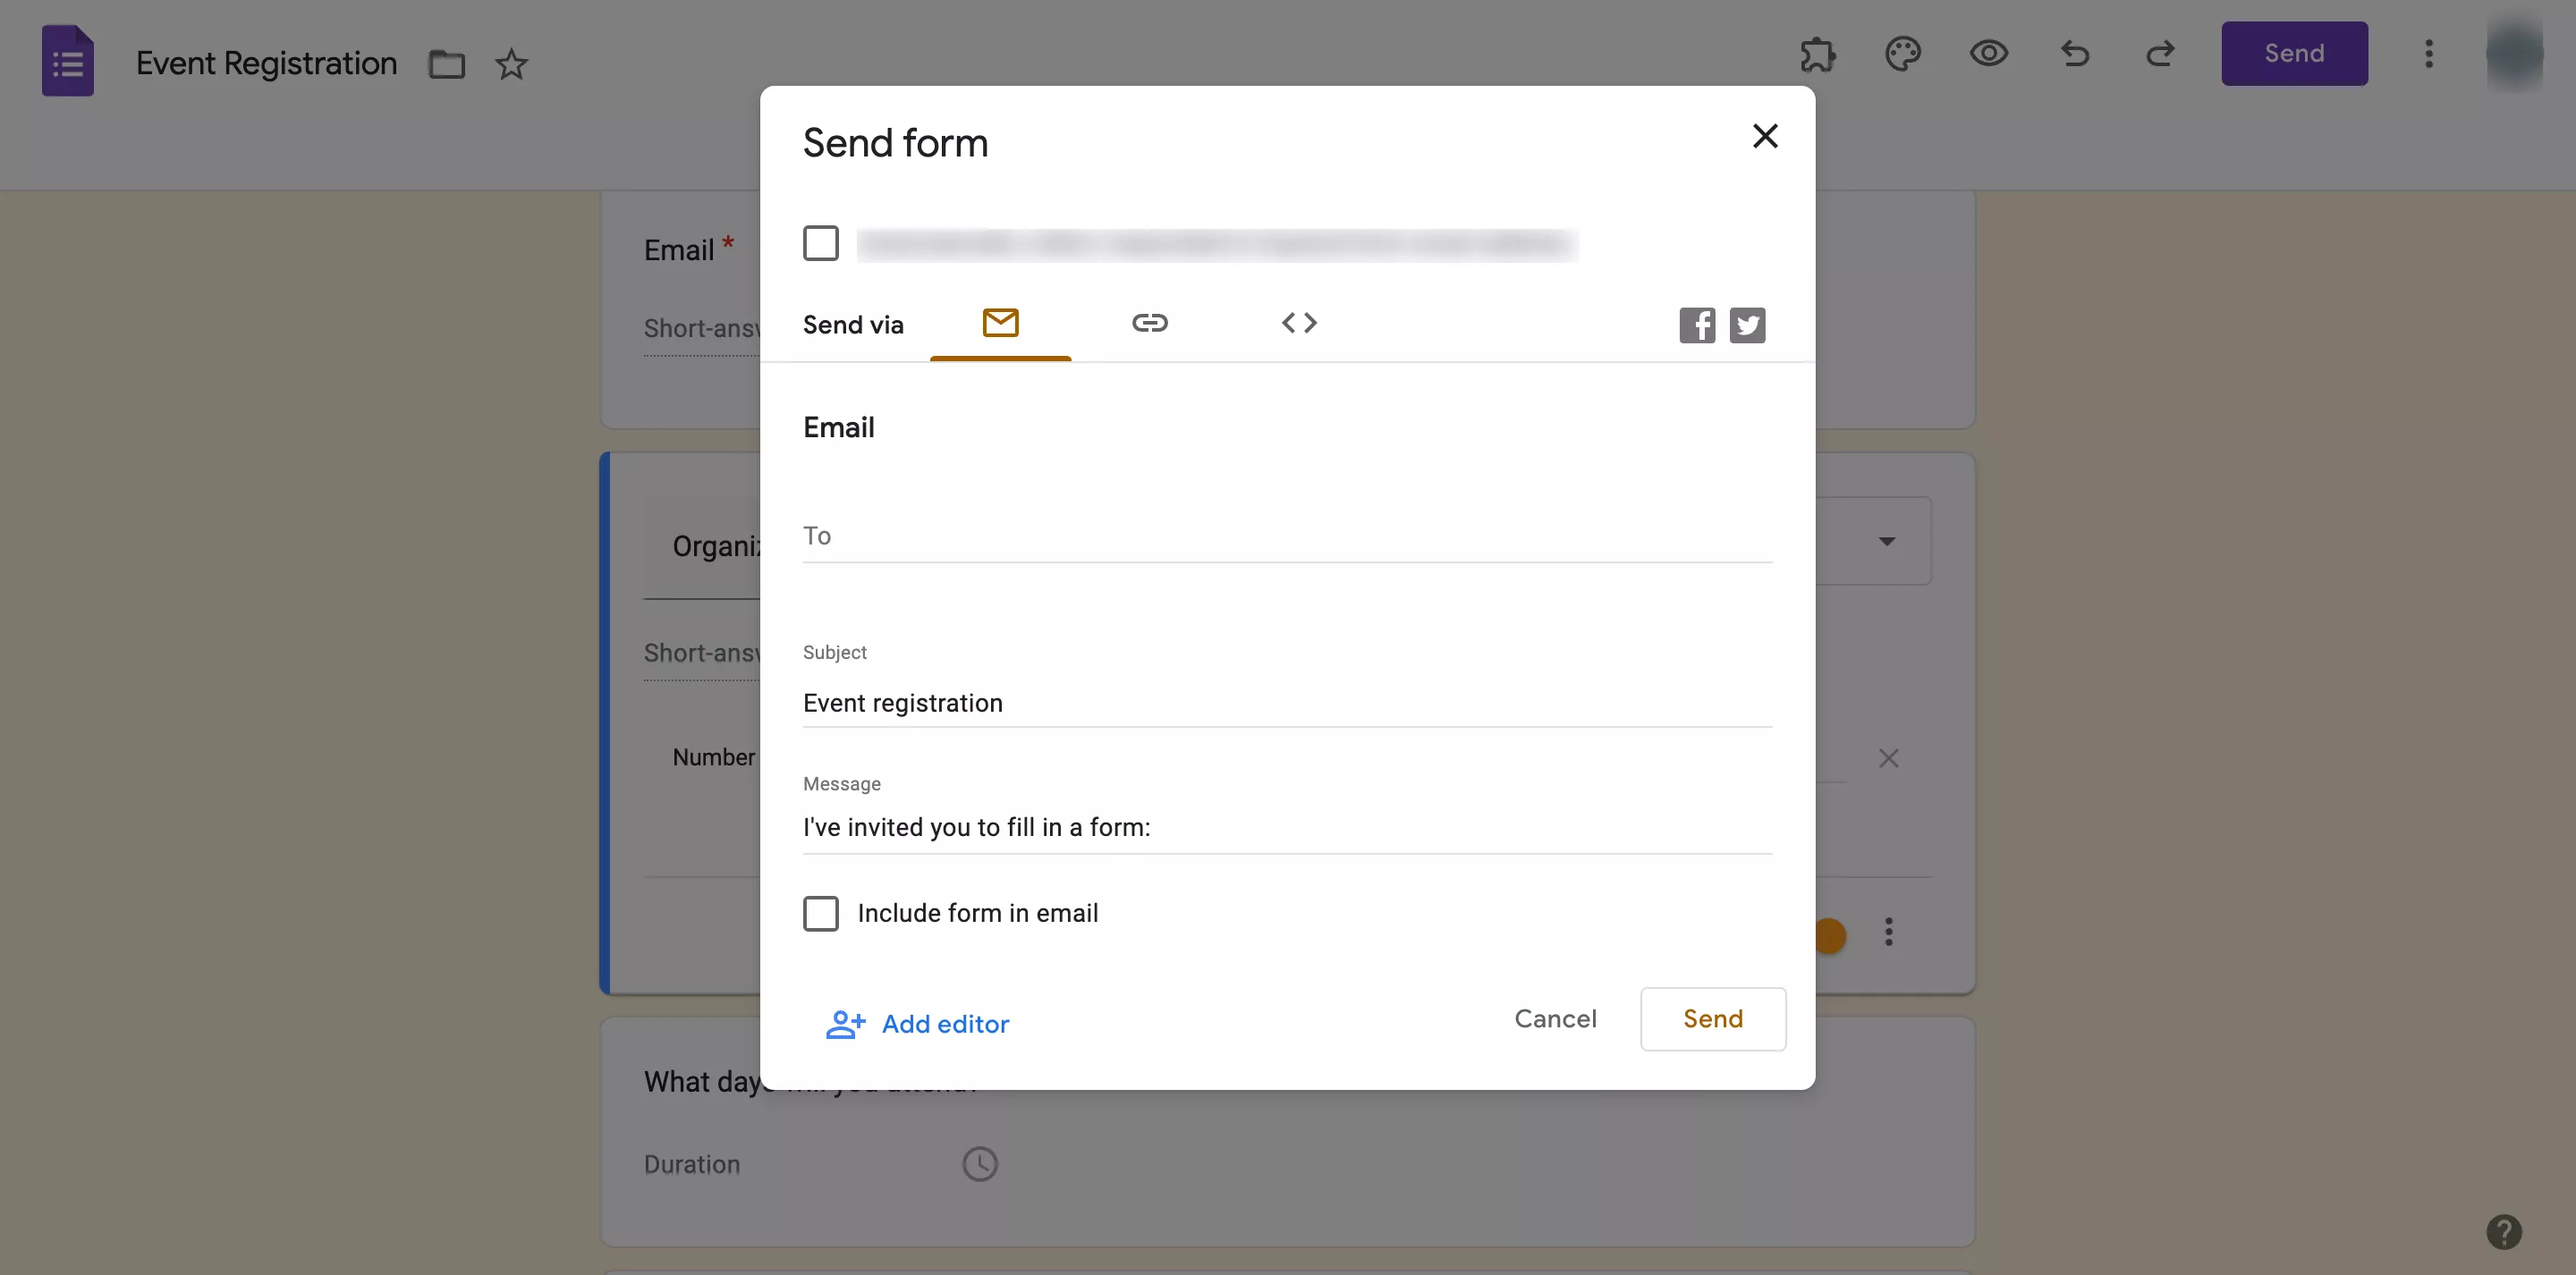
Once all the above steps are done, it’s time for you to preview your form to see how it’s looking. Just click on the ‘eye’ icon at the top bar to preview the form. Then to share the form, click on the ‘Send’ button.
If you are using your business Google account, then you’ll get an option of – automatically collecting respondent’s company email addresses, you can enable that option if you want to default collect email-ids.
You can send forms, either through invites, links, embedded HTML (add it to your webpage), or social platforms.
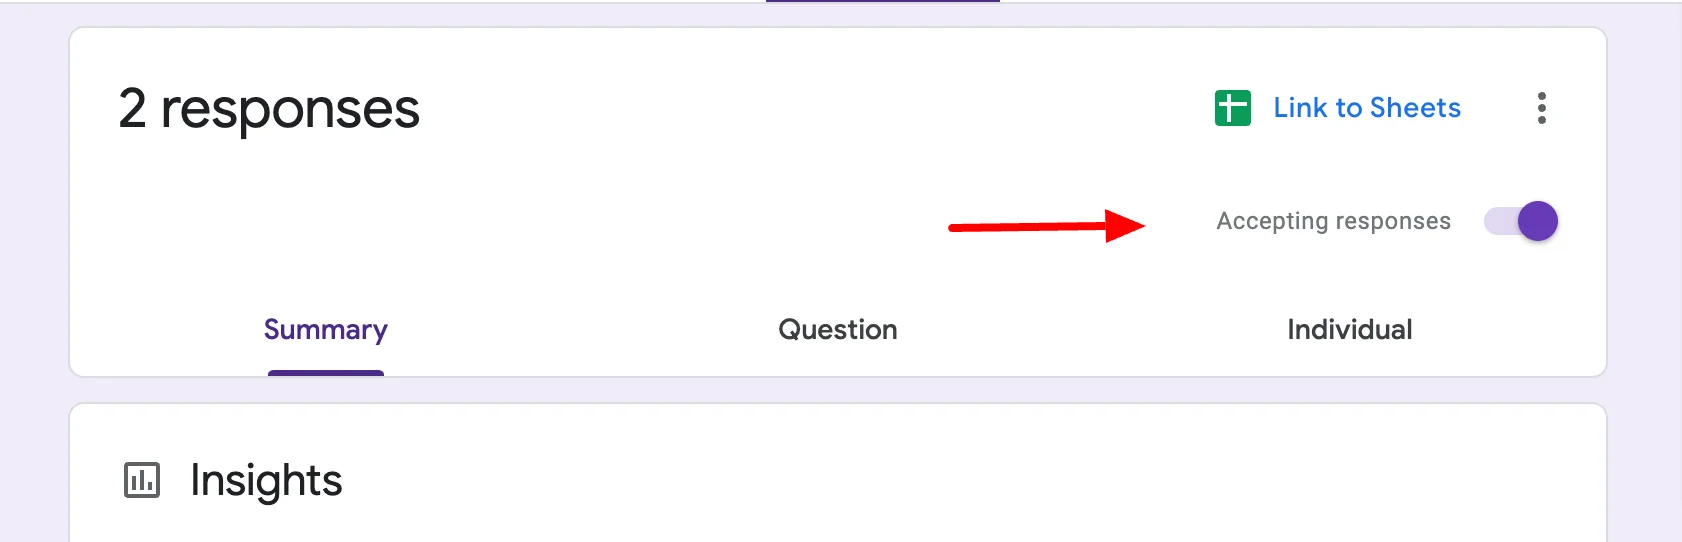
Also, once your deadline is over you can also stop accepting responses, in the ‘Responses’ tab you will see an option of ‘accepting responses’ just disable it, Google Forms will then not accept any further responses.
6. Collect & Analyze Form Responses in Spreadsheet
The last step here is that you can connect Google Forms with Google Sheets so that you can collect data in an Excel sheet and you can share that sheet with anyone. It will help you to further analyze the attendees and based on that data, you can work on making your registration process easier.
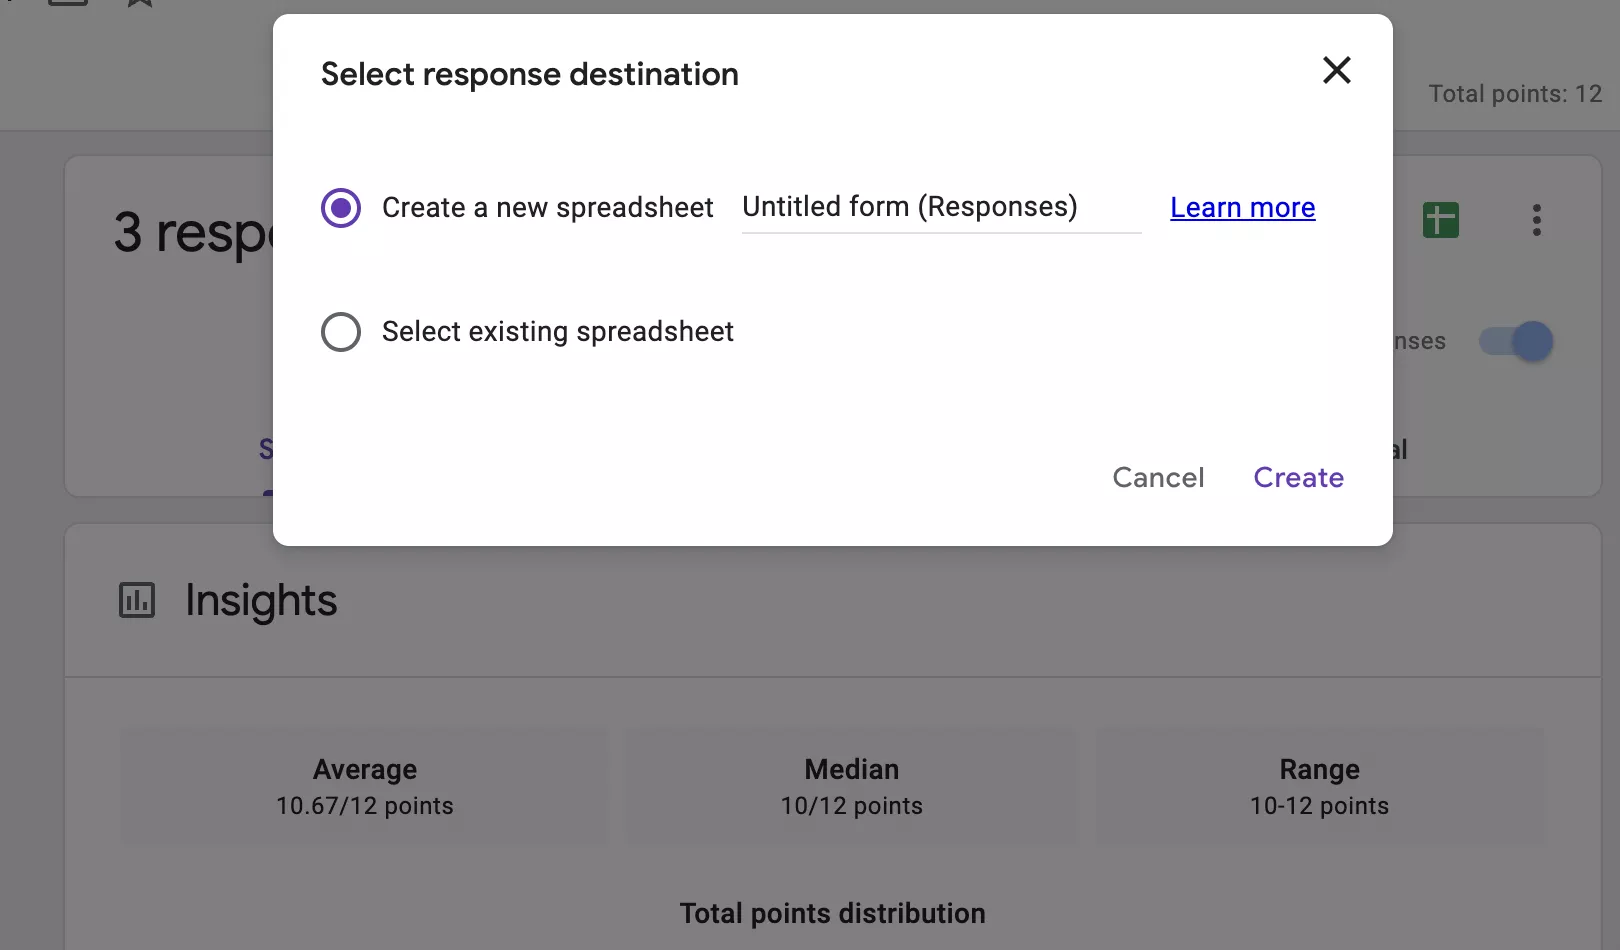
- So, for that, go to the ‘Responses’ tab in Google Forms,
- Click on the spreadsheet icon and a new sheet will be made
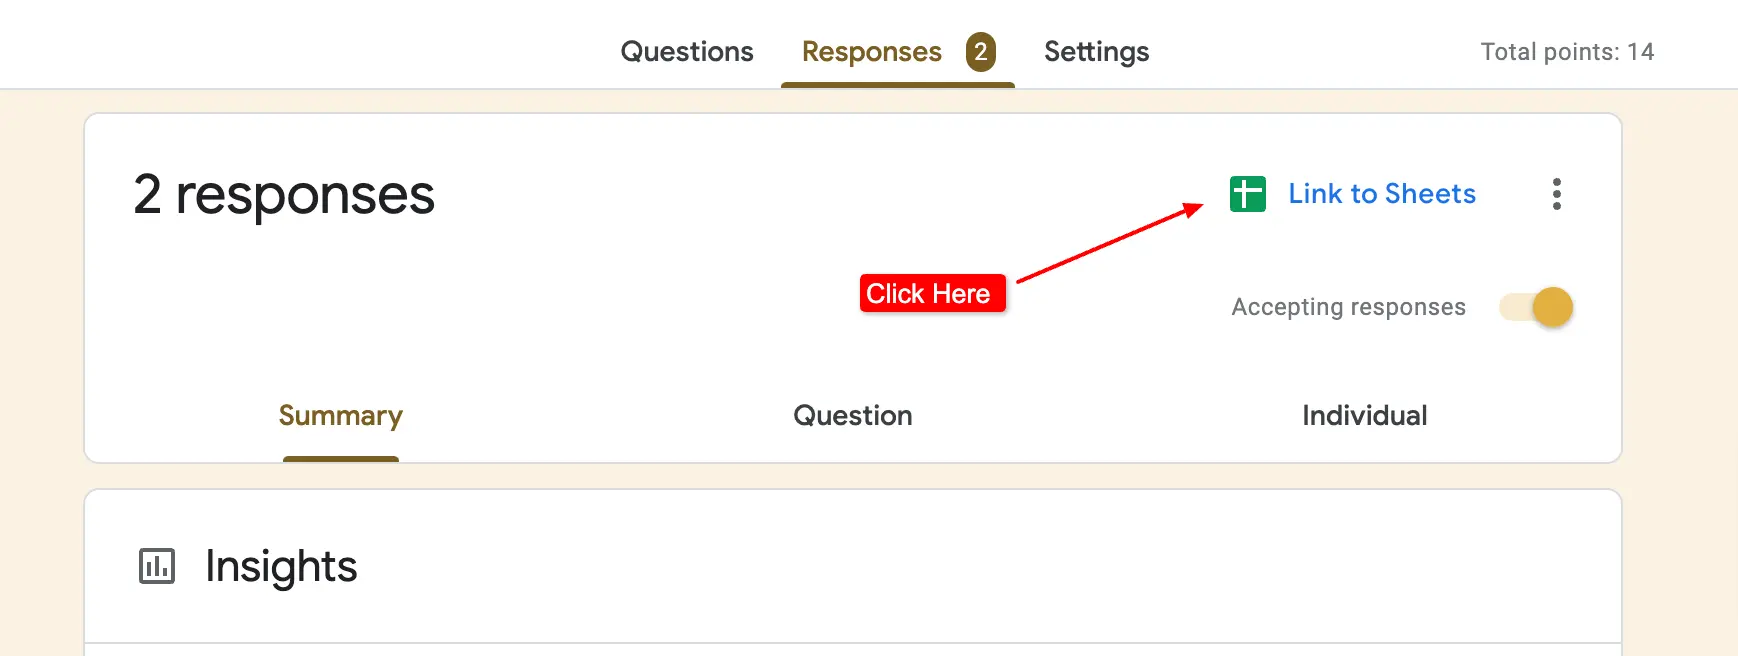
- You can also select the response destination, click on three dots,
- Navigate to the ‘select response destination,’ create a new sheet, or add it to any previous ones.
Bonus Point – Add Timer add-on in your G-Forms
Now that you’ve created a Google form for registration! What if I tell you that you can add deadlines to your Google Forms, add a countdown timer (especially if you are creating quizzes or tests), auto-submit form, and customize your brand, all with this one add-on? Quite interesting, right? It is the ExtendedForms add-on.
ExtendedForms is a timer Google Forms add-on that not only adds a timer to your forms but also schedules deadlines (start & end dates). It has different features apart from the mentioned ones like, email invitation customization, brand customization, and adding welcome messages in different languages.
You can also create a team, add team members, and even assign the role of team manager. You can check out the website and try its free version that will not include every feature but you can always upgrade the plans.
Frequently Asked Questions
What is the online registration form?
An online registration form is a way to collect registration information for any events like webinars, seminars, concerts, etc., and contact attendees for further information, and even for registration fees. Besides, the purpose of the online registration system/form is to be able to register & connect with attendees from anywhere with ease and plan out events.
Can I use Google Forms for event registration?
Yes, Google Forms is great online software to create online registrations for any sort of event, because of how easy it is to build out fields and send out invites quickly. Additionally, you can customize the look & feel of the form, and match it with your branding with the help of add-ons that give you extra flexibility with your form.
How can I create an online registration form for free?
There are various ways to create an online registration form, however, Google Forms is one of the best tools for creating an online registration form for free. It is an easy-build tool, that has a pre-built template for event registration.
Wrap Up
This step-by-step guide has explained how to use Google Forms for registration. It is the most uncomplicated way to create an event registration with Google Forms to send to attendees. Even if you are not familiar with Google Forms and its features, you’ll get the hang of everything within minutes. With this post, I have just made your learning experience a bit easier.
Besides, do you know you can also create job application forms in Google Forms, it is as easy as this one to create. Besides, Google Forms is used by many recruiters to create an initial screening interview process, it helps them streamline the overall selection process. Google Forms is a really helpful tool to create any sort of form! Do you want to know how to use Google Forms for recruitment? Then check out this article – How to use Google Forms for Recruitment? (6-Step Guide)
Как сделать регистрацию в гугл форме
![]()
![]()
![]()
![]()
![]()
- Главная
- Google Формы: создание веб-формы регистрации участников
![]()
![]()
![]()
![]()
![]()
Google Формы: создание веб-формы регистрации участников
Если Вы являете зарегистрированным пользователем сервисов Google (т.е. уже имеете почтовый ящик на Gmail.com), это значит что Вы можете начинать создание формы регистрации участников для Вашего мероприятия с помощью сервиса Google Формы. Если же Вы не зарегистрированы на Google (не имеете почтового ящика на Gmail.com), то следует зарегистрироваться и авторизоваться. Это не займет много времени.
Создаваемые формы регистрации участников мероприятия и их ответы хранятся на облачном сервисе Google Диск. Поэтому для начала следует зайти на сервис Google Диск. При необходимости авторизуемся. Нажимает кнопку «Создать», выбираем «Еще…» и вариант «Google Формы».
Появится удобное окошко конструктора создания формы регистрации участников для Вашего мероприятия (анкеты).
Заполняем предложенные поля названия и описания формы. В названии формы указываем, например «Анкета участника», в описании указываем название Вашего мероприятия.
Для примера создадим анкету с такими полями как: «Фамилия», «Имя и отчество», «Название доклада», «Секция», «Организация», «Населенный пункт», «Ученая степень», «Электронная почта», «Желаемое количество печатных сборников», «Файл доклада», «Примечание». Нажимаем на плюсик из правого меню.
В созданном поле вместо «Вопрос» пишем «Фамилия». В свойствах поля выбираем «Текст (строка)». По аналогии создаем все текстовые поля нашей анкеты, такие как «Имя, отчество», «Название доклада», «Организация», «Населенный пункт», «Электронная почта», «Желаемое количество печатных сборников».
Для таких полей анкеты участника как «Секции», где необходим выбор каких либо значений, можно использовать следующие типы полей анкеты: «Один из списка», «Несколько из списка» и «Раскрывающийся список».
Тип поля «Один из списка» и «Раскрывающийся список» предполагает выбор только одного значения. Различием между этими типами является не способ представления вариантов, но и то, что тип поля «Один из списка» предоставляет возможность ввода в поле своего варианта ответа. «Раскрывающийся список» возможность ввода своего варианта участнику не предполагает.
Поле «Желаемое количество печатных сборников» можно представить как в виде простого числового поля, так и в виде числовой шкалы. При этом тип поля «Шкала» предполагает настройку минимального и максимального значений шкалы (от 0 до 10).
Для поля анкеты «Файл доклада» выбирает тип поля «Загрузка файлов». Настройки данного типа поля позволяют определить какие типы файлы могут быть загружены, определить максимальное число загружаемых файлов и максимальный размер каждого файла.
Для поля «Примечание», рекомендуем выбирать тип поля «Текст (абзац)». Этот тип поля позволяет ввод данных с некоторым форматированием (допускает в значении перевод строки).
Для любого типа полей можем выбирать обязательность заполнения полей анкеты (при этом поле отмечается красным символом «*») и указать дополнительное описание к создаваемому полю анкеты.
При создании достаточно объёмной анкеты со множеством полей, можно разделить анкету на страницы для последовательного ее заполнения.
Теперь можно украсить нашу анкету выбрать цветовую палитру оформления или применить готовую тему оформления с различными изображениями. Много доступных тем оформления предлагает Google Формы. Также можно создать свою.
В тело анкеты при желании можно добавить различные логотипы, поясняющие изображения, прикрепить видеофайлы.
В любой момент создания анкеты есть возможность предварительного просмотра результата. Кликните на глазик в правом верхнем меню и посмотрите как будут видеть анкету потенциальные участники вашего мероприятия.
Сохраните файл анкеты в желаемой папке в вашем облачном пространстве Google Диск. При необходимости переименуйте файл.
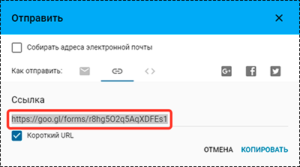
Закончив создание структуры анкеты мы должны получить уникальную ссылку, которую необходимо будет внести в наш Каталог при регистрации мероприятия и по которой потенциальные участники мероприятия перейдут к заполнению анкеты.
Нажимаем на экране кнопку «Отправить» и выбираем ссылку как вариант отправки. Если отметить флажок «Короткая ссылка», мы получим более удобную ссылку (в сокращенном виде). Скопируйте полученную ссылку, сохраните ее в закладках вашего браузера. Ссылка пригодится для внесения в наш Каталог, для того чтобы пользователи нашего Каталога нашли и заполнили форму анкеты участника вашего мероприятия.
При заполнении анкеты вашего мероприятия, результаты будут сохраняться в том же самом файле анкеты. Вы в любое время сможете посмотреть полученные данные. Вкладка «Ответы» предоставит результаты заполнения формы. При необходимости полученные результаты можно экспортировать в виде таблицы Excel.
В данной статье мы обратили внимание на самое необходимое для создания довольно простой анкеты участника мероприятия. Google Формы предоставляет отличный инструмент с широкими возможностями для создания любого вида анкеты.
Наши рекомендации:
Поле «ФИО участника» желательно разделять на «фамилия» и «имя, отчество» для удобства работы с полученными результатами формы в дальнейшем.
Недавно добавлены:
- II Международная научно-практическая конференция «Наука и инновации: перспективы и вызовы»
- 79-я Научно-техническая конференция Санкт-Петербургского НТО РЭС им. А. С. Попова, посвященная Дню радио
- Студенческая конференция «Актуальные проблемы парламентаризма: история и современность» (Встречи в Таврическом)
- XI Международная научно-практическая конференция «Актуальные аспекты научных исследований»
- II Международная научно-практическая конференция «Глобальные научные тренды: междисциплинарные исследования»