Учебное пособие по FL
Все плагины (как инструменты, так и эффекты FX) функционируют в FL Studio через Fruity Wrapper.
Wrapper – это, своего рода адаптер, который обеспечивает совместимость с плагинами стандартов VST- и DX- (скриншот демонстрирует Fruity Wrapper, содержащий VSTi-плагин — синтезатор Poi-Poi).
Есть две версии Fruity Wrapper: Effect (для эффектов) и Generator (для синтезаторов). Тип выбирается, в зависимости от загружаемого типа плагина. Имеется несколько управляющих опций: меню плагина (1), селектор пресетов (3) и кнопка закрытия плагина (4) и специфические опции плагина (2).
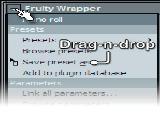
Меню плагинов содержит различные специфические команды плагинов: управление пресетами, MIDI-маппинг и функции сервиса. Команды различаются в зависимости от типа плагина, загружаемого во Wrapper.
FL Studio FAQ
FL Studio — полнофункциональная программа для создания музыки, способная к многоканальной аудиозаписи, упорядочиванию миксованию и созданию музыкальных производений профессионального качества. В программе встроена поддержка VST/DX, 32-битовым внутреннего микширования, продвинутых MIDI, DX и ReWire. С помощью этой программы можно создать любой музыкальный стиль. Треки и семплы могут быть экспортированы в .wav .mp3 .ogg .mid форматах
Что такое Fruit kick ?
Fruit kick — синтезатор, предназначенный для озвучивания партий искусственного басового барабана.
Что такое Sytrus ?
Sytrus — 6-операндный FM-/RM-синтезатор, обладающий отличным звучанием. По своей функциональности и качеству звучания напоминает Native Instalments FM7 — один из лучших программных FM-синтезаторов.
Совместим с синтезатором Yamaha DX7 на уровне SysEx (привилегированных системных MIDI-сообщений) и позволяет загружать пре-
сеты от DX7 из файлов с расширениями SYX и DX7.
Что такое Wave Traveller ?
Wave Traveller — специализированный плеер аудиофайлов, позволяющий реализовывать эффект скретча (scratch) — приема игры на виниловой
пластинке, применяемого dj-ями: пластинку вручную «дергают» в раз-
ных направлениях, а игла проигрывателя при этом остается в канавке, при этом выходит спецефический звук.
Что такое Fruity Granulizer ?
Fruity Granulizer — гранулярный синтезатор, в котором звук синтезируется
из множества коротких фрагментов (гранул) семплов. Тембр синтезируемого звука зависит от свойств отдельных гранул и порядка их совмещения.
Синтезатор не подходит для озвучивания партий традиционных инструментов — слишком заметны возникаемые искажения, обусловленные алгоритмом его
работы, но Fruity Granulizer — отличный инструмент для реализации
электронных эффектов, основанных на обработке вокала человека.
Что такое Fruity Slicer ?
Fruity Slicer — плеер барабанных лупов (drum loops). Фрагменты лупа распределяются по MIDI-клавиатуре так, чтобы каждому из них соответствовала MIDI-клавиша.
Автоматически создается трэк отпечатков клавиш, при проигрывании
которого последовательно воспроизводятся все фрагменты лупа.
Что такое Plucked ?
Plucked — синтезатор, имитирующий звучание практически любых струнных инструметов.
Что такое FL Keys ?
FL Keys — модуль, предназначенный для высококачественного озвучивания партий клавишных инструментов. Достоинствами FL Keys являются простота и небольшое использование рессурсов PC.
Что такое BooBass ?
BooBass — модуль синтезирующий звук басс-гитары.
Что такое ВеерМар ?
ВеерМар — уникальный синтезатор, преобразовывающий любое изображение (картинку) в сигнал звуковой частоты.
Что такое 3х Osc ?
3х Osc — синтезатор, действие которого основано на аддитивном методе синтеза. Предназначен для создания ярких тембров, насыщенных высокочастотными
компонентами. Его звучание сильно отличается от звучания TS404.
3х Osc не является встроенным синтезатором Fruity Loops, он реализован
в виде плагина в FL Studio формата Fruity.
Что значит BPM?
BPM (от англ. Beats Per Minute — Удары в минуту) — это точное количество четырех нот за минуту, например 120 BPM значит что в минуту проиграется 120 четвертых нот. Этот термин определяет скорость композиции. Ему назначают только целые числа.
Что такое Loops (Лупы) ?
Loop (от англ. петля) — отрывок музыкального цикла, определенного звука такта, который своей цикличностью задает длину. С помощью лупов делают бит.
Что такое MIDI Out ?
MIDI Out — генератор, обеспечивающий возможность осуществлять контроль любыми внешними (по отношению к FL) MIDI-инструментами (включая
аппаратные инструменты, DX-инструменты, VST-инструменты).
Что такое Fruity Wrapper ?
Fruity Wrapper — плагин формата Fruity, который служит адаптером, позволяющим передавать аудио- и MIDI-информацию от
Фруктов к DXi- или VSTi-плагину и наоборот от него к Фруктам.
Что такое Fruity Vibrator ?
Fruity Vibrator — плагин, позволяющий использовать в качестве генератора любое устройство ввода с обратной связью, например, джойстик, руль, штурвал и др.
Что такое Fruity Keyboard Controller ?
Fruity Keyboard Controller — специализированный контроллер, позво-
ляющий преобразовать сообщения о нажатии MIDI-клавиш в угол пово-
рота вращающегося регулятора, который можно настроить на управление
любым параметром любого виртуального устройства.
— специализированный контроллер, позволяющий преобразовать сигнал о нажатии MIDI-клавиш в угол поворота вращающегося регулятора, который можно настроить на управление любым параметром любого виртуального устройства в FL.
Что такое ReWired ?
ReWired — плагин, позволяющий подключать и совмещать с Fruity Loops Studio другие приложения, поддерживающие технологию ReWire.
Что такое TS404 ?
TS404 — псевдоаналоговый синтезатор (synth), который имитирует звучание синтезатора Roland ТВ-303 и некоторых других популярных аналоговых синтезаторов. TS404 также позволяет синтезировать уникальные, присущие именно этому инструменту звуки и ориентирован на озвучивание партий баса «электронными» тембрами.
Что такое Sampler ?
Sampler — простой встроенный сэмплер, позволяющий загружать лишь
один звуковой файл.
Что такое sample (Сэмпл)?
Sample — небольшой оцифрованный фрагмент звука. Их часто используются при написании разноплановой музыки на PC с помощью различных секвенсеров и программ.
Что значит сведение ?
Сведение — процесс создания готового трека из нескольких ранее созданных звуковых дорожек. Как правило при сведении дорожек в трек настраивают громкость, плотность, звуковые эффекты, скорость, динамику и др.
Стоит ли вешать эквалайзер на мастер-канал?
Попытаемся дать ответ на достаточно часто возникающий вопрос: стоит ли обрабатывать эквалайзером весь микс целиком, подключая его к основному мастер-каналу?
Есть много причин, по которым вам может захотеться повесить эквалайзер на мастер-канал. Первая – чисто практическая. Допустим, вы провели весь день, сводя вашу композицию и добились того, что она, по-вашему, звучит сбалансированно и законченно. Затем вы сравниваете ее с несколькими коммерческими релизами в том же стиле и понимаете, что ваш микс на самом деле слегка разбалансирован: возможно, слишком много средних частот, из-за того что вы сводили на большой громкости. Человеческий слуховой аппарат феноменально хорош в плане адаптации к тому, что мы слышим, так что вполне вероятно, что вы не заметите общий дисбаланс во время сведения, просто из-за того, что ваши уши адаптировались к нему. (Это, между прочим, одна из основных проблем всех звукорежиссеров или музыкантов, занимающихся сведением своих треков.) Итак, если в вашем миксе присутствует общий дисбаланс, вы можете начать исследовать каждый трек и подкручивать ручки эквалайзеров, чтобы решить проблему, однако очевидно, что проще просто повесить эквалайзер на мастер и внести необходимые поправки.
Другая вполне логичная причина для использования эквалайзера на мастер-канале – для качественного поднятия высоких частот. Практика показывает, что поднятие высоких частот одним качественным эквалайзером, находящемся на мастер-канале дает лучшие результаты, чем попытки сделать это, поднимая частоты у отдельных каналов.
Plugin Wrapper
The Wrapper is a software interface/layer between instrument / effect plugins and FL Studio. All controls are common to all plugins (FL native & VST), while the plugin options ( 7 ) only appear on Wrappers hosting VST format plugins. The Wrapper provides compatibility with the VST 1, 2 & 3 standards (the screenshot below demonstrates the Fruity Wrapper hosting the ‘Drumaxx’ VSTi plugin). More information on installing and using 3rd party VST/DX plugins here.
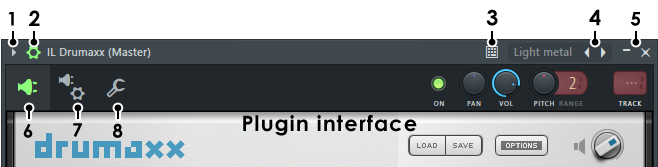
There is a native and a VST wrapper, FL Studio automatically selects the appropriate Wrapper depending on the plugin type loaded. There are several control options:
1. Plugin Menu
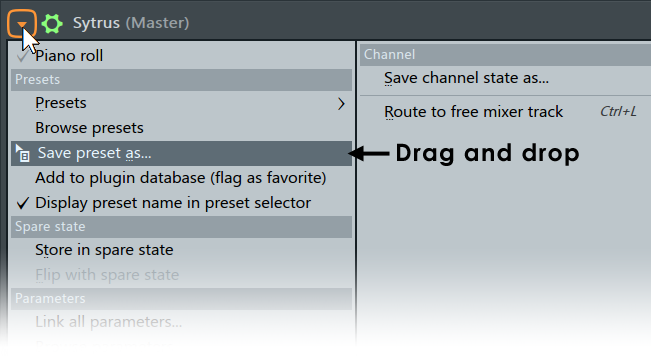
- Presets — Contains a sub-menu with preset handling options for the effect:
- Randomize gives random values to the published (i.e. known to FL Studio) plugin settings. When enabled, selecting a preset will load a random 50% of the settings, so you can quickly mix different presets and create new effects.
- Hybridize blends between the previous and next selected preset.
- Tree Display displays the settings in a ‘tree’ view. The Presets menu is disabled if there is no effect assigned to the plugin slot.
- Store in spare state — Saves the plugins current settings in a temporary buffer (spare state).
- Flip with spare state — Swaps the plugin’s current settings with those in the spare state.
- Link all parameters. — Opens a dialog to link automatable plugin parameters to ‘tweaked’ hardware controllers in sequence down the ‘parameter list’. There are several options for skipping parameters or jumping to new locations in the list.
- Basic operation — Select ‘Link all parameters’ from the menu, and move the first hardware controller to be linked (the link is made to the first item in the ‘Current parameter’ list). When you move the second hardware controller it will be auto-linked to the next parameter and so on, until the end of the parameter list is reached or the link dialog is closed.
- To skip a link, Left-click the Skip button at the bottom of the link dialog (immediately left of the ‘Accept’ button).
- To jump directly to a parameter, use the Current parameter menu (top most in the link dialog) and select the target parameter you are interested in. You can then continue auto-linking from that point in the list by moving hardware controllers as before OR jump to another parameter in the list using the ‘Current parameter’ menu as previously described.
- Allow threaded processing — Improves multi-threading and multi-core CPU performance. NOTE: Some 3rd party plugins may perform worse with multi-threading on. If you are experiencing choppy or broken sound (the GPO/Kontakt Player for example), try turning this off. To permanently disable multithreaded processing for the plugin (even for future FL Studio sessions) disable the ‘Processing >Allow threaded processing’ option and save it for the plugin type.
- Smart disable — Stops FL Studio processing the plugin when inactive. This can dramatically reduce CPU load, in certain projects. There is a macro: Tools > Macros > Misc > Switch smart disable for all plugins that selects this switch for all plugins. As some 3rd party plugins can misbehave when disabled, you can deselect the Wrapper Settings > Allow smart disable option. This will be remembered for future instances of the plugin. There is also a global Smart disable on the F10Audio settings panel.
- Make editor thumbnail — Places a small thumbnail image of the plugin interface into the Browser > Plugin database so that the plugin is easily identified. NOTE: the Browser view must be larger than ‘Compact’ for the thumbnail image to display.
- Rename, color and icon. ( F2 ) — Open dialog to change associated Channel (button) name, color and icon.
- Change color. — Open dialog to change associated Channel (button) color.
- Change icon. — Open dialog to change associated Channel (button) icon.
- Detached — Detaches the Plugin from the FL Studio desktop so it can be moved to a monitor that does not have the FL Desktop stretched across it. NOTE: Detached plugins now are seen by Windows and FL Studio as separate applications. The plugin will stop responding to MIDI input if you tweak the UI AND can steal the Audio Interface. Refocus FL Studio to continue MIDI play. To correct audio stealing see the sections on Audio Settings > Auto close device and Plugin GUI Scaling to learn more how this affects workflow.
- Help — Opens the plugins in-line help (if any).
- Save channel state as. — Saves the Channel state as a preset.
- Route to free mixer track ( Ctrl+L ) — Routes the channel to the first empty Mixer track. Feeling lucky punk?
2. Detailed Wrapper Settings (Show/Hide)

Wrapper settings — opens and closes the additional settings details as discussed below. 3. Typing Keyboard Priority

Typing Keyboard Priority — This decides whether FL Studio or the plugin is the first to respond to keyboard shortcuts. When selected — The plugin uses keyboard shortcuts before FL Studio. Any unused shortcuts are passed onto FL Studio. When deselected — FL Studio uses keyboard shortcuts first then any unused shortcuts are passed to the plugin. This ‘first to use’ order is important, because when a keyboard command is used by FL Studio or a plugin, it is no longer available down-stream. When a keyboard command is not used by FL Studio or the plugin, it is passed downstream. The option is only available when the plugin accepts keyboard shortcuts. - Wrapper settings — Enable the ‘Keep focus’ option.
- Bridging — Bridged plugins (Bit size option) always steal keyboard focus when selected (that is its window has been clicked in). You can avoid this by using plugins of a corresponding bit version (32 Bit or 64 Bit) as your FL Studio version. NOTE: FL Studio for Mac only supports 64 Bit VST and AU plugins.
- Patcher — All plugins within Patcher will steal keyboard focus when selected.
- Plugin specific — Some plugins just don’t forward the key event to FL Studio. Please contact the developer.
- Detached — Some detached plugin windows steal keyboard focus when focused. Avoid this by changing the detached state of the plugin from the Plugin window menu.
4. Preset Browser

Preset browser — This is for presets saved by the user and some plugins that publish their presets to the Wrapper. In this case, clicking on the left/right arrows will step through presets. Right-clicking here will open the preset menu for the plugin. 5. Window Controls
6. Plugin Interface

Plugin interface — Use this to switch back to the Plugin interface after using one of the other Channel Settings tabs. To open multiple plugin interfaces — Hold ( Alt )/( option ) and click the Channel’s Button on the Channel Rack. Keep doing this for each new instrument you wish to remain simultaneously visible. To disable the auto-close interface behavior you can also deselect the F10 General settings option Auto select linked modules. 7. Plugin Wrapper Settings

Settings — These options are only available when using VST/AU plugins and provide advanced plugin wrapper controls. Click on the screenshot Settings, Processing or troubleshooting tabs above to see the help for that tab. 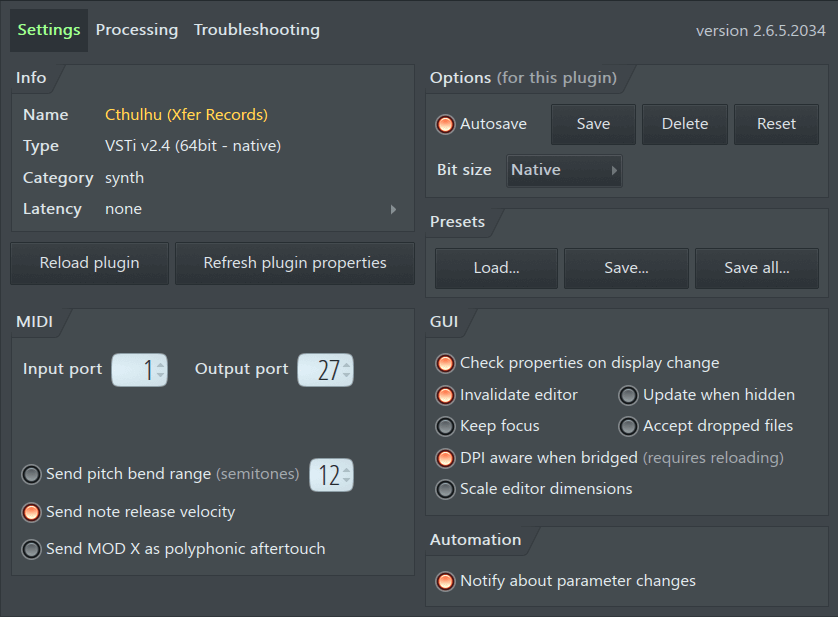
-
Latency — Manual offset (Left-click the Latency value) to compensate for plugins that consistently report an incorrect latency. This setting will be remembered per-plugin. See Plugin Delay Compensation for more info.
- Autosave — Automatically saves the options set in the wrapper Settings and Processing tabs. Settings are remembered the next time the plugin is loaded (this option is on by default). NOTE: Not all options are saved. Scaling / GUI options. In this case, these parameters are saved with presets. Making a favorite preset after setting these options will ensure the plugin always loads with the correct GUI settings.
- Save — Saves the options set in the wrapper. Saved options are used each time the plugin is loaded. Use when automatic saving is disabled. NOTE: Not all options are saved. Scaling / GUI options. In this case, these parameters are saved with presets. Making a favorite preset after setting these options will ensure the plugin always loads with the correct GUI settings.
- Delete — Clear the options for the currently loaded plugin. Default settings will be used next time the plugin is opened.
- Reset — Reset plugin options to the default state.
- Bit size (Bridging) — This option tells the Wrapper which Bit size version of a plugin to load for both FL Studio 32 and 64 Bit. It’s useful when you want to always use a particular Bit size of a plugin (say a 64 Bit sampler in FL Studio 32 Bit) OR one Bit size is more stable than another across all versions of FL Studio. There are three options, Native, 32 Bit and 64 Bit:
- Native — The Wrapper will load the Bit-size plugin to match FL Studio 32 or 64 Bit (the native Bit-size).
- 32 or 64 Bit — The Wrapper will always try to load the set Bit-size in all versions of FL Studio (32 and 64 Bit). If the set Bit size can’t be found the Wrapper will use the one that is available.
- Load preset/bank — Allows you to import a standard VST bank (FXB) or preset (FXP) in the currently hosted plugin instance. A bank replaces all of the programs for this plugin instance, while loading a preset replaces only the currently active program.
- Save preset — Allows you to export the current patch as a VST preset (FXP).
- Save all — Exports all programs in the bank as individual VST presets (FXP).
- Reload plugin — Reloads the plugin and resets it to the default settings.
- Refresh plugin properties — Checks plugin properties, such as, the number of inputs, outputs and latency. Can be useful if these were not registered correctly on loading or for properties that have changed after the plugin was loaded.
- Input port / Output port — Select the MIDI input and output ports respectively. MIDI ports are independent communication channels within a given MIDI connection. When the same port numbers are set on a MIDI input and output device the plugin and other MIDI device will be able to share exclusive MIDI data.
- Send note release velocity — Sends the note release velocity to the plugin along with the ‘note off’ message. Note off velocity is recorded in the Piano roll and can be edited using the integrated event editor. Your controller must send ‘release velocity’ for this to work, of course. But then again, perhaps not. Our support forums are full of people wondering why ‘release velocity’ is not working 🙂
- Send pitch bend range — When selected, the MIDI pitch bend range selected to the right of the switch will be passed to the plugin. Plugins that support pitch bend range will respond correctly to host bend instructions. This is not selected by default as some plugins interpret pitch bend range messages as a filter ‘reset’ message, causing problems.
- Send MOD X as polyphonic aftertouch — Enabling this option allows polyphonic, per-note, aftertouch to be sent to the plugin from the (Mod X) note property in the Piano roll. Per-note aftertouch values are sent at note-on. This option is not related to poly aftertouch from controllers.
- Check properties on display change — Some plugins send a display change message when some properties have changed, such as the selected patch. This option allows FL Studio to detect the change and ensure data is correctly copied between FL Studio and the plugin.
- Invalidate plugin editor — Sends the plugin’s ‘idle’ message. When FL Studio receives the idle message the plugin GUI can be refreshed. Try de-selecting this setting if the plugin has graphical display glitches.
- Update when hidden — Keep the GUI updated when not visible.
- Keep focus — Prevent the plugin from stealing keyboard input. NOTE: This won’t always work. In particular bridged plugins always steal keyboard focus if focussed.
- Accept dropped files — VST plugins have first priority use files dropped on the plugin. If the plugin handles the file, it will not be available to FL Studio. When this is off, FL Studio will use the file and it will not be available to the plugin.
- DPI aware when bridged — Must be used with ‘Wrapper Processing > Make bridged’. VST plugins with native rescaling will then use the Operating System display scaling. See Rescaling VST plugins for more details. NOTE: For Windows, deselect this option if VST plugins don’t display correctly when using the FL64 (scaled).exe version.
- Scale editor dimensions — Try this when plugin GUIs are mismatched to the size of the window containing them.
- Notify about parameter changes — Normally this is on so FL Studio is notified precisely what plugin controls you have been touching, and the police can be alerted. This data is also used for Last tweaked parameter linking and the undo history (when ‘General Settings > Undo knob tweaks’ is selected). As some badly behaved plugins continuously send parameter change messages to FL Studio this will reset the ‘Last tweaked parameter’ value and make it impossible select and link some target of your choice.
> Processing. Click on the screenshot Settings, Processing or troubleshooting tabs below to see the help for that tab. 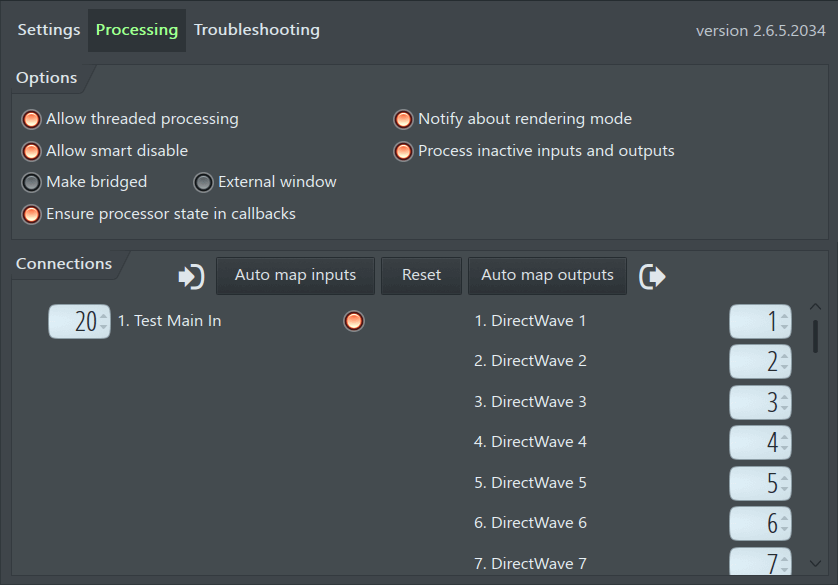
-
Compatibility Options — Not all plugin developers work strictly to the letter of the VST/2/3 plugin specification (sadly). In this case there may be graphical, audio or other issues (crashing) with a plugin. These options are provided to help in such cases. NOTE: If you are troubleshooting plugins, see the section on ‘Plugins behaving badly’ for more tips. If you report plugin issues to developers expect a lot of finger pointing and blaming the other guy. No we don’t really expect you to remember all these options, to understand what they do, or even to find them in the manual. They are here mainly so Tech support can tell you to flip a switch when some plugin is acting up, and you start pointing the finger at FL Studio. These options keep the peace and make everyone happy.
- 2.1 Memory — 64 Bit plugins running on 64 Bit windows will have access to the maximum memory available under your Windows version.
- 2.2 CPU and Stability — We recommend using 32 Bit plugins in FL Studio 32 Bit and 64 Bit plugins in FL Studio 64 Bit, where possible. Bridging introduces an additional layer of processing and so a small CPU overhead (approx 1-2% per plugin). It can also decrease stability for some plugin. If a plugin crashes, please report it to Tech support and we will fix it, or point the finger at the developer.
- VST plugins WITH native rescaling — Select Wrapper processing > Make bridgedON and Wrapper settings > DPI aware when bridgedON. NOTE: You should check your plugin manual for information on how to use its own scaling settings.
- VST plugins WITHOUT native rescaling — Bridging opens the plugin outside FL Studio so it can respond to Windows Systemscaling. Select Wrapper processing > Make bridgedON and Wrapper processing > External windowON plus Wrapper settings > DPI aware when bridgedOFF. NOTE: The ‘Make bridged‘ option won’t show if the plugin is already bridged. If this is the case, you can proceed without setting it. Also, please take the time and contact the VST plugin developer and request they support VST Scaling.
- Two foolproof fixes when all else fails:
- FL Studio Scaling — See General Settings > Rescaling options for more information on GUI rescaling. You have probably already set Windows scaling to work on your high resolution monitor, and so the plugin will be scaled appropriately. If not, open the Windows Control Panel, click on Display > Custom Sizing Options. From there adjust GUI zoom percentage selector. All bridged plugins with the correct settings will use this scaling value.
- Bridged plugins — Will steal Audio Interface focus and this can stop audio playback. Use FL Studio ASIO or deselect Options > Audio > Auto close.
- Manual assignment of plugins loaded in channels — Right-click the input or output number fields to open a list then click on an item to select it. When plugins are loaded in Channels, the numbers for the inputs and outputs are Mixer-track offsets (relative to the Mixer track number set in the Channel Settings). For example, if the plugin is routed to Mixer track 10 and a plugin input is set to -2 and a plugin output set to 10, then the plugin will receive audio-input from track 8 (10 — 2) and output audio to track 20 (10 + 10).
- Manual assignment of plugins loaded in effects slots — Right-click the input/output number fields to open a list then click on an item to select it. When plugins are loaded in the Mixer, the numbers are ‘indexes’ to the list of inputs or outputs that are routed to and from the Mixer track that the effect is in. NOTE: When routing Mixer tracks to the target Mixer track (the one holding the effect), Right-click the Track Send switch and use the ‘Sidechain to this track‘ option. This mutes the audio being sent to the effect’s track, while allowing the ‘side-chain’ signal to be processed on the input set to receive it. Failure to do this will result in a parallel audio signal, one entering through the effect’s input and another passing through the effect stack as normal.
- Reset plugin when FL Studio resets — When selected the plugin state is reset when FL Studio resets (on transport start/stop). This control allows you to individually disable/enable ‘Reset Plugins on Transport’ for a specific plugin.
- Send loop position — Sends information about the song loop start and end positions to a VST plugin. This setting is calculated by the wrapper and is not available until FL has looped once.
- Use fixed size buffers — This option can be useful in fixing rendering errors (glitching / timing issues) or crashes. FL Studio shares data with plugins using variable sized chunks of data (buffers). Some plugins require fixed sized buffers. While the VST specification allows hosts to use variable size buffers, some people don’t care about specifications, so we provide this format since FL Studio uses variable sized buffers. If the additional options are both off (see below) the fixed buffer size option uses 2 ms. The disadvantage is that fixed size buffering can introduce an extra delay, depending on the audio buffer size selected in the Audio settings (F10). This delay is doubled for effects plugins. However, in some cases this setting may fix unwanted rendering delays and/or audio glitches caused by some plugins. Options:
-
Allow threaded processing — Switch to turn multi-core enhanced processing on/off. NOTE: A plugin will be multi-core threaded only if this, the Global Multithreaded options and the Wrapper menu — ‘Allow threaded processing’ options are on. The threaded processing option here is provided since it can be saved using the ‘Settings’ tab ‘per plugin type’. This is useful to prevent plugins that are not multithread safe running in this mode in future, regardless of the other settings.
1. Memory management (only useful for FL Studio 32 Bit) — Bridging removes the plugins memory allocation from FL Studio’s memory space to an independent process under Windows. Bridging is particularly beneficial for sampler and ROMpler plugins that consume large amounts of memory loading samples. The maximum memory available to the bridged plugin will be at least 2 Gb for 32 Bit Windows and at least 4 Gb depending on your version of 64 Bit Windows (see 2). To reduce the memory burden of Audio Clips and Sampler Channels use the ‘Keep on disk’ option.
3. Protect FL Studio from crashing plugins — If a plugin crashes while in Bridged mode then it is less likely to bring down FL Studio at the same time. Try using Bridged mode with plugins that are unstable or crash. If you just read point 2.2 (above), you are right, this is a paradox!
1. Rescale FL Studio — There are a pair of additional executable files in the FL Studio installation folder, FL64 (scaled).exe and FL (scaled).exe. These will submit FL Studio and VST plugins to the Windows scaling and should simplify plugin management. The tradeoff is FL Studio may look slightly blurry, particularly on displays 17″ or larger. OR
Troubleshooting — These options are only available when using VST/AU plugins and provide advanced plugin wrapper controls. Click on the screenshot Settings, Processing or troubleshooting tabs above to see the help for that tab. 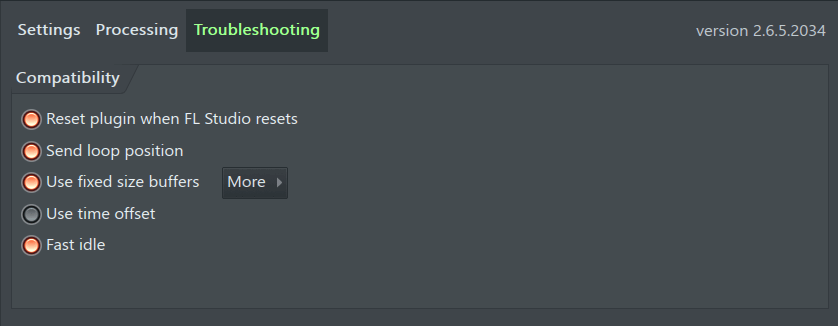
8. Miscellaneous Wrapper Settings

Miscellaneous Channel Settings — These are available for all Instrument Channels, click here for full details or on the section of interest below. Учебное пособие по FL
Все инструменты (включая FX), как встроенные, так и внешние, функционируют в FL Studio через Fruity Wrapper. Wrapper обеспечивает совместимость с плагинами стандартов VST- и DX- .
Есть две версии Fruity Wrapper: Effect и Generator. Тип выбирается, в зависимости от загружаемого типа плагина. Имеется несколько управляющих опций:Меню плагинов содержит различные специфические команды плагинов: управление пресетами, MIDI-маппинг и функции сервиса. Команды различаются в зависимости от типа плагина, загружаемого во Wrapper.
· Piano roll – Открывает окно Piano roll загруженного инструмента.
· Presets – Позволяет увидеть список пресетов, доступных для плагина.
· Browse presets – Открывает меню пресетов в браузере (однако пресеты для плагина могут отсутствовать).
· Save presets as – Позволяет сохранить текущий пресет в отдельный файл в браузере.
· Add to plugin database – Добавляет плагин в текущую папку базы данных. Это специальная директория браузера, которая работает с Plugin picker для организации и загрузки плагинов в проекты.· Last tweaked – Открывает в браузере последний редактировавшийся параметр.
o Edit events – Открывает редактор событий для последнего добавленного элемента управления. Эти данные сохраняются в текущий паттерн. Также, содержит опции для редактирования событий в новом окне или во встроенном редакторе Piano roll.
o Init song with this position – определяет для элемента управления начальную позицию. С началом воспроизведения параметр примет указанное значение. Необходимо нажатие кнопки STOP, затем PLAY для достижения эффекта.
o Create automation clip – создает клип автоматизации, для последнего настраивавшегося параметра.
o Link to controller – Открывает диалог создания связи, который позволяет связать внешний контроллер с данным элементом управления.
o Copy value/Paste value – Позволяет копировать и вставлять значения параметров элементов управления.
· Link all parameters – Открывает диалог для связи доступных для автоматизации параметров с контроллерами и затем автоматически переходит к следующему параметру в «списке параметров» для создания следующей связи.
Имеется несколько опций для пропуска параметров или перехода к другому пункту списка. Базовая операция – Выберите «Link all parameters» в меню и переместите первый контроллер, для которого нужно установить связь (связь создается с первым элементом в списке «Current parameter»). Когда Вы добавите второй контроллер, он будет автоматически связан со следующим параметром, и так далее, пока не будет достигнут конец списка или закрыт диалог. Чтобы пропустить связь, щелкните левой кнопкой мыши на кнопку Skip в нижней части окна диалога (рядом с кнопкой «Accept»). Чтобы перейти к следующему параметру, используйте Current parameter menu (в самом верху окна диалога) и выберите нужный параметр. Затем Вы можете продолжить автоматическое создание связей с той точки, на которой остановились ранее или перейти к другому параметру в списке «Current parameter», как уже было описано.
· Browse parameters – Позволяет просматривать список доступных для автоматизации параметров в браузере.
· Вложенные СС параметры: каждый экземпляр Wrapper имеет 128 СС (MIDI Control Change) параметров в списке параметров. Эти параметры передают СС-данные непосредственно плагину (для плагинов, непосредственно читающих СС-данные) и могут быть связаны как любой другой параметр с MIDI- или внутренним контроллером.
Таким образом, можно посылать СС-данные непосредственно плагину вместо того, чтобы связывать их с элементами управления в интерфейсе плагина. Эти параметры могут также быть установлены в соединении с Omni mode, связанным с Remote control settings, для отправки СС-данных нескольким выбранным плагинам и сохранения заданий MIDI-контроллера (см. раздел Omni и VSTi/DXi Control).
· Smart disable – Будучи неактивной, опция останавливает работу плагина для защиты процессора.
· Allow threaded processing – Использует многопоточность и многоядерное исполнение процессора. Замечание:
Некоторые внешние плагины работают хуже при многопоточности. Если Вы работаете с переменным звуком (проигрыватель GPO/Kontakt, например), старайтесь отключать эту опцию.
· Make editor thumbnail – Помещает эскиз изображения интерфейса плагина в Browser > Current Project >Generators Folder, чтобы облегчить поиск плагина.
· Detached – Отделяет плагин от рабочего стола FL Studio таким образом, что он может быть помещен на монитор вне рабочего стола FL Studio.2. Additional Settings Menu.
Опции, представленные в этом меню, изменяются в зависимости от подключенного плагина.
MIDI
· Show MIDI In Port / Show MIDI Out Port – Изменяет отображение порта MIDI (4), для показа номера входного либо выходного порта.
Options
· Compatibility – Большинство следующих функций предназначено для работы с внешними плагинами. Обратите внимание, что настройки по умолчанию согласованы со всеми стандартами плагинов, поэтому включение некоторых из следующих установок может вызвать проблемы для плагинов, соответствующих этим стандартам.
Обратите внимание также, что установки уникальны для каждого плагина.
Опции:
o Send loop position (Отправить позицию лупа) – Передает информацию о начальном и конечном положении лупа трека VST-плагину. Параметры этой установки вычисляются Wrapper и не доступны, пока FL не создал лупы.
o Send note off velocity — Посылает сообщение плагину о скорости возвращения клавиш в исходное положение.
Скорость возвращения клавиш в исходное положение задается в Piano roll и может быть отредактирована с использованием встроенного редактора событий.
o Send pitch bend range (Отправить диапазон модуляции звука) – При выборе этой опции диапазон модуляции звука MIDI будет передан плагину. Плагины, поддерживающие диапазон модуляции звука, будут корректно реагировать на загрузку инструкций модуляции. Эта опция не задана по умолчанию, поскольку некоторые плагины интерпретируют сообщения о диапазоне модуляции звука как сообщение о сбросе фильтра, что вызывает проблемы.
o Bottom toolbar — Перемещает панель инструментов в нижнюю часть окна Wrapper.
o Check current program on display change (только для VST) – Некоторые плагины посылают сообщение изменения отображения, когда внутри плагина выбирается новый патч (программа). Эта опция позволяет FL Studio обнаружить замену патча и обеспечивает корректный перенос данных между FL Studio и плагином.
o Invalidate plugin editor window — Открывает пустое сообщение редактора плагина (только для VST). «Пустое сообщение» предоставляет плагину возможность перезагрузить окно. Не меняйте эту установку, если плагин не имеет проблем отображения.
o Legacy velocity translation – Эта опция обеспечивает совместимость с проектами, созданными в FL Studio версий старше, чем 5.0. Метод вычисления скорости был усовершенствован после выхода FL 5.0. Эта опция должна быть использована только, если возникают проблемы со скоростью в более старых проектах, такие как ошибки громкости звука, фильтрования на основе скорости и т.д.
o Use fixed size buffers (для всех форматов плагинов) — FL Studio распределяет данные плагинов, используя фрагменты данных различных размеров (буферы). Для некоторых плагинов требуются буферы фиксированных размеров (что вне стандарта VST, но поддерживается в FL Studio для удобства). Эта опция обеспечивает использование только буферов фиксированного размера. Неудобство – фиксированный размер буфера вызывает дополнительную задержку, зависящую от размера аудиобуфера, заданного в Audio settings (F10) . Эта задержка удваивается для плагинов эффектов. Однако в некоторых случаях эта установка может создать нежелательные задержки для определенных плагинов.
o Record parameter changes – При отключении опции недоступно получение параметра «change notification» от плагина. Замечание: Некоторые плагины непрерывно посылают изменения параметра, что вызывает постоянную переустановку «Last tweaked parameter», делая невозможным выбор и связывание нужного параметра. Отключите «Record parameter changes» только на время, когда Вы записываете автоматизацию, и затем повторно включите его
(не забывайте это сделать, поскольку отключение опции воздействует на другие функции Wrapper, которые, возможно, вам понадобятся).
· Automatically save plugin options — По умолчанию эта установка автоматически сохраняет опции, выбранные в этом меню, и при следующей загрузке плагина они будут восстановлены.
· Save options for this plugin now – Сохраняет опции, выбранные в этом меню, при следующей загрузке плагина они будут восстановлены.
· Delete plugin options – Используйте для удаления сохраненных опций для загружаемого типа плагина.Эти команды предназначены только для управления VST-плагинами.
· Allow Program Editing – По умолчанию FL Studio временно сохраняет модификации для изменения программы таким образом, что, если Вы изменяете пресет, просматриваете другие пресеты и возвращаетесь к измененному пресету, изменения будут сохранены. Если эта установка отключена, все изменения пресетов будут потеряны при переходе к другому патчу. Это сессионная функция, поэтому модификации патча не будут бесконечно перезаписы-
ваться, если Вы удалите плагин и перезагрузите его, все модификации будут потеряны.
· Rename Program – Позволяет переименовывать активный патч. Опция «Allow Program Editing» должна при этом быть включена.
· Copy Program – Копирует активный патч в буфер обмена. Опция «Allow Program Editing» должна при этом быть включена.
· Paste Program – Заменяет установки активного патча установками из буфера обмена. Опция «Allow Program
Editing» должна при этом быть включена. Команда будет недоступна, если буфер обмена пуст (вы должны предварительно скопировать программу).· Import VST Bank/Preset — Позволяет импортировать стандартный банк VST (FXB) или пресет (FXP) в экземпляр загруженного плагина. Банк заменяет все программы для этого экземпляра плагина, в то время как пресет заменяет только в настоящее время выбранную программу.
· Export VST Bank — Позволяет экспортировать всю библиотеку программы (включая любые дополнительные загруженные или модифицированные программы) как банк VST (FXB).
· Export VST Preset — Позволяет экспортировать текущий патч как пресет VST (FXP).
· Export all programs as VST Preset — Экспортирует все программы в банке как отдельный пресет VST (файл *.FXP).· Reload Current Plugin – Перезагружает текущий плагин, это дает возможность быстро вернуть плагин в начальное состояние.
3. Plugin Folder
Открывает список плагинов, доступных в FL Studio, и позволяет заменять текущий плагин новым.
Позволяет устанавливать входной/выходной MIDI-порт для подключенного плагина (в зависимости от выбора в Additional Settings Menu).
5. Preset Browser
Preset Browser — Если этот элемент поддерживается плагином, он позволяет поэтапно перемещаться по пресетам плагина.
Щелкните левой кнопкой мыши на стрелке для перемещения на шаг вперед или назад по пресетам плагина. Правой кнопкой мыши можно отобразить список пресетов целиком и затем выбрать пресет из вложенного меню.