How to Install Google Chrome in Ubuntu 22.04
Google Chrome or Chrome it is a free web-browser, developed by Google on WebKit engine. In 2022 almost 61% users of the Internet use Google Chrome. It is 8% less than in 2020. This browser is available for Linux, Windows, Android, IOS, and MacOS.
In this article I will show how to install Chrome in Ubuntu 22.04. Google Chrome has an open-source version that is called Chromium, but I will cover only proprietary version here.
Installing Google Chrome in Ubuntu 22.04
You can use this guide not only for installing Google Chrome in Ubuntu 22.04 but also in 20.04, other previous versions, and other distributions, for example Linux Mint or Debian. Furthermore, the installation package installs a repository in your system, so you will get updates for this browser automatically with other system packages.
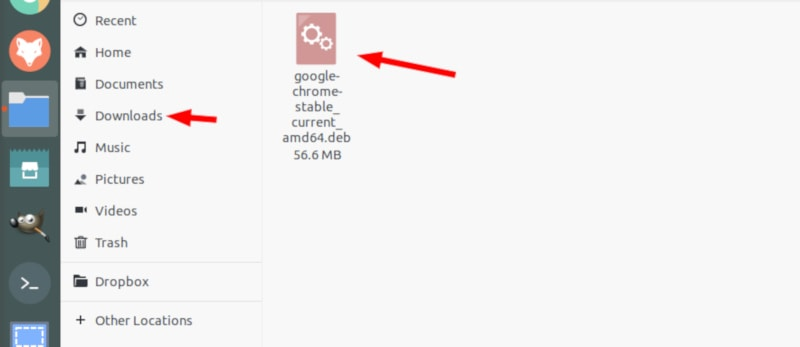
You can download the repository installer for stable version of Chrome using this command:
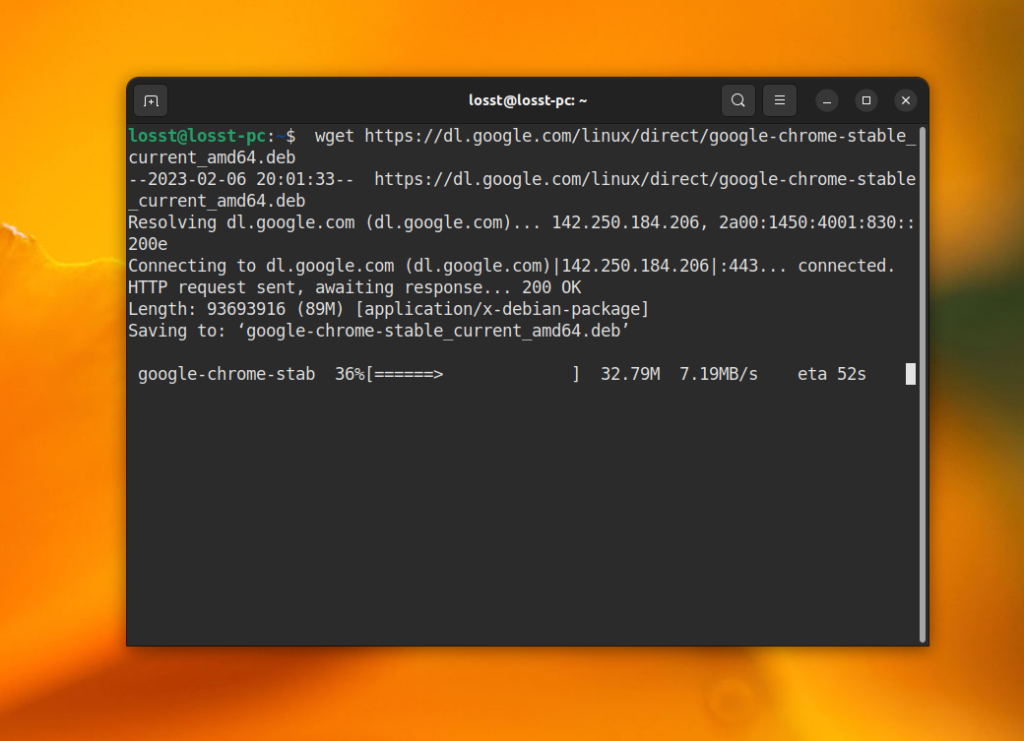
wget https://dl.google.com/linux/direct/google-chrome-stable_current_amd64.deb
After this, install the package using dpkg:
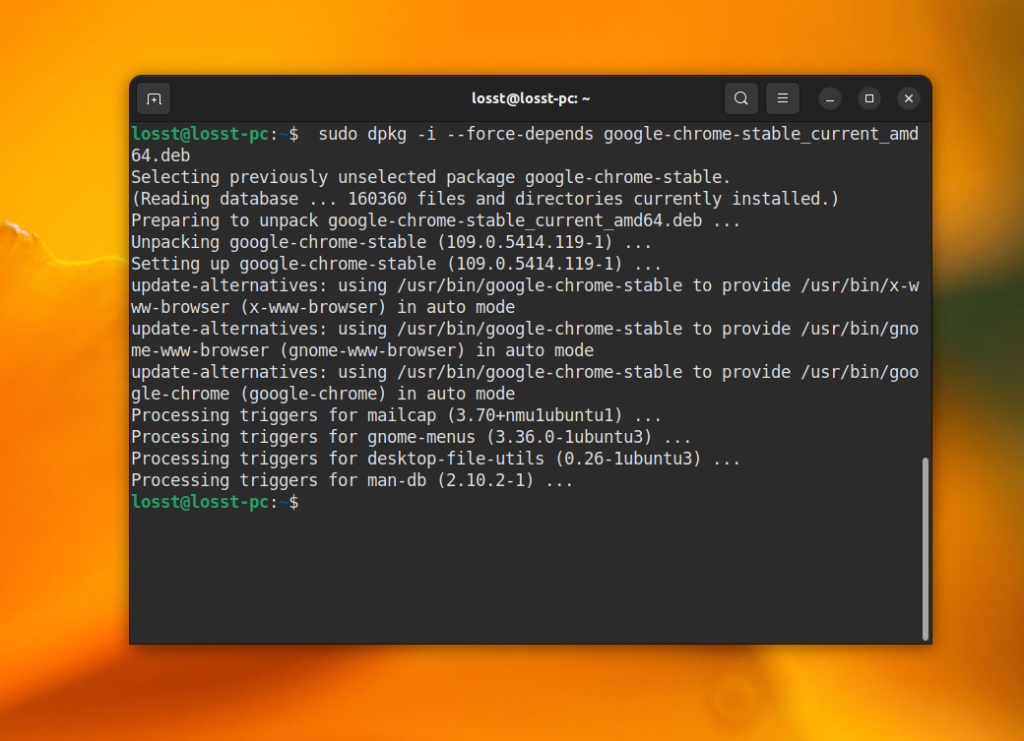
sudo dpkg -i —force-depends google-chrome-stable_current_amd64.deb
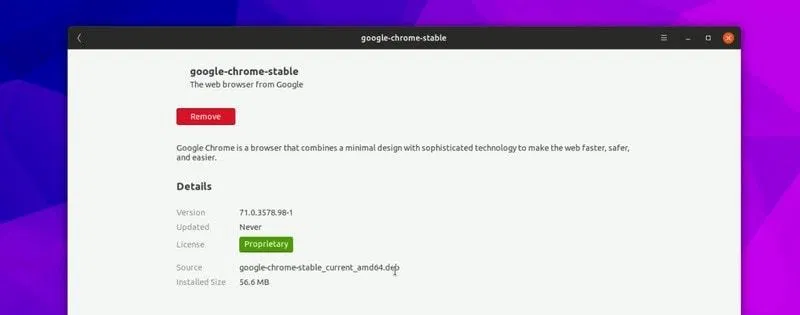
This package contains Google Chrome binaries and repository configuration. So that, once instillation finishes, you will have Google Chrome in your system and it will be updated automatically from the official repository during the system update.
If you want to install unstable version replace the stable word by unstable:
wget https://dl.google.com/linux/direct/google-chrome-unstable_current_amd64.deb sudo dpkg -i —force-depends google-chrome-unstable_current_amd64.deb
The unstable version is always newer, but it can contain bugs. If you want to install 32-bit version of Google Chrome, it will be difficult. Google does not build binaries for 32-bit systems. You consider installing open-source Chromium instead of Google Chrome.
If the dpkg reports that can’t install dependencies, you can install them using this command:
sudo apt-get install -f
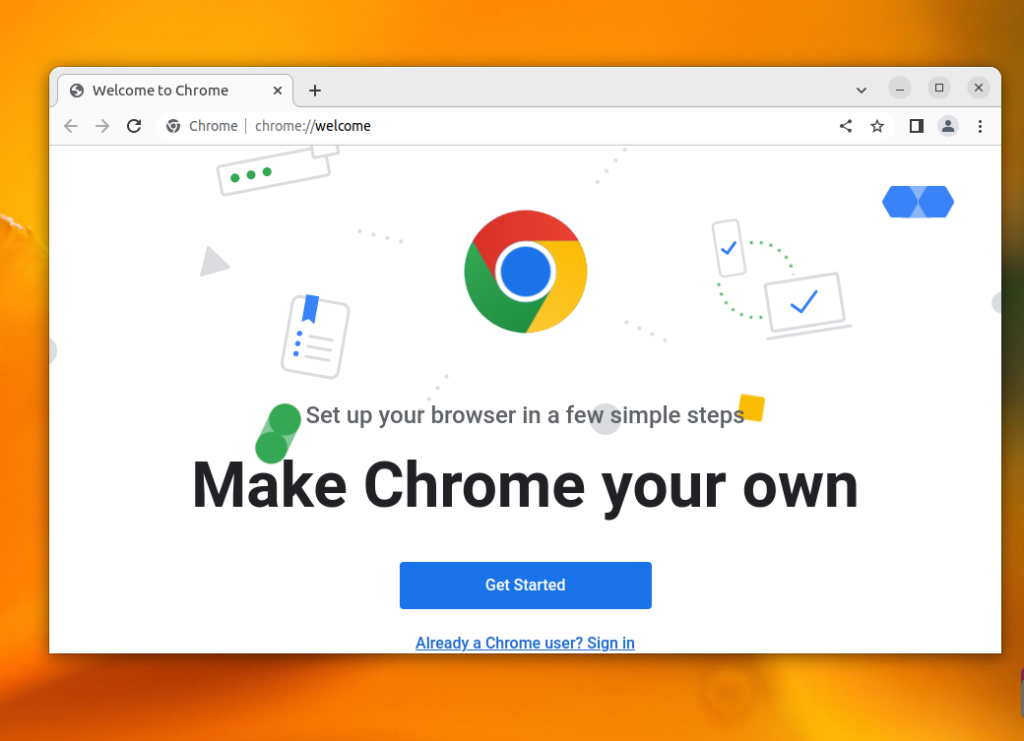
After this, installation of the browser is complete. You can run it using the following command:
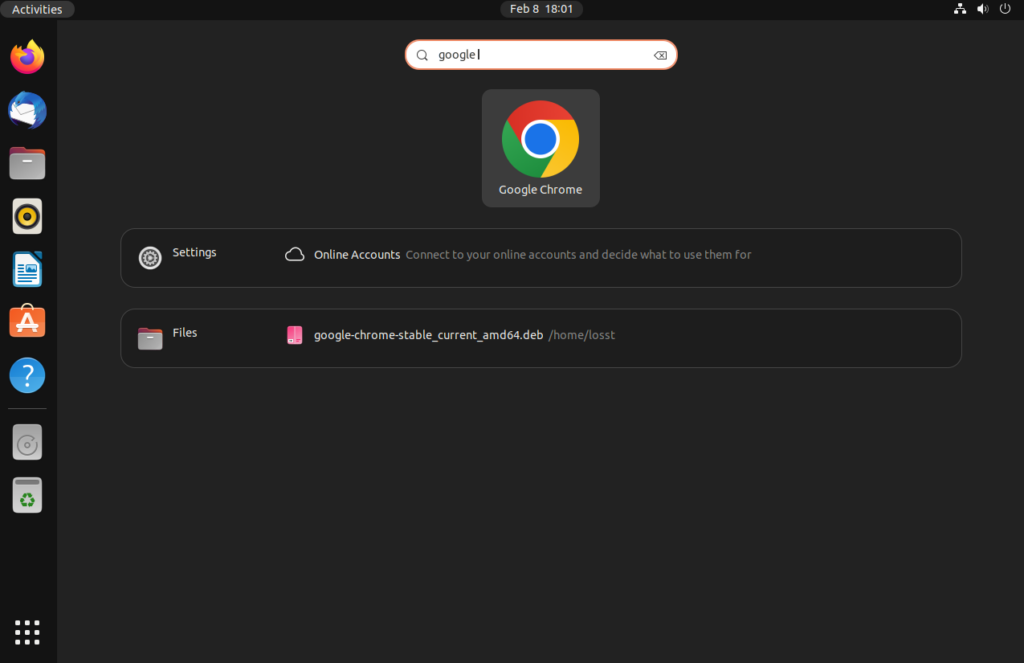
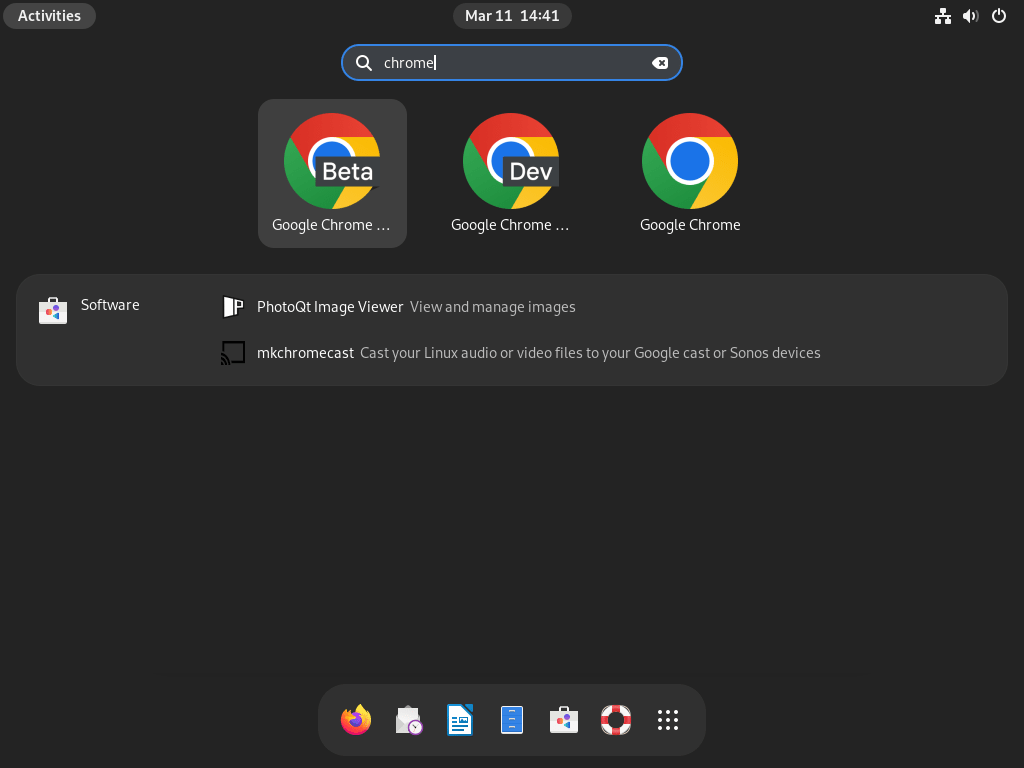
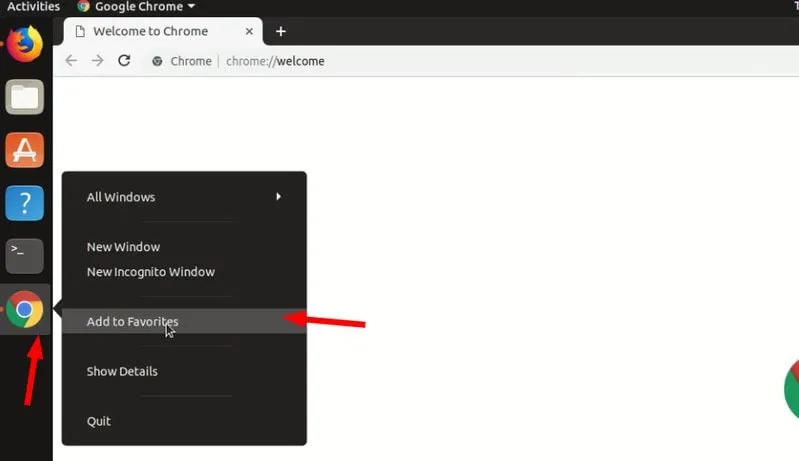
Besides, you can find the application shortcut in the Activities menu:
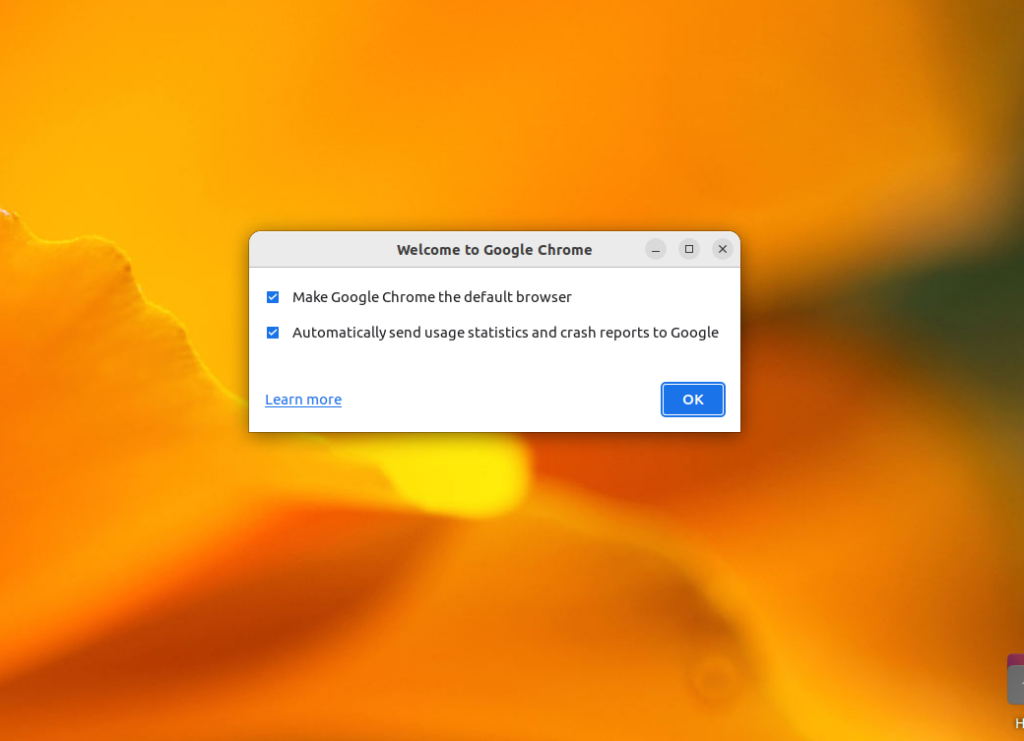
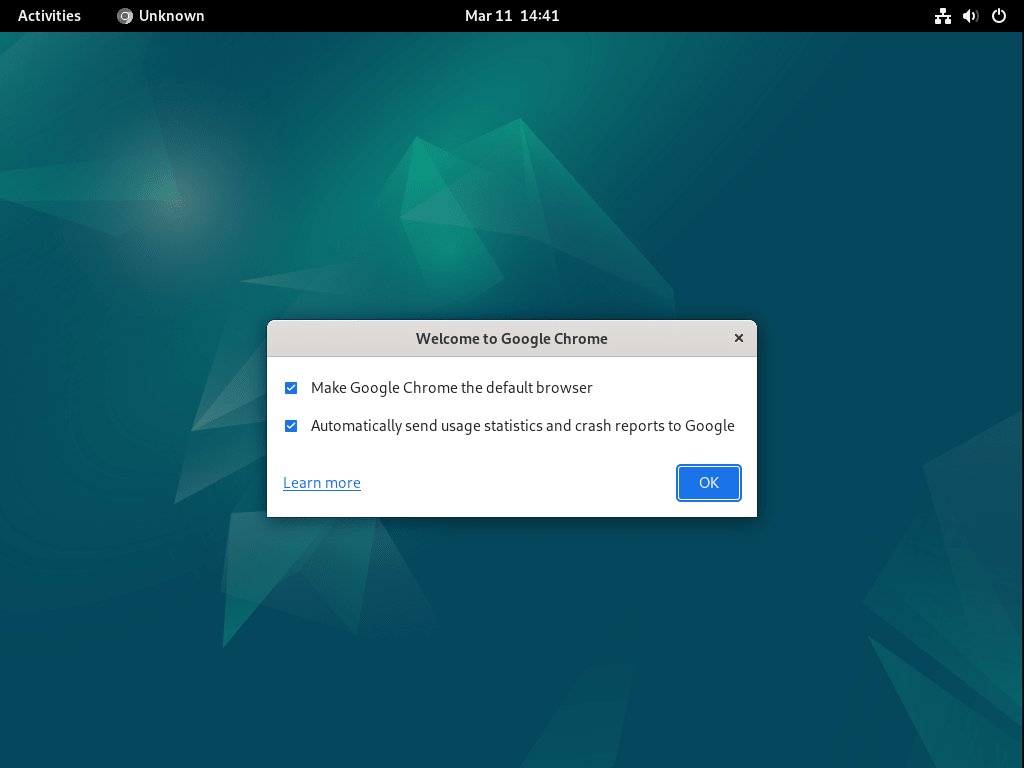
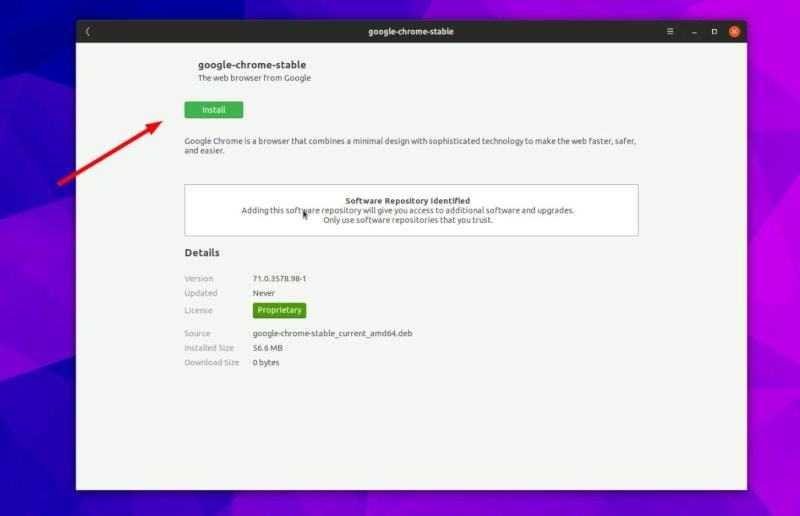
At the first launch the browser will ask whether it can send usage statistics and crash reports to Google and whether you want to make Google Chrome the default browser:
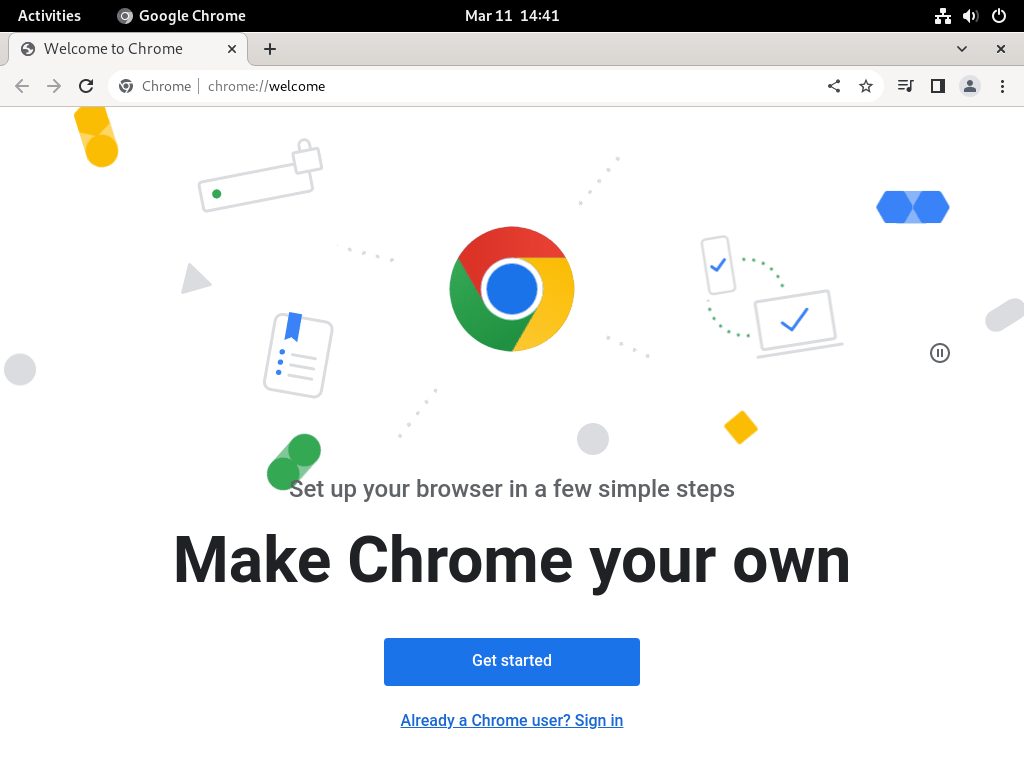
Then, you can configure your browser. You can change a color scheme, log in your Google account and etc. Also, you can close this tab and leave default settings:
If Chrome does not start in Ubuntu 22.04, probably the problem is in Wayland and GPU drivers. You can try disabling Wayland and swich to old Xorg. Just open /etc/gdm3/custom.conf and uncommend or add the WaylandEnable=false line:
sudo vi /etc/gdm3/custom.conf WaylandEnable=false
That’s it. Hope that this guide helped you to learn how to install Google Chrome in Ubuntu 22.04 or 20.04.
How to Install Chromium Browser on Ubuntu 22.04 or 20.04
Chromium Browser stands as an open-source foundation for some of the most widely used web browsers in the world. In this guide, we will demonstrate how to install Chromium Browser on Ubuntu 22.04 or 20.04, ensuring you have access to a fast, reliable, and customizable internet browsing experience. Known for its speed and efficiency, Chromium offers a unique blend of features that cater to both casual and power users.
Key Features of Chromium:
- Open-Source Nature: Allows for transparency, security, and community-driven development.
- Speed and Performance: Engineered for quick page loads and smooth browsing.
- Customization and Flexibility: Supports a wide range of extensions and themes.
- Security Features: Regular updates and a strong focus on user privacy and data protection.
- Cross-Platform Compatibility: Available on various operating systems, ensuring a consistent experience.
As you embark on installing Chromium on your Ubuntu system, these features ensure you have a robust tool for exploring the web. The installation process is straightforward and adaptable to both Ubuntu 22.04 or 20.04. Let’s dive into the steps to unlock the full potential of your internet browsing with Chromium.
Table of Contents
Install Chromium on Ubuntu 22.04 or 20.04 via APT
Step 1: Update the Ubuntu System Before the Chromium Installation
Before proceeding with the installation of Chromium, it’s essential to update your Ubuntu system. This ensures that all existing packages are up-to-date, helping you avoid potential conflicts during the installation process. To update your system, execute the following command:
sudo apt update && sudo apt upgradeStep 2: Install Chromium on Ubuntu 22.04 or 20.04 via APT Command
There are two main methods to install Chromium on your Ubuntu system: using the Ubuntu repository or using a PPA (Personal Package Archive). Each method has its advantages, so let’s explore both options.
Method 1: Install Chromium Browser with the Ubuntu Repository
The first installation method uses the APT package manager. However, it’s important to note that this method installs Chromium as a Snap package, similar to the default installation of Firefox. This method is an excellent choice if you don’t mind using Snap packages. But if you prefer a non-snap APT method, you may want to consider Method 2, which uses a PPA.
To install Chromium with the Ubuntu repository and Snapcraft, execute the following command:
sudo apt install chromium-browserMethod 2: Install Chromium Browser on Ubuntu 22.04 or 20.04 via APT PPA
The second method involves using the xtradeb/apps Launchpad PPA, which contains several well-known applications, including the Chromium browser. These applications are updated more frequently, making this PPA a reliable option for installing Chromium.
First, import the PPA by running the following command:
sudo add-apt-repository ppa:xtradeb/apps -yAfter adding the PPA, update the packages list with this command:
sudo apt updateFinally, install Chromium by executing the following command:
sudo apt install chromiumTo adjust package priorities in your system, particularly for Chromium from the xtradeb/apps repository, you can employ the technique of APT pinning. This method effectively sets a higher preference for specific packages, ensuring they are chosen over others during installation or updates.
The process is straightforward and can be executed using a concise command. Here’s the method:
Use the following command to set up a pinning preference for the Chromium package:
echo "Package: chromium\nPin: release o=LP-PPA-xtradeb-apps\nPin-Priority: 700" | sudo tee /etc/apt/preferences.d/chromium-pin This command utilizes echo to generate the necessary pinning information, which is subsequently directed using a pipe (|) into the sudo tee command. This action creates a file in /etc/apt/preferences.d/ named chromium-pin. The file serves as an instruction for your system, ensuring it gives precedence to the Chromium package from this particular PPA over other available options.
Install Chromium on Ubuntu 22.04 or 20.04 via Flatpak and Flathub
This section will explore an alternative method to install Chromium using the Flatpak package manager. Flatpak is a universal packaging format similar to Snap, offering benefits such as sandboxing, easy distribution, and increased security for applications like Chromium.
Step 1: Enable Flathub For Chromium on Ubuntu
Before installing Chromium through Flatpak, you must enable the Flathub repository, a primary source for Flatpak applications. To enable Flathub, execute the following command in your terminal:
flatpak remote-add --if-not-exists flathub https://flathub.org/repo/flathub.flatpakrepoThis command adds the Flathub repository to your Flatpak configuration, ensuring you have access to various applications, including Chromium.
Step 2: Install Chromium on Ubuntu 22.04 or 20.04 via Flatpak Command
With Flathub enabled, you can install Chromium on Ubuntu 22.04 or 20.04 using the flatpak install command. Run the following command in your terminal:
flatpak install flathub org.chromium.Chromium -yThis command installs Chromium from the Flathub repository, providing you with the latest browser version.
If your system does not have Flatpak installed, please refer to our comprehensive guide on How to Install Flatpak on Ubuntu for step-by-step instructions on installing the most recent supported version of Flatpak. This guide will help you set up Flatpak on your Ubuntu system and ensure you can take advantage of its benefits when installing applications like Chromium.
Launch Chromium Browser on Ubuntu 22.04 or 20.04
Now that you have successfully installed the Chromium Browser on your system, it’s time to launch it and start browsing. Depending on your preferences and installation method, there are several ways to open Chromium.
CLI Methods to Launch Chromium on Ubuntu
You can launch Chromium immediately from your terminal by typing the following command:
chromiumIf you installed Chromium using Flatpak, you would need to use a different command to launch it from the terminal:
flatpak run org.chromium.ChromiumWhile launching Chromium from the terminal can be quick and convenient, it might not always be the most practical option for everyday use.
GUI Method to Launch Chromium on Ubuntu
You can launch Chromium directly from your desktop environment for a more user-friendly approach. To do this, follow these steps:
- Open the Show Applications menu at the bottom-left corner of your screen.
- Search for “Chromium” in the search bar or browse the list of installed applications.
- Click on the Chromium Web Browser icon to launch the browser.

Tips on Getting Started with Chromium Browser on Ubuntu 22.04 or 20.04
Now that you have Chromium installed and know how to launch it, it’s time to get acquainted with some tips and tricks to maximize your browsing experience on Ubuntu Linux. This section will provide general tips, customization options, and other helpful suggestions to enhance your Chromium experience.
General Tips with Chromium on Ubuntu
- Stay up-to-date: Keep Chromium updated to the latest version to ensure optimal performance, security, and access to new features. You can check for updates by clicking the three-dot menu in the top-right corner, then selecting Help >About Chromium.
- Use keyboard shortcuts: Speed up your browsing by learning and utilizing Chromium’s keyboard shortcuts. Some common shortcuts include Ctrl+T to open a new tab, Ctrl+W to close the current tab, and Ctrl+Shift+N to open a new incognito window.
- Manage extensions: Enhance Chromium’s functionality by adding extensions from the Chrome Web Store. Click the three-dot menu > More tools > Extensions to manage your extensions.
Customization Tips with Chromium on Ubuntu
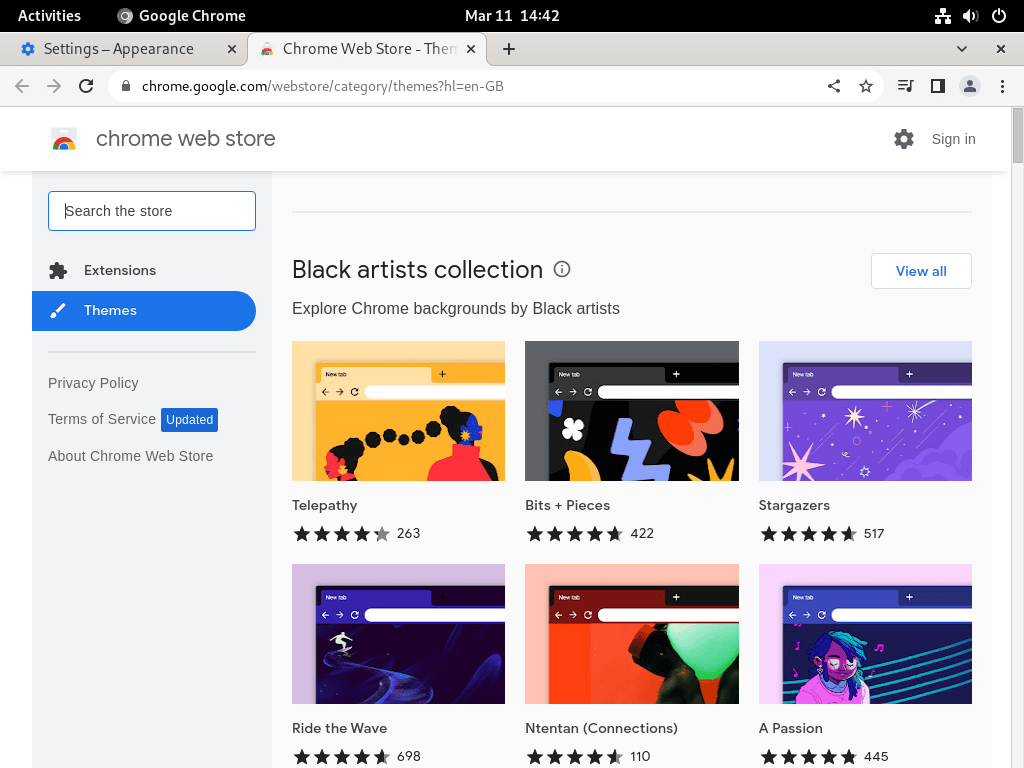
- Change the theme: Personalize Chromium’s appearance by applying a custom theme. Visit the Chrome Web Store, search for themes, and click Add to Chrome on your chosen theme to apply it.
- Customize the new tab page: Tailor the new tab page to display your most visited sites, curated news articles, or a custom background by clicking the Customize button at the bottom-right corner of the new tab page.
- Organize bookmarks: Keep your favorite websites easily accessible by organizing your bookmarks. To create folders, right-click the bookmarks bar and select Add folder.
Other Helpful Tips with Chromium on Ubuntu
- Enable dark mode: Reduce eye strain and save battery life by enabling dark mode. Go to Settings >Appearance >Themes and select the dark theme.
- Manage your privacy: Configure your privacy settings to protect your personal information. Visit Settings >Privacy and Security to review and adjust your privacy preferences.
- Sync your data: Synchronize your bookmarks, history, and extensions across devices by signing in with a Google account. Click on the profile icon in the top-right corner and follow the prompts to sign in and sync your data.

Managing Chromium on Ubuntu 22.04 or 20.04
This section will discuss how to update and uninstall the Chromium browser on your Ubuntu system and the installation method you used. These steps will help you keep your browser up-to-date or remove it if you no longer need it.
Update the Chromium Browser on Ubuntu 22.04 or 20.04
To ensure optimal performance and security, it is essential to keep your Chromium browser updated. Depending on your installation method, use one of the following commands to update Chromium:
APT Chromium Update Method on Ubuntu
If you installed Chromium using the APT package manager, execute the following command in your terminal to check for updates and upgrade all packages, including Chromium:
sudo apt upgrade && sudo apt upgradeFlatpak Chromium Update Method on Ubuntu
If you installed Chromium with Flatpak, use the following command to update the browser:
flatpak updateRemove Chromium Browser From Ubuntu 22.04 or 20.04
If you no longer need the Chromium browser on your system, use one of the following commands based on your installation method to uninstall it:
APT Chromium Remove Method on Ubuntu
For users who installed Chromium using the APT and Ubuntu’s repository package manager, execute the following command in your terminal to remove the browser:
sudo snap remove chromiumUbuntu’s default Chromium installation version uses Snap now as you may have noticed when installing it, so it is best to use the Snap remove command.
Alternatively, if you installed Chromium from the PPA, you can run the following command to remove Chromium:
sudo apt remove chromiumFlatpak Chromium Remove Method on Ubuntu
For users who installed Chromium using Flatpak, run the following command to uninstall the browser and delete its associated data:
flatpak uninstall --delete-data org.chromium.ChromiumClosing Thoughts
This article covered different methods for installing the Chromium browser on Ubuntu Linux, including the APT package manager and Flatpak. We also discussed how to launch the browser, shared tips for getting started, and provided additional commands and tips for updating and uninstalling Chromium. Following the steps outlined, you can easily manage your Chromium browser on your Ubuntu system to ensure a secure and efficient browsing experience.
How to Install Google Chrome on Debian 12, 11 or 10
For users seeking to install Google Chrome on Debian 12 Bookworm, Debian 11 Bullseye, or Debian 10 Buster, it’s essential to understand the browser’s distinct features and offerings. Google Chrome stands out with its sleek interface, rapid performance, and extensive range of extensions, significantly enhancing your web browsing experience.
Key Features of Google Chrome:
- Customization & Control: Google Chrome allows users to tailor their browsing experience through various appearance settings, themes, and a robust developer console for advanced web development and troubleshooting tasks.
- Built-In Security: With features like Safe Browsing, sandboxing, and frequent automatic updates, Chrome provides users a secure browsing environment, safeguarding against various online threats.
- Synchronization Across Devices: Chrome’s synchronization feature ensures a smooth transition between devices by syncing bookmarks, extensions, and browsing preferences, providing a consistent browsing experience.
Available Versions for Debian Users:
- Stable Version: Thoroughly tested and verified by Google’s development team, the Stable version is reliable, secure, and free of experimental features.
- Beta Version: Ideal for users eager to explore upcoming features in a relatively stable setting, the Beta version offers a glimpse into future updates.
- Unstable/Dev Version: For those who wish to engage with the newest, possibly experimental features, the Unstable or Dev version is the go-to option despite being less stable than its counterparts.
With these versions, Debian users can select a Chrome version that aligns with their stability and feature preferences. The subsequent guide will walk you through the steps to install Google Chrome on Debian 12 Bookworm, Debian 11 Bullseye, or Debian 10 Buster, covering the Stable, Beta, and Unstable branches.
Table of Contents
Import Google Chrome APT Repository on Debian 12, 11, or 10
Step 1: Update Debian Before Google Chrome Installation
The first step to installing Google Chrome on Debian Linux is to ensure that your system is up to date. By updating your system, you mitigate any potential compatibility issues that may occur during the Google Chrome installation process.
To update your Debian system, you need to open the terminal and execute the following command:
sudo apt update && sudo apt upgradeAfter updating your system, installing specific packages is the next course of action. These packages are crucial for the installation process. They include software-properties-common, apt-transport-https, ca-certificates, and curl.
You can install these packages by executing the following command:
sudo apt install software-properties-common apt-transport-https ca-certificates curl -yRemember that your system may already have installed these packages as they are common dependencies.
Step 2: Import Google Chrome APT Repository on Debian
The subsequent step to installing Google Chrome involves the incorporation of the Google Chrome repository. This process begins with importing the GPG key for the digital signature.
You can achieve this by executing the following command:
curl -fSsL https://dl.google.com/linux/linux_signing_key.pub | sudo gpg --dearmor | sudo tee /usr/share/keyrings/google-chrome.gpg >> /dev/nullThis command ensures successful importation of the GPG key, a prerequisite for the installation process. The absence of this step results in an incomplete installation.
After successfully importing the GPG key, import the Google Chrome repository by executing the following command:
echo deb [arch=amd64 signed-by=/usr/share/keyrings/google-chrome.gpg] http://dl.google.com/linux/chrome/deb/ stable main | sudo tee /etc/apt/sources.list.d/google-chrome.listTo complete the incorporation of the Google Chrome repository, you must update the repository list using the apt update command. This step updates the apt sources list with the newly added Google Chrome repository.
Execute the following command to update your repository list:
sudo apt updateOnce you have successfully updated your system, installed the required packages, and incorporated the Google Chrome repository, you can proceed to install Google Chrome.
Install Google Chrome on Debian 12, 11, or 10 via APT
The installation of Google Chrome begins with the stable version. This version is typically the most secure and reliable option for general use due to its thorough testing.
To install the Google Chrome stable version, execute the following command:
sudo apt install google-chrome-stableIn addition to its stable version, Google Chrome provides Beta and Unstable versions. Google doesn’t recommend these versions for daily use because of their potential instability. However, tech enthusiasts eager to experiment with new features may find these versions attractive.
To install the Google Chrome Beta or Unstable versions, execute one of the following commands:
sudo apt install google-chrome-betasudo apt install google-chrome-unstablePlease note that it is possible to install all three versions of Google Chrome as they each run as separate installations. However, for this to happen
Launching Google Chrome on Debian 12, 11 or 10
The next step is launching the browser after successfully installing Google Chrome on your Debian Linux system. The method you choose to launch Google Chrome largely depends on your installed version — Stable, Beta, or Unstable.
CLI Methods to Launch Google Chrome on Debian
You can launch Google Chrome directly from the terminal using a version-specific command, with each version having its unique command.
Use the command below for the stable version of Google Chrome:
google-chrome-stableIf you have chosen to install the beta version, use this command:
google-chrome-betaAnd if you’ve opted for the unstable version, use this command:
google-chrome-unstableGUI Method to Launch Google Chrome on Debian
Most desktop users can launch Google Chrome directly from their desktop environment. Typically, this process requires navigating to the application icon. The general access path to Google Chrome is as follows:
Activities > Show Applications > Google Chrome
First Run Experience with Google Chrome on Debian 12, 11 or 10
Upon opening Google Chrome for the first time, several prompts will greet you. First, the browser will request that you create a keychain password, a security measure designed to store all passwords for websites and applications. Google Chrome will also ask whether you want to set it as your system’s default browser, replacing the current one (Firefox by default). This optional choice can streamline your web browsing experience.
In this prompt, you’ll see a tick box requesting your consent to send usage statistics and crash reports to Google. While this data helps Google improve its browser, you can agree or disagree with this proposition.
Once you have decided, click the “OK” button to proceed. Next, Google Chrome allows you to sign in for a more personalized experience. However, if you prefer, you can skip this step by clicking the “X” in the browser tab.
Tips on Getting Started with Google Chrome on Debian 12, 11 or 10
This guide offers essential tips and tricks to improve your experience with Google Chrome on Debian Linux. It helps optimize your browser’s functionality and customize its appearance to your preferences.
General Google Chrome Tips with Debian
Here are some general tips to improve your experience with Google Chrome on Debian Linux:
- Sync Your Google Account: To synchronize your bookmarks, history, passwords, and other settings across all your devices, sign in to Google Chrome with your Google account.
- Use Extensions: Extensions can significantly enhance your browser’s functionality. Some recommended extensions for Chrome on Linux include:
- The Great Suspender: Automatically suspends inactive tabs to make your browser faster.
- Session Buddy: Allows you to resume your tabs from where you left off.
- Hover Zoom: Enables you to zoom images by hovering the cursor over them.
- Download Tab: Allows you to download the complete contents of a tab or a link.
- Speed Dial: An excellent alternative to the built-in New Tab.
- Session Manager: This extension allows you to save and restore sessions.
Google Chrome Customization Tips with Debian
Making your Chrome browser visually appealing can significantly enhance your browsing experience. Here are some tips to customize your Chrome browser:
- Dark Mode: Chrome offers a dark theme that changes the browser’s color scheme to darker colors, making the eyes more comfortable in low-light conditions. To enable it, type chrome://flags in the address bar, enter “dark mode” in the search bar, and choose “Force Dark Mode for Web Contents” from the drop-down menu.
- Themes: You can customize the appearance of your Chrome browser with various themes. To change the theme on Chrome, navigate to the “Themes” menu under the “Appearance” menu in the settings menu. The Themes gallery in the Chrome Web Store allows you to browse a wide range of themes and choose the one that best suits your needs.
- Chrome Linux Theme: This theme is a great way to customize your Linux system with a unique and modern look. Its various color choices allow you to customize your system to match your personality and preferences.
- Chrome GTK Theme: This is a modern, flat theme for the GNOME desktop environment, designed to provide users with a modern and sleek look. It is compatible with GTK2 and GTK3 and supports multiple desktop environments, such as GNOME, Xfce, and LXDE.
Remember, the goal is to create a comfortable and efficient workspace that suits your needs and preferences
Additional Google Chrome Commands with Debian 12, 11 or 10
This section delves into the necessary steps to manage Google Chrome on your Debian Linux system. We will walk through two crucial procedures: updating and uninstalling Google Chrome.
Update Google Chrome on Debian 12, 11 or 10
Google Chrome’s developers regularly release updates to improve the browser’s performance, patch security vulnerabilities, and add new features. As a user, it’s critical to keep your browser updated to benefit from these enhancements.
To update Google Chrome along with other installed packages, you need to run the following command:
sudo apt update && sudo apt upgradeThis command first updates the package list ( sudo apt update ), and then upgrades all upgradable packages ( sudo apt upgrade ), which includes Google Chrome if an update is available.
Remove Google Chrome From Debian 12, 11 or 10
Should you decide to switch web browsers or need to free up system space over time, you can easily remove Google Chrome from your Debian Linux system with a few terminal commands. If you installed the stable version of Google Chrome, use the following commands to remove it:
sudo apt remove google-chrome-stableFor those who chose the beta or unstable version, the commands would be:
sudo apt remove google-chrome-betasudo apt remove google-chrome-unstableAfter uninstalling the browser, consider removing the Google Chrome repository imported earlier during installation. Execute the following to do this:
sudo rm /etc/apt/sources.list.d/google-chrome.listThis command removes the Google Chrome list file from the sources.list.d directory, ensuring that the repository will no longer be used for package updates.
Troubleshooting Multiple Google Chrome ‘sources.list’ on Debian 12, 11 or 10
Managing different versions of Google Chrome on Debian Linux requires understanding the potential issues that might arise. Installing multiple browser versions, like stable, beta, and unstable releases, can create conflicts. Each installation generates a unique source list file in the /etc/apt/sources.list.d/ directory, leading to problems during an apt update. The system may struggle with handling multiple source list files for Google Chrome.
For example, if you install Google Chrome following a guide for the stable release and later decide to experiment with beta or developer versions, you introduce additional source list files, creating conflicts.
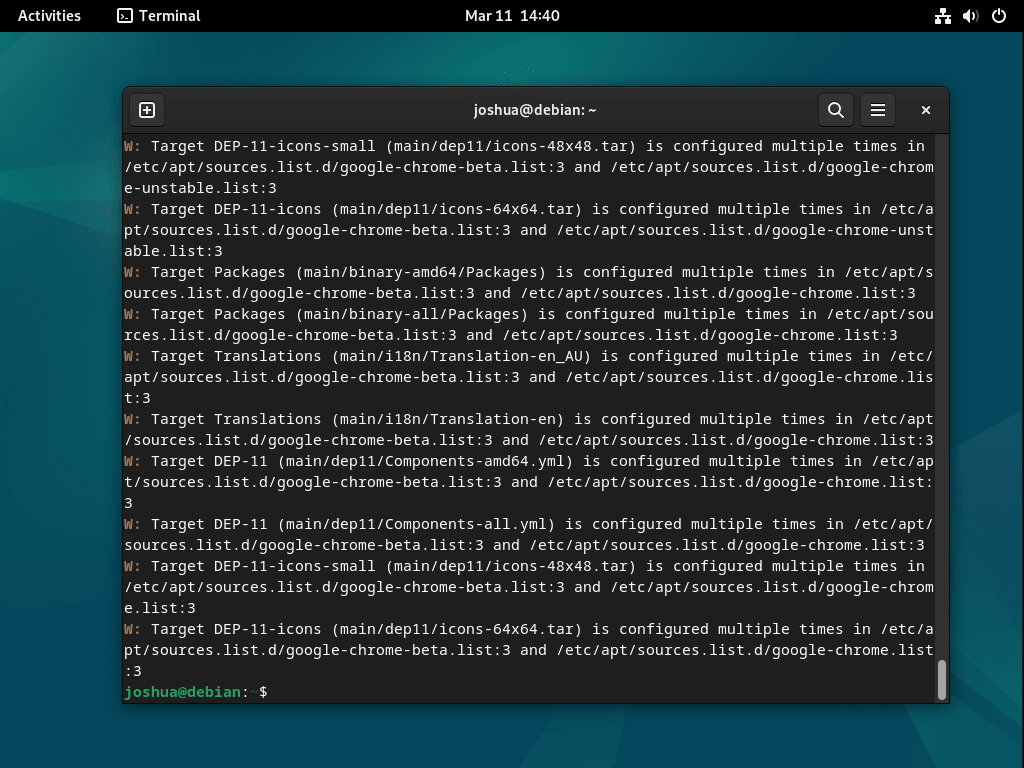
Addressing Source List Conflicts
The solution to this problem lies in managing your source list files correctly. If you’ve identified conflicts stemming from the beta or unstable Google Chrome releases, you can remove these source files using the terminal commands:
sudo rm /etc/apt/sources.list.d/google-chrome-beta.list sudo rm /etc/apt/sources.list.d/google-chrome-unstable.listThese commands specifically remove the source list files for the beta and unstable Google Chrome releases.
Alternatively, you might start afresh and remove all Google Chrome-related source list files, including the one for the stable release. This allows you to re-establish a clean slate and circumvent any potential conflicts. You can remove all Google Chrome source list files with the command:
sudo rm /etc/apt/sources.list.d/google-chrome*Re-establishing the Correct Google Chrome Repository
Remove all Google Chrome repositories, then re-add the initial correct one. Use the following command to do so:
echo deb [arch=amd64 signed-by=/usr/share/keyrings/google-chrome.gpg] http://dl.google.com/linux/chrome/deb/ stable main | sudo tee /etc/apt/sources.list.d/google-chrome.listThis command recreates the Google Chrome source list file, pointing to the stable release. As a best practice, you should run an APT update to ensure the system recognizes the newly added repository:
sudo apt updateYou can resolve conflicts between different Google Chrome versions by carefully managing your source list files. This allows your system to continue receiving updates for all installed browser versions without interference.
Conclusion
In conclusion, successfully installing and managing Google Chrome on a Debian Linux distribution necessitates careful attention to detail and command-line proficiency. This guide has provided a systematic walkthrough of each necessary step, covering the installation of various Google Chrome versions, the launching process, periodic updates, and even uninstallation when required. Furthermore, we’ve explored how to troubleshoot common issues, such as conflicts arising from multiple source list files.
Как установить Google Chrome в Ubuntu

Google Chrome — самый популярный в мире веб-браузер. Он быстрый, безопасный и полный функций, чтобы дать вам лучшие впечатления от просмотра веб-страниц.
Firefox значительно улучшился в последнее время и является лучшим выбором особенно с точки зрения конфиденциальности. Тем не менее, если вы являетесь ярым поклонником Google Chrome, я не буду заставлять вас бросить Chrome и перейти на Firefox.
Google Chrome не является программным обеспечением с открытым исходным кодом, и если вы попытаетесь установить Google Chrome через Ubuntu Software Center, вы не найдете его там. Скорее всего, он предложит установить Chromium (проект с открытым исходным кодом Chrome, который является производным). Chromium похож на Chrome, но это все равно не настоящий Google Chrome.
Тогда как установить Google Chrome на Ubuntu? Простой ответ заключается в том, что вы загружаете его с официального сайта.
Это можно сделать двумя способами:

Следует помнить, что Google Chrome недоступен для 32-битных операционных систем. Убедитесь, что используете 64-битную операционную систему.
Разумеется, вам необходимо иметь активное подключение к Интернету.
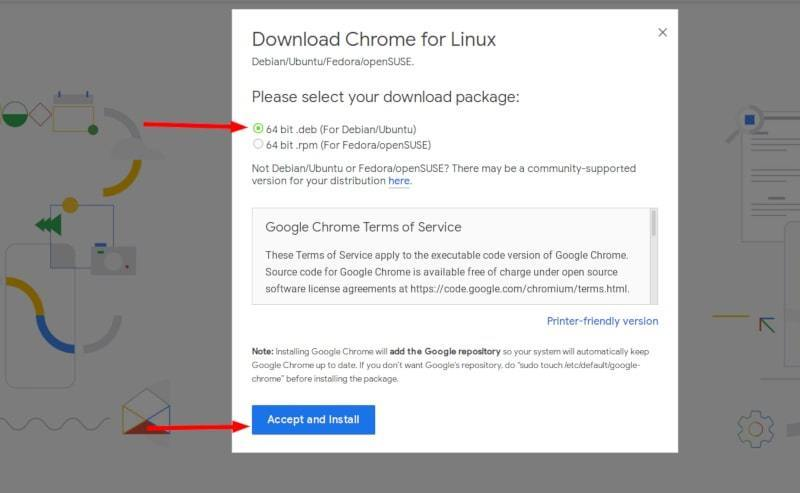
Там вы увидите ссылку на скачивание. Нажмите на кнопку загрузки.

Когда вы нажимаете на кнопку загрузки, она дает два варианта загрузки файлов. Вы должны скачать .deb файл, который подходит для Ubuntu.
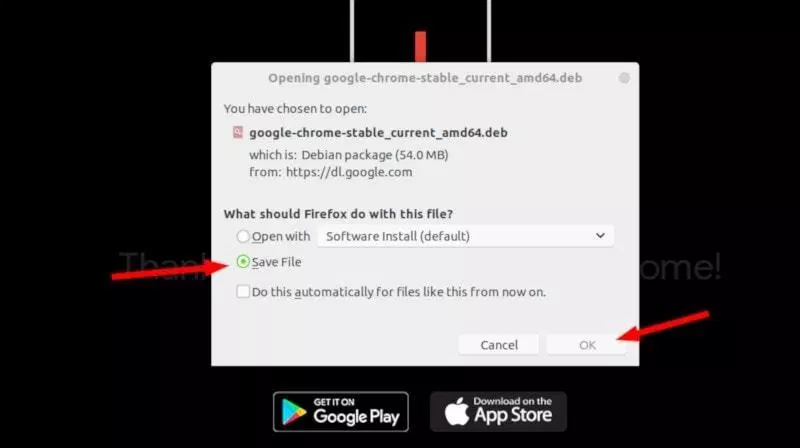
На следующем этапе нужно выбрать сохранение файла на компьютер вместо того, чтобы открывать его в центре программного обеспечения для установки.
Если вы этого не сделаете и возникнут некоторые проблемы в центре программного обеспечения, вам придётся загрузить deb-файл ещё раз. Лучше скачать и сохранить сам файл.
Загруженный deb-файл, скорее всего, должен находиться в папке Загрузки. Установка deb-файлов очень проста. Перейдите в эту папку и дважды щелкните по deb-файлу. Вы можете воспринимать эти deb-файлы, как exe-файлы в Windows.
Затем откроется центр программного обеспечения Ubuntu, и вы должны увидеть возможность установки Google Chrome. Нажмите на кнопку установки.
Проблемы: В Ubuntu 20.04 вам нужно будет щелкнуть правой кнопкой мыши на deb-файл и выбрать вверху Открыть с помощью Центра приложений.

Он запросит ваш пароль перед началом установки. Вы должны ввести пароль вашей учетной записи. Завершение установки Google Chrome займет меньше минуты. Теперь вы должны увидеть кнопку удаления, которая указывает на то, что программа установлена.
После установки Chrome в Ubuntu, вы можете найти его в меню. Просто нажмите клавишу Windows и начните вводить Chrome.

Нажмите на этот значок Chrome, чтобы начать пользоваться браузером Google Chrome.

Установка Google Chrome в терминале Ubuntu [Метод 2].
Процесс, который вы только что видели в методе 1, может быть выполнен и в терминале. Многие предпочитают графический интерфейс, но если вам нравится использовать командную строку, вы можете установить Google Chrome с помощью терминала.
Это не так просто, как с помощью apt-get установить chrome, но и не очень сложно.
Чтобы установить Google Chrome из терминала, получите DEB-файл с помощью команды wget:
wget https://dl.google.com/linux/direct/google-chrome-stable_current_amd64.deb
Теперь вы можете использовать dpkg для установки Chrome из загруженного DEB файла:
sudo dpkg -i google-chrome-stable_current_amd64.deb
Вот так. Теперь вы можете найти Google Chrome в меню и запустить его оттуда.
Несколько советов по использованию Google Chrome на Ubuntu
Теперь, когда вы установили Google Chrome на Ubuntu 18.04 или другой версии, вы должны знать несколько советов.
1. Синхронизируйте Google Chrome с вашим аккаунтом Google
Ты, наверное, уже знаешь это. При входе в Chrome с помощью аккаунта Google (аккаунт gmail) можно синхронизировать закладки, историю, плагины браузера и расширения с других устройств, на которых вы используете Google Chrome с тем же аккаунтом Google.
2. Добавьте Google Chrome в избранное
Если вы часто используете Google Chrome, было бы неплохо добавить его в избранное в Ubuntu 18.04 версии GNOME по умолчанию, так что вы можете быстро получить доступ к нему с панели запуска слева.
3. Обновление браузера
Хорошо, что Google Chrome добавляет дополнительный репозиторий в ваш каталог sources.list.
Другими словами, Google Chrome будет обновляться вместе с системными обновлениями, предоставляемыми Ubuntu через Software Updater. Полагаю, вы знаете, как обновлять систему Ubuntu, не так ли?
4. Отключился Google Chrome (без паники)
Если вы видите ошибку, которая сообщает:
«Приложение Google Chrome неожиданно закрылось.»
Без паники. Система в безопасности. Ваш браузер Chrome безопасен и удобен в использовании.
Возможно, возникла временная проблема и по какой-то причине сломалась вкладка или расширение браузера. Но это не смертельно.
Если вы будете продолжать видеть всплывающее окно каждый раз, когда вы запускаете Google Chrome в Ubuntu, вы можете использовать «Игнорировать будущие проблемы этой версии программы».
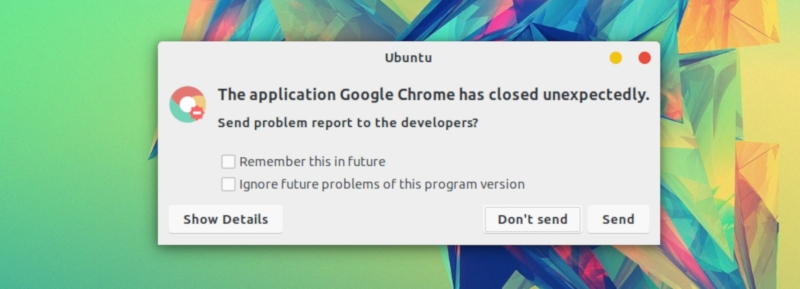
Это зависит от тебя, если ты хочешь отправить отчет о крушении. Даже если вы его не отправите, это не будет проблемой.
Заключение
Установка Google Chrome на Ubuntu является простой задачей. Его нет в центре программного обеспечения, но вы можете скачать и установить его практически так же, как вы делаете это в Windows и MacOS.
Это все равно проще, чем установить Google Chrome на Arch Linux, я полагаю.
Я надеюсь, что эта статья помогла вам получить Google Chrome на Ubuntu и Linux Mint. Если у вас есть вопросы или предложения, пожалуйста, не стесняйтесь оставить комментарий ниже.