How to Insert a Picture in Clip Studio Paint
Clip Studio Paint makes it easy to incorporate your own images into your work. As an art enthusiast myself, I’m excited to share with you my tips and tricks for adding pictures to CSP creations. I’ll guide you through the process step by step so that you can achieve a beautifully customized digital art piece. So let’s dive in and unleash your creativity.
How to Put a Picture in CSP
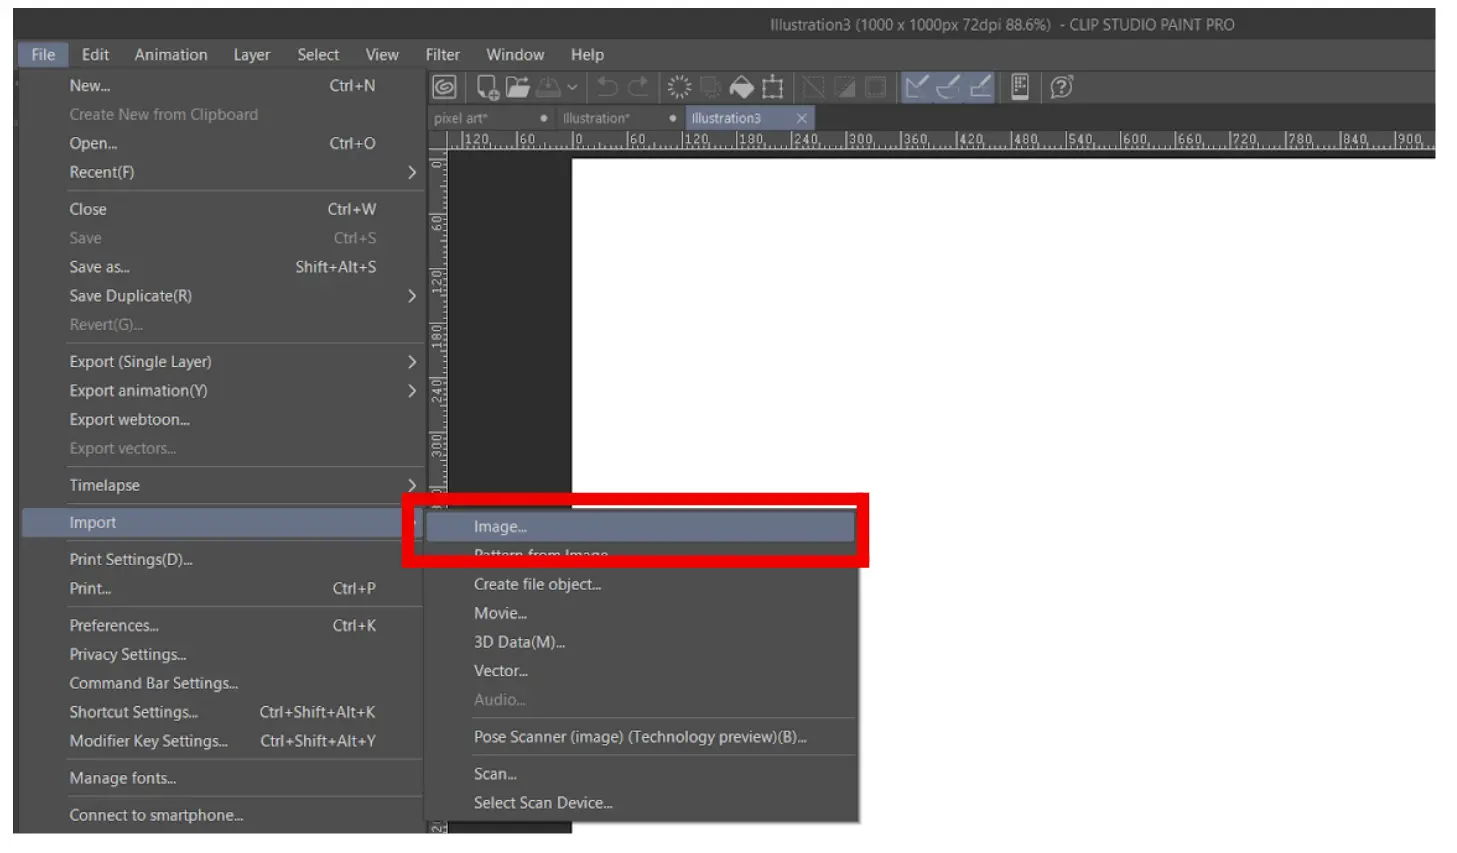
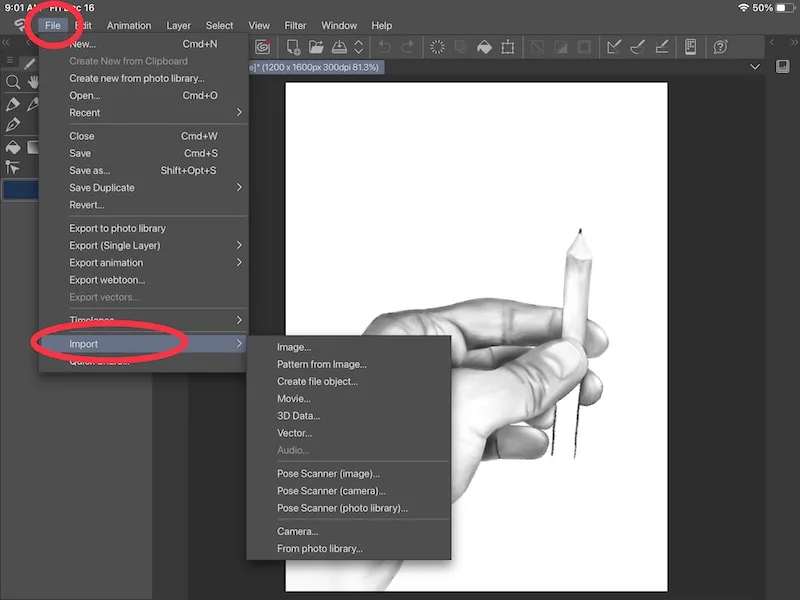
Go to “file,” ‘Import,” and click “image.”
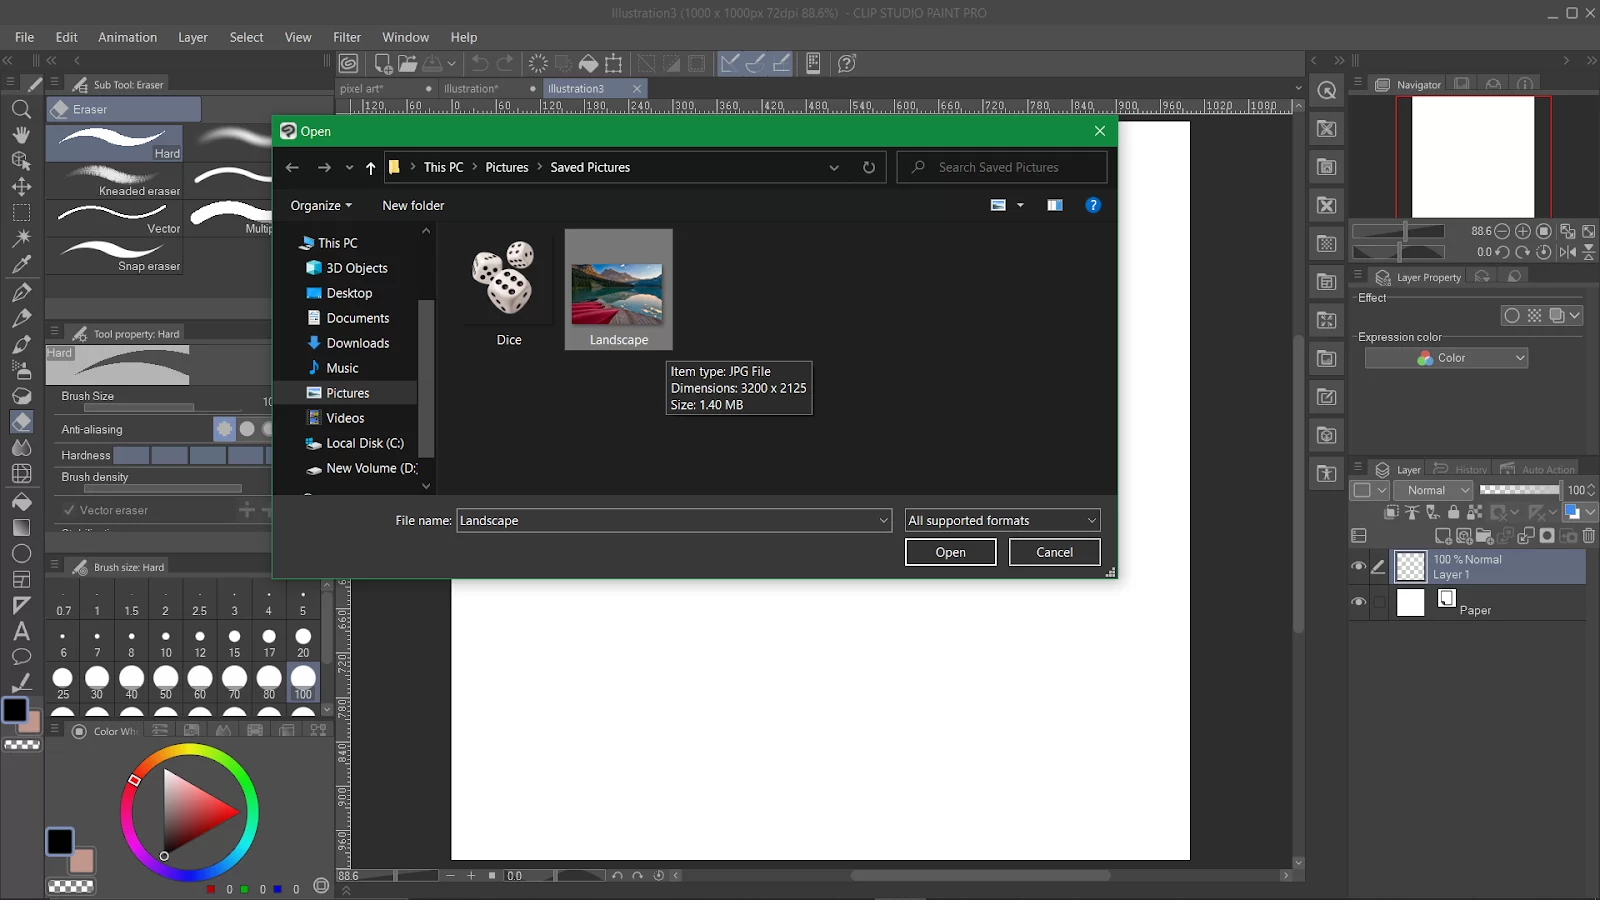
Go to the folder of the picture. Select the picture and click “open.”
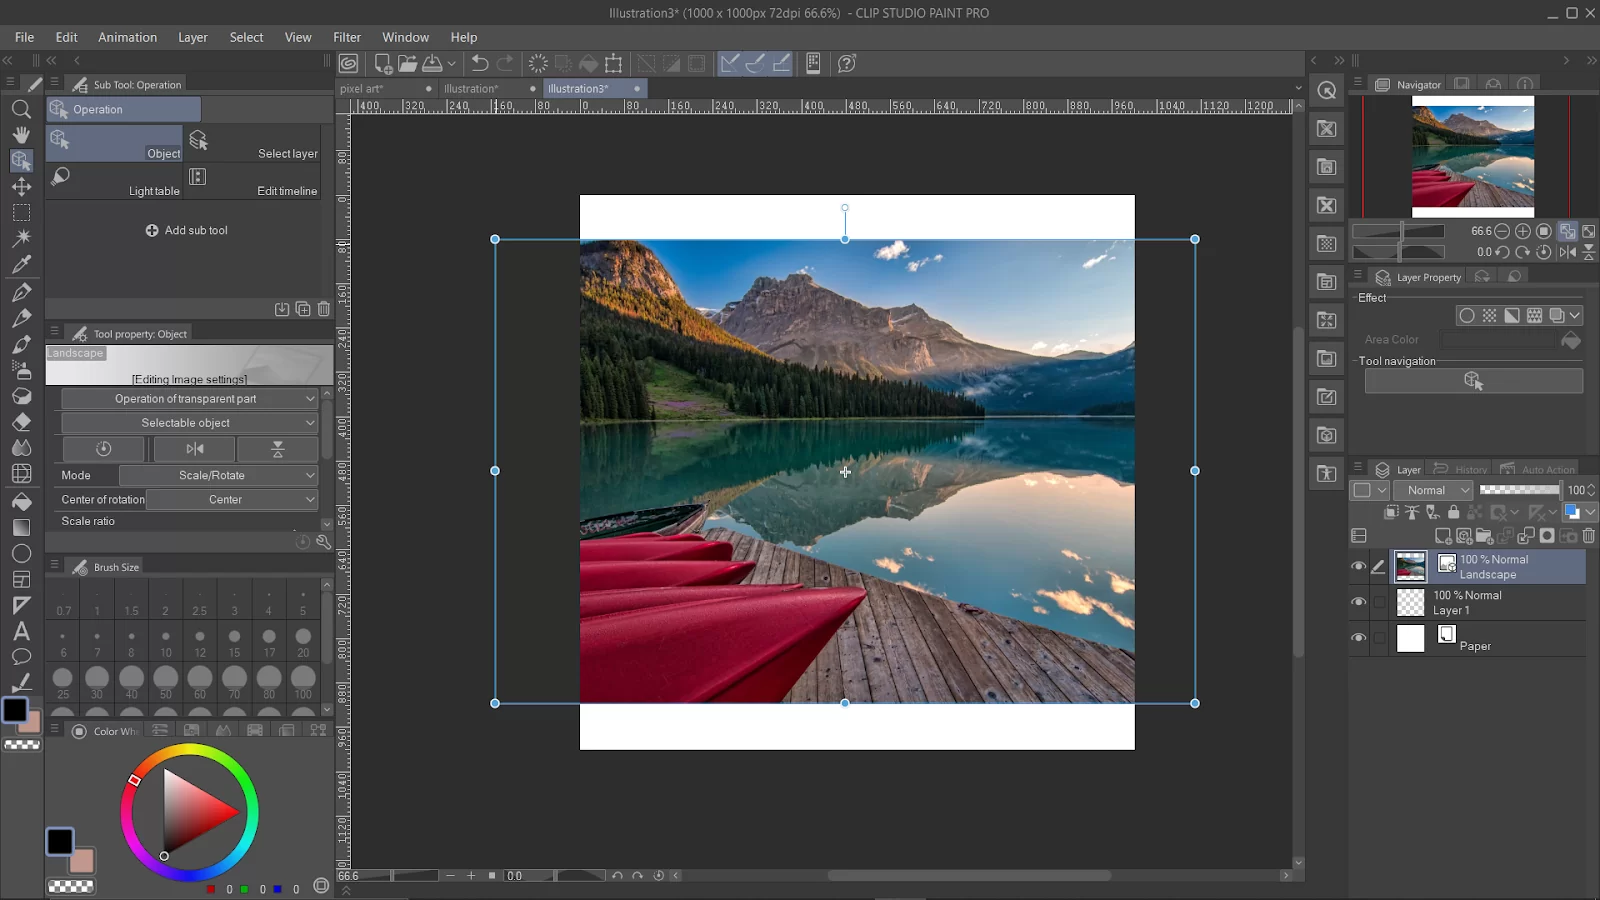
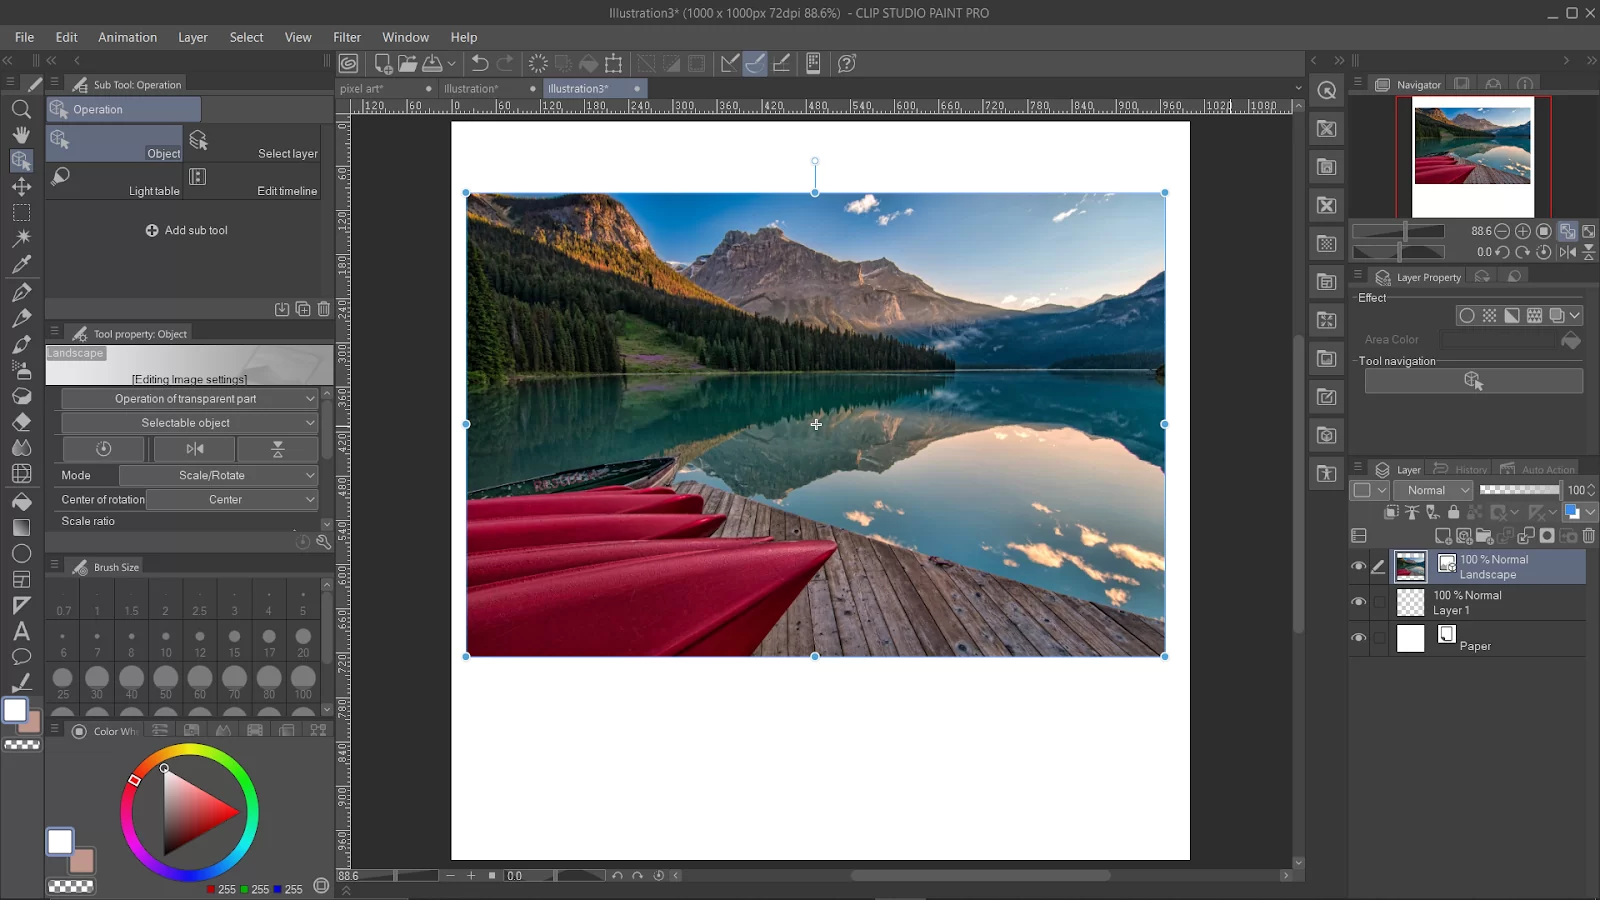
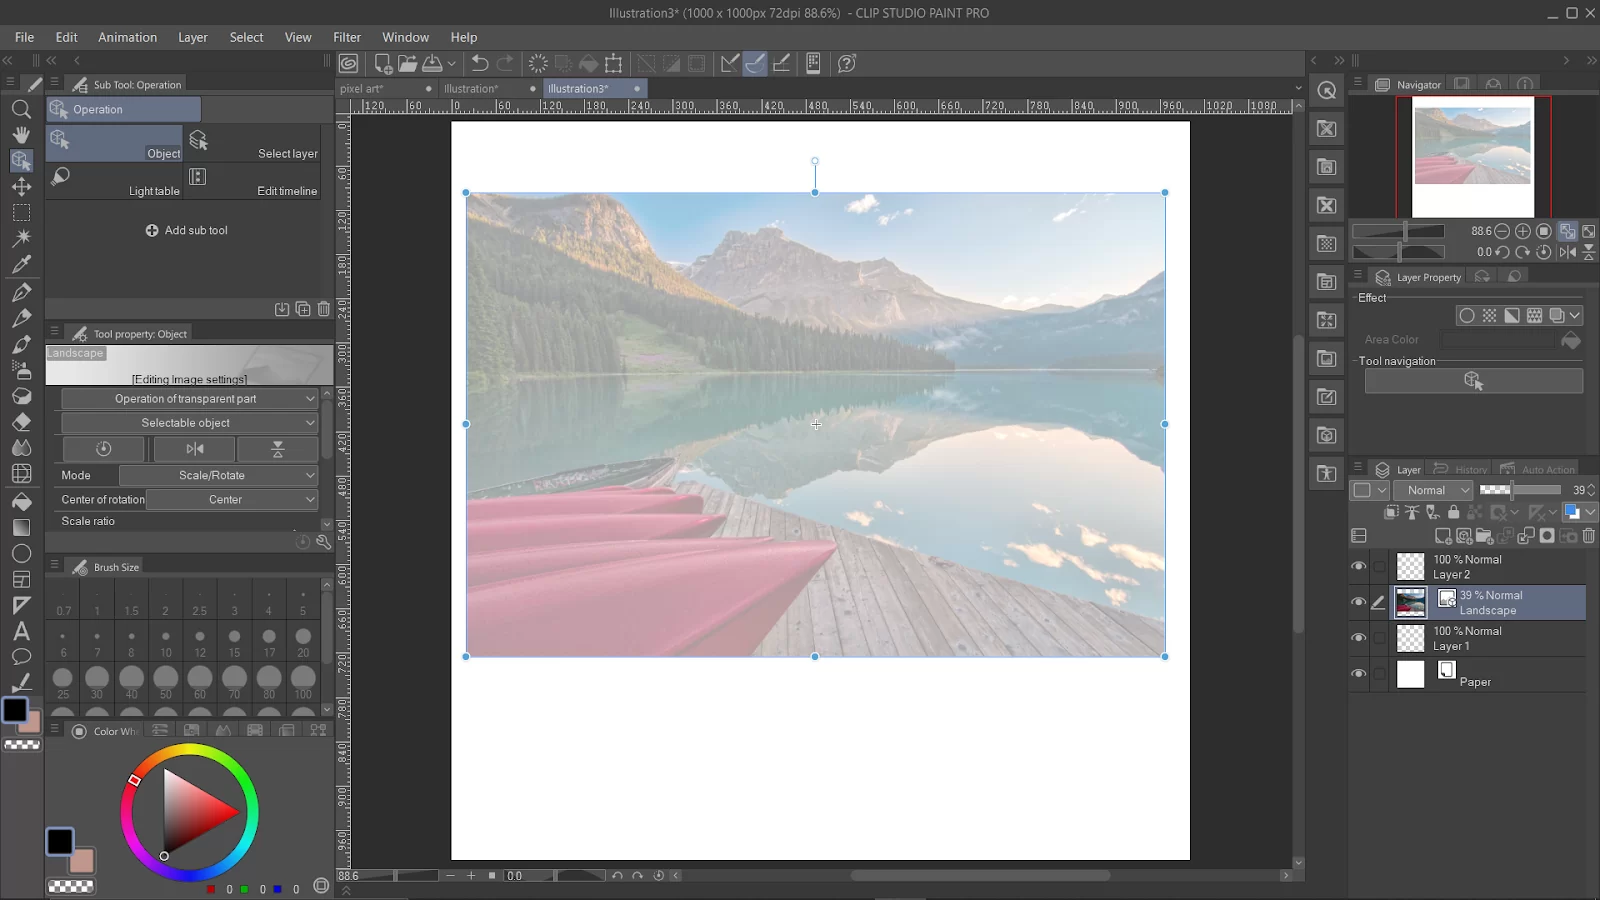
The picture will be inserted as a vector layer, and the size may be larger or smaller than your canvas size. To fit into the canvas without changing its proportions, press and hold the shift key, and drag the corner of the picture.
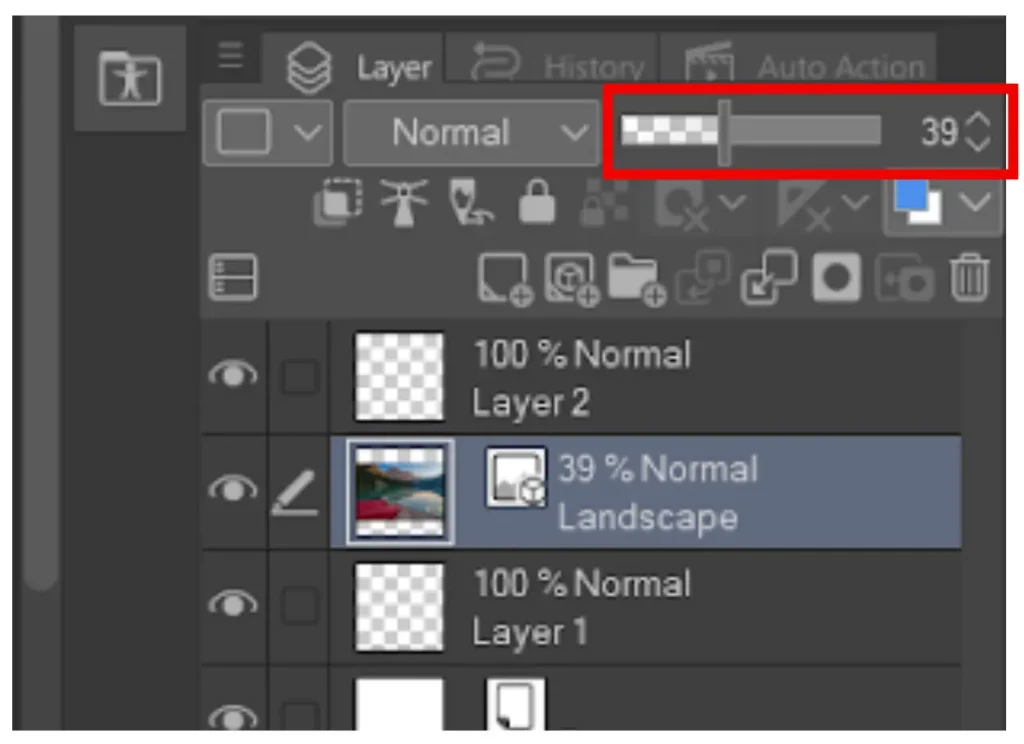
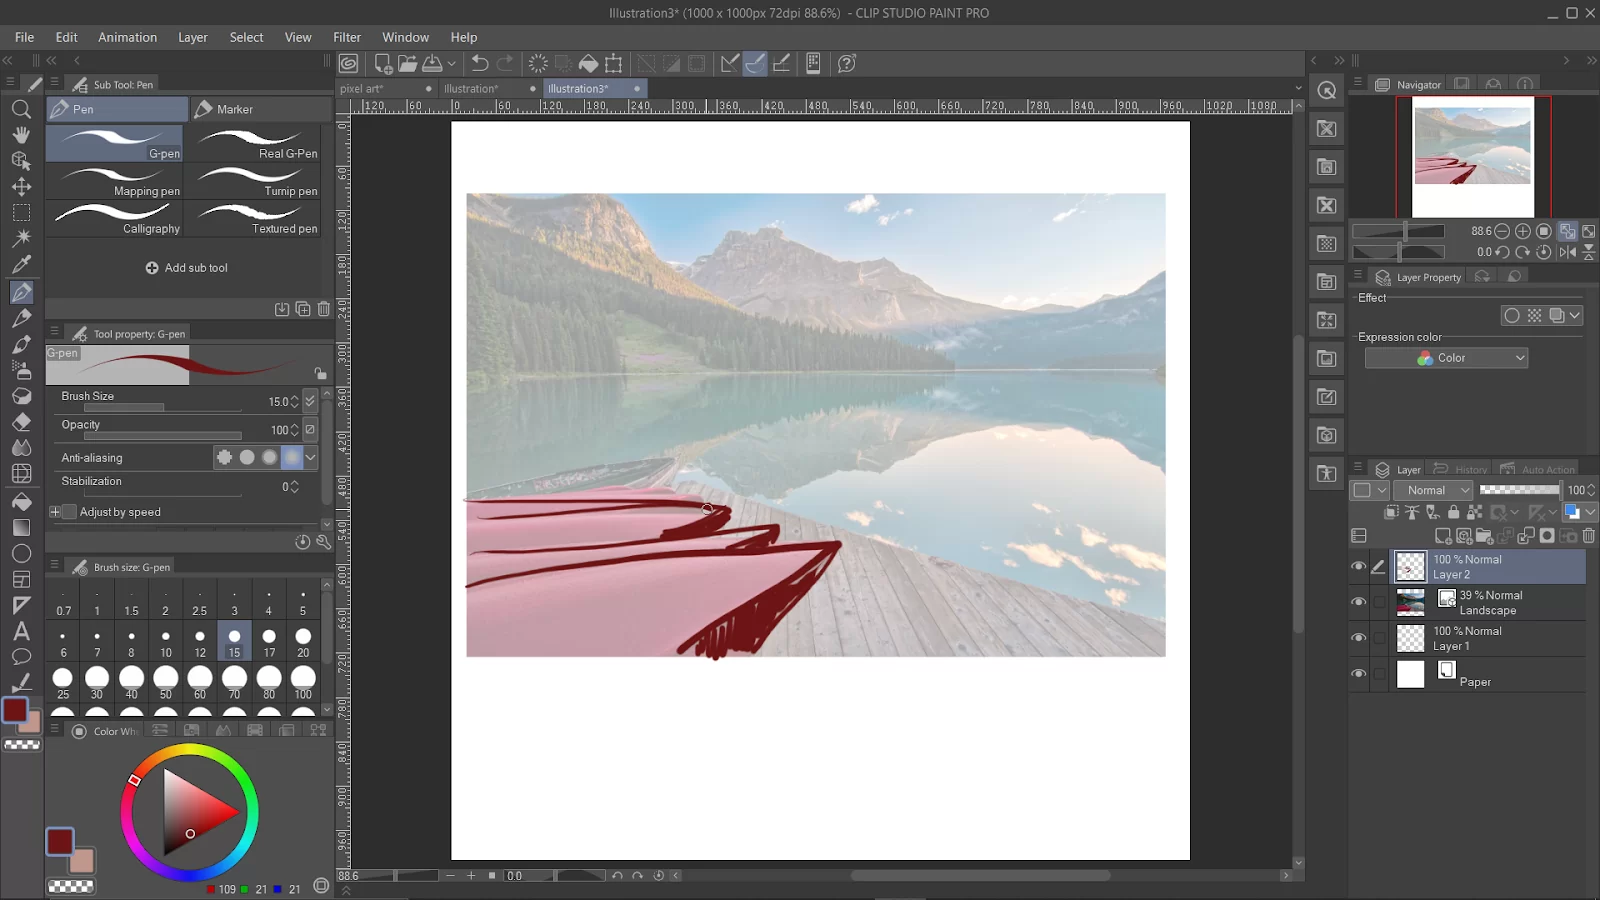
If you are using the picture as a reference, you can tone down the opacity, create a new layer and draw on it.
You can also check out our in-depth article on how to make pixel art in Clip Studio Paint.
How to Import Images Using iPad
Follow these steps to import images into Clip Studio Paint using an iPad.
Step 1
Start by opening up the Clip Studio Paint app. Make sure that you aren’t creating any canvas, then exit to the home screen of the iPad. Ensure that the photo library icon is in the app launcher.
Step 2
Now double-tap the home button. After that, hold and drag the photos library icon over the Clip Studio Paint app. Next, hold the icon until the screen blinks, and then place the photo app opposite the Clip Studio Paint app.
Step 3
Using the photo app, drag any photo that you want to open and drop it on the Pallete.
You can also read our guide on how to turn on symmetry lines in Clip Studio Paint.
How to Import Reference Images
Start by choosing a good image from the web and proceed to save the image to my files. Next, go into clip studio paint and go to File > Import > image. Now choose the image you want to use for your reference and open it. It should open up on your canvas.
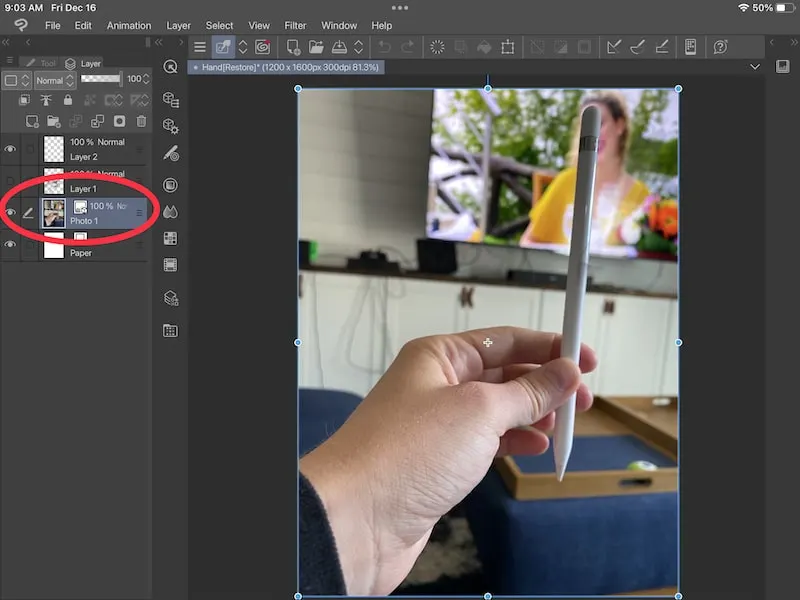
When the image is on the page, move it around and make it your preferred size. You are also allowed to lower the opacity of the image layer.
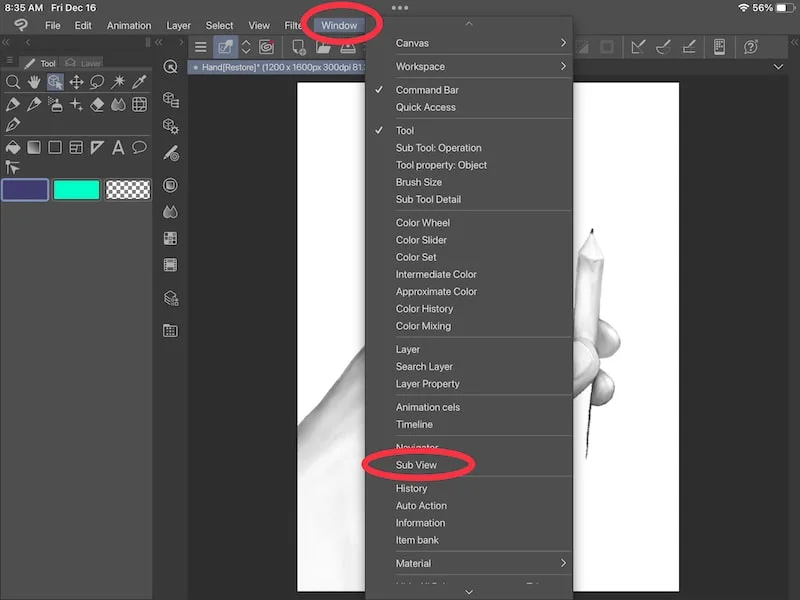
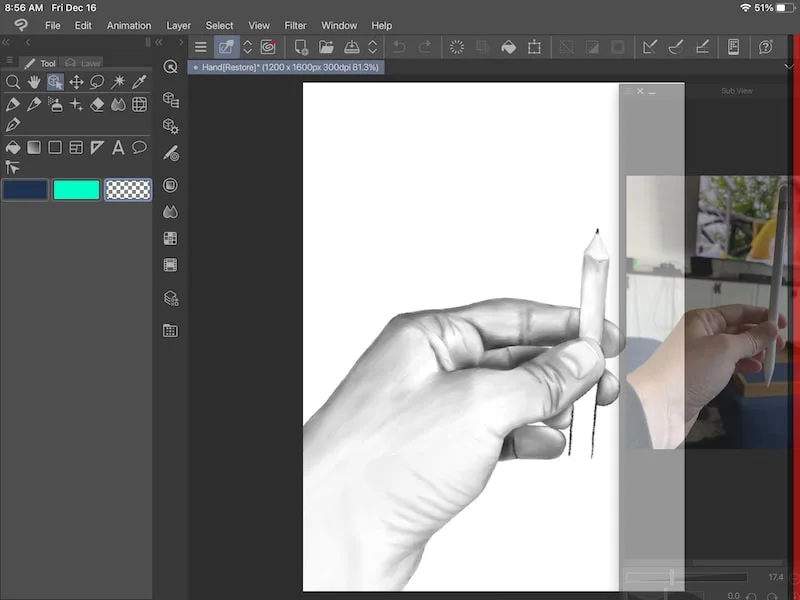
Allow me to show you a second method. You may be wondering why there is a second method. This is because the first method can often lead to an overcrowded canvas. However, using this method, you can separate the references and the canvas so that you can have as much room as possible. Just go to windows>sub view.
You can now use your subview! You are allowed to move and resize it wherever you see fit. Simply click on the little file icon and select the image you want to import into it. You can switch between references by clicking the tiny arrows if you import many references.
If you liked reading this guide, we recommend seeing our step-by-step guide on changing hue in Clip Studio Paint.
How do I import photos and images from the Gallery app into Clip Studio Paint on my Samsung Galaxy series Tablet?
To import photos and images from the Gallery app into Clip Studio Paint for Galaxy on your Samsung Galaxy series Tablet, please follow the procedure below.
Opening a file directly
You can create a new canvas and load photos and images onto it by using the [Create new from storage] function.
1. Select [File] > [Create new from storage].
2. Select [Gallery] from the [≡] menu in the upper left corner.
3. Select the the image you wish to import.
The selected image will be loaded into a newly created canvas.
How to import into a canvas you are drawing on
With the [Import] function, you can load pictures and images onto a canvas you are drawing on.
1. Select [File] Menu > [Import] > [From device].
2. Select [Gallery] from the [≡] menu in the upper left corner.
3. Select the the image you wish to import.
The image will be loaded into the canvas you are drawing on.
Note
If you want to draw onto an image imported via [Import], you will need to rasterize the image’s layer first.
People who read this FAQ also viewed the below article.
Importing image data
This section introduces how to import image data such as photos to Clip Studio Paint.
Directly opening a file
Procedure
1. Select [File] menu > [Open].
2. Select the image you want to open and click [Open].
(When you import an image from [Open], a new canvas will be created.)
Note:
If you directly open an image such as jpeg or png and then save it as it is, it will merge any layers.
If you want to continue editing it, you need to change the file type to clip format to keep the layer information.
How to Use Reference Photos with Clip Studio Paint
![]()
Reference images can be really helpful when creating art. But, it can be a pain to think about printing a picture, using another device to open your images with, or finding some method of having your reference photo easily available. Luckily, Clip Studio Paint has a reference window that makes it quick and easy to use reference images!
To use a reference image in Clip Studio Paint, open the Window menu and choose the Sub View option. Add your photo to use CSP’s features with it. If you’re using an iPad, you can also use the split screen function to open your Photos app alongside CSP.
Alright, let’s talk about how to add reference images to Clip Studio Paint, step-by-step.
1. Open the Window menu and choose Sub View
The Window menu is in the top toolbar of Clip Studio Paint. There are a LOT of awesome options in the Window menu, so don’t get overwhelmed. Simply scroll through until you find the Sub View option.
2. Add your photo in the sub view window
Now that you’ve opened your sub view window, it’s time to add your photo to it. There are a few ways to do this. To access these options, you can click on the icons at the bottom of the sub view window.
![]()
Or, you can click on the horizontal lines near the top of your sub view window to open the sub view settings.
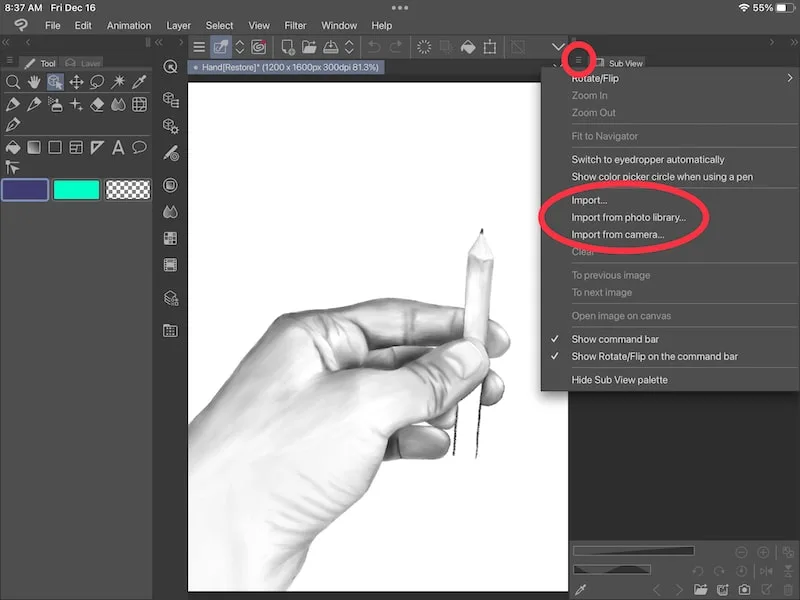
Now, to add your photo.
You can import a photo file by choosing the Import option, or the file folder icon.
You can import a photo from your photo library by choosing the Import from photo library option, or the picture icon.
You can take a picture and import it by choosing the Import from camera option, or the camera icon.

3. Add multiple photos, if needed
You can add multiple photos as references in your sub view window, if needed. Simply use the methods in step 2 to add the reference photos you need.
Then, use the arrows near the bottom of your subview window to scroll between them.

4. Have fun with everything you can do with your reference images in CSP
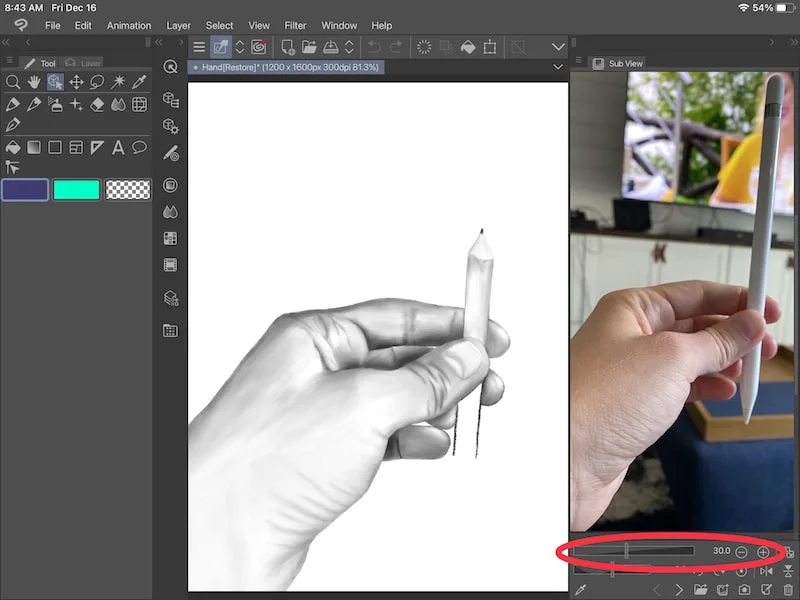
Once you’ve added your reference photos to your sub view window, explore everything you can do with them!
You can zoom in or out of them by using the plus or minus icons, or dragging the zoom slider. If you’re on an iPad, you can just pinch the photo to zoom and reposition it.
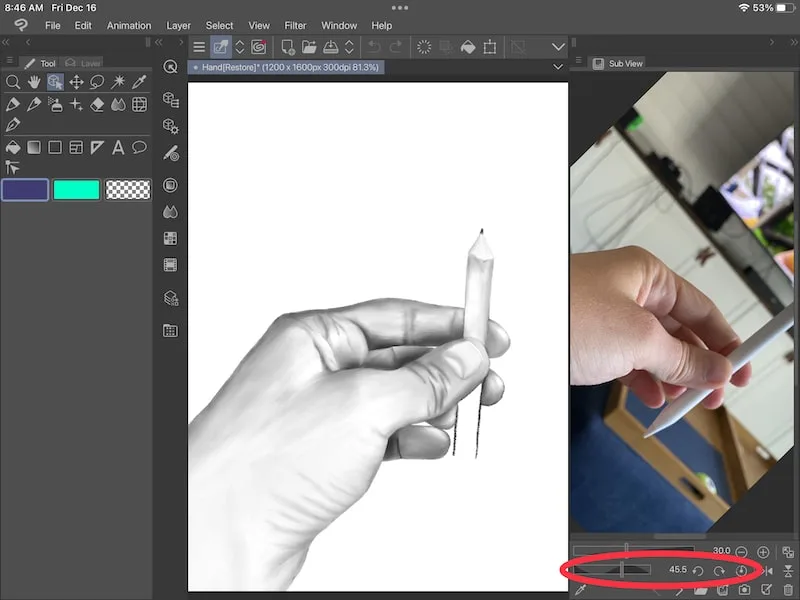
You can rotate the photo by using the circles with arrows icons, or dragging the rotation slider. If you’re on an iPad, you can just pinch the photo to rotate it and reposition it.
If you want to reset the rotation of your picture, click on the dial icon.
To have the photo fit within your window, click on the icon that shows two squares and arrows.
Important note: you can override the Fit to Navigator setting even while it’s enabled. You can zoom, rotate, and adjust your photo even if it looks like it’s enabled. If it’s enabled and you need to reset it, simply click it to disable it and then click again to enable it again. This will reset it. You may need to reset your rotation or other settings too.

To flip your photo horizontally, click on the icon of two triangles lined up next to each other. To flip your photo vertically, click on the icon of two triangles lined up on top of each other.

There’s also an eyedropper icon. If you click on it to enable it, this means that you’ll automatically be switched to the eyedropper when engaging with your photo. This is useful if you want to grab colors from your reference photos!

5. Pop out your reference photo, if needed
A neat feature of Clip Studio Paint’s sub view tool is that you can pop it out and reposition it on your screen. If you’re on an iPad, simply hold down on the edge of the sub view window until it pops out.
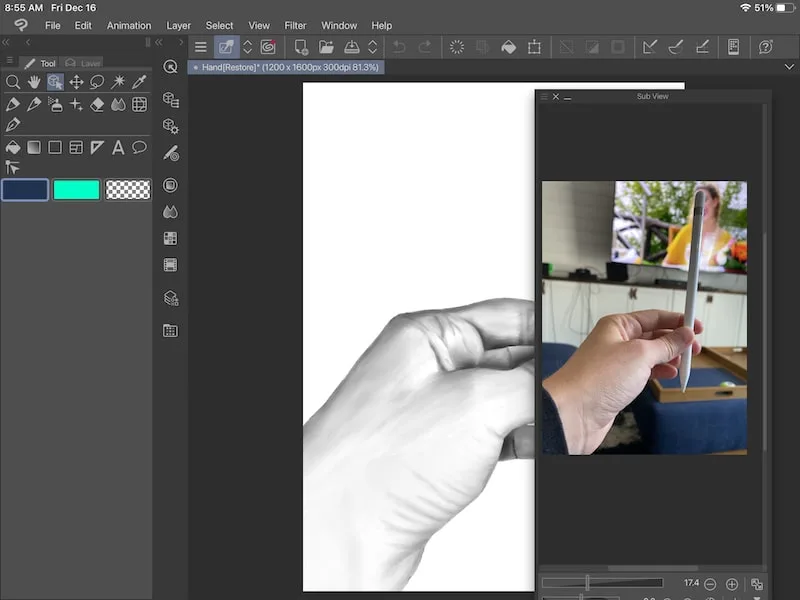
If you want to return the sub view window back to the side of your screen, simply drag it there.
As we’ve seen, using reference photos with CSP’s sub view tool is really cool. That said, there might be times when you want your photo added directly as a layer. Let’s talk about that.
Add Your Reference Photo as a Layer
Having your reference photo as a layer can be clunky, but it’s still an option worth mentioning.
Here’s what you need to do.
1. Open the File menu and choose Import
The File menu is in the top toolbar of Clip Studio Paint. Scroll down to find the Import button.
2. Choose how you want to import your image
Within the import settings, you can choose to import an image file, from your photo library, a scanner, etc. Choose the one that works for you!
When you import a photo, it’ll be added as a layer. Keep in mind though that it’s an image and not the same as the layers you use to draw on.
So, we’ve talked about using Clip Studio Paint’s sub view tool to add reference images. We’ve also talked about adding images as layers.
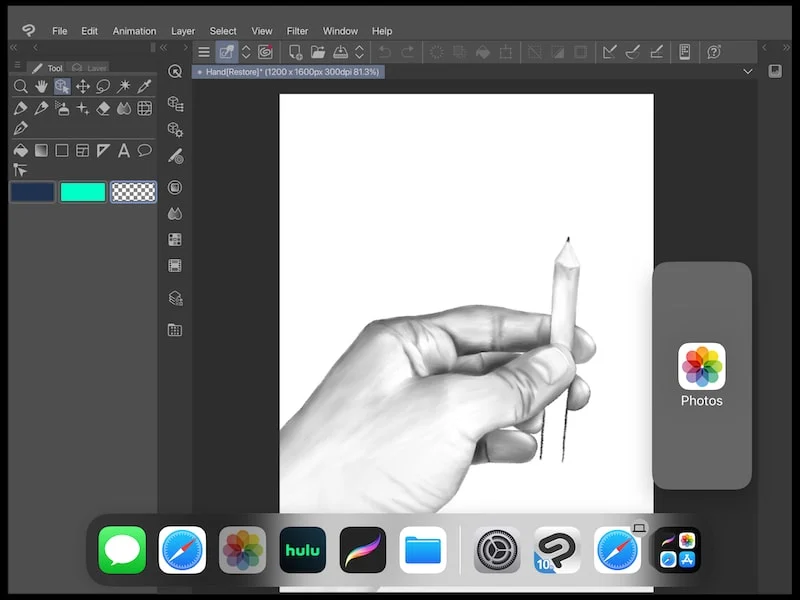
If you’re an iPad user, there’s another cool feature that I use all of the time.
If I’m using my iPad and I want to be able to quickly scroll through lots of photos quickly, I often turn to the split screen function instead.
Using the iPad’s Split Screen Function for Reference Photos in Clip Studio Paint
I like using the iPad’s split screen function if my reference photos are in my Photos app and I want quick access to all of them.
That said, keep in mind that the split screen function isn’t a part of Clip Studio Paint. This means that you can’t use Clip Studio Paint’s features with it.
For example, we talked about how you can use the eyedropper with the photos in Clip Studio paint’s sub view window. You can’t do that with the Photos app in split screen.
I have a full guide on using the split screen feature on your iPad with Procreate, and we’ll go over those instructions here.
1. Slide up from the bottom of your iPad screen onto your canvas
Use your finger to slide up on your canvas, starting at the very bottom. To make it easier, I usually start sliding at the very bottom rim of my iPad. By starting with the inactive part of my screen, it makes sure that I don’t accidentally start too high up.
If you accidentally swipe too high on your screen, you’ll just end up drawing a line on your canvas or moving it. You need to make sure that your swipe is hitting the very bottom of your active canvas, which is why getting a running start from the rim of your iPad helps.
The goal is to have your apps appear. If you see an arrow instead, drag the arrow until your apps appear.

2. Hold down on your needed app until it floats
Whichever app that you need to split screen with Clip Studio Paint, grab it from your toolbar and hold down on it. For the rest of this example, we’ll be talking about the Photos app, but it can be whichever app you plan to use.
It’s important to note here that you’ll need to have your desired app in your iPad app toolbar that lives at the bottom of your screen. This is what you’ll be able to see and choose from.
3. Drag your app and let go of it either on top of your CSP canvas, or to the side of it
When you drag your app out of the toolbar and onto your CSP canvas, you have two options.
The first option is to drop it onto your CSP canvas directly. This will keep your CSP canvas the same size, but it will put your app on top of it for you to use.
The second option is to drag it to the far side of your CSP canvas. You’ll notice that this will trigger CSP to become smaller in size while your app takes up a portion of your screen.
If you use this second option, you can use the line dividing CSP and your app to adjust the sizes of both of them.
4. Use your app as needed alongside CSP
Now that you have your second app opened on top of, or alongside of, CSP, you’re ready to use it.
For example, if you’ve opened the Photos app, you can use it in the same exact way you normally would. Tapping between different albums, scrolling through photos, etc.
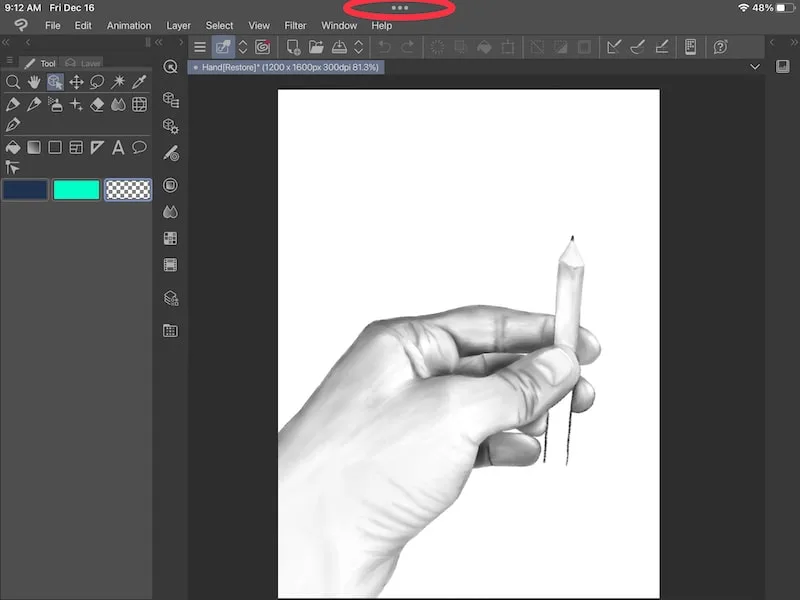
There’s another way to access the split screen feature as well.
1. Click on the 3 dots at the top of your iPad screen.
In the top middle of your iPad screen, you should see 3 horizontal dots.
If you’re using a light screen interface, they might be hard to see. If that’s the case, change your screen to a dark interface to see them better. You may also need to tap around up there for them to appear.
2. Choose the Split View option
With the options that pop up, choose the Split View option.
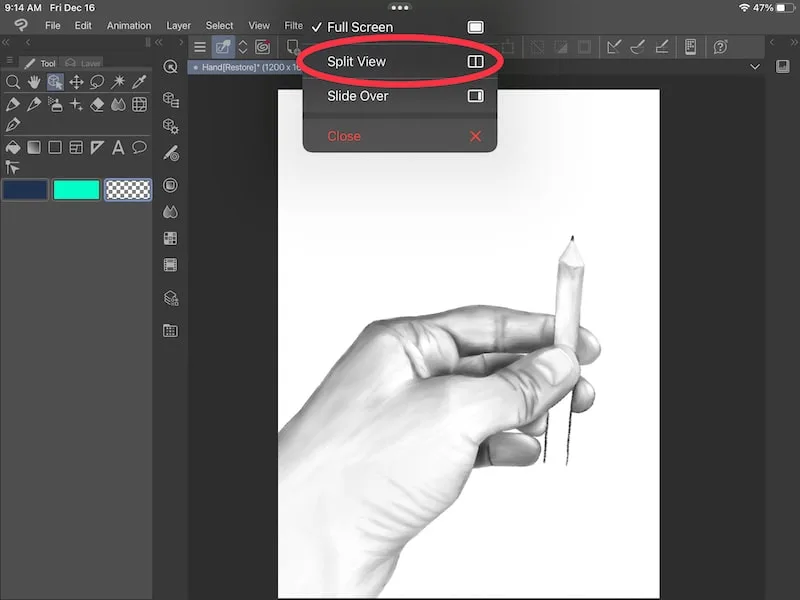
3. Choose the app you need.
At this point, you’ll see your iPad’s home screen. Choose your Photos app and it will open in split view next to Clip Studio Paint.
There you have it! Using reference photos in Clip Studio Paint can be such a huge help in creating art. Choose the strategy that works for you and have fun with it!
Diana has been an artist for over 27 years and has training in drawing, painting, digital drawing and graphic design. Diana’s latest obsession is digitally drawing with Procreate Procreate Dreams. Diana has experience selling her art across a number of platforms and loves helping other artists learn how to make money from their art as well.