Как писать в Zoom на доске
Сервис для создания видеоконференций « Zoom » — полезный инструмент для ведения различных форм деятельности онлайн. Среди разнообразия его функций выделим белую доску (whiteboard), которая по своему функционалу сходна с преподавательской доской в образовательных и бизнес учреждениях. Она используется для наглядной демонстрации представляемого материала, позволяя повысить общую эффективность проводимой видеоконференции. Начинающие работать с программой пользователи подчас не знают, каким образом писать в Zoom на этой доске. А также какие инструменты предоставляет её функционал. Эти и другие вопросы мы разберём в нашем материале.
Что нужно знать о белой доске в Zoom?
Белая доска в «Zoom» – это аналог классной доски в образовательных и бизнес-учреждениях, позволяющая наглядно продемонстрировать те или иные визуальные образы в поставленных организатором целях. С помощью функционала доски вы можете воочию показать нужные текстовые и графические элементы другим участниками конференции, делая видеоконференцию более грамотной и эффективной.
Обратиться к белой доске в приложении Zoom можно на ПК и мобильных устройствах. При этом функционал белой доски позволяет начертание текстов, графических рисунков, а потом и сохранение их на ПК или телефон.
Ниже мы подробно разберём, каким образом можно писать на доске в программе Зум на компьютере и телефоне.
Включение функции, чтобы писать в Зум на ПК
Для запуска белой доски в Зум на компьютере понадобится сделать следующее:
- Скачайте клиент «zoom.us/download» на ваш ПК;
- Запустите клиент, и авторизуйтесь в нём (пройдите регистрацию);
- Создайте новую конференцию, нажав на « Новая конференция »;
- Далее нажмите на « Войти с использованием звука компьютера »;
- Внизу кликните на опцию « Демонстрация экрана »;
Как в Zoom писать на доске: простая инструкция для всех пользователей!
В том, как в Zoom писать на доске и как вообще пользоваться этой функцией, нет ничего сложного. По принципу функционирования это даже проще Paint или другого простенького редактора изображений. Прочитав нашу статью, вы в этом убедитесь.
Что это такое
Whiteboard в Zoom — это полный аналог той доски, на которой что-то может писать / рисовать лектор или ученики в в любой (учебной или совещательной) аудитории. В этом сервисе она реализована также: пользоваться доской в Зуме может и автор конференции, и ее участники. Более того, можно выставить настройки так, что будет видно, кто именно оставил комментарий, рисунок или пометку, удобно пользоваться в сессионных залах Zoom.
Такая доска сообщений Zoom незаменима при удаленном обучении и проектах, требующих коллективной работы над задачей. То есть условного “Васю” можно “вызвать” и предложить ему решить пример или выполнить задание — а класс наблюдает, слышит и видит комментарии учителя касательно ошибок или понравившихся моментов. Или руководитель проекта предлагает какой-то вариант развития событий в виде схемы, а остальные его участники здесь же могут писать дополнения или предлагать свои решения.
Как пользоваться доской в Zoom мы расскажем ниже, а пока краткое описание принципа работы, в общих чертах:
- Автор конференции включает доску сообщений и пишет что-то на ней. Ну или рисует диаграмму, схему, график и т. д.
- Далее идут разъяснения на тему, автор дополняет имеющееся содержимое надписями, пометками, рисунками.
- Участники при необходимости / по желанию или по просьбе лектора могут здесь писать, вносить свои дополнения или пометки к содержимому доски.
- Все изменения отображаются в режиме реального времени, они видны и автору конференции, и всем ее участникам.
Обратите внимание: доску со всем наработанным в процессе ее демонстрации содержимым можно сохранить. Просто нажмите на “Сохранить” и выберите место, куда будет загружен скриншот. Формат файла можно будет выбрать при определении места его сохранения.
Знаете ли вы, что значит идентификатор конференции в Zoom — читайте что это такое и зачем он нужен!
Как включить доску в Zoom, чтобы писать на ней
Использование доски доступно в любой Zoom конференции по умолчанию. Ее нужно только “достать”, когда понадобится во время трансляции. Как включить доску в Zoom:
- Наведите курсор мыши на нижнюю кромку экрана, чтобы вызвать меню управления конференцией.
- Нажмите на кнопку “Демонстрация экрана” (зеленый прямоугольник со стрелкой, направленной вверх, примерно посередине панели).

- Выберите из предложенных вариантов плитку “Доска сообщений” . Запуск по двойному щелчку левой кнопкой мыши.

Ваше изображение сменится белым полем с панелью управления по верхнему краю. Такие же изменения появятся и на экранах участников. Готово, вы смогли открыть доску в Zoom. Можно приступать к работе — писать и рисовать.

Как пользоваться, писать, чертить, рисовать
Теперь поговорим о том, как использовать доску в Zoom — как с ней работать. На самом деле тут нет ничего сложного. На панели управления есть все необходимые в таких случаях инструменты. Нужно только активировать их нажатием на кнопки.
Как в Зуме писать и выполнять другие действия на доске (кнопки и что скрывается под ними):
- Выбрать . Захват и перемещение объектов по рабочему полю;

- Текст . Включается функционал для ввода текстового содержимого;

- Рисовать . Наведите курсор и выберите — произвольное рисование (мышь = карандаш), прямые линии, стрелки одно- и двухсторонние, формы с прямыми углами (простые и с заливкой), круги и овалы;

- Метка . Это маленький стикер — стрелка, галочка, крестик, звезда, сердце и “?”;

- Отслеживание. “Лазерная указка” и укрупненный курсор в виде стрелки *;

- Ластик . Важно! Не стирает части объектов, а удаляет их целиком;

- Форма . Набор цветных плиток для выбора цвета текста или заливки объектов, настройки ширины линий и стрелок, настройки шрифта;

- Отменить (↶) . Отмена последнего и предыдущих действий поочередно;
- Повтор (↷) . Повторение последнего действия;
- Очистить. Очистка доски от того, что на ней писали или рисовали;
- Сохранить. Сохранение скриншота содержимого Whiteboard на компьютер;
- Закрыть (⛒) . Закрытие Whiteboard и возврат к экрану конференции Zoom;

Каких-то более подробных инструкций, как работать с доской в Зуме, не требуется — функционал здесь очень простой и понятный.
* Используется именно как указка — лектор, комментируя содержимое доски, может указать участникам на объект, о котором идет речь.
Ещё не знаете, как организовать конференцию в Zoom — тогда обязательно читайте другую статью на нашем сайте!
Совместный доступ
Писать на доске в Zoom, как мы уже сказали, может не только автор конференции. Функция совместного доступа работает на всех тарифах сервиса, включая бесплатные. Как в Zoom настроить совместное использование доски:
- Нажать на кнопку “Демонстрация экрана” (панель управления конференцией).
- Одинарным кликом левой кнопки мыши выбрать “Доска сообщений” .
- Нажать на синюю кнопку “Совместное использование” .

На этом все. Доска в Зуме развернется как обычно, но писать и рисовать на ней смогут все участники конференции.
How to use Zoom Whiteboard (with screenshots)

Zoom Whiteboard is a video collaboration tool that can turn any virtual meeting into an interactive space. The virtual whiteboard lets teams mark up documents, annotate on drawings, and allows meeting attendees to demonstrate their points visually.
Any team using Zoom can access the Whiteboard function from a Zoom call, Zoom Room, and Zoom Breakout Room.
In this article, we’ll give you a step-by-step guide on how to use, share, and collaborate using the Zoom Whiteboard feature.
We’ll also discuss the three key benefits of using a whiteboard for meetings.
This article contains:
(Click on the links below to jump to specific sections)
- How to Use a Zoom Whiteboard (Detailed Walkthrough)
- How to Enable the Zoom Whiteboard Feature
- How to Draw on a Zoom Whiteboard
- On Windows, macOS, and Linux Devices
- On iOS Devices
- On Android Devices
Let’s get started.
How to use a Zoom Whiteboard (detailed walkthrough)
In order to benefit from Zoom’s whiteboard feature, you’ll need to:
- Understand how to enable the Zoom Whiteboard setting.
- Learn how to use the drawing tool.
We’ll give you a step-by-step guide for both these processes.
A. How to enable the Zoom Whiteboard feature
The first step you need to take is to enable the Whiteboard feature on the Zoom app or Zoom web portal.
As the Zoom meeting host or if you are using a company account, you can follow these steps:
Step 1
If you are using a company account, sign in to your Zoom account and ensure you have admin privileges to edit the account settings.
Step 2
With admin privileges, in the navigation menu, click on Account Management and then click Account Settings.
Step 3
Click the Meeting tab. You’ll see the Whiteboard toggle under the option that says In Meeting (Basic).
From here, you’ll be able to toggle it on and off. Toggle the Whiteboard on.

Step 4
A verification pop-up will appear. Click Enable to verify the change.
Step 5
If you want to make this setting mandatory for all account users, click on the lock icon and then choose Lock.
Now that we know how to enable the Whiteboard feature, let’s see how we can use its drawing tools.
B. How to draw on a Zoom Whiteboard
The drawing tools on Zoom allow the meeting participants to annotate on the Whiteboard.
With this feature, participants can add sticky notes, comments, drawings, texts, shapes, and more to effectively collaborate with team members.
Participants can also use a mouse pointer, pen, highlighter, eraser, and other tools to draw on the Whiteboard screen.
You’ll be able to use this feature as soon as the host has granted annotation permission.
There are two drawing methods on the Zoom Whiteboard. They are:
- Smart Recognition: Zoom auto-converts your imperfect shapes to smooth and straight lines.
- Free Form: Zoom leaves your drawings as is and will not auto-convert.
Here’s how you can draw once you’ve opened the Whiteboard feature:
Step 1
Click on the pencil or the shape icon at the bottom of your screen.
Step 2
Select your drawing method. You can choose to draw using the Free Form feature or activate the Smart Recognition feature.
To activate Smart Recognition, click on the … symbol in the control panel. You’ll be given the option to toggle Smart Recognition on and off.
Step 3
Choose which color you’d like to draw in, and then click and drag on the screen to begin drawing.

Step 4
The Undo and Redo icon will allow you to clear your last drawing, and the Trash icon will allow you to clear all drawings.
You can save a Whiteboard as a PNG file by clicking on the save button in the annotation tool bar.
You now know how to enable and draw on the Whiteboard.
So let’s learn how to share a Whiteboard with your team members.
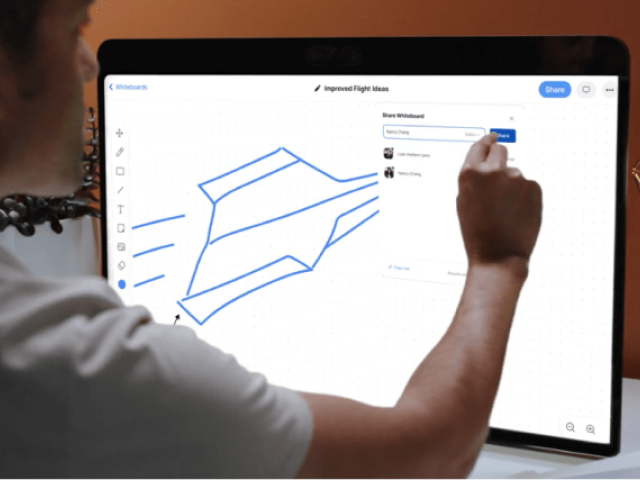
How to share viewing access to a Zoom Whiteboard
Sharing viewing access to a Zoom Whiteboard can help with team collaboration.
You’ll have to be in a meeting with all your participants before you can use the screen share feature. As a prerequisite, make sure your device uses the latest version of Zoom.
Once you share the Whiteboard, the participants will see the Whiteboard instead of a view from your camera.
Read on to find out how to share a Zoom Whiteboard once you’re in a meeting.
1. On Windows, macOS, and Linux devices
Here’s how you can start screen sharing a whiteboard from a Windows, Mac, and Linux device:
Step 1
In your meeting tool bar, click the Share Screen button and then select Whiteboard.
Step 2
Click Share. The annotation tools should appear now.
If they don’t, you can click the Whiteboard option in the Meeting Controls menu to display or hide the annotation tools.
You can now use the page controls in the bottom right-hand side corner to create a new page or to switch between whiteboards.

Step 3
When you are finished sharing the Whiteboard, click Stop Share.

2. On iOS devices
Here’s how to share viewing access to a Whiteboard on an iOS device:
Step 1
On the iOS device, tap the Share Content button within the meeting controls menu.

Step 2
Tap Share Whiteboard. The annotation tools should show automatically.
If they don’t, tap the pen tool to show the annotation tools.

Step 3
When you have finished using the Whiteboard, tap the pen icon to hide the annotation tools and click Stop Share.

3. On Android devices
Here’s how you can share a Whiteboard on an Android device:
Step 1
Click Share in the meeting controls tool bar.

Step 2
Next, tap on the Share Whiteboard option.

Step 3
Tapping on the pen icon opens up the annotation tools. From there, you can select the drawing tools you require.
You can use a pen, highlighter, shapes, and more.

Step 4
To stop sharing, click on the pen icon to hide the annotation tool bar. Then click Stop Share.
Additionally, during your Zoom session, you can share multiple whiteboards. If you have simultaneous screen sharing on, you can view whiteboards from different meeting attendees.
However, to view two Whiteboards simultaneously, you will need dual monitors. You can also share a whiteboard through an email and Zoom Chat.
Now let’s look at how you can get your team members to collaborate with you on a Zoom Whiteboard.
How to collaborate on a Zoom Whiteboard
You can further your collaboration with your team by giving them edit access to your Whiteboard.
Suppose someone else is working on a whiteboard. As a participant in the meeting, you can edit the Whiteboard, use the cursor, and add texts and sticky notes to the diagrams.
Here’s how to do it:
Step 1
From Windows, Mac, and Linux devices, select the View Options button. You can find it in the share screen menu.

Step 2
Windows, Mac, and Linux users will have to select Annotate to start drawing on the shared Whiteboard.

From an iPad, iPhone, and Android device on the Zoom app, simply tap the pencil icon when you are viewing someone’s whiteboard to begin collaborating.

Now that we know how to use, share, and collaborate on a Zoom Whiteboard, let’s look at some of the benefits it offers.
2 key benefits of using a Zoom Whiteboard
Adding a Zoom Whiteboard to your meetings can positively affect your team collaboration, creativity, engagement.
Let’s take a deeper look at some of these benefits.
1. Host engaging and collaborative Zoom meetings
Adding an interactive element to Zoom meetings can increase the overall level of engagement during your meetings. A Zoom Whiteboard can do precisely that.
A Zoom Whiteboard can shift attention from the meeting host to the material and the meeting participants.
Adding comments and sticky notes to the information on the Whiteboard allows the participants to provide valuable input. This way, instead of conducting only a presenter to audience interaction, you can make way for a collaborative group discussion.
Teams can also use Zoom’s Breakout Room feature in combination with the Whiteboard for better collaboration. A host can split participants into separate breakout rooms where they can use different Whiteboards to brainstorm ideas.
Read our detailed article on how to use Zoom and understand how you can make the most of its features.
2. Make remote employees more comfortable
Bringing a Zoom Whiteboard into the communication mix can help employees adjust to a remote setting.
A Whiteboard can make your remote teams feel like they are in the conference room with the speaker.
The feature gives you the ability to share, create, and annotate during Zoom meetings from anywhere in the world. It can make your team members feel at home. That can go a long way in promoting healthy work attitudes, which can in turn yield productivity.
Wrapping up
The Zoom Whiteboard feature can create a more engaging video conferencing environment for employees.
It promotes positive working mindsets for your employees and is cost-efficient compared to the standard costs for setting up conference rooms.
Not only is it easy to use and share, but also readily available on all popular devices.
You can go through the tutorials in this article to learn how to use, share and collaborate on the Zoom Whiteboard.
Enhance collaboration with online whiteboards
Zoom Whiteboard lets you collaborate whenever and wherever you want. Share your online whiteboards to collaborate with anyone with a Zoom account.
Advanced whiteboarding tools allow users to expand and clarify their ideas.
Zoom’s online whiteboards are accessible with a web browser, the Zoom client, and Zoom Rooms for Touch.

Designed for many use cases
Zoom Whiteboards are designed to work across all supported Zoom hardware platforms, from laptops to in-room full-size Zoom Rooms for Touch devices.
Use room size 55″ and 65″ digital whiteboards from DTEN and Neat to present and collaborate with groups of people.
Virtual whiteboard features like touch support, extendable canvas, adding images, and templates make presenting and teaching a lot easier.

Leverage Zoom’s Existing Platform
Zoom’s existing platform integrates perfectly with Zoom Whiteboard giving everyday Zoom users a whole new tool and a huge advantage when collaborating.
Share or create real-time interactive whiteboards in Zoom Meetings. Give users different access depending on the meeting you are running.
Take your workshops to the next level by offering whole new ways to work together using all of what Zoom has to offer.