Оформление сервера дискорд

Это кроссплатформенная система для обмена сообщениями, проведения видео- и голосовых конференций. Больше всего «Дискорд» используется в геймерской среде, учащимися старших классов и студентов. Сервис позволяет создавать публичные и приватные чаты, в которых можно обмениваться сообщениями.
В отличие от обычных мессенджеров, где у каждого пользователя существует собственный аккаунт, а связь осуществляется между аккаунтами, в «Дискорде» связь происходит между серверами. Каждый пользователь может создать свой сервер, на котором завести нужное количество каналов с разделением по тематикам. Например, по разным играм. В остальном этот сервис мало отличается от современных мессенджеров, вроде WhatsApp или Telegram.
К особенностям «Дискорда» относится возможность настраивать голосовые конференции с работой по принципу «нажми, чтобы говорить», отключая микрофон на время бездействия. Существует не только десктопная, но и браузерная версия программы, в которой режим «нажми, чтобы говорить» работает только при активной вкладке с приложением в браузере.
Приступаем к оформлению
Геймерское сообщество имеет некоторые негласные тенденции, правила и порядки, которые распространяются и на использование мессенджеров для поддержания связи с партнерами по команде. В том числе они распространяются и на оформление каналов, где собираются игровые команды.
Мы прошерстили интернет, поговорили с игроками и собрали самые главные особенности оформления серверов в «Дискорде». Для удобства каждая настройка и последовательность действий выделена в свой раздел.
Создание сервера

Это шаг, без которого невозможна дальнейшая работа в «Дискорде». Чтобы создать его, необходимо открыть программу и нажать на значок добавления нового сервера, который маркируется знаком «+», а затем выбрать пункт «Создать». Оформлять сервер в «Дискорде» нужно с учетом простых и понятных правил, которые актуальны при оформлении любой странички в социальных сетях или в других мессенджерах.
Название
Выбирая название, нужно сделать его соответствующим тематике сервера и добавить что-то авторское. Если речь идет про конкретного геймера или стримера, который будет вести данный сервер, можно это упомянуть. Либо отразить основную направленность, которой он будет посвящен. Например, использовать имя игры, участники которой будут собираться. Также в названии допускается использование эмодзи — разновидности смайликов, которые можно подобрать, перейдя на сайт Piliapp.
В дальнейшем имя сервера можно изменить. После добавления сразу же появятся стандартные каналы — для голосового обмена сообщениями и текстовый чат. Чтобы настроить все правильно, нажимайте на значок шестеренки напротив и следуйте указаниям в меню. Каналы можно удалять или добавлять.
Аватарки
После создания переходите в пункт «Персонализация» и выбирайте отдельные опции для настройки канала. Здесь можно изменить значок и загрузить изображение размерами не более 512*512 пикселей.
Учитывайте, что значок будет показываться в списке серверов Discord в миниатюре, поэтому лучше использовать контрастное простое и яркое изображение, не перегруженное лишними деталями и текстом. Чем проще и лаконичнее значок, тем сильнее он будет выделяться. Также неплохо сделать, чтобы значок отражал тематику площадки.
Эмодзи
Можно использовать не только в названии, но и при оформлении, и в сообщениях. Для их активации необходимо перейти в соответствующий пункт меню и выбрать подпункт «Загрузка эмодзи». Такие значки можно сделать самому, заказать у специалиста или скачать в интернете.
Создание и группировка
Зайдите в меню и найдите в нем строку «Создать канал», затем создайте несколько каналов. Например, с новостями, с правилами сервера и чат для бездействия, в который будут переправляться бездействующие игроки, а также любые другие.
После этого можно добавить отдельные голосовые или текстовые чаты, провести распределение по группам и построить такую структуру, чтобы посетители сервера могли быстро и легко найти нужный канал. Для этого в названиях рекомендуется использовать тематические слова.
Канал с правилами

Для большинства публичных серверов предусматривается создание специального канала с общими правилами, который по умолчанию назначается главным и в который попадают все посетители, заходящие в первый раз.
В приветственном сообщении можно указать правила, а также дать короткую справку относительно содержания категорий сервера. Это сообщение допускается редактировать по мере добавления новых правил или каналов, для чего требуется нажать на кнопку редактирования справа от сообщения. Сообщения от пользователей в разделе с правилами лучше отключать.
Текстографика
В оформлении текста в «Дискорде» можно использовать разные цвета, эмодзи и форматирование шрифта. Например, *курсив*, **жирный**, ***жирный + курсив***, __подчеркнутый__, ~~зачеркнутый~~ и ‘’’цитата’’’. Команды можно совмещать, чтобы сделать текст __**жирным и подчеркнутым**__ или каким-то еще. Цвет текста можно изменять с помощью символа решетки и номера нужного цвета.
Роли
Еще одной интересной особенностью «Дискорда» является возможность управления и назначения ролей для участников на сервере. Можно выдавать права администратора или настраивать ограничения для отдельных или всех пользователей, выделять категории гостей и постоянных участников, вводить правила касательно тайминга при отправке сообщений и применять другие ограничения. Подробнее можно посмотреть в разделе «Роли», который находится слева на панели.
Роли можно выделять с помощью эмодзи, также каждой роли присваивается отдельный цвет, как у кланов в игре. Распределяя роли, создатель сервера должен оставлять за собой все возможные права, иначе случайно можно поставить ограничение для собственной записи и тогда проводить дальнейшую настройку ролей окажется невозможно.
Привилегии для ролей можно настроить в списке прав, а чтобы закрепить роли за отдельными пользователями, необходимо в блоке управления участниками выбрать пункт «Участники» и нажать кнопку «+» напротив нужного участника, а затем добавить для него роль, выбрав подходящую из выпадающего списка. Обычно роли на серверах назначаются вручную, но в некоторых случаях выдачу ролей можно настроить автоматически.
Боты

Для автоматического назначения ролей и использования других возможностей «Дискорда» не обойтись без использования ботов. Разновидностей ботов довольно много: они могут использоваться, чтобы играть в мини-игры внутри каналов, слушать музыку или выполнять другие функции.
Чтобы установить бота, необходимо перейти на сайт https://www.carbonitex.net/Discord/bots и выбрать подходящий вариант, изучив описание функционала, после чего нажать кнопку «Добавить бота на сервер» и выбрать нужный сервер.
За автоматическое назначение ролей отвечает бот MEE6. Чтобы запустить этот функционал, необходимо сначала создать роли и настроить для них привилегии, а затем перейти на сайт бота и добавить его в «Дискорд». После чего зайти в настройки, авторизоваться и предоставить боту все необходимые права. Готово! Остается только перейти в раздел уровней, где настроить уведомления и правила повышения уровней для участников. Эту механику можно применять для поощрения участников, заранее создав роли, которые назначаются для участников при достижении определенного уровня.
Также с помощью ботов можно настроить приветственное сообщение, которое будет отправляться персонально для каждого вновь зашедшего на сервер. Такие сообщения можно делать персонализированными. Дополнительной функцией ботов в «Дискорде» является интеграция с другими социальными сетями, благодаря чему можно подключить к своему профилю «Твич», YouTube, Steam, Reddit и другие, что позволит подписчикам получать ссылки на трансляции и видеть их внутри «Дискорда».
Просто о сложном
По большому счету Discord — это еще одна разновидность мессенджера, просто чуть функциональнее с точки зрения настроек пользователя, что позволяет выполнять дополнительные операции.
Попробуйте оформить сервер в Discord, используя наши советы, и тогда новые участники на ваших каналах не заставят себя ждать. И не забудьте создать ссылку-приглашение в настройках, указав срок ее действия и количество человек, которые могут перейти на сервер.
500+ символов для оформления Discord сервера
Один из ключевых аспектов создания уникальной и привлекательной обстановки на вашем Discord сервере — это использование специальных символов, которые придают ему оригинальность и стиль. В этом руководстве мы представляем вам коллекцию символов, которые можно использовать для оформления и украшения сервера Discord. Они помогут вам добавить красоту, эстетику и индивидуальность в каналы, названия, ники и другие элементы вашего сервера. Разнообразные символы и скобки позволят вам создать уникальные комбинации, которые выделят ваш Discord сервер среди других. Приготовьтесь к тому, чтобы придать своему серверу особый шарм и привлечь внимание участников!
Символы для оформления Discord сервера
☠︎ ☮︎ ☯︎ ♠︎ Ω︎ ♤︎ ♣︎ ♧︎ ♥︎ ♡︎ ♦︎ ♢︎ ♔︎ ♕︎ ♚︎ ♛︎ ⚜︎ ★︎ ☆︎ ✮︎ ✯︎ ☄︎ ☾︎ ☽︎ ☼︎ ☀︎ ☁︎ ☂︎ ☃︎ ☻︎ ☺︎ ☹︎ ۞︎ ۩︎ ε︎ ї︎ з︎ Ƹ︎ ̵︎ ̡︎ Ӝ︎ ̵︎ ̨︎ ̄︎ Ʒ︎ ξ︎ Ж︎ З︎ ε︎ ж︎ з︎ ☎︎ ☏︎ ¢︎ ☚︎ ☛︎ ☜︎ ☝︎ ☞︎ ☟︎ ✍︎ ✌︎ ☢︎ ☣︎ ♨︎ ๑︎ ❀︎ ✿︎ ψ︎ ♆︎ ☪︎ ☭︎ ♪︎ ♩︎ ♫︎ ♬︎ ✄︎ ✂︎ ✆︎ ✉︎ ✦︎ ✧︎ ♱︎ ♰︎ ∞︎ ♂︎ ♀︎ ☿︎ ❤︎ ❥︎ ❦︎ ❧︎ ™︎ ®︎ ©︎ ✖︎ ✗︎ ✘︎ ⊗︎ ♒︎ ■︎ □︎ ▢︎ ▲︎ △︎ ▼︎ ▽︎ ◆︎ ◇︎ ○︎ ◎︎ ●︎ ◯︎ Δ︎ ◕︎ ◔︎ ʊ︎ ϟ︎ ღ︎ ツ︎ 回︎ ₪︎ 卐︎ ™︎ ©︎ ®︎ ¿︎ ¡︎ ½︎ ⅓︎ ⅔︎ ¼︎ ¾︎ ⅛︎ ⅜︎ ⅝︎ ⅞︎ ℅︎ №︎ ⇨︎ ❝︎ ❞︎ # &︎ ℃︎ ∃︎ ∧︎ ∠︎ ∨︎ ∩︎ ⊂︎ ⊃︎ ∪︎ ⊥︎ ∀︎ Ξ︎ Γ︎ ɐ︎ ə︎ ɘ︎ ε︎ β︎ ɟ︎ ɥ︎ ɯ︎ ɔ︎ и︎ ๏︎ ɹ︎ ʁ︎ я︎ ʌ︎ ʍ︎ λ︎ ч︎ ∞︎ Σ︎ Π︎ ➀︎ ➁︎ ➂︎ ➃︎ ➄︎ ➅︎ ➆︎ ➇︎ ➈︎ ➉︎ ➊︎ ➋︎ ➌︎ ➍︎ ➎︎ ➏︎ ➐︎ ➑︎ ➒︎ ➓︎ Ⓐ︎ Ⓑ︎ Ⓒ︎ Ⓓ︎ Ⓔ︎ Ⓕ︎ Ⓖ︎ Ⓗ︎ Ⓘ︎ Ⓙ︎ Ⓚ︎ Ⓛ︎ Ⓜ︎ Ⓝ︎ Ⓞ︎ Ⓟ︎ Ⓠ︎ Ⓡ︎ Ⓢ︎ Ⓣ︎ Ⓤ︎ Ⓥ︎ Ⓦ︎ Ⓧ︎ Ⓨ︎ Ⓩ︎ ⓐ︎ ⓑ︎ ⓒ︎ ⓓ︎ ⓔ︎ ⓕ︎ ⓖ︎ ⓗ︎ ⓘ︎ ⓙ︎ ⓚ︎ ⓛ︎ ⓜ︎ ⓝ︎ ⓞ︎ ⓟ︎ ⓠ︎ ⓡ︎ ⓢ︎ ⓣ︎ ⓤ︎ ⓥ︎ ⓦ︎ ⓧ︎ ⓨ︎ ⓩ︎ ℘︎ ℑ︎ ℜ︎ ℵ︎ ♏︎ η︎ α︎ β︎ ε︎ ℓ︎ ℓ︎ α︎ ·︎ ¨︎ …︎ ¦︎ ┅︎ ┆︎ ┈︎ ┊︎ ╱︎ ╲︎ ╳︎ ¯︎ –︎ —︎ ≡︎ ჻︎ ░︎ ▒︎ ▓︎ ▤︎ ▥︎ ▦︎ ▧︎ ▨︎ ▩︎ █︎ ▌︎ ▐︎ ▀︎ ▄︎ ◠︎ ◡︎ ╭︎ ╮︎ ╯︎ ╰︎ │︎ ┤︎ ╡︎ ╢︎ ╖︎ ╕︎ ╣︎ ║︎ ╝︎ ╜︎ ╛︎ ┐︎ └︎ ┴︎ ┬︎ ├︎ ─︎ ┼︎ ╞︎ ╟︎ ╚︎ ╔︎ ╩︎ ╦︎ ╠︎ ═︎ ╬︎ ╧︎ ╨︎ ╤︎ ╥︎ ╙︎ ╘︎ ╒︎ ╓︎ ╫︎ ╪︎ ┘︎ ┌︎ ツ︎ ♋︎ 웃︎ 유︎ Σ︎ ⊗︎ ♒︎ ☠︎ ☮︎ ☯︎ ♠︎ Ω︎ ♤︎ ♣︎ ♧︎ ♥︎ ♡︎ ♦︎ ♢︎ ♔︎ ♕︎ ♚︎ ♛︎ ★︎ ☆︎ ✮︎ ✯︎ ☄︎ ☾︎ ☽︎ ☼︎ ☀︎ ☁︎ ☂︎ ☃︎ ☻︎ ☺︎ ۞︎ ۩︎ ♬︎ ✄︎ ✂︎ ✆︎ ✉︎ ✦︎ ✧︎ ∞︎ ♂︎ ♀︎ ☿︎ ❤︎ ❥︎ ❦︎ ❧︎ ™︎ ®︎ ©︎ ✗︎ ✘︎ ⊗︎ ♒︎ ▢︎ ▲︎ △︎ ▼︎ ▽︎ ◆︎ ◇︎ ○︎ ◎︎ ●︎ ◯︎ Δ︎ ◕︎ ◔︎ ʊ︎ ϟ︎ ღ︎ 回︎ ₪︎ ✓︎ ✔︎ ✕︎ ✖︎ ☢︎ ☣︎ ☤︎ ☥︎ ☦︎ ☧︎ ☨︎ ☩︎ ☪︎ ☫︎ ☬︎ ☭︎ ☹︎ ☺︎ ☻︎ ت︎ ヅ︎ ツ︎ ッ︎ シ︎ Ü︎ ϡ︎ ♋︎ ♂︎ ♀︎ ☿︎ ♥︎ ❤︎ ❥︎ 웃︎ 유︎ ♡︎ ۵︎ ❣︎ ☼︎ ☀︎ ☁︎ ☂︎ ☃︎ ☄︎ ☾︎ ☽︎ ❄︎ ☇︎ ☈︎ ⊙︎ ☉︎ ℃︎ ℉︎ °︎ ♪︎ ♫︎ ♩︎ ♬︎ ♭︎ ♮︎ ♯︎ °︎ ø︎ ✽︎ ✾︎ ✿︎ ❀︎ ❁︎ ❃︎ ♚︎ ♛︎ ♜︎ ♝︎ ♞︎ ♟︎ ︎ ♔︎ ♕︎ ♖︎ ♗︎ ♘︎ ♙︎ ✉︎ ✍︎ ✎︎ ✏︎ ✐︎ ✑︎ ✒︎ ⌨︎ ☑︎ ✓︎ ✔︎ ☒︎ ☓︎ ✕︎ ✖︎ ✗︎ ✘︎ ✦︎ ★︎ ☆︎ ✰︎ ✮︎ ✯︎ ❇︎ ❈︎ ❅︎ ❄︎ ❆︎ ╰︎ ☆︎ ╮︎ Æ︎ æ︎ ❖︎ ℘︎ ℑ︎ ℜ︎ ℵ︎ ♏︎ η︎ α︎ β︎ ε︎ ℓ︎ ℓ︎ α︎ ·︎ ¨︎ …︎ ¦︎ ┅︎ ┆︎ ┈︎ ┊︎ ╱︎ ╲︎ ╳︎ ¯︎ –︎ —︎ ≡︎ ჻︎ ░︎ ▒︎ ▓︎ ▤︎ ▥︎ ▦︎ ▧︎ ▨︎ ▩︎ █︎ ▌︎ ▐︎ ▀︎ ▄︎ ◠︎ ◡︎ ╭︎ ╮︎ ╯︎ ╰︎ │︎ ┤︎ ╡︎ ╢︎ ╖︎ ╕︎ ╣︎ ║︎ ╝︎ ╜︎ ╛︎ ┐︎ └︎ ┴︎ ┬︎ ├︎ ─︎ ┼︎ ╞︎ ╟︎ ╚︎ ╔︎ ╩︎ ╦︎ ╠︎ ═︎ ╬︎ ╧︎ ╨︎ ╤︎ ╥︎ ╙︎ ╘︎ ╒︎ ╓︎ ╫︎ ╪︎ ┘︎ ┌︎ (◕︎^^◕︎) ✖︎ ✗︎ ✘︎ ♒︎ ♬︎ ✄︎ ✂︎ ✆︎ ✉︎ ✦︎ ✧︎ ♱︎ ♰︎ ♂︎ ♀︎ ☿︎ ❤︎ ❥︎ ❦︎ ❧︎ ™︎ ®︎ ©︎ ♡︎ ♦︎ ♢︎ ♔︎ ♕︎ ♚︎ ♛︎ ★︎ ☆︎ ✮︎ ✯︎ ☄︎ ☾︎ ☽︎ ☼︎ ☀︎ ☁︎ ☂︎ ☃︎ ☻︎ ☺︎ ☹︎ ☮︎ ۞︎ ۩︎ ε︎ ї︎ з︎ ☎︎ ☏︎ ¢︎ ☚︎ ☛︎ ☜︎ ☝︎ ☞︎ ☟︎ ✍︎ ✌︎ ☢︎ ☣︎ ☠︎ ☮︎ ☯︎ ♠︎ ♤︎ ♣︎ ♧︎ ♥︎ ♨︎ ๑︎ ❀︎ ✿︎ ψ︎ ☪︎ ☭︎ ♪︎ ♩︎ ♫︎ ℘︎ ℑ︎ ℜ︎ ℵ︎ ♏︎ η︎ α︎ ʊ︎ ϟ︎ ღ︎ ツ︎ 回︎ ₪︎ ™︎ ©︎ ®︎ ¿︎ ¡︎ ½︎ ⅓︎ ⅔︎ ¼︎ ¾︎ ⅛︎ ⅜︎ ⅝︎ ⅞︎ ℅︎ №︎ ⇨︎ ❝︎ ❞︎ ◠︎ ◡︎ ╭︎ ╮︎ ╯︎ ╰︎ ★︎ ☆︎ ⊙︎ ¤︎ ㊣︎ ★︎ ☆︎ ♀︎ ◆︎ ◇︎ ▆︎ ▇︎ █︎ █︎ ■︎ ▓︎ 回︎ □︎ 〓︎ ≡︎ ╝︎ ╚︎ ╔︎ ╗︎ ╬︎ ═︎ ╓︎ ╩︎ ┠︎ ┨︎ ┯︎ ┷︎ ┏︎ ┓︎ ┗︎ ┛︎ ┳︎ ⊥︎ ﹃︎ ﹄︎ ┌︎ ┐︎ └︎ ┘︎ ∟︎ 「︎ 」︎ ↑︎ ↓︎ →︎ ←︎ ↘︎ ↙︎ ♀︎ ♂︎ ┇︎ ┅︎ ﹉︎ ﹊︎ ﹍︎ ﹎︎ ╭︎ ╮︎ ╰︎ ╯︎ *^_^* ^*^ ^-^ ^_^ ^︵︎^∵︎ ∴︎ ‖︎ ︱︎ ︳︎ ︴︎ ﹏︎ ﹋︎ ﹌︎ ♂︎ ♀︎ ♥︎ ♡︎ ☜︎ ☞︎ ☎︎ ☏︎ ⊙︎ ◎︎ ☺︎ ☻︎ ►︎ ◄︎ ▧︎ ▨︎ ♨︎ ◐︎ ◑︎ ↔︎ ↕︎ ▪︎ ▫︎ ☼︎ ♦︎ ▀︎ ▄︎ █︎ ▌︎ ▐︎ ░︎ ▒︎ ▬︎ ♦︎ ◊︎ ◦︎ ☼︎ ♠︎ ♣︎ ▣︎ ▤︎ ▥︎ ▦︎ ▩︎ ぃ︎ ◘︎ ◙︎ ◈︎ ♫︎ ♬︎ ♪︎ ♩︎ ♭︎ ♪︎ の︎ ☆︎ →︎ あ︎ £︎ ❤︎ 。︎ ◕︎ ‿︎ ◕︎ 。︎ ✎︎ ✟︎ ஐ︎ ≈︎ ๑︎ ۩︎ ۩︎.. ..۩︎ ۩︎ ๑︎ ๑︎ ۩︎ ۞︎ ۩︎ ๑︎ ✲︎ ❈︎ ➹︎ ~.~◕︎ ‿︎-。︎ ☀︎ ☂︎ ☁︎ 【︎ 】︎ ┱︎ ┲︎ ❣︎ ✚︎ ✪︎ ✣︎ ✤︎ ✥︎ ✦︎ ❉︎ ❥︎ ❦︎ ❧︎ ❃︎ ❂︎ ❁︎ ❀︎ ✄︎ ☪︎ ☣︎ ☢︎ ☠︎ ☭︎ ♈︎ ✓︎ ✔︎ ✕︎ ✖︎ ㊚︎ ㊛︎ *.:。︎ ✿︎*゚︎ ‘︎ ゚︎ ・︎ ⊙︎ ¤︎ ㊣︎ ★︎ ☆︎ ♀︎ ◆︎ ◇︎ ◣︎ ◢︎ ◥︎ ▲︎ ▼︎ △︎ ▽︎ ⊿︎ ◤︎ ◥︎ ▆︎ ▇︎ █︎ █︎ ■︎ ▓︎ 回︎ □︎ 〓︎ ≡︎ ╝︎ ╚︎ ╔︎ ╗︎ ╬︎ ═︎ ╓︎ ╩︎ ┠︎ ┨︎ ┯︎ ┷︎ ┏︎ ┓︎ ┗︎ ┛︎ ┳︎ ⊥︎ ﹃︎ ﹄︎ ┌︎ ┐︎ └︎ ┘︎ ∟︎ 「︎ 」︎ ↑︎ ↓︎ →︎ ←︎ ↘︎ ↙︎ ♀︎ ♂︎ ┇︎ ┅︎ ﹉︎ ﹊︎ ﹍︎ ﹎︎ ╭︎ ╮︎ ╰︎ ╯︎ *^_^* ^*^ ^-^ ^_^ ^︵︎^∵︎ ∴︎ ‖︎ ︱︎ ︳︎ ︴︎ ﹏︎ ﹋︎ ﹌︎ ♂︎ ♀︎ ♥︎ ♡︎ ☜︎ ☞︎ ☎︎ ☏︎ ⊙︎ ◎︎ ☺︎ ☻︎ ►︎ ◄︎ ▧︎ ▨︎ ♨︎ ◐︎ ◑︎ ↔︎ ↕︎ ▪︎ ▫︎ ☼︎ ♦︎ ▀︎ ▄︎ █︎ ▌︎ ▐︎ ░︎ ▒︎ ▬︎ ♦︎ ◊︎ ◦︎ ☼︎ ♠︎ ♣︎ ▣︎ ▤︎ ▥︎ ▦︎ ▩︎ ぃ︎ ◘︎ ◙︎ ◈︎ ♫︎ ♬︎ ♪︎ ♩︎ ♭︎ ♪︎ の︎ ☆︎ →︎ あ︎ £︎ ❤︎ 。︎ ◕︎ ‿︎ ◕︎ 。︎ ✎︎ ✟︎ ஐ︎ ≈︎ ๑︎ ۩︎ ۩︎.. ..۩︎ ۩︎ ๑︎ ๑︎ ۩︎ ۞︎ ۩︎ ๑︎ ✲︎ ❈︎ ➹︎ ~.~◕︎ ‿︎-。︎ ☀︎ ☂︎ ☁︎ 【︎ 】︎ ┱︎ ┲︎ ❣︎ ✚︎ ✪︎ ✣︎ ✤︎ ✥︎ ✦︎ ❉︎ ❥︎ ❦︎ ❧︎ ❃︎ ❂︎ ❁︎ ❀︎ ✄︎ ☪︎ ☣︎ ☢︎ ☠︎ ☭︎ ♈︎ ✓︎ ✔︎ ✕︎ ✖︎ ㊚︎ ㊛︎ *.:。︎ ✿︎*゚︎ ‘︎ ゚︎ ・︎ ◊︎ ♥︎ ╠︎ ═︎ ╝︎ ▫︎ ■︎ ๑︎ »︎ «︎ ¶︎ ஐ︎ ©︎ †︎ ε︎ ï︎ з︎ ♪︎ ღ︎ ♣︎ ♠︎ •︎ ±︎ °︎ •︎ ิ︎.•︎ ஐ︎ இ︎ *×︎ ○︎ ▫︎ ♂︎ •︎ ♀︎ ◊︎ ©︎ ¤︎ ▲︎ ↔︎ ™︎ ®︎ ☎︎ ε︎ ї︎ з︎ ♨︎ ☏︎ ☆︎ ★︎ ▽︎ △︎ ▲︎ ∵︎ ∴︎ ∷︎ #︎ ♂︎ ♀︎ ♥︎ ♠︎ ♣︎ ♧︎ ♤︎ ♧︎ ♡︎ ♬︎ ♪︎ ♭︎ ♫︎ ♪︎ ﻬ︎ ஐ︎ ღ︎ ↔︎ ↕︎ ↘︎ •︎ •︎ ●︎ ¤︎ ╬︎ ﹌︎ ▽︎ ☜︎ ♥︎ ☞︎ ♬︎ ✞︎ ♥︎ ♕︎ ☯︎ ☭︎ ☠︎ ☃︎ ─︎ ━︎ │︎ ┃︎ ┄︎ ┅︎ ┆︎ ┇︎ ┈︎ ┉︎ ┊︎ ┋︎ ╭︎ ╮︎ ╯︎ ╰︎ ╱︎ ╲︎ ╳︎ ╴︎ ╵︎ ╶︎ ╷︎ ╸︎ ╹︎ ╺︎ ╻︎ ╼︎ ╽︎ ╾︎ ╿︎ ▰︎ ▱︎ ◆︎ ◇︎ ◈︎ ◉︎ ◊︎ ○︎ ◌︎ ◍︎ ◎︎ ●︎ ◐︎ ◑︎ ◒︎ ◓︎ ◔︎ ◕︎ ◖︎ ◗︎ ◘︎ ◙︎ ◚︎ ◛︎ ◜︎ ◝︎ ◞︎ ◟︎ ◠︎ ◡︎ ◢︎ ◣︎ ◤︎ ◥︎ ◦︎ ◧︎ ◨︎ ◩︎ ◪︎ ◫︎ ◬︎ ◭︎ ◮︎ ◯︎ ◰︎ ◱︎ ◲︎ ◳︎ ◴︎ ◵︎ ◶︎ ◷︎ ◸︎ ◹︎ ◺︎ ◻︎ ◼︎ ◽︎ ◾︎ ◿︎ ☀︎ ☁︎ ☂︎ ☃︎ ☄︎ ★︎ ☆︎ ☇︎ ☈︎ ☊︎ ☋︎ ☌︎ ☍︎ ☎︎ ☏︎ ☐︎ ☑︎ ☒︎ ☓︎ ☔︎ ☕︎ ☖︎ ☗︎ ☘︎ ☙︎ ☟︎ ☠︎ ☡︎ ☢︎ ☣︎ ☤︎ ☥︎ ☦︎ ☧︎ ☨︎ ☩︎ ☪︎ ☫︎ ☬︎ ☭︎ ☮︎ ☯︎ ☰︎ ☱︎ ☲︎ ☳︎ ☴︎ ☵︎ ☶︎ ☷︎ ☸︎ ☹︎ ☺︎ ☻︎ ☼︎ ☽︎ ☾︎ ☿︎ ♀︎ ♁︎ ♂︎ ♃︎ ♄︎ ♅︎ ♇︎ ♔︎ ♕︎ ♖︎ ♗︎ ♘︎ ♙︎ ♚︎ ♛︎ ♜︎ ♝︎ ♞︎ ♟︎ ♠︎ ♡︎ ♢︎ ♣︎ ♤︎ ♥︎ ♦︎ ♧︎ ♨︎ ♰︎ ♱︎ ´︎ ῾︎ ︎ ︎ ‐︎ ‑︎ ‒︎ –︎ —︎ ―︎ ‖︎ ‗︎ ‘︎ ’︎ ‚︎ ‛︎ “︎ ”︎ „︎ ‟︎ †︎ ‡︎ •︎ ‣︎ ․︎ ‥︎ …︎ ‧︎ ︎ ︎ ︎ ‰︎ ‱︎ ′︎ ″︎ ‴︎ ‵︎ ‶︎ ‷︎ ‸︎ ‹︎ ›︎ ※︎ ‼︎ ‽︎ ‾︎ ‿︎ ⁀︎ ⁁︎ ⁂︎ ⁃︎ ⁄︎ ⁅︎ ⁆︎ ⁊︎ ⁋︎ ⁌︎ ⁍︎ ⁎︎ ⁏︎ ⁐︎ ⁑︎ ⁒︎ ⁓︎ ⁔︎ ⁕︎ ⁖︎ ⁗︎ ⁘︎ ⁙︎ ⁚︎ ⁛︎ ⁜︎ ⁝︎ ⁞︎ ︎ ︎ ︎ ︎ ︎ ︎ ︎ ︎ ︎ ︎ ︎ ︎ ︎ ︎ ︎ ︎ ︎ ₕ︎ ₖ︎ ₗ︎ ₘ︎ ₙ︎ ₚ︎ ₛ︎ ₜ︎ ︎ ︎ ︎ ₠︎ ₡︎ ₢︎ ₣︎ ₤︎ ₥︎ ₦︎ ₧︎ ₨︎ ₪︎ ₫︎ €︎ ₭︎ ₮︎ ₯︎ ℀︎ ℁︎ ℂ︎ ℄︎ ℅︎ ℆︎ ℇ︎ ℈︎ ℉︎ ℊ︎ ℋ︎ ℌ︎ ℍ︎ ℎ︎ ℏ︎ ℐ︎ ℑ︎ ℒ︎ ℓ︎ ℔︎ ℕ︎ №︎ ℗︎ ℘︎ ℙ︎ ℚ︎ ℛ︎ ℜ︎ ℝ︎ ℞︎ ℟︎ ℡︎ ™︎ ℣︎ ℤ︎ ℥︎ Ω︎ ℧︎ ℨ︎ ℩︎ K Å︎ ℬ︎ ℭ︎ ℮︎ ℯ︎ ℰ︎ ℱ︎ Ⅎ︎ ℳ︎ ℴ︎ ℵ︎ ℶ︎ ℷ︎ ℸ︎ ℹ︎ ℺︎ ℻︎ ℼ︎ ℽ︎ ℾ︎ ℿ︎ ⅀︎ ⅁︎ ⅂︎ ⅃︎ ⅄︎ ⅅ︎ ⅆ︎ ⅇ︎ ⅈ︎ ⅉ︎ ⅊︎ ⅋︎ ⅌︎ ⅍︎ ⅎ︎ ⅏︎ ⅐︎ ⅑︎ ⅒︎ ⇫︎ ⇬︎ ⇭︎ ⇮︎ ⇯︎ ⇰︎ ⇱︎ ⇲︎ ⇳︎ ⇴︎ ⇵︎ ⇶︎ ⇷︎ ⇸︎ ⇹︎ ⇺︎ ⇻︎ ⇼︎ ⇽︎ ⇾︎ ⇿︎ ∀︎ ∁︎ ∂︎ ∃︎ ∄︎ ∅︎ ∆︎ ∇︎ ∈︎ ∉︎ ∊︎ ∋︎ ∌︎ ∍︎ ∎︎ ∏︎ ∐︎ ∑︎ −︎ ∓︎ ∔︎ ∕︎ ∖︎ ∗︎ ∘︎ ∙︎ √︎ ∛︎ ∜︎ ∝︎ ∞︎ ∟︎ ∠︎ ∡︎ ∢︎ ∣︎ ∤︎ ∥︎ ∦︎ ∧︎ ∨︎ ∩︎ ∪︎ ∴︎ ∵︎ ∶︎ ∷︎ ∸︎ ∹︎ ∺︎ ∻︎ ∼︎ ∽︎ ∾︎ ∿︎ ≀︎ ≁︎ ≪︎ ≫︎ ≬︎ ≭︎ ≮︎ ≯︎ ≰︎ ≱︎ ≲︎ ≳︎ ≴︎ ≵︎ ≶︎ ≷︎ ≸︎ ≹︎ ≺︎ ≻︎ ≼︎ ≽︎ ≾︎ ≿︎ ⊀︎ ⊁︎ ⊂︎ ⊃︎ ⊄︎ ⊅︎ ⊆︎ ⊇︎ ⊈︎ ⊉︎ ⊊︎ ⊋︎ ⊌︎ ⊍︎ ⊎︎ ⊏︎ ⊐︎ ⊑︎ ⊒︎ ⊓︎ ⊔︎ ⊕︎ ⊖︎ ⊗︎ ⊘︎ ⊙︎ ⊚︎ ⊛︎ ⊜︎ ⊝︎ ⊞︎ ⊟︎ ⊠︎ ⊡︎ ⊢︎ ⊣︎ ⊤︎ ⊥︎ ⊦︎ ⊧︎ ⊨︎ ⊩︎ ⊪︎ ⊫︎ ⊬︎ ⊭︎ ⊮︎ ⊯︎ ⊰︎ ⊱︎ ⊲︎ ⊳︎ ⊴︎ ⊵︎ ⊶︎ ⊷︎ ⊸︎ ⊹︎ ⊺︎ ⊻︎ ⊼︎ ⊽︎ ⊾︎ ⊿︎ ⋀︎ ⋁︎ ⋂︎ ⋃︎ ⋄︎ ⋅︎ ⋆︎ ⋇︎ ⋈︎ ⋉︎ ⋊︎ ⋋︎ ⋌︎ ⋍︎ ⋎︎ ⋏︎ ⋐︎ ⋑︎ ⋒︎ ⋓︎ ⋔︎ ⋕︎ ⋖︎ ⋗︎ ⋘︎ ⋙︎ ⋚︎ ⋛︎ ⋜︎ ⋝︎ ⋞︎ ⋟︎ ⋠︎ ⋡︎ ⋢︎ ⋣︎ ⋤︎ ⋥︎ ⋦︎ ⋧︎ ⋨︎ ⋩︎ ⋪︎ ⋫︎ ⋬︎ ⋭︎ ⋮︎ ⋯︎ ⋰︎ ⋱︎ ⋲︎ ⋳︎ ⋴︎ ⋵︎ ⋶︎ ⋷︎ ⋸︎ ⋹︎ ⋺︎ ⋻︎ ⋼︎ ⋽︎ ⋾︎ ⋿︎ ⌀︎ ⌁︎ ⌂︎ ⌃︎ ⌄︎ ⌅︎ ⌆︎ ⌇︎ ⌈︎ ⌉︎ ⌊︎ ⌋︎ ⌌︎ ⌍︎ ⌎︎ ⌏︎ ⌐︎ ⌑︎ ⌒︎ ⌓︎ ⌔︎ ⌕︎ ⌖︎ ⌗︎ ⌘︎ ⌙︎ ⌚︎ ⌛︎ ⌜︎ ⌝︎ ⌞︎ ⌟︎ ⌠︎ ⌡︎ ⌢︎ ⌣︎ ⌤︎ ⌥︎ ⌦︎ ⌧︎ ⌨︎ ⟨︎ ⟩︎ ⌫︎ ⌬︎ ⌭︎ ⌮︎ ⌯︎ ⌰︎ ⌱︎ ⌲︎ ⌳︎ ⌴︎ ⌵︎ ⌶︎ ⌷︎ ⌸︎ ⌹︎ ⌺︎ ⌻︎ ⌼︎ ⌽︎ ⌾︎ ⌿︎ ⍀︎ ⍁︎ ⍂︎ ⍃︎ ⍄︎ ⍅︎ ⍆︎ ⍇︎ ⍈︎ ⍉︎ ⍊︎ ⍋︎ ⍌︎ ⍍︎ ⍎︎ ⍏︎ ⍐︎ ⍑︎ ⍒︎ ⍓︎ ⍔︎ ⍕︎ ⍖︎ ⍗︎ ⍘︎ ⍙︎ ⍚︎ ␋︎ ␢︎ ␣︎ ─︎ ━︎ │︎ ┃︎ ┄︎ ┅︎ ┆︎ ┇︎ ┈︎ ┉︎ ┊︎ ┋︎ ┌︎ ┍︎ ┎︎ ┏︎ ┐︎ ┑︎ ┒︎ ┓︎ └︎ ┕︎ ┖︎ ┗︎ ┘︎ ┙︎ ┚︎ ┛︎ ├︎ ┝︎ ┞︎ ┟︎ ┠︎ ┡︎ ┢︎ ┣︎ ┤︎ ┥︎ ┦︎ ┧︎ ┨︎ ┩︎ ┪︎ ┫︎ ┬︎ ┭︎ ┮︎ ┯︎ ┰︎ ┱︎ ┲︎ ┳︎ ┴︎ ┵︎ ┶︎ ┷︎ ┸︎ ┹︎ ┺︎ ┻︎ ┼︎ ┽︎ ┾︎ ┿︎ ╀︎ ╁︎ ╂︎ ╃︎ ╄︎ ╅︎ ╆︎ ╇︎ ╈︎ ╉︎ ╊︎ ╋︎ ╌︎ ╍︎ ╎︎ ╏︎ ═︎ ║︎ ╒︎ ╓︎ ╔︎ ╕︎ ╖︎ ╗︎ ╘︎ ╙︎ ╚︎ ╛︎ ╜︎ ╝︎ ╞︎ ╟︎ ╠︎ ╡︎ ╢︎ ╣︎ ╤︎ ╥︎ ╦︎ ╧︎ ╨︎ ╩︎ ╪︎ ╫︎ ╬︎ ╭︎ ╮︎ ╯︎ ╰︎ ╱︎ ╲︎ ╳︎ ╴︎ ╵︎ ╶︎ ╷︎ ╸︎ ╹︎ ╺︎ ╻︎ ╼︎ ╽︎ ╾︎ ╿︎ ▀︎ ▁︎ ▂︎ ▃︎ ▄︎ ▅︎ ▆︎ ▇︎ █︎ ▉︎ ▊︎ ▋︎ ▌︎ ▍︎ ▎︎ ▏︎ ▐︎ ░︎ ▒︎ ▓︎ ▔︎ ▕︎ ▖︎ ▗︎ ▘︎ ▙︎ ▚︎ ▛︎ ▜︎ ▝︎ ▞︎ ▟︎ ■︎ □︎ ▢︎ ▣︎ ▤︎ ▥︎ ▦︎ ▧︎ ▨︎ ▩︎ ▪︎ ▫︎ ▬︎ ▭︎ ▮︎ ▯︎ ▰︎ ▱︎ ◆︎ ◇︎ ◈︎ ◉︎ ◊︎ ○︎ ◌︎ ◍︎ ◎︎ ●︎ ◐︎ ◑︎ ◒︎ ◓︎ ◔︎ ◕︎ ◖︎ ◗︎ ◘︎ ◙︎ ◚︎ ◛︎ ◜︎ ◝︎ ◞︎ ◟︎ ◠︎ ◡︎ ◢︎ ◣︎ ◤︎ ◥︎ ◦︎ ◧︎ ◨︎ ◩︎ ◪︎ ◫︎ ◬︎ ◭︎ ◮︎ ◯︎ ◰︎ ◱︎ ◲︎ ◳︎ ◴︎ ◵︎ ◶︎ ◷︎ ◸︎ ◹︎ ◺︎ ◻︎ ◼︎ ◽︎ ◾︎ ◿︎ ☀︎ ☁︎ ☂︎ ☃︎ ☄︎ ★︎ ☆︎ ☇︎ ☈︎ ☊︎ ☋︎ ☌︎ ☍︎ ☎︎ ☏︎ ☐︎ ☑︎ ☒︎ ☓︎ ☔︎ ☕︎ ☖︎ ☗︎ ☘︎ ☙︎ ☟︎ ☠︎ ☡︎ ☢︎ ☣︎ ☤︎ ☥︎ ☦︎ ☧︎ ☨︎ ☩︎ ☪︎ ☫︎ ☬︎ ☭︎ ☮︎ ☯︎ ☰︎ ☱︎ ☲︎ ☳︎ ☴︎ ☵︎ ☶︎ ☷︎ ☸︎ ☹︎ ☺︎ ☻︎ ☼︎ ☽︎ ☾︎ ☿︎ ♀︎ ♁︎ ♂︎ ♃︎ ♄︎ ♅︎ ♇︎ ♎︎ ♏︎ ♐︎ ♑︎ ♒︎ ♓︎ ♔︎ ♕︎ ♖︎ ♗︎ ♘︎ ♙︎ ♚︎ ♛︎ ♜︎ ♝︎ ♞︎ ♟︎ ♠︎ ♡︎ ♢︎ ♣︎ ♤︎ ♥︎ ♦︎ ♧︎ ♨︎ ♰︎ ♱︎ ☫︎ ª︎ ↀ︎ ↁ︎ ↂ︎ Ↄ︎ ➟︎ ➡︎ ➢︎ ➣︎ ➤︎ ➥︎ ➦︎ ➧︎ ➨︎ ➚︎ ➘︎ ➙︎ ➛︎ ➜︎ ➝︎ ➞︎ ➸︎ ♐︎ ➲︎ ➳︎ ➳︎ ➴︎ ➵︎ ➶︎ ➷︎ ➸︎ ➹︎ ➺︎ ➻︎ ➼︎ ➽︎ ←︎ ↑︎ →︎ ↓︎ ↔︎ ↕︎ ↖︎ ↗︎ ↘︎ ↙︎ ↚︎ ↛︎ ↜︎ ↝︎ ↞︎ ↟︎ ↠︎ ↡︎ ↢︎ ↣︎ ↤︎ ↥︎ ↦︎ ↧︎ ↨︎ ➫︎ ➬︎ ➩︎ ➪︎ ➭︎ ➮︎ ➯︎ ➱︎ ↩︎ ↪︎ ↫︎ ↬︎ ↭︎ ↮︎ ↯︎ ↰︎ ↱︎ ↲︎ ↳︎ ↴︎ ↵︎ ↶︎ ↷︎ ↸︎ ↹︎ ↺︎ ↻︎ ↼︎ ↽︎ ↾︎ ↿︎ ⇀︎ ⇁︎ ⇂︎ ⇃︎ ⇄︎ ⇅︎ ⇆︎ ⇇︎ ⇈︎ ⇉︎ ⇊︎ ⇋︎ ⇌︎ ⇍︎ ⇎︎ ⇏︎ ⇐︎ ⇑︎ ⇒︎ ⇓︎ ⇔︎ ⇕︎ ⇖︎ ⇗︎ ⇘︎ ⇙︎ ⇚︎ ⇛︎ ⇜︎ ⇝︎ ⇞︎ ⇟︎ ⇠︎ ⇡︎ ⇢︎ ⇣︎ ❂︎ ⋆︎ ✢︎ ✣︎ ✤︎ ✥︎ ✦︎ ✧︎ ✩︎ ✪︎ ✫︎ ✬︎ ✭︎ ✮︎ ✯︎ ✰︎ ★︎ ✱︎ ✲︎ ✳︎ ✴︎ ✵︎ ✶︎ ✷︎ ✸︎ ✹︎ ✺︎ ✻︎ ✼︎ ❄︎ ❅︎ ❆︎ ❇︎ ❈︎ ❉︎ ❊︎ ❋︎ ╰︎ ☆︎ ╮︎ ✡︎ ❂︎ -‘︎ ๑︎
Мы надеемся, что представленная коллекция символов, скобок и украшений, которые можно использовать для оформления сервера Discord, вдохновит вас на творческий подход и создание неповторимой атмосферы на вашем сервере.
Customizing & Branding Your Discord Server
When you’re building your server, remember to always create channels thoughtfully. If you create one for every topic, engagement will drop off and your community will feel you’re not paying attention to what they care about. As much as possible, you want every channel to address a need that your specific, unique community has.
You don’t always have to guess what those needs are. Once you’ve gotten started with a few simple channels, it might be better to look for common themes in the conversation before adding more. If people love talking about video games in #general, for example, consider adding a #videogames channel. If you notice diehard JRPG fans taking over #videogames all the time, you might want to add #jrpgs. We like to call channels like these “breakout channels.”
While there are channels you’ll probably always want to include, even these can be customized to suit your community. For example, just because you’ve got a general chat doesn’t mean you have to call it #general: a fantasy-themed server might call it the #tavern, a server for your city might have the #town-square, and a serious philosophy server might offer both #general-discussion and #just-chatting. All communicate the vibe of the server well while offering the same basic functions.
Similarly, you’ll want to make sure that any channels you have for making new members feel at home—#welcome for telling people what your server’s about, #introductions for saying hi, #FAQ for answering questions people often ask, and so on—give off the appropriate tone for your community. Putting jokes in your FAQ is a great way to let people know your server’s all about relaxing and having a good time. Putting in a glossary, on the other hand, is a good way to let people know it’s about deep-dives on niche subjects.
Customizing Your Server Profile
There are a lot of ways to make your server look and feel unique with custom assets. For example, be mindful when creating the following:
- Server Icon — Because your icon is the “face” of your server, you’ll want one that resonates with your community. You may even want to hold a contest, commission it, or otherwise source it from them!
- Custom emoji and stickers — Great for honoring in-jokes, commemorating great moments, or assisting conversations (for example, chess pieces for your board game server). As a bonus, Nitro members will be able to use these in other servers.
- Boosted assets — Servers that have been boosted by Nitro members can set custom banner images, invite splashes, and vanity urls.
- Header images — Especially in locked or pinned channels like #rules, using images as header for your channels is a great way to achieve a polished and customized look.
Roles
Roles fill a number of diverse functions in your server. Depending on what your community’s about, here are a few ways you can design them to achieve the right vibe and functionality.
- Top Fans — You might want to honor the most active, long-term, or accomplished members of your community with special roles. These might be general (“Superfan”) or specific to the person (“Grilled Cheese Expert”).
- Channel Access — You can hide channels from or reveal channels to a member based on their roles. Want to make a secret clubhouse for subscribers? A spot for moderators to plan the monthly surprise event? A discussion channel for sensitive topics not everyone wants to participate in? Roles can be a useful way to expand your server’s functionality.
- Interests and Demographic — Roles can help express what your community’s about, as well as who members are. If your server has roles to indicate members play certain video games, it tells new members that those games are popular in your community. If your server has roles for different languages, it tells international members they’re welcome.
September 23, 2022
Related articles
No items found.
Show more articles
No matching results.
COMMUNITY RESOURCES
Build
Engage
Grow
Manage
Creator Portal
Build

Customizing & Branding Your Discord Server
Picking Your Channels
When you’re building your server, remember to always create channels thoughtfully. If you create one for every topic, engagement will drop off and your community will feel you’re not paying attention to what they care about. As much as possible, you want every channel to address a need that your specific, unique community has.
You don’t always have to guess what those needs are. Once you’ve gotten started with a few simple channels, it might be better to look for common themes in the conversation before adding more. If people love talking about video games in #general, for example, consider adding a #videogames channel. If you notice diehard JRPG fans taking over #videogames all the time, you might want to add #jrpgs. We like to call channels like these “breakout channels.”
While there are channels you’ll probably always want to include, even these can be customized to suit your community. For example, just because you’ve got a general chat doesn’t mean you have to call it #general: a fantasy-themed server might call it the #tavern, a server for your city might have the #town-square, and a serious philosophy server might offer both #general-discussion and #just-chatting. All communicate the vibe of the server well while offering the same basic functions.
Similarly, you’ll want to make sure that any channels you have for making new members feel at home—#welcome for telling people what your server’s about, #introductions for saying hi, #FAQ for answering questions people often ask, and so on—give off the appropriate tone for your community. Putting jokes in your FAQ is a great way to let people know your server’s all about relaxing and having a good time. Putting in a glossary, on the other hand, is a good way to let people know it’s about deep-dives on niche subjects.
Customizing Your Server Profile
There are a lot of ways to make your server look and feel unique with custom assets. For example, be mindful when creating the following:
- Server Icon — Because your icon is the “face” of your server, you’ll want one that resonates with your community. You may even want to hold a contest, commission it, or otherwise source it from them!
- Custom emoji and stickers — Great for honoring in-jokes, commemorating great moments, or assisting conversations (for example, chess pieces for your board game server). As a bonus, Nitro members will be able to use these in other servers.
- Boosted assets — Servers that have been boosted by Nitro members can set custom banner images, invite splashes, and vanity urls.
- Header images — Especially in locked or pinned channels like #rules, using images as header for your channels is a great way to achieve a polished and customized look.
Roles
Roles fill a number of diverse functions in your server. Depending on what your community’s about, here are a few ways you can design them to achieve the right vibe and functionality.
- Top Fans — You might want to honor the most active, long-term, or accomplished members of your community with special roles. These might be general (“Superfan”) or specific to the person (“Grilled Cheese Expert”).
- Channel Access — You can hide channels from or reveal channels to a member based on their roles. Want to make a secret clubhouse for subscribers? A spot for moderators to plan the monthly surprise event? A discussion channel for sensitive topics not everyone wants to participate in? Roles can be a useful way to expand your server’s functionality.
- Interests and Demographic — Roles can help express what your community’s about, as well as who members are. If your server has roles to indicate members play certain video games, it tells new members that those games are popular in your community. If your server has roles for different languages, it tells international members they’re welcome.
Как сделать красивое оформление дискорд сервера


Grace Ling
December 14, 2021
Community Spotlight
Hey there! I’m Grace, and I founded Design Buddies: an inclusive community on Discord for anyone interested in design. Full-time, I’m a Product Designer in the games industry and I love all things design.
Today, we’d like to share some design tips with everyone on Discord, on a place that anyone can use: your profile! How do you make people feel when you show up? What do people say when you leave the room? That’s your personal brand. Your personal brand can be linked to your online persona.
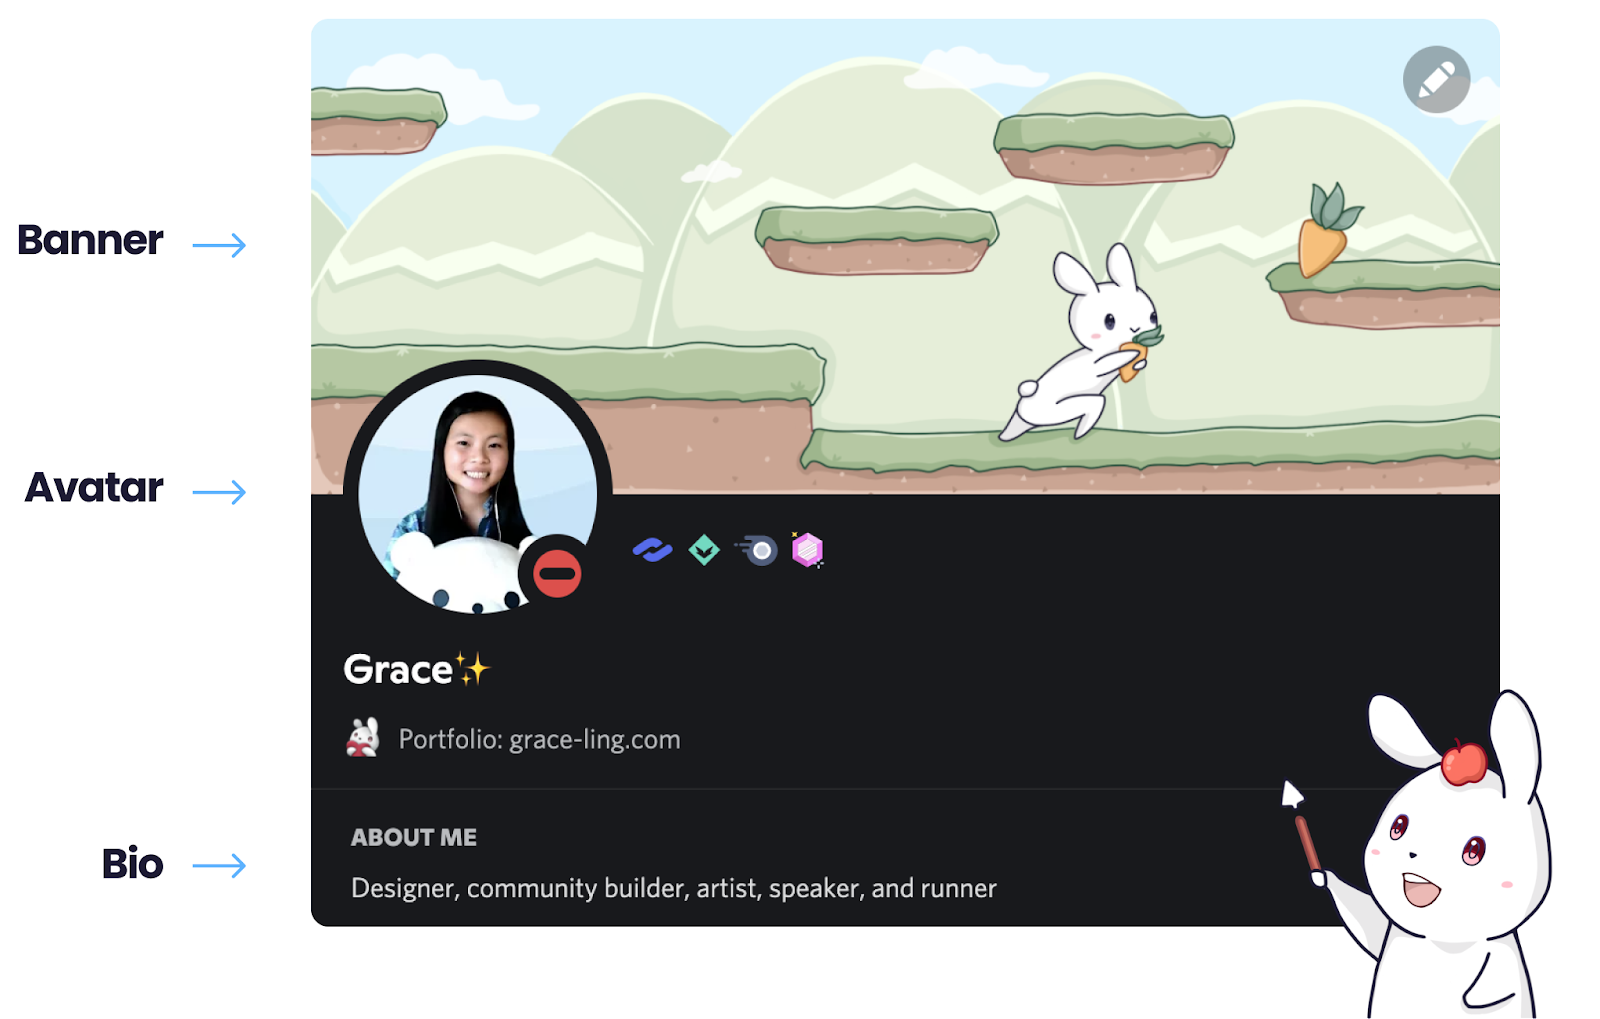
Personal branding can be more beneficial than you’d think — below, we’ve got guidance for those just getting started, along with more expert guidance for creators. Whether you’re a gamer, artist, fan, or anything in between, there are multiple places on Discord where you can customize your appearance—including your avatar, banner, and bio—in a way that represents who you truly are.
We’ll be sharing some examples and walking you through the process of how we designed an avatar, banner, and bio set. You’ll come away with practical tips on how to help make your own Discord profile stand out in style.
Your Profile Avatar
Your avatar is shown in your servers, the conversations you have with your friends, and when you’re in a Voice call. On Discord, you aren’t limited to how others may perceive you — your presence on the platform is whatever you make of it, and in turn, who you truly are. Choose imagery that represents the real you, whatever that may be!
Some pointers on uploading the best avatar: while you may use a square photo, it’ll be cropped to a circle when displayed on Discord. When uploading, it’s best to use a simple image or GIF (file formats JPG, PNG, or GIF) that’s around 200×200 pixels at minimum, and under 10 MB. There are plenty of tools available to create your avatar with — Photoshop, Procreate, Figma, Spline, Blender, your own camera, and plenty more!
Now let’s hop into designing!
First, Brainstorm Your Idea!
- What things do you like? What inspires you?
- What colors best represent you? Or, what’s your favorite color?
- What do you do on Discord? What kind of communities are you in and what are your roles there, if any?
- How would you like your banner to look along with your avatar? Is there a common theme you’d like to carry across the two of them?
- What imagery would you like to use to bring out your themes?
If it helps, you may also create a moodboard to help you think of your theme and imagery. Lay everything out and listen to what jumps out at you!
Here are some ideas of different ways to lay out your avatar (but not limited to this):
Imagery is the visual language that helps others recognize you. They tell a story of who you are, so tell them what you want!
Then, Sketch and outline!
Once you decide on a design, you can start to draw! In this example, we’re using the Procreate app for iPad, but there’s similar features in other digital painting software. Use what you’re most comfortable with! This example is featuring one of the goodies we will be sharing towards the end of the blog post — stay tuned to the end for a surprise! 🙂
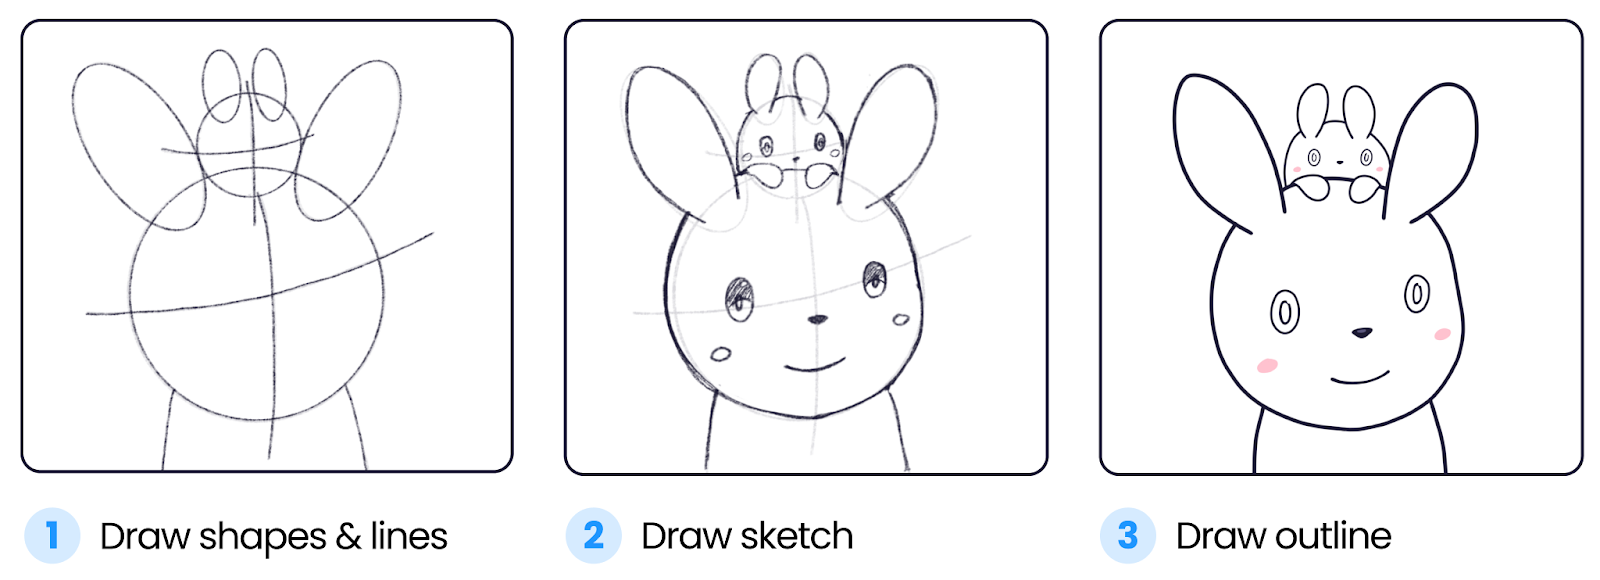
Similar to our avatar, we start by drawing basic shapes of all of the main objects for the foundation — the game platforms, bunny, carrot, and mountains in the background. For characters, you can also draw the joints of what position their body will be in, shown in step 1.
Next, in step 2, we can lower the opacity of the first layer to around 30% and then add the main sketches of our objects in another layer. In these first 2 layers, we are using Procreate’s 6B pencil brush.
To finish off our outline, we can draw over our sketch to make the final outline like in step 3. using the technical brush.
Now, we’re ready to color!
Finally, Get It Colored!
Color is one of the first things people notice when they look at your profile and shows your overall aesthetic. Do you want to bring a cool or warm vibe? Is your aesthetic pastel or monochromatic? Utilizing color effectively can bring your vibe to life and let others understand immediately what emotions or messages they should be feeling.

In our same example from above, here are the steps we took to color the avatar:
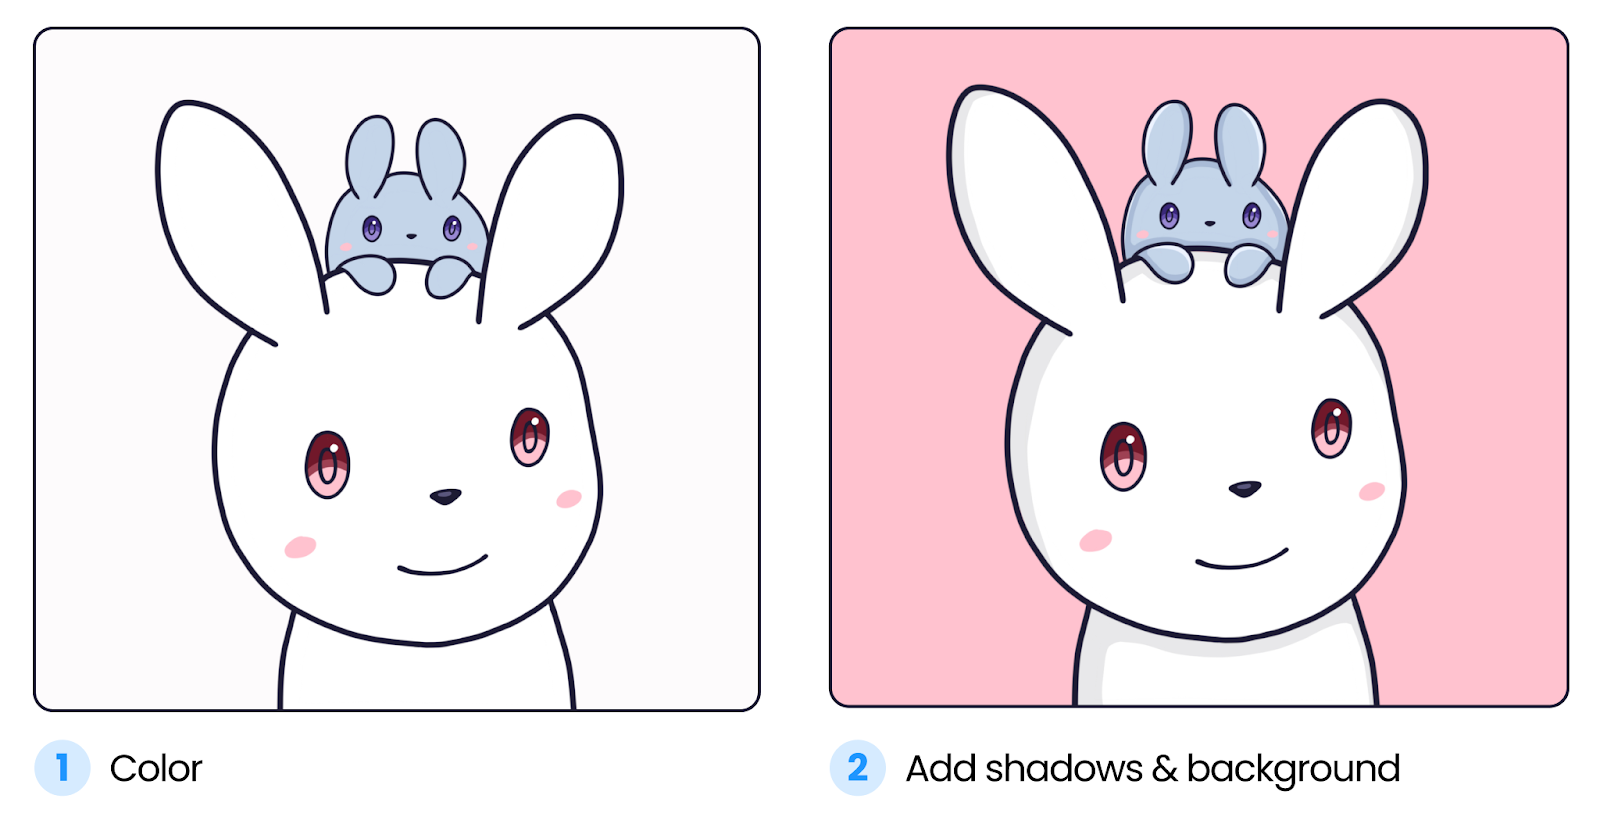
Make sure that the color layers are separate from your sketch and outline layers. Here, we start with a flat color to get the main colors down using the outline as a guide, as shown in Step 1. Then, we add some subtle shadows in a cel-shading style to get to Step 2. Here, we are using the Round brush. When shading, be sure to create a new layer on top of your color layer and turn on a clipping mask to stay within the intended coloring area.
You can additionally add depth to your color by utilizing flat cel-shading, blending, perspective, visual effects, and more. In all of our examples, you can also use any brush you wish to achieve different visual styles— there’s no right or wrong answers!
Optionally, Add a Frame
Adding a frame to your avatar can help spice up your avatar for any sort of special occasion! You could even share the frame you make with members of your community and be twinsies. (or triosies, quadsies or more… sies!)

You can even use an animated avatar or select your favorite GIF! Some tools you can use to animate are After Effects, Blender, and Procreate. Fun fact: when you speak on either a Voice call or on a Stage channel, your avatar will animate in a loop. You can even make it look like you’re talking!
Also, if there’s a GIF on the internet that you absolutely resonate with, you can even set it as your avatar the same way you update your avatar!
Your Profile Banner
Your banner lives behind your avatar and is shown to anyone who clicks on your profile. When uploading a banner, you’ll need an image of at least 600×240 px as a PNG, JPG, or animated GIF under 10 MB. Even without Discord Nitro, you can also edit your banner color to match, or contrast with, your avatar.
When displayed, parts of your banner will be hidden by your avatar. Be aware of the area where it’s hidden by your avatar:

Brainstorm Your Banner!
- Do you want your banner to look similar to your avatar?
- What themes and would you like on your banner?
- What imagery could you use to bring out those themes?
Here are some different ways you can lay out your banner (but not limited to this):

Sketch Your Banner
Once you decide on a design, now it’s time to sketch it. Like last time, we’re using Procreate here, but you’re welcome to use whatever you’re most comfortable with.

Similar to our avatar, we start by drawing basic shapes of all of the main objects for the foundation — the game platforms, bunny, carrot, and mountains in the background. For characters, you can also draw the joints of what position their body will be in, shown in example 1.
Next, in example 2, we can lower the opacity of the first layer to around 30% and then add the main sketches of our objects in another layer.In these first 2 layers, we are using Procreate’s 6B pencil brush.
To finish off our outline, we can draw over our sketch to make the final outline like example 3. using the technical brush.
Now, we’re ready to color!
Finally, Color Your Banner
Color will be one of the first things someone notices when they click into your profile. It’s a great, eye-catching tool to emphasize your overall vibe and aesthetic. As with everything about expressing yourself, your banner colors could match or be completely different from your avatar.

In our same example from above, here are the steps we took to color:

When adding color, make sure to create separate layers to avoid mixing colors when they are not supposed to be mixed. Make sure all coloring layers are separate from your outline layers. Also, sometimes it helps to create a thumbnail (laying out how all your colors will work, then zooming out to see how it looks) to see how all of your colors will look like all together first before coloring. Thumbnails are also good for more detailed and larger artwork.
You may start with the larger areas first, then smaller. Here, we start by adding just color with a round brush. After that, we add more details — shadows, glows, effects (eg. the patterns on the dirt patched), and even clouds! There are no right or wrong approaches here to coloring and visual effects. You may experiment with different colors and visual styles to bring out different moods, convey a different message, and more!
Optionally, Add a Frame
You could create frames for your avatars to additionally spice it up! You could even share frames with members of your community and twin with others.

Your Bio
Your bio is a space where you can input any text in 190 characters. It’s shown when someone clicks on your name anywhere across Discord.
You can use this space to briefly describe yourself, include your social media links, add some fun facts/inspirational quotes, memes, emojis that describe you, or anything else that you would want!
Ask yourself: What do you sound like? Playful, serious, or funny? Then you can have this tone in your bio!
Here are some examples of bios:
- Descriptive & short about who you are: “Designer, community builder, artist, speaker, and runner”
- Fact about yourself: “I have 3 dogs named Snowball, Goldie, and Teddy”
- Meme or song: “What does the fox say?”
- Phrase: “YOLO”
- Emojis: “������☕”
Putting it all together
You can set your avatar, banner, and bio in your user profile settings! Here are some examples. If you have Nitro, then you may also have a different avatar and profile banner in each server you’re in!

Also, here’s how you can edit your avatar, banner, and bio on Discord:

Note: If your file sizes are too large for your banner when you upload one, you may use tools such as Adobe’s image resizer to shrink them.
You may also choose a GIF from the internet as your avatar and banner!
Visuals & Tone: The Fundamentals of Profile Design
There are many elements you can use to describe yourself — colors, imagery, tone of voice, and more. We’ll break them down and connect them to your Discord profile!
Color
Color is one of the first things people notice when they look at your profile and show your overall aesthetic. Within the professional art community, color symbolism is how different hues of color help perceive meaning in life driven by the viewer’s cultural associations and personal experiences.
For example, red represents good luck in China but it means morning in South Africa. Red is also associated with passion, energy, and danger. It’s important to keep your audience in mind when you’re choosing colors.
Each color also has a different hue, shade, tint, and tone that affect its perception. For example, neon colors have different meanings than pastel colors.
Combining multiple colors can also enhance or take away from your message from your design. Color theory explains the relationship between colors using art and science.

Imagery
Imagery is the visual language and aesthetic appearance that helps others recognize you. They can help tell your story and communicate your message beyond color. Imagery could be your own art or photos in the case for your profile.
Tone of voice
What do you sound like? Playful, formal, or funny? Your tone of voice is how you and your brand communicate with the audience. It influences how people perceive your message. It helps build connection, trust, and memorability.
Your tone of voice can be reflected through your bio, username, and the way you communicate with others online. You can reference our bios section of this blog post for some examples.
Lastly, there is no right or wrong way to approach your online identity and personal brand. It’s uniquely you. You and your online identity, and personal brand are all a constantly evolving process! Don’t be afraid to try new things, grow, and change.
Designer-Made Profile Updates, for Everyone
Before we go, the Design Buddies community has a gift we’d like to share. Our community has come together to create gorgeous sets of profile avatars, banners, and frames, free for anyone to use!
Check them all out below — if you see one you like, you can download it below the preview.

- Download: Four Profile Sets, by Grace Ling

- Download: Sparkly Rainbow Frames, by createdbyjz
- Download: Iced Donut, by createdbyjz

- Download: Rainy Day Frog Profile Set, by hanibee
- Download: Discord Pilot Profile Set, by Gazal

- Download: Space Doggo Profile Set, by GoatedGold
- Download: Astronaut Rabbit set, by Orbit

- Download: Winter Lights Frame, by Patho
- Download: Winter Holidays Frame, by Patho

- Download: Cherry Blossoms Frame Ver. 1, by Aisu Dragons
- Download: Cherry Blossoms Frame Ver. 2, by Aisu Dragons
If this insight into the design process inspired you to pursue the design field further, we’d love to have you — join us at discord.gg/designbuddies and learn more about us at designbuddies.community. If any creatives would like to connect, you’re also welcome to reach out via my art Instagram!
We hope to see you soon,
Grace Ling