Как открыть фотографию из Adobe Lightroom в Photoshop
Adobe Lightroom Classic — это превосходный инструмент для фотографов. Это (в основном) единое решение для организации фотографий, их обработки и представления — в виде слайд-шоу или печатных работ.
Однако бывают случаи, когда вам может понадобиться дополнительная порция волшебства Photoshop для вашего изображения или его части.
В этом руководстве показано, как перенести фотографию из Lightroom Classic в Photoshop, а затем вернуть ее обратно. Приложения тесно интегрированы, поэтому хорошая новость заключается в том, что сделать это очень просто.
Как открыть фотографию из Lightroom в Photoshop
- В Lightroom Classic выберите фотографию, которую вы хотите отредактировать в Photoshop, в модуле Library или в модуле Develop.
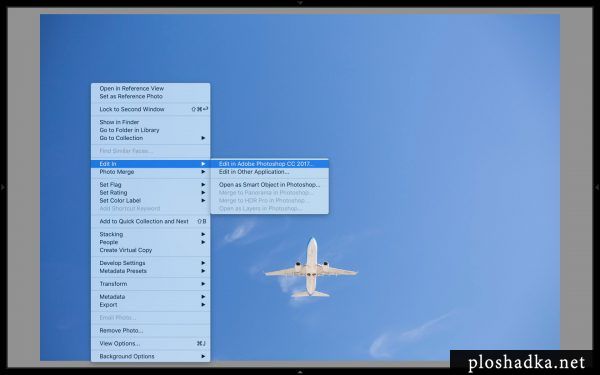
- Щелкните правой кнопкой мыши на фотографии и в выпадающем меню выберите Edit In > Photoshop CC.
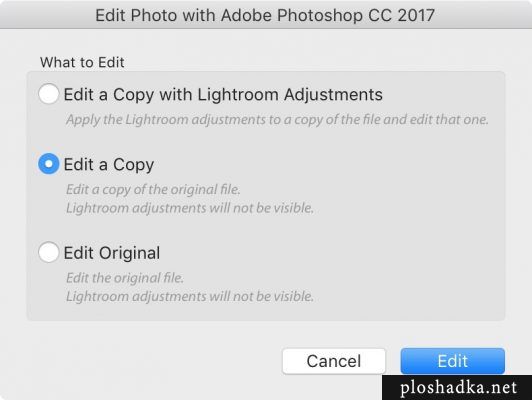
- Если вы редактируете изображение в формате Raw, Lightroom спросит, как вы хотите отредактировать фотографию в Photoshop.
- Выберите Edit A Copy With Lightroom Classic Adjustments, чтобы открыть копию фотографии с уже сделанными корректировками Lightroom.
- Ваша фотография откроется в Photoshop.
- Внесите изменения в Photoshop, а затем выберите Файл > Сохранить. Не выбирайте Файл > Сохранить как.
- Вернитесь в Lightroom. Появится копия вашей новой отредактированной фотографии.
Настройки Lightroom
Прежде чем переносить фотографии из Lightroom в Photoshop, давайте сначала настроим редактор — это нужно сделать только один раз.
Выберите Lightroom > Preferences (Mac) или Edit > Preferences (Windows), а затем перейдите на вкладку External Editing.
Если на вашем компьютере установлен Photoshop или Photoshop Elements, Lightroom автоматически определит это и установит Photoshop в качестве внешнего редактора по умолчанию (см. выделенный красным кружок выше), но вы также можете указать некоторые параметры для передачи файлов в Photoshop.
В верхней части диалогового окна показаны опции для выбора формата файлов фотографий, отправляемых в Photoshop — TIFF или PSD.
Выбрав TIFF, вы можете выбрать метод сжатия (None или ZIP), то есть размер файла изображения не будет таким большим, если вы выберете ZIP.
Варианты цветового пространства: ProPhoto RGB, sRGB и Adobe RGB(1998). Если вы работаете с изображениями RAW, то ProPhoto RGB является лучшим вариантом и рекомендуется компанией Adobe.
Однако если ваша камера настроена на съемку JPEG или TIFF, вам придется выбрать одно из двух других цветовых пространств, поскольку камера встроит один из этих профилей в ваш фотоаппарат. (Посмотрите в руководстве к фотоаппарату, чтобы узнать, какой именно).
Нажмите на красный круг в левом верхнем углу окна настроек (Mac) или нажмите OK (Windows), чтобы закрыть настройки.
После того как вы настроите параметры для внешнего редактирования, вам не нужно будет делать это снова.
Как перенести фотографию из Lightroom в Photoshop
Убедитесь, что фотография, которую вы хотите отредактировать в Photoshop, открыта в Lightroom, либо в режиме просмотра библиотеки, либо в режиме Develop. В этом примере я открываю файл Raw.
Выберите Фото > Редактировать в Adobe Photoshop CC (или любой другой версии Photoshop) или воспользуйтесь сочетанием клавиш Command-E (Mac) или Ctrl+E (Windows).
Или щелкните правой кнопкой мыши на изображении в Lightroom и выберите Edit In > Edit In Adobe Photoshop CC.

Если ваша фотография является файлом Raw, изображение откроется в Photoshop CC, и вы сможете его отредактировать.
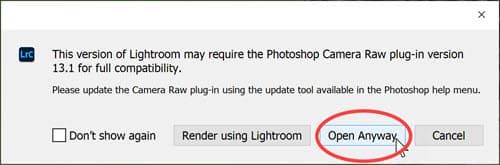
Примечание: В Lightroom может появиться всплывающее сообщение, как показано ниже. Это сообщение — напоминание о том, что для полной совместимости Lightroom может потребоваться плагин Photoshop Camera Raw. Нажмите Открыть в любом случае. Если вы поддерживаете Photoshop, Lightroom и плагин Camera Raw в актуальном состоянии в Creative Cloud, это не проблема.
Открытие файла JPEG из Lightroom в Photoshop
Если ваша фотография представляет собой JPEG, а не Raw-файл, появится следующее диалоговое окно:
Выберите Редактировать копию с корректировками Lightroom и нажмите кнопку Редактировать. Это позволит сохранить все правки, которые вы уже сделали в Lightroom, и они будут видны на фотографии в Photoshop.
Как вернуться из Photoshop обратно в Adobe Lightroom
Допустим, вы внесли изменения в Photoshop и хотите вернуться в Lightroom с новой улучшенной фотографией.
В моем примере ниже я добавил к фотографии текст.
Теперь самое главное!
- Выберите Файл > Сохранить.
- НЕ выбирайте Сохранить как.
- Если вы измените имя файла, он не примет изменения в Lightroom, и ваш рабочий процесс будет нарушен.
- Вернитесь в Lightroom, и вы увидите измененный файл и оригинальный файл в библиотеке Lightroom.
- Вот и все! Это рабочий процесс Lightroom — Photoshop — Lightroom, и он работает очень хорошо.
Я надеюсь, что вы нашли этот учебник по Lightroom и Photoshop полезным. И я буду очень благодарен, если вы поделитесь им. Спасибо!
Как переместить фотографию из Lightroom в Photoshop
 Admin
Admin  24.11.2017
  Adobe
Adobe
Редактирование фотографии в Adobe Photoshop при работе в программе Adobe Lightroom. Сохраняем настройки и атрибуты фотографии.
Если основная программа для обработки изображений Lightroom, то правильнее будет обрабатывать фото в Photoshop используя предназначенные для этого соответствующие инструменты. Почему правильнее?
Если обрабатывать фото через Photoshop минуя Lightroom, то при сохранении он сотрёт все атрибуты этой фотографии, такие как параметры съёмки. А если после обработки фото вернётся в Lightroom, то всё сохранится.
Приступим. Вызываем контекстное меню на фотографии и находим там Edit in. Выбираем там Edit in Adobe Photoshop.
Настройки редактирования можно поправить в настройках программы Lightroom. Например, выбрать как у меня:

При выбора редактирования в Photoshop будет вызвано меню, которое спросит что делать: редактировать копию оригинала, сам оригинал или уже обработанное фото в Лайтруме.
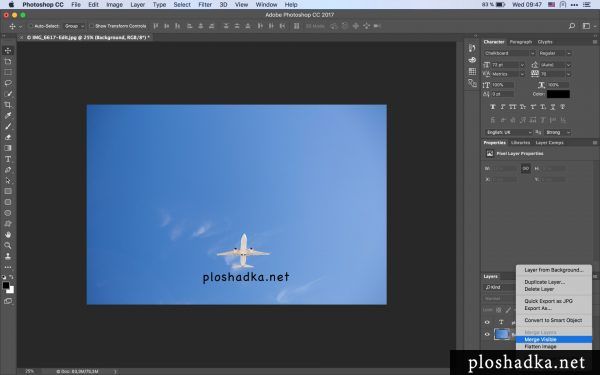
После этого запуститься программа Фотошоп и откроется наше фото. Делаем с фотографией что нужно, а затем переносим обратно. Для переноски обратно достаточно нажать Cmd + S в MacOS или ctrl + S в Windows. Однако, если в Photoshop-е были созданы новые слои, то вместо желаемого нам результата он предложит файл сохранить на компьютере.
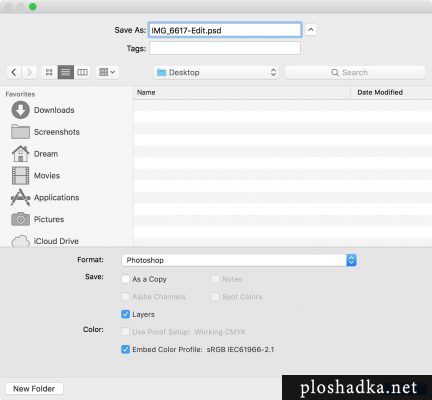
Делать этого не нужно. Возвращаемся обратно в программу и на слое выбираем Merge Visible. Соединяем слои в одну картинку. Теперь при сохранении изображения появится иное окошко. То что нам нужно.
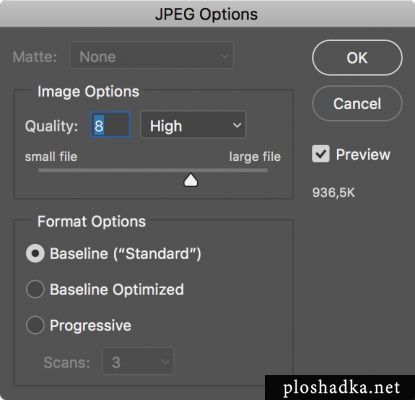
Выбираем параметры сохранения и нажимаем ОК.
После этого измененное фото появится в программе Lightroom.
Читайте также
У сайта нет цели самоокупаться, поэтому на сайте нет рекламы. Но если вам пригодилась информация, можете лайкнуть страницу, оставить комментарий или отправить мне подарок на чашечку кофе.
Открытие и редактирование фотографий в Photoshop
Вы можете дополнительно редактировать фотографии с помощью Photoshop из Lightroom Classic. Чтобы эта функция была доступна, на компьютере должна быть установлена программа Photoshop.
В модуле Библиотека или Разработка выберите фотографию, которую необходимо отредактировать. Выберите Фотография > Редактировать в Photoshop .
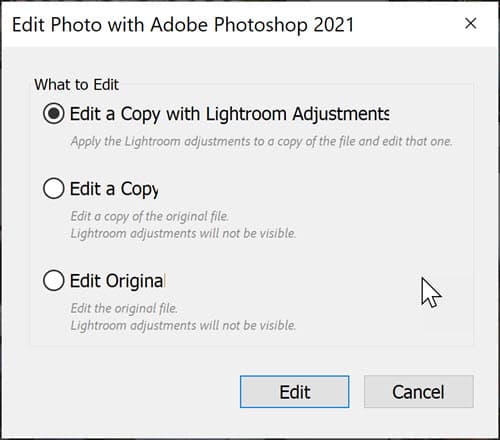
В диалоговом окне «Редактирование фотографии» выберите один из следующих вариантов:
Редактирование копии с помощью настроек Lightroom Classic
Применяет любые изменения Lightroom Classic, сделанные в копии файла, и отправляет этот файл в Photoshop для редактирования.
Редактирование копии
Редактирует копию исходного файла без настроек Lightroom Classic. Этот параметр применим только для файлов в формате JPEG, TIFF и PSD; не предназначен для файлов в формате RAW и DNG.
Редактирование оригинала
Редактирует исходный файл без настроек Lightroom Classic. Этот параметр применим только для файлов в формате JPEG, TIFF и PSD; не предназначен для файлов в формате RAW и DNG.
Примечание.
Чтобы поместить отредактированную фотографию в подборку с оригиналом, выберите Редактировать (Win)/ Lightroom Classic (macOS) > Установки > Внешнее редактирование > Поместить в подборку с оригиналом . При редактировании фотографии во время просмотра коллекции будут созданы две подборки: одна в папке и одна в коллекции.
Выберите Редактировать .
При открытии изображения в формате RAW из Lightroom Classic в Photoshop, если версии Adobe Camera Raw в Lightroom Classic и в Photoshop не совпадают, Lightroom Classic отображает сообщение с предложением обновить плагин Photoshop Camera Raw для полной совместимости. Подробнее об обновлении Photoshop и Adobe Camera Raw до последней версии см. в разделе Обновление Photoshop до последней версии.
Выберите один из следующих вариантов.
Больше не показывать
Выберите этот параметр, если вы не хотите видеть это диалоговое окно в будущем. Изображение в формате RAW из Lightroom Classic открывается непосредственно в Photoshop. Однако некоторые изменения Lightroom Classic могут не отображаться в Photoshop, если версии Camera Raw несовместимы.
Рендеринг с помощью Lightroom Classic
Lightroom Classic обрабатывает файл в формате RAW для рендеринга нового файла в формате TIFF или PSD, который автоматически открывается в Photoshop. Формат файла — TIFF или PSD — зависит от настройки «Формат файла», заданной для внешнего редактирования (Редактировать > Настройки > Внешнее редактирование). Все изменения, внесенные в Lightroom Classic, отображаются в Photoshop при рендеринге с помощью Lightroom Classic.
Все равно открыть
Продолжает открывать файл в формате RAW в Photoshop. Однако некоторые изменения, внесенные в Lightroom Classic, могут не отображаться в Photoshop из-за несовместимости версий Adobe Camera Raw.
При редактировании копии фотографии Lightroom Classic автоматически добавляет копию с приставкой «-Отредактирован» к имени файла в каталог при его открытии в Photoshop.
Отредактируйте фотографию в Photoshop, затем выберите Файл > Сохранить .
Отредактированные файлы в формате RAW и DNG автоматически добавляются в каталог Lightroom Classic с приставкой «-Отредактирован» к имени файла. Формат файла — TIFF или PSD, в зависимости от настроек внешнего редактирования. Файлы в формате JPEG, TIFF и PSD, отредактированные как копии с корректировками, также сохраняются в формате, указанном в параметрах внешнего редактирования.
Примечание.
При сохранении изменений изображений в формате JPEG, TIFF и PSD в Photoshop убедитесь, что имя файла и формат совпадают с копией или оригиналом в Lightroom Classic, если требуется обновить фотографию в каталоге.
Переключитесь на Lightroom Classic, чтобы просмотреть отредактированную фотографию в каталоге.
Примечание.
При сохранении из Photoshop обязательно включите параметр «Максимальная совместимость», чтобы Lightroom Classic мог читать изображения. Photoshop и более поздние версии автоматически сохраняют файлы PSD из Lightroom Classic с максимальной совместимостью.
Открытие и редактирование фотографий в Photoshop Elements
Вы можете дополнительно редактировать фотографии с помощью Photoshop Elements из Lightroom Classic. Чтобы эта функция была доступна, на компьютере должна быть установлена программа Photoshop Elements.
В модуле «Библиотека» или модуле «Разработка» выберите фотографию, которую необходимо отредактировать. Затем выберите «Фотография» > «Редактировать в Adobe Photoshop Elements».
(Только JPEG, TIFF и PSD) В диалоговом окне «Редактирование фотографии» выберите один из следующих параметров:
Редактирование копии с помощью настроек Lightroom Classic
Применяет любые изменения Lightroom Classic, сделанные в копии файла, и отправляет этот файл в Photoshop Elements для редактирования.
Редактирование копии
Редактирует копию исходного файла без настроек Lightroom Classic.
Редактирование оригинала
Редактирует исходный файл без настроек Lightroom Classic.
Примечание.
Чтобы поместить отредактированную фотографию в подборку с оригиналом, выберите Редактировать (Windows) / Lightroom Classic (macOS) > Настройки > Внешнее редактирование > Поместить в подборку с оригиналом . При редактировании фотографии во время просмотра коллекции будут созданы две подборки: одна в папке и одна в коллекции.
(Только JPEG, TIFF и PSD) Выберите Редактировать .
При редактировании копии фотографии Lightroom Classic автоматически добавляет копию с приставкой «-Edit» к имени файла в каталог при его открытии в Photoshop Elements.
Отредактируйте фотографию в Photoshop Elements, а затем выберите «Файл» > «Сохранить».
Отредактированные файлы в формате RAW и DNG автоматически добавляются в каталог Lightroom Classic с приставкой «Присоединен» к имени файла. Формат файла — TIFF или PSD, в зависимости от настроек внешнего редактирования. Файлы в формате JPEG, TIFF и PSD, отредактированные как копии с корректировками, также сохраняются в формате, указанном в параметрах внешнего редактирования.
Примечание.
При сохранении изменений изображений в формате JPEG, TIFF и PSD в Photoshop Elements убедитесь, что имя файла и формат совпадают с копией или оригиналом в Lightroom Classic, если требуется обновить фотографию в каталоге.
Переключитесь на Lightroom Classic, чтобы просмотреть отредактированную фотографию в каталоге.
Примечание.
При сохранении из Photoshop Elements обязательно включите параметр «Максимальная совместимость», чтобы Lightroom Classic мог читать изображения.
Дополнительная информация
Основной внешний редактор Lightroom Classic имеет функции, разработанные специально для работы с Photoshop. Хотя Photoshop Elements имеет ограниченную поддержку некоторых из этих функций, она не соответствует требованиям для использования по назначению.
- Открыть как смарт-объект — Photoshop Elements не позволяет создавать смарт-объекты.
- Открыть как слои смарт-объекта в Photoshop — Photoshop Elements не позволяет создавать смарт-объекты.
- Объединить в панораму — убедитесь, что вы находитесь в режиме редактирования «Эксперт» в Photoshop Elements для создания панорамных снимков.
- Объединить в HDR — Photoshop Elements не поддерживает 32-битные изображения или не имеет функции «Объединить в HDR».
- Открыть как слои — убедитесь, что вы находитесь в режиме редактирования «Эксперт» в Photoshop Elements для работы со слоями.
How To Move JPEG Images From Lightroom To Photoshop

Learn how to seamlessly move a JPEG image from Adobe Lightroom over to Photoshop for further editing. Then learn how to move the edited version back to Lightroom when you’re done! For Lightroom CC and Photoshop CC.
Written by Steve Patterson.
As we learned in the previous tutorial on how to move raw files between Lightroom and Photoshop, Lightroom is primarily a raw image processor, meaning it was designed for improving and enhancing the look of photos that were captured and saved by your camera in the raw file format. Yet Lightroom can also be used just as easily with non-raw files such as JPEG, TIFF and Photoshop’s own PSD format.
Even though raw files have serious advantages over JPEGs (check out our Raw vs JPEG For Photo Editing tutorial for more details), JPEG remains the most popular and widely-used format for capturing and storing photographic images. In this tutorial, we’ll learn how to move JPEG files between Lightroom and Photoshop, but everything we’ll cover also applies to TIFFs and PSDs.
This lesson is part of my Getting Images into Photoshop Complete Guide.
Let’s get started!
Step 1: Make Your Initial Image Adjustments In Lightroom
As with the previous tutorial, I won’t be covering Lightroom or Photoshop in any great detail here so we can focus our attention on how to move JPEG files between them. Here’s an image I’m currently working on in Lightroom’s Develop module. I shot this one through the window of a train as it traveled through the mountains. It’s not bad, but I was so focused on the scenery that I failed to notice the hydro wires running through the top of the frame:

A JPEG file open in Lightroom’s Develop module.
Here’s a larger view of the image to make things easier to see:
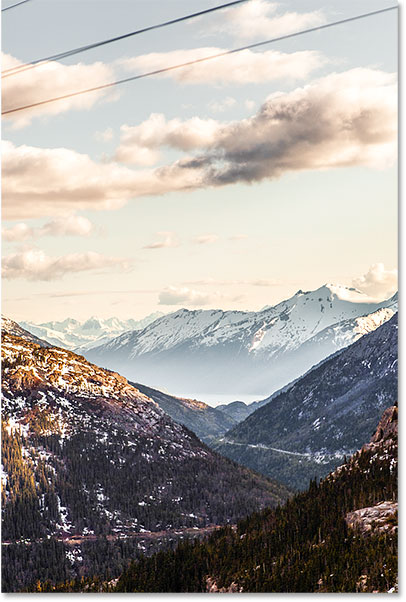
The overall photo is nice enough, but the wires along the top are a problem.
This image was saved as a JPEG file. We know it’s a JPEG because, if we look in the bar above the Filmstrip along the bottom of Lightroom, we can see not only the file’s name but also the «.jpg» extension at the end:

The bar above the Filmstrip shows the file name and extension.
I’d like to remove those wires, but I can’t do that in Lightroom. That’s because, as we learned in the previous tutorial, Adobe Lightroom is not a pixel editor. Rather than changing the pixels in an image, Lightroom works by storing instructions on how to improve and enhance the photo’s appearance, and what it shows us on the screen is simply a preview of what the image would look like with those instructions applied. It doesn’t actually apply our changes until we go to export the photo later, either for the web, print, or as we’ll see, when passing the image over to Photoshop. Even then, Lightroom does not apply our changes to the original photo. Instead, it creates a copy of the image when we go to export it and applies our changes to the copy. The original photo is never harmed.
The advantage to the way Lightroom works is that everything we do is entirely non-destructive. We can make as many changes as we like without affecting the original image at all. Using Lightroom’s simple and intuitive sliders, we can easily fix any overall exposure, contrast or color problems, and bring out hidden detail in the shadows and highlights. We can add some initial sharpening to the image, fix lens distortion issues, and even add some basic effects, like split toning or vignetting. There’s lots that Lightroom can do.
Yet there’s lots that Lightroom can not do. That’s because there’s only so much we can do without changing the pixels in the image. If I want to remove those wires, for example, I’ll need to edit the pixels. Lightroom can’t do it, but Photoshop definitely can. Photoshop’s pixel-editing power is unmatched, and once we learn to use Lightroom and Photoshop together as a team, taking advantage of each program’s unique strengths, then there’s really nothing we can’t do with our images.
The general rule in a good Lightroom/Photoshop workflow is to make as many improvements to the image as we can in Lightroom. In many cases, you’ll find that Lightroom is all you need. But if you’ve done all you can in Lightroom and the image still needs further editing, like my issue here with the hydro wires, then it’s time to pass the image over to Photoshop.
Step 2: Move The Image To Photoshop
If we look in my Basic panel in Lightroom’s Develop module, we see that I’ve made some initial adjustments to the exposure, contrast, and color:

The Basic panel in Lightroom is where we make most of our image adjustments.
I’ve also added some initial sharpening in the Detail panel and fixed some lens distortion in the Lens Corrections panel. There really isn’t much more that needs to be done with this image in Lightroom, so I’m ready to move it over to Photoshop.
To move a JPEG file from Lightroom to Photoshop, go up to the Photo menu (in Lightroom) in the Menu Bar along the top of the screen, choose Edit In, and then choose Edit in Adobe Photoshop. Your specific version of Photoshop will be listed, which in my case here is Photoshop CC 2015. Once you know where the actual command is located, you may find it’s easier in the future to simply press Ctrl+E (Win) / Command+E (Mac) on your keyboard, but either way works:

In Lightroom, go to Photo > Edit In > Edit in Adobe Photoshop.
Before sending the file to Photoshop, Lightroom will ask you what exactly it is that you want to send, and there’s three options: Edit a Copy with Lightroom Adjustments, Edit a Copy, and Edit Original. If this is the first time you’re sending the image to Photoshop from Lightroom, as it is for me with this image, choose the first option, Edit a Copy with Lightroom Adjustments, then click the Edit button. This will create a copy of your image for sending to Photoshop, and it will embed your Lightroom adjustments into the image so that they’re visible in Photoshop. We’ll look at the other two options later:

Choosing «Edit a Copy with Lightroom Adjustments».
This will launch Photoshop if it isn’t already running, and then your image will open in Photoshop:

The image has been moved to Photoshop, complete with the adjustments made in Lightroom.
Step 3: Edit The Image In Photoshop
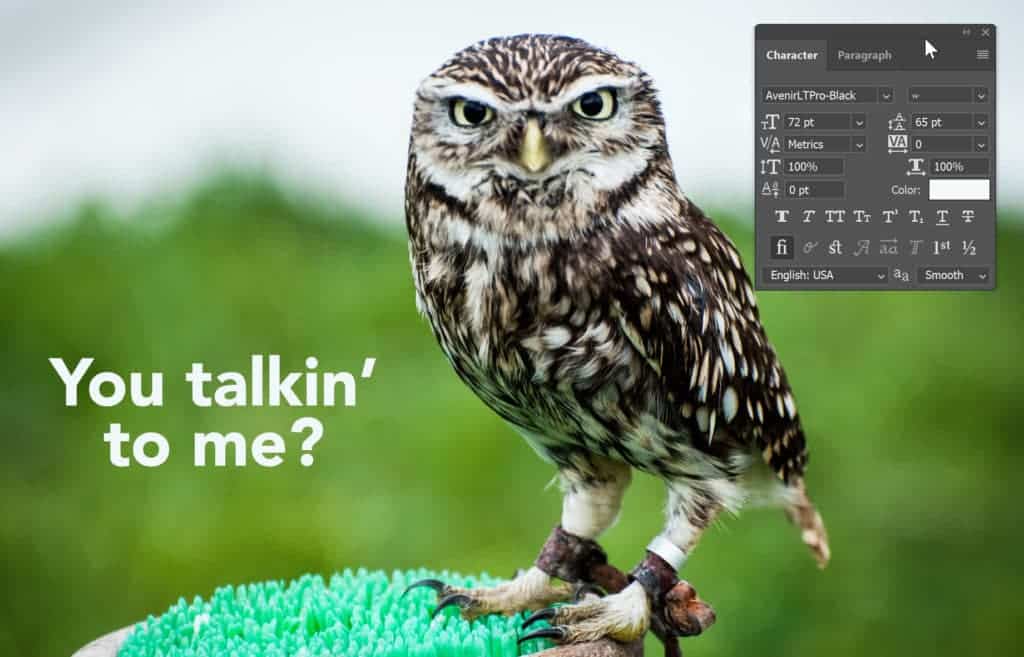
With my image now open in Photoshop, I can remove the wires. I’ll go through this quickly since removing wires from a photo is not really the focus of this tutorial. I’ll start by adding a new blank layer to the document to keep my edits separate from the image itself. To do that, I’ll click the New Layer icon at the bottom of the Layers panel:
![]()
Clicking the New Layer icon.
Photoshop adds the new layer above the Background layer:

A new blank layer appears.
To remove the wires, I’ll use Photoshop’s Spot Healing Brush Tool which I’ll grab from the Toolbar along the left of the screen:
Selecting the Spot Healing Brush Tool.
In the Options Bar along the top of the screen, I’ll make sure that Content-Aware and Sample All Layers are selected:

Choosing «Content-Aware» and «Sample All Layers» in the Options Bar.
I’ll start with the lowest of the three wires. First, I’ll resize my brush so it’s just a little bit wider than the wire itself. To do that, I’ll use the left and right bracket keys ( [ and ] ) on my keyboard. Pressing the left bracket key repeatedly will make the brush smaller. The right bracket key will make it larger:

Making my brush size slightly wider than the area I want to remove.
Since the wire runs in a straight line, I’ll start by clicking with the Spot Healing Brush Tool at one end of the wire. Then, I’ll press and hold my Shift key, move to the other end of the wire, and click again. This tells Photoshop to paint a straight line between the two spots where I clicked. At first, all we see is a dark gray overlay of where I painted. This is the area that Photoshop is analyzing, figuring out what to remove and what to replace it with:

When removing long, straight sections such as wires, click at one end, then Shift-click at the other end.
After a second or two, the overlay disappears, and so does the wire:

Photoshop was able to quickly remove the first wire from the photo.
I’ll do the same thing with the wire above it, although this one looks like two wires overlapping each other since they branch off as they get closer to the left edge of the photo. I’ll remove them in two passes. First, I’ll click on the right end of the wire(s) with the Spot Healing Brush Tool. Then, I’ll press and hold my Shift key and click on the left end to paint a straight line between the spots where I clicked:

Painting over the second wire by clicking at one end, then Shift-clicking at the other.
Photoshop takes a second or two to analyze the area, then does another excellent job of removing the wire. To get that remaining bit of wire that branched off above it, I’ll again click on one end of the wire and then Shift-click on the other end to paint a straight line over it:

Removing the section of wire I missed with the first pass.
And just like magic, the wire has disappeared. Finally, I’ll remove the remaining bit of wire in the upper left corner by clicking, then Shift-clicking on the ends:

Removing the final wire from the upper left corner.
And now, thanks to Photoshop’s Spot Healing Brush Tool and a few simple clicks with the mouse, the wires are gone:

The hydro wires were no match for Photoshop.
Get all of our Photoshop tutorials as PDFs! Download them today!
Step 4: Save And Close The Image
Now that I’m done with my Photoshop edits, I want to save my work and send the edited version back over to Lightroom. To do that, I’ll go up to the File menu at the top of the screen and choose Save. It’s very important that we choose «Save» and not «Save As». The reason is that Lightroom can automatically add the edited version to its catalog for us, but only if the edited version is saved into the same folder as the original image. If we choose «Save As», we run the risk of accidentally saving the file to the wrong location. Choosing «Save» will ensure that it’s saved to the same folder as the original:

Going to File > Save.
With the image now saved, we can close out of it in Photoshop by going back up to the File menu and choosing Close:

Going to File > Close.
Step 5: Return To Lightroom
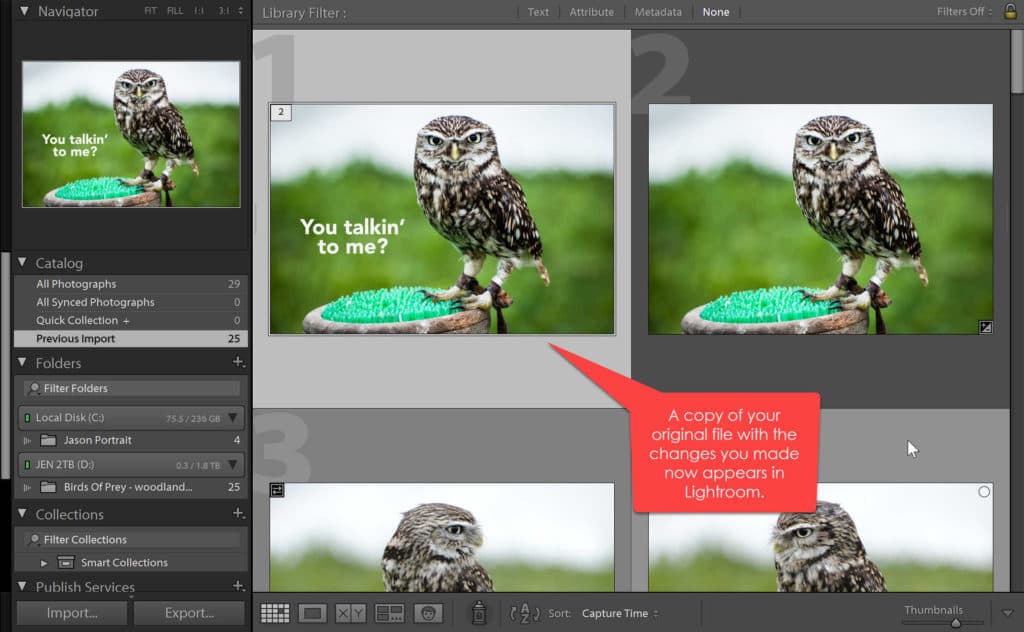
Now that we’ve saved and closed the image in Photoshop, we can return to Lightroom where we see the image now updated with our Photoshop edits. In my case, the wires along the top are now gone:

The Photoshop edits are now visible in Lightroom.
However, while it looks like the same image, if we look down in the Filmstrip, we see that I now actually have two versions of the image; one is the original, the other is the version I edited in Photoshop. That’s because back when we sent the file over to Photoshop, we chose the «Edit a Copy with Lightroom Adjustments» option which told Lightroom to send Photoshop a copy of the image, not the original. The copy, which contains our Photoshop edits, has now been returned to Lightroom and added to its catalog along with the original.
There’s a couple of ways we can tell that this is not the original image. First, if we look at the file’s name above the Filmstrip, we see that it has «-Edit» appended to the end of the name, indicating that this is the edited version. Also, the original image was a JPEG file, but the edited version is no longer a JPEG. Instead, it was saved automatically as a TIFF file (with a «.tif» extension). This is Lightroom’s default behavior. You can change it in Lightroom’s Preferences, and we’ll see how to do that in another tutorial:

The Photoshopped version was saved as a TIFF file with «-Edit» added to its name.
Another way we can tell that this is not the original image is that, if we look in my Basic panel, we see that all of my sliders have been reset to zero, and that’s because Lightroom considers this edited version to be a brand new file. We can still make further adjustments in Lightroom if we need to. We just don’t have access to any of our previous editing history:

All of the sliders in the Basic panel have been reset to zero.
Making Further Edits In Photoshop
Now that you’re back in Lightroom, what if you need to make further edits to the image in Photoshop? All you need to do is make sure you have the correct version of the image selected in Lightroom (that is, the version with your previous Photoshop edits). Then, just as before, go up to the Photo menu, choose Edit In, and then choose Edit in Adobe Photoshop:
Going once again to Photo > Edit In > Edit in Adobe Photoshop.
Lightroom will again ask what it is exactly that you want to send over to Photoshop. This time, we don’t need another copy of the image. We want to open the exact same file that we worked on previously in Photoshop. Since the first two options («Edit a Copy with Lightroom Adjustments» and «Edit a Copy») will both make another copy of the image, they’re not the options we want. Instead, we want to choose the third option, Edit Original.
If you do want to create another copy of the image at this point (maybe for experimenting with an idea), don’t choose «Edit a Copy with Lightroom Adjustments» like we did originally. The reason is that this option will flatten your image when it opens in Photoshop, so any layers you added previously will be gone. Instead, choose the second option, Edit a Copy. This will send a new copy of the file over to Photoshop with all of your layers intact.
The only other important thing to note here is that if you’ve made any additional adjustments to the image in Lightroom since the last time you saved it in Photoshop, choosing either “Edit Original” or “Edit a Copy” will not pass those adjustments over to Photoshop. Instead, you’ll see the image in Photoshop as it appeared before those Lightroom adjustments were made. However, it’s only temporary. As soon as you return to Lightroom, the missing adjustments will reappear.
Since I don’t need another copy of the file, I’ll choose Edit Original, then I’ll click the Edit button:

Choose «Edit Original» to work on the same file as before in Photoshop.
This re-opens my file in Photoshop, ready for further editing:

The previously-edited file is back in Photoshop.
If we look at the document tab above the image to view the name of the file, we see that I did open the TIFF file, not the original JPEG image:

The document tab shows us which image we opened from Lightroom.
And, if we look in my Layers panel, we see that both of my previous layers are still intact:

The Layers panel showing the layer («Layer 1») I added previously in Photoshop.
When you’re done with your latest round of Photoshop edits, save the file the same way you did before by going up to the File menu and choosing Save. Then, close the file by going back up to the File menu and choosing Close. Return to Lightroom, where you’ll see your image updated with your latest changes.
Where to go from here.
And there we have it! If you’ve been following along from the beginning, we’ve now covered all the ways to open images into Photoshop! But while opening images is important, so is knowing how to close them. In the next lesson, you’ll learn how to close an image in Photoshop, including how to close multiple images at once!
You can also skip to one of the other lessons in this Complete Guide to Getting Images into Photoshop. Or visit my Photoshop Basics section for more tutorials!
Get all of our Photoshop tutorials as PDFs! Download them today!
Links
Tutorials
Other Stuff
© 2024 Photoshop Essentials.com.
For inspiration, not duplication.
Site design by Steve Patterson.
Photoshop is a trademark of Adobe Systems Inc.