Запрет / разрешение ответа на ping в Windows Server 2012 и 2016

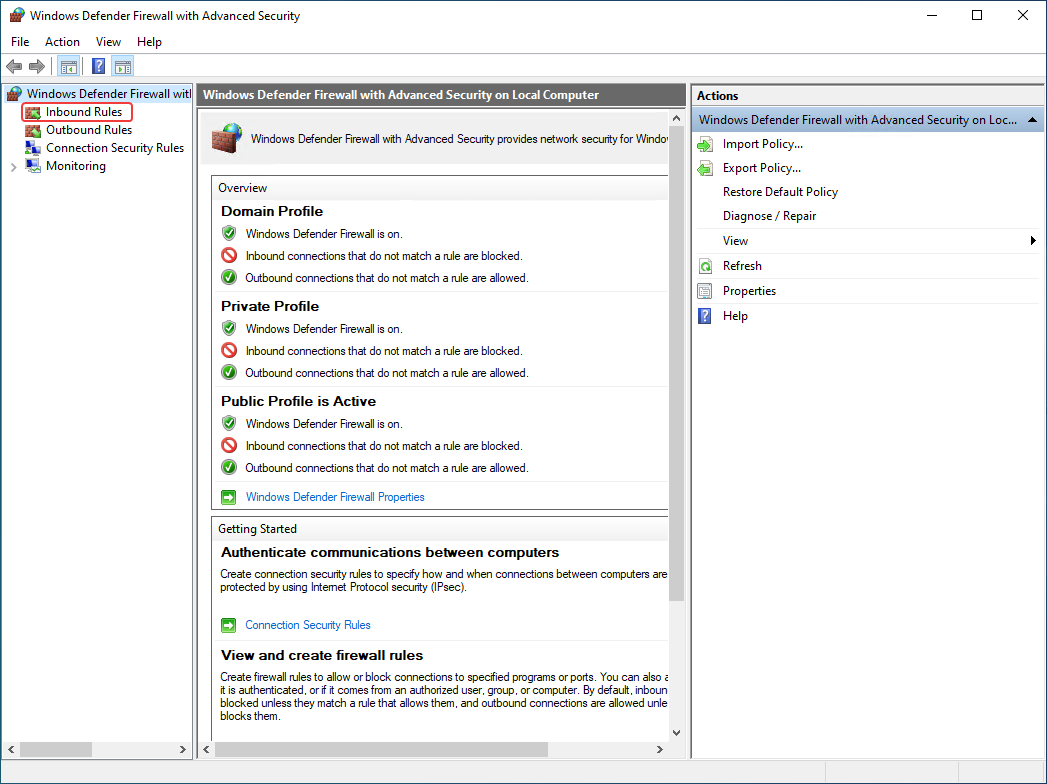
Самый простой способ запретить или разрешить ping — воспользоваться оснасткой
«Брандмауэр Windows в режиме повышенной безопасности».
Для ее запуска нажимаем клавиши Win+R и вводим команду wf.msc.
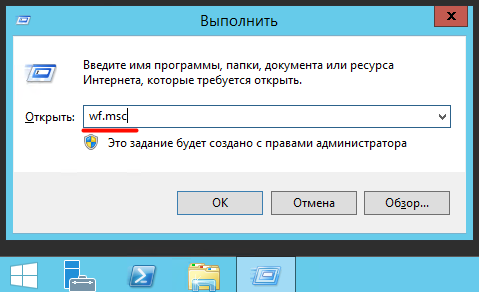
Заходим в раздел входящих правил («Правила для входящих подключений»).
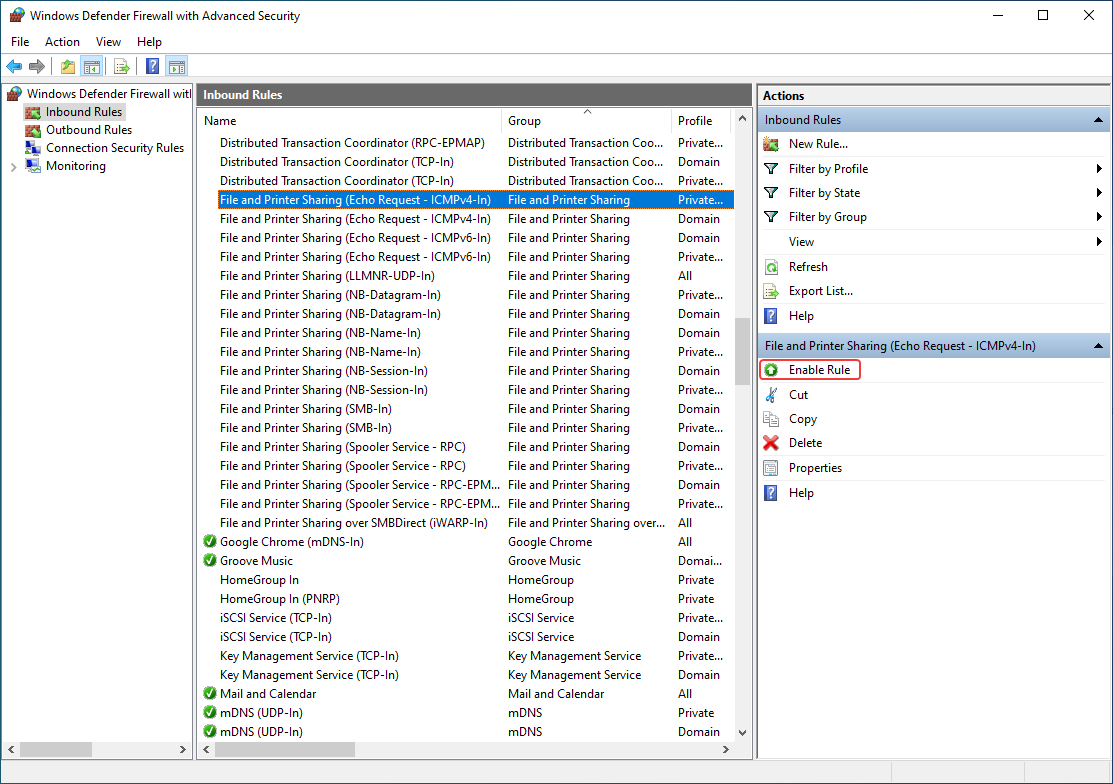
Здесь нас интересует предопределенное правило для IPV4 — ″Общий доступ к файлам и принтерам (эхо-запрос — входящий трафик ICMPv4)″.
Обратите внимание, что в таблице присутствуют три правила с одинаковым названием.
На самом деле это одно и то же правило, просто настроенное для разных профилей — одно для доменного профиля, второе для общего и частного.

Отключить/Включить правило
Для того, чтобы выключить/включить правило — выберите его и нажмите на правой панели «Отключить правило»/«Включить правило».

С отключенным правилом Ваш сервер не отвечает на запросы утилиты ping и наоборот, с включенным — отвечает.
How to Allow Ping in Windows Firewall (Client or Server OS)
In this guide, you will learn how to enable ping requests in Windows client and server operating systems.
I’ll show you the steps for a single computer and how to use group policy to enable ping requests for multiple computers.
By default, the Windows Firewall blocks ping requests. Blocking ping requests adds another layer of security to your network by making systems appear offline or unavailable. This helps to slow down viruses, ransomware, and attackers. For these reasons it is recommended that ICMP ping requests are blocked.
I understand blocking ping requests can cause problems with other systems and in troubleshooting network problems. Many management tools use ICMP requests to check for uptime, system status, and so on. If you need to unblock ping requests try to allow it only where needed.
Allow Ping Requests in Windows 10
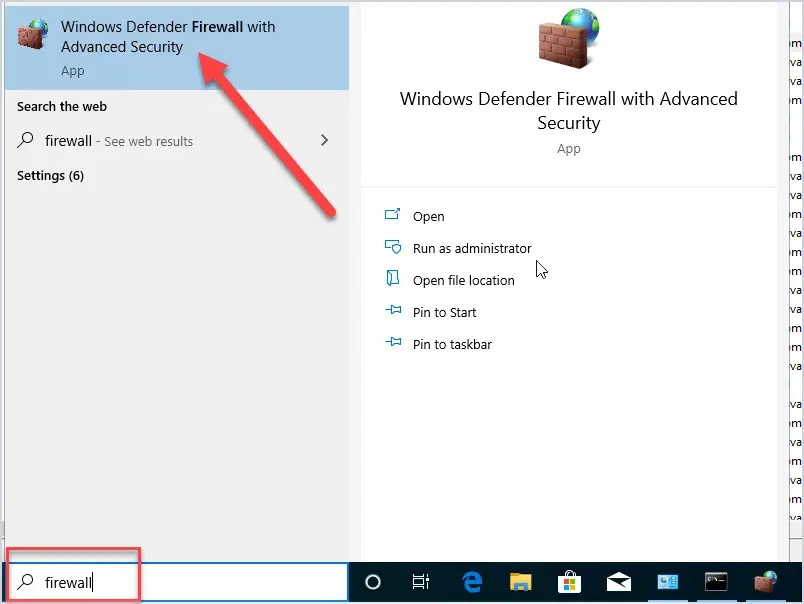
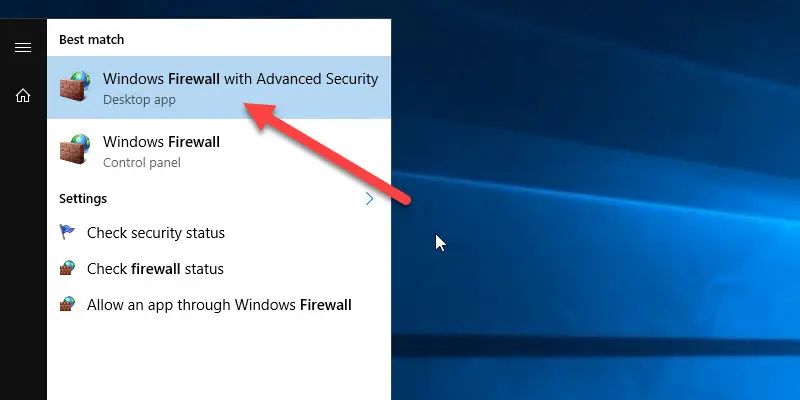
Step 1: Open the Windows Firewall
Click the start button then type firewall and click on “Windows Defender Firewall with Advanced Security”
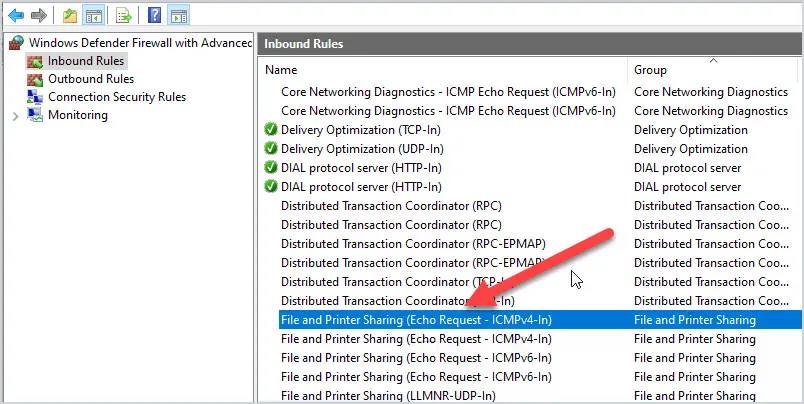
Step 2: Click on Inbound Rules
In the Firewall console click on inbound rules

Step 3: Find File and Printer Sharing (Echo Request – ICMPv4-In) Rule
In the inbound rule list scroll down to find the “File and Printer Sharing (Echo Request
If you look at the Enabled column it should say no and this is why ping requests are being blocked. To allow pings just pick your profile and then click on Enabled. In this example, I will enable pings only for the domain profile.
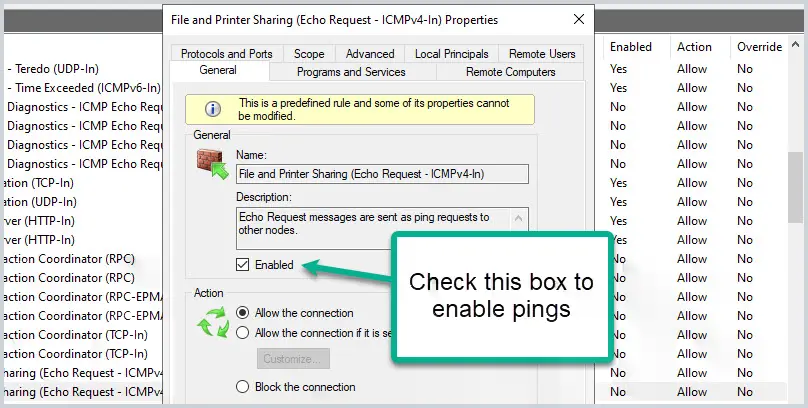
I do not recommend enabling pings on your public profile.
With pings enabled you should now be able to ping this system. I enabled pings on PC2 so I’ll test this from another computer.
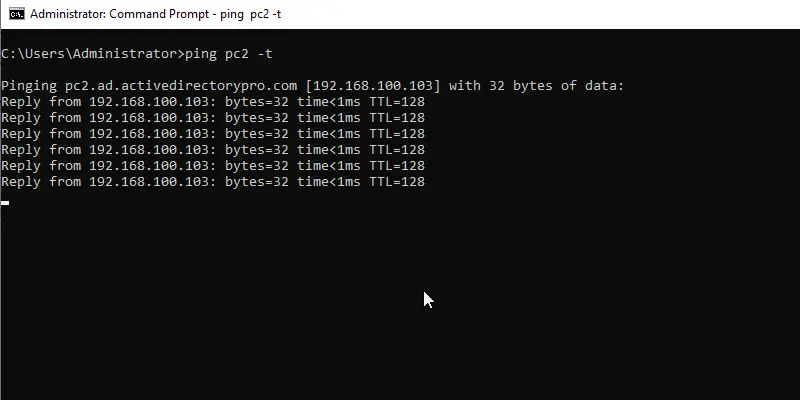
Yes, pings are now working.
If you need to enable ping requests for multiple computers then group policy is a better option, see the next section for example.
Enable Ping Request Using Group Policy
If you need to enable pings on multiple computers then you should use group policy. This will also prevent someone from disabling it.
These GPO settings will work with Windows 10, Server 2008, and later versions.
Open the group policy management console.
Create and link and new GPO to an OU. In this example, I’m going to enable pings on all computers in my ADPRO Computers OU.
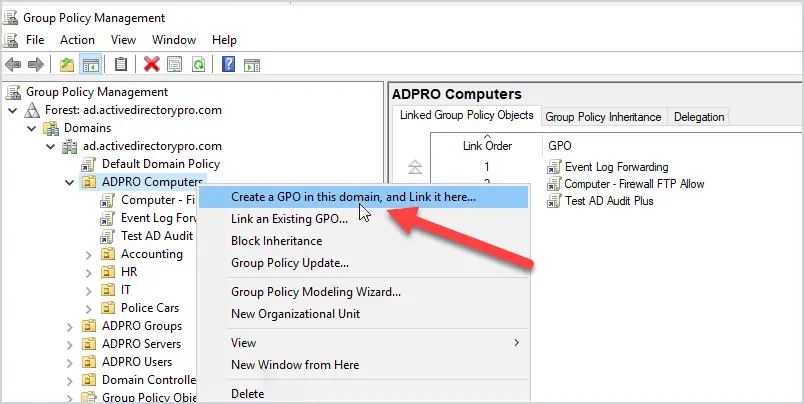
Give the GPO a name, I’ll name mine “Computer – Allow Pings”
Edit the new GPO and navigate to “Policies -> Windows Settings -> Security Settings -> Windows Defender Firewall with Advanced Security”
Click on inbound rules, right-click and select “New Rule”
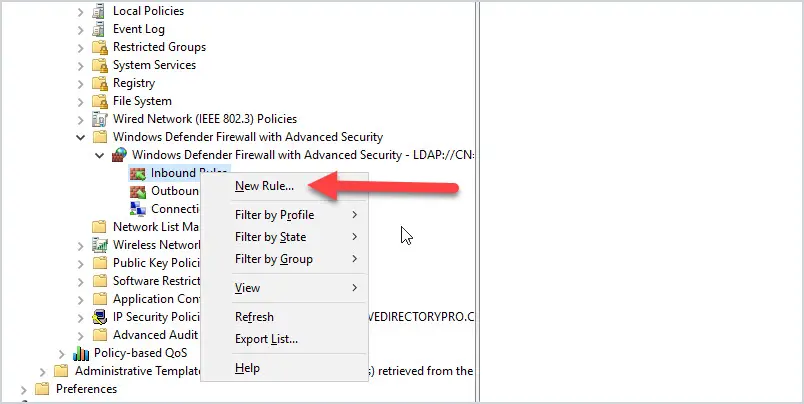
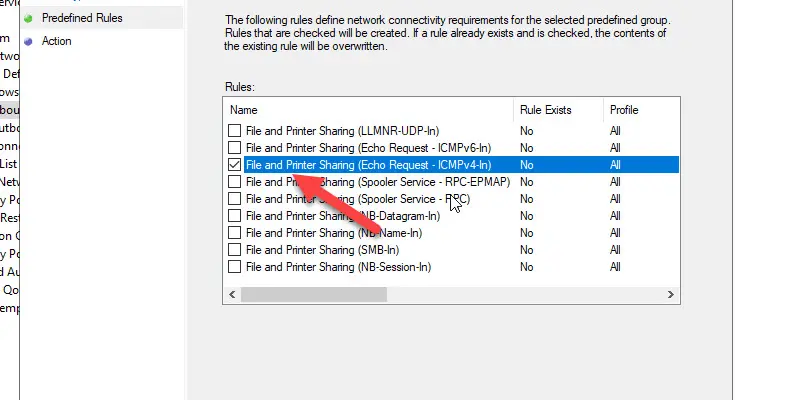
In the dropdown select “File and Printer Sharing”
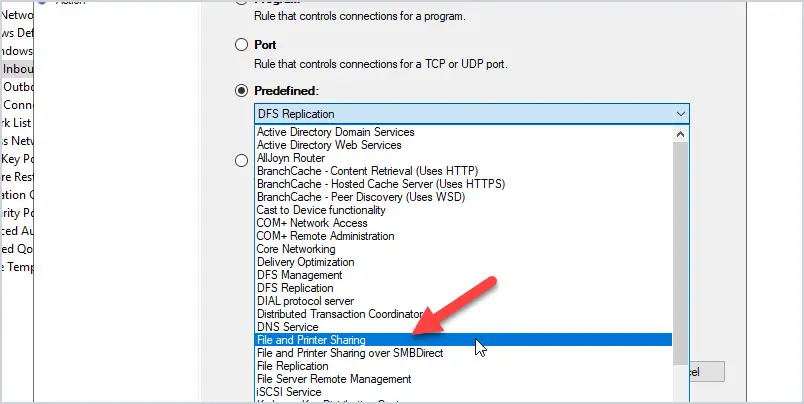
Uncheck all rules except “File and Printer Sharing (Echo Request -ICMPv4-in)
Select “Allow the Connection” and click Finish.
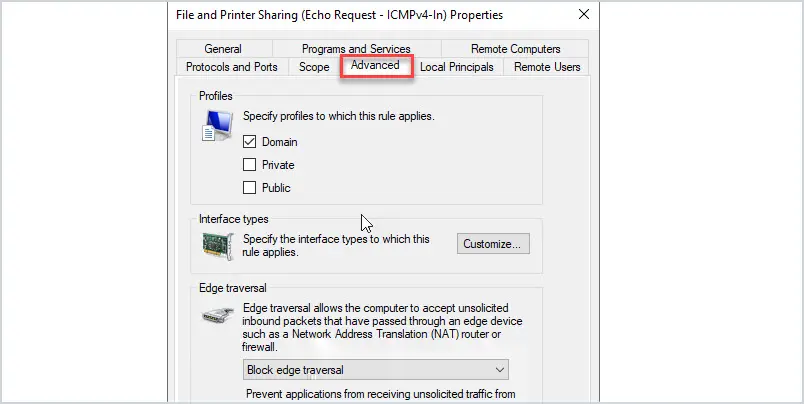
The rule is now created but we need to change the profiles.
Double click the rule and click on the Advanced tab. Unselect any profiles you don’t need. I just need the domain profile enabled so I will unselect “private” and “public” and then click apply.
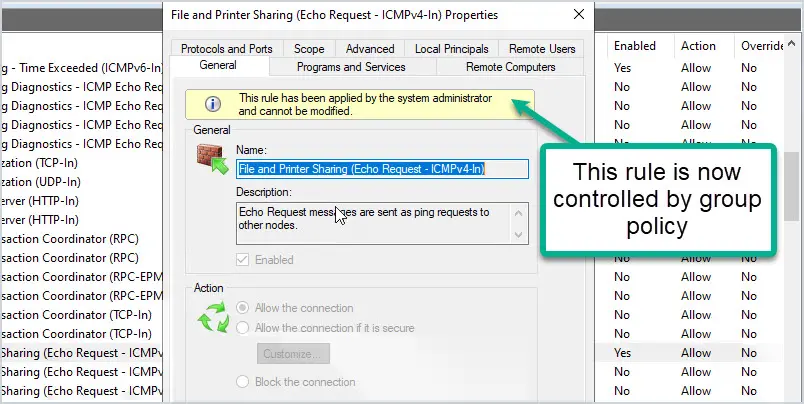
This rule will enable ping requests on any system that the GPO is applied to. It will also prevent changing the rule on the local computer as it is now controlled by group policy. Below is a screenshot of the rule on a local computer. it is locked down and cannot be edited since it is controlled by group policy.
How to Enable Ping Requests in Server 2016
The steps are the same as a Windows 10 computer. The only difference is the firewall is called “Windows Firewall with Advanced Security”
Enable the “File and Printer Sharing (Echo Request – ICMPv4-in) rule and pings will be allowed.
Allow Ping Requests and Limit Scope
For added security, you can use the scope settings to limit which systems can accept and return pings. This is a nice feature as it lets you enable firewall rules with added security.
For example, I need to allow ping requests on my 2016 server but there is no reason Lenny’s computer in finance should have access to ping the server. I can use the scope option to limit which IP addresses can send pings to the server.
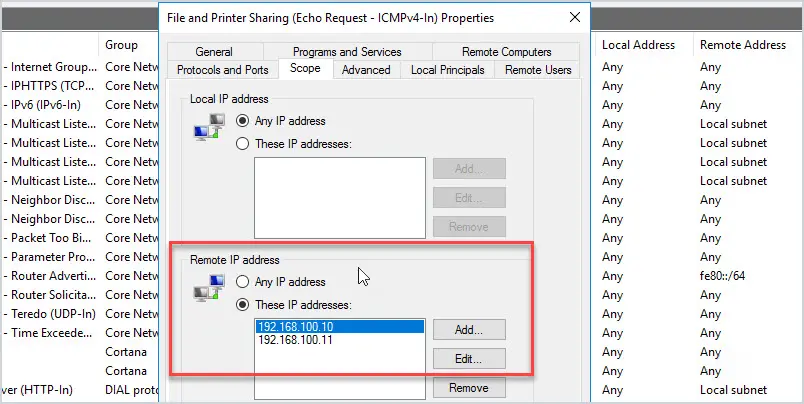
In the picture above, I added the IP addresses of the systems that my 2016 server will accept pings from.
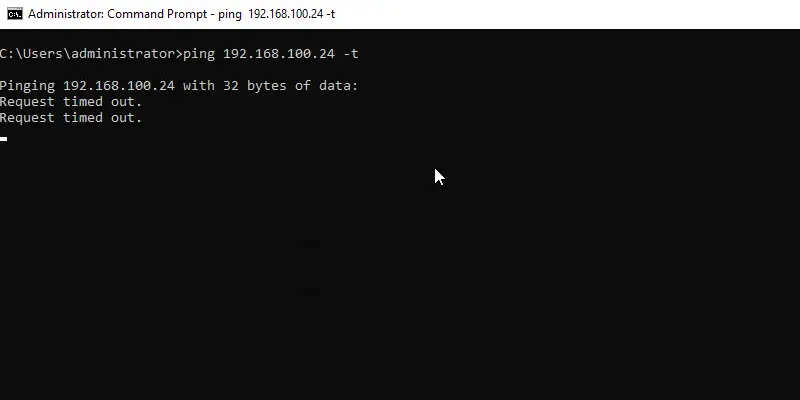
So if I send a ping from my PC2 (192.168.100.103) the ping fails.
Now I’ll send a ping from the server (192.168.100.10)
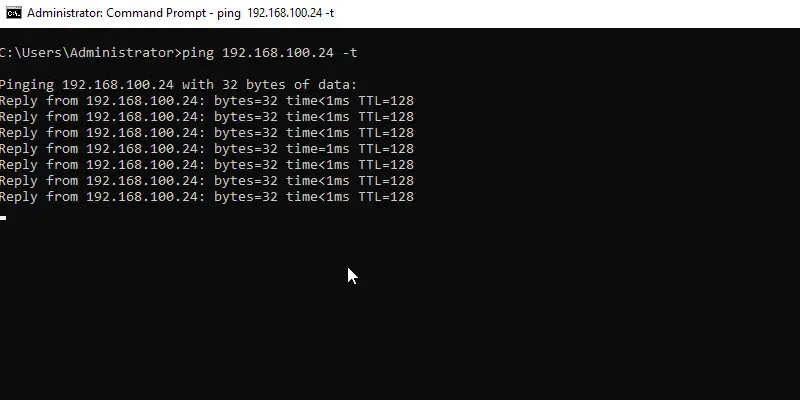
The ping works because this IP is allowed by the firewall scope settings.
This is a great way to add additional security using the Windows Firewall. I use this setting all the time with various rules.
So that is how you enable ping requests in the Windows Firewall. If you liked this guide then check out more of my Active Directory Security tips for Windows domain environments.
If you have questions post them in the comment section below.
How to make Windows 10 pingable
Even those with no familiarity are likely to know about the ping, a networking utility used to test if a device is reachable. Unfortunately, many will also find that ping can stop functioning correctly if the user has a Windows 10 Firewall enabled.
BitLaunch
Read more posts by this author.
BitLaunch
3 Aug 2020 • 4 min read

Even those with no familiarity are likely to know about the ping, a networking utility used to test if a device is reachable and determine the time it takes for information to travel from one destination to another (often seen in video games). Unfortunately, many will also find that ping can stop functioning correctly if the user has a Windows 10 Firewall enabled.
This can prove particularly annoying if you’re trying to determine if a VPS is reachable from a local PC and vice versa, or are trying to see if your home PC is alive from work. Thankfully, in Windows 10 you can allow ping through the Windows Firewall easily and without turning it off entirely, which would pose a major security risk.
However, before we show you how to safely allow ping in Windows 10, you should be aware of a few pre-requisites:

- The Windows 10 PC you want to ping, in our case a Windows 10 VPS
- Your VPS credentials, found in your provider’s control panel
- A computer to ping from
- A method of accessing the VPS, such as Windows 10’s Remote Desktop Connection tool
How to Allow Ping through the Windows 10 Firewall
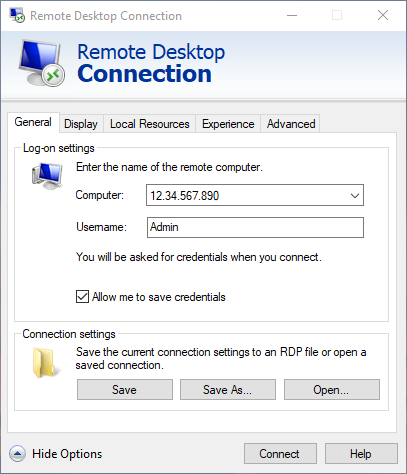
The first step is to connect to your remote Windows 10 PC, in our case a VPS. You can use RDP to connect to it by pressing Start and searching for “Remote Desktop Connection”. Then, open the app and enter the IP and username of your VPS host, which should be in your hosting control panel. Also enter the password when prompted.
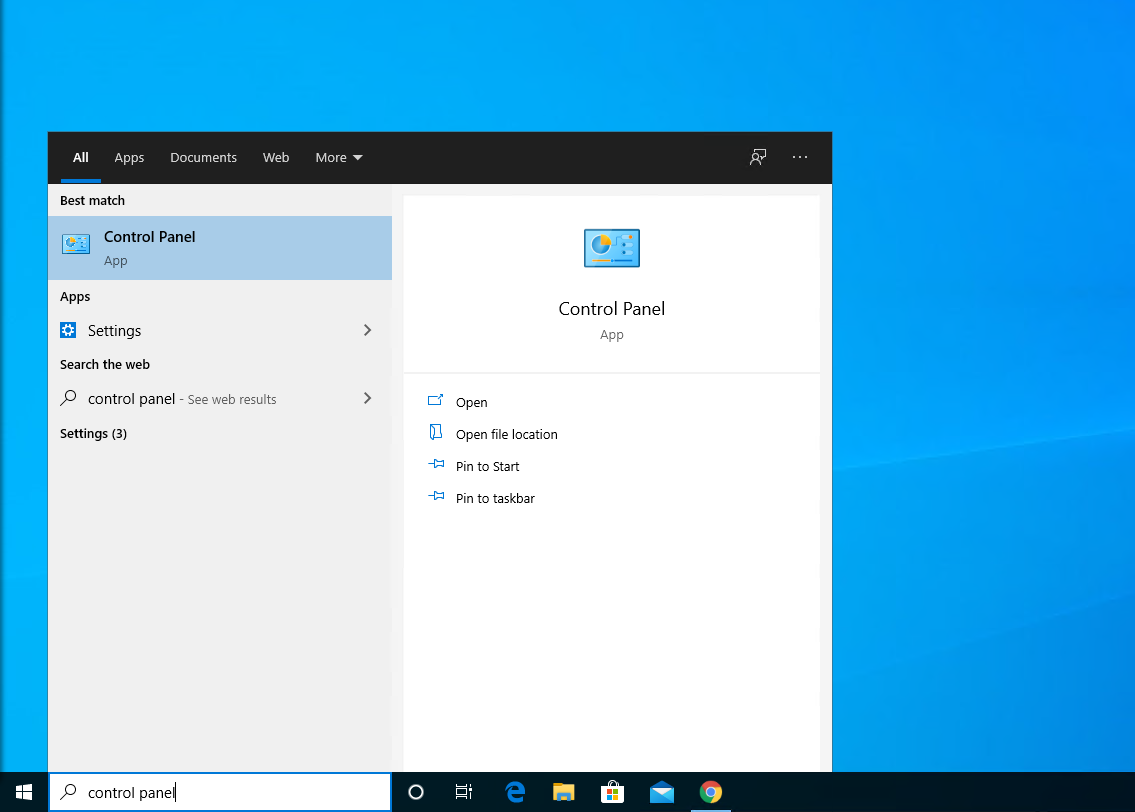
Once connected, press Start and search for “Control Panel”. Click the first result to open the legacy control panel.
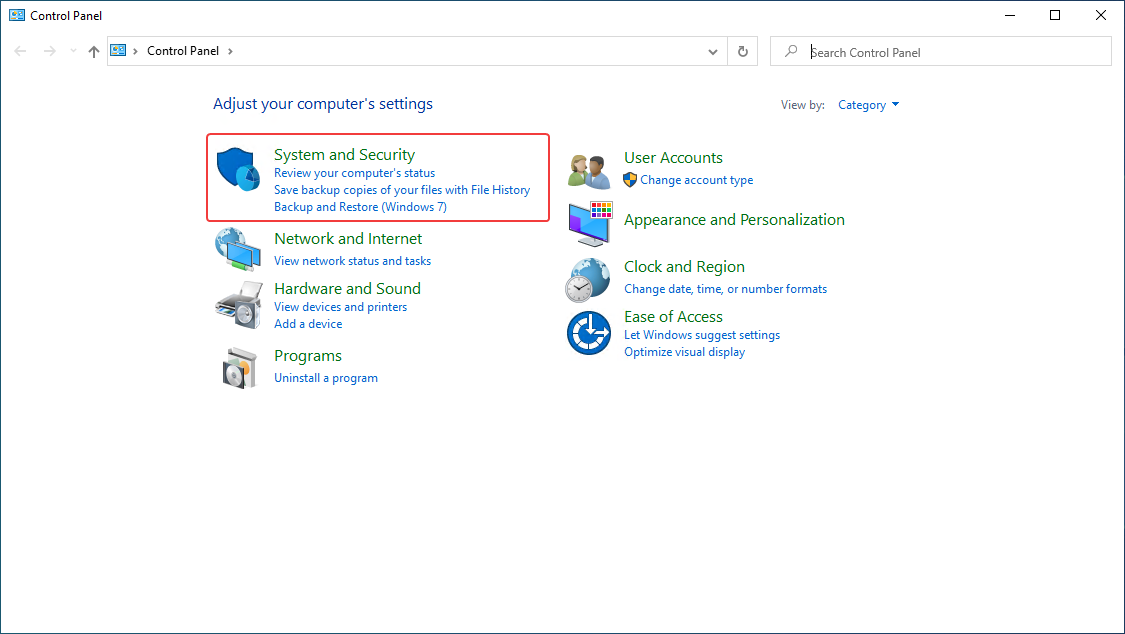
Once there, click on System and Security.
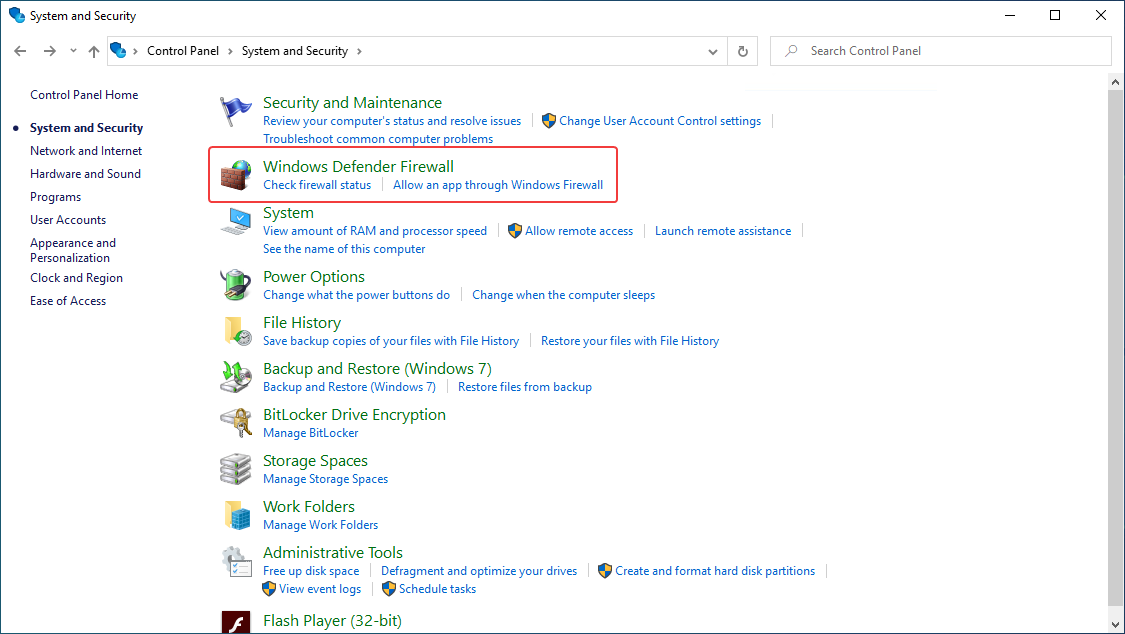
From the list, select Windows Defender Firewall.
In the left-hand sidebar, choose Advanced settings and supply your administrator credentials to access them. You’ll be taken to the main ‘Windows Defender Firewall with Advanced Security’ app, where you should click Inbound Rules in the left sidebar.
Press the F key until you find ‘File and Printer Sharing (Echo Request – ICMPv4 – In)’. Click it once, then press Enable Rule in the right sidebar to allow ping in Windows 10.
A tick will appear next to its name and you should find that Windows 10 is now pingable by PC’s on the local subnet. However, if you’d like to ping Windows 10 from a PC outside of the network, some extra configuration is required.
With the rule enabled, double-click ‘File and Printer Sharing (Echo Request – ICMPv4 – In)’ to open the properties window. Click on the ‘Scope’ tab.
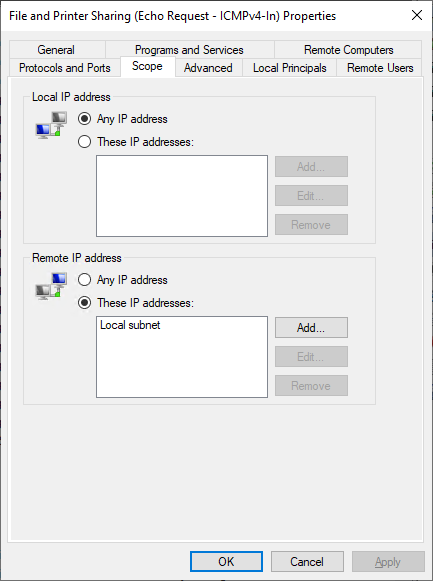
Under ‘Remote IP address’, click Add. Tick ‘This IP address or subnet:’ and enter the IP address of the computer you’re trying to ping from. If you’re unsure of your IP address, you can find it here. Press OK twice.
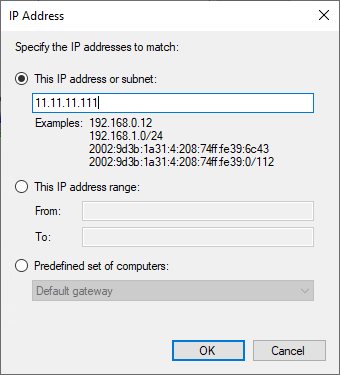
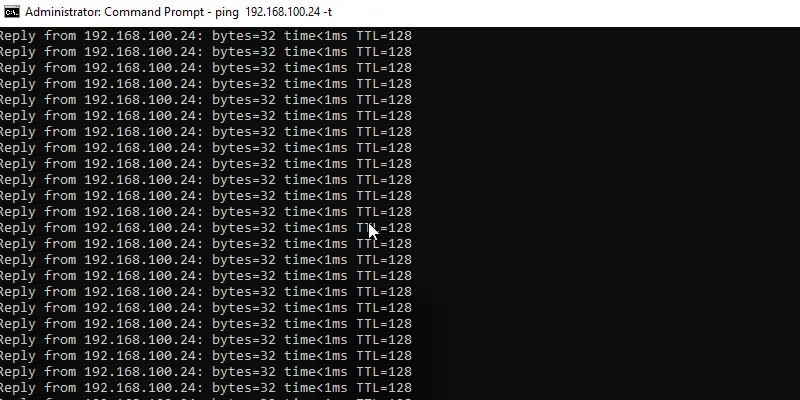
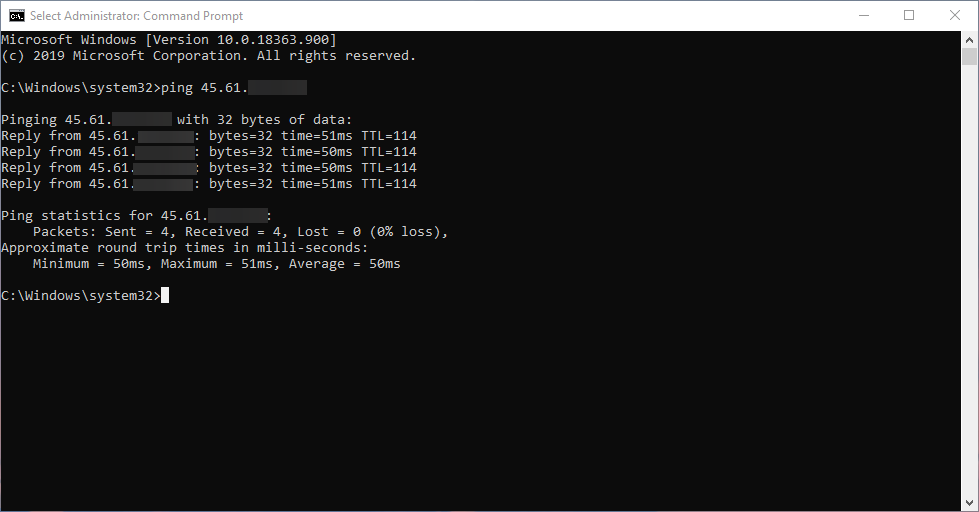
We can now test this configuration again by trying to ping Windows 10 from our local PC. If you’re using Windows 10, open Command Prompt and type ping 11.11.11.111 , replacing the 1’s with your remote PC’s IP address.
Rather than timing out it should now show replies, with information about the time to respond, TTL, bytes and finally a summary of packet loss and round-trip times.
Don’t have a spare Windows 10 PC to ping? Sign up for BitLaunch today.

How to find and filter files via the Linux find command
Today we’re going to teach you everything you need to know about this useful tool, including how to find a file in Linux, search sub-directories, delete, and filter by aspects like name and file type.
BitLaunch 10 Aug 2020 • 6 min read

How to Edit DNS Servers in CentOS
Changing DNS server configuration can be very important. A switch in DNS can aid a server or user’s privacy, fix resolution issues, or allow you to use a self-created DNS server so you have full control over the process.
Не удается пропинговать IP-адрес в Windows 11/10 [Исправить]
Мы и наши партнеры используем файлы cookie для хранения и/или доступа к информации на устройстве. Мы и наши партнеры используем данные для персонализированной рекламы и контента, измерения рекламы и контента, понимания аудитории и разработки продуктов. Примером обрабатываемых данных может быть уникальный идентификатор, хранящийся в файле cookie. Некоторые из наших партнеров могут обрабатывать ваши данные в рамках своих законных деловых интересов, не спрашивая согласия. Чтобы просмотреть цели, в которых, по их мнению, они имеют законный интерес, или возразить против этой обработки данных, используйте ссылку со списком поставщиков ниже. Предоставленное согласие будет использоваться только для обработки данных, поступающих с этого веб-сайта. Если вы хотите изменить свои настройки или отозвать согласие в любое время, ссылка для этого находится в нашей политике конфиденциальности, доступной на нашей домашней странице.
Обычно мы используем пинг команда для проверки связи IP-адреса, чтобы проверить, находится ли IP-адрес в сети или отключен. Однако, если вы
не могу пропинговать IP на компьютере с Windows 11 или Windows 10 эта статья будет вам полезна. Вот несколько советов, которые помогут, когда вы не могу пропинговать IP через командную строку на ПК с Windows.

Не удается пропинговать IP-адрес в Windows 11/10
Если вы не можете пропинговать IP-адрес в Windows 11/10, воспользуйтесь следующими решениями:
- Разрешить ping через брандмауэр Windows
- Временно отключите стороннее программное обеспечение брандмауэра
- Проверьте подключение к Интернету
- Временно отключите VPN и прокси
- Запустите средство устранения неполадок с подключением к Интернету
- Проверьте настройки DNS
Чтобы узнать больше об этих советах, продолжайте читать.
1] Разрешить пинг через брандмауэр Windows
Если вы отключили эхо-запросы ICMP в брандмауэре, вы не сможете использовать команду Ping в своей команде Windows 11/10. Вот почему это первое, что вам нужно проверить, когда вы не можете пропинговать IP-адрес на своем компьютере. Хотя многие администраторы часто отключают эту функцию из соображений безопасности, вам необходимо включить ее на своем домашнем компьютере, чтобы пинговать IP-адреса. Следуйте этому руководству, чтобы разрешить пинг через брандмауэр Windows .
2] Временно отключите стороннее программное обеспечение брандмауэра.
Встроенный брандмауэр и стороннее приложение брандмауэра могут вызвать эту проблему на вашем компьютере. Если вы используете стороннее программное обеспечение брандмауэра и у вас что-то не так, весь входящий и исходящий трафик будет блокироваться автоматически. Другими словами, вы не можете пропинговать любой IP-адрес. Вот почему рекомендуется временно отключить стороннее программное обеспечение брандмауэра и проверить, решает ли оно проблему.
3] Проверьте подключение к Интернету
Чтобы пропинговать IP-адрес, у вас должно быть действующее подключение к Интернету. Если у вас нет действующего интернет-источника, вы никак не сможете его найти. Вот почему рекомендуется проверить, есть ли у вас работающее подключение к Интернету. Если у вас возникли проблемы с подключением к Интернету, следуйте этим советам, чтобы исправить распространенные проблемы с сетью и подключением к Интернету в Windows .
4] Временно отключите VPN и прокси
Если вы используете VPN или прокси и у вас есть проблемы с этими серверами, вы не сможете правильно использовать команду ping. Эти неисправные серверы не позволят вам использовать команду ping, даже если у вас есть действующее подключение к Интернету. Поэтому рекомендуется временно отключить VPN и прокси.
5] Запустите средство устранения неполадок с подключением к Интернету.
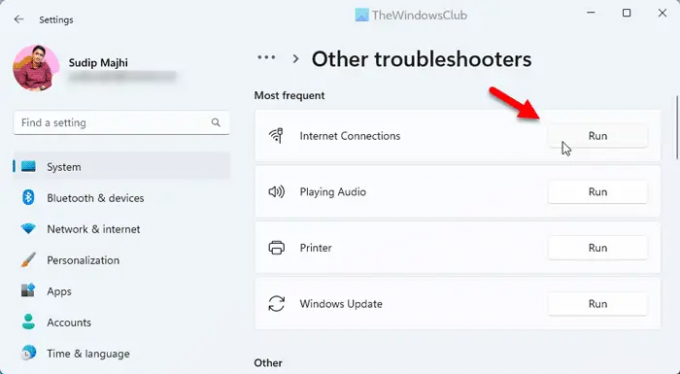
Использование средства устранения неполадок с подключением к Интернету может решить вашу проблему, потому что это проблема, связанная с подключением. Вот почему вы можете выполнить следующие шаги, чтобы исправить это:
- Нажимать Выиграть+Я чтобы открыть настройки Windows.
- Идти к Система > Устранение неполадок > Другие средства устранения неполадок.
- Найди Интернет-соединения Устранение неполадок.
- Нажмите на Бегать кнопка.
- Следуйте инструкциям на экране.
Наконец, вам может потребоваться перезагрузить компьютер перед повторным использованием команды ping.
6] Проверьте настройки DNS
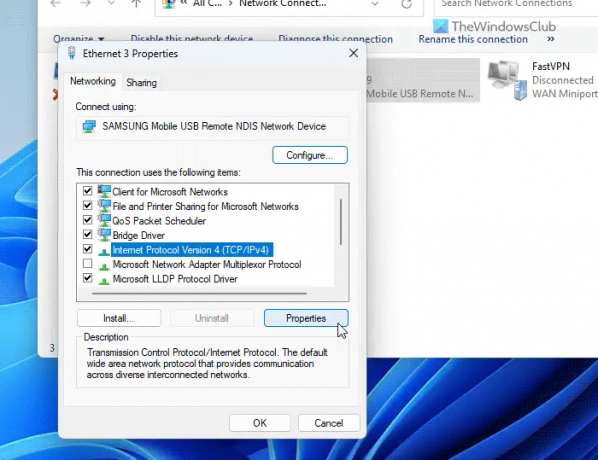
Команда ping каким-то образом связана с DNS, который вы используете на своем компьютере. Возможно, вам потребуется проверить настройки маршрутизатора, если вы используете соединение WiFi. Однако, если вы используете Ethernet, вы должны зайти в мастер сетевых подключений и проверить настройки DNS. Для этого сделайте следующее:
- Нажимать Win+R чтобы открыть приглашение «Выполнить».
- Тип ncpa.cpl и ударил Входить кнопка.
- Щелкните правой кнопкой мыши активный источник Интернета и щелкните значок Характеристики.
- Выберите Интернет-протокол версии 4 и нажмите на Характеристики кнопка.
- Убедитесь, что вы используете правильную настройку DNS.
- Нажмите на ХОРОШО кнопка.
- Перепроверьте статус пинга.
Читать: Лучшие бесплатные инструменты мониторинга пинга для ПК с Windows
Как исправить пинг в Windows 11?
Существует несколько способов исправить проблемы с пингом на компьютерах с Windows 11 или Windows 10. Тем не менее, вы должны сначала проверить, работает ли ваше интернет-соединение. Затем вы можете разрешить ping или через брандмауэр Windows, временно отключить дополнительные приложения брандмауэра, проверить настройки DNS и т. д. Вы также можете запустить средство устранения неполадок с подключением к Интернету, чтобы избавиться от этой проблемы.
Как пропинговать IP-адрес в Windows 11?
Чтобы пропинговать IP-адрес в Windows 11, вам нужно сначала открыть командную строку или строку «Выполнить». Затем введите команду в следующем формате: ping xx.xx.xx.xx -t, где xx.xx.xx.xx необходимо заменить исходным IP-адресом. Наконец, нажмите кнопку Входить кнопка для выполнения команды ping.
Читать: Ping Transmit failed Общая ошибка сбоя в Windows .
- 17/04/2023
- 0
- ИнтернетУстранение неполадок