How to install Linux on Windows with WSL
Developers can access the power of both Windows and Linux at the same time on a Windows machine. The Windows Subsystem for Linux (WSL) lets developers install a Linux distribution (such as Ubuntu, OpenSUSE, Kali, Debian, Arch Linux, etc) and use Linux applications, utilities, and Bash command-line tools directly on Windows, unmodified, without the overhead of a traditional virtual machine or dualboot setup.
Prerequisites
You must be running Windows 10 version 2004 and higher (Build 19041 and higher) or Windows 11 to use the commands below. If you are on earlier versions please see the manual install page.
Install WSL command
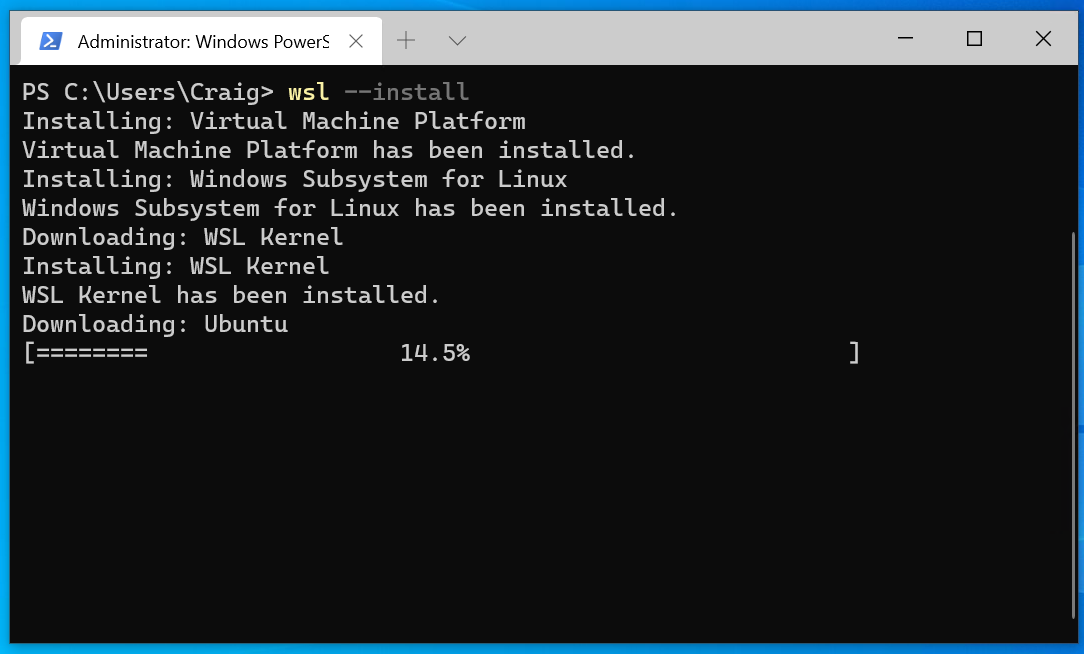
You can now install everything you need to run WSL with a single command. Open PowerShell or Windows Command Prompt in administrator mode by right-clicking and selecting «Run as administrator», enter the wsl —install command, then restart your machine.
wsl --install This command will enable the features necessary to run WSL and install the Ubuntu distribution of Linux. (This default distribution can be changed).
If you’re running an older build, or just prefer not to use the install command and would like step-by-step directions, see WSL manual installation steps for older versions.
The first time you launch a newly installed Linux distribution, a console window will open and you’ll be asked to wait for files to de-compress and be stored on your machine. All future launches should take less than a second.
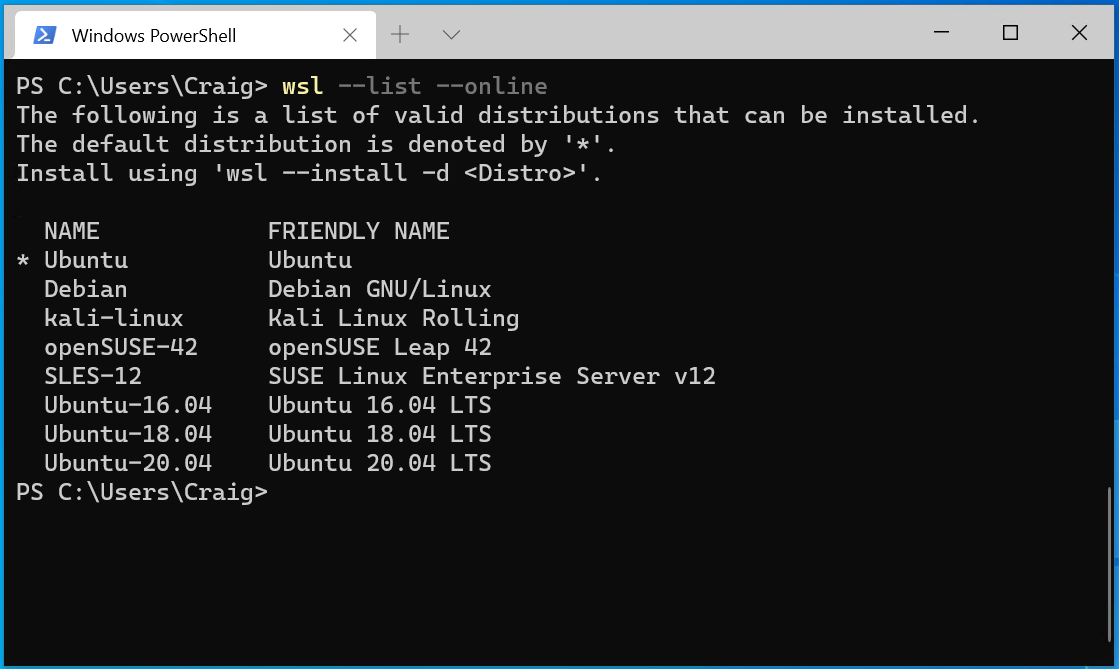
The above command only works if WSL is not installed at all. If you run wsl —install and see the WSL help text, please try running wsl —list —online to see a list of available distros and run wsl —install -d to install a distro. To uninstall WSL, see Uninstall legacy version of WSL or unregister or uninstall a Linux distribution.
Change the default Linux distribution installed
By default, the installed Linux distribution will be Ubuntu. This can be changed using the -d flag.
- To change the distribution installed, enter: wsl —install -d . Replace with the name of the distribution you would like to install.
- To see a list of available Linux distributions available for download through the online store, enter: wsl —list —online or wsl -l -o .
- To install additional Linux distributions after the initial install, you may also use the command: wsl —install -d .
If you want to install additional distributions from inside a Linux/Bash command line (rather than from PowerShell or Command Prompt), you must use .exe in the command: wsl.exe —install -d or to list available distributions: wsl.exe -l -o .
If you run into an issue during the install process, check the installation section of the troubleshooting guide.
To install a Linux distribution that is not listed as available, you can import any Linux distribution using a TAR file. Or in some cases, as with Arch Linux, you can install using an .appx file. You can also create your own custom Linux distribution to use with WSL.
Set up your Linux user info
Once you have installed WSL, you will need to create a user account and password for your newly installed Linux distribution. See the Best practices for setting up a WSL development environment guide to learn more.
Set up and best practices
We recommend following our Best practices for setting up a WSL development environment guide for a step-by-step walk-through of how to set up a user name and password for your installed Linux distribution(s), using basic WSL commands, installing and customizing Windows Terminal, set up for Git version control, code editing and debugging using the VS Code remote server, good practices for file storage, setting up a database, mounting an external drive, setting up GPU acceleration, and more.
Check which version of WSL you are running
You can list your installed Linux distributions and check the version of WSL each is set to by entering the command: wsl -l -v in PowerShell or Windows Command Prompt.
To set the default version to WSL 1 or WSL 2 when a new Linux distribution is installed, use the command: wsl —set-default-version , replacing with either 1 or 2.
To set the default Linux distribution used with the wsl command, enter: wsl -s or wsl —set-default , replacing with the name of the Linux distribution you would like to use. For example, from PowerShell/CMD, enter: wsl -s Debian to set the default distribution to Debian. Now running wsl npm init from Powershell will run the npm init command in Debian.
To run a specific wsl distribution from within PowerShell or Windows Command Prompt without changing your default distribution, use the command: wsl -d , replacing with the name of the distribution you want to use.
Learn more in the guide to Basic commands for WSL.
Upgrade version from WSL 1 to WSL 2
New Linux installations, installed using the wsl —install command, will be set to WSL 2 by default.
The wsl —set-version command can be used to downgrade from WSL 2 to WSL 1 or to update previously installed Linux distributions from WSL 1 to WSL 2.
To see whether your Linux distribution is set to WSL 1 or WSL 2, use the command: wsl -l -v .
To change versions, use the command: wsl —set-version 2 replacing with the name of the Linux distribution that you want to update. For example, wsl —set-version Ubuntu-20.04 2 will set your Ubuntu 20.04 distribution to use WSL 2.
If you manually installed WSL prior to the wsl —install command being available, you may also need to enable the virtual machine optional component used by WSL 2 and install the kernel package if you haven’t already done so.
To learn more, see the Command reference for WSL for a list of WSL commands, Comparing WSL 1 and WSL 2 for guidance on which to use for your work scenario, or Best practices for setting up a WSL development environment for general guidance on setting up a good development workflow with WSL.
Ways to run multiple Linux distributions with WSL
WSL supports running as many different Linux distributions as you would like to install. This can include choosing distributions from the Microsoft Store, importing a custom distribution, or building your own custom distribution.
There are several ways to run your Linux distributions once installed:
- Install Windows Terminal(Recommended) Using Windows Terminal supports as many command lines as you would like to install and enables you to open them in multiple tabs or window panes and quickly switch between multiple Linux distributions or other command lines (PowerShell, Command Prompt, Azure CLI, etc). You can fully customize your terminal with unique color schemes, font styles, sizes, background images, and custom keyboard shortcuts. Learn more.
- You can directly open your Linux distribution by visiting the Windows Start menu and typing the name of your installed distributions. For example: «Ubuntu». This will open Ubuntu in its own console window.
- From Windows Command Prompt or PowerShell, you can enter the name of your installed distribution. For example: ubuntu
- From Windows Command Prompt or PowerShell, you can open your default Linux distribution inside your current command line, by entering: wsl.exe .
- From Windows Command Prompt or PowerShell, you can use your default Linux distribution inside your current command line, without entering a new one, by entering: wsl [command] . Replacing [command] with a WSL command, such as: wsl -l -v to list installed distributions or wsl pwd to see where the current directory path is mounted in wsl. From PowerShell, the command get-date will provide the date from the Windows file system and wsl date will provide the date from the Linux file system.
The method you select should depend on what you’re doing. If you’ve opened a WSL command line within a Windows Prompt or PowerShell window and want to exit, enter the command: exit .
Want to try the latest WSL preview features?
Try the most recent features or updates to WSL by joining the Windows Insiders Program. Once you have joined Windows Insiders, you can choose the channel you would like to receive preview builds from inside the Windows settings menu to automatically receive any WSL updates or preview features associated with that build. You can choose from:
- Dev channel: Most recent updates, but low stability.
- Beta channel: Ideal for early adopters, more reliable builds than the Dev channel.
- Release Preview channel: Preview fixes and key features on the next version of Windows just before its available to the general public.
Additional resources
Установка Linux в Windows с помощью WSL
Разработчики могут одновременно получить доступ к возможности Windows и Linux на компьютере с Windows. Подсистема Windows для Linux (WSL) позволяет разработчикам устанавливать дистрибутив Linux (например, Ubuntu, OpenSUSE, Kali, Debian, Arch Linux и т. д.) и использовать приложения Linux, служебные программы и средства командной строки Bash непосредственно в Windows, не измененные без затрат на традиционную виртуальную машину или двойную настройку.
Необходимые компоненты
Для использования приведенных ниже команд необходимо запустить Windows 10 версии 2004 и выше (сборка 19041 и выше) или Windows 11. Если вы находитесь в более ранних версиях, перейдите на страницу установки вручную.
Команда установки WSL
Теперь вы можете установить все необходимое для запуска WSL с помощью одной команды. Откройте Командную строку PowerShell или Windows в режиме администратора , щелкнув правой кнопкой мыши и выбрав команду «Запуск от имени администратора», введите команду wsl —install, а затем перезапустите компьютер.
wsl --install Эта команда включит функции, необходимые для запуска WSL и установки дистрибутива Ubuntu для Linux. (Этот дистрибутив по умолчанию можно изменить.)
Если вы используете более раннюю сборку или не хотите использовать команду для установки и вам нужны пошаговые инструкции, см. статью Действия по установке WSL вручную для старых версий.
При первом запуске недавно установленного дистрибутива Linux откроется окно консоли. Вам будет предложено подождать, пока файлы будут распакованы и сохранены на компьютере. Все будущие запуски должны занимать меньше секунды.
Приведенная выше команда работает только в том случае, если WSL не установлен вообще. Если вы запускаете wsl —install и видите текст справки WSL, попробуйте wsl —list —online просмотреть список доступных дистрибутивов и запустить wsl —install -d для установки дистрибутива. Сведения об удалении WSL см. в разделе Удаление устаревшей версии WSL или Отмена регистрации или удаление дистрибутива Linux.
Изменение установленного дистрибутива Linux по умолчанию
По умолчанию в качестве устанавливаемого дистрибутива Linux используется Ubuntu. Для этого используйте флаг -d .
- Чтобы изменить установленный дистрибутив, введите wsl —install -d . Замените именем дистрибутива, который хотите установить.
- Чтобы просмотреть список доступных дистрибутивов Linux, доступных для скачивания через Интернет-магазин, введите wsl —list —online или wsl -l -o .
- Чтобы установить дополнительные дистрибутивы Linux после исходной установки, можно также использовать команду wsl —install -d .
Если вы хотите установить дополнительные дистрибутивы из командной строки Linux или Bash (а не из PowerShell или командной строки), используйте .exe в команде wsl.exe —install -d . Чтобы получить список доступных дистрибутивов, используйте wsl.exe -l -o .
Если во время установки возникла проблема, см. раздел Установка руководства по устранению неполадок.
Чтобы установить дистрибутив Linux, который не указан как доступный, можно импортировать его с помощью TAR-файла. В некоторых случаях, как с Arch Linux, можно выполнить установку с помощью файла .appx . Вы также можете создать собственный пользовательский дистрибутив Linux для использования с WSL.
Настройка сведений о пользователе Linux
После установки WSL необходимо создать учетную запись пользователя и пароль для установленного дистрибутива Linux. Дополнительные сведения см. в статье Рекомендации по настройке среды разработки WSL.
Советы и рекомендации
Мы рекомендуем использовать наше пошаговое руководство Рекомендации по настройке среды разработки WSL. В нем описано, как настроить имя пользователя и пароль для установленных дистрибутивов Linux, использовать основные команды WSL, установить и настроить Терминал Windows, настроить управление версиями Git, отредактировать код и выполнить отладку с помощью удаленного сервера VS Code. Кроме того, в руководстве приведены рекомендации по хранению файлов, настройке базы данных, подключению внешнего диска, настройке ускорения GPU и пр.
Проверьте, какая версия WSL запущена
Вы можете получить список установленных распределений Linux и проверить версию WSL, задав команду wsl -l -v в PowerShell или в Командной строке Windows.
Чтобы задать значение WSL 1 или WSL 2 для версии по умолчанию при установке нового распределения Linux, используйте команду wsl —set-default-version , заменив на 1 или 2.
Чтобы определить распределение Linux по умолчанию для использования с командой wsl , введите wsl -s или wsl —set-default , заменив именем распределения Linux, который вы хотите использовать. Например, в PowerShell или CMD введите wsl -s Debian , чтобы задать для распределения значение по умолчанию — Debian. Теперь запуск wsl npm init в PowerShell приведет к выполнению npm init команды в Debian.
Чтобы запустить определенное распределение WSL из PowerShell или Командной строки Windows без изменения распределения по умолчанию, выполните команду wsl -d , заменив именем распределения, которое вы хотите использовать.
Дополнительные сведения см. в руководстве по основным командам для WSL.
Обновление версии WSL 1 до WSL 2
Для новых установок Linux, выполненных с помощью команды wsl —install , по умолчанию будет задано WSL 2.
С помощью команды wsl —set-version можно перейти с версии WSL 2 на WSL 1 или обновить ранее установленные дистрибутивы Linux с версии WSL 1 до WSL 2.
Чтобы проверить, какая установлена версия распределения Linux — WSL 1 или WSL 2, — выполните команду wsl -l -v .
Для изменения версий выполните команду wsl —set-version 2 , заменив именем дистрибутива Linux, который требуется обновить. Например, команда wsl —set-version Ubuntu-20.04 2 настроит распределение Ubuntu 20,04 на использование WSL 2.
Если вы установили WSL вручную, до того как команда wsl —install стала доступна, возможно, вам также потребуется включить необязательный компонент виртуальной машины, используемый WSL 2, и установить пакет ядра, если это еще не сделано.
Список команд WSL см. в справочнике по командам для WSL; рекомендации по использованию одной из версий в рабочем сценарии см. в статье со сравнением WSL 1 и WSL 2; для получения общих сведений о настройке надлежащего рабочего процесса разработки с помощью WSL ознакомьтесь с рекомендациями по настройке среды разработки WSL.
Способы запуска нескольких распределений Linux с помощью WSL
WSL поддерживает запуск неограниченного количества различных распределений Linux. Сюда входит выбор распределений из Microsoft Store, импорт настраиваемого распределенияили создание собственного пользовательского распределения.
Существует несколько способов запуска распределений Linux после их установки:
- Установка Терминал Windows(Рекомендуется)С помощью Терминал Windows поддерживает столько команд, сколько вы хотите установить, и позволяет открывать их на нескольких вкладках или панелях окон и быстро переключаться между несколькими дистрибутивами Linux или другими командными строками (PowerShell, командная строка, Azure CLI и т. д.). Вы можете полностью настроить терминал, используя уникальные цветовые схемы, стили шрифтов, размеры, фоновые изображения и пользовательские сочетания клавиш. Подробнее.
- Вы можете напрямую открыть распределение Linux, для этого откройте меню «Пуск» Windows и введите имя установленного распределения. Например, «Ubuntu». Откроется Ubuntu в собственном окне консоли.
- В Командной строке Windows или PowerShell можно ввести имя установленного распределения. Например: ubuntu
- Из PowerShell или командной строки Windows можно открыть распределение Linux по умолчанию в текущей командной строке, введя wsl.exe .
- Из PowerShell или командной строки Windows можно использовать распределение Linux по умолчанию в текущей командной строке без ввода новой, введя команду wsl [command] . Замена [command] командой WSL, например wsl -l -v для вывода списка установленных распределений или wsl pwd , чтобы узнать место подключения текущего пути к каталогу в WSL. В PowerShell команда get-date предоставит дату из файловой системы Windows, а wsl date предоставит дату из файловой системы Linux.
Выбранный метод должен зависеть от ваших действий. Если вы открыли командную строку WSL в Командной строке Windows или окне PowerShell и хотите выйти, введите команду exit .
Хотите испытать новейшие предварительные версии функций WSL?
Чтобы поработать с самыми последними функциями или обновлениями для WSL, присоединитесь к Программе предварительной оценки Windows. Когда вы присоединитесь к участникам Программы предварительной оценки Windows, вы сможете выбрать канал для получения предварительных сборок в меню параметров Windows и будете автоматически получать предварительные версии функций и обновления для WSL, связанные с этой сборкой. Варианты:
- Канал разработчика: последние обновления, но низкая стабильность.
- Бета-канал: идеально подходит для ранних последователей; более надежные сборки, чем в канале разработки.
- Канал предварительного выпуска: предварительные версии исправлений и основных функций следующей версии Windows непосредственно перед предоставлением их общедоступной версии.
Дополнительные ресурсы
How to download and install Linux
Linux is an operating system, similar to Windows, but with many different versions due to the nature of being open source and fully customizable. To install Linux, you must choose an install method and choose a Linux distribution.
To install Linux:
- Choose an install method: Windows Subsystem for Linux (WSL), Bare metal Linux; or create a Virtual Machine (VM) to run Linux locally or in the cloud.
- Choose a Linux distribution: Ubuntu, Debian, Kali Linux, openSUSE, etc.
- Follow the steps for your preferred install method:
- Use the install Linux command with Windows Subsystem for Linux (WSL)
- Create a Linux Virtual Machine (VM) in the cloud
- Create a Linux Virtual Machine (VM) on your local machine
- Create a bootable USB to install bare-metal Linux
- After installing Linux: Get familiar with your distribution’s package manager, update and upgrade the packages available, and get familiar with the other Linux resources at Microsoft, such as training courses, Linux-versions of popular tools, news, and Open Source events.
Step 1 — Choose a method to install Linux
The choice of which method to use for installing Linux depends on your needs and preferences.
- New to using Linux? We recommend starting with Windows Subsystem for Linux (WSL) as it’s the easiest way to get up and running.
- Work in a business environment with more complex needs related to scale or security? We recommend running Linux as a Virtual Machine (VM) in the cloud and checking out the support that Azure has to offer. This also applies if you want to run Linux as a server.
- Only want to run Linux as your primary operating system? If you are good with a slightly more complicated install process and don’t need access to Windows tools (like Outlook, Teams, Word, PowerPoint, etc), you can run Linux on bare metal to access the full potential of your hardware without any overhead from virtualization or emulation.
Learn more about these options below.
Windows Subsystem for Linux (WSL)
Available to those with a Windows machine, this is the most simple way to install Linux. Just run the Linux install command: wsl —install to install the Ubuntu distribution.
This method uses virtualization to integrate the Windows operating system (OS) with the Linux OS (running on an actual Linux kernel). You can add as many different Linux distributions as you please and run your favorite Linux tools, including GUI apps, alongside your favorite Windows tools. You can also mix and match Bash and PowerShell commands in the same command line. A Linux file system hosts your project files, while a separate Windows file systems hosts any developer tools, such as VS Code, that you’d like to work on the files with. This method of running Linux is highly efficient and performant. Once you choose a Linux distribution or opt to use the default Ubuntu distro, follow the instructions to Use the install Linux command with Windows Subsystem for Linux or learn more in the WSL documentation.
Create a Virtual Machine (VM)
Available to everyone regardless if you’re using a Windows or MacOS-based machine, but will require either an Azure account, if creating a VM in the cloud, or virtualization software, if creating a VM directly on your machine (locally).
A VM is a digital version of a physical computer and is a popular option for running Linux in environments that may require you to scale the level of hardware support (Memory and processing power required) and the level of Security (antimalware, encryption, backups, policy management, etc).
Like with WSL, you can create VM instances of as many different Linux distributions as you’d like, running them in an isolated environment, free from any conflicts and great for software development testing. While running a Linux distribution on WSL has slightly faster performance, a Linux VM is easier to clone or migrate. You can create a virtual machine on a cloud service like Azure or on your local machine, using virtualization software (otherwise known as a hypervisor).
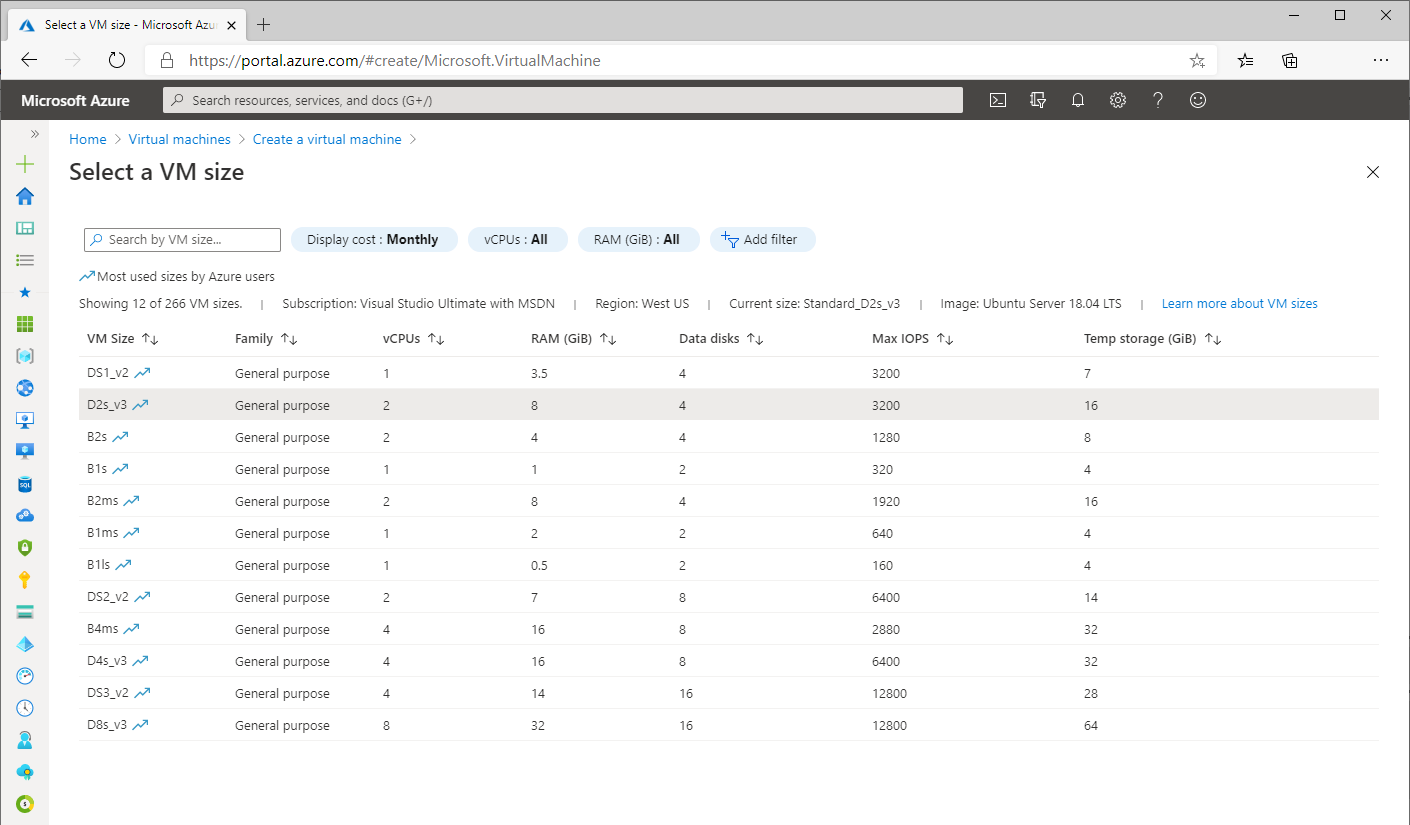
Creating a VM on Azure means that it’s hosted in the cloud, on Microsoft’s servers. You are essentially renting computing resources from Microsoft and using them to run the VM. This can be convenient if you need to quickly provision a new VM or need to run a workload that requires more computing resources than your local computer can provide. Larger businesses with more complex needs often choose to run Linux VMs on Azure for its scalability, control and abundance of features. Learn more about the architecture, workflow, and considerations to Run a Linux VM on Azure.
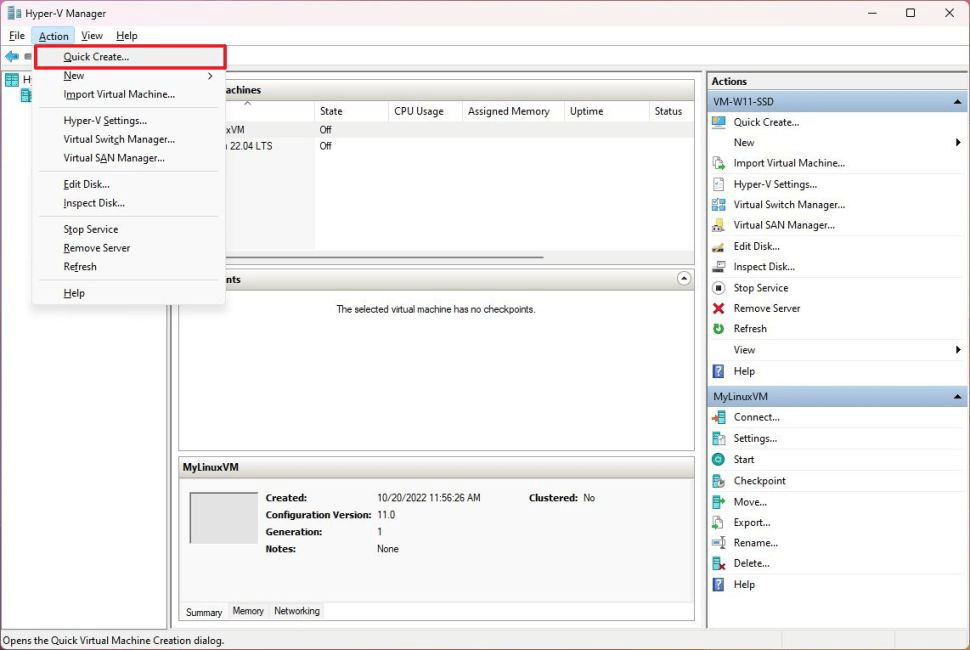
Creating a VM on your local machine requires virtualization using a hypervisor. Windows includes a «type 1» hypervisor called Hyper-V to run virtualization directly on your device hardware. There are also «type 2» hypervisors that run on top of the operating system, like VirtualBox or VMware. If you are using a Mac, the most commonly recommended hypervisor is «Parallels Desktop», though this is a paid service. See Install Linux VM on a Mac with Apple M-Series chip. VirtualBox also supports both Windows and MacOS. See Creating and Running a Linux Virtual Machine for more about how to design and run custom Linux guests on Apple silicon or Intel-based Macs.
You are responsible for managing the virtual machine when using a hypervisor, including allocating resources like memory and disk space, and ensuring that it is secure and up-to-date. This requires more technical expertise than some of the other options and may not be as scalable or fault-tolerant.
Once you’ve chosen a distribution and decided whether you want to run the VM locally, using a hypervisor, or in the cloud, using Azure, follow the instructions to Create a Linux Virtual Machine in the Cloud or Create a Linux Virtual Machine locally using a Hypervisor
Bare metal Linux
Bare metal Linux just means that Linux is running directly on the device hardware. This install method requires you to create a bootable USB drive by downloading an iso install file from the site hosting your chosen Linux distribution. You will need to use a Windows computer (or any desktop device with an existing OS) to create this drive.
Many users choose the traditional method of installing bare metal Linux on a device that is also running Windows and using the «dual boot» method. To boot Linux and Windows, you need to partition your hard drive to create separate spaces for both the Linux and Windows OS. The performance speed between WSL, virtual machines, and bare metal Linux has become so close that few developers choose this method due to the overhead of needing to restart (reboot) your device any time you want to switch between the operating systems. If you choose the bare metal Linux install route, you may also need to deal with potential driver issues or hardware compatibility problems that may arise with Linux on some devices.
If you are planning to dual boot or live boot a bare metal Linux distribution and your Windows machine is using Bitlocker for encryption to protect data theft or exposure, be certain to retrieve and store your BitLocker encryption keys prior to installing Linux. Learn more in this Microsoft Q&A: Can I use Bitlocker with Dual-Boot setup?
Step 2 — Choose a Linux distribution
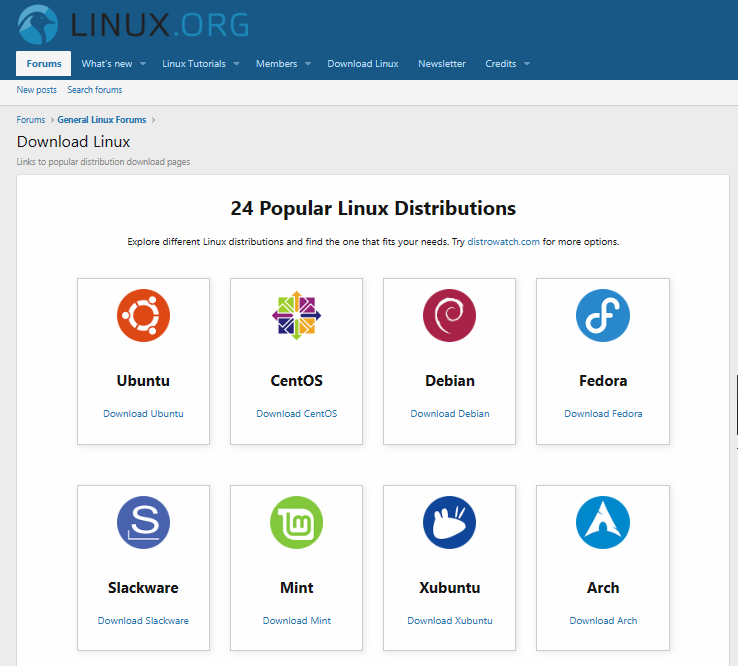
The different versions of Linux are called «distributions» (sometimes shortened to “distros”). So there isn’t actually a way to just “install Linux”, you first need to choose which distribution that uses the Linux kernel you want to download and install. There are over 600 active Linux distributions, such as Ubuntu, Debian, Kali Linux, openSUSE, and more. There are a number of factors to consider in choosing a distribution, such as:
Required Linux experience
If you’re new to Linux, you may want to start with Ubuntu. This is one of the most common starting places for Linux users due to the level of support and ease of use. Ubuntu offers a desktop-version and a server-version depending on how you plan to use it. The specific tasks that the operating system will be responsible for may help you determine which distribution to use. Arch Linux is a popular choice for those who want a highly customizable, do-it-yourself approach that is still stable and well-supported by a large user base. It is a much more complicated place to start, but can help you to get a better understanding of how Linux works due to the amount of custom configuration.
System requirements
A minimal, or «lightweight», distribution means a small footprint, with lower memory and processing speed requirements. Alpine Linux is a popular option where users will find most features disabled or not installed by default, but still has everything you need for a containerized app. Security needs: Some Linux users may have specific security concerns to consider. Kali Linux is an example of a distro designed for security tasks, such as Penetration Testing, Security Research, Computer Forensics and Reverse Engineering.
Business and Enterprise requirements
Business, corporate, or academic environments may have unique concerns from consumer environments. For example Red Hat Enterprise Linux (RHEL), SUSE Linux Enterprise Server (SLES) and Oracle Linux offer 24/7 global support and subscription-based service. CentOS is another popular enterprise distro that is community-supported but still compatible with RHEL.
Community support
A large user community that consistently contributes to the distribution, fixing bugs, adding features, helping with questions, etc. is another good consideration. Ubuntu is one of the most popular distos. openSUSE has been around longer than most other distributions and offers in addition to the stable version (Leap) a rolling version (Tumbleweed). Many other distros rapidly grow popular as the needs and preferences of the user community change. The Linux.org site has resources to help you assess what’s available, well-supported, or growing in popularity.
Step 3 — Follow install method instructions
Install Linux with Windows Subsystem for Linux
To install Linux on a Windows PC, use the install Linux command.
- Open PowerShell or Windows Command Prompt in administrator mode by right-clicking and selecting «Run as administrator».
- Enter the Linux install command: wsl —install .
- Restart your machine.
Install Linux command options
By default, the install command will use the Ubuntu distribution of Linux. You can see the other distributions that are available in the Microsoft Store by entering the command: wsl -l -o . If you’d like to install a distribution other than Ubuntu, just add -d to the command with the name of the distribution you’d like to install:
wsl --install -d
If the distribution you want to install isn’t available in the Microsoft Store, see the Windows Subsystem for Linux (WSL) documentation on how to Import any Linux distribution to use with WSL.
For more information on how to use VS Code, Git, databases, Docker, GUI apps, GPU acceleration, NodesJS, USB devices, or mount a disk, build a custom distribution, manage disk space, or set up WSL for your enterprise business, see the WSL documentation.
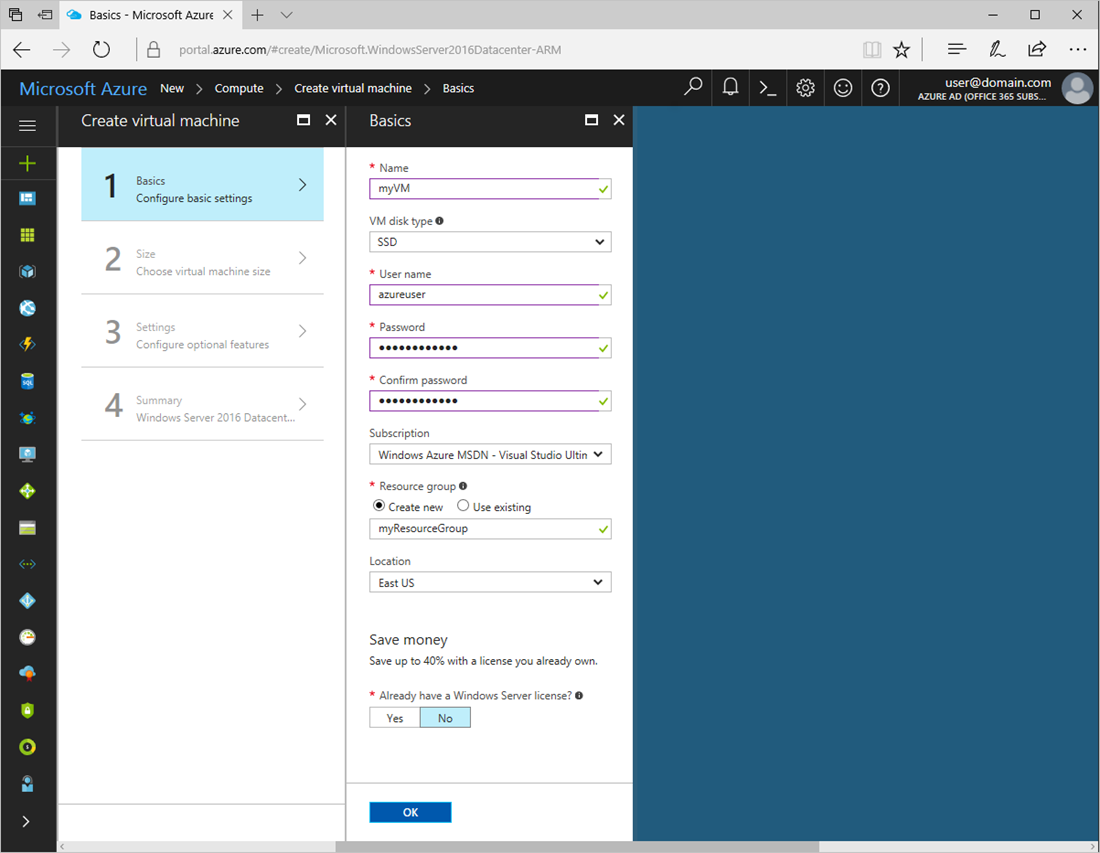
Create a Linux Virtual Machine in the cloud
To create a Linux Virtual Machine (VM) that is hosted in the cloud on Azure, log-in to the Azure Portal and select the “Create a Virtual Machine” service. Then follow the instructions for creating a user name, project, instance, SSH key, ports, and copying the IP address.
Azure supports a variety of options for setting up Linux VMs in the cloud. For a quickstart guide on how to set up a Linux VM, choose your preferred method:
- Azure Portal
- Azure CLI
- Azure PowerShell
- Terraform
- A Bicep file
- Azure Resource Manager (ARM) template
If you don’t have an Azure subscription, create a free account before you begin. If you’re new to creating Linux VMs with Azure, you can learn more about VMs or check out the online training course: Create a Linux virtual machine in Azure.
Create a Linux Virtual Machine locally using a hypervisor
To create a Linux VM that is hosted on your local machine using a hypervisor, you can use:
You will need to check the hardware requirements for your chosen hypervisor. Once the hypervisor is enabled or installed, you will need to choose the type of OS that you want to install and the installation source (this is typically a .iso or .vhdx file). You will need to give the VM a name, select the directory where files will be hosted, select the amount of memory to allocate to the VM and the size of the virtual hard drive where files will be stored (you can typically choose between a fixed or dynamically allocated amount of drive space). Sometimes integrations with a Linux virtual machine can be tricky due to display drivers and other hardware dependencies, but most hypervisors have an active user community that can help. You may also need to set up a virtual network if you want your VM to connect to the internet.
If you’re new to hypervisors and want to learn more, try the free online training module: Configure and manage Hyper-V virtual machines.
Create a bootable USB drive to install bare-metal Linux
If you want bare-metal Linux, whether to run a distribution alone on a device or to dual-boot between the distribution and Windows, here are the steps:
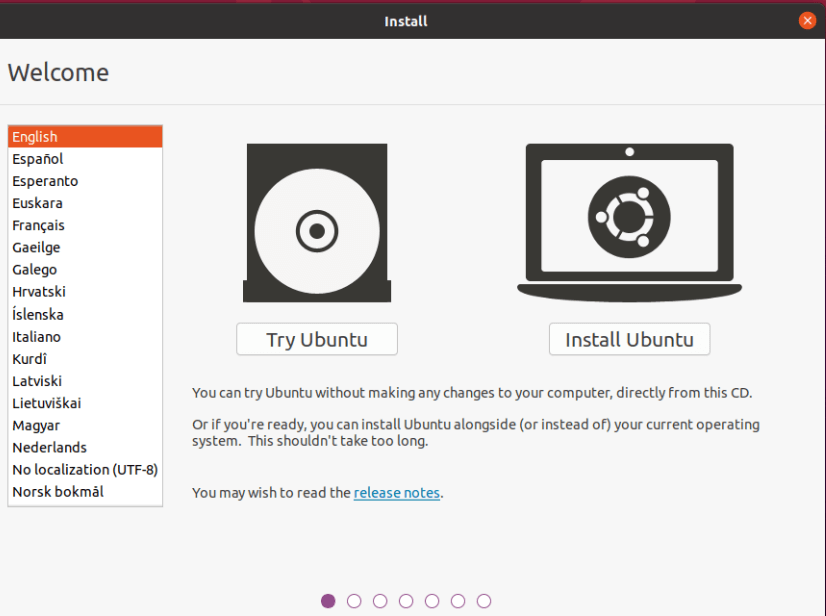
- Download an image file for your chosen Linux distribution. This is usually an ISO file. As an example, you can find an image file for the most recent version of Ubuntu at Download Ubuntu Desktop. Some Linux distributions may require you to verify the image signature before downloading. Some Linux distributions also cannot be installed unless Windows Secure Boot is disabled (which is not recommended).
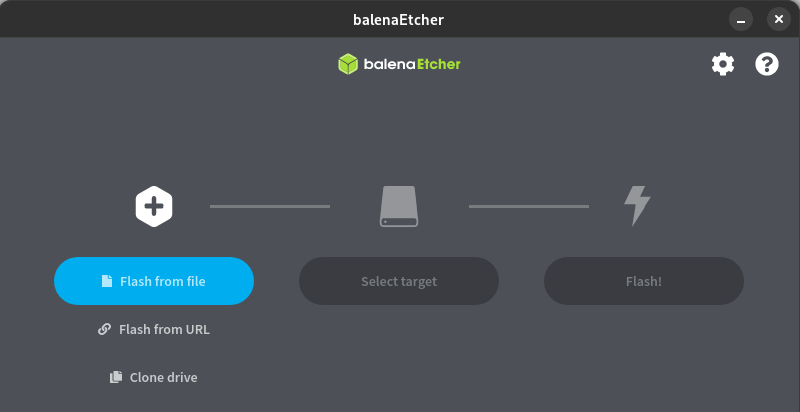
- Create a bootable USB drive. You will typically need a USB drive with at least 16gb of space. You will also need software to create the bootable drive. There are many options (such as balenaEtcher, Rufus, UNetbootin, etc.). Often the download site for your chosen Linux distribution will recommend which startup disk creater software to use.
- Boot your device from the USB drive. When restarting the device, you will need to enter the boot menu. This is typically done by holding down the F12 key during startup. You can then select the USB drive containing your Linux distribution ISO to install from.
- Select install options. Typically the installer for your Linux distribution will include a set of installation steps that will involve choosing options about whether you want to include certain features, third-party software packages, etc. You may also need to specify whether to erase the disk in the case that this Linux distro will be the only operating system, or to use a partition, if you plan to run multiple operating systems. You may also be asked about whether you’d like to enable encryption.
- Finally, as with any Linux installation, you will be asked to create a user name and password.
Step 4 — After installing Linux
Once you have successfully installed a Linux distribution, there are a few more important steps:
- Get familiar with the preferred package manager used by your chosen Linux distribution. Linux uses package manager’s to download and update any software that you plan to use. For example, Ubuntu uses the Advanced Packaging Tool (APT).
- Use your distribution’s package manager to update and upgrade your distribution. Software packages in a stable release of a Linux distribution are often outdated. It is recommended to regularly run an update. You may also want to run an upgrade, which installs newer versions of any packages that you’ve already installed. For example, if you’re using Ubuntu, run: sudo apt update && sudo apt upgrade .
- Learn more about the Linux resources available at Microsoft, such as Linux-specific versions of Microsoft tools like Visual Studio Code, .NET, and PowerShell, free Linux-related training courses available from the Learn catalog, and information about events, news, and the ongoing partnerships between Linux organizations and Microsoft, including the Microsoft-supported Mariner distribution.
Feedback
Submit and view feedback for
Как установить Linux в Windows 10

В Windows 10 появилась новая возможность для разработчиков — оболочка Ubuntu Bash, позволяющая запускать, устанавливать приложения Linux, использовать скрипты bash прямо в Windows 10, все это называется «Подсистема Windows для Linux». В версии Windows 10 1709 Fall Creators Update доступны уже три дистрибутива Linux для установки. Во всех случаях требуется 64-разрядная система для установки.
В этой инструкции — о том, как установить Ubuntu, OpenSUSE или SUSE Linux Enterprise Server в Windows 10 и некоторые примеры использования в конце статьи. Следует также учитывать, что есть некоторые ограничения при использовании bash в Windows: например, нельзя запускать GUI приложения (правда, сообщают об обходных путях с помощью X server). Кроме этого, командами bash нельзя запустить Windows-программы, несмотря на наличие полного доступа к файловой системе ОС.
Установка Ubuntu, OpenSUSE или SUSE Linux Enterprise Server в Windows 10
Теперь необходимые шаги выглядят следующим образом:
- Прежде всего, необходимо включить компонент «Подсистема Windows для Linux» в «Панель управления» — «Программы и компоненты» — «Включение и отключение компонентов Windows».

- После установки компонентов и перезагрузки компьютера, зайдите в Магазин приложений Windows 10 и загрузите оттуда Ubuntu, OpenSUSE или SUSE Linux ES (да, теперь доступно три дистрибутива). При загрузке возможны некоторые нюансы, о которых далее в примечаниях.

- Запустите загруженный дистрибутив как обычное приложение Windows 10 и выполните первоначальную настройку (имя пользователя и пароль).

Для включения компонента «Подсистема Windows для Linux» (первый шаг) можно использовать команду PowerShell:
Enable-WindowsOptionalFeature -Online -FeatureName Microsoft-Windows-Subsystem-Linux
Теперь несколько примечаний, которые могут быть полезны при установке:
- Вы можете установить сразу несколько дистрибутивов Linux.
- При загрузке дистрибутивов Ubuntu, OpenSUSE и SUSE Linux Enterprise Server в русскоязычном магазине Windows 10 заметил следующий нюанс: если просто ввести название и нажать Enter, то нужных результатов в поиске не оказывается, но если начать вводить и затем нажать по появляющейся подсказке, автоматически попадаешь на нужную страницу. На всякий случай прямые ссылки на дистрибутивы в магазине: Ubuntu, OpenSUSE, SUSE LES.
- Запускать Linux можно и из командной строки (не только с плитки в меню Пуск): ubuntu, opensuse-42 или sles-12
Установка Bash в Windows 10 1607 и 1703
Для того, чтобы установить оболочку bash, выполните следующие простые действия.
- Зайдите в параметры Windows 10 — Обновление и безопасность — Для разработчиков. Включите режим разработчика (должен быть подключен Интернет для загрузки необходимых компонентов).

- Зайдите в панель управления — Программы и компоненты — Включение или отключение компонентов Windows, отметьте пункт «Подсистема Windows для Linux».

- После установки компонентов, введите в поиске Windows 10 «bash», запустите предлагаемый вариант приложения и выполните установку. Вы можете задать свое имя пользователя и пароль для bash, либо использовать пользователя root без пароля.

По завершении установки вы можете запускать Ubuntu Bash на Windows 10 через поиск, или создав ярлык для оболочки там, где вам требуется.

Примеры использования Ubuntu Shell в Windows
Для начала отмечу, что автор не является специалистом по bash, Linux и разработке, а примеры ниже — просто демонстрация того, что в Windows 10 bash работает с ожидаемыми результатами для тех, кто разбирается в этом.
Приложения Linux
Приложения в Windows 10 Bash можно устанавливать, удалять и обновлять с помощью apt-get (sudo apt-get) из репозитория Ubuntu.

Использование приложений с текстовым интерфейсом ничем не отличается от такового на Ubuntu, например, вы можете установить Git в Bash и использовать его привычным образом.

Скрипты bash
Вы можете запускать скрипты bash в Windows 10, создать их можно в имеющемся в оболочке текстовом редакторе Nano.

Скрипты bash не могут вызвать программы и команды Windows, но возможен запуск скриптов и команд bash из bat файлов и сценариев PowerShell:
bash -c "команда"
Также вы можете попробовать запускать приложения с графическим интерфейсом в Ubuntu Shell в Windows 10, на этот счет в Интернете уже имеется не одна инструкция и суть способа сводится к использованию Xming X Server для вывода GUI приложения. Хотя официально возможность работы с такими приложениями Майкрософт не заявлена.
Как было написано выше, я не тот человек, который может в полной степени оценить ценность и функциональность нововведения, но вижу как минимум одно применение для себя: различные курсы Udacity, edX и другие, связанные с разработкой проходить будет куда проще, работая с необходимыми инструментами прямо в bash (а в этих курсах обычно демонстрируется работа именно в терминале MacOS и Linux bash).
А вдруг и это будет интересно:
- Лучшие бесплатные программы для Windows
- Не удалось запустить службу Windows Audio на Локальный компьютер — как исправить?
- Ошибка DXGI ERROR DEVICE HUNG — как исправить?
- Как сбросить Windows на заводские настройки в командной строке
- Как создать отчет о работе Wi-Fi сети в Windows 11 и 10
- Устройство tap0901 — что это и как установить драйвер?
- Windows 11
- Windows 10
- Android
- Загрузочная флешка
- Лечение вирусов
- Восстановление данных
- Установка с флешки
- Настройка роутера
- Всё про Windows
- В контакте
- Одноклассники
-
Женя 09.08.2016 в 08:56
- Алексей Никитич 09.08.2016 в 11:43