Как сделать автотюн для Дискорда

Autotune – эффект, автоматически корректирующий высотный тон голоса. Он, как бы, дотягивает вокальную партию или речь до определённых нот (звуков), заданных алгоритмом. Автотюн придаёт пению, разговору характерный «роботизированный» оттенок. И в то же время в подобной автокоррекции есть своя особенная красота: звуковысотные скачки эффекта немного напоминают манеру пения под названием «йодль» (например, как в тирольских песнях), создают своеобразные «преломления» в звучании.
Для тех, кто не знаком с этим эффектом, рекомендуем послушать песни, в которых он использовался:
- T-Pain — I’m Sprung (на словах «homies» и «lady»)
- Avril Lavigne — Complicated («way», «when», «driving» и «you’re»)
- Dixie Chicks — The Long Way Around («parents», «but I»)
Конечно, это лишь отдельные примеры. Autotune можно услышать в самых разных музыкальных стилях – рэп, рок, поп.
А чем же хорош автотюн для Дискорда? Да, это мессенджер, а не звукозаписывающая студия, и там, вообще-то, люди в основном общаются. И тем не менее… Эффект нашёл своё применение в голосовых чатах. Это интересно, оригинально. Сделать такой «окрас» со звуковысотными перепадами можно и шутки ради, и для какой-нибудь тематической «вечеринки» на сервере, и подключить во всякие разные обзоры… Тут уже как у кого фантазии и креатива хватит по эксплуатации.
Подытоживая о применении, можно подчеркнуть и то, что autotune – это хороший способ отойти от предустановленных аудионастроек в мессенджере. Если вы большой любитель голосовых чатов в Discord, определённо стоит поэкспериментировать с этой штукой.
Подготовка
Для внедрения эффекта в аудиосистему Дискорда потребуется:
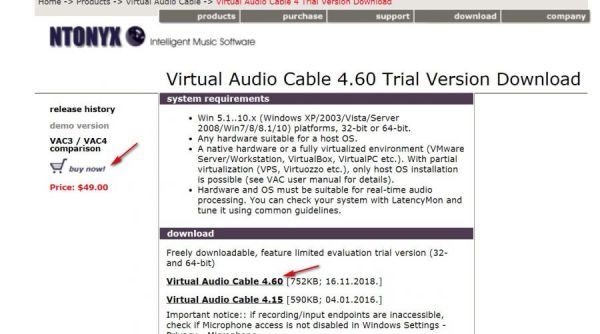
Программа Virtual Audio Cable, или VAC – виртуальный кабель для передачи звука между программами в системе компьютера (последовательно, смешивание, одновременное распределение). Она понадобится для подключения autotune к мессенджеру.
Чтобы загрузить демо-версию дистрибутива, откройте раздел офсайта http://ntonyx.com/vac_demo.htm . Для покупки VAC на этой же странице воспользуйтесь ссылкой «buy now!» (в колонке слева).
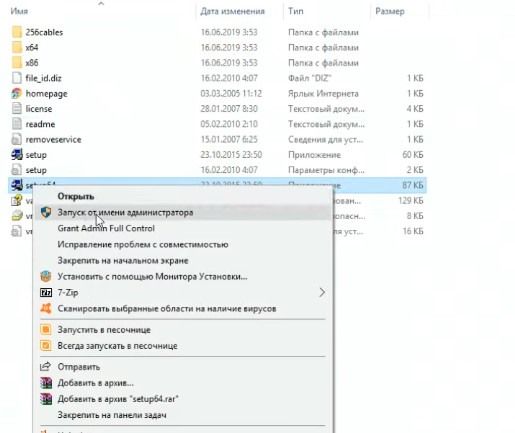
Запустите скачанный инсталлятор Virtual Audio Cable с правами администратора. Следуйте инструкциям по установке.
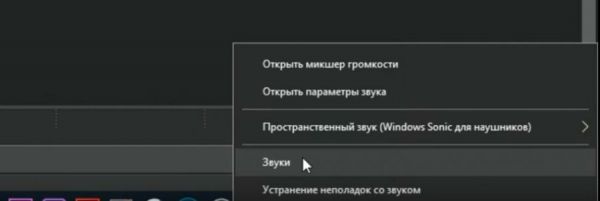
Если после инсталляции VAC в системе ПК пропадёт звук, сделайте следующие настройки аудио:
1. В трее откройте меню «динамик». Выберите пункт «Звуки».
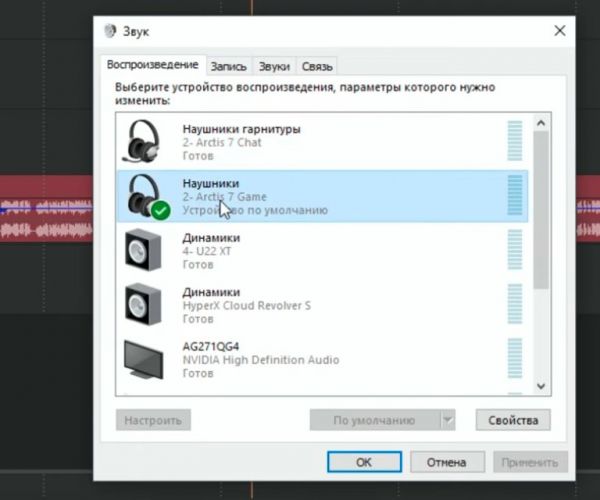
2. На вкладке «Воспроизведение» выберите устройство, на котором слушаете аудио с компьютера (колонки или наушники). Затем нажмите «Применить» и «OK».
T-Pain – программа, создающая эффект autotune. Разработана компанией Izotope, общепризнанным лидером в сфере поставки программных инструментов для обработки звука.
Примечательно, что у исполнителя, применявшего в своих песнях автотюн, такое же имя – T-Pain.
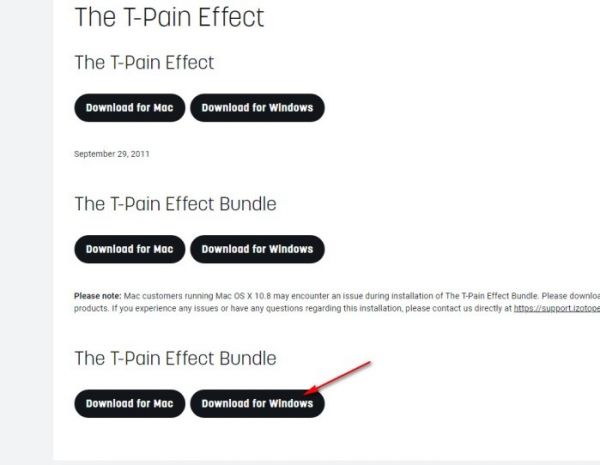
Чтобы скачать автотюн T-Pain с офсайта, перейдите на страницу https://www.izotope.com/en/products/downloads/legacy-products.html . Затем в разделе «The T-Pain Effect Bundle» кликните ссылку «Download for Windows».
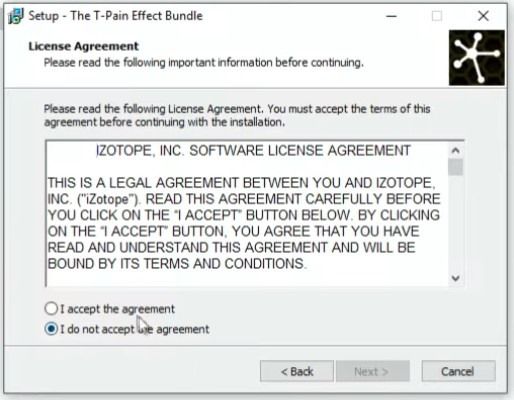
Запустите инсталлятор. В его панели кликните радиокнопку «I accept the… » для подтверждения соглашения.
Затем постоянно нажимайте «Next» (Далее).
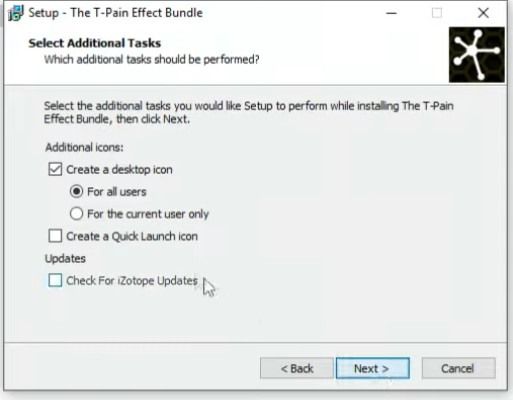
На финальном этапе инсталляции можно дополнительно указать настройки: создание иконки (для всех пользователей или только для текущего пользователя), кнопки для быстрого запуска с панели задач, включение/отключение модуля загрузки обновлений программы.
Примечание . ПО, необходимое для создания эффекта, на официальных сайтах распространяется по платной лицензии и в виде демо-версий (с ограниченным периодом пользования). В статье указаны ресурсы разработчиков. Применение неофициальных источников оставляем на ваше усмотрение. Но, помните, что при использовании «бесплатных версий» всегда присутствует риск заражения компьютера вирусами.
Настройка
Ну что ж, все необходимые программы в системе вашего компьютера есть. Теперь можно преспокойно сформировать эффект. Всего-то осталось немного поколдовать в настройках.
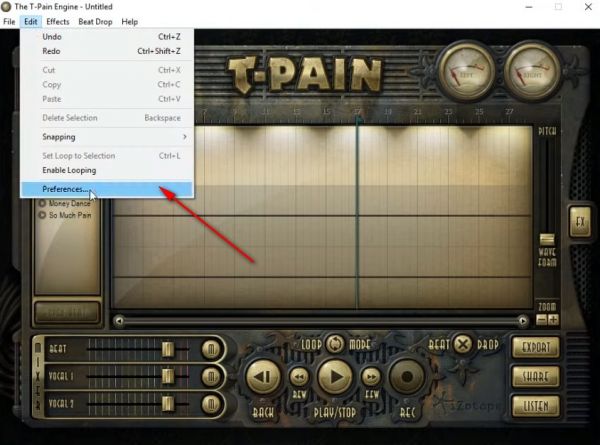
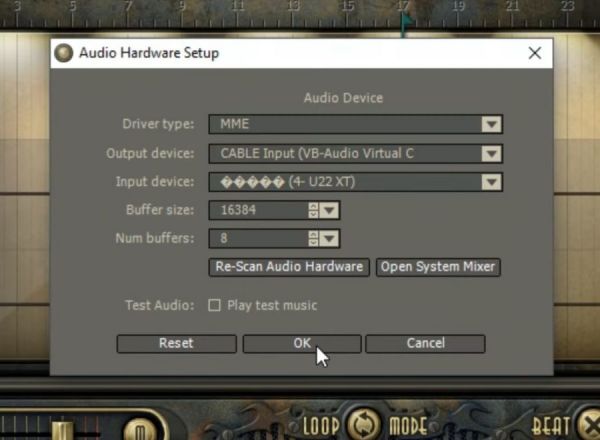
Открываем T-Pain. В горизонтальном меню над интерфейсом выбираем: Edit → Preferences…
В панели «… Setup» назначаем в Output device: (выход) виртуальный кабель (Cable Input… ), а в Input device (вход) звуковую карту компьютера (просмотрите в списке доступные устройства). Нажимаем «OK». При такой конфигурации сигнал с микрофона поступает в программу и обрабатываться эффектом, а затем отправляется на виртуальный кабель.
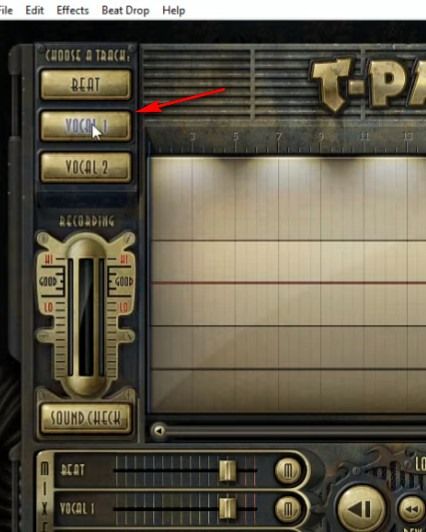
В правой боковой панели «Choose a track» выбираем трек – VOCAL 1.
В панели справа нажимаем кнопку FX. Устанавливаем настройки для автотюнера.
Примечание . Стоит отметить, что пользователям, знакомым с музыкальной грамотой, конечно, сориентироваться в опциях autotune будет легче. Но если таковых знаний нет – не беда. Всё можно настроить по принципу «как больше нравится».
Key – выбор ноты, определяющей тональность (С – до, С# – до диез, D – ре и т.д.)
Scale – гамма (звукоряд в пределах которого эффект будет «подстраивать» голос), на выбор: minor – минорная, major – мажорная, chromatic – хроматическая.
Примечание . Опять же, если петь не собираетесь, то особо с этой функцией заморачиваться не стоит. Для обычной речи лучше просто «поиграться» с разными гаммами и решить для себя, что интересней звучит.
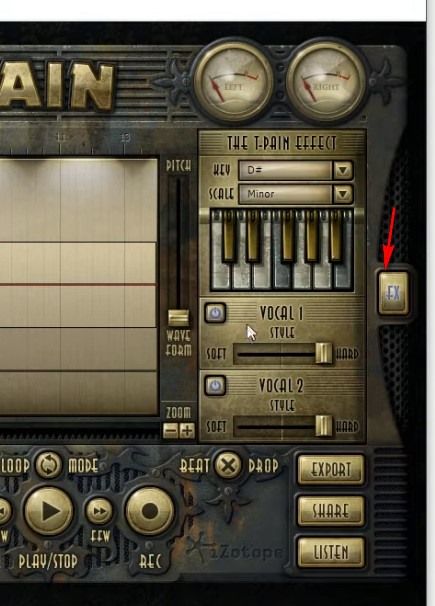
Клавиши – можно поклацать и послушать, как звучит гамма в выставленном ключе (нота в опции «Key»).
В блоке VOCAL 1 ползунок soft/hard – регулировка уровня присутствия эффекта в сигнале. Крайнее положение hard – будет громко слышно автотюнингование, soft – слабо выражено, тихо.
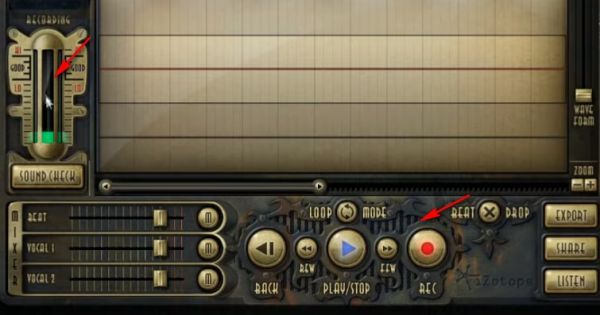
По завершении настройки кликаем кнопку «REC» в нижней панели. При этом autotune должен уже работать, а уровень громкости сигнала отображаться в шкале «Sound check» слева. Если требуется, отрегулируйте громкость: уровень должен быть примерно ближе к нулю – чтобы не было зашкаливаний и слабого сигнала.
Подключение в мессенджер
Чтобы сделать автотюн в Дискорде, необходимо настроить в его опциях ввод и вывод аудио в соответствии с используемыми программами:
1. Перейдите в меню (кнопка «шестерёнка» возле логина в профильной панели).
2. Войдите в раздел «Голос и видео».
3. В графе «Устройство ввода» установите «Audio Virtual Cable» (виртуальный кабель). Таким образом обработанный сигнал c T-Pain (уже с автотюнингом) через VAC поступает в мессенджер.
4. В «Устройство вывода» выберите устройство для прослушивания (наушники, колонки или гарнитура). Ориентируйтесь по названиям девайсов в ниспадающем списке
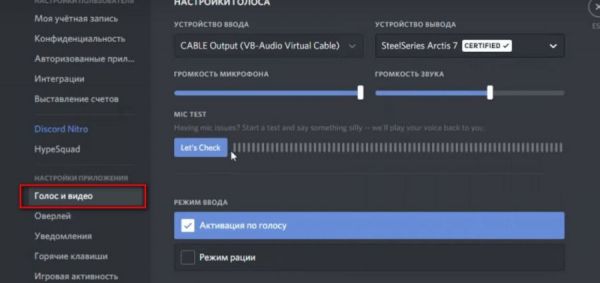
5. Чтобы проверить, правильно ли всё настроено, воспользуйтесь кнопкой Let’s Check: нажмите её, поговорите в микрофон и послушайте. При необходимости подкорректируйте уровни: в мессенджере громкость микрофона и звука и в программе T-Pain.

А теперь можно удивлять друзей в голосовом канале автотюнингованной речью. Ваш Дискорд дополнился интересной фишкой – пользуйтесь, общайтесь!
Autotune Discord: Voicemod? Or Better Alternative?
Tired of your Discord party chat friends complaining about your echo or uneven volume? Of course, you must be looking for software to solve this issue.
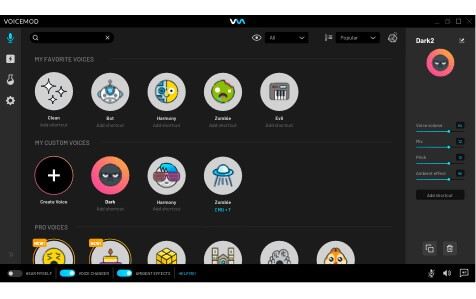
Voicemod is an awesome and great tool to resolve all these issues. This voice changer is great for autotuning Discord and has an impressive list of voice filters. It is a great free voice changer which works best with Discord and is used to deal with all problems related to uneven volumes and sounds.
In this post, we’ll talk about autotune Discord using Voicemod and a better alternative to Voicemod for autotuning on Discord.
- Part 1. Can You Do Autotune on Discord with Voicemod?
- Part 2. The Best Alternative to Voicemod for Autotune Discord
Part 1. Can You Do Autotune on Discord with Voicemod?
Voicemod is a great autotune voice changer for Discord. To use autotune on Discord, you must first download the «Voicemod» voice changer app from their website. Follow the steps below to use it on Discord after you’ve done that.
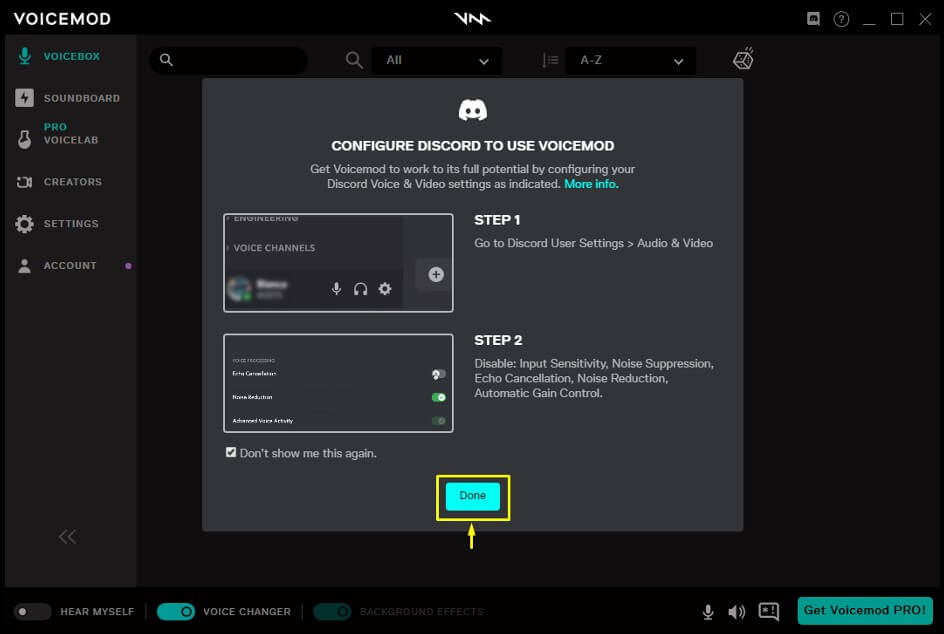
Step 1 Launch the Voicemod app on your system. You will be asked to set up Discord so that it can use Voicemod and run in the background.
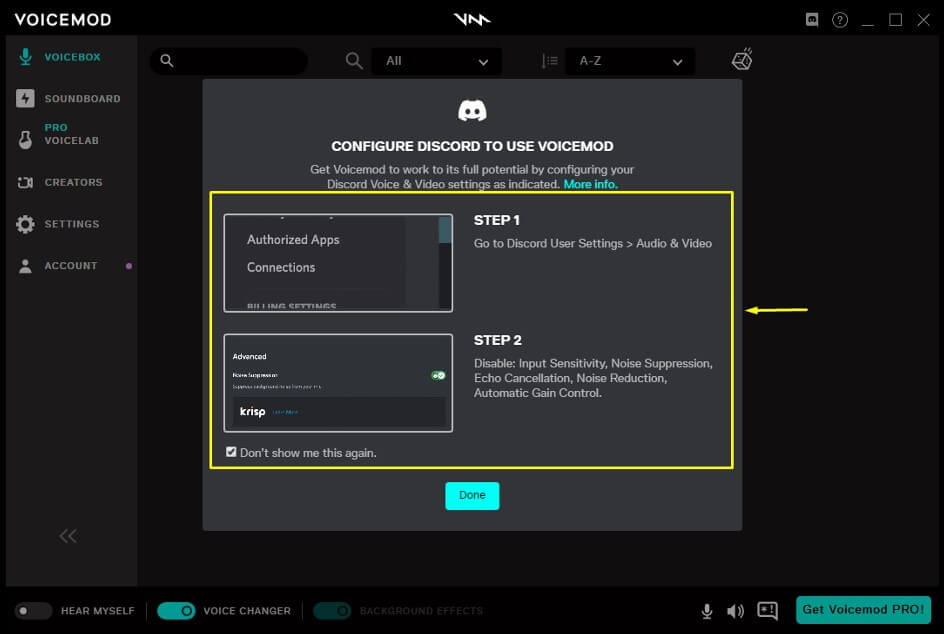
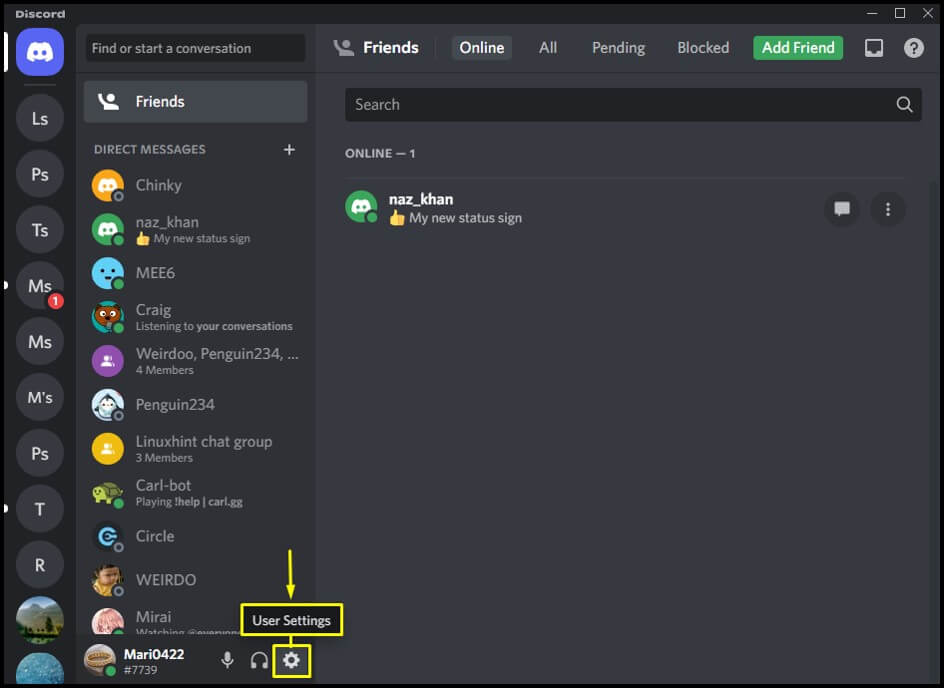
Step 2 Now, open Discord on your system by going to the Startup menu. To open User Settings, click the Settings icon.
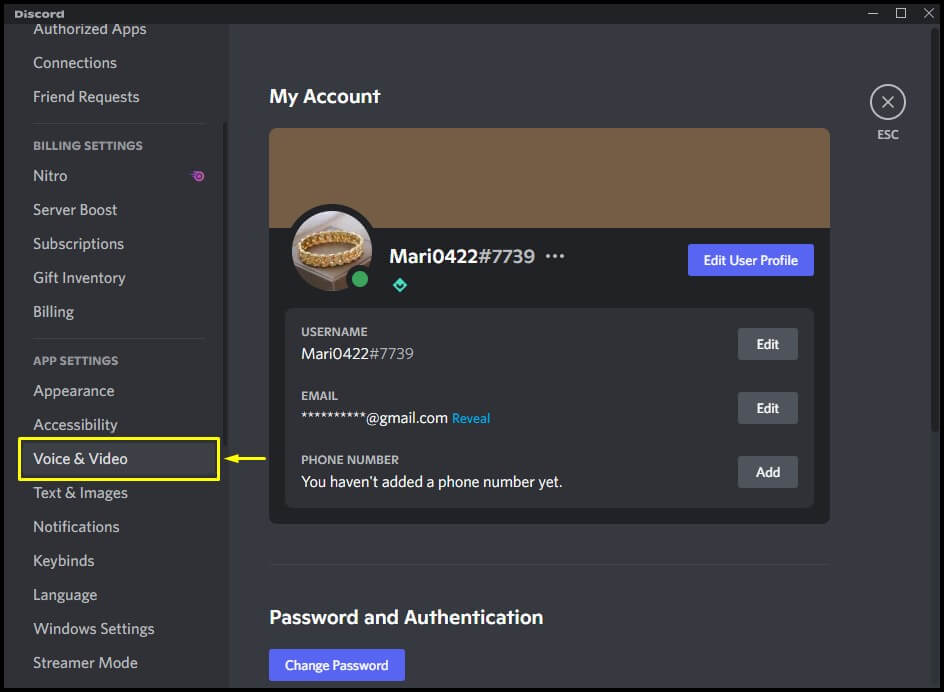
Step 3 Then, go to App Settings and open the Voice & Video settings.
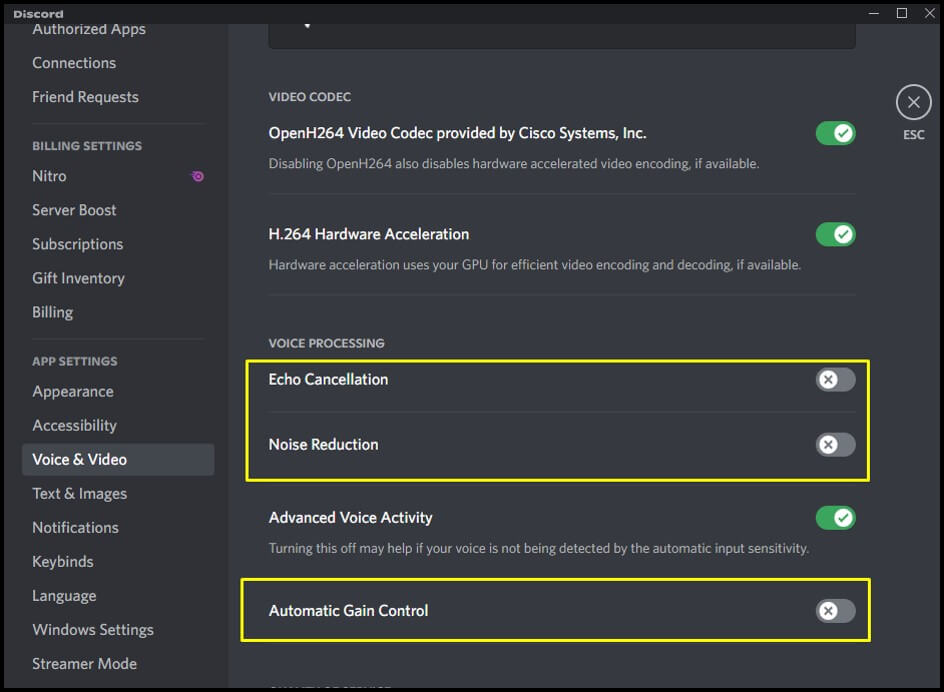
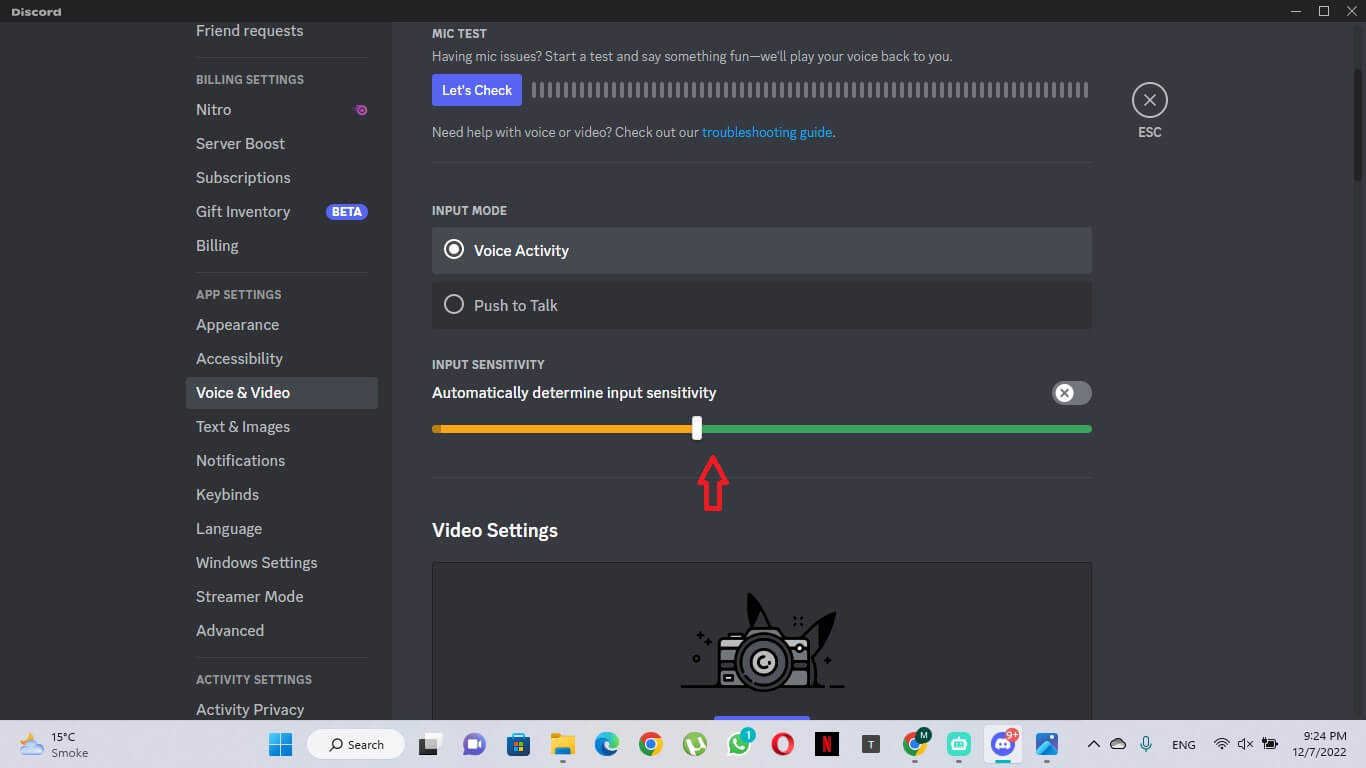
Step 4 Go to the Voice & Video tab and click Input Sensitivity. Turn off the Automatically determine input sensitivity.

Next, disable the Noise Suppression toggle under the Advanced option.
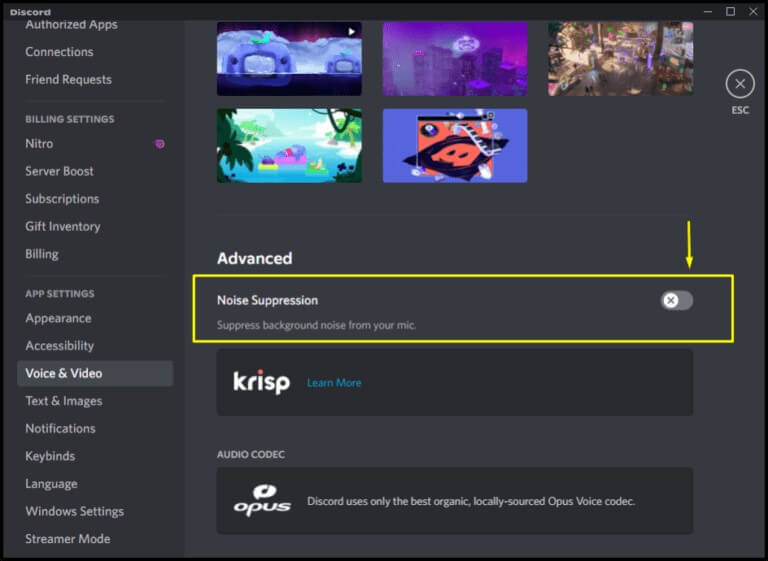
Lastly, disable the below-highlighted option under the Voice Processing section.
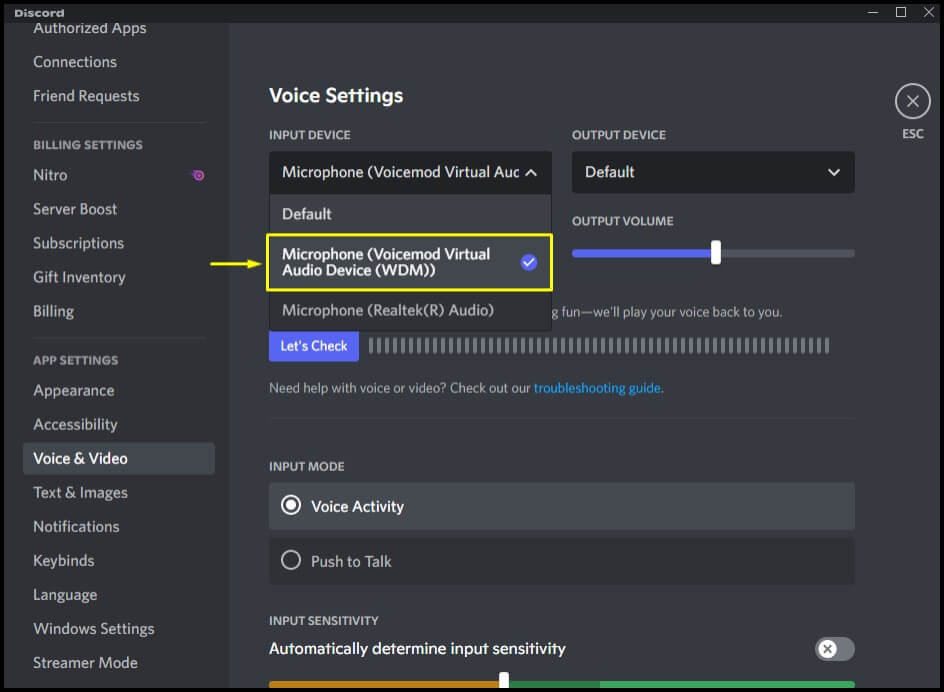
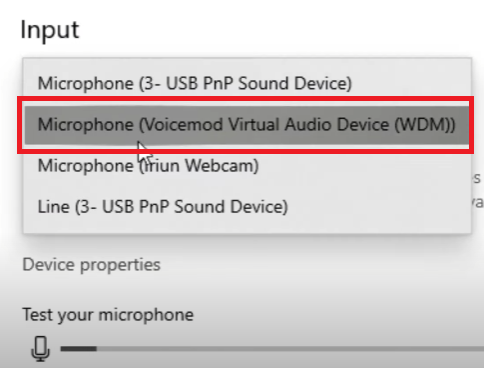
Step 5 Under the Voice Settings, open the drop-down menu of the Input Device. Select the Microphone (Voicemod Virtual Audio Device (WMD)) option from the opened drop-down menu.
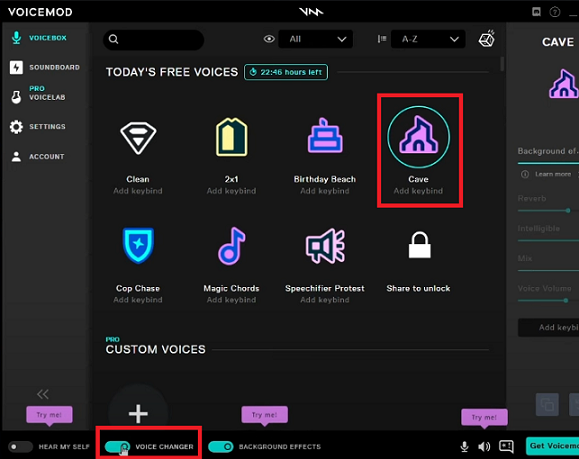
Step 6 After that, go to the Voicemod app and click on the Done button.
Next, select any of your friends and make a voice call. Meanwhile, go to the Voicemod app, and select any voice filter from the available lists.
You can autotune for Discord using Voicemod by following the steps mentioned above.
Discord autotune can be done using Voicemod, which has a lot of good points, but it also has some flaws. For example, some users have trouble with sound quality and there are also other complaints.

- Limited sound effects and filters with the free version.
- Voicemod can mess up the audio drivers of your PC.
- You have to reinstall audio drivers again and again.
- The voice-changing effects are outdated and limited and need to be updated.
- It often crashes while using the soundboard.
- Too many ads.
- It does not work perfectly with slow internet.
Part 2. The Best Alternative to Voicemod for Autotune Discord
We have discussed the workings of Voicemod in detail. But you can also use WooTechy SoundBot for autotuning on Discord. SoundBot and its functioning are discussed in detail below.
WooTechy SoundBot
If you want to use your computer to make phone calls and want to change your voice, WooTechy SoundBot is the best option. It is software that lets you change your voice in real-time.
Discord autotune can be done using WooTechy Soundbot, as this software is best for voice changing using its 125 voice filters. SoundBot can help you get a perfect voice by adjusting the pitch, volume, and tone with its voice customization feature.
Compared with Voicemod, WooTechy SoundBot, though new to the market, has more voice filters and the professional teams of the software is constantly updating it and voices to improve user experience. And SoundBot has a better sound quality and won’t crash during the use.
SoundBot – The Best Autotune Discord Software
- Change Voice in Real Time: You can change your voice in real time and use it in various contexts, such as entertaining pranks, live chats, or game group plays.
- Best for Discord Autotune: You can alter your voice on several different platforms like Discord, Zoom, etc., and video games like Fortnite, PUBG, etc.
- 400+ Sound Effects: The fun is doubled with over 400 sound effects and over 200 voice memes.
- Easy to Use: With a user-friendly interface, you can also assign keybind to voice filters or sounds to quickly autotune your voice.
Download Now Secure Download
How to autotune your voice on Discord with WooTechy SoundBot:
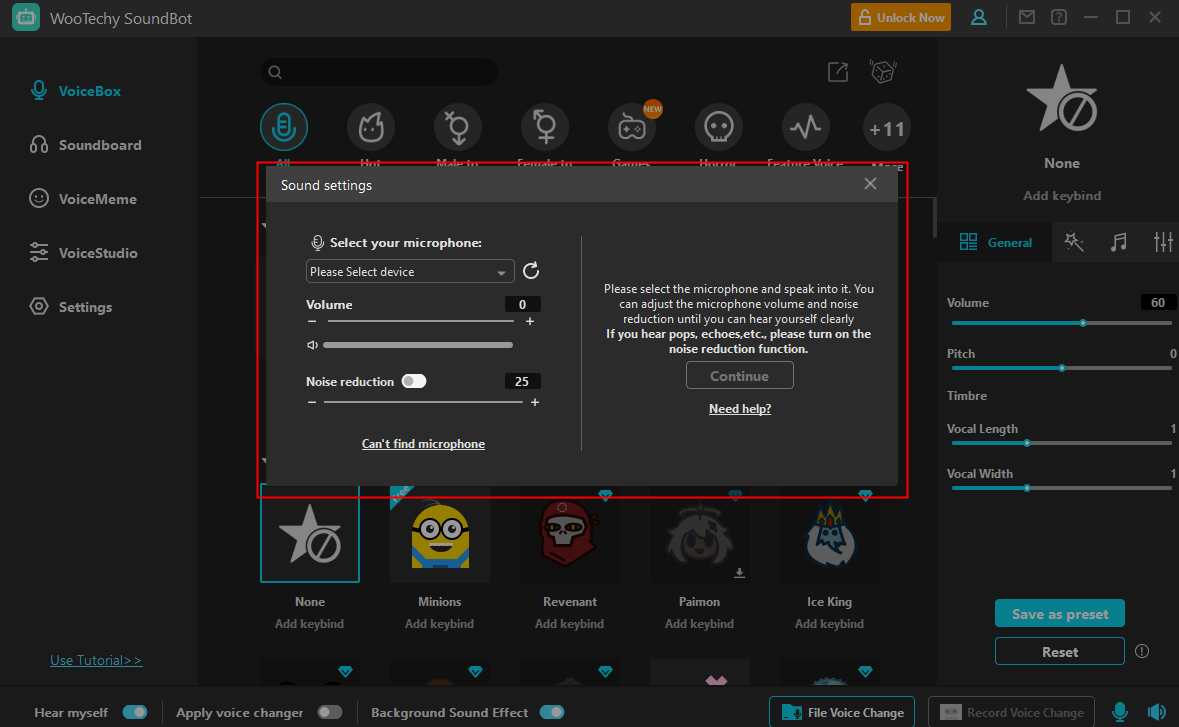
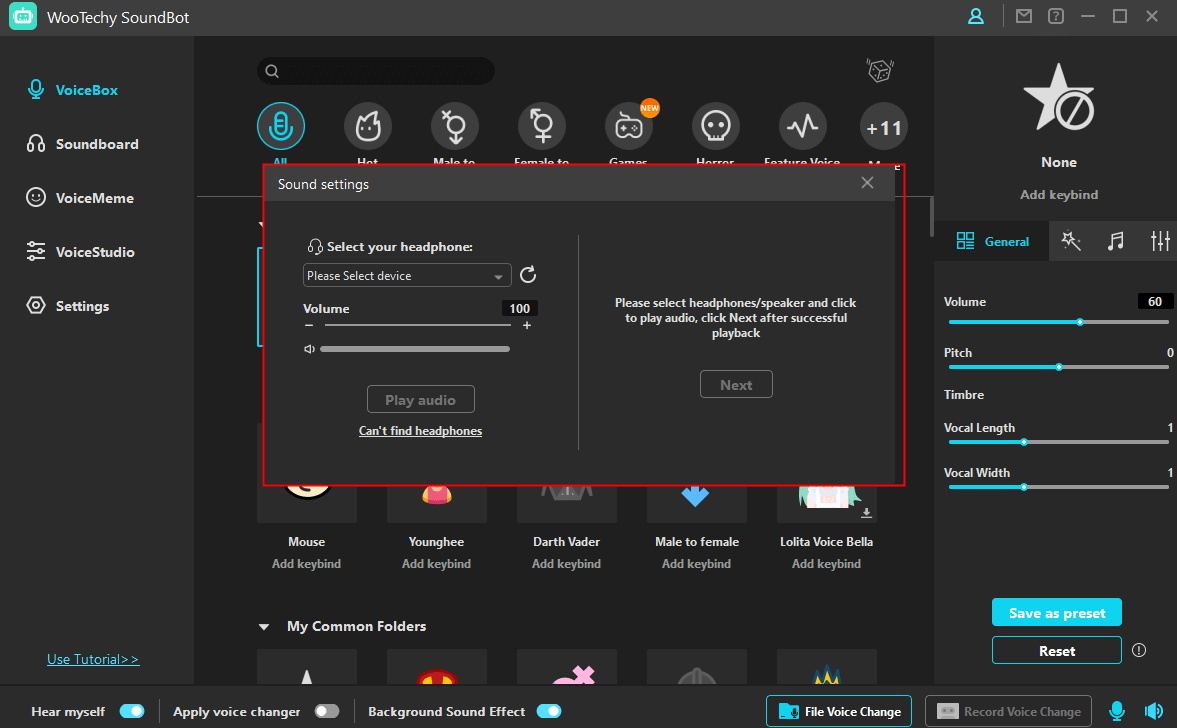
Download, install, and set up WooTechy SoundBot on your PC. Choose your microphone and headphone as input and output devices.
Launch Discord and click on your settings icon. Select Voice & Video on the user settings window.
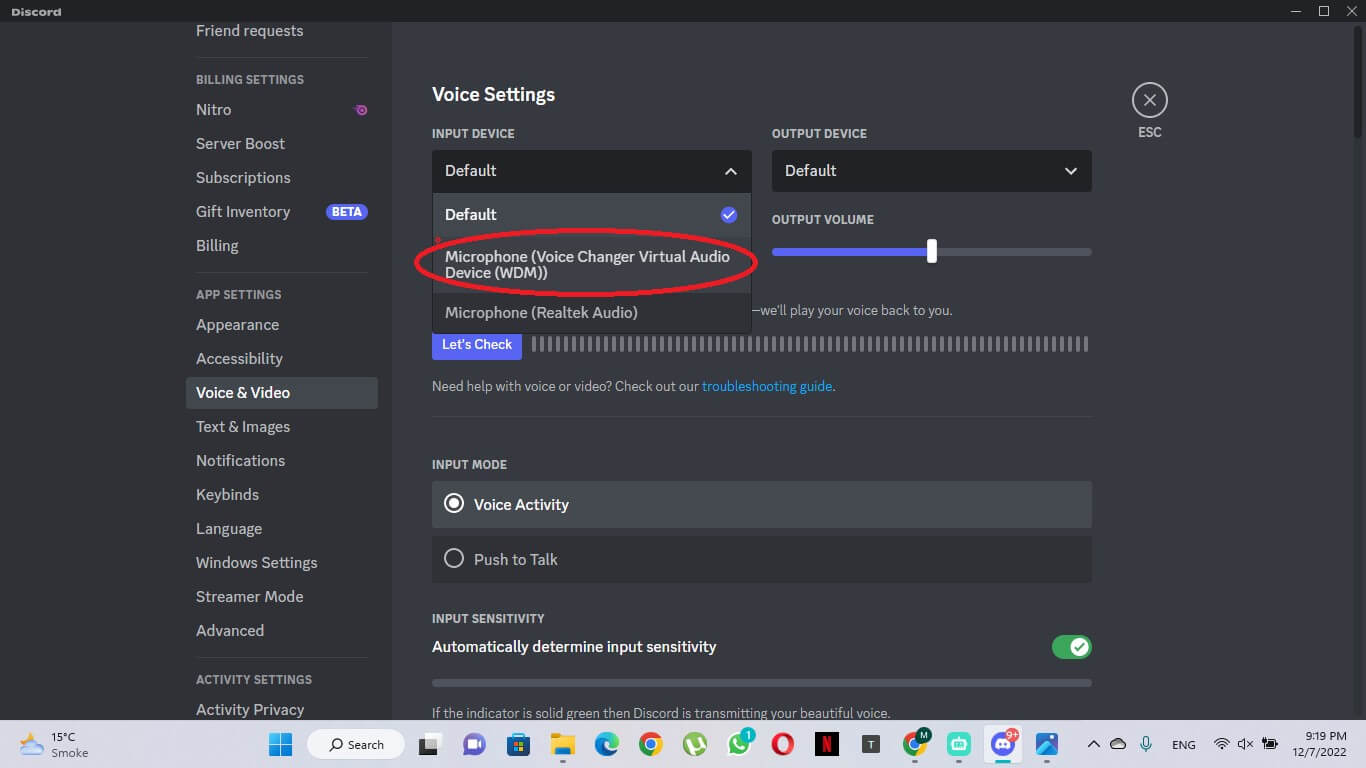
Choose Microphone (Voice Changer Virtual Audio Device) below the Input Device tab.
Turn off Automatically determine input sensitivity. Adjust the sensitivity setting and check it by speaking into your microphone.
Ensure the Microphone is showing green when you speak. Then press Escape to finish setting up.
Go back to WooTechy SoundBot and select the Autotune from the VoiceBox tab, or other sounds from the Soundboard. You can assign keybinds to them.
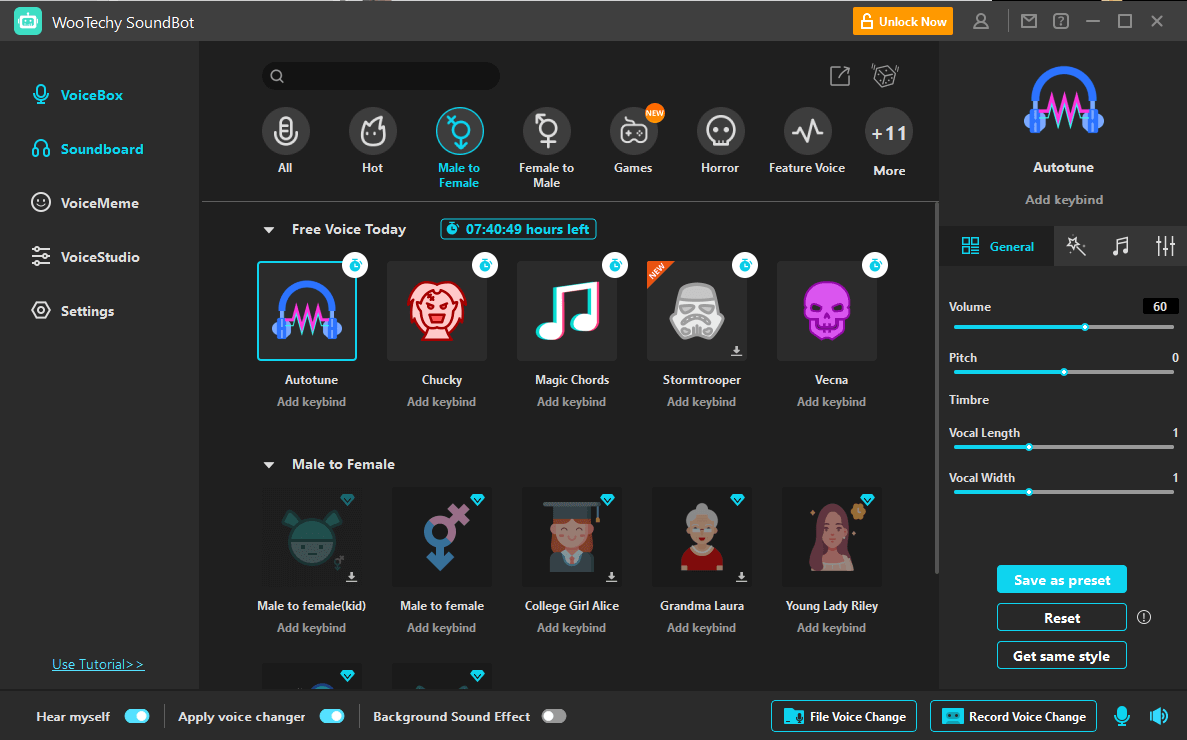
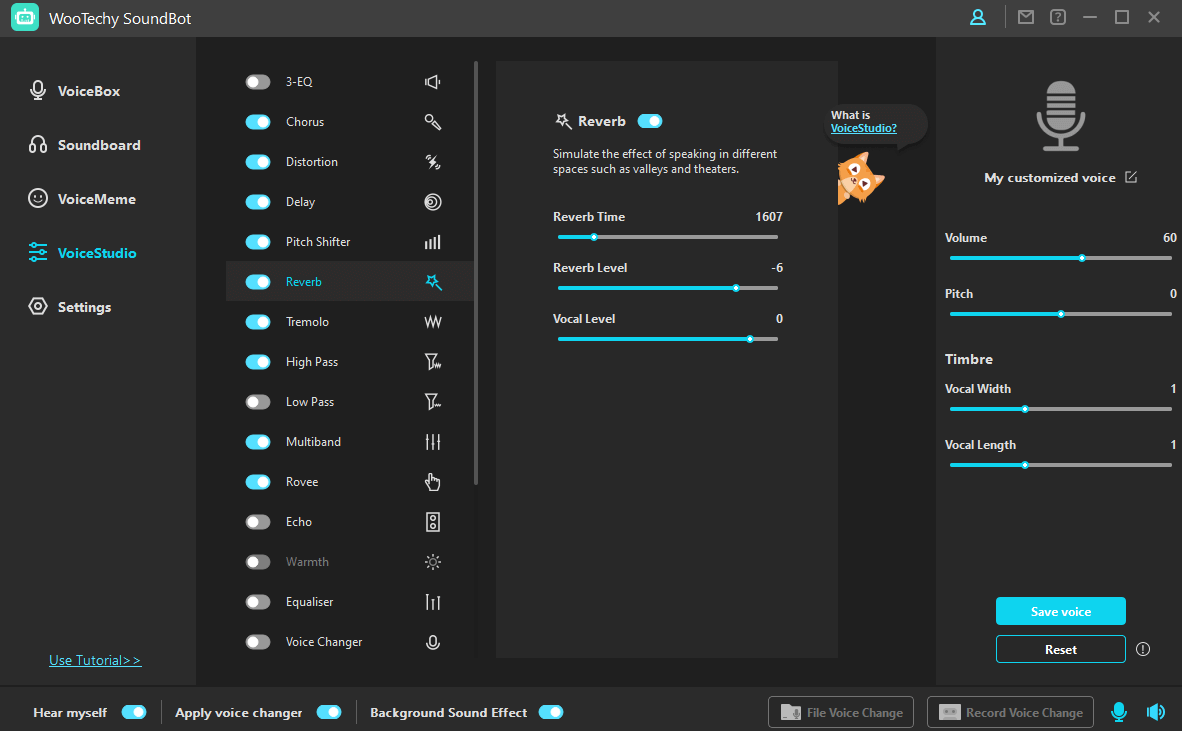
To adjust your own voice, you can also go to the VoiceStudio tab to customize it. Then on your Discord calls, your voice is automatically changed.
Conclusion
We have discussed Discord autotuning and two different programs that can be used for this purpose in detail. Regarding to the number of voices and the quality of sound, we recommend you use WooTechy SoundBot for autotuning on Discord easily and usefully.
Try to follow all the steps in the correct order. We hope you can autotune Discord or change your voice in the program by following our guides. If you find this article helpful, share it with your friends who use Discord a lot.
Как Сделать Автотюн Для Discord, Steam и т.д | T-Pain Engine Autotune

Узнай как сделать Autotune за пару минут, через T-Pain Engine! Как стать репером? — Используйте автотюн в реальном времени 😀 СКАЧАТЬ STREAMLABS OBS ➞ https://goo.gl/X8UoFH ============================================ ОБЗОР STREAMLABS OBS НА ПК ➞ https://www.youtube.com/watch?v=xFLcPmP3s04 ============================================ Пост с ссылками на программы: (1000РУБ за его репост) ➞ https://vk.com/dorriankarnett?w=wall-66329915_3094 ============================================ Автор и его контакты: ➞ Instagram — https://www.instagram.com/dorrian.karnett ➞ Мой VK — https://vk.com/vladimirbrester ➞ Steam — https://steamcommunity.com/id/Dorrian_K ➞ Discord — https://discord.gg/dorriankarnett ➞ Группа VK — http://vk.com/dorriankarnett ➞ Партнерка YouTube — https://vk.cc/9ik6VT ============================================ Хотите заказать РЕКЛАМУ?Пишите в VK или на ПОЧТУ: ➞ DorrianKarnett@yandex.ru ➞ https://vk.com/topic-66329915_31632627 ============================================ Музыка из видео: Gogaga — Giants’ Nest You Got Issues — spring gang ============================================ Информация о видео: Все просто, используя VAC и T-Pain Engine мы сделаем простой автотюн. Этот автотюн можно использовать везде, даже в Discord или Stream играх! Пока еще никто не использует это как фишку, поэтому пользуйся бро! Это не профессиональный урок по тому как тюнить вокал, но все равно полезно! Поставьте лайк и приятного просмотра! #Автотюн #Autotune #Рэпер #DorrianKarnett #Streamlabs
Показать больше
Войдите , чтобы оставлять комментарии
How to Get Autotune on Discord? (2022)
Do you want to know how to get autotune on Discord for free in 2022? Well, today here in this guide, I’m going to teach you how to change your voice on discord easily using a few free tools.
There is various voice changer available online that you can use to modulate your voice. But when it comes to auto-tuning your voice completely live while talking to someone on Discord, there are only a few working methods.
I researched a lot on the web to find out the best voice changer for Discord. Finally, after hours of research, I’m curating this guide where I’ll not only teach you how to get auto-tune on Discord but also which is the best Autotune for Discord.
Enough talking, let’s get straight into the tutorial guide.
How to Get Autotune on Discord for Free?
To change your voice on Discord or to make your voice Autotune on Discord, you must have a few programs installed on your computer. Here are the things that you will need to change your voice on Discord:
- Clownfish or Voicemod Voice Changer
- G-Snap VST Plugin
- Winrar File Extractor
- A Microphone
We are going to use the Winrar file extractor to unzip all these files that you need to install on your computer. There are various voice-changing tools that you can use. But for this tutorial, firstly, we are going to learn how to use clownfish to autotune voice on discord. Then we’ll also look at how to use Voicemod on Discord.

You can also use other voice changers like Antares. The process is completely the same, you just need to turn on your desired voice-changing tool and follow the steps as explained in this guide.
How to Get Autotune on Discord using Clownfish?
Using Clownfish, you can easily change your voice on Discord in a few simple steps. Again, the process is pretty much the same if you want to know how to use Antares autotune in discord or how to use Voicemod on discord. Just follow the simple step-by-step below guide to easily set up the Clownfish voice changer for Discord.
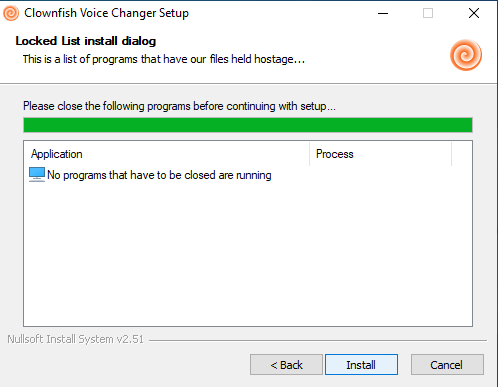
1. Download & Install the Clownfish voice changer on your computer. It may run CMD commands, simply give permissions and get it installed.
2. Once installed, start Clownfish to connect it with your microphone.
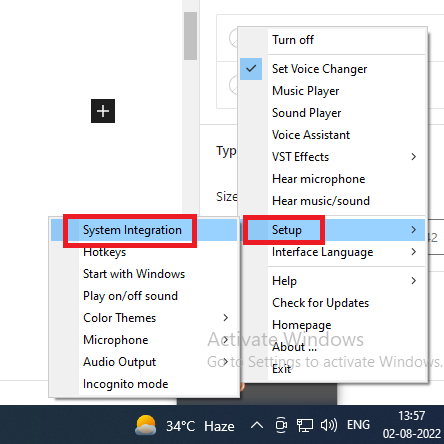
3. Right-click on Tray notification, and go to Setup > System Integration.
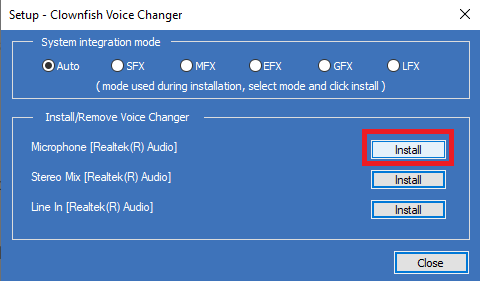
4. Simply, select your microphone & click the install button.
5. Download G-Snap VST Plugin from our download link.
6. Simply, unzip the downloaded file using Winrar & copy the “.dll” file.
7. Paste it in Program Files (x86) > Clownfish Voice Changer > VST.
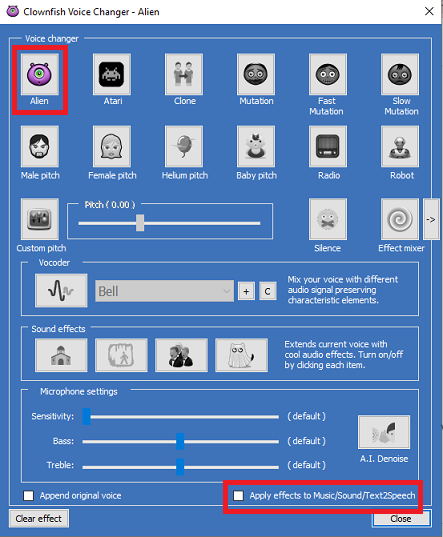
8. Restart Clownfish & choose Set Voice Changer & enable Apply Effects to Music/Sound.
9. Now, go to VST Effects & Enable Gsnap.dll.
10. Again, go inside VST Effects > Config Effects & simply configure your voice.
If you are not sure what Config Effects setting you should do, simply, choose any scale from the drop-down menu. Keep the speed somewhere around 20 & the amount at 100%. This is one of the best settings for Clownfish voice changer to Autotune your voice on Discord.
To make it easier for you to understand the steps here is an awesome step-by-step video tutorial explaining the above-mentioned steps. Do watch the video to easily set up your Clownfish and get your voice to autotune on Discord.
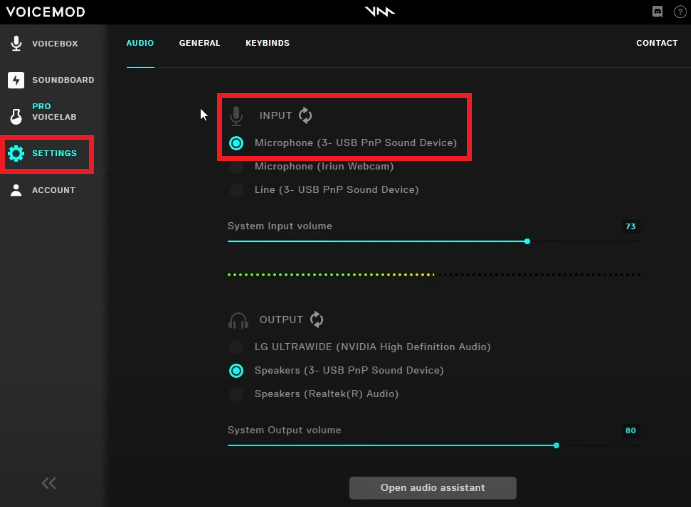
3. Select the Microphone you want to use from the drop-down.
4. Now search “Audio” or “Sound Settings” on your Windows & open it.
5. In your Audio Input, choose “Voicemod Microphone” as your default input.

6. Now go into your Discord > User Settings > Voice & Video & again choose the “Voicemod Microphone” as input.
7. Simply, open Voicemod, and choose the Voice Effect you want.
8. Now simply toggle the slider to enable the Voice Changer.
And done. Congrats, you just perfectly configured the Voicemod app to autotune your voice on Discord. There are a couple of free voice effects that you can choose and try in the free version of Voicemod.
If you like the program, you can support them by upgrading to more voice packs. It was pretty easy, right? All you need to do is set the correct microphone input on your Computer, Discord & Voicemod.
You can also hear how your voice is sounding by toggling the “Hear My Self” button in the Voicemod app. There are a lot more features that you can explore yourself while using the app.
FAQs
Does Voicemod have Autotune effect?
Voicemod has various free voice effects that you can try. You can explore all these features and get the autotune voice you’re looking for. Simply, follow our guide to learn how to use Voicemod on Discord.
What is the best autotune for Discord?
Voicemod & Clownfish are the best autotune apps to change your voice on Discord while talking with your friends on the voice channel.
How do I add a voice changer to discord?
You can use free voice changer apps like Antares, Voicemod & Clownfish to add voice changer to Discord. Simply, follow this tutorial guide to use these apps.
How to Get Autotune on Discord Mac?
There are not many free options available on the Mac to change your voice on Discord. You can try using some paid tools or it’s the best method to use a Windows computer to use this trick.
How to Get Autotune on Discord Mobile?
There is an inbuilt voice changer feature available on smartphones these days. You can use the inbuilt voice changing tool to get autotune on Discord Mobile. Or if your phone doesn’t have the feature or you’re using an iPhone. Simply, download any free voice changer app from the Playstore or AppStore.
Conclusion
Voicemod & Clownfish are both the best voice changer for Discord. I hope now you have learned how to use autotune on discord using Voicemod & Clownfish.
There are a lot of different voice effects that you can use to make your voice sound like an alien, robot, or autotuned voice. Voicemod & Clownfish have several other features that you can try and explore yourself.
I hope this guide helped you to learn how to get autotune on Discord for free in 2022. If this guide was helpful, please share it with your other Discord mates. For more amazing Discord Tricks & Tutorials, keep visiting The Discord Guide!
Hey Folks, I am Dustin Anderson. I’m a very passionate tech enthusiast who loves experimenting with cool gadgets and software on the computer. On this blog, I majorly write informative & in-depth Discord Tips, Tricks & Tutorial Guides.