Как установить Fedora в VirtualBox [с инструкциями для USB, буфера обмена и общего доступа к папкам]
![]()
Если вам интересно узнать о Fedora Linux, есть несколько способов попробовать ее.
Самый простой способ, который не повлияет на вашу текущую операционную систему, — это создать живой USB Fedora.
Альтернативный способ попробовать Fedora — воспользоваться преимуществами технологии виртуализации путем установки в VirtualBox. Таким образом, вы используете Fedora как приложение в вашей текущей операционной системе.
Таким образом, вы можете выполнить более тщательное тестирование, не испортив текущую операционную систему.
Вы даже можете скопировать свою виртуальную установку и переустановить ее в другой системе. Звучит удобно? Позвольте мне показать вам, как это сделать.
Установка Fedora в VirtualBox

Давайте посмотрим, как установить Fedora Linux в Oracle VirtualBox.
Шаг 1. Установите VirtualBox
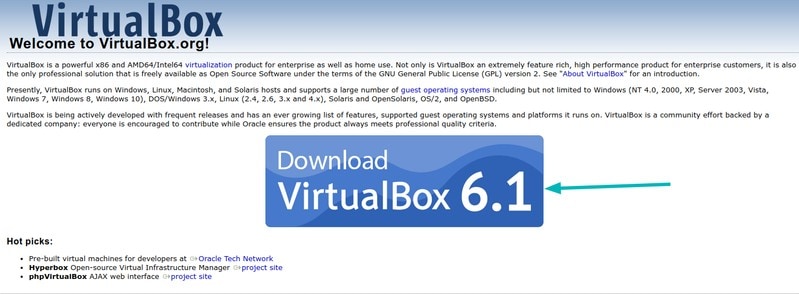
Если вы еще не установили VirtualBox в своей системе, вы можете скачать его с официального сайта. Вы можете найти инструкции для Windows, Mac OS и Linux. Пользователи Ubuntu могут обратиться к этому подробному руководству по установке VirtualBox..

Шаг 2. Загрузите ISO-образ Fedora
Если вы не знакомы с Fedora, следует помнить о нескольких образах.
Fedora IoT будет использоваться для масштабируемой инфраструктуры, Рабочая станция Fedora это образ с набором инструментов, ориентированный на рабочий стол в стандартной среде рабочего стола GNOME и Fedora сервер как следует из названия, предназначен для сервера или центра обработки данных.
Если GNOME не ваш первый выбор, вы можете скачать прясть рабочего стола Fedora с альтернативной средой рабочего стола. Для этого урока я выбрал Fedora 33 в среде рабочего стола GNOME.
Шаг 3. Создайте пустую виртуальную машину и настройте ее.
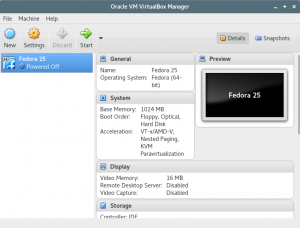
Для успешной установки и запуска Fedora требуется минимум 20 ГБ дискового пространства и 2 ГБ оперативной памяти. Хотя для более плавного взаимодействия с пользователем рекомендуется удвоить эти суммы. На основе этого я создам и настрою виртуальную машину.
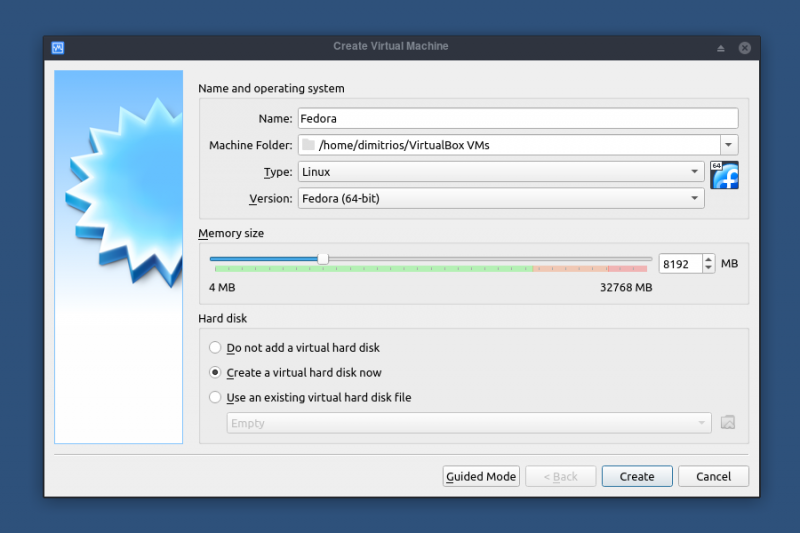
Запустите Virtual Box и нажмите New.

Самый важный вариант, на который следует обратить внимание, — это Тип должен быть установлен в Linux, а версия — в Fedora (64-бит). Если вы начнете вводить Fedora в ответ на приглашение имени, VirtualBox автоматически выберет для вас правильные настройки. Хотя имя не обязательно должно быть Fedora, оно может быть любым.
Если у вас есть доступ только к 32-битной версии, вам необходимо включить технологию виртуализации в BIOS, если у вас процессор AMD, это называется SVM. В худшем случае ваш ЦП не поддерживает технологию виртуализации. Если вы не уверены, сначала проверьте это.
Когда у вас будут аналогичные настройки со мной, нажмите кнопку создания.

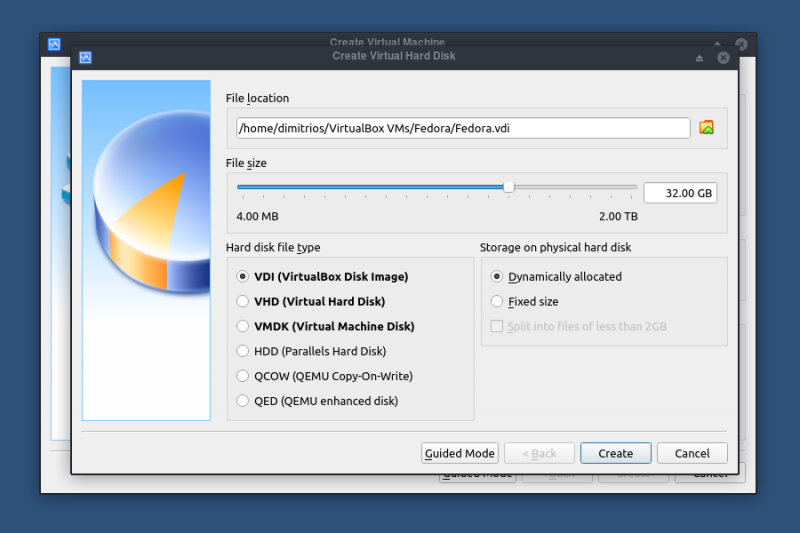
Как упоминалось ранее, вам необходимо не менее 20 ГБ дискового пространства для установки Fedora. В моей системе 32 ГБ оперативной памяти, поэтому я назначил здесь 8 ГБ. Вам должно хватить 3 ГБ ОЗУ.
Несколько слов о потреблении оперативной памяти: виртуальная машина будет использовать оперативную память только тогда, когда вы ее запускаете. В противном случае он будет доступен для обычного использования.
Убедитесь, что остальные настройки соответствуют примеру, и нажмите «Создать».

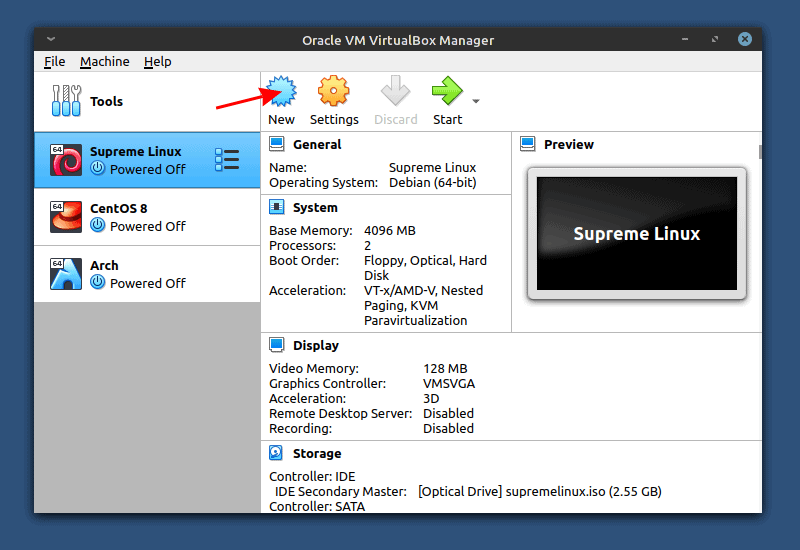
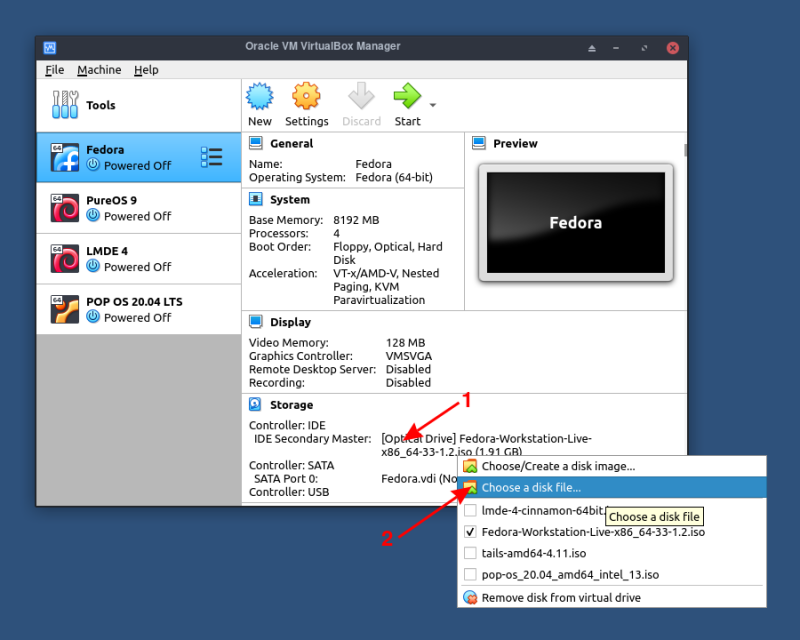
Перед тем, как нажать кнопку запуска вашей виртуальной машины, вам необходимо загрузить ISO, как показано ниже [Оптический привод].

Поскольку ваш виртуальный жесткий диск пуст, виртуальная машина загрузится с этого ISO. Думайте об этом как об использовании живого USB или диска для установки Linux.

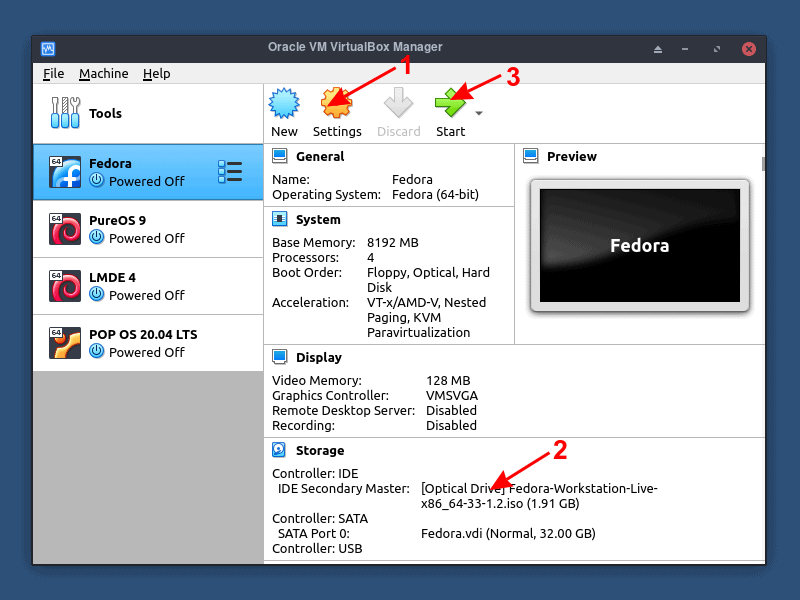
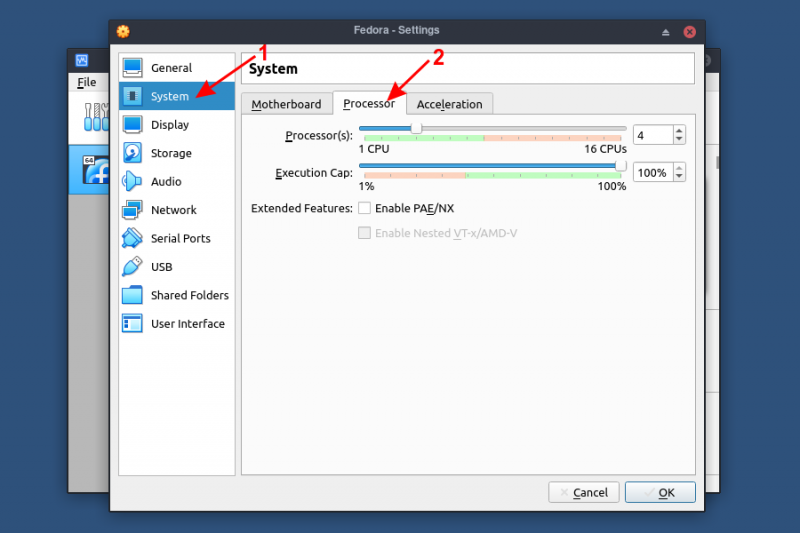
Затем, если у вас многоядерный процессор, рекомендуется выделить 2 или более ядер для вашей виртуальной машины. Вы можете найти ядра ЦП на вкладке «Система». Когда вы настроите свою систему, нажмите ОК и запустите виртуальную машину.

После того, как вы все настроили, нажмите кнопку «Пуск», чтобы начать установку.
Шаг 4: Установите Fedora в VirtualBox
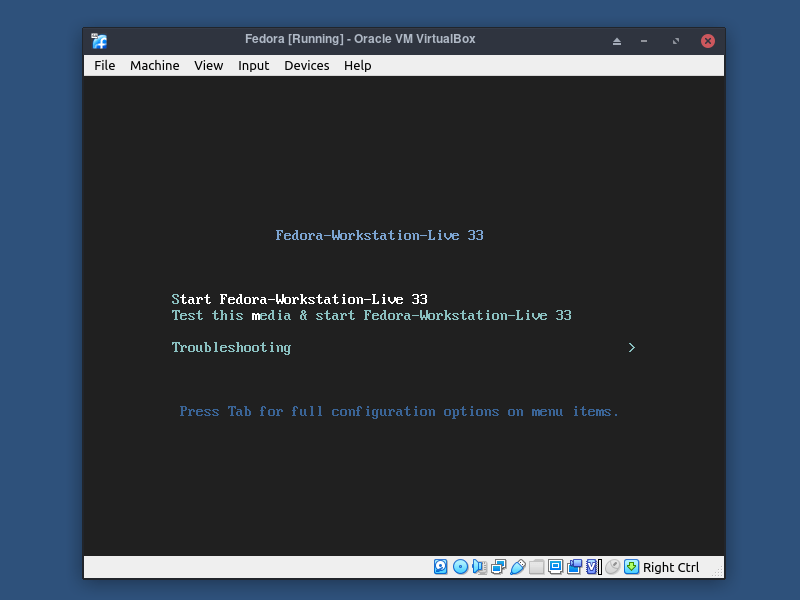
Если вы правильно выполнили процесс, при запуске виртуальной машины вы загрузитесь прямо из файла ISO. Когда вы увидите экран, похожий на показанный ниже, выберите «Запустить Fedora» и нажмите клавишу ввода.

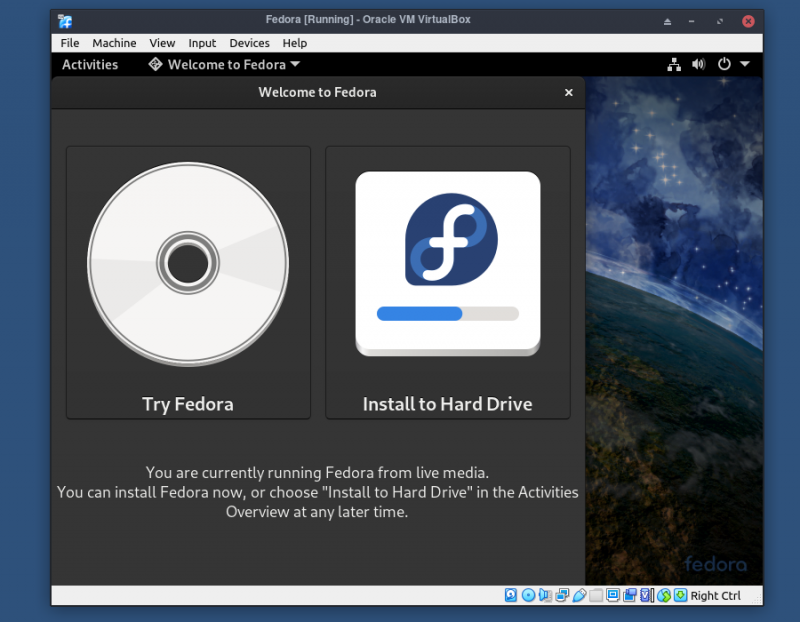
Чтобы запустить диалоговое окно установки, нажмите «Установить на жесткий диск».

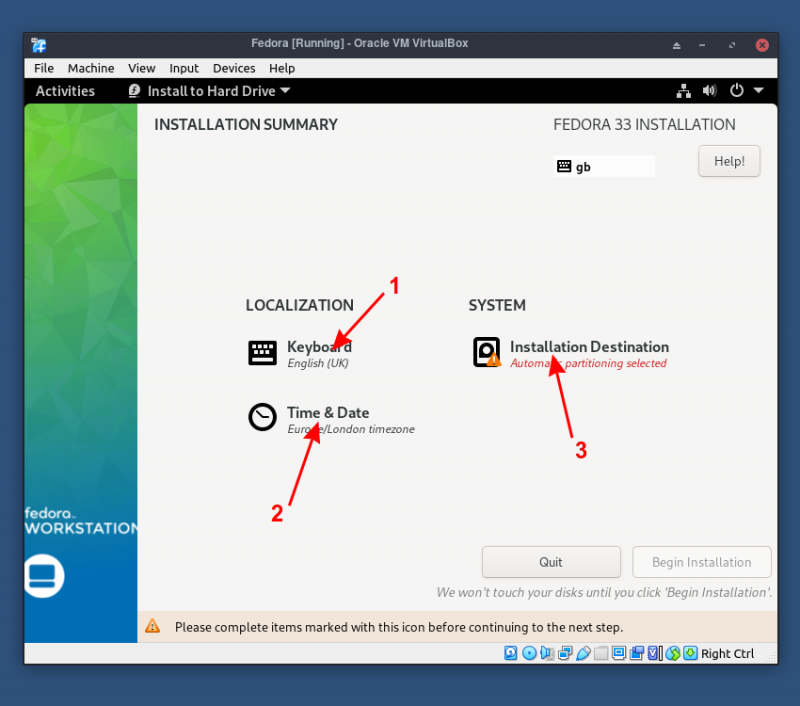
Прежде чем приступить к установке, важно определить раскладку клавиатуры, часовой пояс и, наконец, место установки операционной системы.

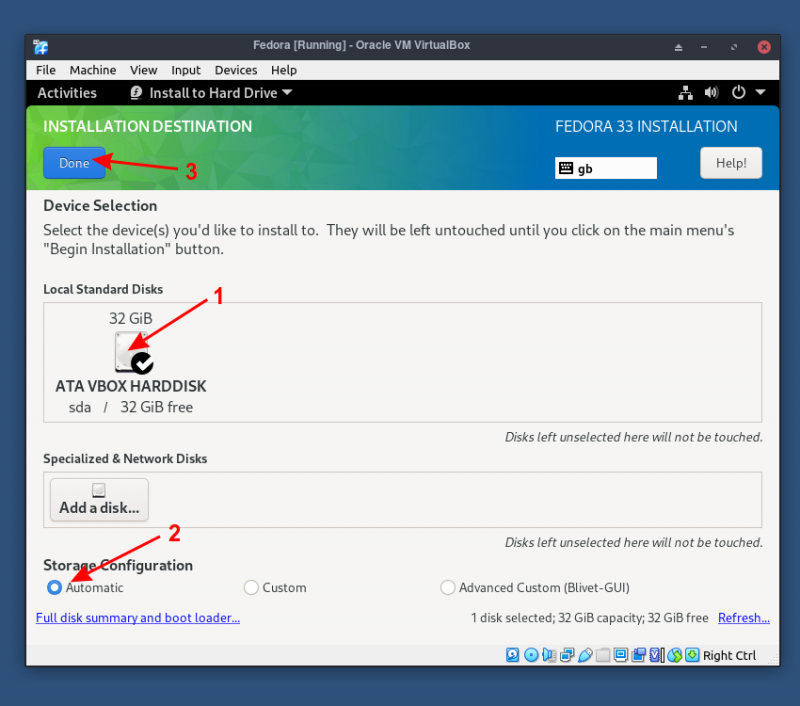
Процесс разбиения прост. Ранее вы освободили место в качестве VDI. Он должен распознаваться автоматически.
Выберите свой диск и установите автоматическую конфигурацию хранилища. Щелкните Готово, чтобы перейти к предыдущему диалоговому окну.

После того, как вы настроили вышеуказанное, нажмите «Начать установку».

Теперь вам просто нужно подождать пять-шесть минут до завершения установки. По завершении установки нажмите кнопку «Завершить установку».
В качестве последнего шага вам необходимо выключить вашу систему. Если вы не знакомы со средой рабочего стола GNOME, вы можете сделать это так.

Вам необходимо вручную выгрузить ISO-файл, который вы загрузили на начальных этапах.

В следующий раз, когда вы запустите виртуальную машину с Fedora, вам будет предложено создать учетную запись пользователя и установить пароль для Fedora Linux.
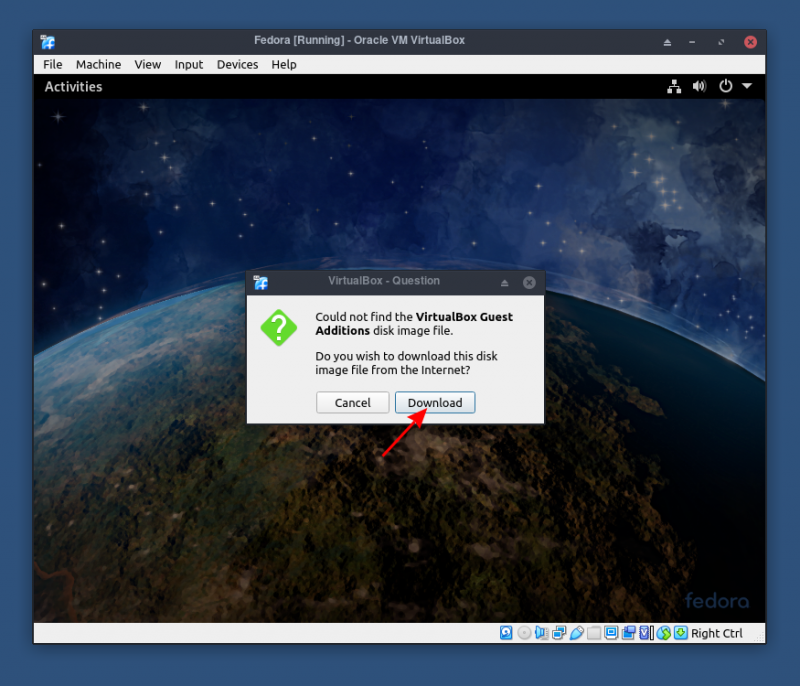
Используйте гостевые дополнения VirtualBox для дополнительных функций, таких как совместное использование буфера обмена, совместное использование папок и т. Д.
дополнения Гость предназначены для установки внутри виртуальной машины после установки гостевой операционной системы. Они содержат драйверы устройств и системные приложения, которые оптимизируют гостевую операционную систему для повышения производительности и удобства использования.
ISO-файл гостевых дополнений монтируется как виртуальный CD-ROM для установки.
Это простой процесс. Просто перейдите на вкладку «Устройства» и затем нажмите «Вставить образ компакт-диска с гостевыми дополнениями».

Вам будет предложено загрузить образ гостевых дополнений, когда появится запрос на скачивание.

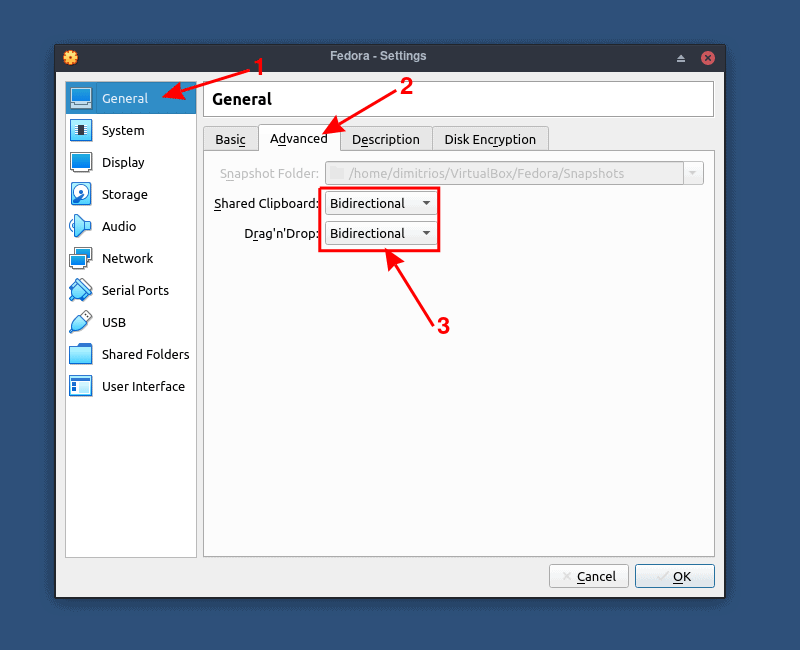
Общий буфер обмена
В какой-то момент вам понадобится переместить некоторый контент между вашей виртуальной машиной и операционной системой хоста. Общий буфер обмена / поддержка перетаскивания позволит вам копировать элементы на одну платформу и вставлять их на другую.
Чтобы включить эту функцию, выберите Настройки на домашней странице VirtualBox и следуйте инструкциям ниже. Я нахожу двунаправленная вариант самый удобный.

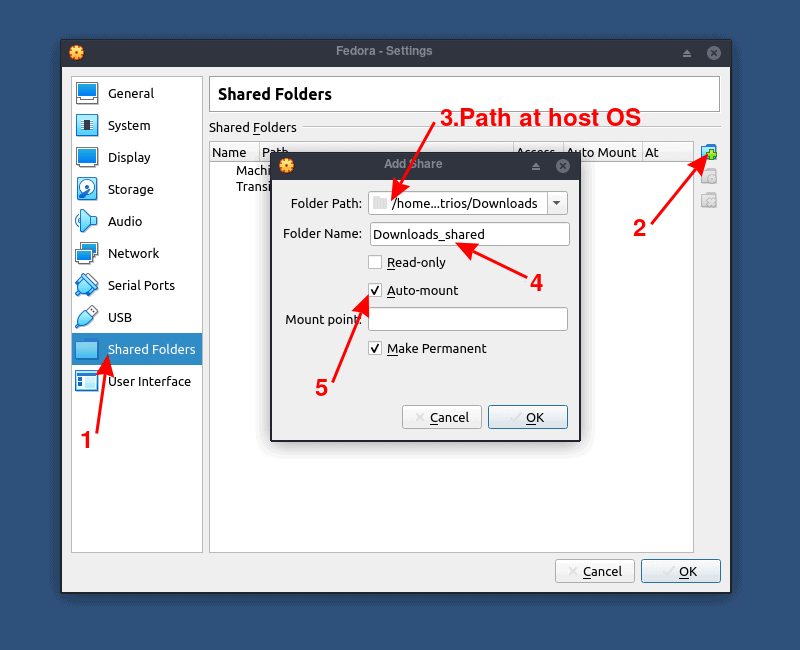
Общие папки
Есть два типа акций:
- Постоянные общие ресурсы, которые сохраняются с настройками виртуальной машины.
- Временные общие ресурсы, которые исчезают при выключении виртуальной машины. Их можно создать с помощью флажка в VirtualBox Manager.
В этом уроке я создам постоянную общую папку. В настройках виртуальной машины добавьте системную папку хоста, к которой вы хотите предоставить общий доступ, и выберите имя, которое вы хотите отображать на вашей виртуальной машине.

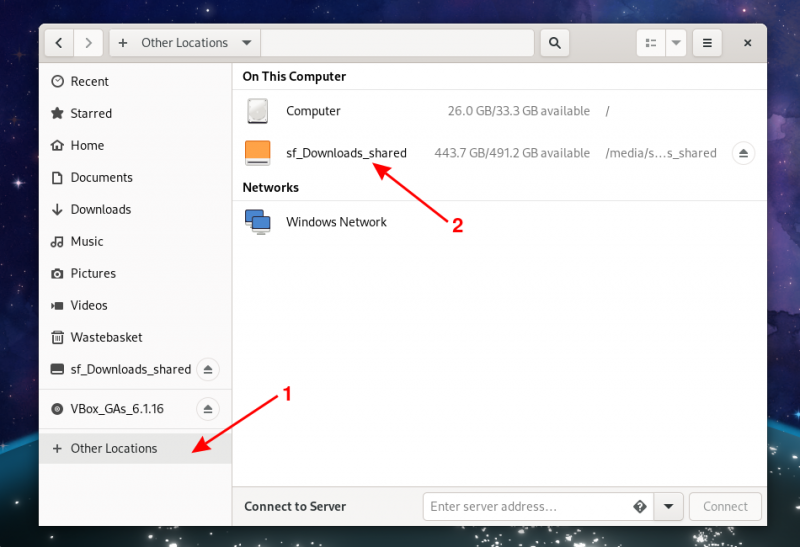
При следующем запуске виртуальной машины папка должна отображаться как сетевой диск.

Лучшая поддержка видео
В то время как виртуальная видеокарта, на которой Oracle VirtualBox предоставляет все основные функции, настраиваемые видеодрайверы, устанавливаемые вместе с гостевыми дополнениями, предоставляют вам сверхвысокие и нестандартные видеорежимы, а также повышенную производительность видео.
Используя гостевые дополнения, разрешение гостевой ОС будет динамически изменять размер по мере настройки окна VirtualBox на вашем компьютере.
Наконец, гостевые дополнения могут использовать видеокарту вашего компьютера. Если вы геймер или используете программное обеспечение для повышения производительности в WM, это имеет огромное значение.
Совместное использование USB и сетевых устройств
С VirtualBox пользователи могут использовать полнофункциональную операционную систему без необходимости выполнять настройку на другом оборудовании. Однако совместное использование USB-устройств и сетевых устройств между хостом и гостевым компьютером не так просто, как должно быть.
Для доступа к USB-устройствам вам необходимо установить пакет расширений VirtualBox.

Это только для Linux потому что я использую все это в Linux.
Чтобы VirtualBox имел доступ к подсистеме USB, пользователь (в хост-системе), запускающий VirtualBox, должен принадлежать к группе vboxuser. Для этого откройте терминал и выполните следующую команду:
sudo usermod -aG vboxusers 'your username'После того, как вы запустите команду, вы должны либо выйти и снова войти в систему, либо перезагрузить хост-компьютер.
На этом шаге подключите USB-накопитель и через настройки виртуальной машины вы сможете найти и добавить носитель, как показано в примере.

Ваш USB будет доступен при следующем запуске виртуальной машины.

Дополнительный совет: сохраните и экспортируйте виртуальную машину, чтобы вы могли использовать ее позже в любой системе.
Возможно, вы захотите использовать свою виртуальную машину на другом компьютере, или пришло время построить новую машину, и вам нужно оставить свою виртуальную машину такой, какая она есть. Вы можете легко экспортировать текущую настройку и импортировать ее на другой компьютер, выполнив несколько простых шагов.
На домашней панели VirtualBox щелкните файл и устройство экспорта. Если вы предпочитаете сочетания клавиш, вы можете просто нажать Ctrl + E.

Выберите виртуальную машину, которую вы хотите экспортировать, и нажмите «Далее».

Параметр «Формат» требует внимания. Существует три различных варианта Open Virtualization Format 0.9, 1.0 и 2.0, которые могут быть расширениями ovf или ova.
С расширением ovf несколько файлов будут записаны отдельно, по сравнению с расширением ova, которое объединяет все файлы в один архив в формате Open Virtualization Format.
Формат по умолчанию, Open Virtualization Format 1.0, должен подойти.

Чтобы завершить процесс, нажмите «Далее», а в следующем диалоговом окне — «Экспорт».
Заключение
Используя виртуальную машину, вы можете не просто протестировать операционную систему, но и развернуть полностью работающую систему, в равной степени сопоставимую с физической машиной. В настоящее время оборудование стало настолько мощным и доступным, что большая часть его мощности не используется.
Благодаря технологии виртуализации вы можете использовать потраченные впустую ресурсы. Уменьшается потребность в физических машинах и, следовательно, уменьшается потребление энергии. Вы можете сэкономить деньги как на оборудовании, так и на снижении эксплуатационных расходов.
В более широком масштабе виртуализация серверов — это скорее базовое требование, чем расширенная концепция.
Я надеюсь, что вы нашли этот учебник полезным при установке Fedora Linux в VirtualBox. Если у вас возникнут проблемы, дайте мне знать в комментариях.
Похожие посты:
- Как загрузить Android 12 и 12L для Google Pixel и других устройств Android
- Обзор рабочей станции Fedora 30 — умнее, быстрее и громче
- Руководство по свежему Windows 10 Установка или обновление ОС
- Как выполнить двойную загрузку Fedora и Windows
- Как увеличить диск виртуальной машины в VirtualBox или VMware
- Как установить VirtualBox в Ubuntu [Учебник для начинающих]
- 8 бесплатных программных решений для виртуализации Windows PC
- Как установить Linux Mint в VirtualBox [Учебник по созданию скриншотов]
- Ubuntu 17.04 «Zesty Zapus» Все варианты Ссылки для скачивания
- Установка Kali Linux на VirtualBox: самый быстрый и безопасный способ
Как установить Fedora на Oracle VM VirtualBox
![]()
Fedora — это операционная система Linux, которая очень полезна для разработчиков программного обеспечения, облачных инженеров и технических энтузиастов в целом. Несмотря на то, что вы можете установить Fedora вместе с текущей операционной системой, имеет смысл создать виртуальную машину и установить на нее Fedora. В этом посте мы собираемся сделать то же самое, используя один из лучших инструментов VM, Oracle VM VirtualBox. Итак, если вы хотите установить Fedora на Oracle VM VirtualBox, это руководство для вас.

Как установить Fedora на Oracle VM VirtualBox
Чтобы установить Fedora на Oracle VM VirtualBox, вам необходимо выполнить шаги, указанные ниже.
- Загрузите ISO-файл Fedora
- Установите виртуальный бокс
- Настроить виртуальную машину
- Загрузитесь и установите Fedora
Поговорим о них подробнее.
1] Загрузите ISO-файл Fedora
Что нужно для установки программного обеспечения? Сам софт. Итак, чтобы установить Fedora, вам нужен ISO-образ Fedora. Чтобы сделать то же самое, перейдите к getfedora.org и нажмите на Скачать сейчас в разделе Fedora Workstation. Выберите операционную систему, для которой вы хотите загрузить файл, а затем загрузите его. Обязательно храните ISO в доступном месте.
2] Установите виртуальный бокс
После того, как вы загрузили файл ISO, пришло время загрузить VirtualBox, на который мы будем устанавливать Fedora. VirtualBox можно скачать с официального сайта, виртуальный бокс.орг. Просто нажмите кнопку «Загрузить», чтобы получить копию программного обеспечения, затем перейдите в папку «Загрузить» и установите VirtualBox. Вам просто нужно следовать инструкциям на экране, чтобы завершить процесс.
3] Настройте виртуальную машину
Теперь, когда у нас есть все необходимое для установки Fedora, давайте установим и настроим виртуальную машину перед установкой ОС. В зависимости от конфигурации вашего компьютера и ресурсов, которые вы ему выделили, Fedora будет работать или ползать в вашей системе. Именно поэтому обязательно выбирайте с умом. Чтобы сделать то же самое, выполните предписанные шаги.
- Откройте VirtualBox на твоем компьютере.
- Теперь нажмите кнопку «Создать».
- Введите «Fedora» в поле «Имя». Это автоматически установит тип на Linux и версию на Fedora (64-разрядная версия). Если нет, просто сделайте это самостоятельно, чтобы ваша ОС была готова.
- Нажмите «Далее.
- Установите базовую память на 2048 МБ и процессор на 1 (как минимум).
- Снимите галочку с Включить EFI и нажмите «Далее».
- Отметьте поле, связанное с Создайте виртуальный жесткий диск сейчас и Размер диска до 15.00 ГБ.
- Убедитесь, что флажок «Предварительно выделить полный размер» не установлен, и нажмите «Далее».
- Наконец, нажмите «Готово».
Теперь, когда мы создали виртуальную машину, давайте перейдем к следующему шагу.
4] Загрузитесь и установите Fedora
Теперь, когда мы создали виртуальную машину, нам нужно загрузиться с помощью файла ISO, а затем установить операционную систему. Чтобы сделать то же самое, вам просто нужно выполнить шаги, указанные ниже.
- Выберите созданную виртуальную машину и нажмите «Настройки».
- Перейдите на вкладку «Хранилище» и нажмите кнопку Оптический диск кнопку.
- Нажмите «Добавить», перейдите к месту, где вы сохранили ISO, а затем добавьте его.
- Затем нажмите «Выбрать» > «ОК».
- После настройки параметров выберите Fedora и нажмите «Пуск».
- Подождите, пока виртуальная машина включится, и после ее загрузки нажмите «Установить Fedora на жесткий диск».
- Выберите язык и нажмите «Продолжить».
- Теперь выберите Место установки из системы, а затем продолжить.
- Настройте свою учетную запись и завершите установку.
Вот как вы можете установить Fedora на виртуальную машину.
Точно так же вы можете установить любую операционную систему Linux на Windows компьютер с помощью VirtualBox или других инструментов VM. Все, что вам нужно, это программное обеспечение виртуальной машины и файл ISO. Это позволит вам запускать две операционные системы одновременно. Вы также можете установить Linux на Hyper-V если это то, что вы предпочитаете.
Fedora, как и большинство ОС Linux, изначально поддерживает расширение виртуализации, которое позволяет пользователю без особых усилий создавать виртуальные машины с оборудованием и периферийными устройствами. Эта возможность была предоставлена операционным системам на базе Linux благодаря KVM или виртуальной машине на основе ядра. Это работает вместе с QEMU для включения виртуальной среды. Итак, если вы хотите изначально установить Fedora, а затем Windows кроме того, вы можете сделать это с помощью KVM.
Похожие посты:
- Как загрузить Android 12 и 12L для Google Pixel и других устройств Android
- Как установить Fedora в VirtualBox [с инструкциями для USB, буфера обмена и общего доступа к папкам]
- Руководство по свежему Windows 10 Установка или обновление ОС
- Обзор рабочей станции Fedora 30 — умнее, быстрее и громче
- Как увеличить диск виртуальной машины в VirtualBox или VMware
- Как установить VirtualBox в Ubuntu [Учебник для начинающих]
- Как выполнить двойную загрузку Fedora и Windows
- Как настроить свой Windows 11 ноутбук для этого школьного сезона
- 15 функций, которые должен знать каждый Windows 11 на этот школьный сезон
- Ubuntu 17.04 «Zesty Zapus» Все варианты Ссылки для скачивания
How to Install Fedora in VirtualBox [With Steps for USB, Clipboard and Folder Sharing]
If you are curious about Fedora Linux, there are several ways to try it. You could install Fedora Linux alongside Windows but that’s a bit of an effort. An easier way that won’t affect your current operating system is to create a live USB of Fedora.
An alternative way to try Fedora, is to get advantage of virtualization technology through an installation in VirtualBox. This way, you use Fedora like an application on your current operating system.
This way, you can perform more thorough testing without messing up your current operating system.
You can even copy your virtual setup and re-install it on some other system. Sounds handy? Let me show you how to do it.
Installing Fedora in VirtualBox
Let’s see the steps for installing Fedora Linux in Oracle VirtualBox.
Step 1: Install VirtualBox
If you haven’t already installed VirtualBox on your system, you can download it from the official website. You can find instructions for Windows, Mac OS and Linux. Ubuntu users can refer to this detailed tutorial on installing VirtualBox.
Step 2: Download the Fedora ISO
If you are not familiar with fedora, there are a few images to be aware of.
Fedora IoT is to be used for scalable infrastructure, Fedora workstation is an image with a set of tools oriented for a desktop in a vanilla GNOME desktop environment and Fedora server as its name reveals, is tailored for a server or data center.
If GNOME isn’t your first choice, you can download a spin of Fedora desktop with an alternative desktop environment. For this tutorial, I chose Fedora 33 with the GNOME desktop environment.
Step 3: Create an empty virtual machine and configure it
Fedora requires a minimum of 20GB disk space & 2GB RAM, to install and run successfully. Although double those amounts is recommended for a smoother user experience. Based on that I will create and configure the virtual machine.
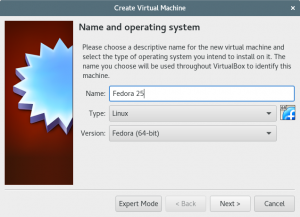
Start Virtual Box and click on New.
The most important option to pay attention, is the type to be set to Linux and the version to Fedora (64-bit). If you start typing Fedora at the name prompt, VirtualBox will automatically pick the correct settings for you. Although the name doesn’t have to be Fedora, it can be anything you like.
If you have access to 32-bit version only, you need to enable virtualization technology on BIOS, if you have an AMD CPU it is called SVM. Worst-case scenario is that your CPU doesn’t support virtualization technology. If you are not sure, check this first.
Once you have similar settings with me, click on the create button.
As mentioned before, you need at least 20 GB of disk space to be able to install Fedora. I have 32 GB of RAM on my system so I assigned 8 GB here. You should be fine with 3 GB of RAM.
A word about RAM consumption, the RAM will only be consumed by the virtual machine when you are running it. Otherwise, it will be available for regular usage.
Make sure that the rest of the settings match the example and click Create.
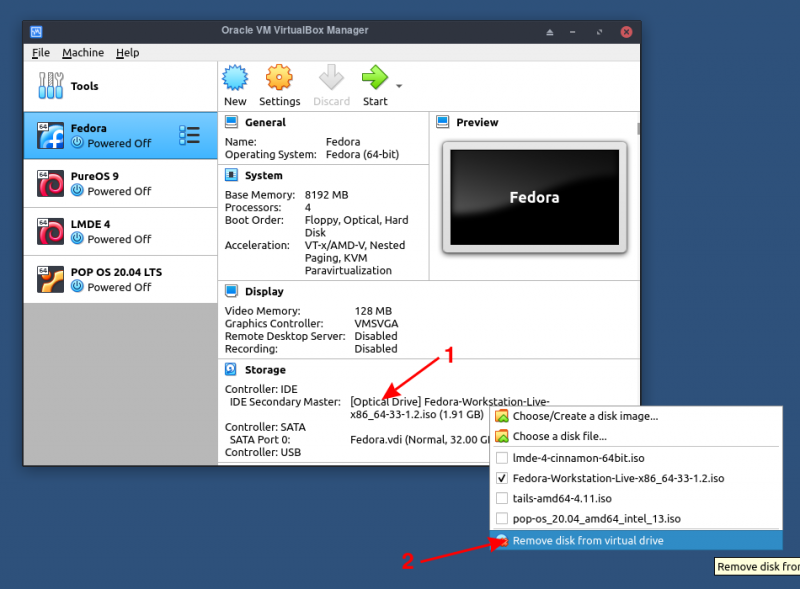
Before you click the start button of your virtual machine, you need to load the ISO as shown below [Optical Drive].
As your virtual hard drive is empty, the virtual machine will boot from this ISO. Think of it as using a live USB or disk for installing Linux.
Then, if you have a multi-core CPU it is recommended to assign 2 or more cores for your virtual machine. You may find the CPU cores under the system tab. When you configure your system click ok and start the virtual machine.
Once you have configured everything, click on the start button to begin the installation.
Step 4: Install Fedora in VirtualBox
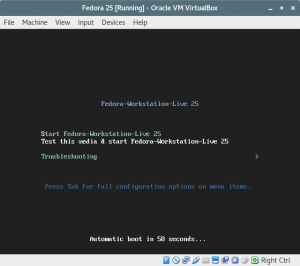
If you have followed the process correctly, when you start the virtual machine you will boot directly from the ISO file. When you see a similar to below screen select Start Fedora, and press the enter key.
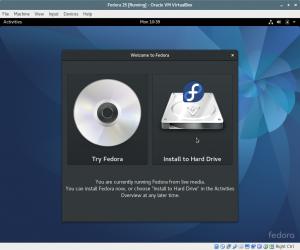
To start the installation dialog box, click on Install to Hard Drive.
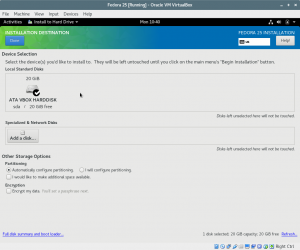
Before you proceed to the installation, it is essential to define your keyboard layout, your timezone and finally where the operating system will be installed.
The partitioning process is straight forward. You made some free space as VDI earlier. It should be automatically recognized.
Select your disk and set the storage configuration to automatic. Click on Done to go to the previous dialog box.
Once you have configured the above, click on “Begin Installation”.
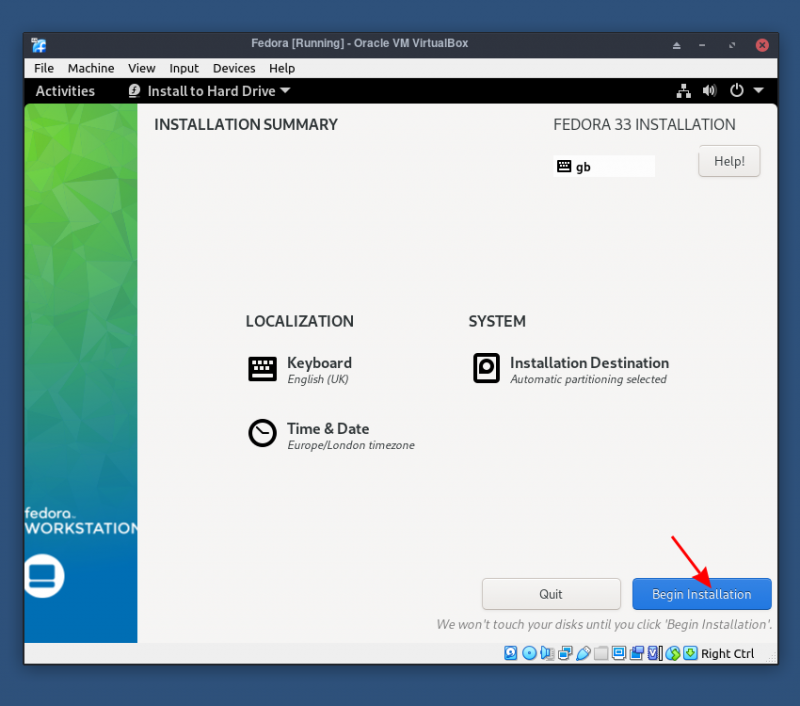
Now you just need to wait for five-six minutes for installation completion. Click on the “Finish installation” button when installation is finished.
As a last step, you need to power off your system. If you are unfamiliar with the GNOME desktop environment you can do it like so.
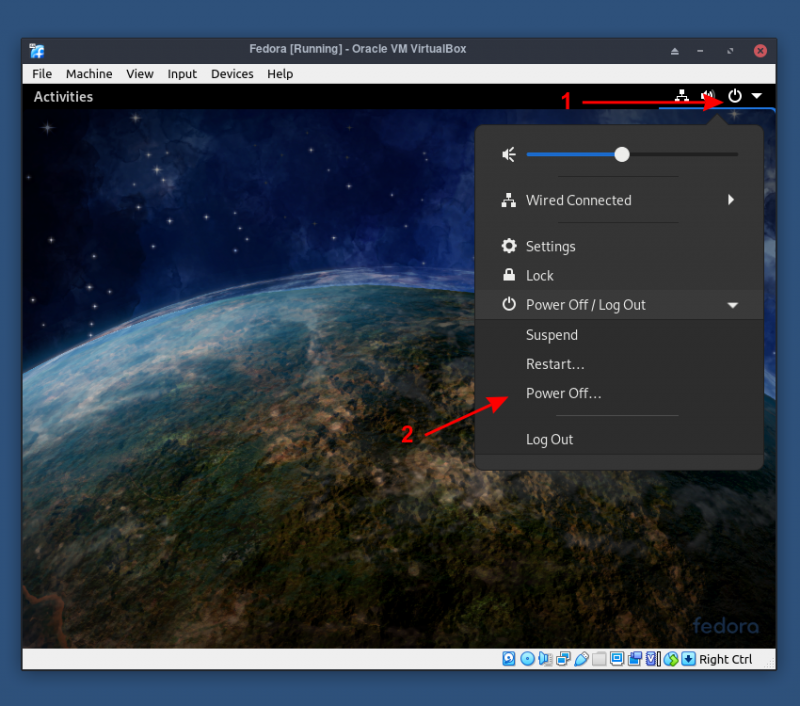
You have to manually unload the ISO file that you loaded at the initial steps.
The next time you start the virtual machine with Fedora, you will be prompted to create a user account and set your password for Fedora Linux.
Use VirtualBox guest additions for additional features like clipboard sharing, folder sharing and more
Guest Additions are designed to be installed inside a virtual machine post installation of the guest operating system. They contain device drivers and system applications that optimize the guest operating system for better performance and usability.
The Guest Additions ISO file is mounted as a virtual CD-ROM in order to be installed.
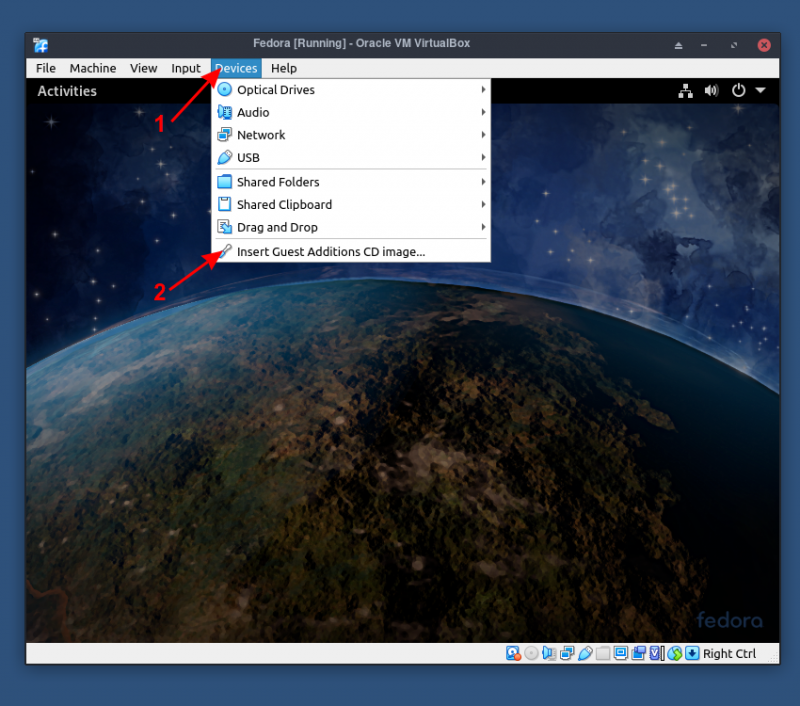
This is a straightforward process. Simply click on the devices tab and then click on “Insert Guest Additions CD image”
You will be prompted to download the guest additions image, when prompt click on Download.
Shared clipboard
At some point you’ll need to move some content between your virtual machine and the host operating system. The shared clipboard/drag and drop support will allow you to copy items on one platform and paste them on the other.
To enable this feature, choose Settings on the VirtualBox home page and follow the instructions as below. I find the Bidirectional option the most convenient.
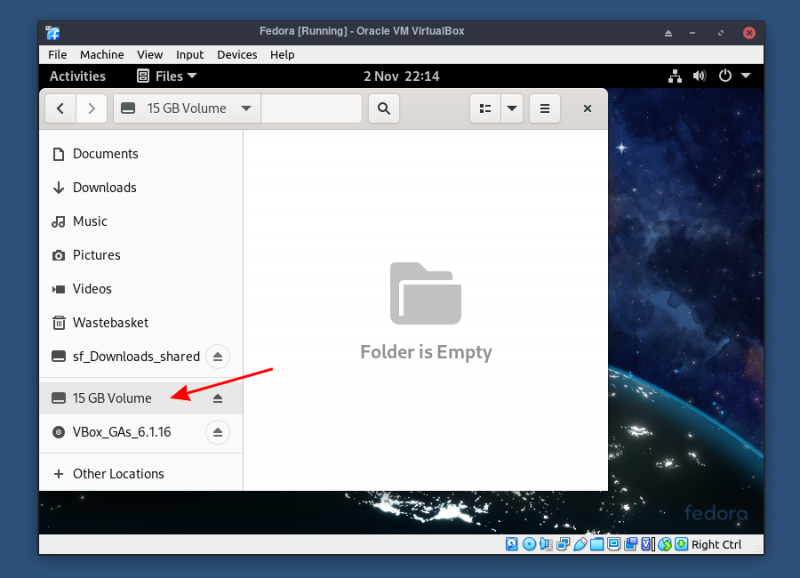
Shared folders
There are two types of shares:
- Permanent shares, that are saved with the Virtual Machine settings.
- Transient shares, that are disappear when the Virtual Machine is powered off. These can be created using a checkbox in the VirtualBox Manager.
In this tutorial, I will make a permanent shared folder. In the VM settings add the host system folder you want to share and choose the name that you want to appear at your VM.
The next time you start the virtual machine, the folder should appear as a network drive.
Better video support
While the virtual graphics card which Oracle VirtualBox provides all the basic features, the custom video drivers that are installed with the Guest Additions provide you with extra high and non-standard video modes, as well as accelerated video performance.
Using Guest Additions, the guest OS’s resolution will dynamically resize as you adjust the VirtualBox window on your computer.
Finally, Guest Additions can take advantage of your computer’s graphics card. If you’re a gamer or using productivity software in a WM, this makes a huge difference.
USB and Network Devices sharing
With VirtualBox, users have the ability to use a fully-functional operating system, without having to do the setup on different hardware. However, sharing USB and network devices between the host and guest machine is not as straightforward as it should be.
To access USB devices, you will need to install the VirtualBox extension pack.
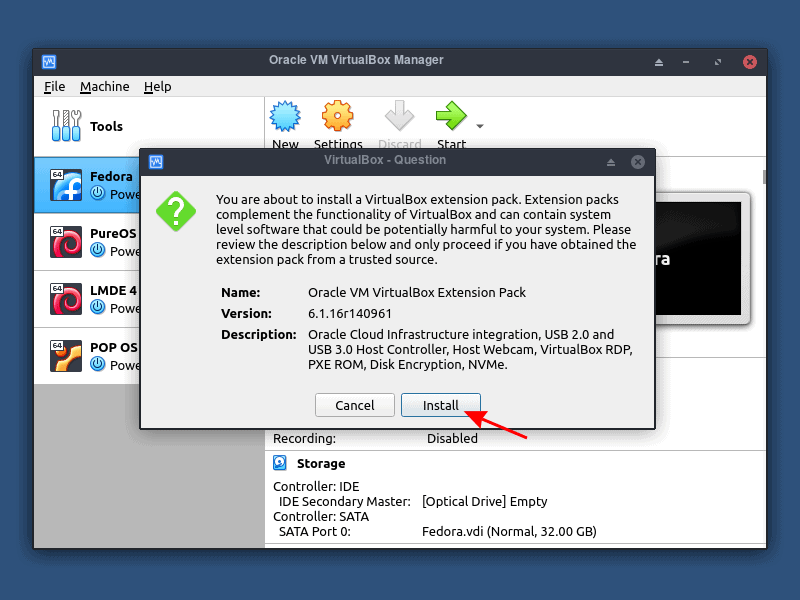
This is for Linux only because I am using all this in Linux.
In order for VirtualBox to have access to the USB subsystem, the user (on host system) running VirtualBox must belong to the vboxuser group. To do this, open up a terminal and issue the following command:
sudo usermod -aG vboxusers 'your username'Once you run the command, you should either log out and log back in, or restart your host machine.
At this step, plug in your USB stick and through your VM settings you should be able to find and add the medium as shown at the example.
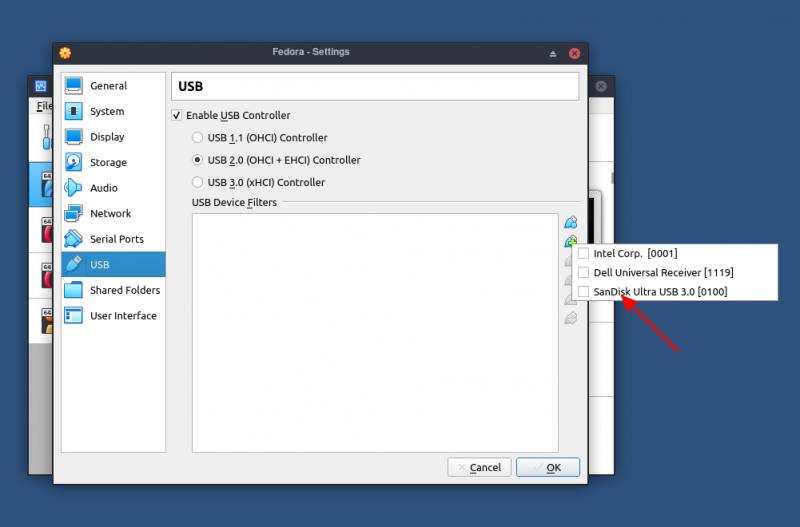
Your USB will be accessible the next time you start your virtual machine.
Bonus Tip: Save and export the Virtual Machine so that you can use it later on any system
You may want to use your virtual machine to another computer or it is time to build a new machine and you need to keep your virtual machine as it is. You can easily export your current setup and import it to another machine at a few easy steps.
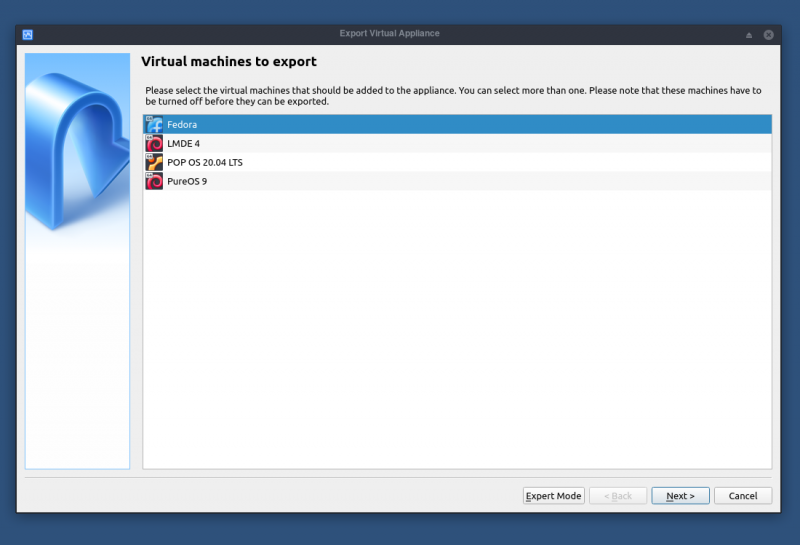
At the VirtualBox home panel, click on file and the export appliance. If you prefer keyboard shortcuts, you can simply click Ctrl+E.
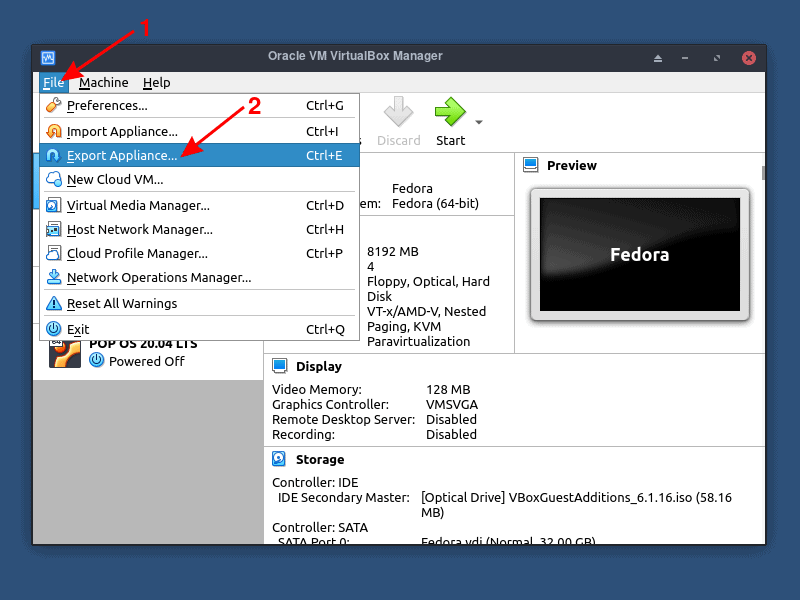
Choose the virtual machine you want to export and click on next.
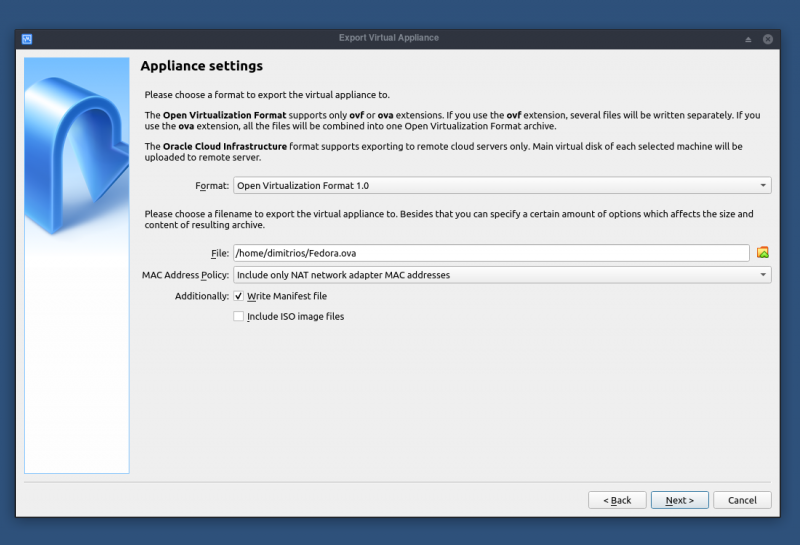
The Format option needs some attention. There are three different options of Open Virtualization Format 0.9, 1.0 and 2.0, which can be either ovf or ova extensions.
With ovf extension, several files will be written separately, compared to ova extension, which combines all the files into one Open Virtualization Format archive.
The default format, Open Virtualization Format 1.0, should be fine.
To finish the process, click next and at the next dialog box click export.
Conclusion
By using a virtual machine you can’t just test an operating system but deploy a fully functioning system, equally comparable to a physical machine. Nowadays, hardware has become so powerful and affordable that most of its power is not being utilized.
Through virtualization technology, you can use those wasted resources. The need for physical machines is reduced, and consequently the energy consumption is less. You can save money both from hardware and reduced running costs.
On a larger scale, server virtualization is more of a basic requirement than an advanced concept.
I hope you found this tutorial helpful in installing Fedora Linux in VirtualBox. If you face any issues, please let me know in the comments.
How to install Fedora as a VirtualBox guest


There are many ways to give Fedora a try if you are currently using another operating system. One way that will have little impact on your current operating system is to create a live USB of Fedora, and boot directly into it. Alternatively, you could use virtualization technology such as VirtualBox to run a Fedora install. The virtualization approach allows you work on on your Fedora install without haveing to to reboot the system every time you need to use Fedora. Additionally, even if your main operating system is Fedora or not, and you want to do some hack or test some software on a spare installation without harming your main system, having the option to start from zero again and again without losing your other works. You can even restore a backup of your virtualized system if something in your test goes wrong.
Note that if you are currently running Fedora as your main machine, VirtualBox may not be the best choice for virtualization, because it is not in the Fedora repositories. In this case, using KVM / Libvirt is probably a better approach. However, if your main system is Windows or OSX, you can use VirtualBox to create a Fedora guest.
What is VirtualBox
Oracle VM VirtualBox is, as stated in the homepage “a powerful x86 and AMD64/Intel64 virtualization product for enterprise as well as home use“. Virtualization lets you to run an entire operating system inside a virtual machine. A virtual machine is a piece of software that runs on top of your system and, in brief, emulates a PC hardware (however, in reality the subject is a little bit more complex).
You can install the VirtualBox software, configure a virtual machine, and run another operating system, like installing it on another PC. You can configure the virtual machine (VM) configuring various kind of hardware: how much RAM, what kind of chipset (PIIX3 or ICH9), how many (virtual) CPUs, up to four network cards and which model, how many (virtual) hard disks, boot order, audio device and a bunch of other things.
You can install as many VMs you want, and run them at the same time, well, in this case as many as your physical hardware is able to support (you can imagine what happens if you try to start ten VMs with 1GB of RAM each, and your PC have 4GB of RAM).
VirtualBox is a multi platform software: in the sense that it is released for a lot of operating systems (Linux, Windows, MacOS and Solaris/Illumos). VirtualBox is developed by Oracle and, since version 4, it is free software released under the GNU General Public License version 2 (GPLv2).
Installing Fedora as a VirtualBox guest
Start Oracle VM VirtualBox Manager
In this tutorial, we assume you already have VirtualBox installed. It is a straightforward task: download the Windows or MacOS X installer from the VirtualBox website. Generally speaking, the version that you can download from the Oracle VirtualBox website is more recent than the one you can find in 3rd party repositories.
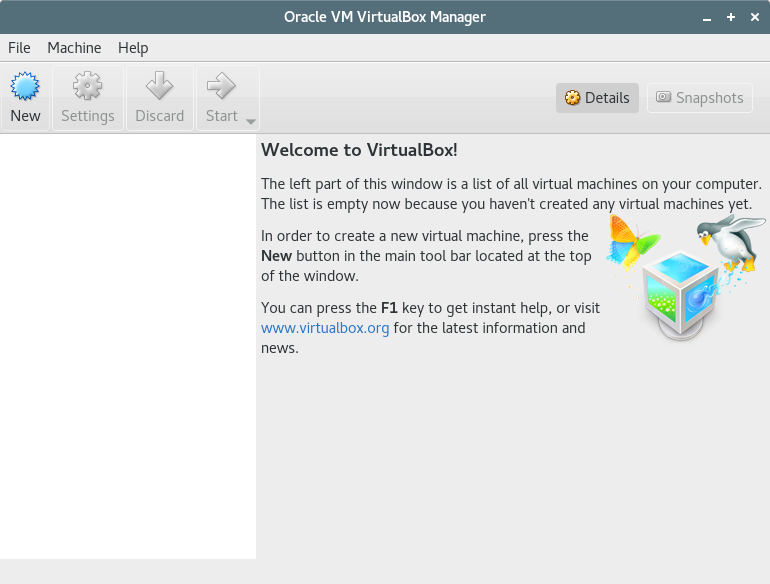
Once VirtualBox is installed, start it, and you will see the configuration and management dashboard: Oracle VM VirtualBox Manager. Also this interface is pretty simple and straightforward.
Download the Fedora ISO
In order to install Fedora, you need the installation media. You can download Fedora from https://getfedora.org/ Any of the Fedora downloads will work. You can grab the full Fedora Workstation ISO, the slim netinstall ISO, or even a spin of the Fedora desktop environment: maybe XFCE or LXDE desktop environment will runs smoothly inside a virtualized platform.
Create an empty virtual machine
The graphical interface will guide you through the VM creation. Basically the default options should fit your basic needs.
Click on the “New” icon. Write the name of the VM. Type and Version should be automagically reflect the operating system you are going to install: based on this, some basic options will be automatically adapted to fit the operating system minimal requirements.
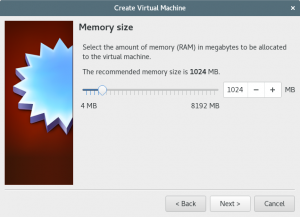
Click on “Next”. Now you must select the amount of RAM to assign to the VM. Please note that the more you assign to the VM, the lesser will remains to your host operating system: if there is a lack of available memory on the host OS, the system will start to swap, affecting even the VM performances. So pay attention in balancing the RAM size of the VM: however the configuration interface will alert you if you are exaggerating. By the way 1024 MB is a good starting point.
Now it is time to configure the VM disk. Default choiches are ok, except for the size: 8GB is too small for a usable Fedora workstation, so let’s use at least 20GB. Also in this case, you are taking up space to the host system: you must take that into account if you are planning to use many virtual machines or you’re short in disk space.
Remember that you can add as many (virtual) disks as you want. So, for instance, if you end up filling the virtual machine disk space, you can add a second disk. It is more easy than adding an hard disk to your desktop PC or your notebook.
Ready to start with the machine configuration
The virtual machine is now ready. You can change some options by clicking the Settings option from the toolbar.
Network
The network options allow you to configure more than one interface, and the kind of network. You can configure your VM mainly in these ways:
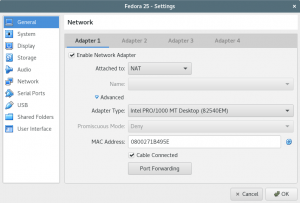
- NAT: the VM will be like in a private network not accessible from the outside. It can freely reach the same sites you are allowed to with your host syestem. The VM will get an IP from the VirtualBox internal DHCP, then, to go on the network, such address will be translated in the IP of the host system. This option is suitable if you have not to reach the VM from the rest of the network, i.e. you don’t run network services on the VM. At the same time you can reach the outside network.
- Bridged Adapter: in this case you must think as a new network card on your host PC. The VM is directly attached to your LAN, so you must assign a static IP in the same subnetwork of the host system, or use your LAN DHCP. In this way the VM will have a reachable IP, at least from the LAN, so you can configure some network services and reach them from any host in the LAN.
There is a third way that worth mentioning. You can configure the main interface as NAT, and a second interface as Host-only Adapter: in that way the VM can reach the outside network using NAT, but it is at the same time reachable, but unlike Bridged mode, it is reachable solely and exclusively from your PC.
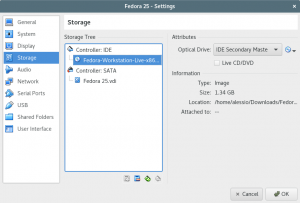
Installation media
You need to select the installation disk. So go in Storage and select the ISO file previously downloaded.
Select Empty in the IDE controller, then the CD icon. Select the ISO image and press OK.
Start up the VM and let’s install Fedora
It is now the time to start the virtual machine. By default it will start from the virtual CD. You must think to a virtual machine, like it is a physical one: you can boot up, shut down gently, abruptly power off, it has memory, disks, network card, and even a sound card if you want.
Let’s click on the green arrow. The virtual machine will start.
You can ignore the overlay message complaining something related to mouse pointer and keyboard integration. We will manage to solve that later.
The boot process begins and you can go ahead with the normal installation process.
You will see the (virtual) network interface, and the 20GB (virtual) Hard Disk.
It is a good choice to leave the default partitioning scheme. In fact by default Fedora will set up a LVM, logical volume manager. LVM could be useless in a notebook, where you will never add a second hard drive. In a virtual machine you can easily add pretty as many disks as you want, as said before, so using LVM is a good choice in order to further expand available filesystem space inside the VM.
Go ahead with the installation process and reboot the system.
Final steps
Update Fedora
As for every installation, inside a VM or not, the first thing to do is a system update. Then login on Fedora with the user configured during the installation process and complete the first login steps. To update the Fedora install in your VM, open a Terminal and type:
sudo dnf -y update
Installing the Guest Additions
VirtualBox Guest Additions are device drivers and system applications that help to optimize the operating system installed inside the VM, useful for better performance and usability, like a better mouse and keyboard integration, window scaling and resizing, better video performances, and clipboard integration. Guest Additions need to be installed inside the VM, not on your host OS.
Then let’s insert the Guest Additions CD, by clicking on Devices -> Insert Guest Additions CD image… A window should appear asking you if you want to allow autorun of the CD content.
Click on “Cancel” because you need to install some additional packages in order to fully install the Guest Additions.
Open a terminal and type, even if some packages may be already installed:
sudo dnf -y install gcc automake make kernel-headers kernel-devel perl
Once finished, actually install the Additions by running the script
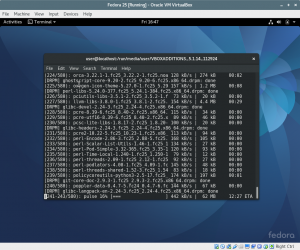
sudo /run/media/user/VBOXADDITIONS*/VBoxLinuxAdditions.run

Make a clone
The clone is a copy of the newly created machine. When you are ready, stop the VM. In the Manager select the VM and in the Machine drop down menù, select “Clone…”

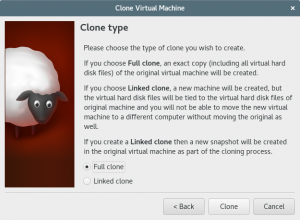
The main difference between Full and Linked clones is that latter cloning process is faster and consumes less size on your hard disk, at least initially, by contrast you cannot delete the virtual disk of the source VM, and cloned VMs cannot be exported to a different computer without moving the original as well.
Final thoughts
VirtualBox is a very convenient way to try Fedora if you don’t already use it, whitout having to partition or format your PC or configuring dual booting. If you already are a Fedora user, VirtualBox is a very effective way for testing purposes without the fear to break your system: you can reinstall the VM as many times as you want, or better, as stated before, you can use clones to restart your test from a fresh installation without wasting time in the installation process.