Get your Discord bot online .
We built a platform designed for hosting bots, with the goal of making deployment easy and cheap.
Supported Runtimes

Our services are trusted by thousands of users.
Bot-Hosting.net has been succesfully running since 2021 and we are proud to have helped thousands of users bring their bots online 24/7.
We know hosting can be confusing, which is why we’ve tried to simplify the process with extensive guides in our docs. We hope we can help you too, why not give it a try ~ it’s free!
Топ-4 лучших хостинга для ботов в Дискорде и как поставить помощника

Боты в Дискорде играют незаменимую роль. Они помогают администрировать серверы, развлекать пользователей, расширяют функционал мессенджера и интегрируют каналы с другими приложениями. Чтобы боты всегда были на связи, их устанавливают на специальный компьютер, который постоянно имеет доступ к интернету и никогда не выключается. Такие компьютеры называются хостингами. Расскажем, как выбрать хостинг для работы и залить туда бота для Дискорда.
Хостинги для ботов

На рынке хостингов нет никакой монополии, ведь каждый может включить компьютер, вставить в него побольше дисков, подключить к интернету и зарегистрировать на специальных сайтах. Конечно, дополнительно необходимо настраивать сервер, но это уже другая тема. Но, несмотря на такую простоту, предоставлять поистине качественные услуги могут только единицы, о которых и пойдет речь.
CLOUD4BOX
По сути, для работы бота не подойдет обычный хостинг, который используется для сайтов. Вместо этого сайт предлагает покупку выделенного сервера (DS) или виртуального сервера (VPS). Разница между ними в том, что виртуальным сервером могут одновременно пользоваться несколько участников. То есть при выборе этого типа вы сможете использовать только отдельную часть, что ограничивает в настройке. А выделенный сервер предоставляется только одному владельцу. В таком случае его легко настроить под собственные нужды, а также администрировать. Выделенные серверы дороже. Например, VPS с конфигурациями, указанными ниже, будет стоить 2406 рублей. Выделенный сервак дороже, он стоит 4800 рублей в месяц.
| Конфигурация | Значение |
| CPU | 9×3.0 GHz |
| RAM | 16 GB |
| Disk | 240 GB (SSD) |
| IP | IPv6 |
| Канал | 1 Гбит/с |
| Ядро ОС | Linux |
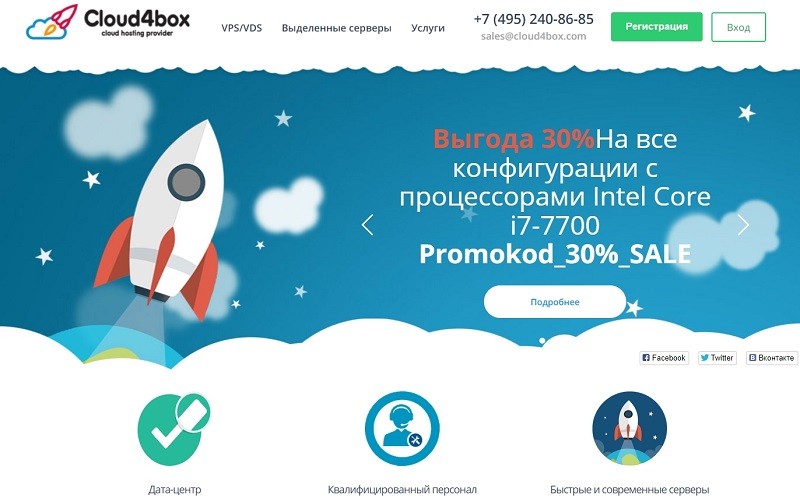
В целом, для ботов подойдут и обычные VPS, так как им не нужна гибкая настройка. Предупредим сразу: компания не предлагает услуги из категории «hosting free», да и в таких услугах нет смысла. Бесплатный сыр, как известно, только в мышеловке. Более подробно о сайте и услугах читатель может узнать на офф сайте.
SPRINTHOST

А на очереди у нас очередной российский поставщик услуг, предлагающий выгодные и практические решения. В отличие от конкурента выше этот провайдер не мучает пользователей гибкой настройкой, а предлагает сразу готовые решения. Особенно полезно, если клиент плохо разбирается в устройстве компьютера. Да, и такое бывает, особенно если бота заливает не разработчик, а тот, кто перекупил его. Здесь также доступны обычные хостинги для сайтов. VDS и выделенные серверы. Самое дорогое предложение (VDS) стоит 340 рублей, а это мало, учитывая сборку компа.
SIMPLE CLOUD
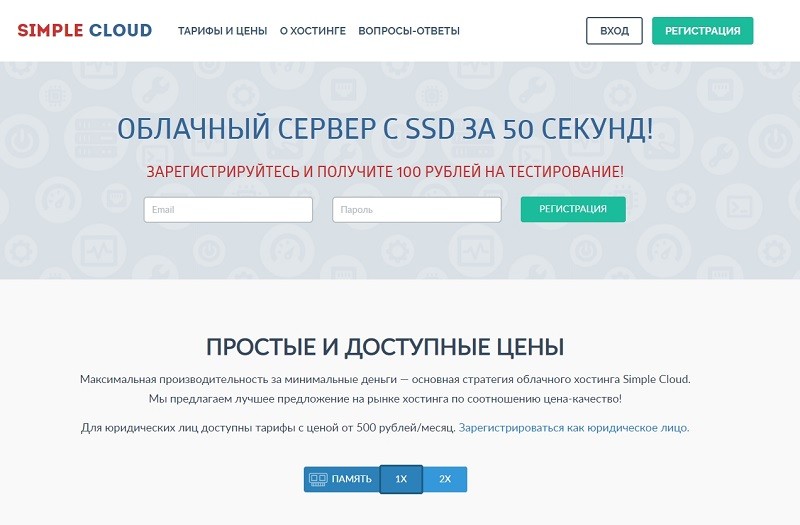
«Зарегистрируйся и получи 100 рублей» – гласит надпись на главной странице сайта. Уже заманчиво, а вы еще не видели предоставляемые услуги. Компания предлагает услуги поддержки облачного хостинга, но также не позволяет вручную собрать аппаратную конфигурацию. Вместо этого пользователю предлагается 16 разных решений (по сути их 8, но пользователь может увеличить вдвое ОЗУ в каждом). Стоимость самого дорогого тарифа – 22 400 рублей, но при этом клиент получит 128 GB ОЗУ и 400 GB SSD. Для бюджетников доступен тариф за 150 рублей, но там только 512 MB ОЗУ и 5 ГБ памяти.
Botghost
- Разработан именно для ботов. Говоря точнее, поддерживается интерфейс создания бота без программирования. Причем это бесплатно.
- Англоязычный сайт. Для тех, кто не верит в российские сайты.
- Прямая интеграция с Дискордом. Не придется поднимать npm, сервер, закидывать файлы.
Но, с точки зрения поддержки хостинга, здесь все проблематично. Сервис больше рассчитан на создание, нежели поддержку.

Как поставить Дискорд бота на хостинг
Мы предполагаем, что вы уже создали собственное приложение и протестировали на локальном компьютере. Потому этап настройки npm и сборки мы опустим. Для загрузки приложения необходимо:
- Арендовать один из возможных серверов и получить данные авторизации по FTP.
- Через FileZilla подключиться к хосту.
- Перенести данные с ботом на сервер.
- Посредством SSH активировать бота через node (или какая там у вас технология).
Готово. После этого не забудьте пригласить бота на собственный сервер.
How to Host Discord Bot on Digital Ocean, Amazon AWS or Azure

Previously, we did a tutorial on How To Host a Minecraft Server on the Digital Ocean. This post will give you a step-by-step guide on setting up your own Discord bot on a VPS (Virtual Private Server). Our cloud hosting platform of choice in this post will be Digital Ocean. However, the same procedure can be replicated on Amazon (AWS) or Microsoft Azure. We will use Ubuntu Server, which is available on all the cloud platforms.
If you wish to develop a Discord bot, you can easily do so using Discord.js. Personally, I always felt worried about my privacy when using third-party Discord bots. What if some of them could be tracking my messages? Due to that worry, I developed my own Discord bot and hosted it on a VPS. Virtual Private Servers are reliable since they are affordable and ensure your bot is online 24/7.
Download the Simple Discord Music Bot
In this post, we will not dive into developing Discord bots. Instead, we will use a freely available Discord bot on GitHub – Simple Discord Music bot. As the name suggests, it’s a very simple discord music bot with the discordjs.guide command handler for easy learning and adapting. Other features include:
- Queue system
- Volume control
- Pause/Resume
Setup a VPS Server on Digital Ocean
Writing this post, Digital Ocean offers free $100 credit for 60 days when you first sign up. All you need to do is verify an account for $5 using PayPal or a credit card. That’s a good offer to get you started—two full months of free hosting. Sign up for an account and log in to the Control Panel.
Click on the Create button(green) on the top-right to open a dropdown menu. Select Droplets to create a cloud server.

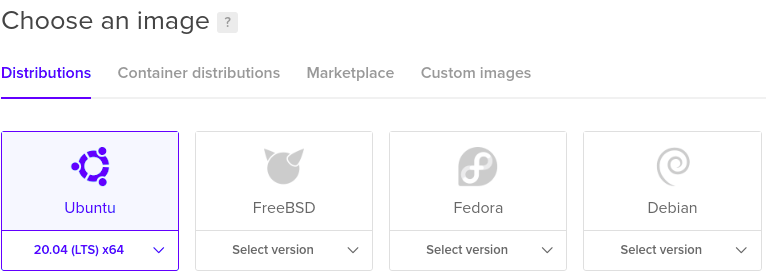
You will see an option to select the distribution you want to use. Select Ubuntu. As of writing this post, the available stable Ubuntu release is Ubuntu 2.04 LTS. However, if you are well versed with Linux systems, don’t be limited. Feel free to explore other distros like Debian, Fedora, CentOS, and more.
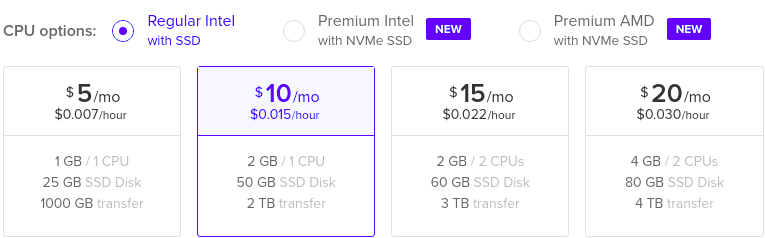
After selecting your distribution of choice, you will need to select a plan. That is basically the hardware architecture for your VPS. For this particular tutorial, I will select the Basic plan for $10/month. That comes with 2GB RAM, 50GB SSD storage, and 2TB data transfer.
Below that, you will see additional options like Block Storage, VPC Network, and Data Center region. You can leave these as they are, but select a region where you expect a lot of traffic for the data center option.
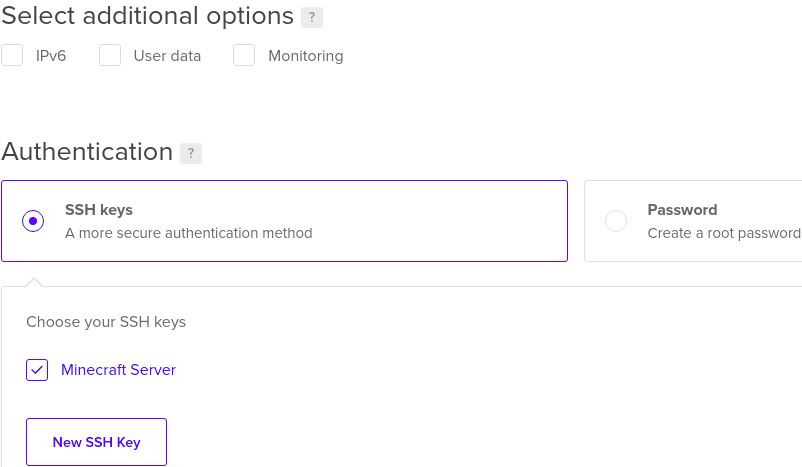
Next, you will need to select an authentication method. You have two options, SSH and a password. If you have used SSH before to set up a VPS, use SSH. If you are not well versed with these technical terms, use the password instead.
Note: Droplets that use SSH keys have password authentication disabled by default. That makes them more secure against Bruteforce attacks.
If you decide to use SSH authentication, you will need to create an SSH key or use an existing key for those who have created a VPS on the digital ocean before. In my case, I will use the SSH key I set up for the Minecraft Server.
Next, select a hostname for your Droplet. I will name mine Discord-Bot-One. When done, click the Create Droplet at the bottom of the window. Your droplets will be created. This process might take a few seconds to a minute or two. When done, you will see a new window that will list all your droplets.

Connect to Your VPS
With our VPS set up and running, we can now connect to it and set up the Discord bot. I will show you three ways of connecting to a VPS on the Digital Ocean.
Connect to VPS via Terminal
If you are a Linux user, then you should be well familiar with the Terminal. Copy the public IP address of your VPS and enter the command below on your Terminal.
ssh root@ E.g ssh root@14*.***.***.79
Note: root is the default username.
If you set a password as your authentication method of choice, you will be prompted to enter the password. If you set SSH authentication, you will not be prompted for any password.

Connect to VPS via Putty
If you are on Windows, Putty will come in handy when connecting to your VPS. You can download it from this link. There are also other utilities like BitVise, but for this particular tutorial, we will use Putty.
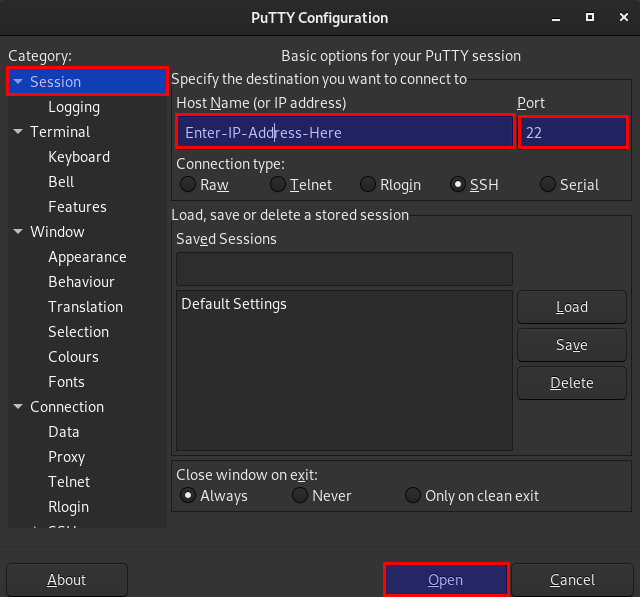
When you first launch Putty, you will see a window similar to the image below. Click on Session, Enter your VPS public IP address on the Host Name (Ip address field), enter the port as 22, and select SSH. Click the Open button at the bottom to start a session.
You will see a console window with the prompt, log in as. Type root and hit Enter. Now, if you chose password authentication, you will be prompted to type the password. If you chose SSH authentication, Putty will detect the SSH keys on your computer and immediately start a session.
Create a New Directory for Your Discord Bot Files
After successfully logging in to your VPS server, we need to create a directory to hold our Discord bot files. Execute the command below. In my case, I will name the directory as “Discord_Bot_Test.”
sudo mkdir Discord_Bot_Test
To confirm the directory was successfully created, execute the ls command as shown below.

From the image above, you can see we successfully created the directory. To navigate to your new folder, use the cd the command as shown in the image below.

Download/Upload Discord Bot Files to Your VPS
Now, here we will be a little bit technical. If your Discord bot files are uploaded on GitHub or any other website, we can download the files to our VPS using the wget command.
If the files are on your computer, we can use an FTP application like FileZilla, or if you are well versed with Linux commands, you can use the SCP command to upload files from your local computer to the VPS.
Download Discord Bot Files From a Website to Your VPS
If your files are hosted on GitHub or any other website, use the wget command syntax below to download them to your website:
sudo wget E.g., sudo wget https://github.com/eritislami/evobot/archive/refs/heads/master.zip
In my case, I have downloaded the Discord Music bot files from GitHub. The file is in a zipped format; I will extract it using the unzip utility, which can be installed with the command, apt install unzip . To unzip the file, use the syntax below:
unzip
When I type the ls command, you can see I have a folder ‘discord-music-bot-master,’ containing the Discord Bot files.

Upload Discord Bot Files from Your Computer to VPS With FileZilla
Alternatively, you can download FileZilla from this link. If you are using Linux, specifically a Debian-based distribution, install FileZilla with the command below.
sudo apt install Filezilla
When you first launch FileZilla, you will see the window below.

Fill the highlighted fields as detailed below:
- Host: Enter the public IP of your VPS
- Username: The default user is ‘root.’
- Password: If you set a password authentication, you will need to type the password. If you used SSH authentication, leave the field blank.
- Port: Enter port 22 (SSH)
Once done, click the Quickconnect button to connect to your VPS. After successfully establishing a connection, you will see a window similar to the one below. On the left, we see the Local files and directories on our computer. On the right, we have the files on the VPS.
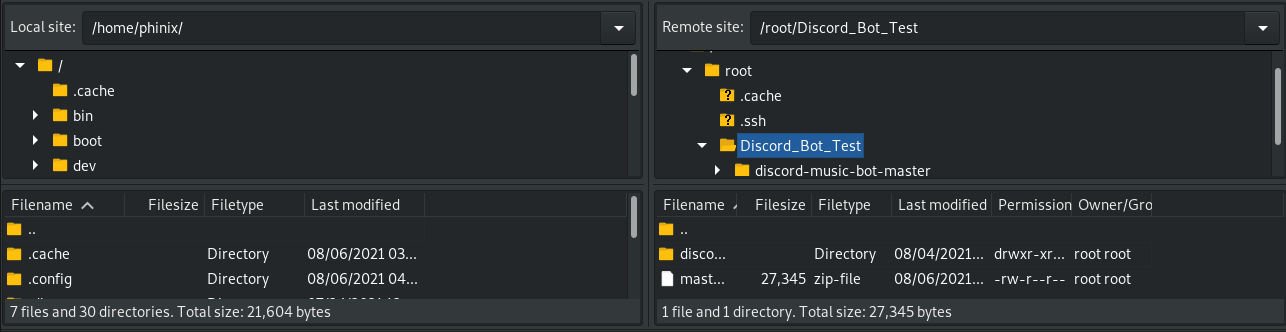
To upload files from your local PC to the VPS, drag the files from your PC (left) to the directory you want on the VPS (right). That simple! When done, close the FileZilla window and continue with the SSH connection on Putty or Terminal.
Start Your Discord Bot
Up to this point, we have everything set up to start our Discord bot.
Note: In this tutorial, we are using a bot that was developed in Javascript – Simple Discord Music Bot. Specifically, Discord.js and Node.js. If you developed your bot with a language like Python, the steps below would not work for you.
To get started, we first need to install node.js. Execute the commands below to install NodeJs version 12. It is the latest node version as of writing this post.
sudo apt -y install curl dirmngr apt-transport-https lsb-release ca-certificates curl -sL https://deb.nodesource.com/setup_12.x | sudo -E bash - sudo apt install nodejs -y
To confirm the installed version of Nodejs, execute the command below.
node -v

Next, we will run the npm install command to download the necessary node modules packages required for our project. Execute the command in the directory containing the package.json file.

To add your Discord token, rename the .env_example to .env and fill out the values:
DISCORD_TOKEN= DISCORD_PREFIX=
Since this is a hidden file (starts with a dot), we will use the ls -a command to list all files. When done, navigate to the src directory and start the bot.
cd src node index.js

That’s it! Our Discord bot is up and running.
However, there is one problem. You will notice that while the bot is running, you can do anything else on the Terminal, and if you stop the process, that will also kill our bot. In the next step, we will look at how to keep our bot running 24/7 behind the scenes.
Install PM2
PM2 is an npm package that you can easily install o your VPS with the command below:
npm install pm2 -g
After a successful installation, navigate to the src folder containing the index.js file. Now start the discord bot with the command below.
pm2 start index.js

As you can see from the image above, PM2 started our bot and assigned it an ID. You can continue performing other tasks while the bot is still running. Other useful PM2 commands to manage your tasks are:
- pm2 logs : Shows the logs of your the selected process.
- pm2 list: Lists all running pm2 processes
- pm2 stop : PM2 stops the selected process.
To view all other PM2 commands, execute pm2 —help .
Conclusion
We have given you a step-by-step guide on setting up a Discord bot on a Virtual Private Server in this post. Our cloud platform of choice that we used is Digital Ocean. However, the setup process is the same since most cloud platforms support Linux VPS. If you encounter any issues while carrying out any of the steps above, please feel free to leave a comment below.
How to host your own Discord bot

In this guide, you will find all the important information about hosting your own Discord bot.
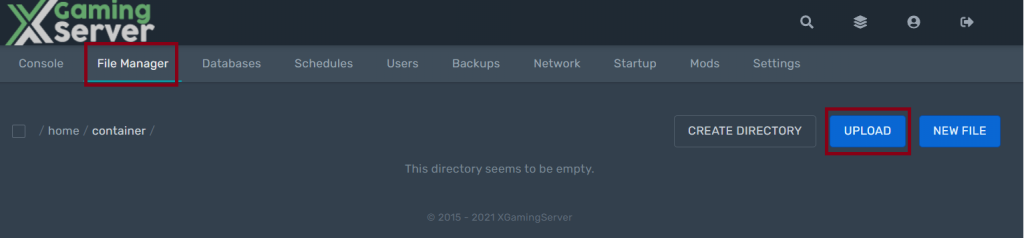
Uploading your bot files
First of all, we need to upload the bot on the server.
Log in to your server control panel and navigate to the file manager section. Here you can upload your bot to the server.

Running your Discord bot
To start your bot, you firstly need to access the CLIs commands.
Navigate to the console section and execute this command:
/bin/bash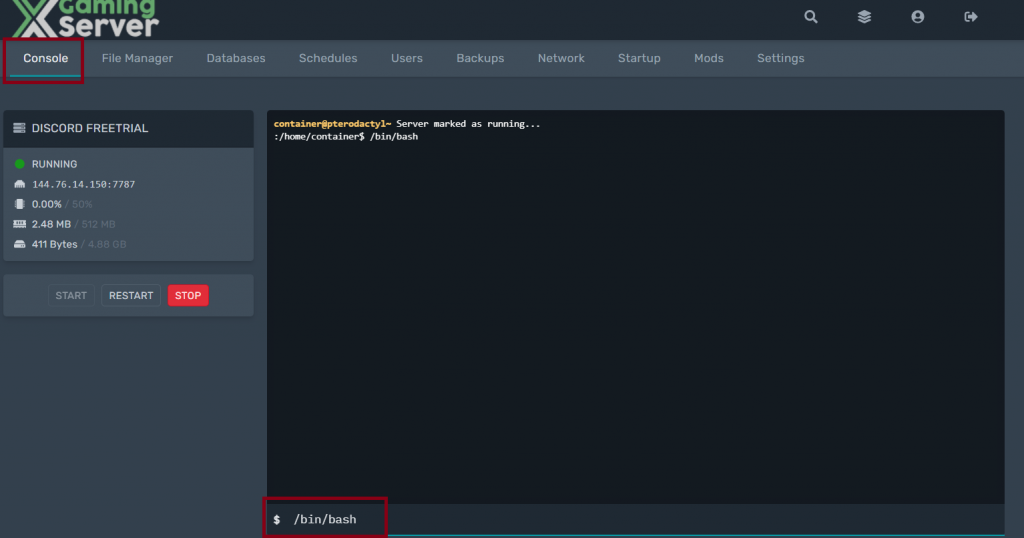
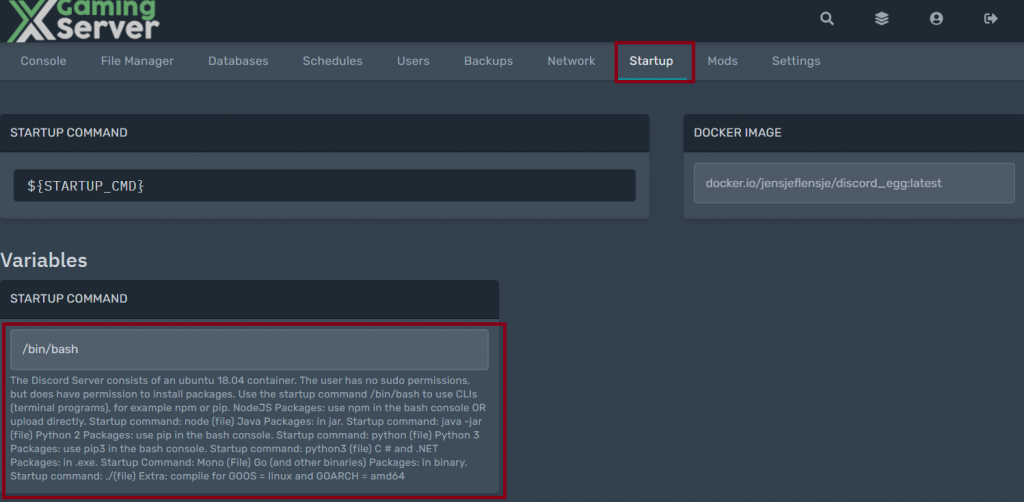
Now, choose a command from the list below depending on the language which your bot is running.
NodeJS Packages: use npm in the bash console OR upload directly. Startup command: node (file) Java Packages: in jar. Startup command: java -jar (file) Python 2 Packages: use pip in the bash console. Startup command: python (file) Python 3 Packages: use pip3 in the bash console. Startup command: python3 (file) C # and .NET Packages: in .exe. Startup Command: C# .NET .exe - "Mono C# .NET binary - "/" Go (and other binaries) Packages: in binary. Startup command: ./(file) Extra: compile for GOOS = linux and GOARCH = amd64 You can also find this list in the startup section of your server control panel.
Now, execute the command in the console section to run your Discord bot.
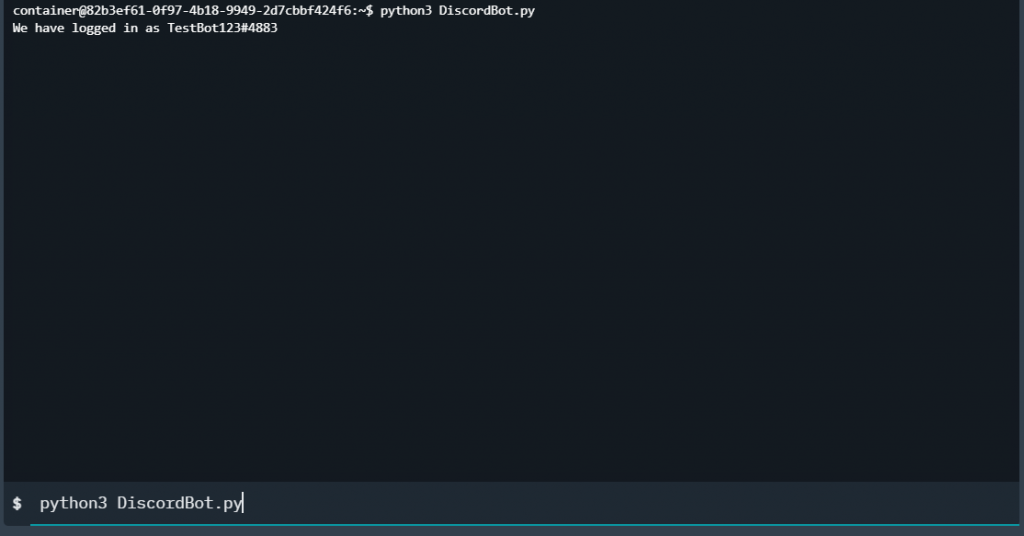
Your Discord bot should now be up and running.