How to Replace Ender 3/Pro/V2 Nozzles Easily
Learning how to replace the nozzle on your Ender 3/Pro or V2 is an important part of 3D printing, especially if you are experiencing printing failures or imperfections. This article will walk you through the process simply.
How to Remove & Replace the Nozzle on Your Ender 3/Pro/V2
This section will go through all minor to major aspects of removing, changing or replacing a nozzle on your Ender 3 3D printer. Although it is labeled just for Ender 3, you can practice this same procedure on almost all kinds of 3D printers because there will be minimal to no variations in the process.
Make sure that you don’t unscrew the nozzle while it is cold as it can lead to major damages and issues and can ruin the nozzle, heater block, and sometimes the whole hot end as well.
- Gather All the Required Tools and Equipment
- Heat the Hot End to High Temperature (200°C)
- Unscrew and Move the Fan Shroud to a Side
- Remove the Silicone Sleeve from Hot End
- Remove the Nozzle By Unscrewing it from Hot End
- Screw the New Nozzle
- Test Print
1. Gather All the Required Tools and Equipment
Usually, the Ender 3 comes with almost all the tools required for the nozzle replacement process.
The required tools for removing and replacing nozzle in Ender 3 include:
Pliers or wrenches will help you hold and grip the heater block so that you can easily unscrew or tighten the nozzle without damaging anything while all other tools will simply be used to remove the nozzle and fan screws.
You can actually get a set of 0.4mm nozzles, cleaning needles, tweezers and a nozzle changing tool to make things much easier. Get yourself the LUTER 10 Pcs 0.4mm Nozzles Set from Amazon.

One reviewer mentioned how he’s been 3D printing for around 9 months and should have bought this set a lot sooner. It makes the nozzle changing process a lot easier, not requiring the cheaper stock tools that comes with typical 3D printers.
2. Heat the Hot End to High Temperature (200°C)
As said earlier, heating the hot end is essential but firstly you should disable the steppers motors to have free access to move the arm upon which the extruder, fan shroud, and nozzle are attached. Moving the arm up will allow you to easily follow the process with enough space to move pliers and wrenches.
Now it is recommended to get rid of filament first if there is any and then heat the nozzle up to 200°C as suggested by many experts. You can heat the hot end either by going into options like:
- Prepare > Preheat PLA > Preheat PLA End
Or you may go into settings as
- Control > Temperature > Nozzle and set the intended temperature
Although most experts and users recommend 200°C as the best suitable temperature for this purpose, some users mention that you should heat the nozzle to the highest temperature as it will mitigate the chance of tearing up the nozzle threads or heater block.
I’ve changed the nozzle using just 200°C, so that should be fine.
3. Unscrew and Move the Fan Shroud to a Side
The fan is attached directly to the print head and removing it will uncover the nozzle fully while making it easy for you to remove it without damaging the hot end, nozzle, or fan.
- The fan is equipped with two screws, one on the top and the second on the left side of the fan’s cover.
- Use an Allen key to remove those screws
- Make sure you don’t push too much as it can damage the cover
- Once the screws have been removed, simply push the fan shroud to one side until you can see the nozzle clearly.
4. Remove the Silicone Sleeve from Hot End
If there is a silicone sleeve (also known as a silicone sock) on the hot end, you should remove it with a tool before moving forward. You should be careful since the hotend is at a high temperature.
5. Remove the Nozzle By Unscrewing it from Hot End
Now it’s time to get the old nozzle out of the hot end.
- Start by holding the hotend using the adjustable wrench or channel locks to ensure the hot end doesn’t move while you are unscrewing the nozzle.
- Now with your second hand, get the spanner or nozzle changing tool and start unscrewing the nozzle by rotating it in an anti-clockwise manner. A 6mm spanner can fit with all nozzles used in Ender 3 3D printers.
The nozzle will be extremely hot so don’t touch this with your hand, or place it on top of something with low heat resistance. Brass conducts heat very quickly and that heat can transfer to other objects easily.
Some people recommend that you let the hotend cool down completely to reduce damage to the threads of the nozzle and hotend before screwing the new nozzle in.
6. Screw the New Nozzle in
- Now you only have a simple task left which is to just put the new nozzle in its place and screw it into the hot end.
- You can cool down the 3D printer then get your new nozzle and screw it in until you feel some resistance. Make sure to hold the hotend with the adjustable wrench so it doesn’t move.
- Try not to overtighten the nozzle as it can either result in damaged/broken threads or some other issues during the printing process.
- Now that the nozzle is almost tightened at its place, heat the hot end to the same high temperature.
- Once the hot end reaches the set temperature, give another spin to tighten the nozzle completely but with care because you don’t want to end up damaging its threads.
Some people choose to just tighten it all the way instead, which can still work but it’s potentially safer to do it this way.
7. Test Print
Try to print out a small test like a calibration print or a miniatures to see if the nozzle is working properly. Changing nozzles doesn’t usually result in issues, but it’s a good idea to do a test print to ensure things are all good.
You can watch the YouTube video as well for better clarity of the step-by-step procedure to Replace Ender 3/Pro/V2 Nozzle.
How Do You Change the Nozzle Size in Cura?
If you choose to change your nozzle diameter, you’ll want to make changes directly in Cura to account for that.
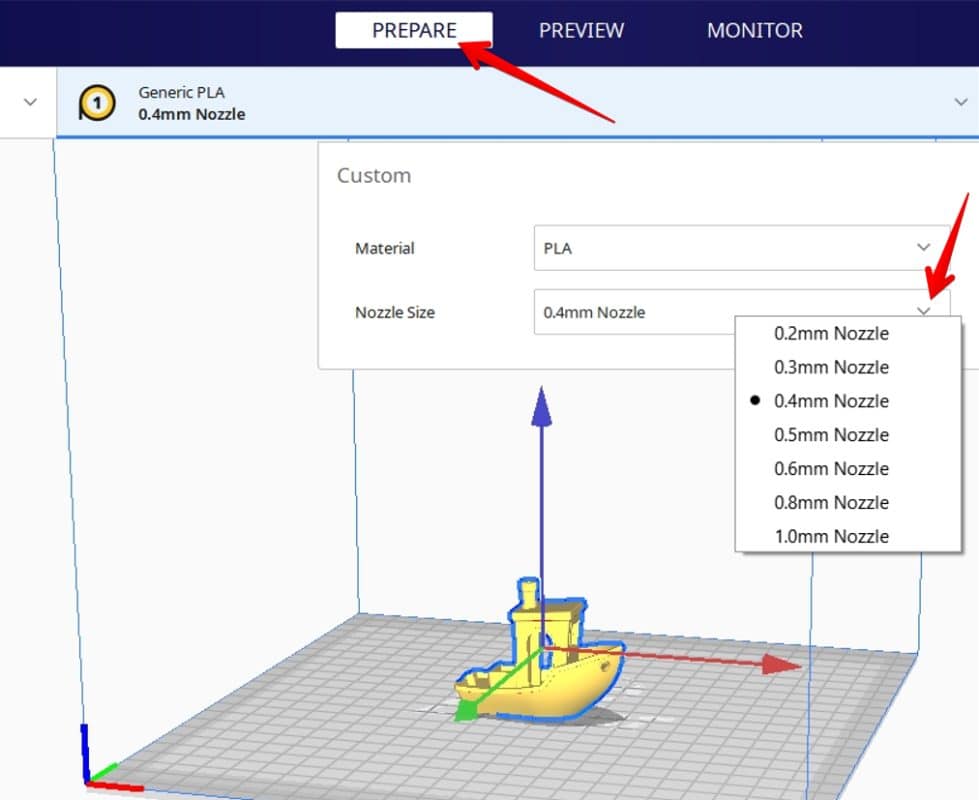
Here’s how to change the nozzle size in Cura:
- Start by getting to the “Prepare” view which is usually the default on Cura.
- Click on the middle block showing “Generic PLA” & “0.4mm Nozzle”
- A window will appear with two main options as “Material” and “Nozzle Size”, click on the latter one.
- Once you click on the Nozzle Size, a drop-down menu will appear listing all the nozzle size options available.
- Simply select the one that you have changed to and that should be done – the settings that depend on the nozzle diameter will automatically change also.
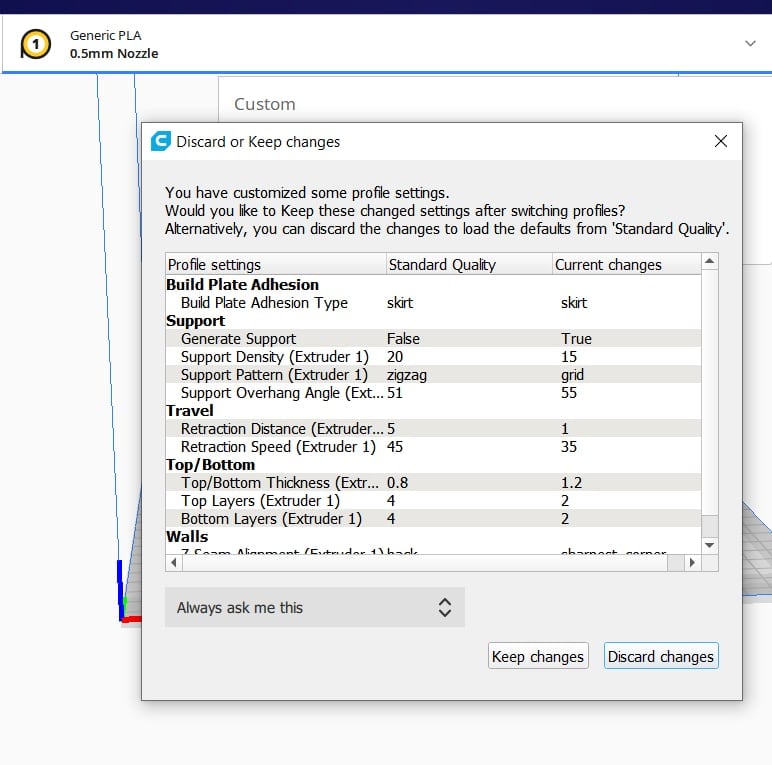
If you had changed some settings that are different from the default profile, you will be asked whether you want to keep those specific settings, or go back to the default settings.
When you change the nozzle size, make sure you review the settings of your print as they will be changed with changing the nozzle size. If the settings are just as you want, well and good, but if they are not, you can adjust them as well.
You can take a look at a detailed video of the whole step-by-step procedure for a better understanding of the process.
What Size Nozzle is Best for Ender 3/Pro/V2?
The best nozzle size for an Ender 3/Pro/V2 3D printer is 0.4mm for high quality models at a 0.12mm layer height, or faster prints at a 0.28mm layer height. For miniatures, a 0.2mm nozzle is great for quality to get a 0.05mm layer height for high-res 3D printers. A 0.8mm nozzle can be great for vases and large models.
Although 0.4mm is the best nozzle size, you can go with bigger sizes as well such as 0.5mm, 0.6mm, and so on up to 0.8mm. This will allow you to get your prints in a much faster way with much better strength and rigidity.
Do keep this fact in mind that using bigger nozzle sizes on Ender 3 will result in visible layers in the printed model and will require high temperature on the hot end to melt as much filament as required.
You can actually use a 0.05mm layer height with a stock 0.4mm Ender 3 nozzle surprisingly, as shown in the video below. Usually, the general rule is you can use a layer height between 25-75% of your nozzle diameter.
Check out the video below to see how to 3D print really high quality miniatures with smaller nozzles.
Related Posts:
Michael Dwamena is the founder of 3D Printerly, a platform dedicated to simplifying 3D printing for hobbyists and professionals alike. Owns over 20 3D printers (filament and resin) and has plenty experience 3D printing. Michael has authored over 900 articles, helping millions navigate the exciting world of 3D printing.
Leave a Reply Cancel reply

Who Is Michael Dwamena?
I’m the owner of 3D Printerly, a website dedicated to simplifying 3D printing. Published over 900 articles and created a beginner’s course. I believe in 3D printing and its ability to transition people from solely consumers to producers.
Learn more about me below:
Beginner’s Filament Printing Course
Master the basics of 3D printing filament. Perfect for beginners looking to start their 3D printing journey. The stuff I wish I knew when I started. Jumpstart your creativity and bring your ideas to life!
3D Printerly LTD owns and operates this website. As an Amazon Associate I earn from qualifying purchases. Commissions are earned from Amazon and other retailers.
Как вытащить тефлоновую трубку из фитинга печатной головы.
Подпишитесь на автора, если вам нравятся его публикации. Тогда вы будете получать уведомления о его новых статьях.
Отписаться от уведомлений вы всегда сможете в профиле автора.
Статья относится к принтерам:
Не нашёл решение этой проблемы в интернете, поэтому опишу свой опыт.
Итак понадобилось прочистить сопло. Для этого нужно снять тефлоновую (фторопластовую) трубку с головы. Но не тут-то было. Сколько бы я ни нажимал на кольцо фитинга, тефлоновая трубка не вытаскивается из фитинга печатной головы и сидит в нём намертво. Приходилось применять такие большие усилия на голову, что уже был риск сломать кинематику. При этом я никогда не ставил на фитинг никаких колец, клипс и прочего технофетиша, т.к. не вижу в этом ни малейшего смысла — не может фитинг случайно отпустить трубку — это исключено конструкцией. А тут обратная проблема — при всём моём желании трубку невозможно освободить от объятий фитинга даже сразу после сборки принтера, а после печати — вдвойне сложней.
Взял гаечный ключ и выкрутил из головы фитинг (у меня Flying Bear Ghost 4S). Фитинг вращается, а трубка — нет — чудеса. Нажал на кольцо и потянул фитинг вверх — он почти без усилий полез вверх по трубке, а трубка так и осталась в голове и держится прочно — совсем чудеса. Дёрнул трубку посильнее — принтер оторвался от стола, трубка оторвалась от принтера и он упал обратно на стол. Оказывается, она ещё и прикипела к соплу.
Подпишитесь на автора
Подпишитесь на автора, если вам нравятся его публикации. Тогда вы будете получать уведомления о его новых статьях.
Отписаться от уведомлений вы всегда сможете в профиле автора.
How to Remove the PTFE Tube From Your Hotend & Extruder – 3D Printer
I’ve had trouble in the past trying to remove the PTFE tube from my hotend on my Ender 3, so I decided to look into proper techniques of how to do it on 3D printers. This article should point you in the right direction to finally solve this issue so keep reading through to get it done.
How Do You Remove the PTFE Tube from the Hotend & Extruder?
How to Remove the PTFE Tube from the Extruder
To remove the PTFE tube from your extruder, you should depress the circular plastic coupler to release the teeth that hold the tube in place, then pull out the PTFE tube. If you can’t pull it out, unscrew the whole fitting from the extruder, then apply more pressure to the coupler using tools and remove the tube.
The video below has a really useful tip on how to remove the PTFE tube from the extruder if it is hard to release.
It involves using a pair of channel locks to hold the main fitting that screws into the extruder, then use the frame of your 3D printer to depress the coupling, and take a second pair of pliers to remove the actual PTFE tube.
In some cases, the coupling may be broken if it can’t be removed so you’ll have to unscrew the whole fitting and get a new set. I’d recommend going with the Creality Capricorn Bowden PTFE Tube which comes with higher quality tubing and 2 sets of pneumatic fittings, along with a tube cutter.

This method should work for all types of 3D printers like the Ender 3 V2, Ender 5 Pro, Prusa Mini, and plenty more.
How to Remove the PTFE Tube From the Hotend
To remove the PTFE tube from your hotend, use the wrench that came with your 3D printer as a tool to apply downward pressure to the coupling, then manually pull out the PTFE tube with your hand.
This is a really useful technique that I gathered from the previous video above, which seems to work very well to remove the PTFE tube from your 3D printer’s hotend.
When Should You Replace the Bowden Tube? – Ender 3 & More
Bowden tubes only need to be replaced when they are damaged through burning at the ends or have been squeezed, usually by cutting it with a fairly blunt tool. You can usually cut the end of the Bowden PTFE tube if it is burnt. Many people have used the same Bowden tube for years without replacing it.
You want to cut the Bowden tube with a fairly sharp object, the best being a specialized PTFE Tube Cutter.

When you get a 3D printer like the Ender 3, they usually come with stock PTFE or Bowden tubes that don’t have the highest temperature, so they are more likely to be affected by high temperatures and an issue called heat creep, which is when heat travels where it isn’t supposed to.
Check out my article on heat creep called How to Fix Heat Creep in Your 3D Printer.
If you just 3D print with PLA, you shouldn’t have a problem with this, but if you use a filament like ABS or PETG which require higher temperatures, the PTFE tub can start to melt away gradually, resulting in printing issues down the line.
This can start to cause clogs or jams regularly if not taken care of.
How to Replace PTFE Tubing on a 3D Printer
To replace the PTFE tubing on your 3D printer, simply remove your own PTFE tube by depressing the couplers and pulling out the PTFE tube. Now get your new PTFE tube and cut it to the same length as the old tubing with a good, sharp cutter. Push the new PTFE tube inside each fitting, ensuring to press the coupler down.
The video in the article above shows the full process on how you can replace the PTFE tube on your 3D printer.
It’s recommended that when you are pushing the Bowden tube back into the hotend where the nozzle is, you should unscrew the nozzle half a turn, then push down on the tube all the way, and then tighten the nozzle back up.
This is done to make sure the connection is sitting tight against the back of the nozzle to stop clogging and under extrusion in the future.
How Do You Cut the PTFE Tube on a 3D Printer?
The best way to cut PTFE tubes is with a specialized tube cutter, that usually comes with your replacement Bowden PTFE tubing. It is sharp enough to not squeeze the tubing so much that it ruins the inner diameter of the tube.
You can also use a sharp cutting tool like a Xacto blade to cut your PTFE tube correctly.
Best PTFE Tube Upgrade for 3D Printers
The best PTFE Tube upgrade is Capricorn tubing since it has precise outer and inner diameters and has a high temperature resistance of 260°C . They are a lot more durable than standard PTFE tubing and gives users a smoother printing experience, especially with flexible filament.
It can even lead to higher quality 3D prints due to the smooth flow of filament through the extruder and hotend. There is less wiggle room inside the tubing which reduces potential errors.
It’s ideal for exotic filament as well like Polycarbonate and Nylon due to being able to work with higher temperatures.
You can get yourself the Creality Capricorn Bowden PTFE Tube to upgrade your 3D printer’s Bowden tubing.
Capricorn tubing is made from PTFE resin that is softer than standard PTFE. It is also heat and moisture-resistant, non-sticky, more flexible, and wear and corrosion-resistant.
How to Remove Filament Stuck in PTFE Tube
To remove filament stuck in the PTFE tube, you can either unscrew the fitting from the extruder or hotend, or remove the PTFE tube from the fitting then manually pull out the filament. You can also insert fresh filament and use that to push the stuck filament out the other end depending on where the filament is stuck.
It’s usually best to remove stuck filament from the extruder first since it’s easy to access and is where the main movement of filament goes through initially.
If the filament is stuck and cannot be pushed out so easily, depending on where it’s stuck, you can try taking apart the extruder and manually removing it.
Some people have tried submerging the tube in boiling water to soften the filament, then pushing it out with fresh filament or a thin wire.
I wrote an article called How To Stop Your Filament Breaking in the Extruder During a Print, so check that out if it’s something that happens to you regularly. Make sure your PTFE tube isn’t misaligned or you aren’t using low quality filament that has absorbed a lot of moisture.
If you have a direct drive extruder, it’s possible for filament to get stuck near the hotend, where it has the small tube before the heat break. You’d have to follow a similar process to remove it.
Take the PTFE tube out the heatsink then use an object like a narrow metal rod to push the filament out.
Another good technique is to heat up the nozzle and manually push filament through from the extruder side to that it extrudes from the nozzle, then pull out the filament from the other side.
When the nozzle is cold, the filament won’t be able to move very well, so ensuring you heat the nozzle is important for removing stuck filament in some cases. You can use a hot air gun in some cases to melt any excess filament that won’t come off the nozzle in the event of bad filament clogs.
How to Fix a Bowden Tube That Keeps Coming Out or Moving
Bowden extruders can build up a lot of pressure during the printing process, especially with the filament moving at relatively high speeds. It needs to be held in place properly with the fittings and couplers so it doesn’t pop out during the printing process.
This can happen more often if you have faulty couplers or if you have a really soft or slippery PTFE tubing.
To fix a Bowden tube that keeps coming out or moving, replace the faulty coupler with a higher quality coupler that holds the filament tighter and has a good set of teeth to grip it. You should also use a small clip to keep the coupler from pressing down and releasing. Upgrading to Capricorn PTFE could be useful.
It is a more durable and reliable Bowden tube for your 3D printer. If you can still manage to 3D print a quick model without the tube coming out, you can 3D print the Bowden Tube Clip yourself from Thingiverse.
I’d also try and check the width of your filament since anything about 1.75mm can get stuck in the tube and build up more pressure than usual. Some people have managed to hold the tube with a piece of tape and solved this issue, so that’s a possible fix you could try.
Make sure your retraction settings aren’t too high, mainly in terms of the retraction distance.
It’s possible that you haven’t screwed the fitting tight enough all the way into the extruder so double check that as well. You can try lowering the tension on your extruder by unscrewing the part that holds the spring a few turns.
If your Bowden tube is too short, this can definitely contribute to it popping out or moving too much.
Related Posts:
Michael Dwamena is the founder of 3D Printerly, a platform dedicated to simplifying 3D printing for hobbyists and professionals alike. Owns over 20 3D printers (filament and resin) and has plenty experience 3D printing. Michael has authored over 900 articles, helping millions navigate the exciting world of 3D printing.
Leave a Reply Cancel reply
Who Is Michael Dwamena?
I’m the owner of 3D Printerly, a website dedicated to simplifying 3D printing. Published over 900 articles and created a beginner’s course. I believe in 3D printing and its ability to transition people from solely consumers to producers.
Learn more about me below:
Beginner’s Filament Printing Course
Master the basics of 3D printing filament. Perfect for beginners looking to start their 3D printing journey. The stuff I wish I knew when I started. Jumpstart your creativity and bring your ideas to life!
3D Printerly LTD owns and operates this website. As an Amazon Associate I earn from qualifying purchases. Commissions are earned from Amazon and other retailers.
Как поменять тефлоновую трубку на Hercules и Hercules Strong
Подпишитесь на автора, если вам нравятся его публикации. Тогда вы будете получать уведомления о его новых статьях.
Отписаться от уведомлений вы всегда сможете в профиле автора.
Статья относится к принтерам:
На связи тех.поддержка Imprinta.
В сегодняшней техничке мы рассмотрим один из самых распространенных обращений в нашу тех.поддержку. Это замена тефлоновой трубки, расположенной внутри экструдера UniHot. Для новичков, объясним, тефлоновая трубка в экструдере — это дополнительная гарантия того, что ваш пластик расплавится там где надо, а именно в зоне расплава.
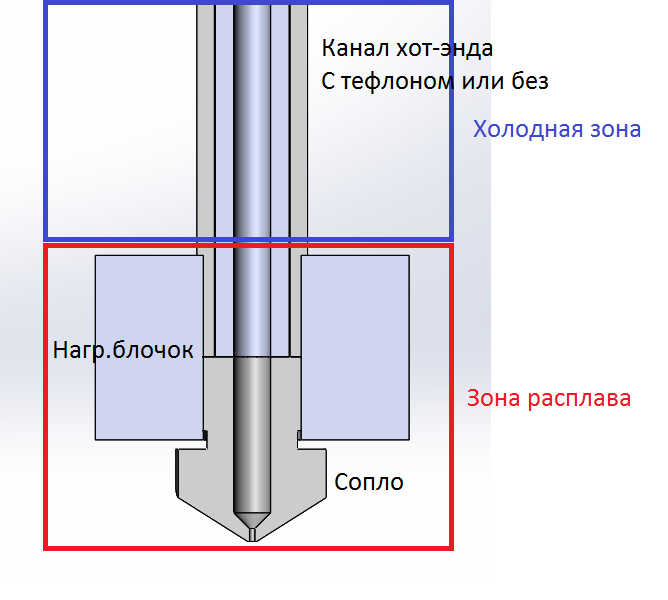
Износ тефлоновой трубки — это обычная ситуация, которая происходит в процессе эксплуатации. Это может вызвать “заторы” в канале хот-энда, связанные с неравномерным плавлением и застыванием пластика. Главным “симптомом”, изношенной тефлоновой трубки являются пропуски в печати. Выглядят они, примерно вот так.
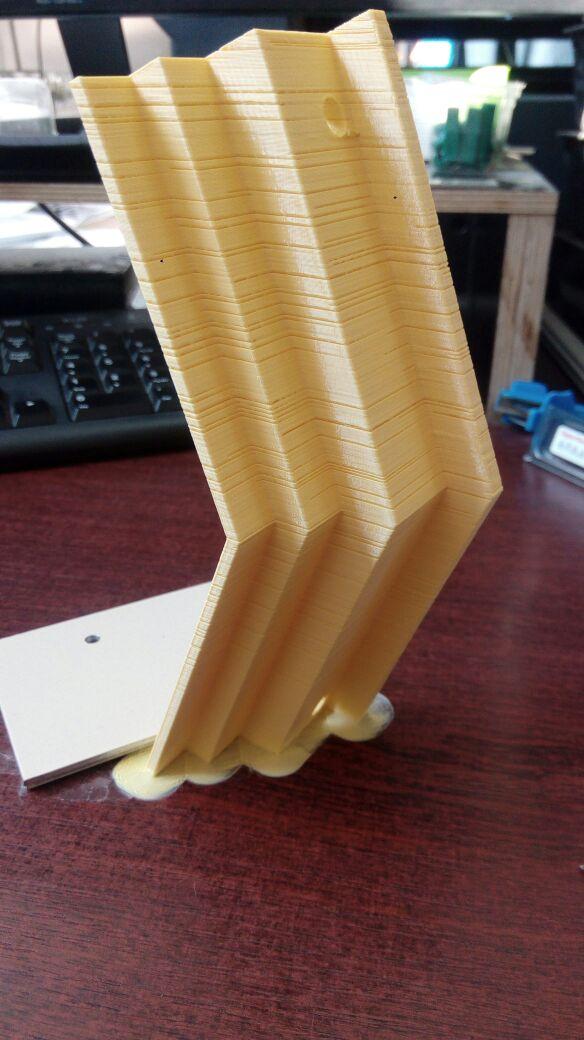
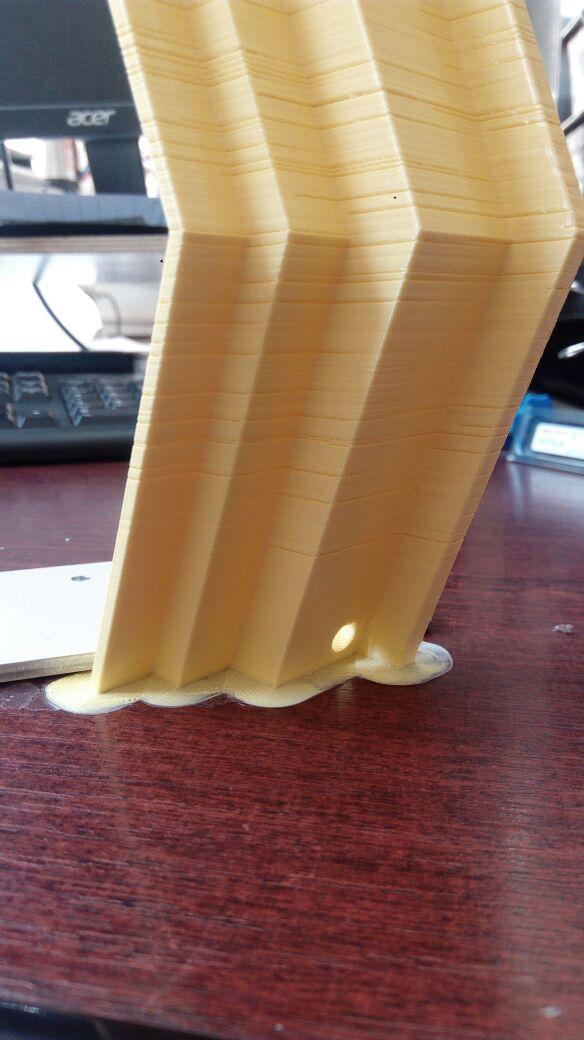
Не менее главным симптомом является чрезмерное загрязнение сопла. Да-да, сопло в процессе эксплуатации загрязняется. Но, вот различие между загрязненным соплом от изнашивания тефлоновой трубки и с новой тефлоновой трубкой.
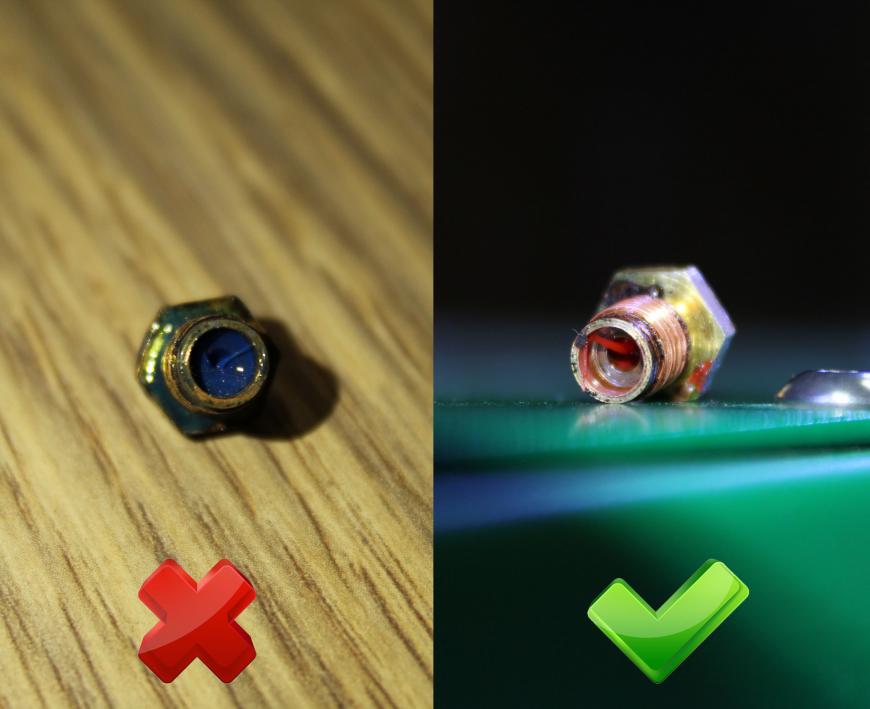
Слева загрязнение от износа тефлоновой трубки, справа, вместе с новой тефлоновой трубкой.
В зависимости от интенсивности эксплуатации и материала печати, через несколько месяцев может потребоваться замена тефлоновой трубки, расположенной внутри радиатора.
1. Включите принтер и нагрейте сопло до рабочей температуры в 220 градусов.
2. Выкрутите сопло.
3. Используя метчик М3 или тонкий саморез извлеките тефлоновую трубку из хотэнда. Вкрутите метчик в трубку снизу, затем потяните вниз. Извлечение может быть затруднено по причине сильного износа трубки.
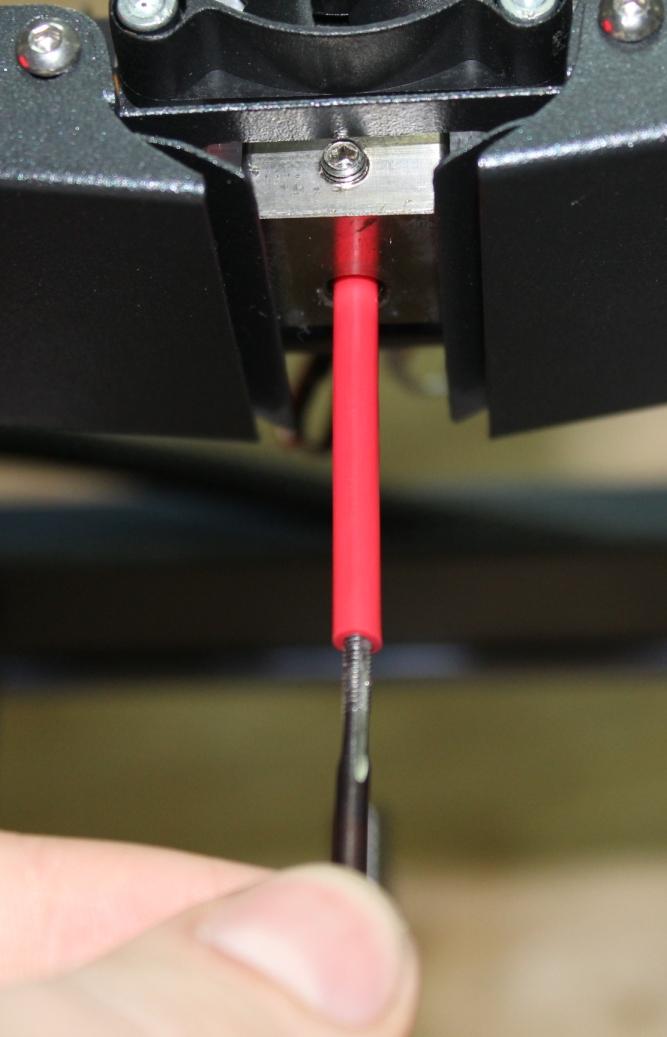
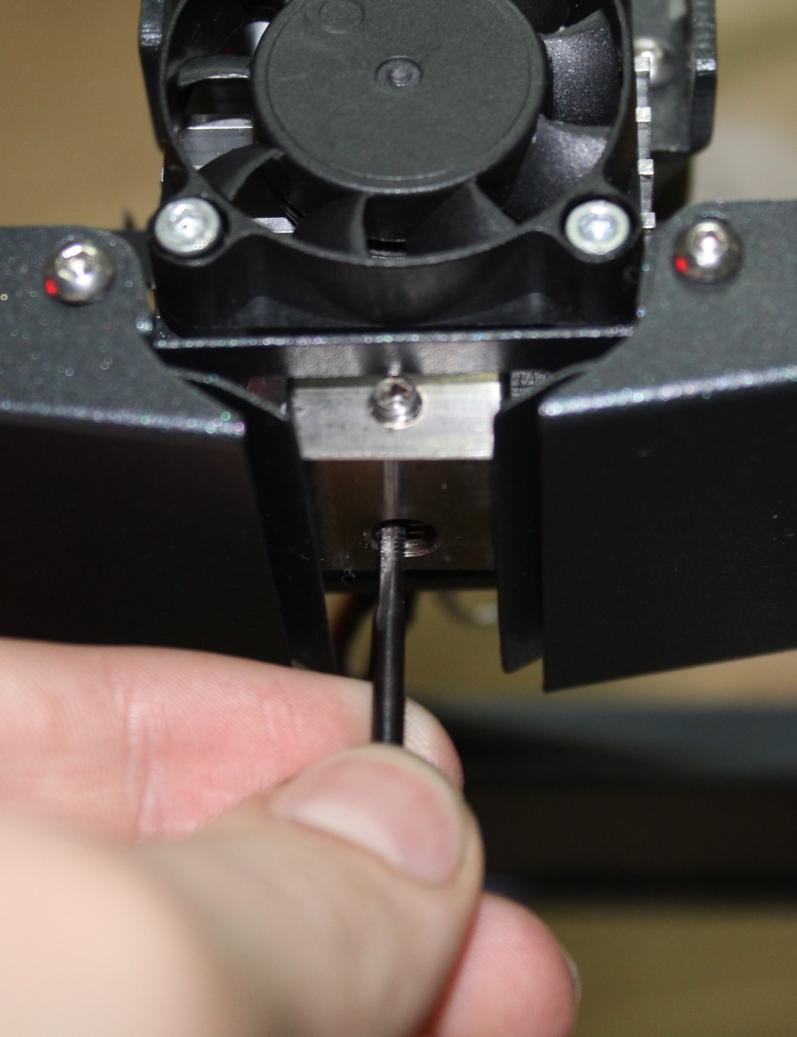
4. Возьмите отрезок новой трубки и при помощи острого лезвия сделайте фаску:
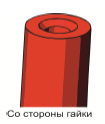
5. Вставьте трубку в хотэнд обработанным концом вперед до упора;
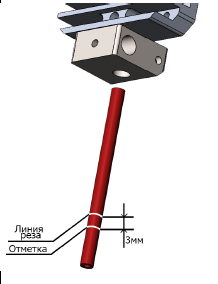
6. Сделайте метку на нижней части трубки, извлеките её и отрежьте необходимое количество:
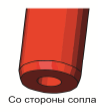
7. После отреза сделайте фаску, сняв, как на картинке ниже, внешний слой тефлоновой трубки:
8. Вставьте трубку в хотэнд, затем вкрутите сопло.
Готово! Вы снова можете пользоваться нашим принтером и не бояться излишнего загрязнения канала хот-энда или “пробелов” при печати, вызванные износом или деформацией тефлоновой трубки.
Остались вопросы? Задайте их нашей технической поддержке в личном кабинете на сайте Imprinta.ru и по телефону 8(800)222-90-20.
Или группе пользовательской поддержки “Геркулес простыл”. Для этого вам надо отправить сообщение пользователю telegram @CrazyEngie: ФИО, серийный номер принтера и название компании.
Удачного первого слоя!
Подпишитесь на автора
Подпишитесь на автора, если вам нравятся его публикации. Тогда вы будете получать уведомления о его новых статьях.
Отписаться от уведомлений вы всегда сможете в профиле автора.