[Solved]How to Restore iPhone on macOS Ventura (iOS 17 Supported)
Apple has released the new iPhone 14/Plus/Pro/Pro Max, many people have changed a new iPhone. And the first thing for them is to restore backup on their new iPhone. Besides, if there are something wrong with your iPhone after updating to iOS 17, it’s a good way to restore your iPhone. In this post, we are going to tell you how to restore iPhone on mac.
- Part 1. How to Restore iPhone on Mac with iTunes
- Part 2. How to Restore iPhone from Backup on Mac through 3 Solutions
- A Useful Tip: How to Restore iPhone Data without Backup on Mac
Part 1. How to Restore iPhone on Mac with iTunes
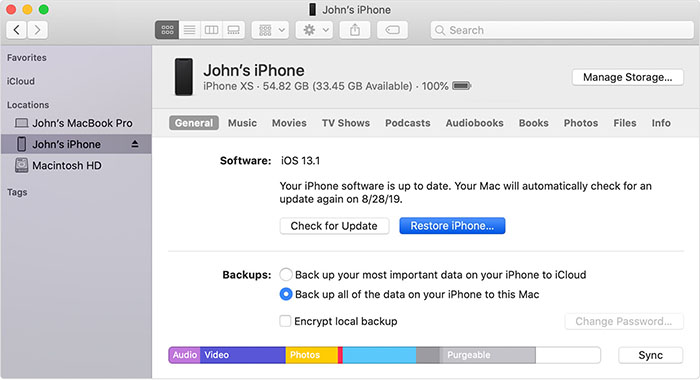
- If you have updated your Mac to the latest macOS Ventura, please open the Finder app. On a Mac running macOS Mojave 10.14 and earlier, launch the iTunes.
- Connect your iPhone to your MacBook via a USB cable. (Allow your device to trust this computer.)
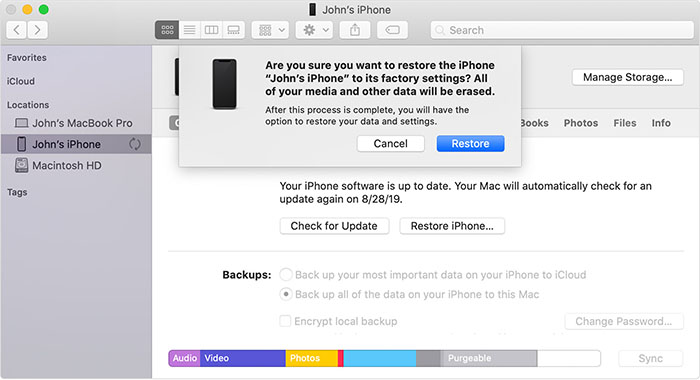
- Select your iPhone when the device icon appears in iTunes or the Finder window. On the right bar of the interface, click “Restore iPhone” button. (You need to sign out “Find My” if you have enabled it before you restore iPhone.)
Part 2. How to Restore iPhone from Backup on Mac through 3 Solutions
- Solution 1. Restore iPhone from iTunes Backup Step by Step (Overwrite The Data)
- Solution 2. Using Tenorshare Ultdata to Restore iPhone from iTunes Backup without Data Loss
- Solution 3. Restore iPhone Backup on macOS Catalina with Tenorshare iCareFone
Solution 1. Restore iPhone from iTunes Backup Step by Step (Overwrite The Data)
Step 1. If you have updated your mac to the latest macOS Catalina 10.15, please open the Finder app. On a Mac running macOS Mojave 10.14 and earlier, launch the iTunes.
Step 2. Connect your iPhone to your MacBook via a USB cable. (Allow your device to trust this computer.)
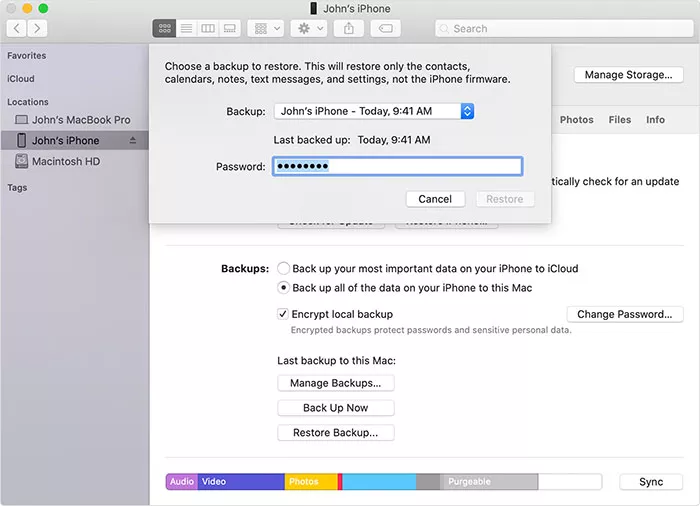
Step 3. Select your iPhone when the device icon appears in iTunes or the Finder window. On the right bar of the interface, click “Restore Backup” button.

Step 4. Choose a backup you need based on the date and then click “Restore”. It will take some time to restore to iPhone. (Enter the password for your encrypted backup file if asked.)
Solution 2. Using Tenorshare Ultdata to Restore iPhone from iTunes Backup without Data Loss
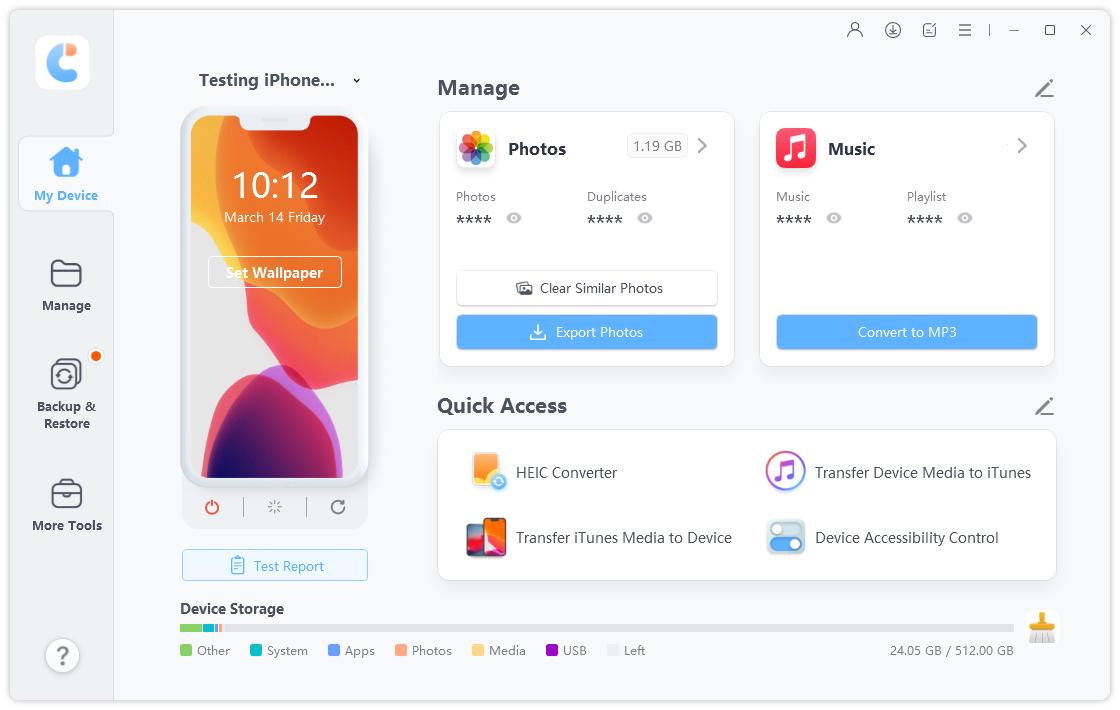
Although the solution we mentioned above can restore iPhone data, it will cause data loss because iTunes will overwrite the current data of your iPhone when restore the backup to it. If you hope to restore your missed data on your iPhone without data loss, here is a professional tool — Tenorshare — UltData you can try. It provides three recovery modes to help you restore lost data on any iOS 17 devices. With several mouse click, more than 35 kinds of files can be restored on your iPhone. You can download and install the execllent tool on your MacBook. And follow the steps below to restore iPhone on Mac.
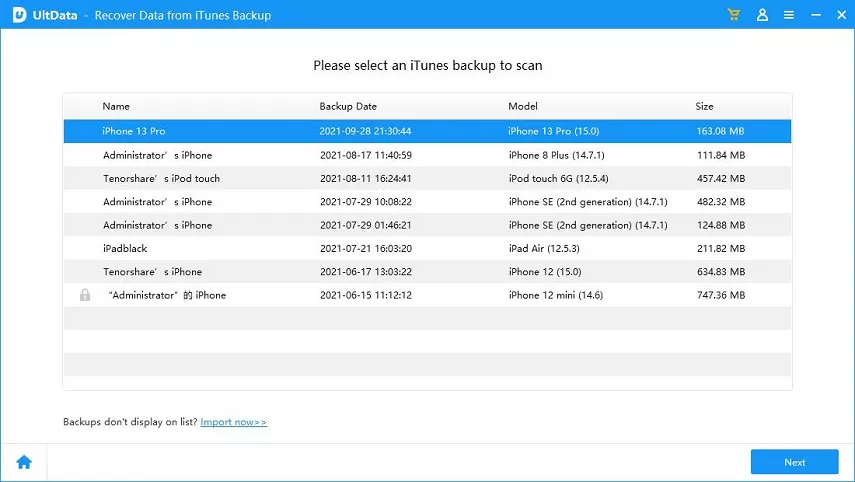
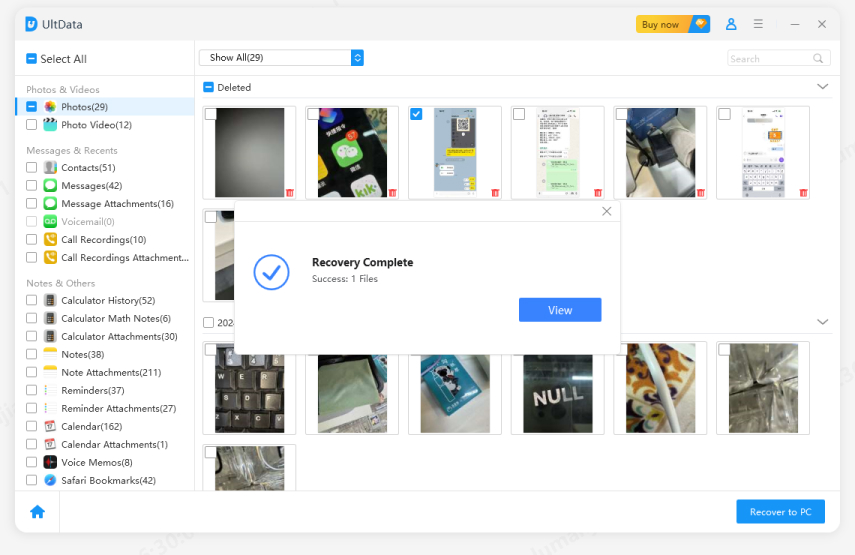
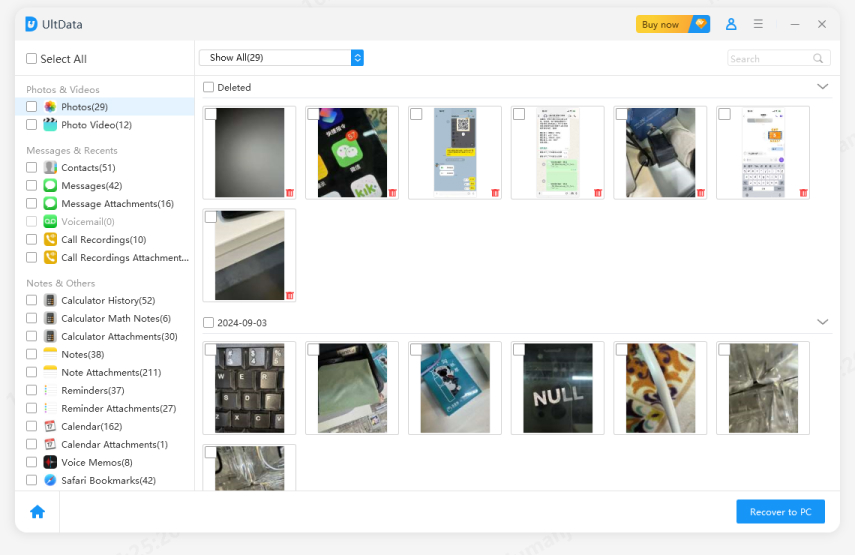
Step 1 Launch the program and connect your iPhone to your mac with a USB cable. Switch to “Recover from iTunes Backup files” and Ultdata will list all iTunes backup on this MacBook. Select an iTunes backup that you want to restore to your iPhone and click “Start Scan” button.
Step 2 After the scanning process is completed, all of the backup files including existing and deleted ones are displayed. You can tick all files to recover or just selectively pick up the files you want. After selecting, click “Recover” button.

Step 3 Next, click “Recover to Device” if you want to restore iPhone from iTunes backup on Mac. (Note: There are two recovery options for contacts, notes and messages: Recover to Device and Recover to Computer. )
Solution 3. Restore iPhone Backup on Mac with Tenorshare iCareFone
Apart from the Tenorshare — UltData, there is another excellent tool which is able to restore iPhone without losing data, that is Tenorshare iCareFone. Here’s how to restore iPhone on macOS Catalina:
Step 1 Firstly, download and install the iCareFone on your Mac.
Step 2 Connect your iPhone to your MacBook with a USB cable. Run the software and switch to the “Backup & Restore” section.
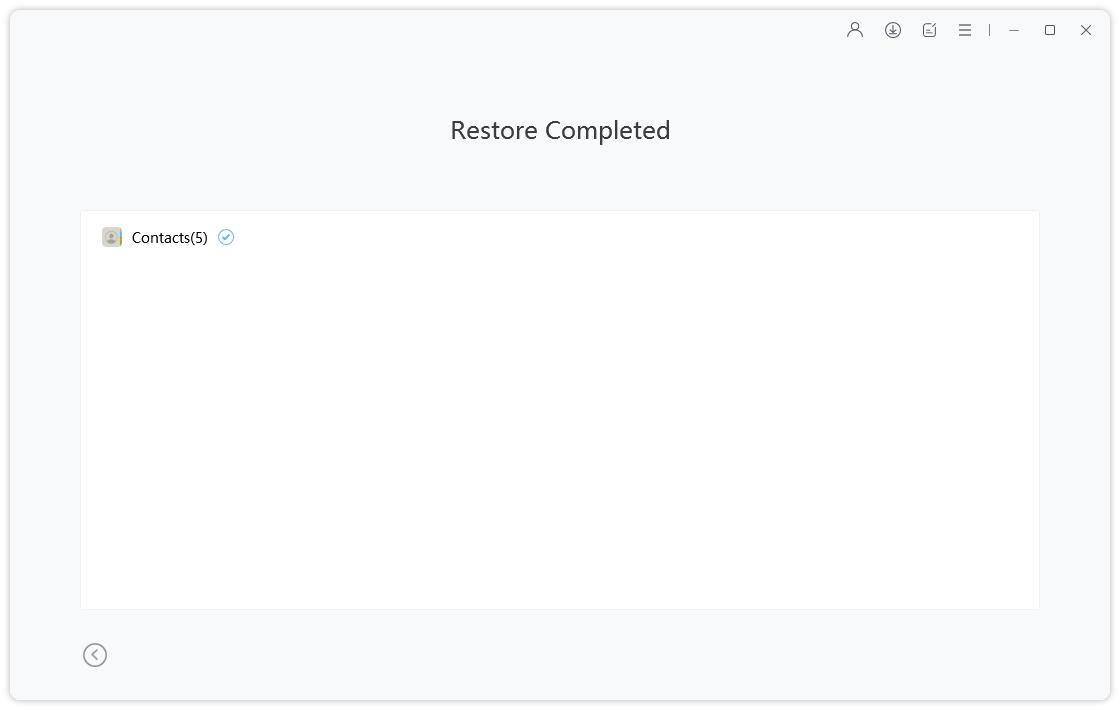
Step 4 Select the files you need and choose to export to your device. (Note: Only contacts, music, photos, videos and bookmarks can be restored directly to your iPhone.)
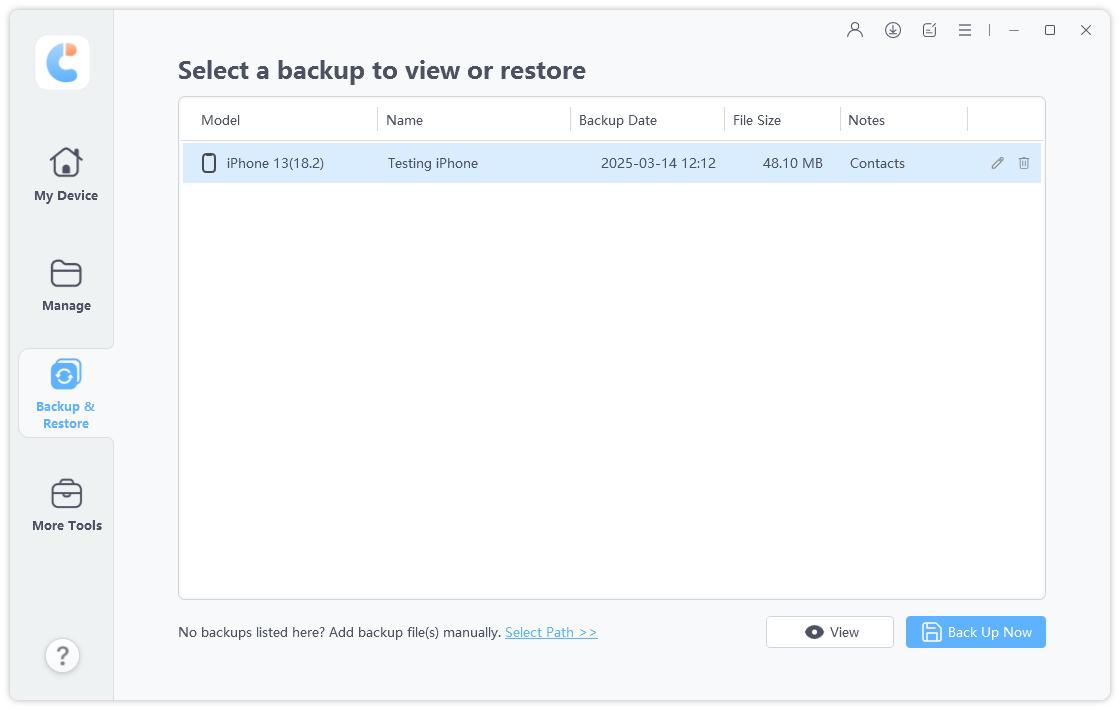
Step 3 Click «To view or restore previous backup files» from the lower left corner, then all the backup files including iTunes backup are displayed. Select a backup file you want to restore from and click “View” button to proceed.
Step 4 Select the files you need and choose to export to your device. (Note: Only contacts, music, photos, videos and bookmarks can be restored directly to your iPhone.)
A Useful Tip: How to Restore iPhone Data without Backup on Mac
Deleted iPhone data by mistake? Want to restore iPhone data without backup on Mac? Tenorshare — UltData can meet your needs. It is able to scan all your deleted or missed data and restore from iOS devices without backup. Follow our step-by-step instructions to find out everything you need to know!
Step 1 Launch the Ultdata and connect your iPhone to your Mac via USB cable. Select “Recover Data from iOS device”.

Step 2 Tick the file type you want to restore or simply tick the “Select All” box. After selected, click “Start Scan” button to continue.

Step 3 When the scan process is finished, you can preview the file before recover.
Step 4 Select the files you need and click the “Recover” button. There are two options to recover: “Recover to Device” and “Recover to Computer”.
Video Guide: How to Restore iPhone on macOS with UltData
Conclusion
In this article, you can learn how to restore iPhone on Mac and restore iPhone from backup on Mac. The official way to restore iPhone on Mac is using iTunes, but the drawback is that iTunes will overwrite the current data of your iPhone, resulting in data loss. The best alternative way to restore your device is with the help of Tenorshare — UltData, which can directly recover from iOS device, iTunes backup and also iCloud backup.
Updated on 2023-08-08 / Update for Mac OS
How to back up your iPhone, iPad and iPod touch with your Mac
If you back up your iPhone, iPad or iPod touch, you’ll have a copy of your information to use in case your device is ever replaced, lost or damaged.
Back up with the Finder
- On a Mac with macOS Catalina or later, open a Finder window.
- Connect your device to your computer with a USB cable.
- If asked for your device passcode or to Trust This Computer, follow the onscreen steps. Get help if you’ve forgotten your passcode.
- Select your device on your computer. Can’t see your device?
- If you want to save Health and Activity data from your device or Apple Watch, you’ll need to encrypt your backup. Tick the Encrypt local backup box and create a password.
Save your password somewhere safe, because there’s no way to recover your backups without this password. - Click Back Up Now.
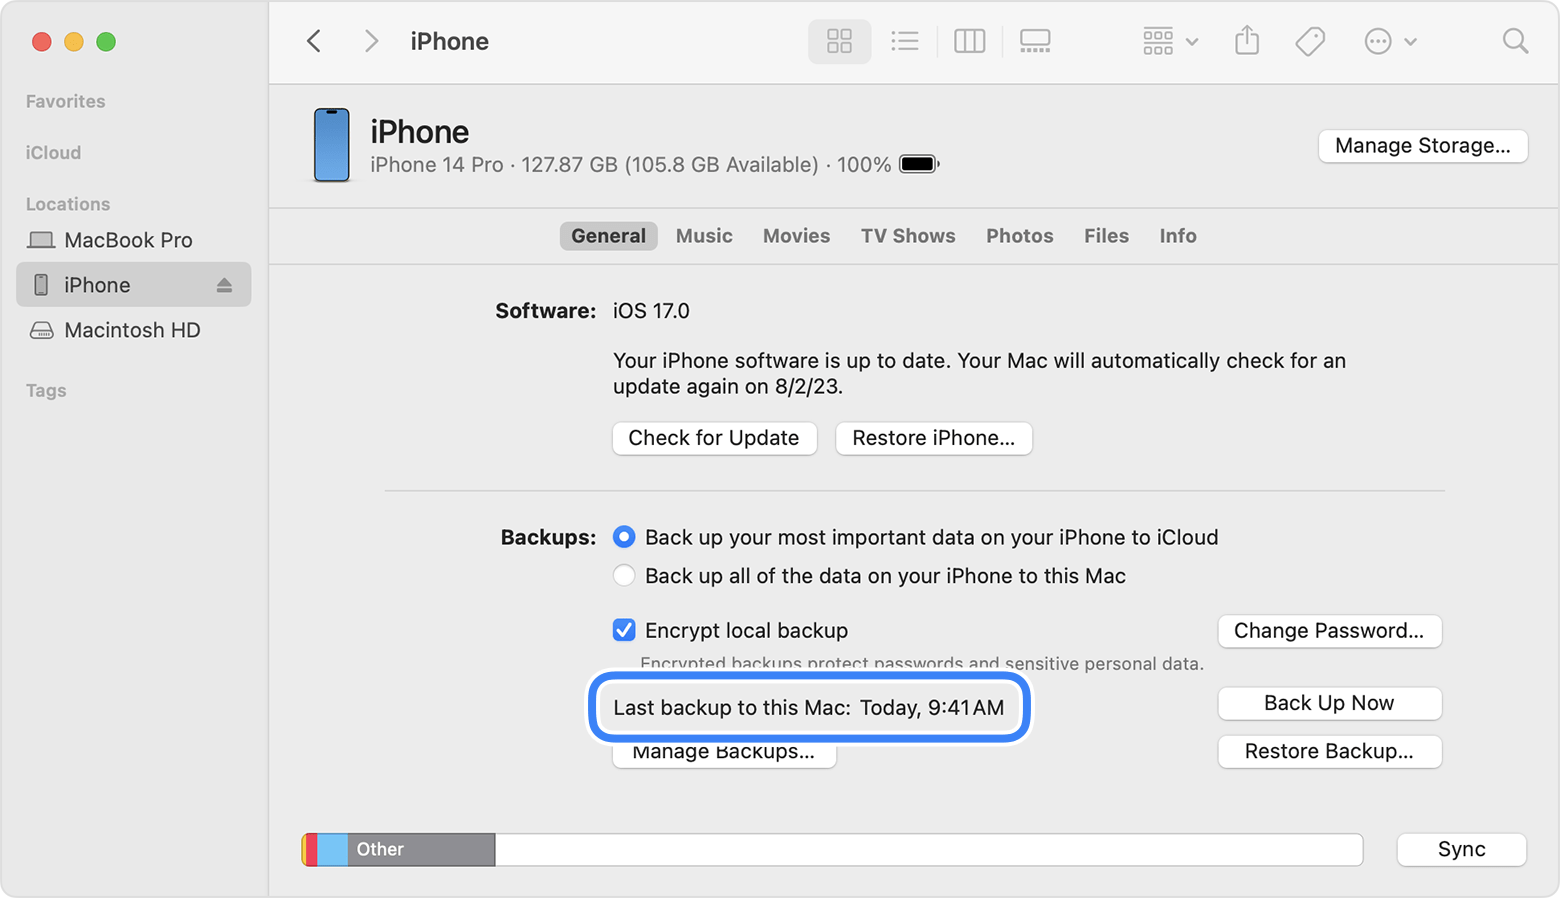
- When the process has finished, you can see if the backup has completed successfully. You’ll see the date and time of your last backup.
Learn more
- Restore your device from a backup.
- Get help with iTunes backups.
- Manage your backups.
Published Date: December 20, 2023
Back up and restore your iPhone, iPad or iPod touch to your Mac or to iCloud

One of the best ways of safeguarding the information on an iPhone, iPad or iPod touch against damage or loss is backing up, or copying, your files and settings to either your Mac or to iCloud. Backing up is also useful if you get a new device and want to transfer your previous settings to it.
After you back up your device, you can use the backup to restore the information on your device whenever needed. If your device has issues that can’t be fixed by restoring from a backup, you can also restore your device to its factory settings and then restore a recent backup to see if that fixes the problem.
Back up your device
- Connect your device to your Mac. You can connect your device using a USB or USB-C cable or using a Wi-Fi connection. See Sync content between your Mac and iPhone, iPad or iPod touch over Wi-Fi.
- In the Finder on your Mac, select the device in the Finder sidebar.
 If you connect your device to your Mac using a USB cable and can’t see the device in the Finder sidebar, see If your device doesn’t appear in the sidebar.
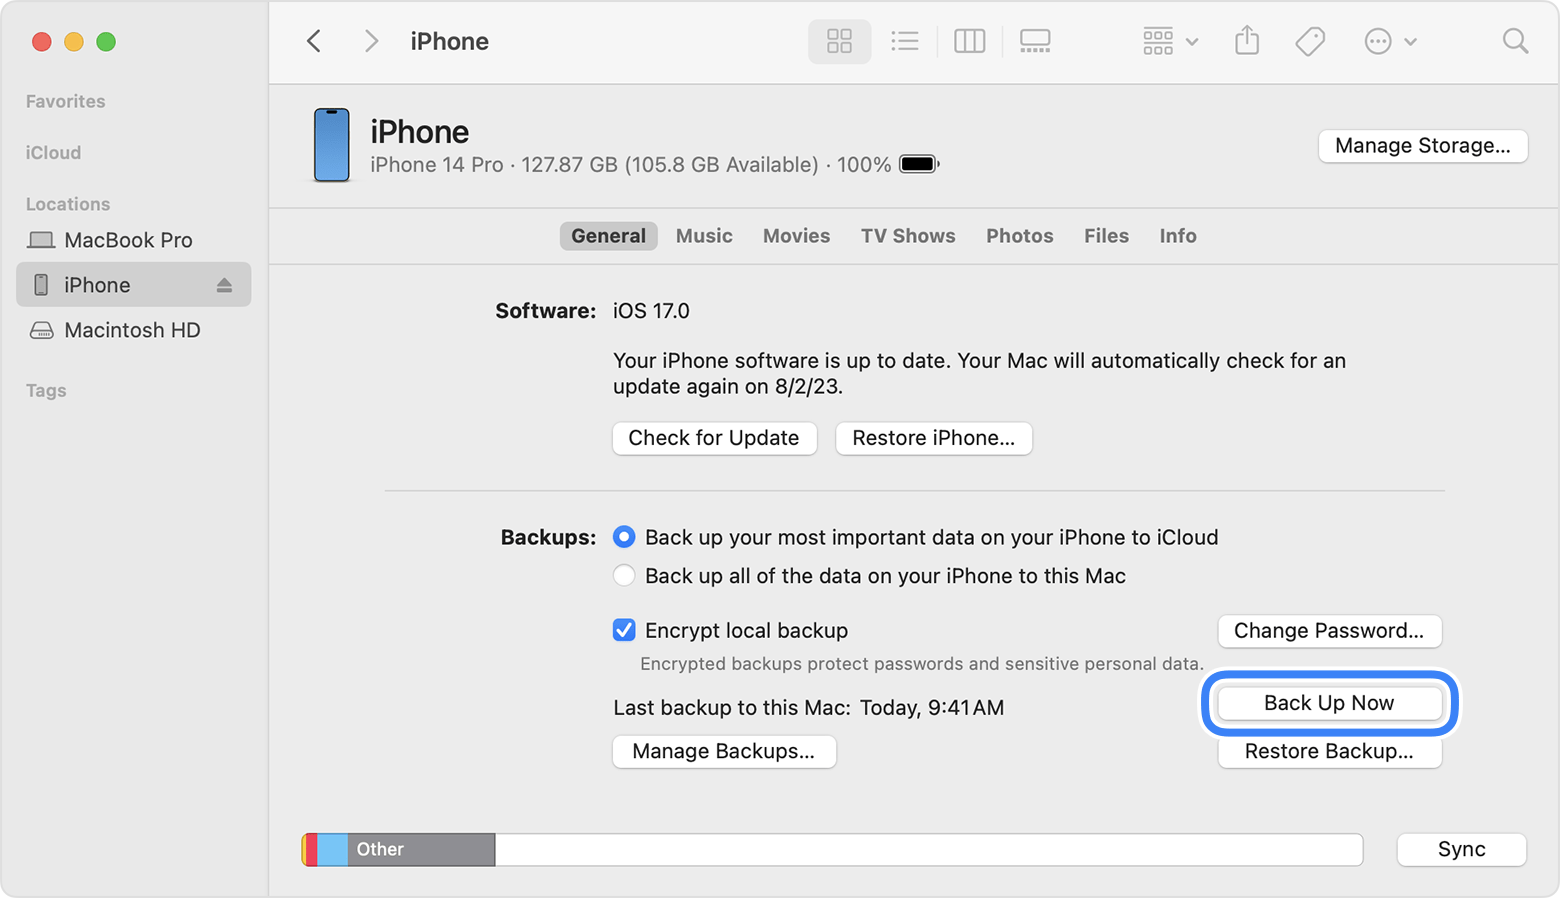
 - Click General in the button bar.

- To select backup options, do any of the following:
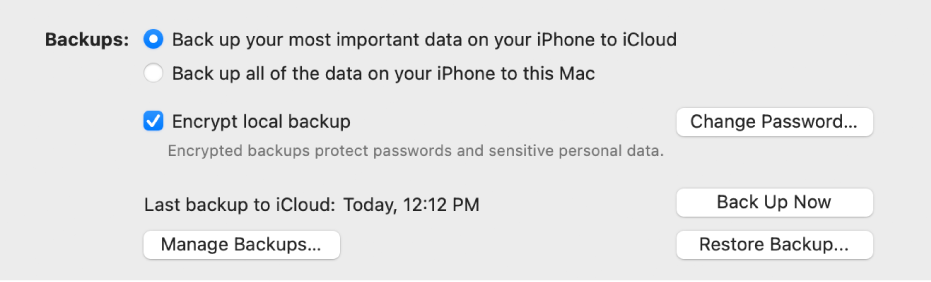
- Select “Back up your most important data on your [device] to iCloud” to store backup data in iCloud instead of on your Mac. Your device backs up to iCloud during the next automatic backup.
- Select “Back up all the data on your [device] to this Mac” to store backups on your Mac. Your device backs up to your Mac during the next automatic backup.
- Select the “Encrypt local backup” tickbox to encrypt your backup data and protect it with a password. To change your password later, click Change Password.
- To immediately start a backup of your device to your Mac, click Back Up Now. After the backup is complete, click Manage Backups to see the backup file.
Restore your device from a backup
If your device has an issue, you can use a recent backup to restore the information on the device.
- Connect your device to your Mac. You can connect your device using a USB or USB-C cable or using a Wi-Fi connection. See Sync content between your Mac and iPhone, iPad or iPod touch over Wi-Fi.
- In the Finder on your Mac, select the device in the Finder sidebar.
- Click General in the button bar.
- Click Restore Backup.
- Click the Backup pop-up menu, choose the backup you want to restore to the device, then click Restore. If your backup is encrypted, you must enter the password before restoring your files and settings.
Restore your device to its factory settings
You can reinstall the software originally on your device and restore it to its factory settings. You might need to do this if you’re having problems with the device (for example, if it freezes or crashes frequently) or if you’re getting ready to sell it or give it away.
Important: Restoring a device to its factory settings deletes all your information and settings. While restoring, you can choose to back up your device on your Mac. You can use this backup to restore your information and settings on the device.
Note: You must turn off the Find My app in iCloud settings on your device before you can restore your device.
- Connect your device to your Mac using a USB or USB-C cable. You can’t restore your device using a Wi-Fi connection.
- In the Finder on your Mac, select the device in the Finder sidebar.
- Click General in the button bar.
- Click “Restore [device]”, then follow the onscreen instructions.
![The “Restore [device]” button appears next to the “Check for Update” button.](https://help.apple.com/assets/6529D8627783ACA29F083601/6529D866CFDD5FD5B90BAB1B/en_GB/385dc0073fecd7aa5171c18702b56bbd.png)
iOS 14 / 13.7 Восстановление iPhone с помощью Finder на macOS Big Sur / Catalina
Найдите пошаговое руководство для установки iOS 13 или восстановления iPhone с помощью Finder в macOS Catalina. До сих пор мы используем iTunes, но не iTunes на Mac с выпуском macOS Catalina, поэтому мы должны использовать Finder на Mac для восстановления, обновления, резервного копирования [Manage Backups] для iPhone / iPad / iPod touch. В этой статье вы узнаете, как установить новую копию iOS или восстановить устройство iOS с помощью Finder. В этом руководстве также рассматриваются проблемы с установкой iOS 13, неудачная установка iOS 13, зависание при обновлении iOS 13, зависание iOS 13 на логотипе Apple на вашем iPhone XS Max, iPhone Xs, iPhone XR, iPhone X, iPhone 8, iPhone 8 Plus, iPhone 7 , iPhone 7 Plus, iPhone 6S / 6S Plus, iPhone 6 и iPad.
Теперь, возвращаясь к названию, вы ищете, как восстановить iPhone на macOS Catalina, не так ли? Для этого также необходима macOS Catalina. Я думаю, вы установили macOS Catalina на свой Mac и теперь видите процесс восстановления iPhone в macOS Catalina.
Шаги по обновлению или восстановлению iPhone с помощью Finder в macOS Catalina
Видео-руководство по восстановлению iOS / iPadOS и восстановлению последней резервной копии
Шаг №1: Подключите iPhone к Mac с помощью оригинального кабеля Lightning.
Шаг № 2: Откройте «Finder».
Проверьте обновление iPhone с помощью Finder на MacOS Catalina
Программы для Windows, мобильные приложения, игры — ВСЁ БЕСПЛАТНО, в нашем закрытом телеграмм канале — Подписывайтесь:)

Шаг № 3: Теперь на левой боковой панели в разделе «Местоположение» выберите свой iPhone. [Unlock the device with a passcode on iPhone/iPad to allow access on Mac]
Шаг № 4: Нажмите «Сопряжение», чтобы продолжить.
Шаг № 5: На вашем iPhone вас попросят доверять компьютеру, нажмите «Доверять».
Шаг № 6: Введите пароль iPhone.
Шаг № 7: Затем на Mac нажмите «Начать».
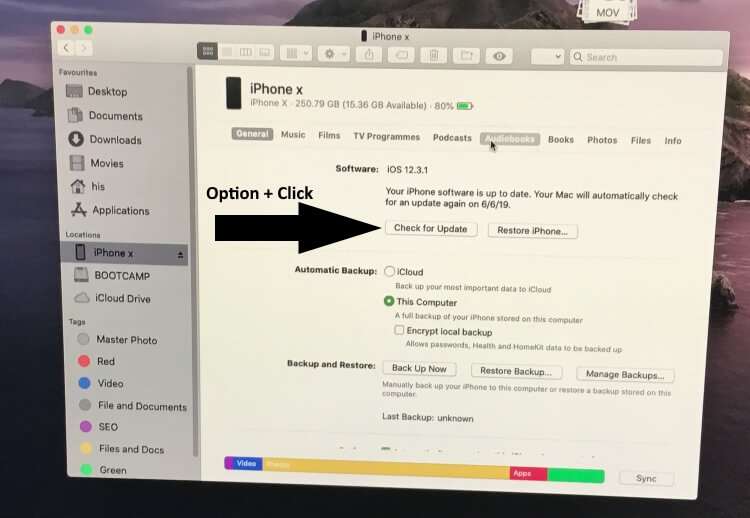
Шаг № 8: Там вы можете увидеть «Восстановить и обновить», нажмите «Option» на клавиатуре и нажмите «Восстановить iPhone».
Выберите файл ipsw и начните восстановление на iPhone iOS 13

Обновление iPhone / iPad: не стирая данные с устройства, обновите iOS до iOS 13 на своем iPhone и iPad. Используйте клавишу Option на клавиатуре + нажмите кнопку «Обновить iPhone».
Обновите iOS до iPhone с помощью Finder на MacOS
Или другой способ – восстановить iOS 13 с помощью чистой установки: [Skip This if you haven’t any problem in Restore File]

Чистое восстановление вашего iPhone с помощью Finder на Mac
Восстановление iPhone / iPad: этот вариант предназначен для восстановления заводских настроек, чистой установки нового ipsw-файла iOS 13 на вашем iPhone или iPad. Используйте клавишу «Параметры» с клавиатуры + нажмите кнопку «Восстановить iPhone».

Шаг № 9: Когда во всплывающем окне вас попросят просмотреть загруженный файл ipsw для iPhone, разрешите Mac продолжить работу.
Введите пароль для проверки и начните установку iOS
После этого ваш iPhone перезагрузится и покажет кабель Lightning с логотипом iTunes. Поэтому не прерывайте процесс установки, нажимая любой переключатель или закрывая искатель. Кроме того, подождите долго.
- Если ваш iPhone выйдет из Finder во время перезапуска, подождите, он вернется на боковую панель Finder.
Ваш iPhone остается подключенным до тех пор, пока вы не увидите экран блокировки iPhone или экран приветствия.
Поиск проблемы:
Не удалось обновить iPhone. Сервер вернул внутреннюю ошибку. : Перезагрузите Mac, откройте файл хоста и добавьте # в строку apple.com, после чего перезагрузите Mac и iPhone.
Также убедитесь, что у вас есть работающее интернет-соединение на iPhone и Mac.
Также проверьте статус Apple Server, зайдите в Google и узнайте, какой статус в вашем регионе.
ПРИМЕЧАНИЕ. На данный момент это единственный способ установить бета-версию iOS 13 на iPhone. Надеюсь, Apple рассмотрит эту длительную процедуру и с нетерпением ждет возобновления использования кнопки беспроводной установки в Profile. Чтобы мы могли легко устанавливать новые обновления на iPhone.
Наконец, вы вернули iPhone к бета-версии iOS 13, поздравляем! Кроме того, если вам не нравится бета-версия iOS 13 и вы хотите понизить версию iPhone с бета-версии iOS 13 до iOS 12, у нас есть выход.
Поделитесь с нами своей проблемой, и мы будем рады помочь вам, если у вас возникнут проблемы с установкой ipsw файла iOS 13 на iPhone, iPad на MacOS Catalina с помощью Finder.
Программы для Windows, мобильные приложения, игры — ВСЁ БЕСПЛАТНО, в нашем закрытом телеграмм канале — Подписывайтесь:)