HybridEidolon / 01-guide.md
Make sure you have Gradle installed and in your path, so you can run it from command line. Otherwise, you should copy a bootstrapper and the gradle jar into your project.
Use this template build.gradle (for the MC 1.8 unstable branch) for your gradle script:
buildscript < repositories < mavenCentral() maven < name = "forge" url = "http://files.minecraftforge.net/maven" > maven < name = "sonatype" url = "https://oss.sonatype.org/content/repositories/snapshots/" > > dependencies < classpath 'net.minecraftforge.gradle:ForgeGradle:1.2-SNAPSHOT' > > apply plugin: 'forge' version = "0.1.0" group = "com.mydomain.mymod" archivesBaseName = "mymod" minecraft < *version = "1.8-11.14.0.1274-1.8"* runDir = "eclipse" *mappings = "snapshot_nodoc_20141130"* > /* processResources inputs.property "version", project.version inputs.property "mcversion", project.minecraft.version // substitute values in mcmod.info from(sourceSets.main.resources.srcDirs) include 'mcmod.info' expand 'version':project.version, 'mcversion':project.minecraft.version > from(sourceSets.main.resources.srcDirs) exclude 'mcmod.info' > > */
Save this in a new directory and run gradle setupDecompWorkspace and gradle build to set everything up on your local cache. Gradle will be smart and not have multiple copies of this cache if you are working on multiple mods with the same target MC version.
Replace version and mappings in the minecraft block to change the MCF version your mod targets, as well as the obfuscation mappings from MCP to use. You do not need mappings if you are using a stable build.
You can uncomment the processResources block and extend it as necessary to provide build-time substitution to your mcmod.info file (which should go in src/main/resources). A template for mcmod.info is as follows:
[ < "modid": "mymod", "name": "My Mod", "description": "A mod that does things.", "version": "$", "mcversion": "$", "url": "http://mydomain.com", "updateUrl": "", "authorList": ["Me", "Another person"], "credits": "Forge, FML, and MCP, for being incredible", "logoFile": "", "screenshots": [], "dependencies": [] > ]
And a hello world template MyModMain.java for your mod class:
package com.mydomain.mymod; import net.minecraftforge.fml.common.Mod; import net.minecraftforge.fml.common.Mod.EventHandler; @Mod(modid="mymod", name="My Mod", version="0.1.0") public class MyModMain < @EventHandler public void onInit(FMLInitializationEvent event) < System.out.println("Hello, world!"); > >
You can generate IDE project files with gradlew idea for IntelliJ and gradlew eclipse for Eclipse.
Useful gradle targets:
- runClient — runs the client using the «eclipse» folder as CWD
- runServer — similar to the above but for the server
- build — total build, drops jar in build/libs/
- clean — cleans the build directory (doesn’t remove IDE project files!)
nornagon / 1-intro.md
Minecraft mods, especially mods which change the client, are by and large written with Forge. If you visit their website, you’ll be greeted abruptly by a mysterious message at the top of an SMF forum, with no clear path towards actually. making a mod. I’m documenting here the steps I went through to get started, in the hopes of helping the next person have an easier time of it.
I’ll be using Scala for this guide, but it should be fairly easy to adapt these instructions to any JVM language (e.g. clojure or if you’re feeling masochistic, Java). I’m also developing on OS X, so some of the commands will be a little different if you’re on Linux or Windows. I’m assuming you have some proficiency with your operating system, so I won’t go into details about how to adapt those commands to your system.
Minecraft doesn’t have an official mod API (despite early promises), so all mods are built off a decompiled version of the source code called Mod Coder Pack, maintained by. I have no idea who, possibly this guy who appears to work at Mojang i.e. Microsoft but still hosts files on Mediafire? MCP is essentially a set of scripts that takes the official Minecraft jar files, decompiles them, and renames all the obfuscated variables and classes. Mojang seems to be fine with this.
Forge is built on top of MCP—it takes the decompiled and deobfuscated source, then tweaks it a bunch, adding hooks in various places that your mod can attach itself to through an extensive set of source code patches. Forge is Minecraft with a mod API.
First up you’re going to want to fetch the latest Forge MDK from http://files.minecraftforge.net/, something like this:
$ curl -O http://files.minecraftforge.net/maven/net/minecraftforge/forge/1.8.9-11.15.1.1764/forge-1.8.9-11.15.1.1764-mdk.zip This contains a template project that uses gradle as a build system, hooking into ForgeGradle for its dirty work (decompiling and deobfuscating Minecraft, applying various patches, and so on). To get this going, you’ll want to unzip the template into a new directory
$ mkdir mymod && cd mymod $ unzip ../forge-1.8.9-11.15.1.1764-mdk.zip This will dump a bunch of files into the current directory, something like this:
. ├── README.txt ├── build.gradle ├── gradle │ └── wrapper │ ├── gradle-wrapper.jar │ └── gradle-wrapper.properties ├── gradlew ├── gradlew.bat └── src └── main ├── java │ └── com │ └── example │ └── examplemod │ └── ExampleMod.java └── resources └── mcmod.info Great! That’s all the stuff we need. Because I want to write my mod in Scala, I’m going to open up the build.gradle and add this line before I do anything else:
--- a/build.gradle 2016-02-29 16:20:56.000000000 -0800 +++ b/build.gradle 2016-03-16 18:32:50.000000000 -0700 @@ -12,6 +12,7 @@ classpath 'net.minecraftforge.gradle:ForgeGradle:2.1-SNAPSHOT' > > +apply plugin: 'scala' apply plugin: 'net.minecraftforge.gradle.forge'
And then we want to ask gradle to pull down all the minecraft stuff it needs and do its deobfuscation magic:
$ ./gradlew setupDecompWorkspace This downloads minecraft, decompiles it, deobfuscates the decompiled source, applies a bunch of patches, recompiles everything, and stores it all in ~/.gradle/caches/minecraft (so it’s shared between projects—not editable!)
Everything’s technically ready to go now. You could boot a client with ExampleMod loaded by running ./gradlew runClient . The only thing ExampleMod does is print out DIRT BLOCK >> tile.dirt during initialization; it’s otherwise identical to the unmodded client. But that’s our Hello World!
On the shoulders of giants
There are many, many other modding tutorials and talented programmers that I’ve drawn from in writing this series. I’m particularly indebted to:
- TheGreyGhost, and especially their Minecraft by Example codebase,
- Bedrock Miner’s Minecraft 1.8 series,
- Jabelar, whose tips and notes have been indispensable,
- BluSunrize, for making Immersive Engineering, and AlgorithmX2 for making Applied Energistics 2, both of whose open source mods have made immensely valuable objects of study.
- Isaac Freeman, for finding and fixing bugs in this tutorial itself 🙂
If this tutorial is at all useful, it is because these others have come before me and shared their wisdom.
Setting up an IDE
I really like using IntelliJ for making Minecraft mods, because it makes it super easy to browse through the deobfuscated Minecraft source code, which is often the only way to figure out how anything works. Fortunately it’s super easy to set up IntelliJ with Forge.
Just hit the ‘Import Project’ button in IntelliJ.

. and select the build.gradle file in your mod directory. Hit ‘OK’ and you’re in!
Importing the project doesn’t automatically create any run configurations, but ForgeGradle comes with a little helper to do that for IntelliJ. Running
$ ./gradlew genIntellijRuns will create ‘Run Client’ and ‘Run Server’ run configurations, so booting the client will be as simple as hitting Ctrl+R.
Time for some Scala
Delete the java directory (nuke it from orbit, it’s the only way to be sure). Make a new scala directory underneath src/main . If it doesn’t show up with a blue folder icon in IntelliJ indicating it’s a directory where source code is found, you might not have added the apply plugin: ‘scala’ line to gradle.build . Add it and re-import the gradle project (I just blew away the .idea directory and imported from scratch when this happened to me).

Underneath src/main/scala , make some more directories for your package, something like src/main/scala/com/mymod . And therein, place the following bare-bones template, which is a Scala transliteration of the Java ExampleMod :
package com.mymod import net.minecraft.init.Blocks import net.minecraftforge.fml.common.Mod import net.minecraftforge.fml.common.Mod.EventHandler import net.minecraftforge.fml.common.event.FMLInitializationEvent @Mod(modid = MyMod.MODID, version = MyMod.VERSION, modLanguage = "scala") object MyMod < final val MODID = "mymod" final val VERSION = "1.0" @EventHandler def init(event: FMLInitializationEvent): Unit = < println(s"DIRT BLOCK >> $Blocks.dirt.getUnlocalizedName>") > >
It’s SUPER CRITICAL to add the modLanguage = «scala» argument to the @Mod annotation, or you’ll get funky error messages about MyMod. not being defined, like this:
net.minecraftforge.fml.common.LoaderException: java.lang.InstantiationException: com.mymod.MyMod at net.minecraftforge.fml.common.LoadController.transition(LoadController.java:162) at net.minecraftforge.fml.common.Loader.loadMods(Loader.java:543) at net.minecraftforge.fml.client.FMLClientHandler.beginMinecraftLoading(FMLClientHandler.java:208) at net.minecraft.client.Minecraft.startGame(Minecraft.java:451) [. ] Caused by: java.lang.InstantiationException: com.mymod.MyMod at java.lang.Class.newInstance(Class.java:427) at net.minecraftforge.fml.common.ILanguageAdapter$JavaAdapter.getNewInstance(ILanguageAdapter.java:174) at net.minecraftforge.fml.common.FMLModContainer.constructMod(FMLModContainer.java:534) at sun.reflect.NativeMethodAccessorImpl.invoke0(Native Method) at sun.reflect.NativeMethodAccessorImpl.invoke(NativeMethodAccessorImpl.java:62) at sun.reflect.DelegatingMethodAccessorImpl.invoke(DelegatingMethodAccessorImpl.java:43) at java.lang.reflect.Method.invoke(Method.java:497) [. ] See here for the code in Forge which needs this annotation.
Anyway, you should now be running the simplest possible Scala-based Minecraft mod. Congrats!
The fundamental elements of Minecraft are blocks, items and entities. Blocks are parts of the world, like dirt and obsidian. Items are things that go in your inventory like a sword or a book. Sometimes an item represents a block, like when you have a dirt block in your inventory. And lastly, entities are things that move, like chickens and players.
Blocks form a 3D grid, with X and Z forming the horizontal plane, and Y the vertical axis. Internally, the infinite world is divided into chunks, each 16 blocks to a side and 256 blocks tall. Chunks can be individually loaded and unloaded by the server, and when you fly around the world, the server will send you chunks one by one.
In code, what Minecraft calls a Block would probably more accurately be called a BlockType , but so be it. Each block in a chunk is stored very compactly, as just 16 bits of data—12 bits for a block ID and 4 bits for metadata. In order to figure out the various other bits of information about a block—say, how to render it, or how long it should take to break the block—Minecraft looks up the Block by its ID and passes in the block position and metadata to ask it questions. Minecraft 1.8 introduced a fancy thing called BlockState to aid in interpreting those 4 bits of metadata (more on that later). If you want to store more than 4 bits of information about your block, like signs and paintings do, you’ll want a TileEntity . More on that later too. Due to the fact that a block’s identity is stored as a 12-bit number, there can only be up to 4096 different block types in any given Minecraft instance.
Enough talk. How do I make a block??
First, make a new class, I’m going to call mine BlockCool .
package com.mymod import net.minecraft.block.Block import net.minecraft.block.material.Material import net.minecraft.creativetab.CreativeTabs class BlockCool extends Block(Material.ground) < setUnlocalizedName("cool") setCreativeTab(CreativeTabs.tabDecorations) >
We’ll put some more stuff in there later, but for now that’s all we need. We extend from Block and pass Material.ground to its constructor. The Material defines a few basic properties of a block, such as whether or not it’s solid, opaque, burnable, and so on. Browse the Minecraft source starting from net.minecraft.block.material.Material for examples of other materials and their use.
That’s defined our block type—well, actually that’s more like a block type type. In order to define a block type, we’ll need an instance of BlockCool . Theoretically we could make many BlockCool instances, and each would get its own block ID and be its own block type. We could even make them render differently, despite all being of the same block type type. But we won’t. Not today, anyway.
Next up we’ll make an instance of BlockCool and register it with the GameRegistry to give it an ID. Add a preInit event handler to MyMod (the name of the function isn’t important; Forge does reflection magic and looks at the type of the event argument):
object MyMod < @EventHandler def preInit(event: FMLPreInitializationEvent): Unit = < val cool = new BlockCool GameRegistry.registerBlock(cool, "cool") // "cool" is the name of the block, used by Minecraft as // a human-friendly version of the block ID that's created // internally. Forge will actually tweak the name to make // sure it doesn't collide with any other mods, by // prepending your mod's ID, like "mymod:cool". > >
NOTE: Technically, it also works to register the block in the init phase, rather than preInit . However, when we later come to registering item models, which must be done in the preInit phase, we’re going to want our blocks to already be registered, so we’re preparing for that. Also, Forge recommends you register blocks in preInit , so there’s that.
And that’s all you need! If you hit run and open the creative inventory, you’ll see something like this:

That beautiful purple and black thing is our baby! Go ahead and plop one down in the world.

Just one thing though. I didn’t actually want it to be black and purple and do nothing.
Models and textures
Let’s solve the ‘not black and purple’ problem first, by way of a blockstates definition file. There are a bunch of different ways to affect the way a block is rendered (up to and including completely custom OpenGL code), but for this relatively normal block the easiest thing for us will be to use the model system built into vanilla Minecraft.
BlockStates and variants
Make a JSON file underneath src/main/resources/assets/mymod/blockstates , called cool.json . (The name is important, it has to match the block’s name). In it, this:
< "variants": < "normal": < "model": "lapis_block" > > >
The «variants» key in the blockstates JSON file can define a different model to be rendered depending on the metadata of a block. There’s a fantastic explanation of the format of this file on the Minecraft wiki, which I won’t repeat here, but it can do some pretty neat stuff. For now we’re just going to use the default «normal» variant, which is what you get if your block doesn’t use metadata at all. And just to test it’s working, we’re going to make our block look like a block of lapis. Since «lapis_block» doesn’t have a : in it, Forge will recognise that we’re referring to a vanilla asset. We’ll refer to our own models later as «mymod:mymodel» .

It still looks all dumb and black and purple in our hotbar though, and anyway we don’t want it to look like lapis at all. To fix those issues, we’re going to need to make a custom model.
Let’s tackle the hotbar issue first. Make another JSON file, this time under the assets/mymod/models/item directory, and call it cool.json .
< "parent": "block/lapis_block", "display": < "thirdperson": < "rotation": [ 10, -45, 170 ], "translation": [ 0, 1.5, -2.75 ], "scale": [ 0.375, 0.375, 0.375 ] > > >
This defines an item model, which tells Minecraft how to render the item when it’s in our inventory, and when it’s in the world as an item (for example, in the player’s hand, or lying on the floor).
To hook it up so that Minecraft knows to render the item using this item model when it’s in your inventory, add this snippet to the preInit function, after the call to registerBlock() :
// GameRegistry.registerBlock() also registers an item which // represents the block. findItem just looks it up by name. val coolItem = GameRegistry.findItem(MODID, "cool") ModelLoader.setCustomModelResourceLocation( coolItem, 0, new ModelResourceLocation(coolItem.getRegistryName) )
NOTE: It’s important that you call ModelLoader.setCustomModelResourceLocation() during the preInit phase, otherwise it doesn’t work. ModelLoader.setCustomModelResourceLocation() adds your item model registration information to a list, which is consulted during the constructor of RenderItem (of which there is one per game instance). RenderItem is constructed after preInit , but before init .
See the definition of net.minecraft.client.Minecraft.startGame() for more details ( preInit is called by net.minecraftforge.fml.client.FMLClientHandler.instance().beginMinecraftLoading() , and init is called by net.minecraftforge.fml.client.FMLClientHandler.instance().finishMinecraftLoading() ).

Begone, vile magenta! I banish ye forever.
Aside: vanilla assets
It’s super helpful to peek at the vanilla Minecraft assets to see how to structure your own. You can unzip the Minecraft JAR file (which ForgeGradle kindly downloaded for you) to browse them easily. For example:
$ unzip ~/.gradle/caches/minecraft/net/minecraft/minecraft/1.8.9/minecraft-1.8.9.jar 'assets/*' -d vanilla-assets wherein you will find all the vanilla blockstate definitions, textures and models.
I copied the item model definition from the vanilla lapis block item file, which you can see at vanilla-assets/assets/minecraft/models/item/lapis_block.json if you unzip the vanilla assets (see below).
To banish the lapis, though, we’ll need to make a new model. We could do all sorts of fancy stuff here, but we’re just going to use the basic ‘cube’ model and change its texture. Baby steps.

Drop a texture (I recommend this one: ) in assets/mymod/textures/block/cool.png , and make a new JSON file in assets/mymod/models/block/cool.json :
< "parent": "block/cube_all", "textures": < "all": "mymod:block/cool" > >
This defines a block model based on the cube_all builtin model, and overrides the «all» texture with our own. (You can check out the cube_all model at vanilla-assets/assets/minecraft/models/block/cube_all.json , and see that it’s in turn based on the cube model, which defines a single cuboid element. More on the model format here)
Update your item model to have «parent»: «mymod:block/cool» instead of «parent»: «block/lapis_block» , and also update the blockstates file to specify the model as «mymod:cool» (not «mymod:block/cool» ; Forge in its infinite wisdom adds the block/ part for you).

Interlude: Client and Server
While developing, you’ve been using what’s called the ‘combined client’. Single-player Minecraft is actually just multi-player Minecraft with the server and client running in the same process. If you try to run the dedicated server with the current code (either through the ‘Minecraft Server’ run configuration in IntelliJ or via ./gradlew runServer ), you’ll get this nasty exception:
java.lang.NoClassDefFoundError: net/minecraft/client/resources/model/ModelResourceLocation [. ] Caused by: java.lang.ClassNotFoundException: net.minecraft.client.resources.model.ModelResourceLocation [. ] Caused by: net.minecraftforge.fml.common.asm.ASMTransformerWrapper$TransformerException: Exception in class transformer net.minecraftforge.fml.common.asm.transformers.SideTransformer@1200458e from coremod FMLCorePlugin [. ] Caused by: java.lang.RuntimeException: Attempted to load class net/minecraft/client/resources/model/ModelResourceLocation for invalid side SERVER This is because the dedicated server doesn’t include any of the client-side rendering logic. The server JAR doesn’t contain the ModelResourceLocation class, which we’re using in our preInit function, so when the server tries to initialize our mod, it can’t find that class and crashes.
To address this issue, Forge has a utility class called SidedProxy , which allows a class to behave differently depending on whether it’s loaded on the client or the server. Refactoring to use this, we get:
@Mod(modid = MyMod.MODID, version = MyMod.VERSION, modLanguage = "scala") object MyMod < final val MODID = "mymod" final val VERSION = "1.0" def registerBlocks() = < val cool = new BlockCool GameRegistry.registerBlock(cool, "cool") > def registerItemModels(): Unit = < val coolItem = GameRegistry.findItem(MODID, "cool") ModelLoader.setCustomModelResourceLocation( coolItem, 0, new ModelResourceLocation(coolItem.getRegistryName) ) > @SidedProxy( clientSide = "com.mymod.ClientOnlyProxy", serverSide = "com.mymod.CommonProxy" ) // Forge will fill this in during mod loading. var proxy: CommonProxy = null @EventHandler def preInit(event: FMLPreInitializationEvent): Unit = < proxy.preInit() >> class CommonProxy < def preInit(): Unit = < MyMod.registerBlocks() > > class ClientOnlyProxy extends CommonProxy < override def preInit(): Unit = < super.preInit() MyMod.registerItemModels() > >
In the client, proxy will contain an instance of ClientOnlyProxy , but in the dedicated server, it will contain an instance of the base class CommonProxy . It’s also possible to have another subclass for dedicated-server-only code, as long as it also extends CommonProxy .
You might also see annotations on functions like @SideOnly(Side.CLIENT) when browsing other Forge mod code. Forge does horrible things with ClassReader to make those functions only appear on either the annotated side. Use at your peril.
Like Block , instances of the Item class represent types of items. A specific item (or stack of items) is represented by an instance of the ItemStack class. An ItemStack can have metadata, often used to store durability (up to 15 bits, it’s stored as a short but restricted to be non-negative) and sometimes called ‘damage’ in the code. An ItemStack can also have an NBT tag associated with it, containing arbitrary extra data—think enchantments, Tinkers Construct item compositions, and so on.
Let’s make an item. I want to make a «wheat and steel» item, like flint and steel but instead of lighting things on fire it plants wheat. I’m going to start by looking at the vanilla source code for flint and steel, which you can see in IntelliJ by double-tapping Shift and typing in ItemFlintAndSteel . This is roughly the strategy I’d suggest for doing anything with Minecraft (or really, anything in programming): find something that’s a little like what you want, learn from it and adapt it to your own nefarious wheat-making purposes. The vanilla source code is your friend, as is GitHub search.
Start by making a new Item subclass, called ItemWheatAndSteel :
class ItemWheatAndSteel extends Item < maxStackSize = 1 setMaxDamage(64) setCreativeTab(CreativeTabs.tabTools) >
Instantiate one and register it with the GameRegistry in preInit (or in registerBlocks if you followed the SidedProxy note above):
val itemWheatAndSteel = (new ItemWheatAndSteel).setUnlocalizedName("wheat_and_steel") GameRegistry.registerItem(itemWheatAndSteel, "wheat_and_steel")
Finally, make an item model for it in assets/mymod/models/item (cribbed from vanilla-assets/assets/minecraft/models/item/flint_and_steel.json ):
< "parent": "builtin/generated", "textures": < "layer0": "blocks/wheat_stage_4" >, "display": < "thirdperson": < "rotation": [ -90, 0, 0 ], "translation": [ 0, 1, -3 ], "scale": [ 0.55, 0.55, 0.55 ] >, "firstperson": < "rotation": [ 0, -135, 25 ], "translation": [ 0, 4, 2 ], "scale": [ 1.7, 1.7, 1.7 ] > > >
And register it with the ModelLoader in registerItemModels (or otherwise during the preInit phase):
ModelLoader.setCustomModelResourceLocation( itemWheatAndSteel, 0, new ModelResourceLocation(itemWheatAndSteel.getRegistryName) )
And there it is, next to our glorious BlockCool .

It doesn’t do anything yet, though. Let’s fix that. Override the onItemUse function in ItemWheatAndSteel like this:
override def onItemUse( stack: ItemStack, // The ItemStack the player is using player: EntityPlayer, // The player using the item world: World, // The world in which the block exists pos: BlockPos, // The position of the block the item is being used on side: EnumFacing, // The side of the block being pointed at hitX: Float, // Exact coordinates the mouse is pointing at hitY: Float, hitZ: Float ): Boolean = < // If the player is pointing at the top face of a block, and there's // nothing above it. if (side == EnumFacing.UP && world.isAirBlock(pos.up)) < // . get the Minecraft item called "wheat_seeds" . val wheat_seeds = GameRegistry.findItem("minecraft", "wheat_seeds") // . which we know implements IPlantable . .asInstanceOf[Item with IPlantable] // . check if the block the player is pointing at can grow wheat (i.e. // it's farmland) val block = world.getBlockState(pos).getBlock val canGrow = block.canSustainPlant(world, pos, EnumFacing.UP, wheat_seeds) if (canGrow) < // . if it is, set the block above the pointed-at block to wheat . world.setBlockState(pos.up, wheat_seeds.getPlant(world, pos)) // . and add one point of damage to the wheat & steel. stack.damageItem(1, player) // The return value of onItemUse indicates whether the use was successful, // which is used to determine whether to play the "swing item" character // animation. return true > > false >
NOTE: You’ll have to be in survival mode for the items to get damaged. See the source for ItemStack.damageItem() , which begins with a check for creative mode.
You still have to hoe the ground before planting the wheat, though. It’d be neat if it would automatically hoe the dirt, too. (hint: look at how ItemHoe works.)
Creating a Minecraft Mod using Java and Fabric
A few weeks ago, YouTube recommended me a Minecraft video from Dream’s Channel in which he was trying to beat the game while his friend George attempted to stop him. That video was really fun and got me to explore more of their content. Right now, there’s a bunch of people recording and uploading Minecraft videos to YouTube, but these two found a way to make their content different. Basically, they build their own plugins to change the rules of the game and then they record themselves attempting to beat the modified game. All I can say is that I love their content, and it’s awesome to see what you can accomplish with the power of code. A few days later, I had an idea to develop a Minecraft mod and thought Why not? It will be fun!
Selecting the tools
Just like in Minecraft, we need some tools but in this case, they will help us in the creation process of our first mod. Multiple tools help you build Minecraft mods, and I chose Fabric because one of the mods that I usually play with was built with it. Minecraft uses Java and so does Fabric, which means we also need to have the Java Development Kit or JDK installed. To be more specific, we need the JDK 8 to be able to compile our mod. You can download it on this page. Last but not least, we need to pick a code editor, in this case, I chose Visual Studio Code because it’s my favorite editor. Nevertheless, you can use whatever editor you like for this guide, as most of the steps will be performed in the CLI.
Setting up the project
For this guide, we will be using a starter to move quickly into actually building our first mod. Let’s go through the following steps:
1. Clone / Download the repository
If you use Git, just clone the repo:
$ git clone https://github.com/HorusGoul/fabric-mod-starter.git Enter fullscreen mode
Exit fullscreen mode
HorusGoul / fabric-mod-starter
2. Open the project folder with your code editor
Using Visual Studio Code:
$ code fabric-mod-starter Enter fullscreen mode
Exit fullscreen mode
3. Open a terminal inside the project folder and run the client
$ cd fabric-mod-starter $ ./gradlew runClient Enter fullscreen mode
Exit fullscreen mode
NOTE: In Windows, you’ll need to run .\gradlew.bat runClient instead.
4. Check that everything is working
A Minecraft instance should be running now on your computer, and the console should have printed these two lines alongside others:
. [main/INFO]: [STDOUT]: Hello Fabric world! . [main/INFO]: [STDOUT]: This line is printed by an example mod mixin! . Enter fullscreen mode
Exit fullscreen mode
If that’s not the case for you, recheck everything and if nothing seems to work, leave a comment or send me a PM and I’ll try to help you.
Getting to know the project
At the moment, we can already get our hands dirty by starting to code, but let’s get familiarized with some of the files.
gradle.properties
In this file, we can configure some values that will be used when building our mod. For example, we can change the Minecraft version, the fabric loader version, the mod version and other properties that we may need to change if we want to use new features of Fabric or Minecraft.
# Done to increase the memory available to gradle. org.gradle.jvmargs=-Xmx1G # Fabric Properties # check these on https://fabricmc.net/use minecraft_version=1.15.1 yarn_mappings=1.15.1+build.1 loader_version=0.7.3+build.176 # Mod Properties mod_version = 1.0.0 maven_group = starter archives_base_name = starter # Dependencies # currently not on the main fabric site, check on the maven: https://maven.fabricmc.net/net/fabricmc/fabric-api/fabric-api fabric_version=0.4.25+build.282-1.15 Enter fullscreen mode
Exit fullscreen mode
src/main
Inside the src folder, we will be able to find another folder called main . That’s where the code and resources of our mod are located.
src/main/java
All the Java code is located inside this folder. There we can find a package called starter which contains two items: the StarterMod.java file and the mixin package. We can find the file StarterMixin.java inside the mixin package.
TIP: If you’re using Visual Studio Code, I recommend you to install the Java Extension Pack. It will power your editor with a bunch of utilities to make Java development easier.
StarterMod.java This is the main entry point of our mod, as we can see, it belongs to the starter package and implements the onInitialize() method, which simply prints Hello Fabric world! to the console.
package starter; import net.fabricmc.api.ModInitializer; public class StarterMod implements ModInitializer @Override public void onInitialize() // This code runs as soon as Minecraft is in a mod-load-ready state. // However, some things (like resources) may still be uninitialized. // Proceed with mild caution. System.out.println("Hello Fabric world!"); > > Enter fullscreen mode
Exit fullscreen mode
StarterMixin.java This class belongs to the starter.mixin package. Our mod will be really small so we shouldn’t worry a lot about the file structure of our project. Let’s just assume that all mixins will be located inside the starter.mixin package. And what are mixins? Mixins are in charge of injecting code into existing classes of the game. For example, in StarterMixin.java , we are injecting a method at the beginning (HEAD) of the init() method that is implemented in the TitleScreen class from Minecraft. Now, if we load this mixin, once Minecraft calls the init() method of TitleScreen , our method that includes the System.out.println(«This line is printed by an example mod mixin!»); will also be called! That’s part of the magic of mixins, and this is just the tip of the iceberg, for now, this is all we need to build our mod. If you want more in-depth knowledge you should go check the Mixin docs.
package starter.mixin; import net.minecraft.client.gui.screen.TitleScreen; import org.spongepowered.asm.mixin.Mixin; import org.spongepowered.asm.mixin.injection.At; import org.spongepowered.asm.mixin.injection.Inject; import org.spongepowered.asm.mixin.injection.callback.CallbackInfo; @Mixin(TitleScreen.class) public class StarterMixin @Inject(at = @At("HEAD"), method = "init()V") private void init(CallbackInfo info) System.out.println("This line is printed by an example mod mixin!"); > > Enter fullscreen mode
Exit fullscreen mode
src/main/resources
Inside the resources folder, we can find the assets folder, which right now only contains the icon for our mod. Besides that folder, there are two JSON files: fabric.mod.json For this file, I recommend you to go into the Fabric docs about fabric.mod.json and read about every field defined inside the file of our project. If you prefer to read the docs later, just take a look at the entrypoints and mixins properties. I bet you can already see a connection here. In the entrypoints is where we are telling Fabric which one of our Java classes should act as the main entry point of our mod. And then, there’s the mixins property, where we simply tell Fabric the location of any Mixin configuration file we want to include in our mod. In this case, we only have one, starter.mixins.json .
"schemaVersion": 1, "id": "starter", "version": "$", "name": "Starter Mod", "description": "Describe your mod!", "authors": ["Your Name"], "contact": "homepage": "https://horuslugo.com", "sources": "https://github.com/HorusGoul/fabric-mod-starter" >, "license": "MIT", "icon": "assets/starter/icon.png", "environment": "*", "entrypoints": "main": ["starter.StarterMod"] >, "mixins": ["starter.mixins.json"], "depends": "fabricloader": ">=0.7.3", "minecraft": "1.15.x" >, "suggests": "flamingo": "*" > > Enter fullscreen mode
Exit fullscreen mode
starter.mixins.json Remember our StarterMixin class? This is how we can tell the toolchain the mixins that we want to include in our mod. The package property is where we define the Java package where the mixins are located, and inside the mixins array is where we can put all the mixin classes that we want to include to the game. Alongside mixins there are two other properties that allow us to specify the environment where we want to load some mixins. Those properties are server and client , but in this case, we’re not using them. This file follows the specification defined in the Mixin configuration files section of the Mixin Docs. Just the same as before, I recommend you to go to the docs and learn more about this file ��
"required": true, "package": "starter.mixin", "compatibilityLevel": "JAVA_8", "mixins": ["StarterMixin"], "injectors": "defaultRequire": 1 > > Enter fullscreen mode
Exit fullscreen mode
Let’s build our mod!
Now that we are familiar with the project, let’s gets our hands dirty and create our mod! In this case, the mod will simply alter one mechanic of the game: receiving damage. We’ll make it so whenever a player receives damage, it will switch its position and inventory with another player in the server. For this, we’re going to need a mixin that injects code in the PlayerEntity class, to be more specific, just before the end of the damage() method.
Detecting when players receive damage
Let’s create this new mixin in the starter.mixin package with the name SwitchPlayerEntityMixin.java :
package starter.mixin; import org.spongepowered.asm.mixin.Mixin; import org.spongepowered.asm.mixin.injection.At; import org.spongepowered.asm.mixin.injection.Inject; import org.spongepowered.asm.mixin.injection.callback.CallbackInfoReturnable; import net.minecraft.entity.damage.DamageSource; import net.minecraft.entity.player.PlayerEntity; @Mixin(PlayerEntity.class) public class SwitchPlayerEntityMixin @Inject(at = @At("RETURN"), method = "damage") private void onDamage(DamageSource source, float amount, CallbackInfoReturnable info) System.out.println("The player received damage!"); > > Enter fullscreen mode
Exit fullscreen mode
Don’t forget to add it to the starter.mixins.json file:
"required": true, "package": "starter.mixin", "compatibilityLevel": "JAVA_8", "mixins": ["StarterMixin", "SwitchPlayerEntityMixin"], "injectors": "defaultRequire": 1 > > Enter fullscreen mode
Exit fullscreen mode
Now execute the command ./gradlew runClient in the console, launch a Minecraft world in creative mode, grab some instant damage potions and try to get hurt. Just like in the GIF, you should be able to see a new line pop up in the console every time the player gets hurt, and that means we can continue to the explanation of what is going on. Take a look to the mixin code, our purpose was to get the method onDamage executed at the end of the method damage , that’s why we are using the string RETURN instead of HEAD . Also, we are going to need the damage source and the amount of damage inflicted. The last parameter, info is required by the Mixin framework. Both the source and amount are parameters that the original damage method receives, and that’s the reason we can just use them in our method.
Accessing the current player
Right now, the mod is just printing a line every time a player gets hurt, our next objective is accessing the player instance. We must first remember that the onDamage method is inside of a PlayerEntity instance. We can take advantage of that and simply use this to access the instance properties and methods. The problem comes when the compiler yells at us because it thinks that we’re an instance of SwitchPlayerEntityMixin . We don’t have a way to tell the compiler that this method is being executed inside of another type of class, so we can use this trick:
PlayerEntity self = (PlayerEntity) (Object) this; Enter fullscreen mode
Exit fullscreen mode
With this, we are telling the compiler that this is an Object and then, we cast the object as a PlayerEntity . And voilá! We have access to the player that is receiving damage, we can now update our printed line to display the player’s name.
. @Mixin(PlayerEntity.class) public class SwitchPlayerEntityMixin @Inject(at = @At("RETURN"), method = "damage") private void onDamage(DamageSource source, float amount, CallbackInfoReturnable info) PlayerEntity self = (PlayerEntity) (Object) this; System.out.println("The player " + self.getGameProfile().getName() + " received damage"); > > Enter fullscreen mode
Exit fullscreen mode
Switching positions with another player
Now that we can access the player’s properties and methods, we can use one of those to access the whole world . The world property references the current Minecraft World that is being played, and one of the things we can do with it is getting the list of the online players. With that list, we can pick one of those players and later, swap their positions as you can see in the following code:
package starter.mixin; import java.util.List; import org.spongepowered.asm.mixin.Mixin; import org.spongepowered.asm.mixin.injection.At; import org.spongepowered.asm.mixin.injection.Inject; import org.spongepowered.asm.mixin.injection.callback.CallbackInfoReturnable; import net.minecraft.entity.damage.DamageSource; import net.minecraft.entity.player.PlayerEntity; import net.minecraft.util.math.BlockPos; @Mixin(PlayerEntity.class) public class SwitchPlayerEntityMixin @Inject(at = @At("RETURN"), method = "damage") private void onDamage(DamageSource source, float amount, CallbackInfoReturnable info) PlayerEntity self = (PlayerEntity) (Object) this; // Get all the players in the current minecraft world ListPlayerEntity> players = (ListPlayerEntity>) self.world.getPlayers(); // The player we'll switch positions with. PlayerEntity otherPlayer; // Stop the execution if the player is playing alone. if (players.size() 1) return; > // Get a random player from the players list. // Repeat this process until we have a player that is // not the player who got hurt. do int index = (int) Math.floor(Math.random() * players.size()); otherPlayer = players.get(index); > while (otherPlayer == self); // Get the block position of both players BlockPos selfPos = self.getBlockPos(); BlockPos otherPlayerPos = otherPlayer.getBlockPos(); // Teleport damaged player to the other player's coordinates // We set the Y to 300 in order to avoid a collision with the other player. // // We add 0.5 to both X and Z because that's the center point of a block // and the players could suffocate under certain circumstances if we didn't self.teleport(otherPlayerPos.getX() + 0.5, 300, otherPlayerPos.getZ() + 0.5); // Teleport the other player to the position of the damaged player. otherPlayer.teleport(selfPos.getX() + 0.5, selfPos.getY(), selfPos.getZ() + 0.5); // Finally change the Y to the real value and complete the teleport of both // players. self.teleport(otherPlayerPos.getX() + 0.5, otherPlayerPos.getY(), otherPlayerPos.getZ() + 0.5); > > Enter fullscreen mode
Exit fullscreen mode
After implementing this, you’ll need two Minecraft clients to be able to test it. You can do it by opening one with ./gradlew runClient and then using the official Minecraft client with your Mojang account. Then, open the test world in LAN and join it with the other client.
Swapping their inventories
And now we’ll add the last feature of the mod: swapping the inventory of the players. To swap the inventories of two players, we have to clone each inventory and after that, we can just replace and swap them. The inventory of a player can be accessed using the inventory property. The class PlayerInventory has two methods that we’ll use, serialize and deserialize . The first one allows us to clone the content of the inventory by putting it inside of a ListTag and then, we can use the second one to replace the content of an inventory with the content that is inside of a ListTag . Here’s the code:
// . teleports . // Only swap inventories if the players are alive if (self.getHealth() > 0.0f && otherPlayer.getHealth() > 0.0f) // Get the inventories of both players ListTag selfInventory = self.inventory.serialize(new ListTag()); ListTag otherPlayerInventory = otherPlayer.inventory.serialize(new ListTag()); // Swap them self.inventory.deserialize(otherPlayerInventory); otherPlayer.inventory.deserialize(selfInventory); >
Enter fullscreen mode
Exit fullscreen mode
As you may have noticed, we’re only swapping the inventories if both players are alive because if we don’t include this check, one of the inventories would get lost whenever a player died.
The final code
If you reached up until this point, congrats! You’ve built your first Minecraft mod, we should now remove the files that aren’t needed, for example, StarterMixin.java and StarterMod.java . Don’t forget to remove the references to these files inside fabric.mod.json and starters.mixins.json . I also recommend you to rename the package from starter to whatever you want, just remember to change every occurrence in the project. You can find the latest version of the code in the branch final-code of the starter repo. Click here see the final version of the mod.
Packaging the mod
If you’re familiar with Minecraft Mods, you may already know that mods usually come packaged inside .zip or .jar files which later you drop inside the mods folder in the server or client of Minecraft. To create a bundle of your mod, you only need to run the following command:
$ ./gradlew build Enter fullscreen mode
Exit fullscreen mode
If everything compiles correctly, you’ll be able to find the .jar inside the ./build/libs folder of your project. In most cases, you’ll want to pick the production version without sources, but there may be cases where also shipping a development version along with the sources is better. That’s it, you can now drop that .jar inside your mods folder, just don’t forget to install the Fabric API first, and for that, you can read the Installing Fabric section in their wiki if you want to learn how to do it.
Learning resources
- The Fabric Wiki. This one has already been mentioned in the article, but seriously, go check it out because there’s a lot of content that I haven’t covered!
- The Forge API. The Forge API is the most famous Minecraft API, you may want to check it out because some of the best mods out there have been built with it!
- ScriptCraft. There seems to be a way to build mods using JavaScript, so if you have a background in web dev, you may want to try this one.
- MCreator. As their site says, MCreator is a software used to make Minecraft mods and data packs using an intuitive easy-to-learn interface or with an integrated code editor. If you know about someone that wants to get started with programming, this may be a good way to introduce them!
Conclusion
Building my first Minecraft Mod was interesting because I got to know a bit more about how my favorite game works, and I even managed to craft something really fun to play.
Also, I took this as an opportunity to create this article because I think modding is a great way to get introduced to programming, and there are a lot of Minecraft players that may get interested and end up learning a lot about software development.
I hope you had a great time reading this article. If you decide to continue learning I invite you to share your progress with us, who knows, maybe a Minecraft Modding community can be born inside of dev.to ��
How to make a mod for Minecraft, a complete guide

Making a mod for Minecraft isn’t as hard as it sounds, although challenging to start with, making a mod will teach you a lot about the programming world, including logical thinking.
A mod is short for modification, this term is used in every game that allows the player to change the game in one way or another, there’s a lot of games that will have their ways of mod creation, but once you learn the basics of programming you will quickly get the grasp of modding for all of them.
This article is focused on the Minecraft Java Edition, which is made in Java, and thus uses «jar» files as game modifications, if you’ve read our guide on how to install Minecraft mods and Forge you will have some idea of the process, knowing how to install a mod can be helpful to understand how to create one.
To create a Minecraft mod, you will need a way to communicate to the game and the computer, a way to give it instructions to follow, computers don’t think by themselves, we need to tell them what to do.
This is why we have programming languages, they have defined syntaxes in which you can give instructions to the computer, and there are a lot of different programming languages, with their own rules and way to work.
Minecraft Java Edition happens to be made with the Java programming language, Java is a language developed by Oracle Corporation and designed by James Gosling, the code you write in Java is compiled and run on Java Virtual Machines (JVM), this way, Java code can run in any device, as it needs only the Java Virtual Machine to work.
This is the mod we will build on this guide:
Understanding more about Java
The term compiled is crucial when talking about Java, what does this term mean, and why Java runs on a Java Virtual Machine?
To understand why Java is the way it is, we need to understand why «traditional» programming languages are the way they are.
The usual programming language will be compiled to machine code, machine code is the language that your computer can understand, it won’t understand anything besides that, it doesn’t know how to read English terms.
But compiling directly to machine code has certain limitations, CPUs are different, and compiled code may not work on different computers, or when the compiler can do that, you still have to handle platform-specific code.
The Java Virtual Machine will take care of most stuff for you, it will run your Java code the same way while it can run on different devices, the Java code is compiled but to the language that the Java Virtual Machine understands, not to machine code.
This is a basic picture of how things work, but don’t worry, it will be more clear once you see the example!
Understanding more about Forge and Minecraft modding
If you installed Minecraft: Java Edition mods before you probably used Forge, but why do we need to install Forge, couldn’t we just put mods in the mods folder and play regular Minecraft?
Forge is a modding API, you can think of it as something that will give you tools to work with Minecraft, tools that Minecraft won’t readily give you by default. Being free and open-source, the code for Forge itself is available for everyone to see, making it crystal-clear safe.
So in the big picture, mods will interact with the Forge API(the «set of tools») to modify Minecraft in a certain way, being easy to notice that Forge is at a high level dictating how things should be done. Forge has an important role when modding Minecraft, and learning more about it can greatly expand what you’re able to achieve, there will be resources about it at the bottom of this article.
Setting up a Minecraft modding development environment
A few software are needed to develop mods, and all of them are free, the reason why we need development software is that they help humans to focus on what is important, giving hints, warning about errors when possible, and also doing the actual compiling and whatever is needed to create the final product, in this case, a beautiful Minecraft mod.
It’s worth noticing that you can approach development in different ways, although we try to keep things as simple as possible, sometimes it’s good to find what works better for you, so don’t be afraid to search other tutorials if this doesn’t «click» for you, it’s not you, it’s us!
To create our first Minecraft mod, we will need:
- Open JDK: Open Java Development Kit is what we will use to develop Java-related things, you may already have Java on your computer, but these are the tools needed to work with Java.
- MDK:Modding Development Kit, we have the kit for Java, we will also need a kit for mod development.
Well. how to download these things?
Downloading and Installing Open JDK:
- There is a website AdoptOpenJDK that will help you download the JDK, access it at: https://adoptopenjdk.net/?variant=openjdk8&jvmVariant=hotspot
- After accessing it, make sure that OpenJDK 8 (LTS) is checked, it should be because the above link will automatically check it for you, but by default, the OpenJDK 11 option is checked, and it is not the one we want
- After changing, just click the big blue button that says download (Latest release), the other option doesn’t need changes
- The file will save to your computer, and after opening it, just press Next through the installer, the default options are alright, and after it ends, JDK is ready!
Downloading MDK:
- If you downloaded Forge before you won’t have trouble with this one, access the Forge download page
- Usually, you would click on Installer to download Forge, but this time you will click on MDK, it’s right to the next of Installer.
- Create a folder called MDK somewhere on your system
- The MDK is a .zip file, instead of a .exe downloader, open it and copy the files to the MDK folder you created
We now have both the JDK and the MDK files, great! There is just something left, that wasn’t mentioned before. we need software where we can write our mod code, and for this, we will download IntelliJ IDEA.
Download and install IntelliJ IDEA:
- Access IntelliJ IDEA download page
- On the right side where it says Community, click on the download button
- Run the installer and follow through clicking on Next
Congratulations if you got here, you now have an environment able to create Minecraft: Java Edition mods! ��
Creating your Minecraft mod project
It’s time to start creating the structure of our mod and setting things up.
Open IntelliJ IDEA and wait for it to load, you will see a Welcome to IntelliJ IDEA window.
On this window, click on New Project, this will open a new window with settings for a new project. Most of this window will be left as it is, the only thing you have to change if needed, is where it says Project SDK.
Make sure Project SDK has version 1.8 selected, which is the Open JDK 1.8 we downloaded before.
After this, just click on Next. The next step will have an unchecked checkbox, leave it unchecked and press Next again.
For the project name, call it AwesomeLLamaMod, for the Project Location, you can leave the default or change the folder if you want.
After that, just click on Finish, and the project is created! Your project will open, you can close the popup tips that IDEA shows.
Setting up your mod files
It’s time to start adding files to our project to set it up.
Do you remember the MDK thing you downloaded before and copied to a folder? It has to be copied to the mod folder that you’re creating, you keep the MDK folder saved somewhere and when you need to use the kit, copy it to the new mod folder.
But not all files need to be copied, so follow these steps:
- Make sure you have the MDK folder which you downloaded from the previous section
- Right-click the AwesomeLLamaMod folder on IDEA, go to Open In, and select Explorer, this will show you the Project folder you specified before(you can also just navigate to it if you want)
- Open the folder AwesomeLlamaMod that IDEA showed you, now you will have both AwesomeLlamaMod and the MDK folders opened
- Copy the following files from the MDK folder: build.gradle , gradlew.bat , gradlew , gradle folder , and paste them in the AwesomeLlamaMod folder.
Great! We have the basic files needed from MDK for our project, you can close the opened folders and go back to IDEA, you will notice that it now shows the added files.
The files are added but IDEA won’t do anything with them by default, you have to right-click the build.gradle file and click on Link Gradle Project.
The final step to be done with our IDE setup is to run a command on the project folder, to do this, open the terminal tab on the bottom of IDEA.
Type the following, and press enter:
If you’re on Linux, remove .bat from the command.
After running the command, wait once a green message saying BUILD SUCCESSFUL appears on the terminal, and you’re able to type on it again.
Naming your mod, and configuring its details
We did set our IDEA project name to AwesomeLlamaMod, but we didn’t define that in the code anywhere, we need to do that now, alongside some other personalization.
Before we get into editing the file that holds these configurations, let’s go over the files we currently have in our mod folder.
You will notice that there is a bunch of folders and 3 files: build.gradle , gradlew , and gradlew.bat . Their similar names can create a lot of confusion, so let’s go over each one of these files:
- gradlew.bat: This is a startup script for Gradle that was made to run on Windows
- gradlew: The gradlew file that doesn’t end with .bat does the same thing that gradlew.bat , however, it was made for Linux systems, so both gradlew and gradlew.bat do the same thing, you just use them in different situations
- build.gradle: Now this is the file that we edit for configurations, this is a file that will tell Gradle about our project and its tasks, this is called a build script.
The elephant in this room is Gradle, Gradle is a build automation tool, if you remember the Java section where we mentioned how code needs to be compiled, Gradle will take care of all that, and more, the building process includes compiling and everything else that may need to be done.
But Gradle can’t magically know how we want it to handle our project, this is why we have the build.gradle file, it allows us to specify how our project is built, making it more organized.
Our project build.gradle file won’t be empty, because we copied the default configuration for an MDK project.
Now that it should be more clear, open the file build.gradle on IDEA by clicking on it on the left panel.
If the file looks complicated to you, don’t worry, learning about Gradle helps but we only need to know what we will edit and why.
The first thing first about our mod that we will change is its name, by default, there will be a line like this:
This is saying that the archivesBaseName value will be modid, the quotation around modid means that is a string/text. We will change it this way:
Notice how we changed but keeping archivesBaseName = and the quotation marks around llamamod , because we are only changing its value that comes after the equal symbol and inside the marks.
There is a group variable above archivesBaseName , change its value to mod.plaguertutorial.llamamod , which will give you the following result:
group = 'mod.plaguertutorial.llamamod' archivesBaseName = 'llamamod'Now we will finish modifying this file by using the search and replace feature of IDEA, you can open it by pressing CTRL+R , or clicking on the Edit tab on the top menu, going to Find, and selecting Replace.
This feature replaces every occurrence of what you type on the first text field, with whatever you type on the second. We will use it because we have to replace all occurrences of examplemod with llamamod .
- Type examplemod on the first text field
- Type llamamod on the second text field, below it
- To the right of the second text field, there is a button called Replace All, click on it because we want to replace all occurrences, and not just one
After it replaces all, it will show «0 results» on the Search and Replace window, you can close it.
Another file that holds information about our mod is a file called mods.toml , as we didn’t copy the example that comes with the MDK folder, we will have to create this file, but you can always take a look at the example folder one to have a base of how it looks like.
If you followed all the above steps, you will notice that our project now has an src folder inside it, the path needed for the mods.toml file is src/main/resources/META-INF/mods.toml
These are the steps to create it:
- On the left side panel, right-click the src folder and go to New and click on Directory, write main on the creation window to name it, and press Enter
- Do the same as above but now right-click on the main folder and create a directory named resources
- Right-click the resources directory and create a new directory called META-INF inside it, paying attention that all letters are capitalized
- Now for the META-INF folder we won’t create a folder inside it, we will go to the same location but select File instead, and name it mods.toml
- The file will be created and IDEA will open it, which will be a blank file
Good, now we only have to write this file content!
You can copy and paste this inside the created file as an example:
modLoader="javafml" # Mandatory! loaderVersion="[@FORGE_SPEC_VERSION@,)" # Mandatory! license="All rights reserved" # Mandatory! # Name and description and another options [[mods]] modId="llamamod" # Mandatory! version="$" # Mandatory! displayName="Awesome Llama Mod" # Mandatory! description=''' Hello world, this is my Awesome Llama Mod. It does awesome things. It is a llama Minecraft mod! ''' # Mandatory! credits="Awesome Llama Mod was created through a plaguer.com tutorial!" # OptionalAfter pasting this inside the file, press CTRL + S to save it.
Notice that this file has text written in English inside it, but machines don’t understand English, so why it is written like that?
When you write text after a hashtag(#), the text will be ignored by the computer, so we write it for other humans to read and understand what we are doing. Different programming languages will have different ways of expressing a comment, here it just happens to be a hashtag.
The configuration above has basic comments explaining what is mandatory and what is not, but still, it’s great to know more about what is happening here.
A .toml file will follow certain specifications, which you don’t have to know 100% about, the declaration of data here is very similar to what we did before.
This line is setting the value of modId to be llamamod , the quotation marks specify that we are using a string(text value), and the quotations are wrapped around our value for that data.
If you respect that pattern you can edit values as you wish, but of course, some configuration data need specific values, and you can’t write anything you want, for example:
- modLoader: This will always be javafm l in this case, unless you’re using another mod loader, don’t change it.
- loaderVersion: The value for this data is specially set as [@FORGE_SPEC_VERSION@,) , this will be further replaced with the correct version, so we don’t have to worry about it, you could also replace this with a Forge version, but this way: [36,) and with the Forge version for the Minecraft version instead of 36.
- [[mods]]: This specifies that the content below will be our mod and dependencies, notice how the text after this line is more to the right, this is called indentation, it makes it easier to read.
- version: Using $ will make the versions be handled automatically for us, we could also specify this ourselves, but a convention needs to be followed.
Well now our mods.toml is set, our mod is named and configurated!
Coding our first Minecraft mod
Installing software, setting up dev environment, changing configurations, all done! It’s time to start coding our mod, its functionalities, so we can play with it in Minecraft.
The first step to code a mod is to know what we want it to do, so we use the tools we have available to achieve that, in this case, our tool is Forge and the Java programming language.
For the llama mod, we will start with something basic, every time you break a Minecraft block, we want 3 llamas to appear! Can this be done? Indeed.
Let’s go straight to the creation of our mod code file:
- On the IDEA left side panel, make sure the src folder is opened, and the main folder is also opened
- Inside the main folder, create a new directory called java (lowercase)
- Right-click on the folder java, you will see that going to the New option won’t show you Directory anymore, instead, click on Package and name it mod.plaguertutorial.llamamod
- Now we need to create the actual code file, right-click the Package mod.plaguertutorial.llamamod and create a new Java Class, naming it LlamaMod , if there’s no «room» to right-click over the llamamod folder, expand the left panel if needed
Now you have the actual file for our code created, it should have some default code inside it but don’t worry about that.
The code for LLamaMod.java will be:
package mod.plaguertutorial.llamamod; import net.minecraftforge.api.distmarker.Dist; import net.minecraftforge.event.world.BlockEvent; import net.minecraftforge.eventbus.api.SubscribeEvent; import net.minecraftforge.fml.common.Mod; import org.apache.logging.log4j.LogManager; import org.apache.logging.log4j.Logger; @Mod("llamamod") public class LlamaMod < private static final Logger LOGGER = LogManager.getLogger(); public LlamaMod() < LOGGER.info("Creating the mod. "); >@Mod.EventBusSubscriber(modid = "llamamod", bus = Mod.EventBusSubscriber.Bus.FORGE, value = Dist.CLIENT) public static class RegistryEvents < @SubscribeEvent public static void onBlockBreak(BlockEvent.BreakEvent event) < LlamaEvents.onBlockBreak(event); >> >We will need another file required by our mod file, create a new Java class on the same package(right-click mod.plaguertutorial.llamamod ) and name it LlamaEvents , paste the following content inside it:
package mod.plaguertutorial.llamamod; import net.minecraft.core.BlockPos; import net.minecraft.world.entity.EntityType; import net.minecraft.world.entity.animal.horse.Llama; import net.minecraft.world.level.Level; import net.minecraft.world.phys.Vec3; import net.minecraftforge.event.world.BlockEvent; import org.apache.logging.log4j.LogManager; import org.apache.logging.log4j.Logger; public class LlamaEvents < private static final Logger LOGGER = LogManager.getLogger(); public static void onBlockBreak(BlockEvent.BreakEvent event) < LOGGER.info("A block was broken, spawning llamas. "); BlockPos breakPosition = event.getPos(); Vec3 llamasPosition = new Vec3( breakPosition.getX(), breakPosition.getY(), breakPosition.getZ() ); Llama myNewLlama = new Llama(EntityType.LLAMA, (Level)event.getWorld()); myNewLlama.setPos(llamasPosition); event.getWorld().addFreshEntity(myNewLlama); >>This makes our mod be able to start and listen to an event!
Creating the MCMETA file
This file is needed before launching our mod, it has basic information about the resource we’re providing.
Create a new file inside the resources folder and call it pack.mcmeta , IDEA will open a window named «Register New File Type Association», just press OK, without changing anything, this is because .MCMETA is a file format it doesn’t know about.
After creating the file, double click it to open, and paste the following content:
Do not forget the curly brackets!
This file is setting the description on the mods menu, and using format 6. There are other formats for different Minecraft versions.
Testing the Minecraft mod
For testing, you don’t want to keep generating a .jar file and moving to the folder, there is an easier way to test a Minecraft mod.
You may notice that IDEA has a panel on the right, with Gradle written on the top, and it has a folder named Tasks in that panel. If you don’t see the gradle panel, you can open it by clicking on Gradle on the top right of the screen.
Open the Tasks folder on the Gradle panel, open the forgegradle runs task folder, and double click runClient .
Minecraft will open with your mod already loaded, you can create a single-player world and test the mod.
If you minimize Minecraft for a second, you will notice that IDEA has a little terminal open with messages being logged, this is information that can be used to debug mod errors and know more about what is going on.
Understanding what the mod is doing
Assuming no Java experience or Minecraft modding knowledge, we will try to explain what the mod files are doing, programming resources will be linked if applicable.
First starting with the file called LlamaMod .
This is the first line on the LlamaMod file:
What is it doing?
This line states that the file belongs to our mod.plaguertutorial.llamamod package. Packages group classes that have something in common, in this scenario our entire mod is in the same package because it is small enough.
Packages can be imported, for example, you could create a package that is useful in different projects, and then import this package on many of your projects.
Java provides us useful packages, but we also have Forge and Minecraft packages in hand.
w3schools has a great guide on Java packages, which you can take a look to learn more about it.
If you are not used to programming, understand the patterns and follow them, note how almost all lines in our mod files end with a semicolon, and how some words are orange in IDEA, some are yellow, others purple, why? Pay attention to these patterns and you will quickly get familiar with programming.
To understand semicolons, curly brackets, and related, take a look at this Oracle Java tutorial.
To understand what an «orange word» does take a look at this w3schools table.
Lines 3 to 8 of our LlamaMod file:
These lines all start with «import», a reserved word that is being used to import packages that we will need in the file.
For example, the line:
Is importing a package called » org.apache.logging.log4j.Logger «, which is a package like our mod.plaguertutorial.llamamod package, which is a file somewhere that will contain classes and methods that we use in our file.
The above line is needed because on line 13, we have this:
private static final Logger LOGGER = LogManager.getLogger();
Forgetting the reserved words «private static final» for now, we have:
logger LOGGER = LogManager.getLogger();
«Logger» is being used here as a variable type, but this type isn’t a Java primitive type, so it has to exist somewhere for us to reference it.
This is why we are importing it! The same applies to all other import lines, they are used somewhere in our code.
If you add «//» to the start of an import line, it will comment such line, IDEA will mark on red some part of the code because it lacks the import for that reference.
It can be complicated to understand the lines that will start with @ . This is called an annotation.
The annotation will do something for you, and there are different types of annotation, the Mod annotation comes from Forge, and it will tell Forge to load this class as a mod. We are passing llamamod as a value, which should be the same value for the mod id defined in the mods.toml file.
public class LlamaMod
This is making a public accessible class named LlamaMod. Our file is called LlamaMod so this class has to be named LlamaMod. Following the class, you will have a curly bracket that makes a block. You can learn more about classes on w3schools.
From this point, the lines of our code are all inside the LlamaMod class block, you will frequently see «private» and «public» orange words when inside a class block, learning about classes will help you with this, so for brevity, we won’t go over private and public for all lines.
private static final Logger LOGGER = LogManager.getLogger();
This creates a variable named LOGGER, which has the type Logger. The equal sign assigns the value being returned from a function called getLogger from a class called LogManager , which we imported from a package. The final keyword won’t allow this variable to be changed again, as we have no reason to do so.
Lines 15 to 17:
You will notice that the method LlamaMod() here has no type, it says public behind it, but there’s no type specified after public.
This is because that is a constructor, the constructor has the same name as our class(LlamaMod) and no type. The constructor is called when our class is constructed.
Line 16 uses a method named info in our LOGGER variable to show a message in the terminal when our mod constructor is called.
Lines 19 to 25
@Mod.EventBusSubscriber(modid = «llamamod», bus = Mod.EventBusSubscriber.Bus.FORGE, value = Dist.CLIENT)
This is another annotation provided by Forge, it helps us to register an event, the event is used so we can know when something happens in the game, so we can react to it in some way.
On line 21, @SubscribeEvent :
This will allow the method below this annotation to listen to an event. This is our method:
onBlockBreak(BlockEvent.BreakEvent event)
Every time a block is broken in-game, this method will call yet another method from a class named LlamaEvents(that we created!), and it will pass the event information to that method.
This is all for the LlamaMod file.
Now for the LlamaEvents file:
This file is on the same package as the other file, so they can access each other.
This file declares a class named LlamaEvents on line 12, which also has a logger as the previous file had.
Lines 15 to 28:
This is the method that is called on the other file with a BlockEvent.BreakEvent parameter.
Inside this method block, we can define what will happen when the method is executed, and we defined that it needs a BlockEvent.BreakEvent type parameter, which we can use.
Line 16 will log A block was broken, spawning llamas. to the terminal.
BlockPos breakPosition = event.getPos();
This is declaring a variable named breakPosition , which has the type BlockPos . The variable is assigned the value of event.getPos , which is a method available on the event variable because it has the type BlockEvent.BreakEvent .
We are getting the position that the block was broken, and storing it in breakPosition .
Line 19 to 23:
Vec3 llamasPosition = new Vec3( breakPosition.getX(), breakPosition.getY(), breakPosition.getZ() );This has more lines, but it’s similar to the above line, it just has multiple parameters being passed, and we can freely add line breaks to make it easier to read.
This line is declaring a variable named llamasPosition which has the type Vec3 . This variable is being assigned the value of a new Vec3 initialized with the X, Y, and Z position of the breakPosition variable that we stored above.
Do you remember that our file LlamaMod has a constructor called LlamaMod ? Vec3 also has a constructor, but its constructor takes 3 parameters that we need to specify to construct it.
The keyword new is being used to create a new instance of a Vec3 with the constructor we specified.
getX , getY , and getZ are all methods defined inside the BlockPos type. They return the positions X, Y, and Z of a block position.
Vec3 is short for Vector3, think about it as a type that holds 3 values, and we are giving it 3 values.
Llama myNewLlama = new Llama(EntityType. LLAMA , (Level)event.getWorld());
This is creating a variable myNewLlama of type Llama .
We are calling Llama constructor with the entity type » LLAMA «, and constructing it on the world that the block was broken
This line sets the position of our new llama to be the position we stored before.
This will add our llama entity to the world!
Spawning 3 llamas instead of one
Currently, our mod only creates one Llama when blocks break, this is cool, but we wanted it to spawn 3 llamas. We can create more llamas using a for the loop around our existing code.
To do this, change the file LlamaEvents and wrap the code that spawns our llama with a For Loop:
for (int i = 0; i
To understand the For Loop, we can break it into three pieces.
This is creating a variable named » i «, which can be accessed in the For Loop. The variable initially will have the value 0.
This is saying that the For Loop body will repeat until i is lesser than 3. We defined i to start with the value of 0, as zero is less than 3, our loop will start.
i++ is a short for i = i + 1
We are specifying that after the end of each iteration, we will increment the value of i by 1.
This essentially means that after 3 iterations, i will be equal or higher than 3, and the condition i < 3 will be no longer true, stopping our loop after 3 iterations.
Now the code that creates and spawns a llama in our world is repeated 3 times, making 3 llamas spawn when a block is broken.
Save the file with CTRL + S and run again the runClient task to test the game.
How to spawn a trader llama?
Our mod is looking great, but it would be awesome if we could change it a little bit to spawn some trader llamas!
Especially, if we could make every even llama spawned to be a trader llama.
Our code has the loop that runs 3 times, and inside our loop where we spawn the llamas, we have access to that «i» variable that holds the current iteration number.
When the first llama is spawned «i» is equal to 0.
When the second llama is spawned «i» is equal to 1.
When the third llama is spawned «i» is equal to 2.
We know that what defines even numbers is that every even number is divisible by two. So we want to check if «i» is divisible by two, and then spawn a trader llama instead.
So this is the For Loop that can create our traveler llamas:
for (int i = 0; i < 3; i++) < EntityType llamaType = EntityType.LLAMA; if (i % 2 == 0) < llamaType = EntityType.TRADER_LLAMA; >Llama myNewLlama = new Llama(llamaType, (Level)event.getWorld()); myNewLlama.setPos(llamasPosition); event.getWorld().addFreshEntity(myNewLlama); >What changed here?
Starting with this line:
EntityType llamaType = EntityType.LLAMA;
We are storing the entity type in a variable, and initializing it to be EntityType.LLAMA , which is a regular llama.
And below we have an if condition:
if (i % 2 == 0)
The body of our if condition only is called when our if condition is true. For this line, our condition is i % 2 == 0 , whenever this is true, the body inside curly brackets will run.
Let’s understand i % 2 == 0 bit by bit.
% is an operator, like + or — , this is the remainder operator which will return the remainder after a division.
When i is equal to 0, that condition will be 0 % 2, and 0 / 2 as no remainder, so it equals 0.
So our if condition will be 0 == 0, this is comparing if 0 equals 0, and that is true! So our body will run.
This is the body of our if condition:
This is setting our llamaType variable to be a trader llama. This variable was initially set to be a regular llama, but as this code will run after that initialization, it will be overwritten with TRADER_LLAMA instead.
When the code that creates the llama is executed:
new Llama(llamaType, (Level)event.getWorld())
It uses the llamaType variable, which will be either a trader llama or a regular one depending on our if condition, achieving the result we wanted!
Save and test the game!
Building our mod jar file
So far we tested the mod using the runClient task, this is great because it will quickly launch Minecraft allowing us to see how our mod is working. But to build our mod and create a .jar file, which we can send to our friends if we want, we will have to run the build task.
The build task is inside the folder build, instead of » forgegrade runs «, double click it to build our jar file.
The task will run and you can follow its progress on the terminal, if everything goes alright, you will see a BUILD SUCCESSFUL message.
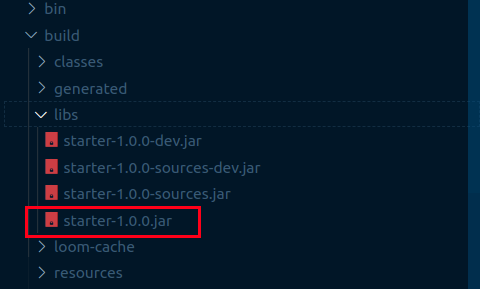
Your jar file is now on your project folder, inside the build and libs folder.
You can install this file as any other mod, we have a guide on how to install Minecraft mods which you can take a look at if needed. The mod should show in the mods list with an appropriate version, as this is a final build.
Further reading
Hopefully, this guide will help you to start making Minecraft mods, if you believe something should be changed, take a look at our contact page to reach out.
These are awesome resources that will help you to understand more about Java and Minecraft modding:
The entire w3schools Java tutorials are a great way to get started with Java.
The Forge Documentation provides detailed information about the modding API.