Solved: Not currently using a display attached to NVIDIA GPU
Newer laptops are increasing sporting dedicated graphics processing units (GPU) beside the integrated GPU. Desktop computer users have also fallen in love with NVidia GPUs and use them for graphic intensive tasks like gaming, animation and video editing among others. However, it is not all smooth sailing. Setting up an NVidia GPU can be a nightmare if you are not sure what is going on. The problem mentioned here has particularly frustrated a lot of users.
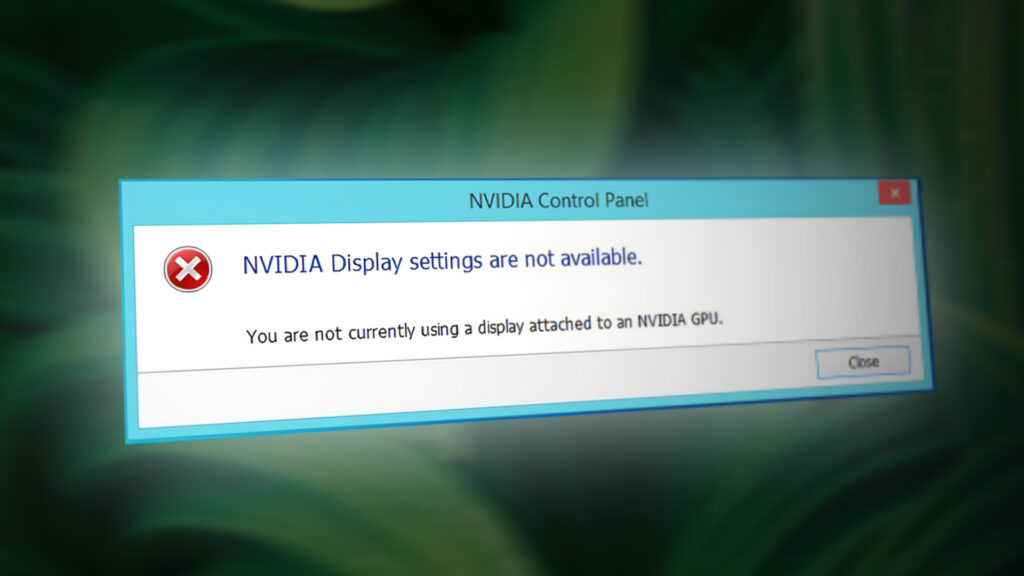
A lot of users have been complaining that whenever they try to access the NVidia control panel, they get a message stating ‘You are not currently using a display connected to an NVidia GPU’ with the heading ‘NVidia display settings are not available’. This robs the users of the capacity to tweak their NVidia GPU to enhance its performance, resolution or speed among other things. The problem occurs in both desktop and dedicated NVidia GPU laptops. Despite this message a lot of users running a dedicated NVidia laptop (there is usually an integrated Intel GPU) indicate that the NVidia GPU seems to come online whenever graphic intensive tasks are run. For others, disabling the integrated GPU in device manager turns the screen blank, and a restart will boot into a VGA (800X600) display. Strangely enough, a lot of users report that whenever they are plugged into the HDMI instead of a VGA port, this message does not come up and they are able to access the NVidia settings. Why does this occur, and how can it be fixed? This article covers this problem and gives you the solutions to it.
Why you cannot access your NVidia GPU settings
Laptops that run Intel with NVidia dedicated graphics usually save power by reverting to the Intel GPU when displaying graphics that do not need a lot of GPU processing power. This is usually known as the NVidia Optimus. When you launch a game or Photoshop, or animation software or other apps that demand a lot of GPU power, the NVidia kicks in. you will usually see a light that turns on the top or on the side of your laptop. Earlier laptops could let you switch between the GPUs by pressing a button. On the other hand, desktop users always deploy the NVidia GPU via an expandable slot at the back.
As the error message says, your NVidia will not work because the system is not able to detect it as the GPU that is currently displaying your screen. This simply means that for your desktop computer, your monitor is plugged into the wrong port at the back; hence your NVidia GPU is not active/online. This is why some users say that the problem is resolved when they plug into the HDMI port, but they are likely plugging into the correct NVidia GPU port. Also in most laptops, the NVidia GPU drives the HDMI and other external monitor ports.
For laptops; at low power, your computer uses the Integrated Intel GPU. When you access the NVidia GPU control panel, it should be able to switch and bring the dedicated NVidia GPU online and allow you to access the GPU’s settings. However, if you have the wrong drivers – it does not matter how up to date they installed drivers are – then your laptop will not be able to make this switch. This is the reason why all users that have this problem insist that updating the drivers does not solve the problem. The reason is that they are installing generic drivers from the Intel website or from the NVidia website. Your laptop manufacturer will always add some elements into these generic drivers so as to tell your PC when to switch between the two GPUs. These drivers are known as the OEM drivers and this problem is one of the reasons why manufacturers insist on installing OEM (Original Equipment Manufacturer) drivers that come with your computer CD or those that can be found on their website using your service tag.
Method 1: Plug your monitor into the NVidia GPU port
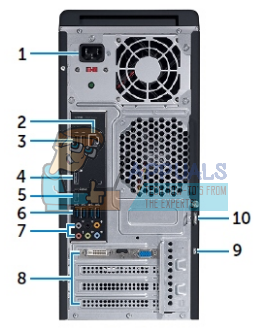
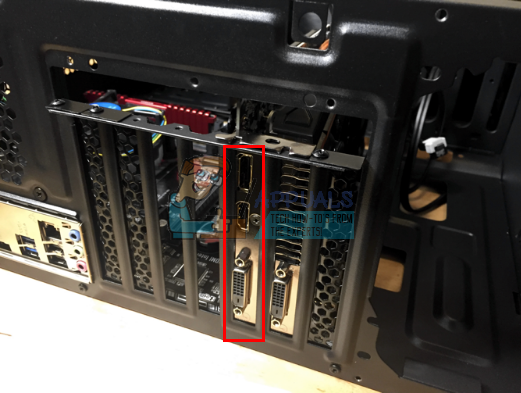
If you have a desktop computer, it is likely that you are plugged into the wrong port at the back of your PC. You should be plugged into the NVidia GPU port and not the port that comes integrated to your motherboard. The NVidia GPU is plugged into the extension slots marked as 8 in the image below. Your NVidia GPU should look like the one marked as 9.
It is easy to miss this port because it is usually plugged with dust covers and nubs. Simply pry off the dust covers and plug in your HDMI or DVI cable that connects to your monitor and the NVidia control panel should now work.
Method 2: Uninstall your drivers and Install the OEM drivers for your Intel and NVidia GPUs
Notebooks and laptops use NVidia Optimus that switches between the Intel and NVidia GPUs depending on the graphic demands. It knows when the NVidia GPU should kick in and when to revert to the low power Intel GPU. However, only the laptop manufacturer drivers can implement this and not the generic drivers from Intel or NVidia. To install OEM drivers:
Step 1: Uninstall graphics drivers
- Press Windows Key + R to open Run
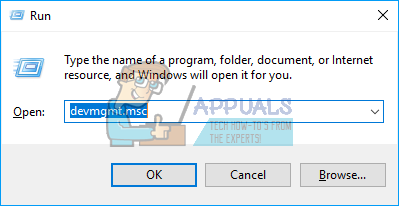
- Type devmgmt.msc and hit enter to open device manager
- Expand the ‘Display adapters’ section
- Right click on your Nvidia Graphics drivers and select ‘Uninstall Device’
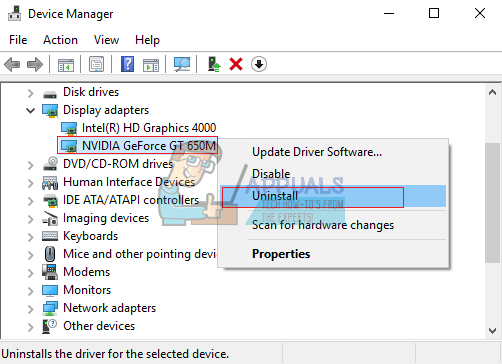
- In the confirmation message that comes up, click Yes/Uninstall to uninstall your drivers.
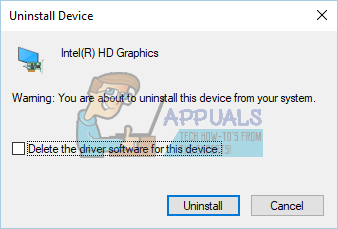
- Right click on your Intel Graphics drivers and select ‘Uninstall Device’
- In the confirmation message that comes up, click Yes/Uninstall to uninstall your drivers. Your screen will have a very low resolution after this. Do not worry, that is supposed to happen.
- Restart your PC
Step 2: Download and install the correct drivers
- Go to your laptop manufacturer website. Dell users can go here, hp users can go here, Toshiba users can go here, Acer users can go here, while Lenovo users can go here.
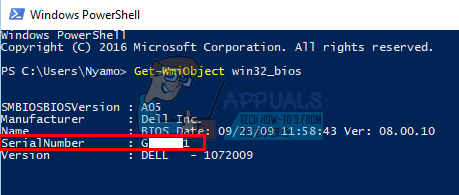
- You will likely be asked for your service tag or serial number. You can find this on a sticker at the bottom of your laptop. If the sticker is damaged you can find the service tag using cmdlets that read your BIOS. Click start > type PowerShell > Open PowerShell > Type “Get-WmiObject win32_bios” (without the quotes) and press enter. You will be shown your Serial Number/Service Tag.
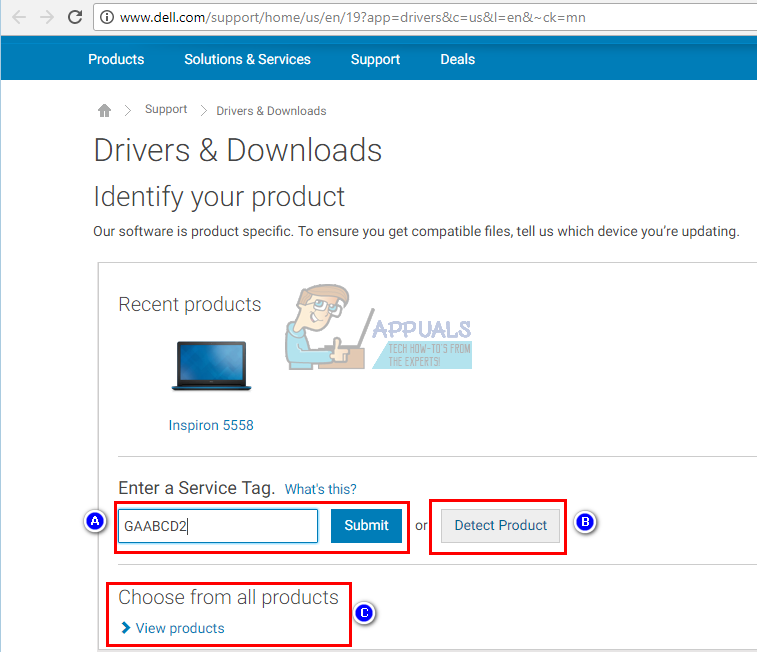
- Type in your service tag and submit it. Your manufacturer will find your laptop model for you and present you with the updates and drivers.You can also choose to search for your laptop manually or use an auto-detect service.
- Search for your graphics drivers that are meant for your OS (Windows 10, 8, 7 64 bit or 32 bit) and download both of them (NVidia and Intel). These drivers might be older than what you will find on the GeForce or Intel website, but they will work. Do nor download BETA drivers since these are not stable.
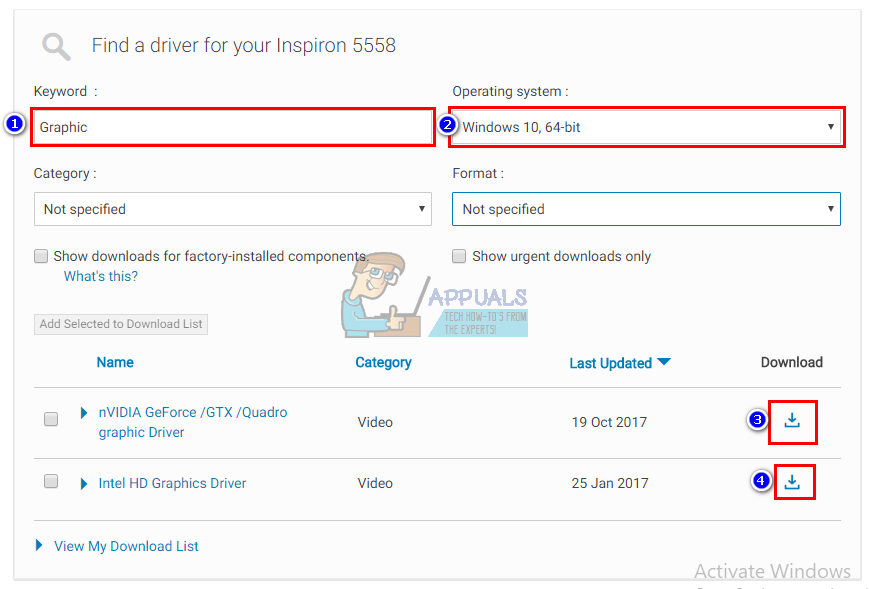
- Install the downloaded Intel graphics drivers first
- Install the NVidia drivers by opening the downloaded file. Make sure you perform a clean install by checking ‘Perform clean install’ in the NVidia installation window.
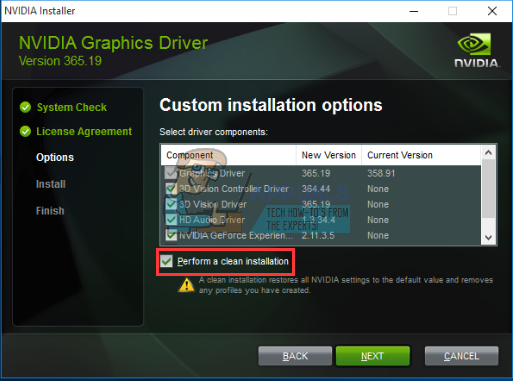
- Restart your PC
Step 3: Hopefully Windows 10 will not update your drivers to wrong drivers. If you notice this behavior, prevent automatics updating of drivers by:
- Press Windows Key + R to open Run
- Type in ‘Control Panel’ and hit enter to open the control panel

- Click on ‘System and Security’

- Click on System
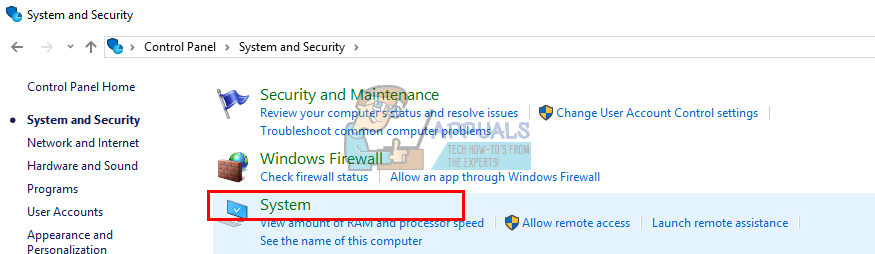
- Click ‘Advanced system settings’ from the left sidebar.
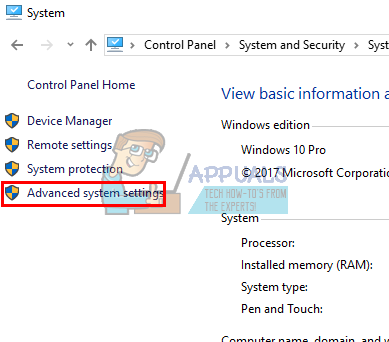
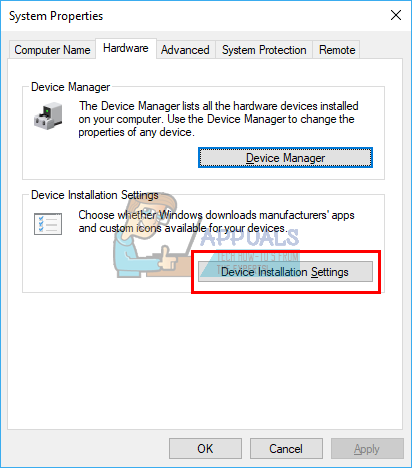
- Click on the hardware tab and click on the Device Installation Settings button.
- In the that pops up, select ‘No (your device might not work as expected)’ and then click on ‘Save Changes’
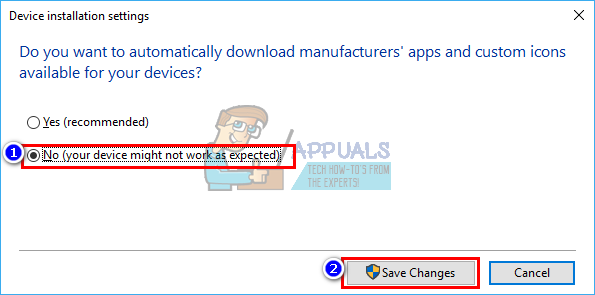
- You might need to restart your PC for effect to take place
Method 3: Update your GeForce/NVidia Drivers
For desktop user, the NVidia GPU is independent of the Intel GPU. If your drivers are faulty, you can download the correct drivers from GeForce.
- Go to GeForce driver download center here
- You can find for your drivers by manually searching for them, or using the ‘Auto-detect your GPU feature’ or the GeForce experience software to detect and update your GPU drivers.
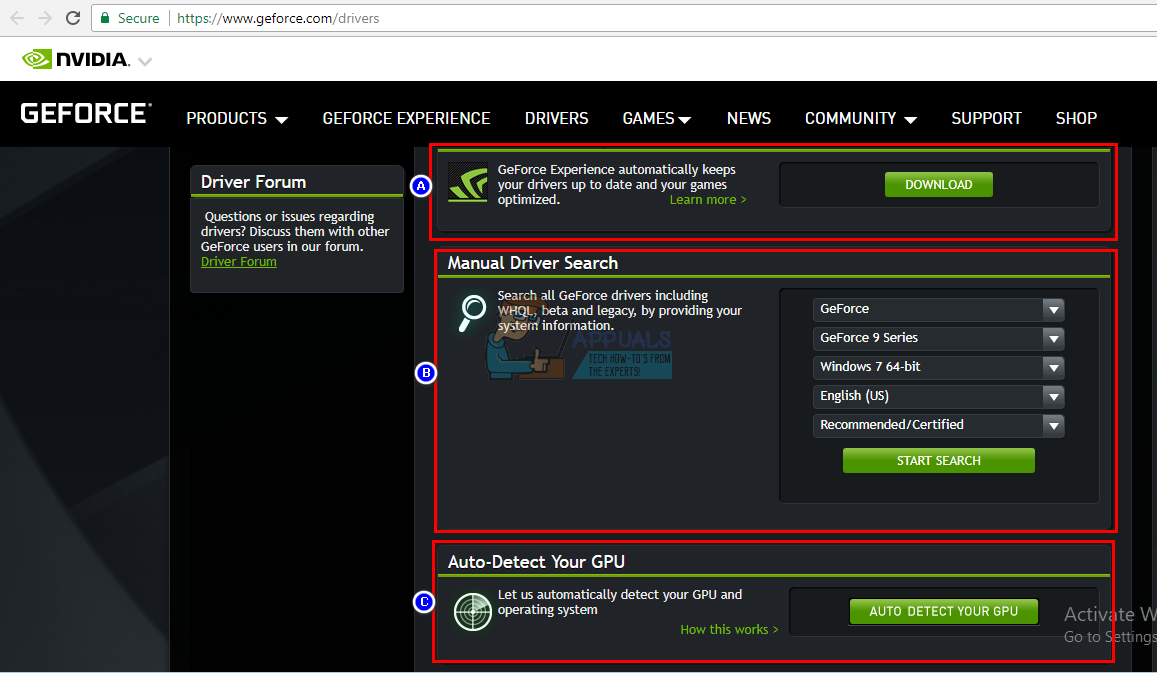
- When searching manually, don’t forget to select your OS e.g. Windows 10 64 bit and also filter your search to include only ‘Recommended/Certified’ drivers because beta drivers are usually faulty.
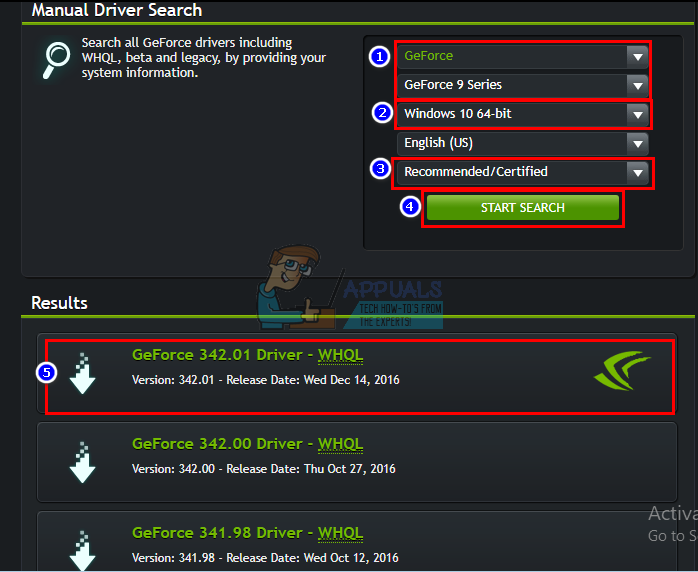
- Download the latest driver (the one at the top of the list)
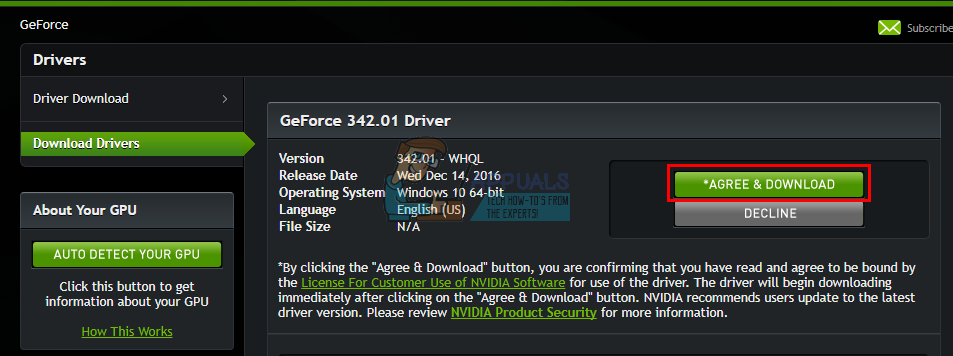
- Run it to install it. Make sure you perform a clean install by checking ‘Perform clean install’ in the NVidia installation window.
Method 4: Uninstall and reinstall your drivers
If your computer previously worked with known drivers, then there is a possibility your drivers are corrupt and you will need to uninstall and reinstall them. You can use DDU (Display Driver Uninstaller) from here or:
- Press Windows Key + R to open Run
- Type devmgmt.msc and hit enter to open device manager
- Expand the ‘Display adapters’ section
- Right click on your NVidia Graphics drivers and select ‘Uninstall Driver’
- In the confirmation message that comes up, click Yes/Uninstall to uninstall your drivers. Your screen will have a very low resolution after this. Do not worry, that is supposed to happen.
- Now install the drivers again. If you do not have the drivers with you, use method 2: Step 2 above to find the drivers for your laptop, or method 3 to find the drivers for your desktop computer.
Настройки дисплея NVIDIA недоступны. Используемый дисплей не подключен к ГП NVIDIA


Ошибка, при которой настройки дисплея NVIDIA недоступны, может возникнуть, если на ноутбуке используются две видеокарты: дискретная и интегрированная. В случае подобного сбоя панель управления NVIDIA просто не открывается. Чтобы решить проблему, необходимо проверить драйвера графического адаптера и его работоспособность. Рассмотрим способы, как устранить ошибку видеокарты NVIDIA.
Содержание
- 1 Диспетчер устройств
- 2 Автоматическое обновление драйвера
- 3 Системная служба NVIDIA
- 4 Установка драйверов вручную
- 4.1 Шаг 1: скачивание драйверов
- 4.2 Шаг 2: удаление устаревшего ПО
- 4.3 Шаг 3: удаление адаптеров в диспетчере устройств
- 4.4 Шаг 4: установка актуальных драйверов
Диспетчер устройств
Самый быстрый способ решить проблему при возникновении ошибки настроек дисплея NVIDIA – это использовать Диспетчер устройств для проверки работы адаптера. Для этого нужно сделать следующее:
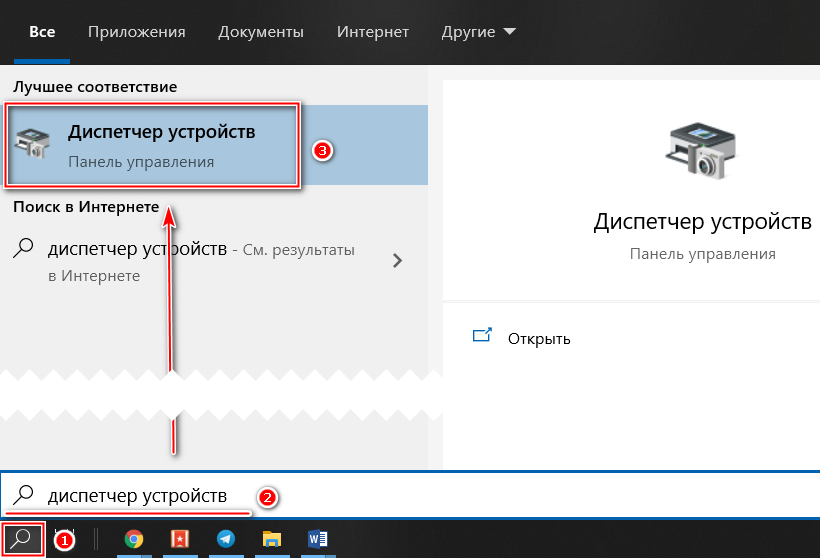
- Откройте системный поиск, который находится в нижней панели Windows 10. В поисковой строке введите «Диспетчер устройств».
- В окне появится результат поиска. Кликните по приложению.
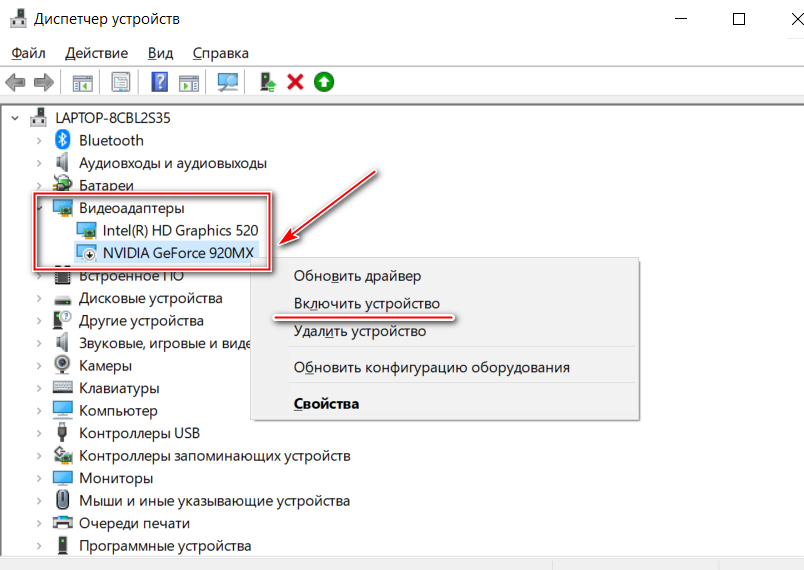
- Раскройте раздел с видеоадаптерами.
- Если устройство NVIDIA не активно, и рядом с ним отображается значок в виде стрелки, нажмите по нему правой клавишей мыши и в появившемся меню выберите пункт «Включить устройство».
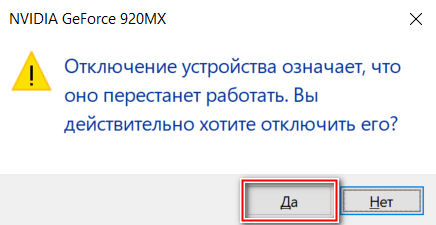
Если видеоадаптер уже включен, попробуйте перезагрузить его. Для этого вызовите контекстное меню и выберите пункт «Отключить устройство». Появится предупреждающее окно, в котором нужно подтвердить действие.
Автоматическое обновление драйвера
Еще один быстрый способ решить проблему видеоадаптера. Системные средства Windows позволяют переустановить драйвера оборудования автоматически. В некоторых случаях проблемы с устройствами возникают из-за устаревшего ПО. Чтобы произвести обновление, действуйте следующим образом:
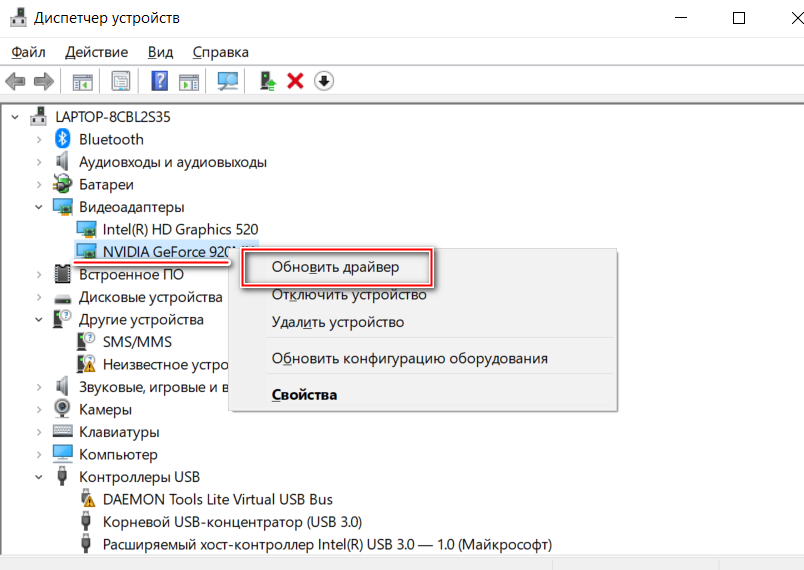
- Перейдите в «Диспетчер устройств» способом, который описан выше и найдите видеоадаптер NVIDIA.
- Кликните правой клавишей мыши по устройству и выберите пункт «Обновить драйвер».
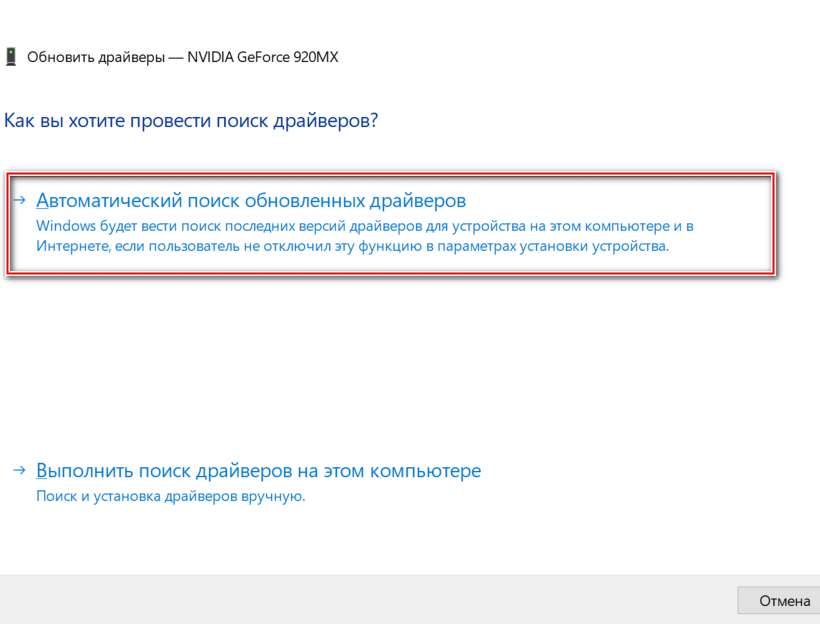
Нажмите на кнопку «Автоматический поиск обновленных драйверов».
То же самое можно проделать со встроенным графическим адаптером Intel. Система проверяет наличие актуального программного обеспечения на официальных ресурсах, поэтому способ является безопасным и надежным.
Системная служба NVIDIA
Иногда системная служба контейнера NVIDIA отключается в аварийном режиме. Неполадка устраняется через приложение Windows «Службы» следующим образом:
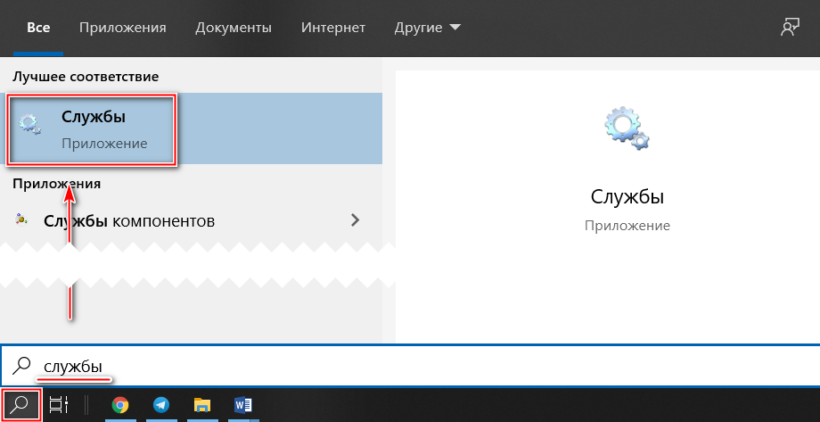
-
Через системную поисковую строку найдите утилиту «Службы» и запустите ее.
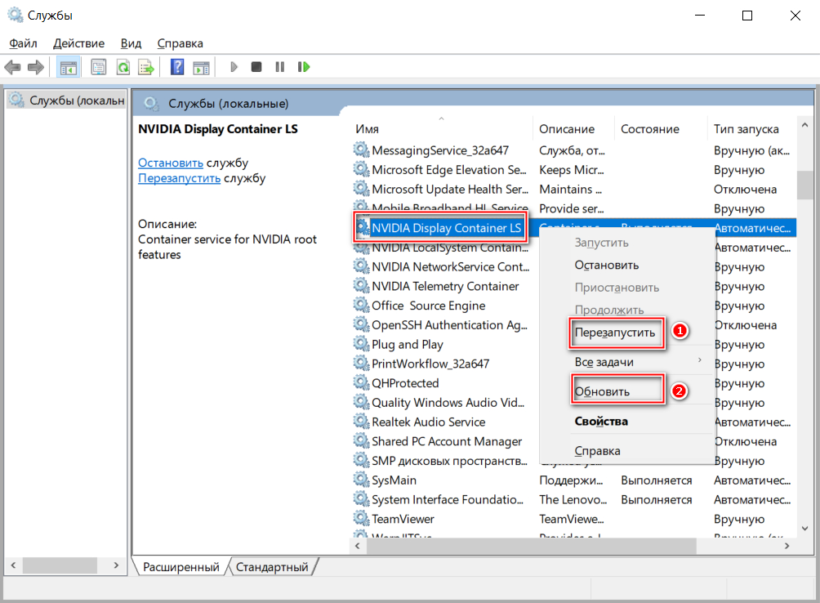
Щелкните правой кнопки мыши напротив службы NVIDIA Display Container LS, затем нажмите на пункты «Перезапустить» и «Обновить» по очереди.
После закройте приложение «Службы» и перезагрузите ноутбук.
Установка драйверов вручную
В том случае, если вышеприведенные способы не помогли устранить ошибку, из-за которой настройки параметров дисплея NVIDIA недоступны, рекомендуем полностью переустановить драйвера обоих графических адаптеров. Для этого следуйте шагам руководства ниже.
Шаг 1: скачивание драйверов
Сначала необходимо найти актуальное ПО на официальном сайте производителя. Для этого потребуется выяснить название ноутбука и его модель.
Обычно производитель указывает сведения о своем продукте на наклейке, которая находится на нижней части корпуса. Также существует альтернативный способ посмотреть это – через диалоговое окно «Выполнить».
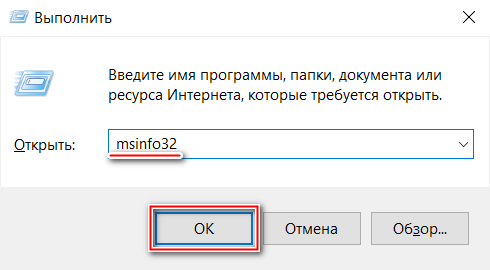
Вызовите приложение комбинацией клавиш Win + R , затем пропишите команду msinfo32 . Для запуска утилиты нажмите на «ОК» или Enter .
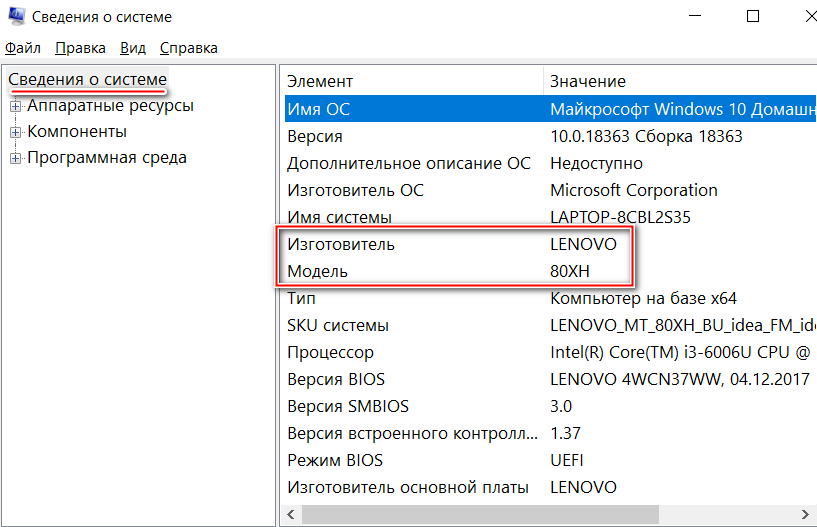
В разделе «Сведения о системе» в списке сведений найдите пункты «Изготовитель» и «Модель». По ним нужно искать драйвера для ноутбука.
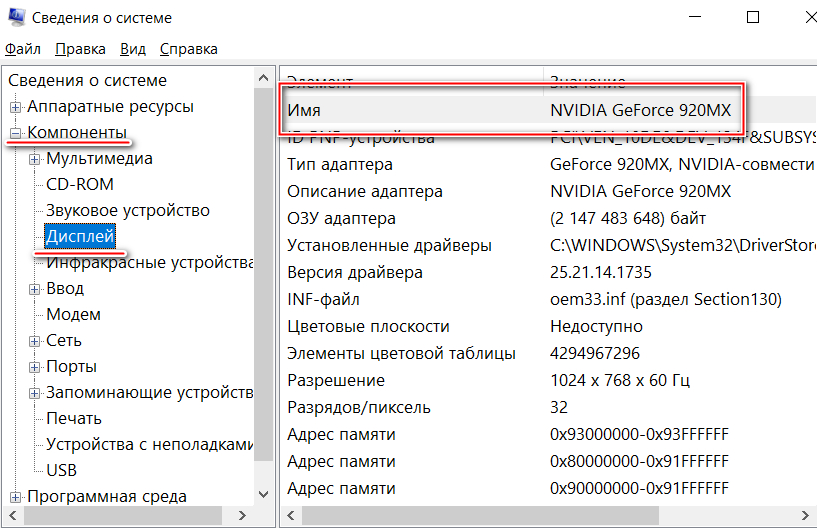
В приложении «Сведения о системе» в разделе «Компоненты» находятся сведения о графической подсистеме. По модели ноутбука найти драйвера для видеокарты не всегда есть возможность, поэтому нужно перейти в раздел «Дисплей», чтобы посмотреть название и модель видеоадаптера.
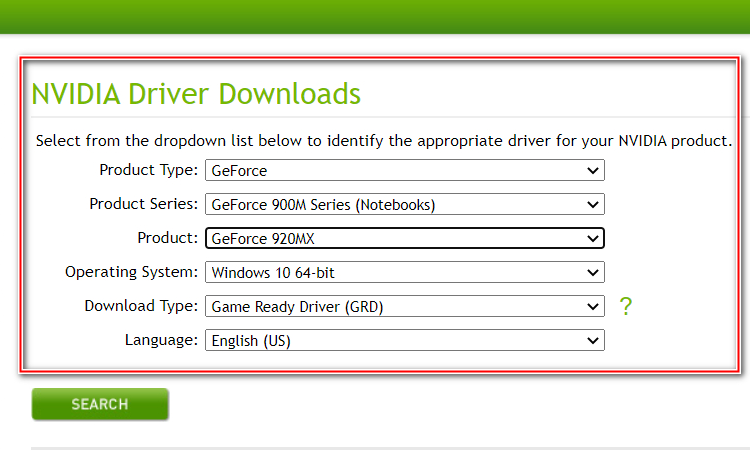
- Перейдите в браузере на официальный сайт производителя NVIDIA чтобы скачать драйвера.
- На сайте NVIDIA будет предложено самостоятельно выбрать тип и серию установленной видеокарты, а также версию и разрядность операционной системы, язык. Кликните на кнопку Search, чтобы найти ПО на сайте.
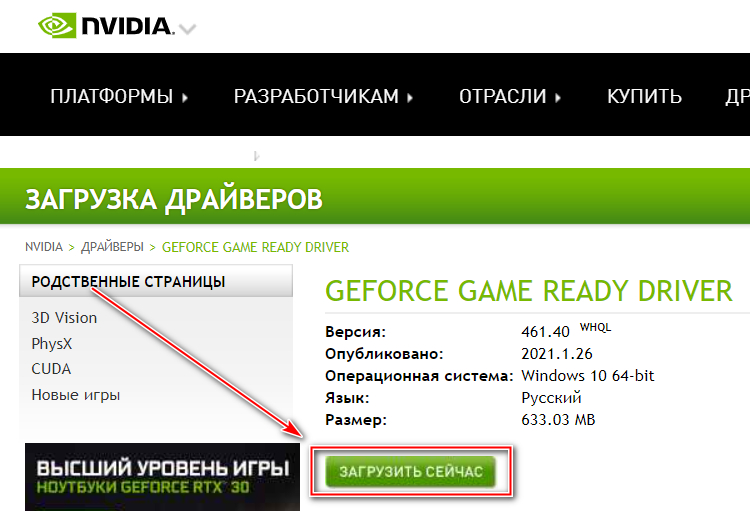
Для скачивания нажмите на соответствующую кнопку под информацией о найденной драйвере.
На сайте можно воспользоваться альтернативным поиском подходящего драйвера. Для этого нужно нажать на кнопку автоматического подбора ПО под формой заполнения параметров адаптера. Через некоторое время система будет проанализирована, и сайт предложит скачать нужный софт.
То же самое проделайте с программным обеспечением для адаптера Intel: перейдите на официальный сайт производителя, отыщите драйверы и загрузите их.
Шаг 2: удаление устаревшего ПО
Теперь необходимо удалить софт NVIDIA, который установлен на ноутбуке. Сделать это можно через раздел «Приложения и возможности» Параметров Windows 10 («Установка и удаление программ»):
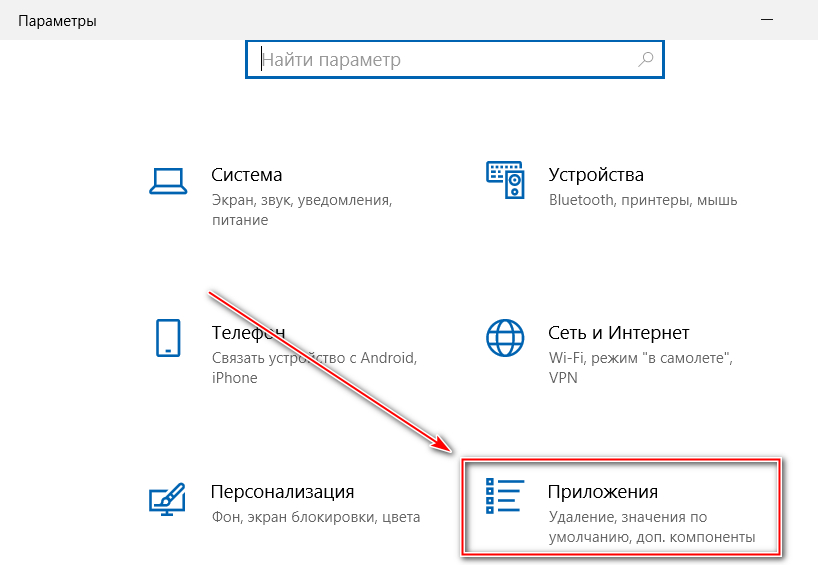
- Одновременно зажмите клавиши Win + I , чтобы перейти в Параметры системы.
- Перейдите в раздел «Приложения».
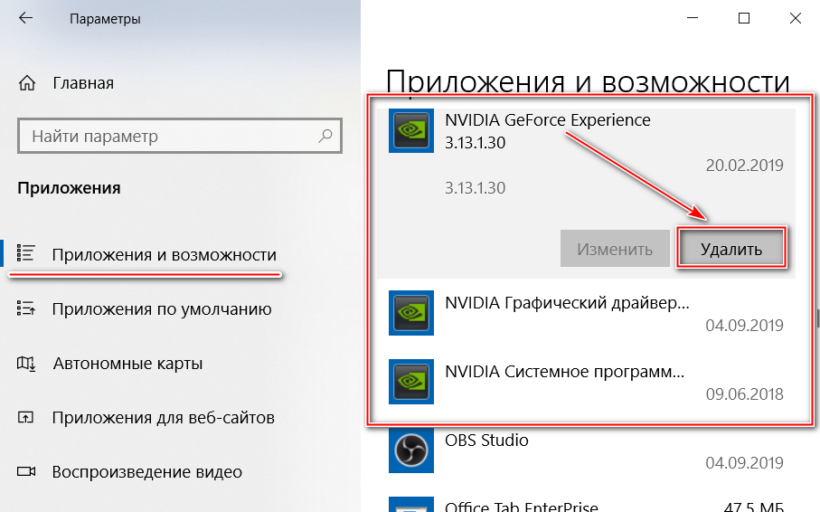
В разделе «Приложения и возможности» в списке установленного софта найдите компоненты программного обеспечения NVIDIA и удалите их все, кликнув левой клавишей мыши по названию и нажав на соответствующую кнопку.
Шаг 3: удаление адаптеров в диспетчере устройств
Чтобы избавиться от конфигурации устаревших видеоадаптеров, которые могут негативно влиять на последующую работу ноутбука, нужно снова перейти в диспетчер устройств и найти графические адаптеры. Щелкните правой кнопкой мыши по названию компонента и в появившемся меню выберите пункт «Удалить устройство».
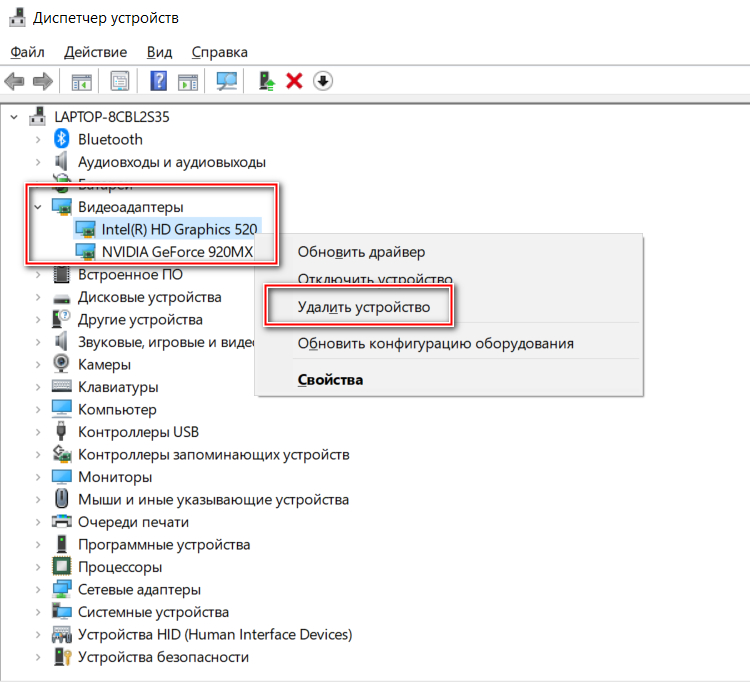
В следующем окне подтвердите действие. Проделайте данную операцию с обоими видеоадаптерами. После процедуры потребуется перезагрузка операционной системы.
Шаг 4: установка актуальных драйверов
Последним этапом станет установка скачанных на первом шаге драйверов. Найдите установочный файл программы и запустите его. Откроется мастер инсталляции и подробная инструкция: нужно действовать согласно подсказкам утилиты. Проделайте процедуру сначала с ПО от Intel, затем NVIDIA. После перезагрузите ноутбук, чтобы системные изменения вступили в силу.
Итог
Если возникает ошибка «Используемый дисплей не подключен к ГП NVIDIA», то системные средства Windows позволяют решить проблему без использования сторонних утилит. Самая распространенная причина – это сбой в работе графического адаптера, поэтому его нужно перезапустить. Кроме того, устаревшие драйвера влияют на работоспособность ноутбука в целом. Обновить их можно автоматически или вручную. Также следует проверить службы ОС и перезапустить их при необходимости.
Fix: NVIDIA Display Settings are Not Available
The error message “NVIDIA display settings are not available” usually occurs when the computer prompts you that you are not currently using a display attached to an NVIDIA GPU. If you are not using the display of the GPU, you will not be able to access the NVIDIA display settings.
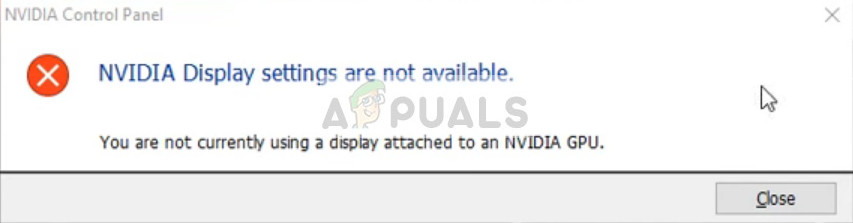
This error is very widespread and happens due to several different reasons. Either you may have the display connected to a wrong port or this might be a driver problem. We will go through the workarounds one by one starting with the easiest and work our way down.
Note: Before you start with any of the solutions down below, navigate to the device manager (Windows + R and “devmgmt.msc”) and disable your GPU. After disabling it, enable it again. The problem was solved for the majority of the cases using this workaround.
Solution 1: Checking display connection
The first and foremost thing which you should check is the port where your display is connected. There are usually two ports where you can attach your display cable. Either you can connect the display to your Intel integrated graphics or to your NVIDIA graphics hardware. This is where most of the people get confused.
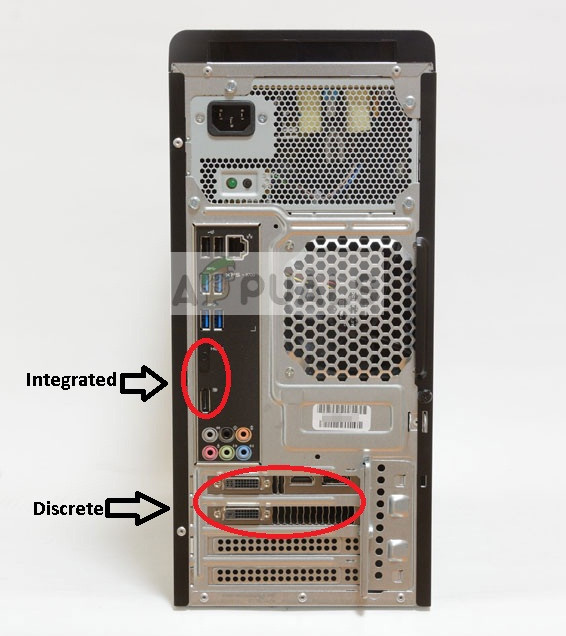
The port which is integrated with the motherboard is the display which is outputted by Intel HD graphics. The display which you see downwards is the display that is connected with your graphics hardware.
Make sure that the connection to your monitor is plugged into the graphics port (also known as a discrete port as shown above) present in your system. Restart your computer after making the change and see if this fixes the error message under discussion.
Solution 2: Changing the adapter output
If you have correctly connected the display cable to your graphics card and the error message still persists, it is worth a shot trying either a converter or changing the form of output from the graphics hardware.
You can either try using a VGA to HDMI Converter and use the HDMI port on your graphics card. Either this or you can change the form of output directly, for example, using a Display port instead of HDMI or VGA. Do some combinations on your own and see if this does the trick.
Solution 3: Checking NVIDIA Display Driver Service
NVIDIA has a service running on your computer which manages the display driver. It provides support to your operating system and is basically a middleware between your NVIDIA hardware and your operating system. There are cases where this service is stopped and because of this, the computer fails to detect your NVIDIA hardware.
- Press Windows + R, type “services.msc” in the dialogue box and press Enter.
- Navigate through all the services until you find NVIDIA Display Driver Service. Right-click it and select Properties.
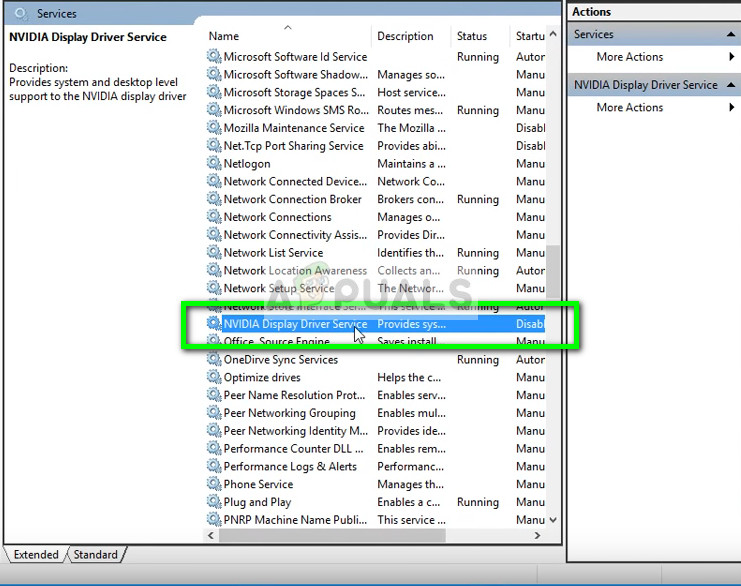
- Set the Startup type as If the Start button doesn’t highlight for clicking, press Apply and it will.
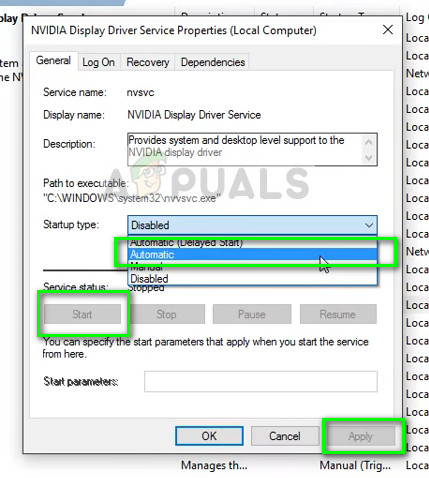
- Once you have made sure the service is up and running, check if the error message still persists.
Solution 4: Updating/rolling back Graphics drivers
We will try updating your NVIDIA hardware either manually or automatically. Furthermore, we will also use an application named as Display Driver Uninstaller (DDU). This will ensure that all remnants of the old display driver are removed so they don’t make problems for us in the future.
Furthermore, if updating the drivers don’t work for you, you should consider rolling back the drivers to a previous build. There are many cases where the newer driver isn’t stable with your device and causes problems.
- Install the utility Display Driver Uninstaller. You can continue without this step but this ensures that there are no remnants of the drivers.
- After installing Display Driver Uninstaller (DDU), launch your computer in safe mode. You can learn how to boot your computer into safe mode by reading our article on it.
- After booting your computer into safe mode, launch the display driver uninstaller.
- After launching the application, select the first option “Clean and restart”. The application will then automatically uninstall the installed drivers and restart your computer accordingly.
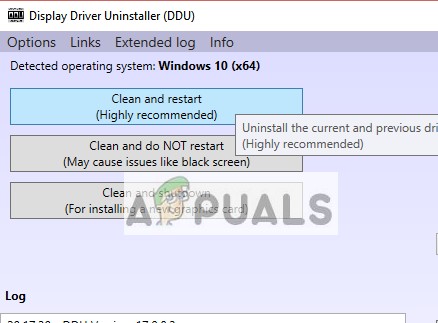
- Boot your computer back into safe mode, press Windows + R, type “devmgmt.msc” in the dialogue box and press Enter. In most cases, the default drivers will be installed against the hardware. If not, right-click on any empty space and select “Scan for hardware changes”.
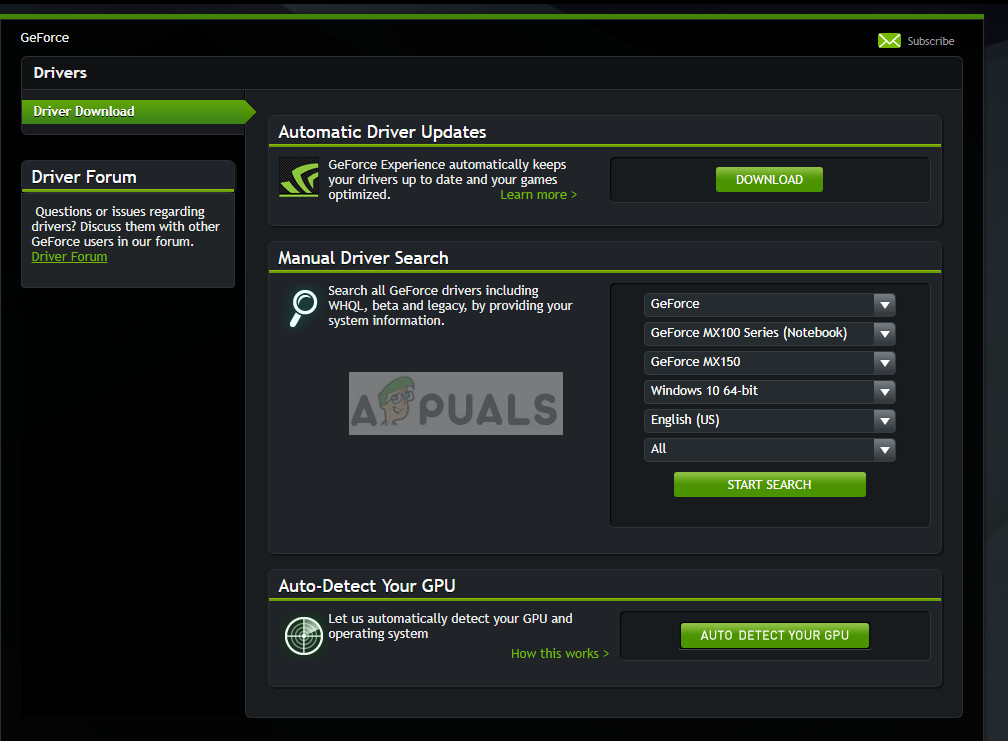
- Now there are two options. Either you can search online for the latest driver available for your hardware from the NVIDIA’s official website. (and install manually) or you can let Windows install the latest version itself (search for updates automatically).
First, you should try updating the hardware automatically. Right-click on your hardware and select “Update driver”. Select the first option “Search automatically for updated driver software”. Choose the second option if you are updating manually and select “Browse for driver” and navigate to the location where you downloaded.
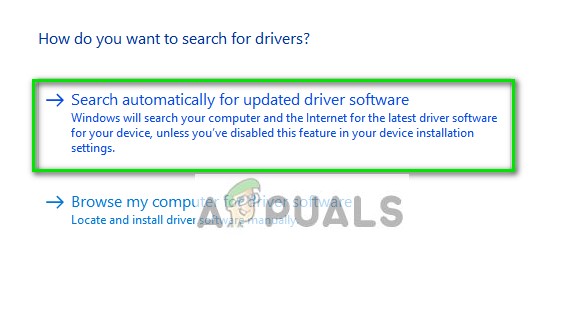
- Restart your computer after installing the drivers and see if the error message “NVIDIA Display settings are not available” still persists.
4 Ways to NVIDIA Display Settings Are Not Available
What is the error that NVIDIA display settings are not available? How to solve the error that NVIDIA Control Panel display settings are not available? This post from MiniTool will walk you through how to fix this NVIDIA problem.
It is common for you to encounter the error that NVIDIA display settings are not available when you are not using a display attached to an NVIDIA GPU. Therefore, when coming across the error that NVIDIA display settings are not available, it means that you are not able to access the NVIDIA display settings.
Hence, in the following part, we will show you how to fix the error that NVIDIA display settings are not available.
Note: Before proceeding on the following solutions, you can go to the Device Manager and disable GPU first. Then enable it again. After that, check whether the error that NVIDIA display settings are not available is solved. If not, try the following solutions.
Solution 1. Check Display Connection
In order to solve the error that NVIDIA display settings are not available Windows 10, you can try checking display connection. You need to check whether the port the display connects is correct. You can choose to connect the display to the Intel Integrated graphics or to your NVIDIA graphics hardware.
In addition, make sure that your monitor is connected with the graphics port. After that, reboot your computer and check whether the error that NVIDIA display settings are not available you are not using a display attached to an NVIDIA GPU is solved.
If this solution is not effective, try another one.
Solution 2. Change Adapter Output
If you come across the error that NVIDIA Control Panel display settings are not available, it is recommended to try to change the adapter output.
You can try using a VGA to HDMI Converter and use the HDMI port on your graphics card. After that, reboot your computer and check whether the error that NVIDIA display settings are not available Windows 10 is solved.
Solution 3. Change NVIDIA Display Driver Service Status
In order to fix the error that NVIDIA display settings are not available, you can choose to check the status of NVIDIA display driver service.
Now, here is the tutorial.
- Press Windows key and R key together to open Run dialog.
- Then type services.msc in the box and click OK to continue.
- In the pop-up window, scroll down to find NVIDIA Display Driver service and right-click it to choose Properties to continue.
- Then change its Startup type to Automatic and change its Service status to Started.
- Click Apply and OK to save the changes.
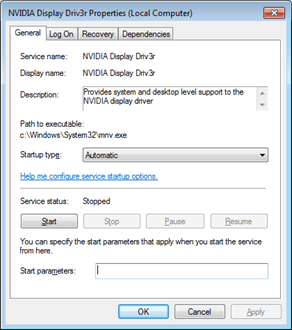
When all steps are finished, reboot your computer and check whether the error that NVIDIA display settings are not available is solved.
Solution 4. Update NVIDIA Drivers
To fix the error that NVIDIA display settings are not available, you can choose to update graphics drivers.
Now, here is the tutorial.
- Click here to go to the GeForce driver download center.
- You can find your driver by manually searching. Or you can also use the Auto-detect your GPU feature.
- Then download the latest NVIDIA driver. When downloading, please take your Windows OS version into consideration.
- After that, reinstall the NVIDIA driver.
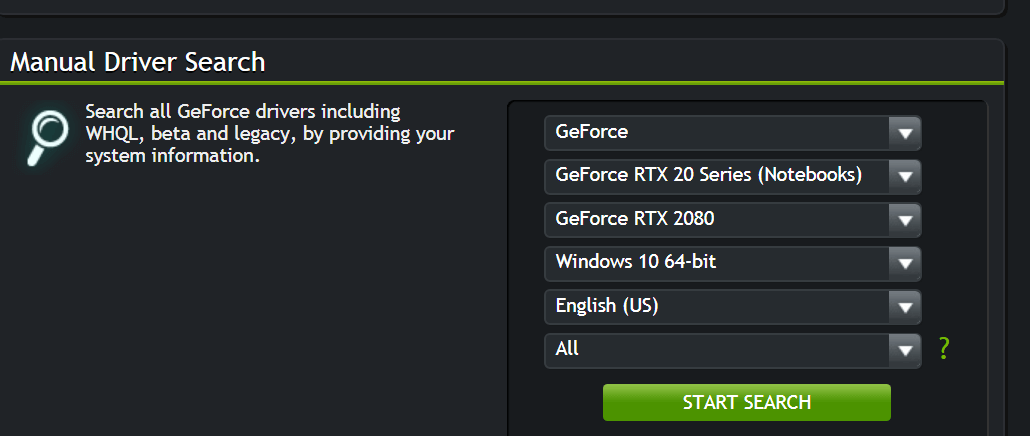
When it is finished, reboot your computer and check whether the error that NVIDIA display settings are not available is solved.
Final Words
To sum up, this post shows 4 ways to fix the error NVIDIA display settings are not available. If you come across the same issue, try these ways. If you have any better solution to fix the error NVIDIA display settings not showing up, you can share it in the comment zone.
About The Author
Tina is a technology enthusiast and joined MiniTool in 2018. As an editor of MiniTool, she is keeping on sharing computer tips and providing reliable solutions, especially specializing in Windows and files backup and restore. Besides, she is expanding her knowledge and skills in data recovery, disk space optimizations, etc. On her spare time, Tina likes to watch movies, go shopping or chat with friends and enjoy her life.