У вас большие запросы!
Точнее, от вашего браузера их поступает слишком много, и сервер VK забил тревогу.
Эта страница была загружена по HTTP, вместо безопасного HTTPS, а значит телепортации обратно не будет.
Обратитесь в поддержку сервиса.
Вы отключили сохранение Cookies, а они нужны, чтобы решить проблему.
Почему-то страница не получила всех данных, а без них она не работает.
Обратитесь в поддержку сервиса.
Вы вернётесь на предыдущую страницу через 5 секунд.
Вернуться назад
How To Record Vocals In Ableton (Simple Guide)
![]()
If you are wondering how to record vocals in Ableton, then look no further.
By following our simple step-by-step guide, you’ll be recording vocals in no time!
Let’s jump straight in…
Contents show
What You Will Need:
- Computer
- Ableton
- Audio interface
- Headphones
- Microphone
- Cables
If you are not sure what an audio interface is, the simplest way to think of it is as a translator that translates your audio input into information your computer can understand and process.
They allow you to hook up microphones via (XLR) cables for vocal recordings or live instruments that can be plugged directly into the audio interface.
They have a headphone jack and audio-out channels for studio monitors (speakers).
I use the Focusrite Scarlett 2i2, which has two audio input channels, although you can find audio interfaces with more input channels if you need them, say, for recordings drums.
You will need closed-back headphones for recording. That way, the sound won’t escape from your headphones while you are recording.
I use the Beyerdynamic DT 770 PRO (80ohm) headphones for this purpose, which is industry standard. However, you can use any closed-back headphones.
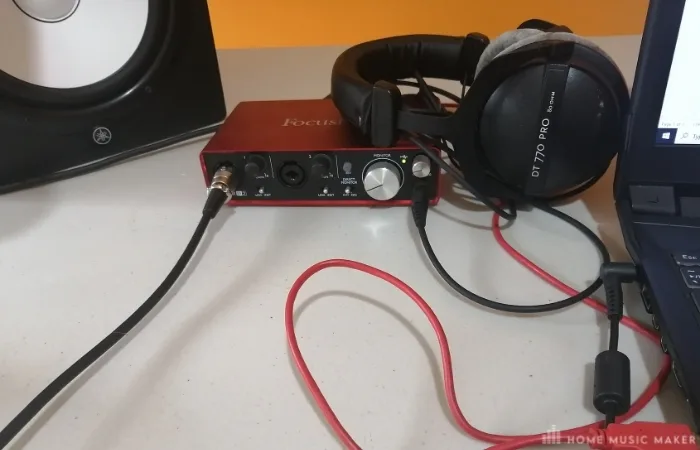
Lastly, you will need a microphone. There are different opinions on which microphones to use for vocal recording or other instruments.
I use an SM58 microphone for recording vocals and live instruments.
Step 1: Make Sure All Your Cables Are Plugged In
- Make sure the audio interface is connected to your computer
- Your microphone is plugged into the input channel on your audio interface
- Your headphones are connected to the audio interface
For this tutorial, I am going to assume that you do not have studio monitors. If so, that is fine; headphones will do. However, if you do have studio monitors – plug them into the audio-out channels at the back of the audio interface.
You will also want to turn the monitor volume knob down so that there is no audio playing back loudly while you record.
Also, make sure that the headphone’s volume knob is turned up a little bit so you can hear the audio playback.
Step 2: Set Up The Interface In Ableton Live
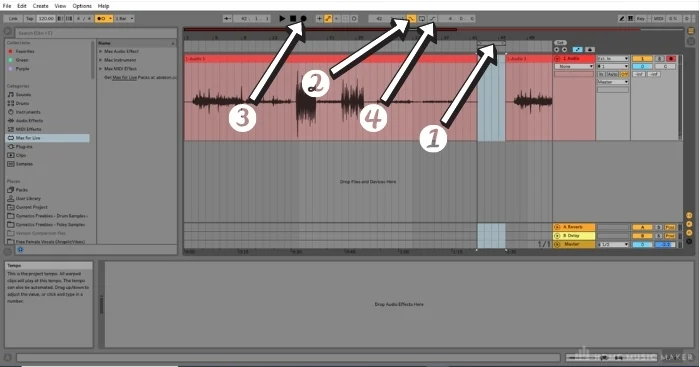
In Ableton Live go to Options > Preferences > Audio. (1&2)
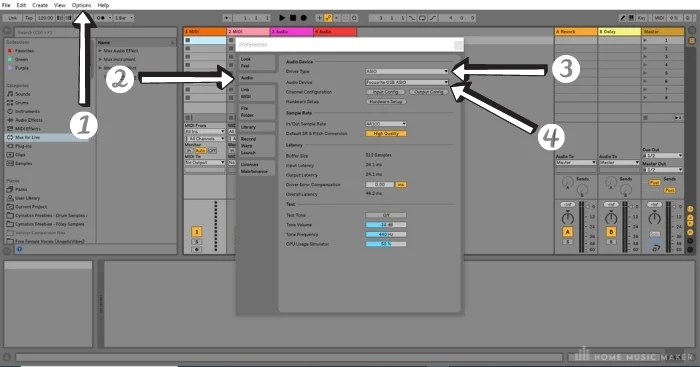
Next, you will want to set the metronome to on by clicking the two circles icon. (2)
When you record, you will hear the metronome play to the BPM, which can help you stay in time. If you want to change the time signature, you can use the time signature box to the left of the metronome icon.
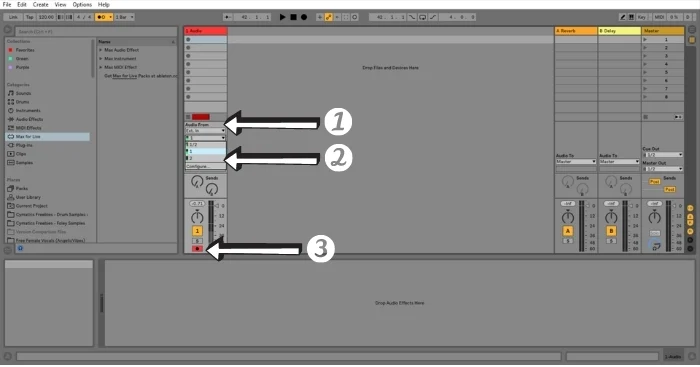
Step 4: Arm A Track For Recording
- First of all, you will need to have an audio track to record on.
- Once you have that, you should set the Audio From option in the second drop-down menu to the channel that matches the number of the channel that your microphone or instrument cable is connected to.
In my instance, my microphone is plugged into channel one (the first input) on my audio interface – so I select channel one.
3. Next, you will arm the track for recording by hitting the Arm Session Recording button on the track.
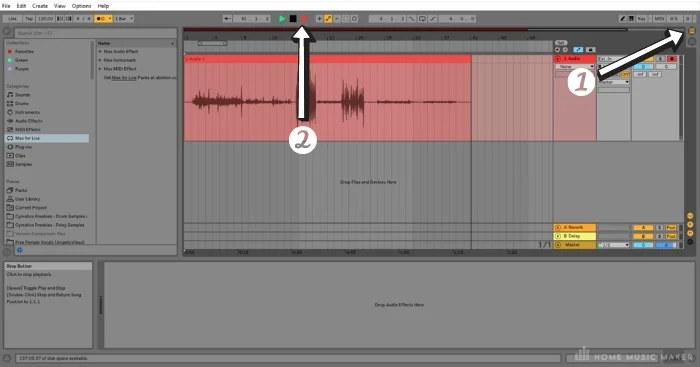
Step 5: Time To Start Recording!
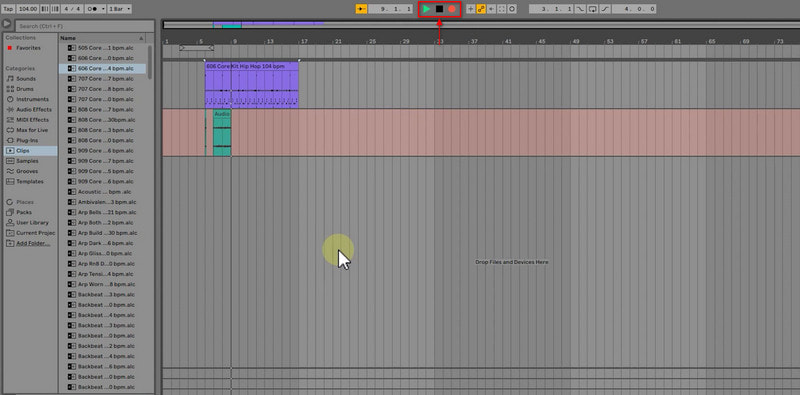
To record audio, I use the arrangement view in Ableton Live. This is because I like seeing the audio clip being made while I record. It can also help me spot any audio spikes (caused by the audio being too loud) as I record.
So for the sake of this guide, I suggest switching to the arrangement view. (1)
Hit the Arrangement Record Button (or simply – the record button) up the top of the DAW and begin recording. (2)
Hit the stop button or spacebar to stop your recording.
Recording at a set point in the arrangement
- To dictate where your recording starts, you can move the Loop Start/Punch-In Point slider to a point in the arrangement where you would like to record.
- Then click the Punch-In Switch button up the top of the DAW, which looks like a slide.
- You can then click anywhere on the arrangement before that point and hit record. Ableton will then record your audio from the start of the Loop Start/Punch-In Point slider.
- If you want the recording to stop at the end of the slider, click the Punch-Out Switch button two icons to the right of the Punch-In Switch, which looks like a step-ladder.
A couple of tips for recording audio in Ableton Live
Check your input volume. You don’t want your audio peaking too loud or clipping.
You do this on the audio interface and not in the DAW.
Find the gain switch, which will be beside the input channel where you plugged your mic or instrument cable and adjust it so that your audio input does not exceed -6db on the audio track’s fader.
This will avoid the possibility of clipping and allows for headroom for mixing, processing, and adding effects.
Make sure the noise from your headphones does not bleed into the recording. This can happen if the metronome is too loud.
You can turn the metronome volume down using the blue metronome volume switch on the master track.
How To Record Vocals In Ableton – FAQ
What Do you Think Of Ableton DAW For Recording?
Honestly, I think that recording in Ableton is straightforward. I could never figure out how to record audio in FL Studio, but perhaps that DAW just wasn’t the right for my recording purposes. In Ableton, I can set up and record a track in a couple of minutes.
How Do You Record Vocals Without A Mic?
You can use your laptop’s inbuilt microphone to record audio, just set it as your input configuration using ASIO as your Driver Type. You will still need to use headphones, so make sure that you have a set plugged into your laptop.
Does Ableton Have Guitar Amps?
Ableton Live Suite has an Amp plugin.
Why Do You Hear Crackling Or Glitches When Recording Guitar?
Faulty cables can cause this, especially with the jack coming loose on the instrument cable. This can also happen if the instrument is too loud to record properly.
Is Ableton Good For Recording Vocals?
Yep. Ableton is excellent for recording vocals.
What Level Should I Record Vocals At?
Is There A Free Autotune?
Finals Words
Recording vocals in Ableton is a pretty straightforward process, and by following the simple steps above you should find the whole process a cinch.
With the right setup, you can get your vocal track sounding like they were professionally recorded by a sound engineer and help take your music production to the next level.
Want to connect with other music producers for help and guidance?
Join our FREE forum today and become part of our community!
Click Here
Простое руководство, как записать вокал в Ableton на Mac или Windows
Digital Audio Workstation (DAW) — это программа, способная записывать, редактировать и создавать звук. Ableton — одна из наиболее популярных цифровых аудио рабочих станций (DAW), которую выбирают многие продюсеры и авторы песен. Он имеет понятный интерфейс, по которому можно ориентироваться независимо от того, являетесь ли вы новичком или экспертом в области аудиозаписи. Если вы хотите научиться как записать вокал в Ableton, рассчитывайте на этот пост. Этот пост поможет вам записать звук с помощью этой программы. Кроме того, он предоставит полезные советы, которые могут вам помочь. Для начала перейдите к следующим частям.
СПИСОК РУКОВОДСТВ Часть 1. Подготовка к записи вокала в Ableton Часть 2. Как записать вокал в Ableton Часть 3. Советы по записи вокала Бонус: мощный диктофон, который нельзя пропустить Часть 4. Часто задаваемые вопросы о записи вокала в Ableton
Часть 1. Подготовка к записи вокала в Ableton
Прежде чем приступить к записи вокала с помощью программы, необходимо сделать следующие приготовления. Прежде чем записывать вокал, вам необходимо настроить все необходимое. Основное оборудование для записи вокала — это компьютер, микрофон, аудиоинтерфейс, студийные наушники и программа. Необходимо убедиться, что ваше оборудование работает правильно и готово к работе.
Часть 2. Как записать вокал в Ableton
Прежде всего подключите к программе микрофон. Подключите кабель XLR вашего микрофона к входу аудиоинтерфейса с помощью конденсаторного микрофона. Кроме того, если вы используете USB-микрофоны, вы можете подключить их напрямую к компьютеру.
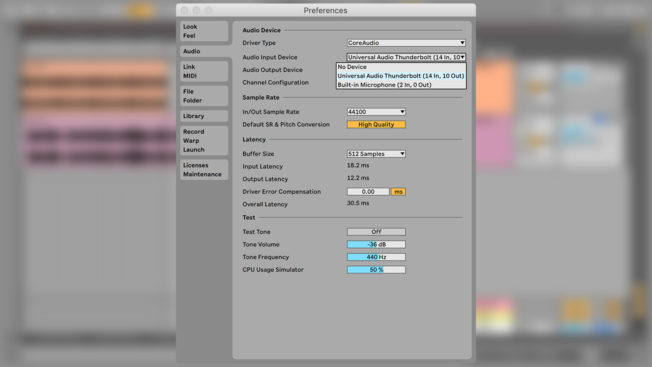
Чтобы настроить микрофон в программе, найдите значок Файл , перейти к Предпочтения , выберите Аудио вкладка, а затем Устройство аудиовхода . Кроме того, убедитесь, что вы также выбрали Устройство вывода звука , к которому подключены наушники. Выбирать Встроенный выход если ваши наушники подключены к настольному компьютеру.
Найдите Панель управления , измените темп песни и включите Метроном кнопку для синхронизации с вашей записью. После включения кнопки она начнет тикать после нажатия кнопок «Запись» или «Воспроизведение». При записи вокала лучше использовать бит или инструментальную дорожку. Это может быть гитара, фортепиано или скрипка, импорт семпла или добавление существующей аранжировки. Если вы хотите синхронизировать ноты по времени с темпом, включите технологию квантования Ableton во время записи, где вы сможете легко контролировать и корректировать синхронизацию нот. В меню «Правка» включите Квантование записи и выберите счетчик, на котором ноты будут фиксироваться при записи.
При создании новой звуковой дорожки для записи вашего вокала нажмите CMD+Т если вы пользователь Mac и CTRL+Т если вы пользователь Windows. После этого откройте Вход/выход микшера раздел. Выберите вход для микрофона из Входной канал выбирающий. После этого вы можете начать запись вокала, нажав кнопку Запись аранжировки кнопка на Панель управления раздел. Если вы хотите слышать воспроизведение своего голоса во время записи, перейдите к Вход/выход микшера раздел, чтобы включить эту опцию. Далее нажмите кнопку Красный в окружении Кнопка над интерфейсом, чтобы начать запись вашего вокала. После этого нажмите эту кнопку еще раз или просто нажмите кнопку Пробел . После этого вы можете добавить к записанному вокалу реверберацию, задержку и другие эффекты, если хотите. Чтобы сохранить файл, перейдите в раздел Файл вкладка, перейдите к Сохранить живой набор , и затем он сохранит записанный вами вокал.
Часть 3. Советы по записи вокала
В этой части будут представлены советы, которые помогут вам записать вокал. Следующие рекомендации помогут вам профессионально записать свой вокал.
◆ Прежде всего убедитесь, что вы разогрели свой голос. Важно выполнять упражнения для разминки вокала, чтобы убедиться, что ваш голос готов петь и выступать. Если вы не выполнили разминку, у вас может возникнуть голосовое перенапряжение, что приведет к ухудшению производительности или, что еще хуже, к повреждению голоса.
◆ Запишите песню как минимум на два дубля. При этом ваш голос разогревается, и вам становится комфортно с направлением и динамикой песни.
◆ Применяйте технику компинга для записи вокала по частям. Это называется компиляцией, так как это сокращение от компиляции.
◆ Во время записи необходим микрофон, поэтому вам следует выбрать микрофон получше.
◆ Звук помещения для записи имеет огромное значение при записи вокала. Это важный ключевой элемент в достижении большего результата.
◆ Рассмотрите возможность сотрудничества с другим вокалистом. Благодаря этому вы сможете обмениваться комментариями после каждого дубля, что поможет вам улучшить свою производительность.
◆ Убедитесь, что вы слышите свой голос во время записи. Важно убедиться, что певец слышит микс, так как это позволит ему чувствовать себя комфортно во время записи.
◆ Было бы лучше использовать поп-фильтр, чтобы предотвратить искажение звука нежелательными взрывными согласными.
◆ Не используйте слишком много реверберации или других эффектов, чтобы получить приятный записанный результат.
Бонус: мощный диктофон, который нельзя пропустить
ArkThinker Устройство записи экрана имеет встроенные функции, позволяющие записывать видео, аудио, игры, окна, веб-камеру и телефон. Эта программа имеет мощные функции записи, позволяющие записывать ваш голос и даже исключать ненужные части. Для этого вы можете вручную сохранить важные части на временной шкале или установить время в параметрах времени начала и окончания. Эта программа может записывать и воспроизводить желаемый высококачественный звук. Как только вы закончите запись, записанный вами звук будет помещен в историю записи. Оттуда вы можете наблюдать за своим результатом, если вам нужно. Если вы хотите использовать программу с удобным интерфейсом, совместимую как с Mac, так и с Windows, рассчитывайте на эту программу. Чтобы начать процесс, перейдите к представленным шагам для записи вокала.
Загрузить и установить
Загрузите и установите программу на свой настольный компьютер. После процесса установки запустите программу, чтобы начать работу.
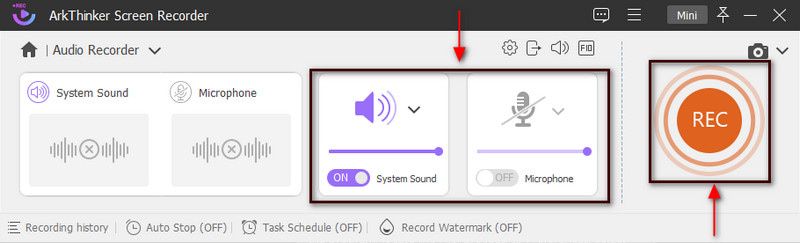
В главном интерфейсе программы откройте Аудиозапись. После этого вы попадете к параметрам записи. Оттуда включите Системный звук и Микрофон и в то же время отрегулируйте их громкость. После этого нажмите кнопку РЭЦ кнопку, чтобы начать запись вашего вокала.
Начать запись вокала
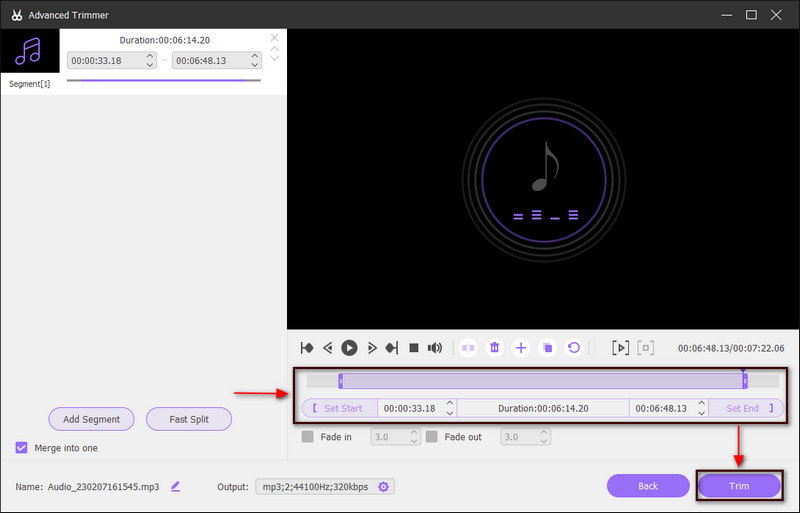
Как только запись начнется, начните записывать свой вокал. Кроме того, вы можете использовать это, чтобы разогреться, попрактиковаться или спеть всю песню. После этого вы сможете прослушать записанный вами вокал и перезаписать его. Например, если вы хотите сделать паузу на минуту, нажмите кнопку Пауза кнопка. Закончив запись вокала, нажмите кнопку Красная коробка это означает Останавливаться . После этого на вашем экране появится еще одно окно, где играет записанный вами вокал. Ударь Расширенный триммер кнопку, чтобы удалить ненужные части из записанного звука. После этого нажмите Подрезать чтобы успешно удалить их. После этого вы вернетесь в окно предварительного просмотра.
Сохранить записанный вокал
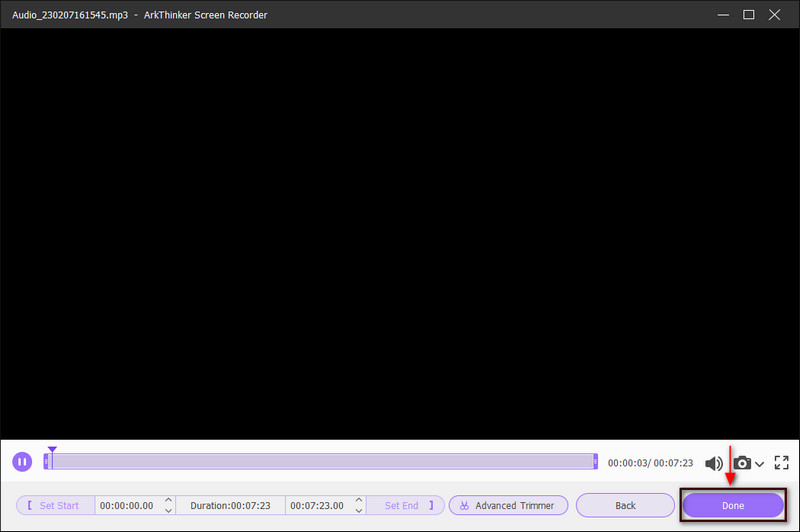
После завершения нажмите кнопку Сделанный кнопку, чтобы сохранить записанный вокал. После этого вы попадете в историю записи, где вы сможете найти свой результат в верхнем списке.
Часть 4. Часто задаваемые вопросы о записи вокала в Ableton
Могут ли новички использовать Ableton?
Если вы новичок и начинаете изучать битмейкинг и написание песен, вы можете использовать эту программу. Эта программа является одной из самых популярных для создания музыки. Он обычно используется продюсерами хип-хопа и электронной музыки из-за композиции, основанной на петлях.
Сколько времени нужно, чтобы научиться пользоваться Ableton?
Говорят, что вам понадобится больше полугода, чтобы научиться правильно пользоваться программой. Вам понадобится время, чтобы воспользоваться всем, что он предлагает. Кроме того, при обучении использованию этой программы вы сосредоточиваетесь на изучении основ.
Ableton все еще бесплатен?
Бесплатная версия Ableton предлагает лишь ограниченные функции и треки. Вам будет предоставлена бесплатная 30-дневная пробная версия для всех версий.
Заключение
При записи вокала необходимо выбрать приложение для записи, которое удовлетворит пользователей. Чем лучше приложение для записи, тем лучше будет результат. В этом посте представлена информация о том, что нужно подготовить, и советы, которые следует учитывать при записи вокала. Кроме того, это поможет вам включить Квантование Ableton во время записи. С учетом вышесказанного вы многое узнали об Ableton. Кроме того, вы можете использовать ArkThinker Screen Recorder для простой и удобной записи звука.
Что вы думаете об этом посте. Нажмите, чтобы оценить этот пост.
Рейтинг: 4.9 / 5 (на основе 438 голоса)
How To Record Your Vocals in Ableton Live – Step By Step
Whether you’re recording Hip-Hop, Pop or Rock, the vocals will be the song’s main focus. So, you’re going to want to record them well while also being able to set up the session quickly and easily. In this article, we’re going to look at how to do this in Ableton Live, step by step.
Using Ableton is really easy, so you will be able to get great vocals in no time at all. We’ll see what kind of microphones you can use, how you will get the sound into Ableton, and what plugins you can use to achieve the sound you’re looking for.
Contents show
How Do I Record Vocals in Ableton Live?
To record vocals in Ableton Live, you’ll need a microphone, an XLR cable, an audio interface, a computer, and the DAW. You’ll need to:
- Set up the mic.
- Set the gain level.
- Define your settings and arm the track in Ableton.
- Press record.
It’s really that simple, but keep reading for an in-depth explanation of each step.
Choose a Microphone
Various kinds of microphones can be used for recording vocals. In general, condenser mics are favored over others as they better document the nuances of the human voice. They are more sensitive to vocal dynamics and allow the singer to move around more freely without influencing the gain too much.
Despite being more common, condenser microphones aren’t the only option. Some singers feel more comfortable with dynamic mics that can be held during the performance or ribbon mics for picking up certain subtleties in the vocals.
No matter which mic you choose, make sure you check if it needs external power to function. This can be with an external amp or phantom power from your audio interface.
Connect Your Mic to a Cable
Most microphones need an XLR cable to function, although some come with a jack output . You’ll need to connect the cable to both the interface and the microphone . Connecting it to the interface first is recommended in case there is a sudden surge of energy that can damage the microphone. Make sure that phantom power is off and all the gain levels are set to zero before making any connections.
Set Up Your Audio Interface
Audio interfaces are devices that will connect your mics to a computer. If yours requires external power, you’ll need to plug it into an electrical outlet. If not, it will be powered by your computer through a USB cable.
Once you have it connected to your computer and have turned it on, you can connect the XLR or jack cable. Again, ensure that the input’s gain level is at the minimum level and phantom power is off.
The interface will have several gain knobs , depending on how many inputs you have. You can start turning them up once the session is set up in Ableton. You’ll also need to make sure your output is connected. This can be speakers or headphones.
Open Ableton Live and Define Your Settings
Once you open Ableton Live, you’ll need to select your interface. Here’s how:
- Click Options , then Preferences , or use Ctrl + , (Windows) or Cmd + , (Mac).
- Go to the Audio section .
- Set your Driver Type , then the Audio Device (select your interface).
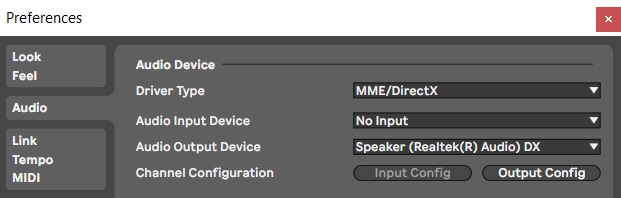
Next, you can see if the inputs are working on either of the two views. They are:
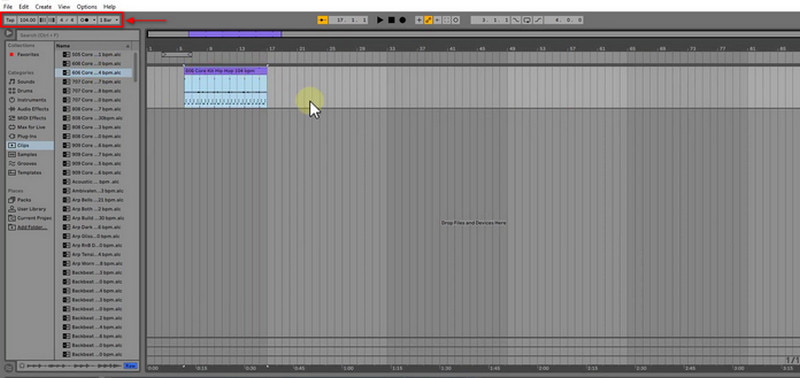
The Session view is where you will see the faders for each track. The Arrangement view is where the waveforms will appear. You can select the inputs on either view.


Get Ready to Record
When you’ve selected the inputs, you can arm each track you want to record with. Use the Arm Recording button (⬤) by the Solo button (S) on either view.
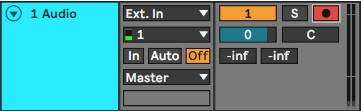
Go to the Session view to see the gain levels . They will appear in the meters . As you turn up the gain on your interface, you will see the meters rise and fall depending on the intensity of the sound being captured by your microphone.
You should aim for a gain level with peaks between -18 and -12dB . These levels are ideal for when you start using plugins. However, it can be hard to always be within this range, especially with vocals, as they are so dynamic. Just try to avoid hitting 0dB, as you will start getting digital clipping , reducing the overall quality of your track.
Aiming for -12dB also gives you more headroom for processing . If all the tracks in the song hit this level, the overall level should be around -6dB. This is a good amount of headroom for mixing the entire song and then moving on to mastering.
You’ll also need to set the BPM for your song. You can do this in the top left-hand corner of the GUI. The default setting is 120 BPM. Then you can choose your time signature and enable the metronome , if necessary.
Start Recording
Once your gain levels are set, you’re nearly ready to record. You just need to press the Record button (⬤) at the top of the screen or use the shortcut F9 . If you are on the Arrangement view, you will see the waveform generating as you record.
![]()
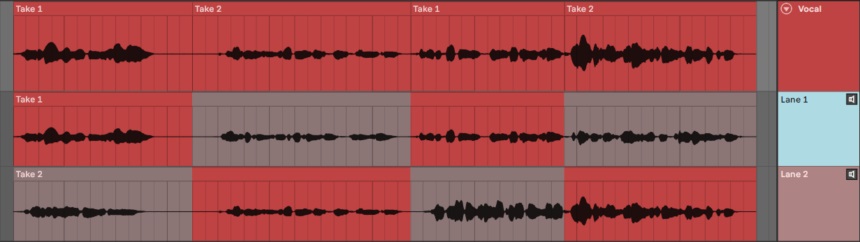
If you’re using Ableton Live 11, you can use Take Lanes to make recording and editing easier. Instead of creating a new track and selecting the input again, you can create a new take lane on the same track and record from the top. You can listen back to each lane by selecting the Audition Take Lane button (��).
When you want to comp the final track , select the sections of each lane that you want to keep and press Enter . Each section will automatically be added to the main lane of the track.
What Effects Should I Add to My Vocals?
When recording, you might want to add some plugins or effects to your vocals to make you feel more confident and comfortable. Here are some examples that can make the process smoother.
Preamp
In analog recording , all microphones are run through a preamp before the sound arrives at the faders. These pieces of hardware usually compress and saturate the signal and can be used for some basic equalizing.
There are plenty of plugins that emulate preamps that you can use at the start of your vocal chain. Unfortunately, Ableton doesn’t have a stock preamp, but you can use other effects to achieve a similar result.
EQ

Equalizing your vocals can tidy up the signal so that you can better perceive your performance. For example, you may want to remove some low-end rumble or cut harsher frequencies that can become present on sibilants (S sounds). You can also boost certain frequencies that enhance your vocals , making them warmer or more present.
Ableton’s EQ Three is a very simple stock plugin with basic equalization controls. If you want to dig a little deeper, try out EQ Eight .
Compressor

Seeing as the human voice is so dynamic, using a compressor can help you control some of the highs and lows in terms of volume . This can make your vocals more present and direct, setting them at the front of the mix.
The Compressor and Glue Compressor stock plugins are easy to use and come with great presets.
Saturator

Analog preamps tend to add harmonic content because of the materials used within them. Using a saturation plugin can give you similar results, making your vocals more present or even distorted if you raise the level too high.
Ableton’s Saturator plugin can quickly add these extra harmonics, making your vocals sound warm and giving them more presence in the mix.
Reverb
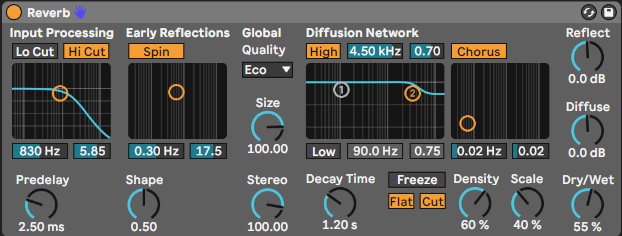
Listening to your own voice in a dry environment can seem strange, as your ear is used to hearing it in the context of a room. Adding some reverb to your vocal track can make it feel more natural. You can choose from smaller spaces like rooms and larger ones like halls.
The Reverb plugin included in Ableton has so many presets for different sounding spaces. It can quickly transform your track and make you feel more comfortable hearing yourself sing.
Is There Any Other Gear I Need to Record Vocals?
There are a few more essentials for recording vocals that are sometimes overlooked. For example:
You should use a sturdy stand to hold your mic for the best results, especially when using condenser or ribbon mics. With condensers, you should also use a shock mount so that the microphone doesn’t pick up vibrations from nearby steps, cars passing outside, air conditioners, etc.
You should also have a pop filter to remove the power from plosive consonants. They are caused by P sounds and are picked up by the microphone with more intensity. As a test, try placing your hand about 7 or 8 inches (20cm) away from your mouth and saying a sentence with lots of Ps (for example, Peter played ping-pong with Patrick). Then place the pop filter between your mouth and your hand, try again, and notice the difference.
Finally, when recording, you should use closed-back headphones to listen to the track you’re singing over and to hear your vocals. Speakers should be avoided as the mic would pick up the sound from them or even feed back in some cases.
Conclusion
You can use Ableton for recording if you have a microphone, a cable, an interface, and a computer. It’s a simple DAW to use, especially for laying down vocals. It has all the functions you need, including gain meters, a metronome, and effects. You can even create take lanes to make recording easier. So, if you want to record vocals for your latest song, try out Ableton and enjoy the results.
Integration is a music website focused on audio advice, how-to, tips & tricks and best plugins (free & paid). Read More…