Программа Diskpart. Форматирование и создание загрузочной флешки или диска через командную строку

Здравствуйте, уважаемые читатели блога MyFirstComp.ru. Сегодня я хочу рассказать Вам о такой замечательной программе, как Diskpart. Что же в ней такого замечательного? — спросите Вы. А то, что с ее помощью можно легко создать загрузочную флешку (здесь читаем как восстановить данные с флешки после форматирования) или диск, и самое интересное — эта программа доступна любому пользователю Windows через командную строку, другими словами, не требует установки. И пускай Вас не пугает словосочетание «командная строка» — использование ее гораздо удобнее и проще, чем кажется на первый взгляд.
Итак, после того, как мы вставили флешку в USB-разъем, запускаем командную строку. Для этого нажимаем Пуск и в строке поиска пишем cmd, и нажимаем Enter.

В появившейся командной строке пишем diskpart, тем самым запуская программу для управления дисками. Нажимаем Enter.

Далее вводим команду list disk и жмем Enter. Отобразятся все подключенные диски и флеш-накопители.

В списке устройств находим нашу флешку — ее можно распознать по размеру. В моем случае это Диск 6. Поэтому далее пишем команду select disk 6. Если Ваша флешка под цифрой 4, то Вам нужно ввести команду select disk 4. Если под цифрой 2, то select disk 2, соответственно. Нажимаем Enter.

Затем вводим команду clean, которая удалит все файлы с флешки или диска. Нажимаем Enter.

Далее создаем раздел с помощью create partition primary. Нажимаем Enter.

Потом вводим команду select partition 1. Таким образом выбираем указанный раздел и перемещаем на него фокус. Нажимаем Enter.

Затем выполняем команду active. Система помечает раздел как активный. Нажимаем Enter.

Теперь необходимо выполнить форматирование флешки в NTFS. Оно может быть быстрым или полным. Полное форматирование выполняется командой format fs=NTFS. Если не хочется ждать и время поджимает, то делаем быстрое форматирование командой format fs=NTFS QUICK. Нажимаем Enter.

Ждем окончания форматирования.

Сейчас необходимо присвоить флешке букву. Делаем это с помощью команды assign. Жмем Enter.

Флешке автоматически назначается буква, и следом за этим срабатывает автозапуск носителя.

Теперь можно завершать работу программы Diskpart. Вводим команду exit и нажимаем Enter.

Последнее, что нужно сделать — это скопировать файлы дистрибутива операционной системы (ту, для которой мы делали загрузочную флешку) на, собственно, наш флеш-накопитель. После этого наша флешка будет загрузочной, и будет загружаться абсолютно везде, на любом устройстве. С ее помощью, можно будет установить Вашу операционную систему где угодно.
Хочу заметить, что с помощью программы Diskpart можно проводить множество манипуляций как с жесткими дисками (здесь читаем как изменить размер жесткого диска), так и с флеш-накопителями. Рассмотренный сегодня пример — лишь малая часть всех возможностей. Другие команды и примеры работы с этой программе я рассмотрю в следующих статьях.
Diskpart: Format USB with Command Prompt
How to format USB drive? The Diskpart format USB drive can help you format write protected usb using cmd. This article will introduce you the specific way to format USB drive.
By Cherry / Updated on May 12, 2023
Share this:
Table of Contents
- “Windows was unable to complete the format”
- Ways to format USB drive successfully
- Solution 1: Disk Management format USB drive
- Solution 2: Diskpart format USB drive
- Solution 3: Format USB drive with AOMEI Partition Assistant
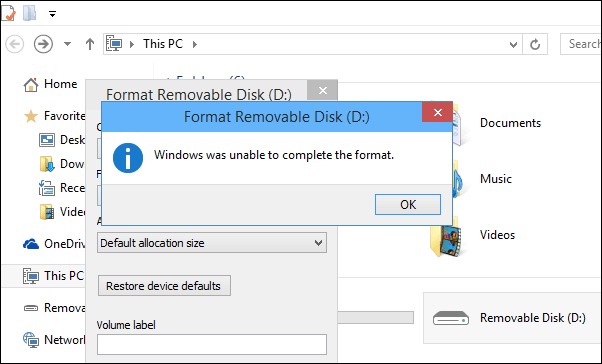
“Windows was unable to complete the format”
Many users would meet the error: “Windows was unable to complete the format” when they try to format their USB drive to FAT 32 or NTFS in Windows Explorer. But why would this happen?
There are many causes that can lead Windows format USB drive failed such as virus infection, storage device damage, or there have bad sectors on the USB drive, or the USB drive is write-protected. Well, how can you format USB drive successfully under those circumstances?
Ways to format USB drive successfully
You may have a lot of problem about those questions, and you may take a lot of measures to overcome those bad situations like kill virus, check bad sectors, or release the write protection, and so on. Actually, there are many easier solutions.
Note: Following operation will wipe your data on USB drive. Please back up important files to safe places like local PC or cloud.
Solution 1: Disk Management format USB drive
When you cannot format USB drive in Windows Explorer, or the USB drive does not show in My Computer or Windows Explorer, you can go to the Windows Disk Management to format USB drive.
Step 1. Open Windows Disk Management by typing “diskmgmt.msc” and pressing Enter in the search box.
Step 2. Right-click the USB drive and select Format at the menu.
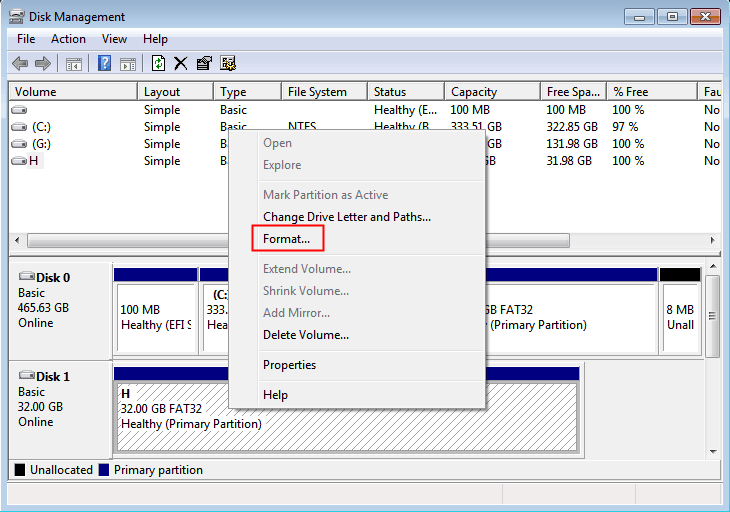
Step 3. Then, select a file system to format USB drive into FAT 32, or NTFS, or others. Click OK to start.
However, if the USB drive is shown as unallocated space in Disk Management, here you need to right-click the unallocated space, select “New Simple Volume” to create new partition for the USB drive. After creating partition on the USB drive, you will find that it has been formatted and it can be recognized by Windows Explorer.
Solution 2: Diskpart format USB drive
Mostly, when the computer cannot recognize a USB drive, you can try to use Diskpart to format USB drive. Diskpart is a built-in tool that manages your hard drives. You can use it to format disk including internal or external hard drive. Diskpart format USB drive is much more effective than Windows Explorer. Here we’ll take an example of how to format USB drive with Diskpart while it is not shown in Windows Explorer.
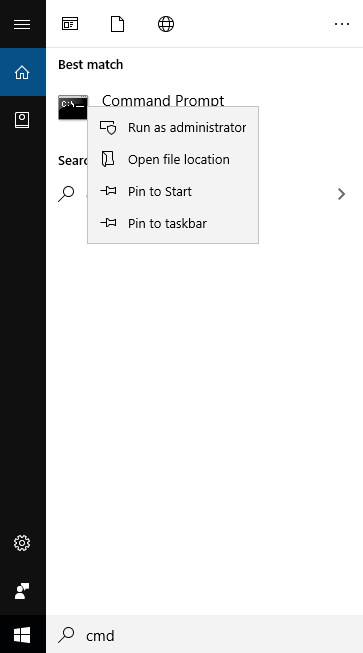
1. Open the command prompt by typing “cmd” at the search box, right-click the program and select Run as Administrator.
2. Then,type “diskpart” and press enter to launch the program.
3. Next, type “list disk” to display all disks on your computer.
4. Type “select disk 1” and press Enter. Here disk 1 is the USB drive.
5. Type “clean” and press Enter.
6. Type “create partition primary”, press Enter.
7. Type “format fs=fat32 quick” or “format fs=ntfs quick” and press Enter to format USB drive to FAT32 or NTFS as you want.
Finally, type «exit» to end up this, and you have already finished the task about Diskpart format USB. Then, you can active the partition and assign drive letter for the USB drive. For all this, Diskpart is dangerous for people who do not familiar with Diskpart cause all the operations cannot be revoked once the progress is launched. Thus, if there is one mistake, you may get into big trouble. Fortunately, there is another easy way to format USB drive that even a noob can do alone.
Solution 3: Format USB drive with AOMEI Partition Assistant
AOMEI Partition Assistant Standard is remarkable free software that can manage your hard drive in Windows 7/8/10/11. You can use it to create/resize/delete/format/move/merge partitions in a few simple mouse-clicks in its intuitive interface. Format USB drive could be much simpler than Windows Disk Management or Diskpart format USB.
Step 1. Plug in your USB drive to your computer. Download the freeware, install and launch it. All disks on your hard dive will be shown on its concise main interface.
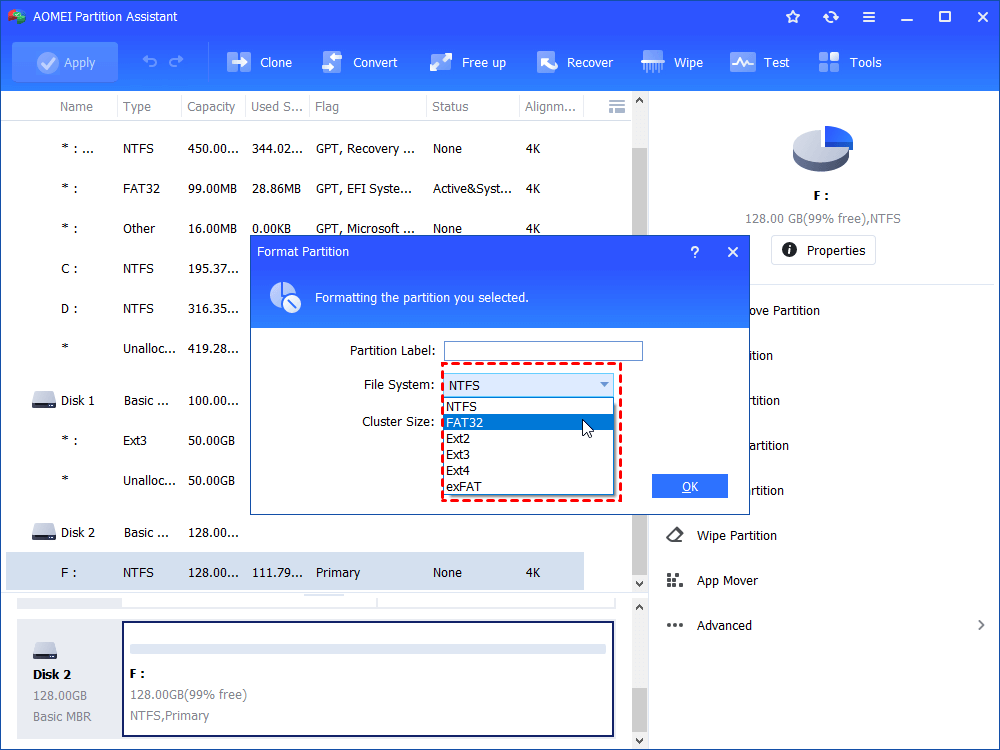
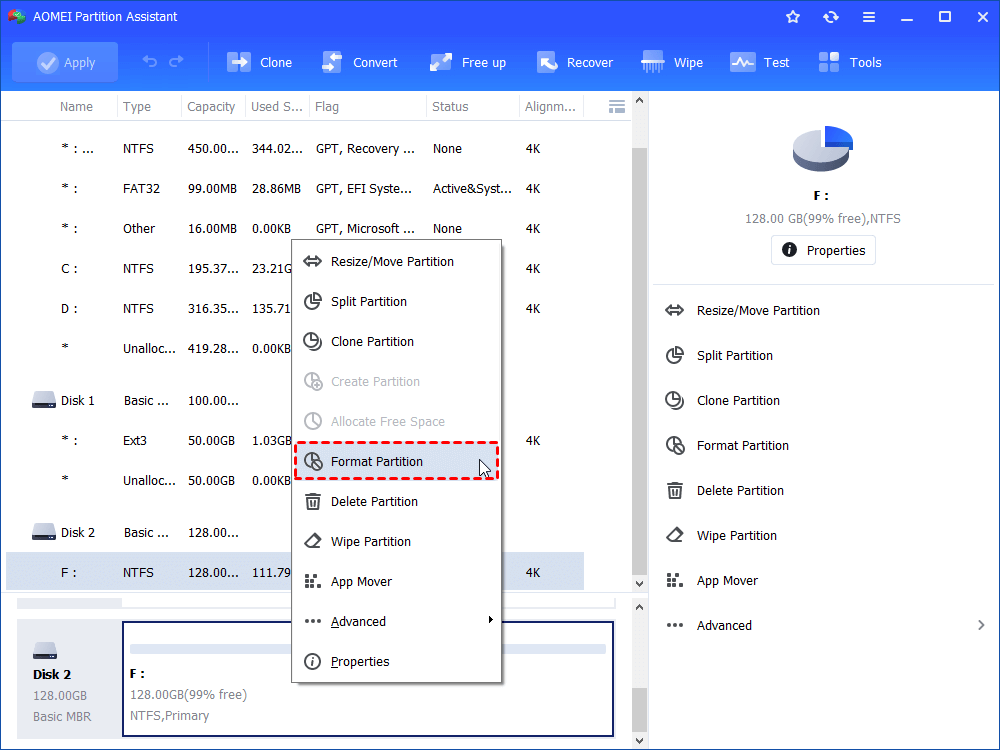
Step 2. Right-click your USB drive, select Format Partition at the drop-down menu.
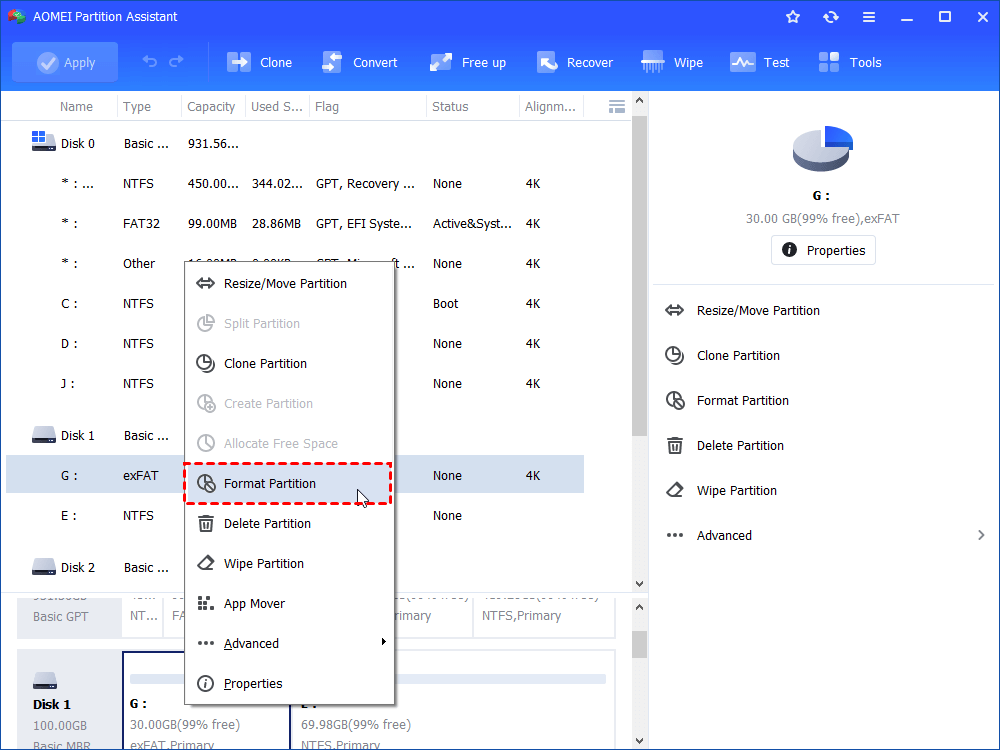
Step 3. Here you can select the file system you need, edit the partition label and the cluster size.
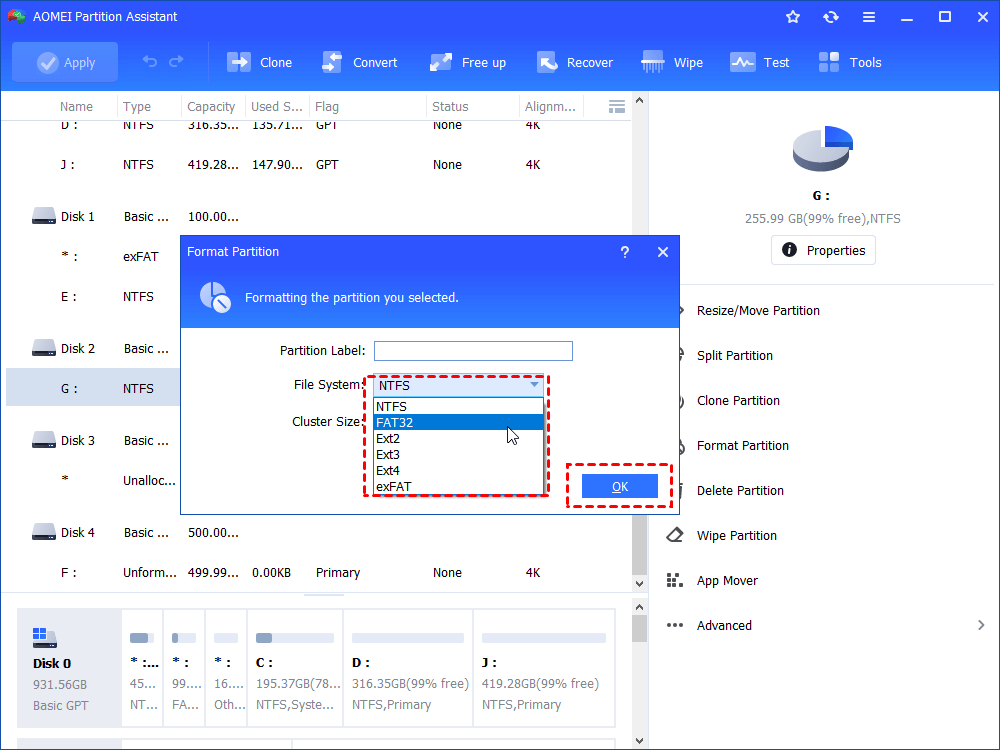
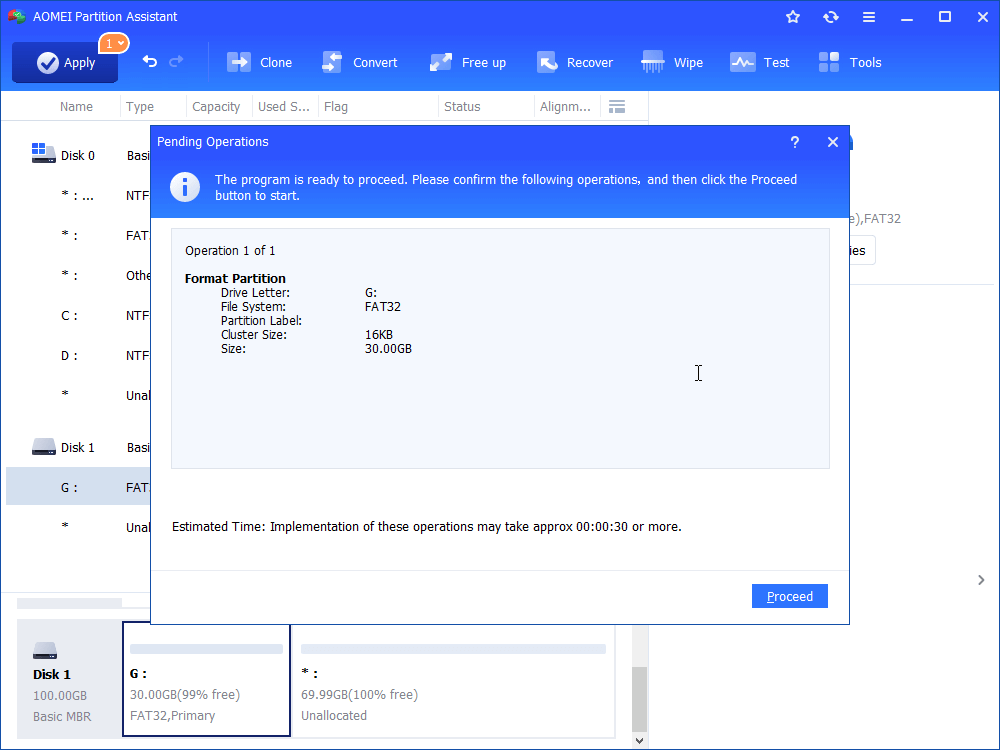
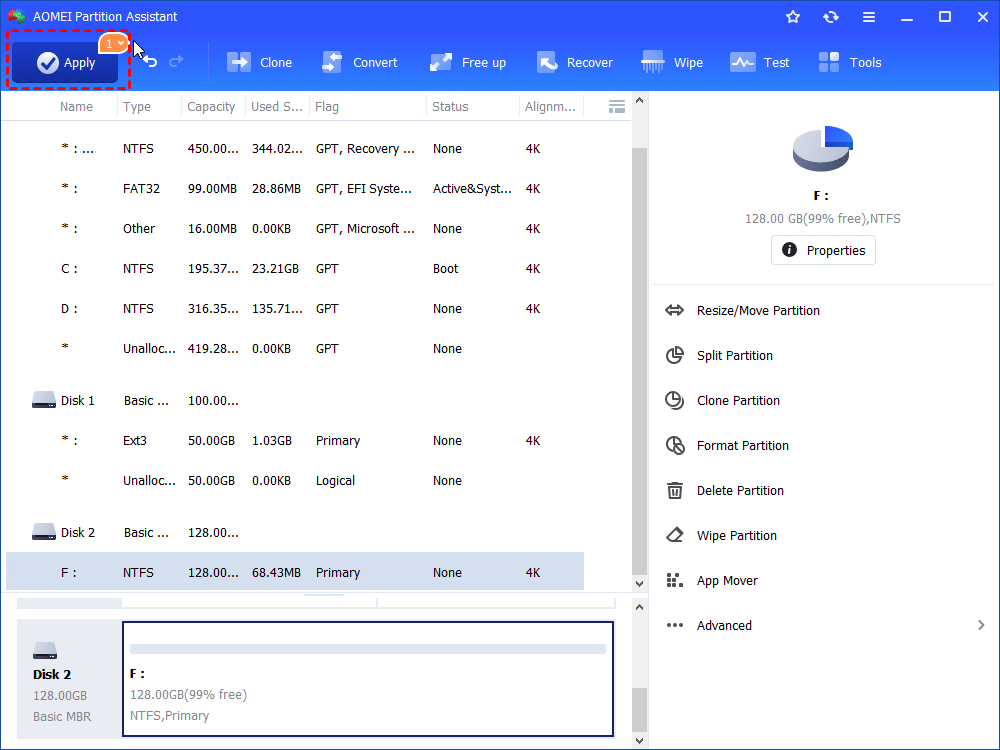
Step 4. Finally, click Apply at the toolbar to submit the operations.
Even though, AOMEI Partition Assistant still provides you the way to partition hard drive from command prompt including format USB drive with command prompt. AOMEI Partition Assistant format USB drive is a good alternative to Diskpart format USB drive. Besides, you can use it to do many other things for managing your hard drive better.
Cherry · Staff Editor
Cherry is an editor of AOMEI Technology, she covers backup & restore, hard disk & partitions management, cloud files transfer, website & database backup and so on for AOMEI. She enjoys helping people find solutions to their problems. She loves traveling, cooking, reading and so on. She takes most of time with her family when she is not working.
Related Articles
Cannot Format USB Drive Write Protected [Solved]
Cannot format USB drive write protected? Refer to this article to get the introduction of write protection and learn how to format write protected USB on Windows 11, 10, 8, and 7.
How to Fix Pen Drive Access Denied in Windows 10, 8, 7 (4 Ways)?
Four solutions for pen drive access denied issue are listed in this post, covering adjusting Windows local group policy, changing drive letter, etc.
Best Free USB Cloning Software to Duplicate Flash Drive
Here introduces a great USB cloning software, which allows you to clone (bootable) USB drive another drive effortlessly.
Free Download to Try AOMEI Partition Assistant Now
The Best Windows Disk Partition Manager and PC Optimizer
Download Freeware

Trustpilot 4.9/5
Diskpart: Format FAT32 via Command Line in Windows 11, 10, 8, 7 (Video Attached)
In this post, you can learn how to use DiskPart to format FAT32 in Windows PC. If you meet the “DiskPart format fat32 volume size is too big” error, you can try the recommended DiskPart alternative.
By Emily / Updated on May 12, 2023
Share this:
Table of Contents
- Need to format hard drive to FAT32
- Full guide: Diskpart format to FAT32 in Windows 11/10/8/7
- Diskpart format FAT32 error -«volume size is too big»
- Free DiskPart alternative: format large drive to FAT32 easily
- Summary
- Video Tutorial
Need to format hard drive to FAT32
No matter you are using a pendrive, SD card, USB flash drive, SSD or other external hard drives to store your data, you will need to format it to FAT32 in the following situations.
①If you plan to use the disk on PS3, Xbox or some other games consoles that only supports FAT32 file system, then you will need to format the disk to FAT32.
②If you want your device to be compatible with more operating systems, like Mac, Linux and some other older versions of Windows including Windows 98, Windows XP, Windows Server 2003, etc, the FAT32 is the best choice.
③If you need to connect your hard drive to a NAS device, but the NTFS won’t allow the NAS device to access the drive, then you need to format or convert NTFS to FAT32.
Full guide: Diskpart format to FAT32 in Windows 11/10/8/7
Usually, you can format a disk to FAT32 in File Explorer and Disk Management. However, if you fail to format hard drive to FAT32 successfully via these two built-in tools and receive formatting errors like «Windows was unable to complete the format» or «The format did not complete successfully», you can turn to DiskPart.exe tool. Below are steps about how to format USB to FAT32 with Command Prompt. You will need local administrator access on the computer to follow these steps.
Warning: The formatting process means data loss, so back up everything important before proceeding. You can back up to cloud or local drive.
Step 1. On your keyboard, press the «Windows + R» at the same time to open «Run» Window, then type «Diskpart» and click «OK» (click Yes if prompted by the User Access Control).
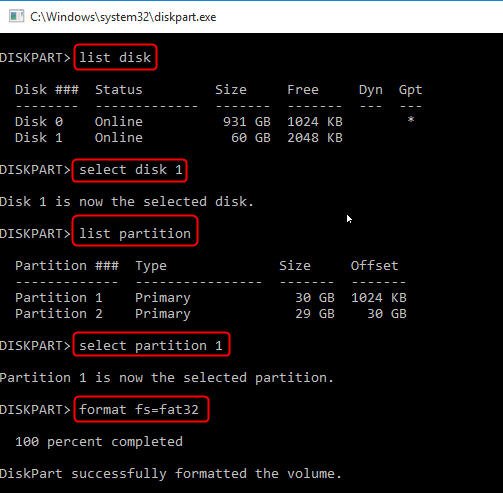
Step 2. DISKPART will open in a command prompt window. And type the following commands in sequence:
- list disk: see all disks connected to your computer, and you need to identify which drive needs to be formatted by size.
- select disk 1: select the disk which contains the target drive.
- list partition: list all partitions on the disk.
- select partition X: X refers the partition number that you need to format.
- format fs=fat32 or format fs=fat32 quick
If the disk is set to be write-protected, you need to run extra different commands to format it to FAT32 via DiskPart.
«list disk >select disk 1 >attributes disk clear readonly >clean >create partition primary >format fs=fat32«
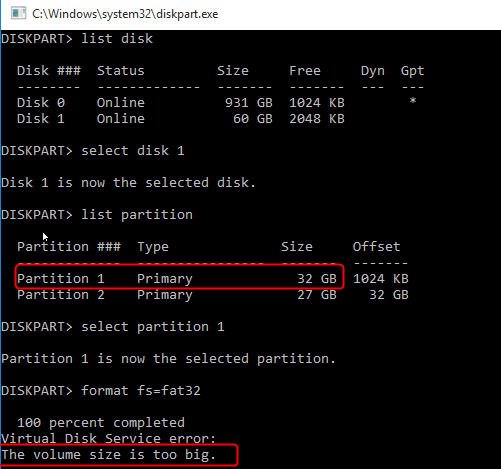
Diskpart format FAT32 error -«volume size is too big»
Although DiskPart is a great choice when Windows Disk Management and File Explorer fail to format hard drive to FAT32, it also shares a common limitation with the other two tools: they cannot format a large drive (over 32GB) to FAT32. When you try to perform such formatting task in Diskpart, you will receive an error message saying «The volume size is too big for FAT32″(as shown in the below screenshot).
Free DiskPart alternative: format large drive to FAT32 easily
When you meet the above-described error message or you are not an expert at running such complicated commands, you can search for a DiskPart alternative to easily format hard drive to FAT32. We highly recommend a free partition manager named AOMEI Partition Assistant Standard. It is easy to use no matter you are either a computer expert or a newbie. It can help format a large hard drive (over 32GB) to FAT32 in below three steps.
Secure Download
Step 1. Download free software. Install and launch it. Right-click the disk partition you want to format as FAT32 and choose «Format Partition». Here we choose a 120GB drive.
Step 2. Select «FAT32» as the file system and click «OK».
Step 3. Back to the main interface, click «Apply» to actually begin formatting the disk.
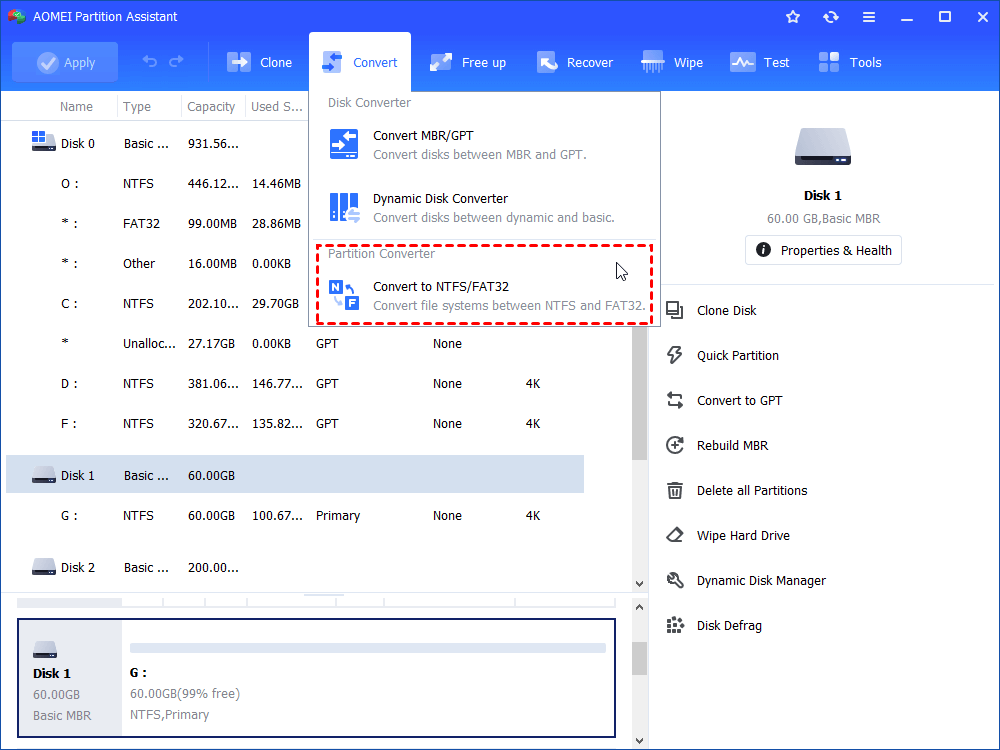
Note: if the large hard drive happens to be with the NTFS file system, you can try AOMEI Partition Assistant Standard’s Convert to NTFS/FAT32 , which allows you to convert file systems between FAT32 and NTFS without formatting or losing data.
Summary
So, when Diskpart format FAT32 disappoints you, AOMEI Partition Assistant Standard can be a great alternative. Besides, it can format write-protected disk directly. If you upgrade to Professional version, more advanced functions will be available, including converting boot disk between MBR and GPT without losing data, recovering lost partitions, cloning MBR disk to GPT and vice versa.
Moreover, you can try AOMEI Partition Assistant Server if you are mainly running Windows Server operating system. That supports both Windows PC and Server computers.
Video Tutorial
Emily · Staff Editor
Emily is an English editor of AOMEI Technology; she has a great passion for providing easy solutions for people to tackle with all disk or partition management problems. In addition to writing articles about disk/partition management, she also edits great tutorials on how to back up and restore disk for data security. In her spare time, she loves to learn computer skill to improve herself or stay with her family to enjoy a good day.
Related Articles
How to Format 2TB hard drive to FAT32 Successfully in Windows 10/8/7
If you want to format a 2TB hard drive to FAT32 file system for better compatibility, you can use the free AOMEI Partition Assistant Standard, which can format large hard drive to FAT32 with ease in Windows 11, 10, 8, 7 computer.
How to Repair Server 2012 R2 Using SFC Scannow Command?
In this article, we will introduce how to use the SF/Scannow command to repair Windows server 2012 R2 boot failure issues step by step. Besides, an easier tool will also be shared to repair Windows Server.
How to Effectively Format EXT4/3/2 in Windows 10/8/7?
It is well known that Windows native tools cannot format Ext4. Here we would like to share you with a free partition manager that can easily format drive to Ext4 in Windows 11, 10, 8 or 7.
Free Download to Try AOMEI Partition Assistant Now
The Best Windows Disk Partition Manager and PC Optimizer
Download Freeware
Trustpilot 4.9/5
Как форматировать флешку в командной строке
Здравствуйте админ, проблема такая, пошёл к приятелю чинить операционную систему, она у него жутко зависала, взял с собой флешку с антивирусной программой, придя, подсоединил «флеху» к USB-порту его ноутбука, но ничего не произошло, накопитель не появился в окне «Компьютер» и в управлении дисками тоже?!
Вытащил флешку и подсоединил к своему ноуту, вышло предупреждение
«Чтобы использовать диск в дисководе F:, сначала отформатируйте его«.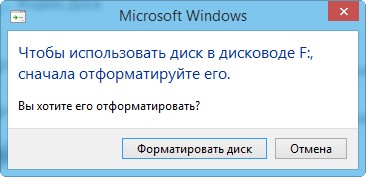
Нажимаю » Форматировать диск «. Начать

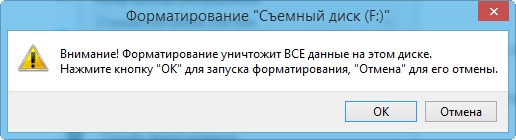
ОК.
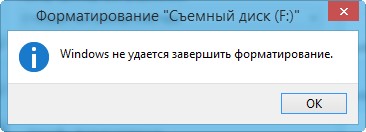
Выходит ошибка: «Windows не удаётся завершить форматирование.
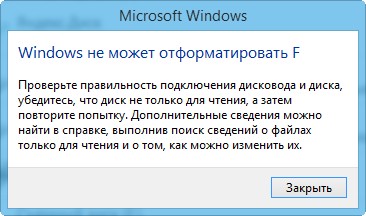
Windows не может отформатировать F. Проверьте правильность подключения дисковода и диска, убедитесь, что диск не только для чтения, а затем повторите попытку».
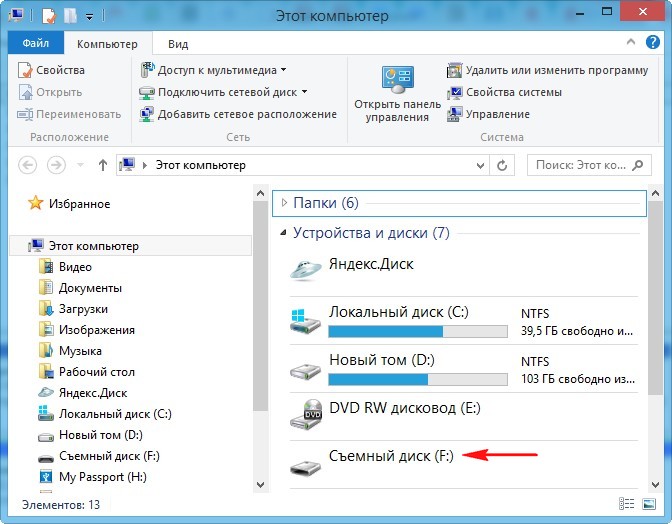
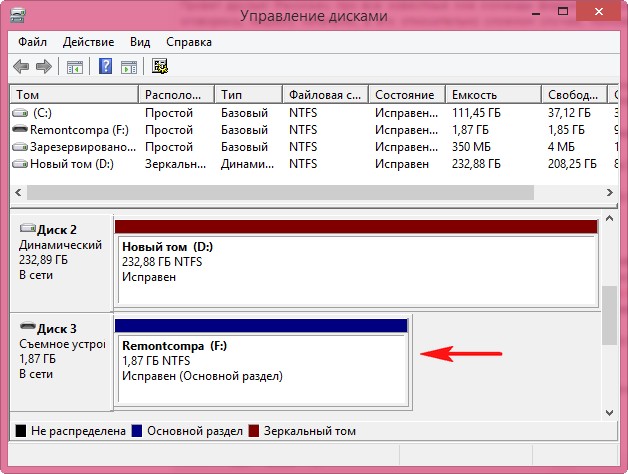
В окне «Компьютер» флешка определяется вот так
Вот думаю и дела, помочь пришёл человеку, а теперь самому помощь нужна стала!
Худо бедно приятелю вопрос решил, откатил его ноут к заводским настройкам, затем пришёл домой и стал думать, что делать со своей флешкой. Полез в интернеты за советами, а их много, да ни один не помогает.
Один чел посоветовал запустить командную строку от имени администратора и ввести команду
format /FS:NTFS F: /q
Вышло сообщение: Вставьте новый диск в дисковод F: и нажмите клавишу ENTER.
Нажимаю клавишу Enter.
Вышло сообщение: Тип файловой системы: RAW.
Новая файловая система: NTFS.
Быстрое форматирование: 0,0 байт.
Не удаётся определить количество секторов на данном томе.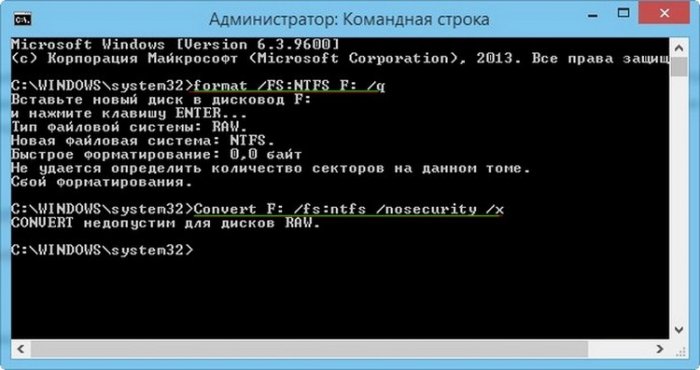
Сбой форматирования.
Пробовал команду
Convert F: /fs:ntfs /nosecurity /x
Вышла ошибка: Convert недопустим для дисков RAW.Короче, хоть бери флешку и выкидывай! Может на вашем сайте подскажут как форматировать флешку в командной строке правильно, чтобы был результат в моём случае?
Как форматировать флешку в командной строке
Привет друзья! Расскажу про все известные мне команды форматирования флешки в командной строке, но сразу оговорюсь, нашему читателю, в его относительно сложном случае, поможет самая последняя команда описанная в этой статье.
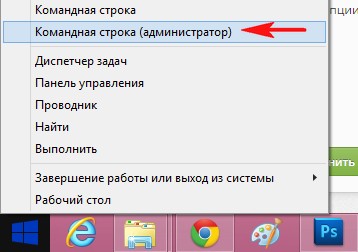
Итак, поехали. Запускаем командную строку от имени администратора.
Самая простая команда:
format /fs:NTFS F: /q обозначает, что мы хотим форматировать накопитель имеющий букву ( F: ) в файловую систему NTFS и метка диска /q нам не нужна (что такое метка, объяснено дальше в статье) . Если Вам нужна файловая система FAT32, значит команда будет выглядеть так format /FS:FAT32 F: /q .
Выходит сообщение: » Вставьте новый диск в дисковод F: и нажмите клавишу ENTER. »
Нажимаем ENTER.
Выходит сообщение: » Метка тома (11 символов, ENTER — метка не нужна)»
Нажимаем ENTER.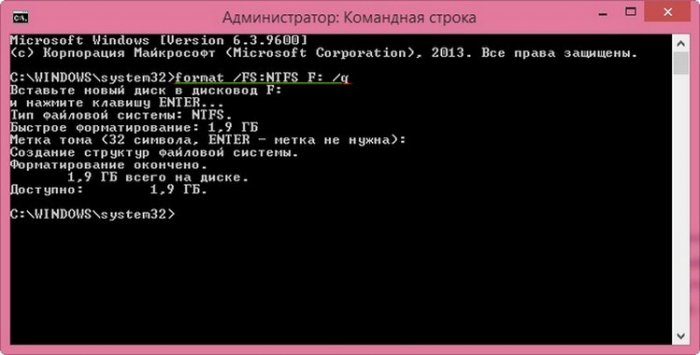
Всё, флешка отформатирована.
Вторая команда: format F: /fs: NTFS /v:Remontcompa обозначает , что мы хотим форматировать накопитель имеющий букву ( F: ) в файловую систему NTFS и метка диска будет такая /v:Remontcompa (метку конечно можете выбрать другую) . Если Вам нужна файловая система FAT32, значит команда будет выглядеть так format F: /fs: FAT32 /v:Remontcompa .Выходит сообщение: » Вставьте новый диск в дисковод F: и нажмите клавишу ENTER. »
Нажимаем ENTER.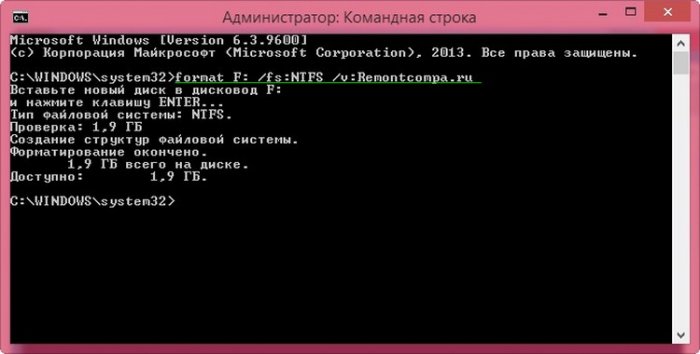 Флешка отформатирована.
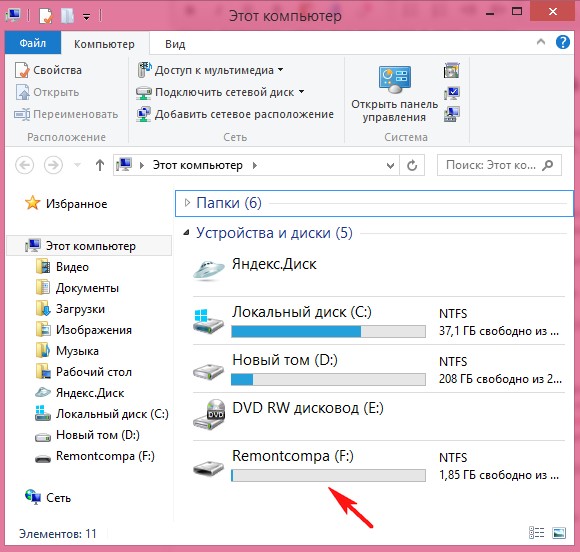
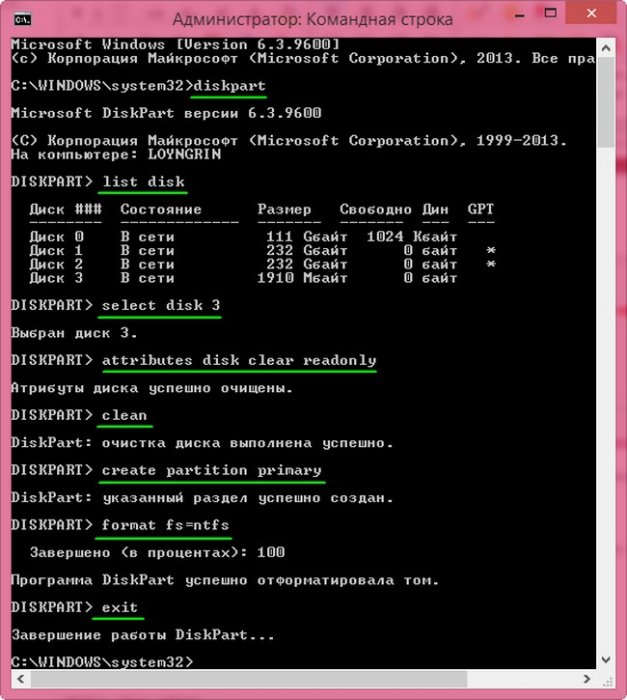
 И наконец, третья команда отформатирует вашу флешку при любых ошибках (конечно, если флешка исправна).
Набираем в командной строке:
diskpart — утилита управления дискового пространства
list disk — отображается весь список дисков, наша флешка под номером три ( определяйтесь по объёму).
select disk 3 (3 — это число, соответствующее нашей флешке)
attributes disk clear readonly — очистка атрибутов.
clean — очистка флешки.
create partition primary — создание первичного раздела.format fs=ntfs (или format fs=fat32 , если нужна файловая система fat32. Также можете применить быстрое форматирование командой format fs=NTFS QUICK)
Друзья, если у вас не получится форматировать флешку вышеуказанными способами, то попробуйте программы для низкоуровнего форматирования флешек. Хорошая статья на данную тему: Как удалить все разделы на флешке.
tagsКлючевые слова
Рекомендуем другие статьи по данной теме
Заметили ошибку
Выделите и нажмите Ctrl+EnterКомментарии (166)
Рекламный блок
Навигация
- Windows (все версии)
- Windows 10
- Лицензирование и активация
- Windows 8.1
- Windows 7
- Windows XP
- Установка Windows
- Драйвера
- Обновления Windows
- Восстановление Windows
- Перенос (миграция, клонирование) Windows
- Учётные записи и пароли
- Чистка, оптимизация, твики
- Сборки и дистрибутивы Windows
- Кастомизация
- Функционал Windows
- Безопасность
- Антивирусы
- Восстановление данных
- Резервное копирование
- Шифрование данных
- Загрузочный носитель
- LiveDisk
- Разное
- Другие операционные системы
- Веб-дизайн
Облако тегов
Архив статей
Сейчас обсуждаем
Владислав
Есть четыре файла видеофайла VTS_01_0.VOB, VTS_01_1.VOB, VTS_01_2.VOB, VTS_01_3.VOB, VTS_01_4.VOB,
Гость Denis
в диспетчере устройств есть производительность?
rinat
Очень помогла статья. На работе дали флешку, мол не открывается и на самом деле, подсоединял к
Дмитрий
Уважаемый admin, у меня интересный вопрос. Есть RAID1 на HDD (система), надеюсь будет SSD без RAID
Гость Александр
Здравствуйте. Нигде не могу найти, подскажите. В окошке мастера сохранения образа (Бэкап системы) в
О проекте RemontCompa.ru
RemontCompa — сайт с огромнейшей базой материалов по работе с компьютером и операционной системой Windows. Наш проект создан в 2010 году, мы стояли у истоков современной истории Windows. У нас на сайте вы найдёте материалы по работе с Windows начиная с XP. Мы держим руку на пульсе событий в эволюции Windows, рассказываем о всех важных моментах в жизни операционной системы. Мы стабильно выпускаем мануалы по работе с Windows, делимся советами и секретами. Также у нас содержится множество материалов по аппаратной части работы с компьютером. И мы регулярно публикуем материалы о комплектации ПК, чтобы каждый смог сам собрать свой идеальный компьютер.
Наш сайт – прекрасная находка для тех, кто хочет основательно разобраться в компьютере и Windows, повысить свой уровень пользователя до опытного или профи.
Разделы сайта
- Регистрация на сайте
- Новое на сайте
- Статистика
- Пользовательское соглашение
- Об авторе
- Карта сайта
- RSS подписка
- Правила сайта
- Обратная связь
Социальные сети
© Copyright © 2010-2021. RemontCompa.ru Копирование материалов сайта запрещено!