# Genp Guides
This website is just intended for educational purpose and does not promote cracking and patching softwares.
This is unoffical website made from the wiki at r/genp.
Almost all the written material is taken from the subreddit and I would like to thank the subreddit wiki maintainers for their awesome efforts in maintaining the wiki.
I have only converted those files to website format and changed the markdown format in some places and changed some content.
You can suggest changes or corrections to the wiki here.
# Changelog
16 Nov 2023 : Update text to match reddit
23 Sep 2023 : Update the Compatibility Suite Guide, update acropolis version, update adobe block urls, remove one adobe process block.
17 Aug 2023 : Update Adobe Genuine Service URL
04 Aug 2023 : Update Adobe Genuine Service URL
13 Jul 2023: Update the CC Patching guide for latest cc version thanks to AbsentForeskin
04 Jul 2023: Update CC Patching guide for latest cc version Thanks to AbsentForeskin
03 Jul 2023: Update Photoshop link thanks to s4m
29 Jun 2023: Update the powershell commands in genp method thanks to AbsentForeskin
24 Jun 2023: Add Warning of AV blocking Monkrus and minor formatting fix
12 Jun 2023: Move Changelog to README, Added Block Adobe Genuine Service URL step in genp method, update CC patch guide.
07 Jun 2023: Update links to acropolis v1.3 to v1.6
01 Jun 2023: Fix a formatting issue in genp method step 4
01 Jun 2023: Add generative fill instructions
Reddit Last Updated Date: 16-Nov-2023
# Genp Method
Antivirus may sometimes delete or move files into quarantine. You can either whitelist as safe or disable antivirus while extracting. This will fix the issue of .exe not showing in the folder after extracted.
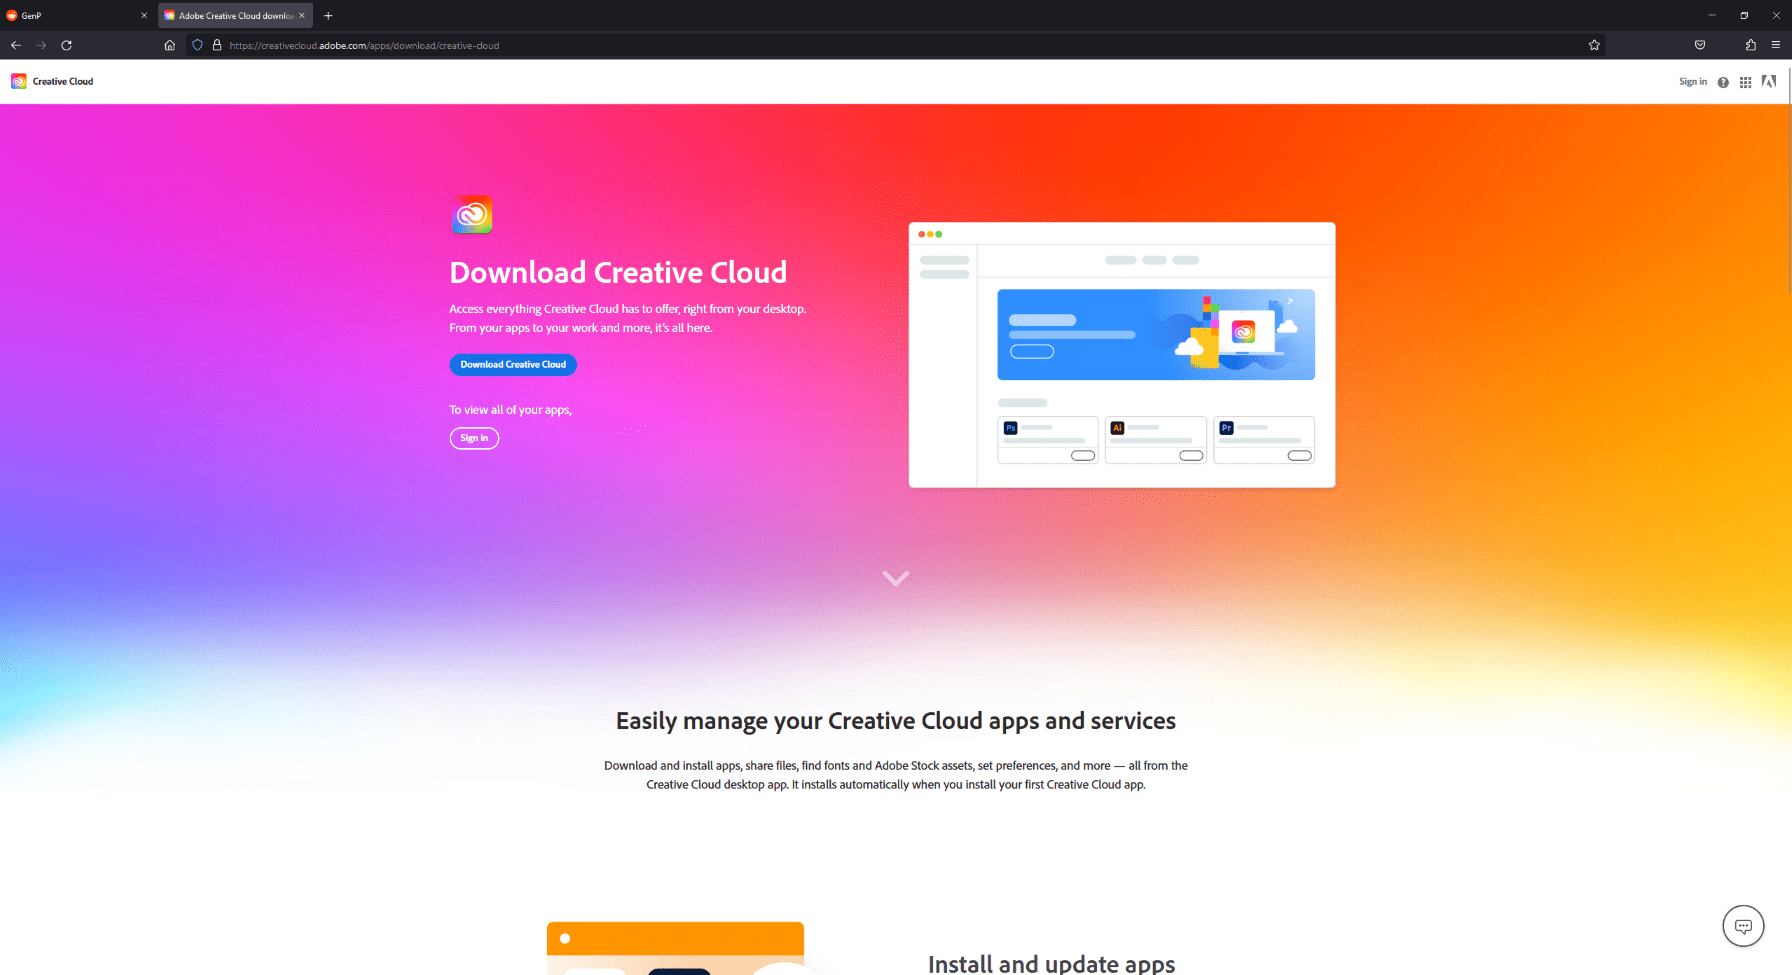
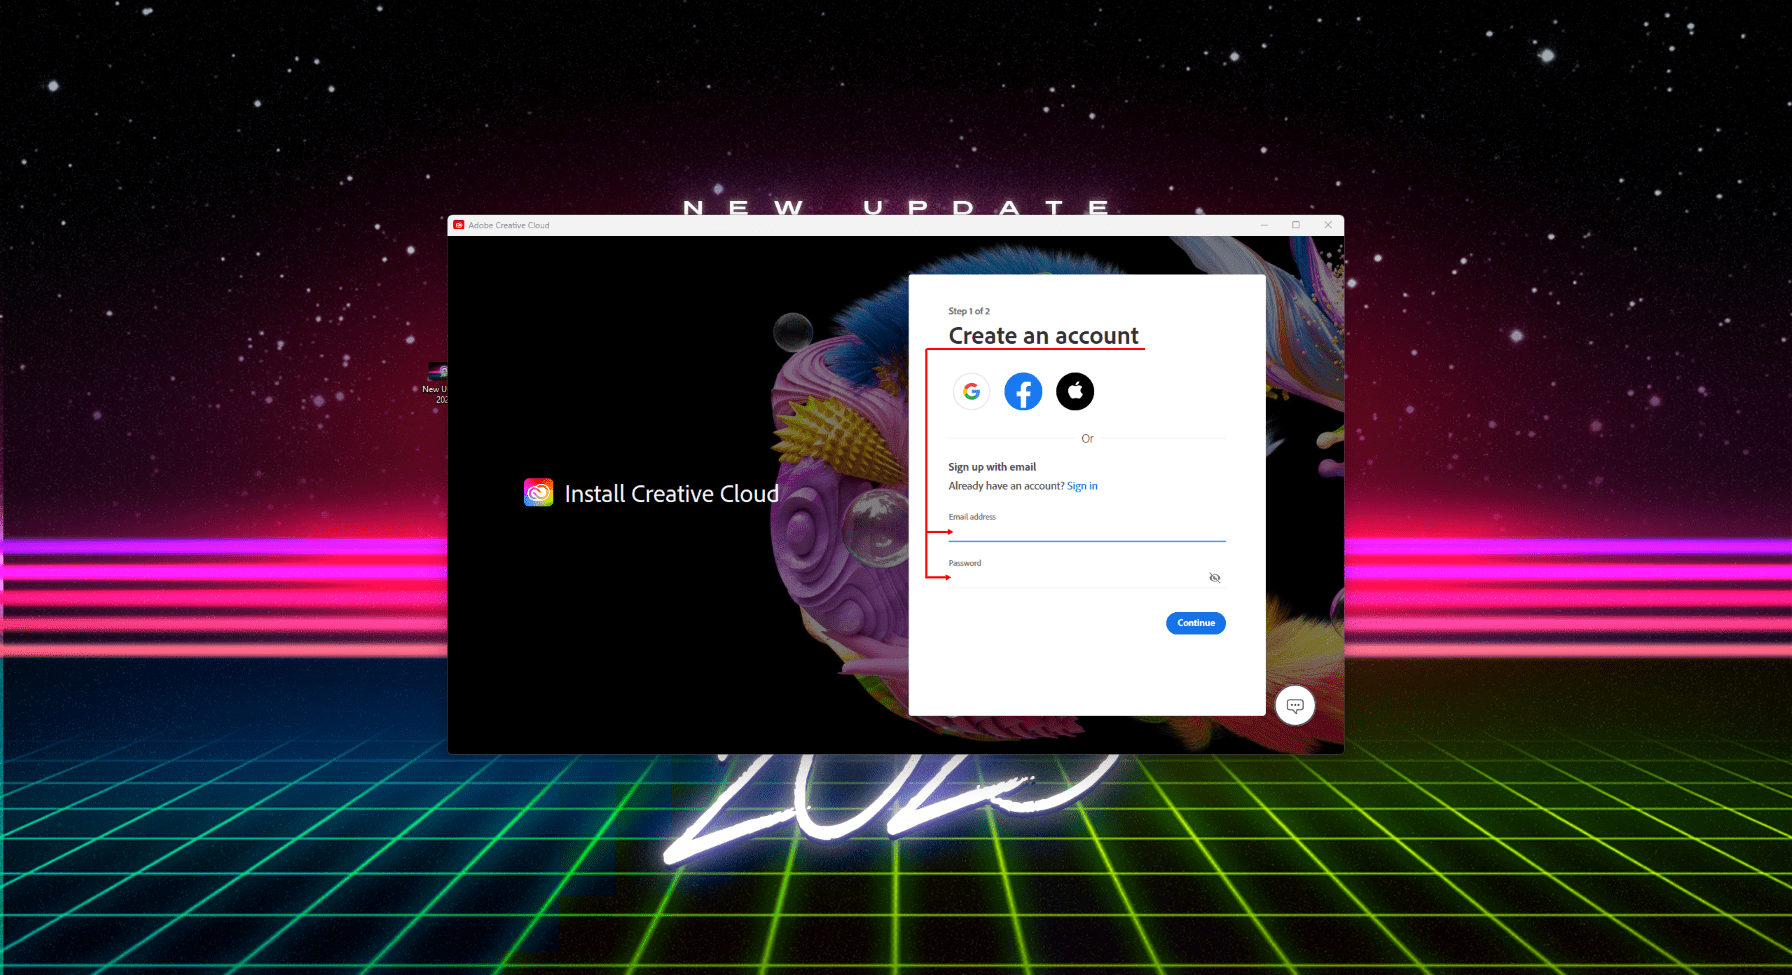
# 2. Download & Install Creative Cloud
- Create a free account or use one you already have, preferably without any ongoing subscription (avoid problems)
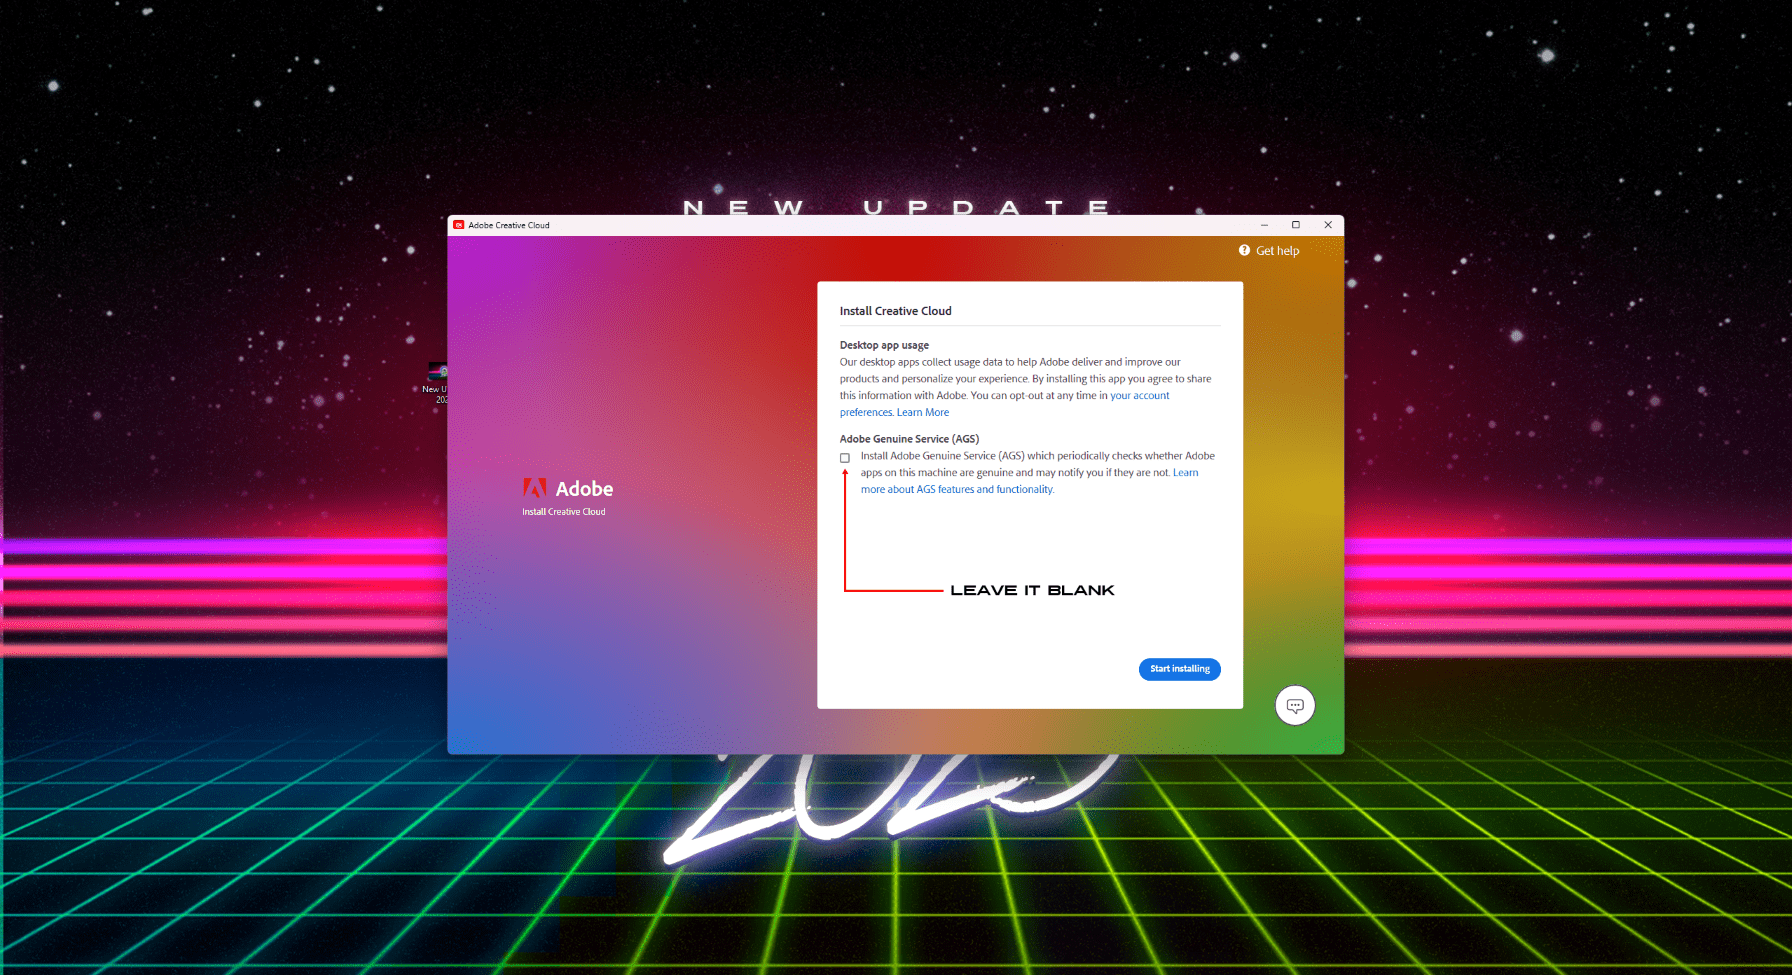
- During setup, if possible do NOT install AGS (Adobe Genuine Service)
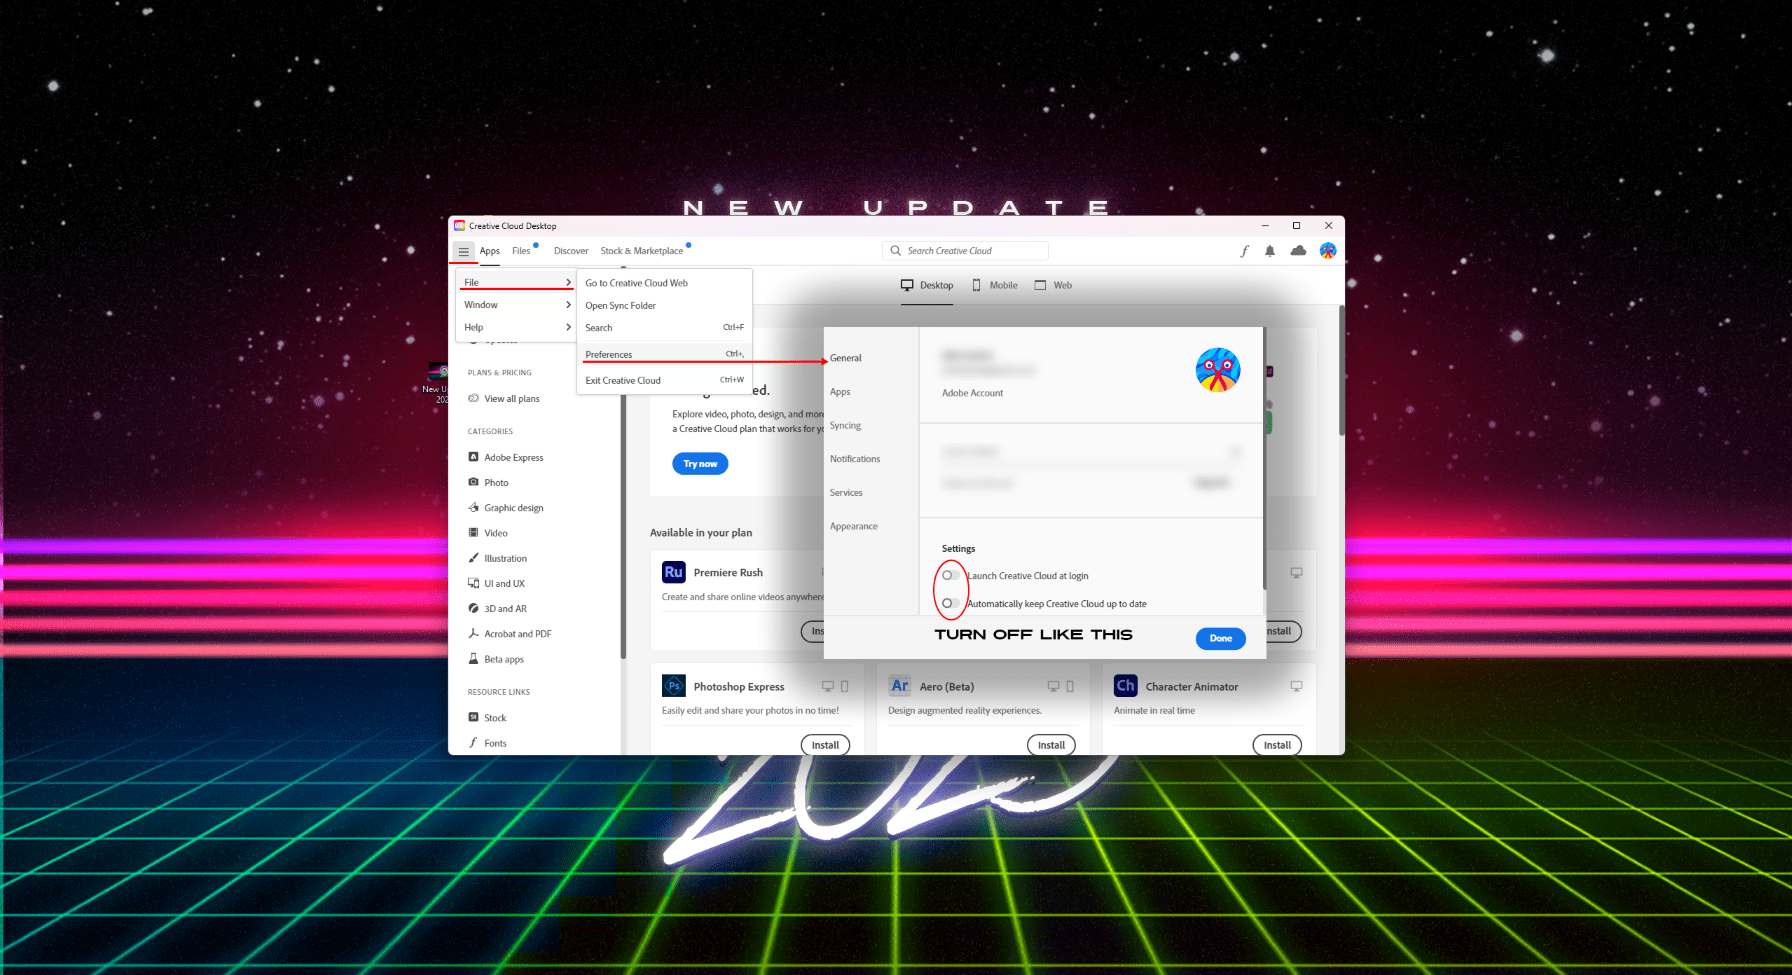
- Once installed go to Menu > File > Preferences and disable the following:
- Launch at login
- Sync files in the background after quitting
- Automatically keep it updated
# 3. Replace Try with Install buttons using Windows Powershell as ADMIN
Thanks AbsentForeskin
Adobe Creative Cloud v.5.11.0.522.1 (June 2023 — latest)
Last updated July 5, 2023Warnings
IMPORTANT: Do not apply this patch if you have already made any changes to AppsPanelBL.dll or AppsPanelIL.dll . NOTE: Additional firewall rules or other network changes are not necessary or recommended while using this patch.
# Overview
Restoring the «Install» buttons in Creative Cloud Desktop—in place of «Try» buttons, which demand payment information—is possible with PowerShell commands on the current latest release of Adobe Creative Cloud ( v.5.11.0.522.1 ). Before you proceed, ensure this is the exact version specified in the «About Creative Cloud» menu, as displayed below—

(If you can’t see the image above, it’s possible that the source of this part might have updated, visit discord to see the updated part for this section).
# Usage & Steps
Click Windows Button and write «Windows Powershell» right-click, Run as Administrator
Enter the following command first:Stop-Process -Name "Adobe Desktop Service" -forceEnter the following command to create a backup of your current Apps Panel—
cp "C:\Program Files (x86)\Common Files\Adobe\Adobe Desktop Common\AppsPanel\AppsPanelBL.dll" "C:\Program Files (x86)\Common Files\Adobe\Adobe Desktop Common\AppsPanel\AppsPanelBL.dll.bak"After creating a backup with the above command, apply the Apps Panel patch by pasting the entirety of the following code block into PowerShell and press ENTER—
$bytes = [System.IO.File]::ReadAllBytes("C:\Program Files (x86)\Common Files\Adobe\Adobe Desktop Common\AppsPanel\AppsPanelBL.dll") $bytes[1116554] = 0xfe $bytes[1216383] = 0xfe $bytes[1987439] = 0xfe $bytes[2150557] = 0xfe $bytes[2151982] = 0xfe $bytes[2152497] = 0xfe $bytes[2153297] = 0xfe $bytes[2279801] = 0xc6 $bytes[2279802] = 0x40 $bytes[2279811] = 0xc6 $bytes[2279812] = 0x40 $bytes[2279821] = 0xc6 $bytes[2279822] = 0x40 [System.IO.File]::WriteAllBytes("C:\Program Files (x86)\Common Files\Adobe\Adobe Desktop Common\AppsPanel\AppsPanelBL.dll", $bytes)If the console prints no errors, restart your machine. Upon startup, Creative Cloud will be ready for use.
# Error Checking
If you receive an error stating that the file is being used by another process, then Creative Cloud is still partially running. Enter the following command to exit the running service—
Following that command, re-enter the same code block again—
Restart your machine after entering the code block. Upon startup, Creative Cloud will be patched and ready for use.
# To Restore AppsPannel
To restore from the previously made backup, use the following command—
cp "C:\Program Files (x86)\Common Files\Adobe\Adobe Desktop Common\AppsPanel\AppsPanelBL.dll.bak" "C:\Program Files (x86)\Common Files\Adobe\Adobe Desktop Common\AppsPanel\AppsPanelBL.dll"If no errors are printed to the console, restart your machine. Upon startup, Creative Cloud will be returned to normal functionality—

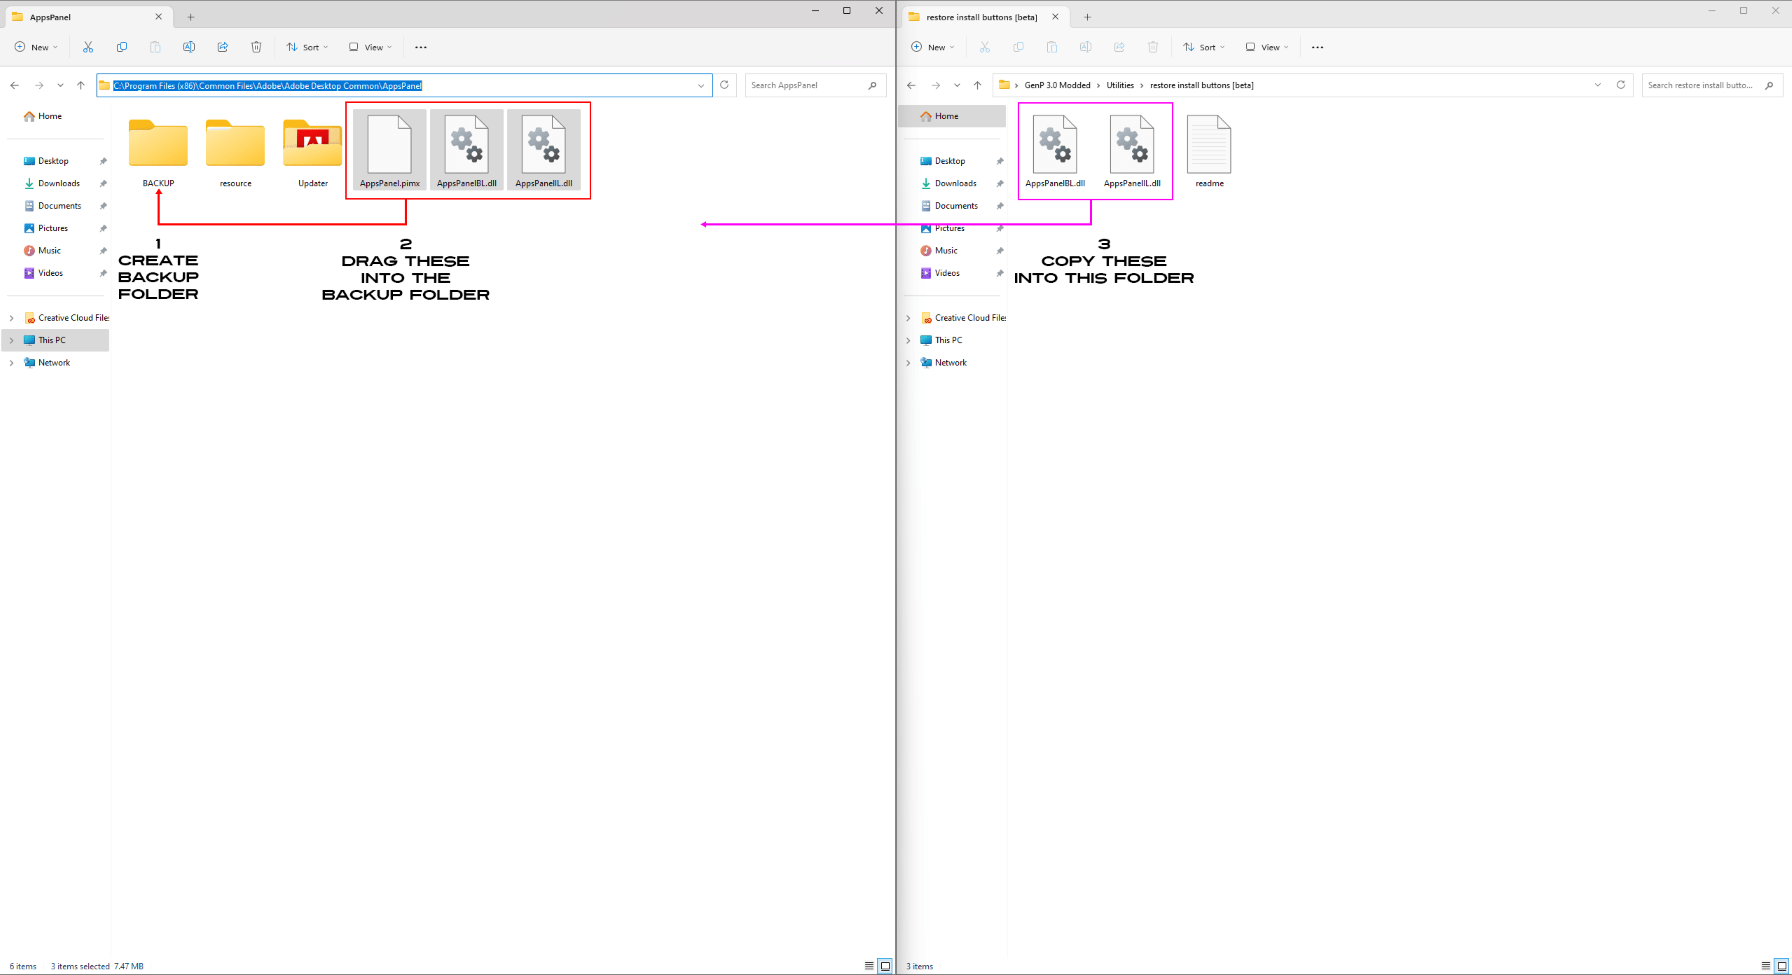
- Go to the default folder for adobe in your file Explorer:
C:\Program Files (x86)\Common Files\Adobe\Adobe Desktop Common\AppsPanel - Create a folder inside it named «BACKUP» and move the following files (If you have them) to it:
AppsPanel.pimx, AppsPanelBL.dll and AppsPanellL.dll
(in case you want to restore them to default at a later date) - Go to Genp 3 — Modded > Utilities > restore install buttons [beta] , there will be another 2 «AppsPanel» files. You will copy these into the default AppsPanel folder (NOT THE BACKUP ONE).
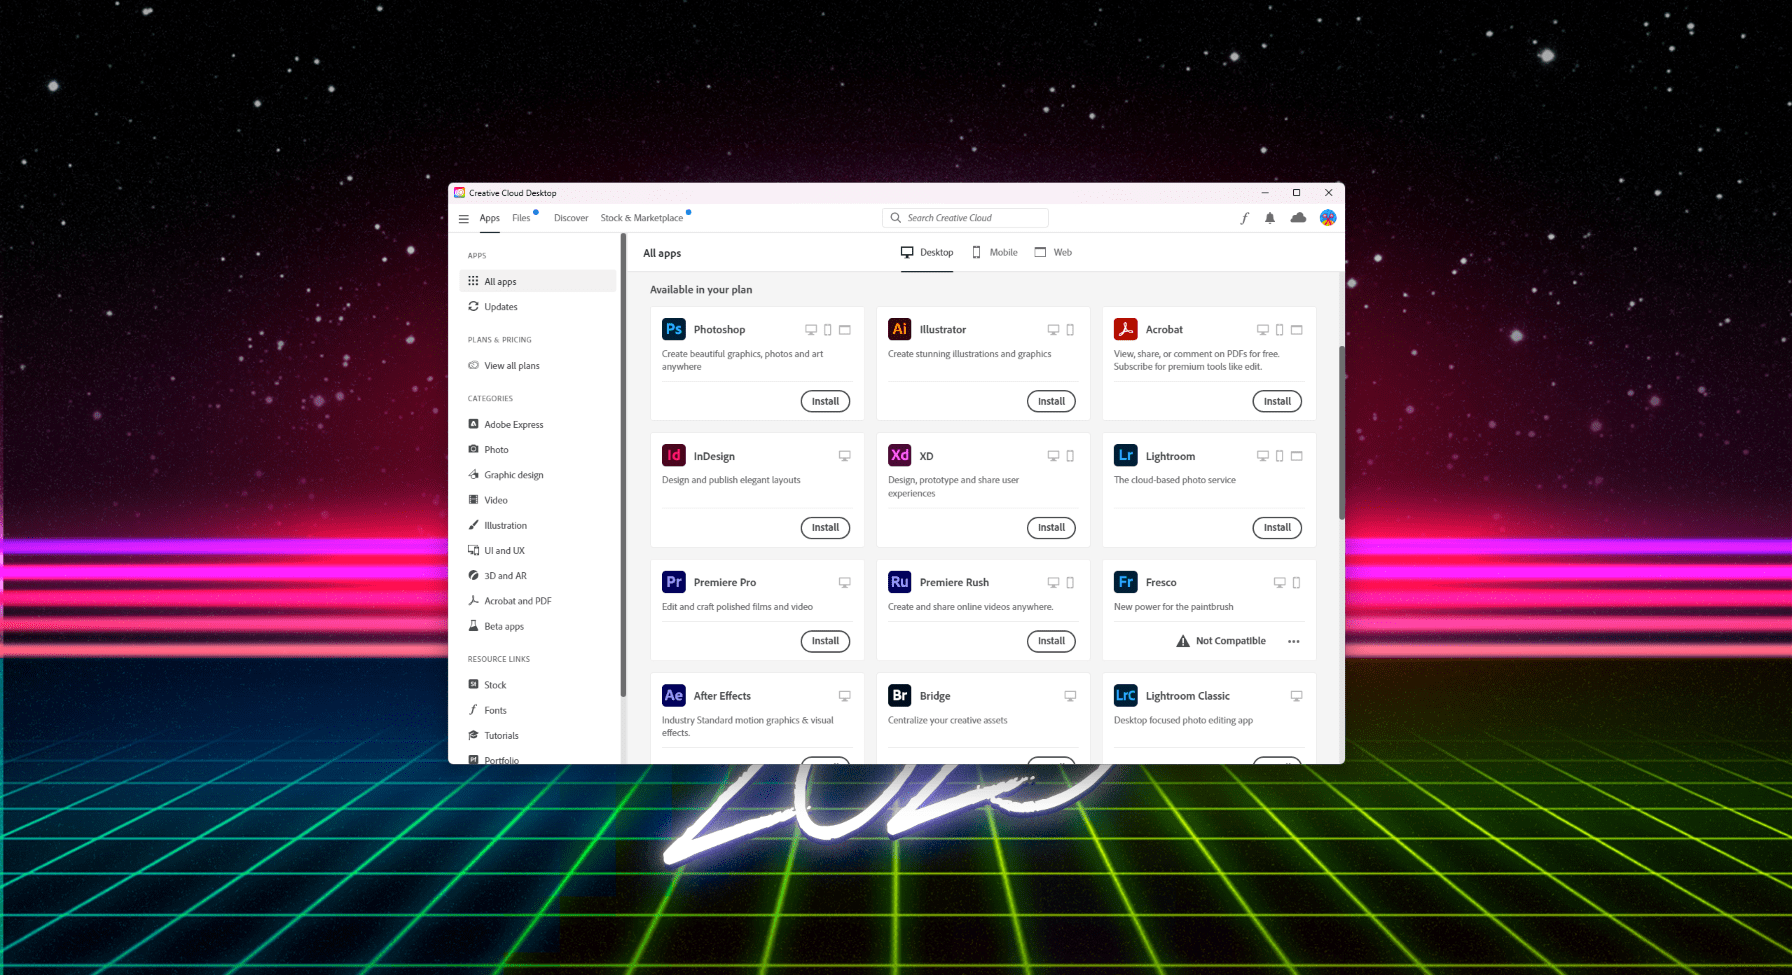
# 4. Open Creative Cloud > Apps > Install
- You should now have the install button, install all the apps you want, wait until everything is installed and DON’T OPEN ANY YET.
- Generative Fill / AI online features on PS or others DO NOT WORK ANYMORE — stop asking about it
- It’s been adapted into the monthly credits for verified paying users (paywall). Therefore, its gone.
- Once that is done go Menu > File > Exit Creative Cloud
# 5. Run GenP on the installed apps
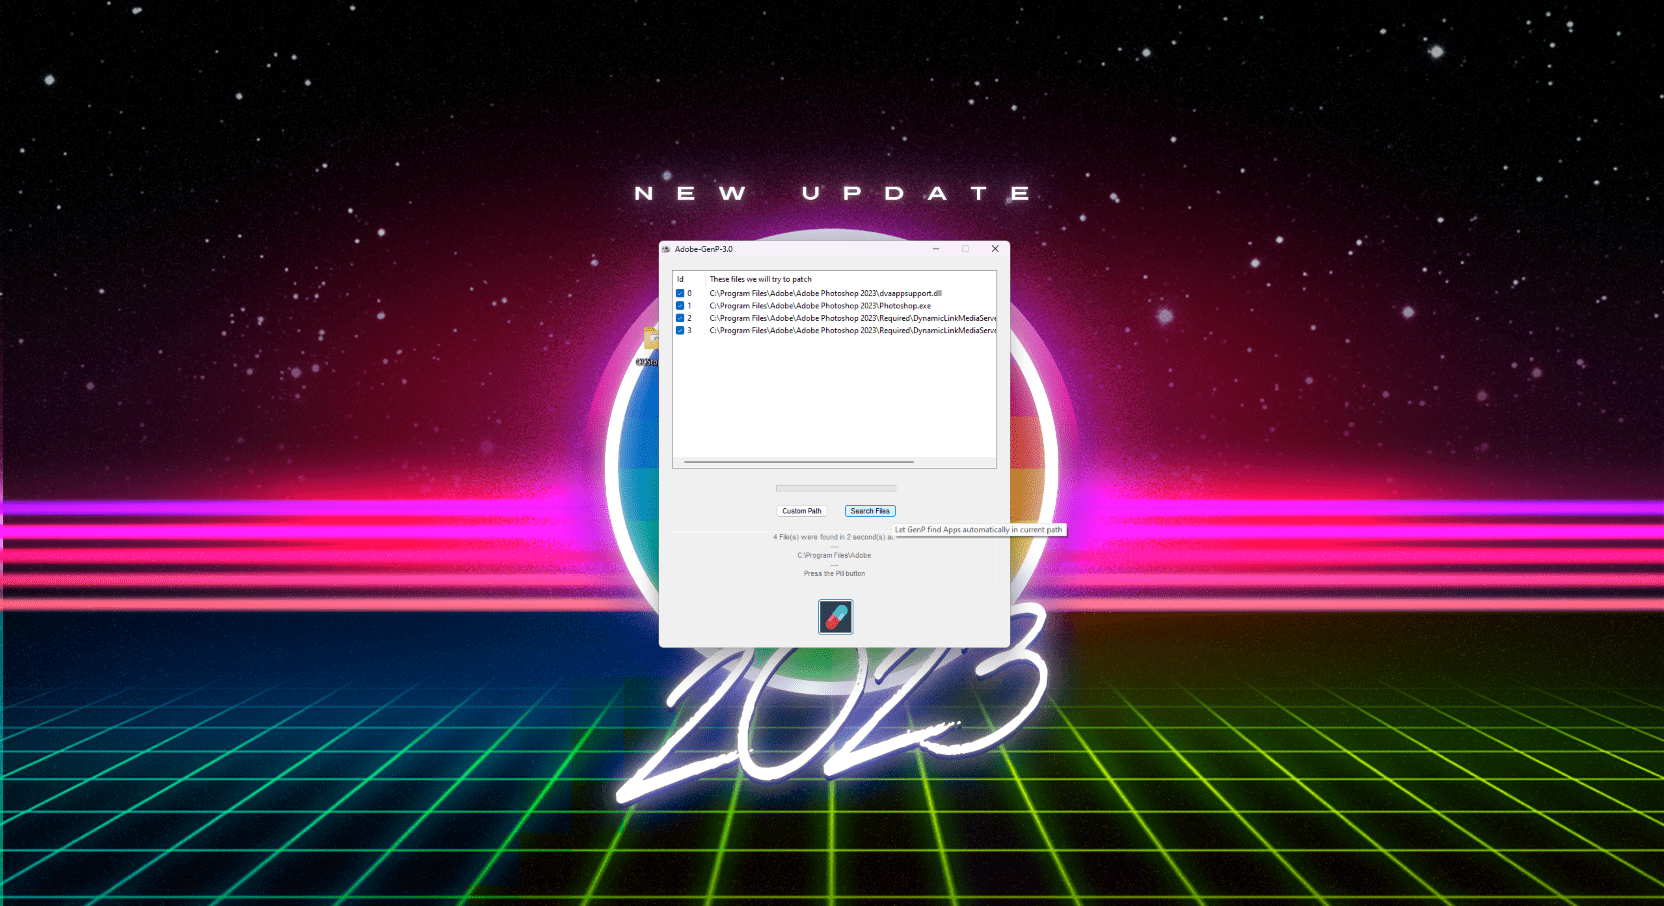
- Open GenP folder > Resources > Run GenP file
- If you’re having issues opening it, turn AntiVirus OFF and try again, however don’t forget to turn it back ON after its patched.
- Click «Search Files» and wait. (will look at the default locations, use custom path if installed somewhere else)
- You can de-select paths in case you have any programs you dont want to patch. (in case of using Monkrus Acrobat)
- Finally click the PILL to run the patch.
- Everything should be working now
OPEN THE APPS THROUGH THEIR .EXE and NOT FROM Creative Cloud. Meaning press Windows button, write name of app you wanna use that was patched > Open
# 6. Block Adobe Genuine Service URL
Thanks AbsentForeskin
Use the following two commands in PowerShell (admin) if your apps are warning you of unlicensed or non-genuine usage.Add-Content -Path $env:windir\System32\drivers\etc\hosts -Value "`n0.0.0.0`tm59b4msyph.adobe.io" -ForceAdd-Content -Path $env:windir\System32\drivers\etc\hosts -Value "`n0.0.0.0`tic.adobe.io" -ForceIf you prefer to do this manually, you can add the following two lines to the system hosts file (located in C:\Windows\System32\drivers\etc ) using a text editor of your choice—
0.0.0.0 m59b4msyph.adobe.io 0.0.0.0 ic.adobe.ioEverything should be working now
# 7. Optional, therefore ignore — Block Each Installed app via Firewall
(In case of issues like app will be disabled, day counter, unable to launch app due to some popup)
- Go to Windows Firewall > Advanced Settings
- Create Inbound and Outbound rule on each app with issues
Structure is the following:- File Type: Program
- Program: It’s necessary to select the actual «program».exe inside the folder that was installed because the shortcut will not work.
- Typical path example would be: C:\Program Files\Adobe\Adobe Photoshop 2023\Photoshop.exe (Find the proper path for the app you need)
# 8. Optional, therefore ignore — Block AGS via Firewall — (similar to step 4)
- Create both Inbound and Outbound rules on Adobe Genuine Service
Path of AGS — C:\Program Files (x86)\Common Files\Adobe\Adobe Desktop Common\AdobeGenuineClient\AGSService.exe
Always check first the monthly Compatibility List before updating any apps, otherwise don’t update.
If you want to install / update more apps, hit «Install/Update» on New app, let it download, and run GenP on them again.
If something ain’t working properly check Issues FixПатч для Adobe
Если у вас закончился/заканчивается период подписки на продукты Adobe, можно воспользоваться способом, предлагаемым тут. Это патч GenP, который изменяет кое-какие процессы в Creative Cloud и позволяет пользоваться продуктами Adobe без оплаты. При этом скачивать взломанные программы с торрентов не надо, патч работает с уже существующими на компьютере программами и учетной записью CC. Патч работает для Windows OS, но в сообществе есть ссылка и на патч для Mac.
Внимание! Мы не одобряем пиратство, но в данный момент совершить легальную оплату программ стало проблематично.
Вы можете изучить сообщество на реддите самостоятельно, если знаете английский (на десктопной версии см. колонку Links справа — там вы найдете ответы на вопросы, гайд к патчу и ссылку на его скачивание), или же использовать наш перевод.
Внимание! Не используйте патчи, скачанные с этих сайтов: «adobegenp.com», «official-genp.com» или «amtemu-adobe.com»
Не загружайте GenP 3.0 — это вирус!
Не со всеми версиями программ патч работает нормально. Вот тут обновляемый список. (Например, у автора перевода не работает полноценно Lightroom v5.2)
F.A.Q.
Безопасен ли GenP?
- Множество людей использовали патч или используют его сейчас. Если бы файл был заражен, мы бы об этом узнали
- Вы можете отсканировать программу с помощью VirusTotal или Hybrid Analysis
- Чаще всего антивирусы помечают патч как вирус, но GenP ложноположительный
- При желании вы можете пропатчить программы, а потом удалить GenP с компьютера и просканировать его с помощью Malware Bytes.
Как пользоваться GenP?
Во-первых, четко следовать гайду (см.ниже).
А далее есть два способа пропатчить программу: автоматический и ручной.
- Автоматический: выбираете в программе кнопку «CC 20xx» (в зависимости от года выпуска загруженной программы) и жмете на кнопку с таблеткой
- Ручной: выбираете программу, которую надо пропатчить (в идеале одну за другой), находите папку загрузки (обычно «C:\Program Files\Adobe» для большинства приложений и «C:\Program Files (x86)\Adobe\Acrobat DC» для Acrobat) и выбираете нужный файл
Что такое «File is not ‘vanilla’. Aborting. «?
Это ошибка, которую GenP выдает при попытке пропатчить уже пропатченный файл:)
Почему появляется сообщение о триале?
Это норма. Сообщение об истекшем сроке использования появляется при запуске всех программ, но сами программы работают.
Есть инструкция, как убрать плашку триала (чисто ради эстетики), но у автора перевода это не сработало.
Можно ли загружать обновления?
Да, правда их, скорее всего, придется заново пропатчить после установки.
Ответы на другие вопросы можно найти тут. Пишите, если очень нужен перевод, и ответ есть на сайте, но вы ничего не понимаете:)
Гайд
- Загрузите GenP и извлеките все файлы в папку
- Загрузите и установите Creative Cloud (пропустите этот шаг, если он у вас уже есть). Не устанавливайте «Genuine Software Detector»!
- Выйдите из всех служб Creative Cloud:
— запустите Диспетчер задач (Ctrl+Alt+Delete)
— завершите все процессы с названиями «Creative Cloud», «CC. » и «Adobe»
— некоторые процессы будут снова появляться, завершайте их методично, начиная сверху - Откройте Creative Cloud и установите нужные вам программы (пропустите этот шаг, если все нужные проги уже установлены на компьютере). Выберите Опробовать или Установить.
Photoshop Neural Filters: после установки ФШ, откройте программу и загрузите Neural Filters на этом этапе, иначе потом их установить будет невозможно - Снова выйдите из всех служб Creative Cloud:
— запустите Диспетчер задач (Ctrl+Alt+Delete)
— завершите все процессы с названиями «Creative Cloud», «CC. » и «Adobe» - Остановите и отключите сервисы Adobe Genuine(это очень важно):
— кликните на значок Windows на клавиатуре (обычно слева рядом с Alt), введите «Services.msc» — и откройте Службы
— найдите в списке «Adobe Genuine Monitor Service» и «Adobe Genuine Software Integrity Service» (если не найдете оба, сделайте это с одним из списка)
— на каждом из сервисов кликаете правой кнопкой мыши >Свойства
— измените следующее: Тип запуска >Отключена, Состояние >Остановить
— нажмите Применить, ОК, и закройте
Если не нашли эти службы в списке, пропустите этот шаг. - Удалите папку «AdobeGCClient» по адресу C:\Program Files (x86)\Common Files\Adobe\AdobeGCClient
Если у вас нет этой папки, пропустите этот шаг. - Запустите GenP:
— нажмите на кнопку CC202X (цифра зависит от года выпуска программы; если у вас установлены последние версии, то выберите 2022) для автоматического выбора программ, а потом кликните на кнопку с таблеткой. Программа сделает всё сама. - Отключите все программы Adobe из автозагрузки (это тоже важно):
— запустите Диспетчер задач (Ctrl+Alt+Delete)
— выберите вкладку Автозагрузка
— выберите программу Adobe > Правая кнопка мыши > Отключить
Что отключать: Creative Cloud Desktop, AGCInvokerUtility, CCXProcess, Adobe Updater Startup Utility и любые другие процессы с именем Adobe. Попытайтесь найти большинство:) - Редактор реестра:
— кликните на значок Windows на клавиатуре (обычно слева рядом с Alt), введите «Regedit.msc» — и откройте Редактор реестра
— следуйте по пути Компьютер\HKEY_CURRENT_USER\SOFTWARE\Classes\CLSID\
— ищете в выпадающем списке папку и кликаете на нее. Справа появятся находящиеся в папке файлы
— дважды нажмите на файл «System.IsPinnedToNameSpaceTree» и измените значение на “0” (ноль)
— нажмите ОК и закройте всё.
☝Открывайте приложения не через Creative Cloud, а через меню Windows или иконки на рабочем столе (если есть).
- Перед установкой обновлений проверяйте их в списке, не устанавливайте обновление, если в списке оно значится как Unstable.
- Если вы хотите поставить новое приложение, нажмите Опробовать, дождитесь загрузки, а потом запустите GenP и пропатчьте как в пункте 8 (всё остальное из гайда делать не нужно)
Поздравляем! Все программы должны работать без проблем.
Перевод будет обновляться по запросам. Если у вас ничего не работает, вы можете самостоятельно разобраться с проблемой по инструкции, или написать нам, мы приготовим перевод.
Если у вас система Mac OS, и вы тоже не можете разобраться без перевода — пишите, будем переводить инструкции для мака.
whoa there, pardner!
Your request has been blocked due to a network policy.
Try logging in or creating an account here to get back to browsing.
If you’re running a script or application, please register or sign in with your developer credentials here. Additionally make sure your User-Agent is not empty and is something unique and descriptive and try again. if you’re supplying an alternate User-Agent string, try changing back to default as that can sometimes result in a block.
You can read Reddit’s Terms of Service here.
if you think that we’ve incorrectly blocked you or you would like to discuss easier ways to get the data you want, please file a ticket here.
when contacting us, please include your ip address which is: 178.132.110.75 and reddit account