Take A Screenshot On Vivo Y31

Taking a screenshot or screen capture on your vivo Y31 is very helpful when you want to share your mobile screen with your friends or colleagues. There are two main methods for taking a screenshot ( Print Screen ) on your Vivo smartphone.

How To Take A Screenshot on Vivo Y31
- On your vivo Y31 phone, navigate to the app screen of which you want to take a screenshot.
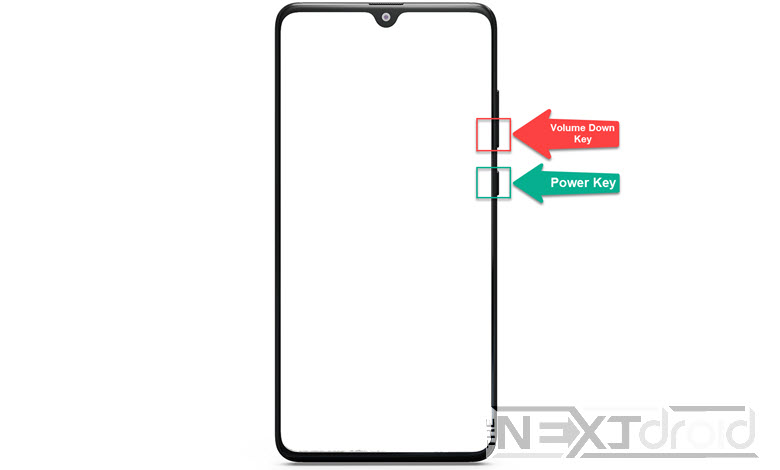
- Press and hold the Volume Down Button and Power Button on your Y31 simultaneously.
- If your Vivo device has a home button then press the Home button and Power button at the same time to take a screenshot.
- You will hear the screenshot notification sound and you will also see a screenshot floating on the bottom left ( if you are using Android 8 or higher version ) which indicates that the screenshot has been taken successfully.
- Click on the floating screenshot thumbnail image to view and edit the screenshot on Android Oreo and above or click on the screenshot notification on older Vivo devices.
- After editing you can share the screenshot using the share buttons for WhatsApp, Facebook, email, etc.
Vivo Y31 Screenshot Using the Print Screen Toggle
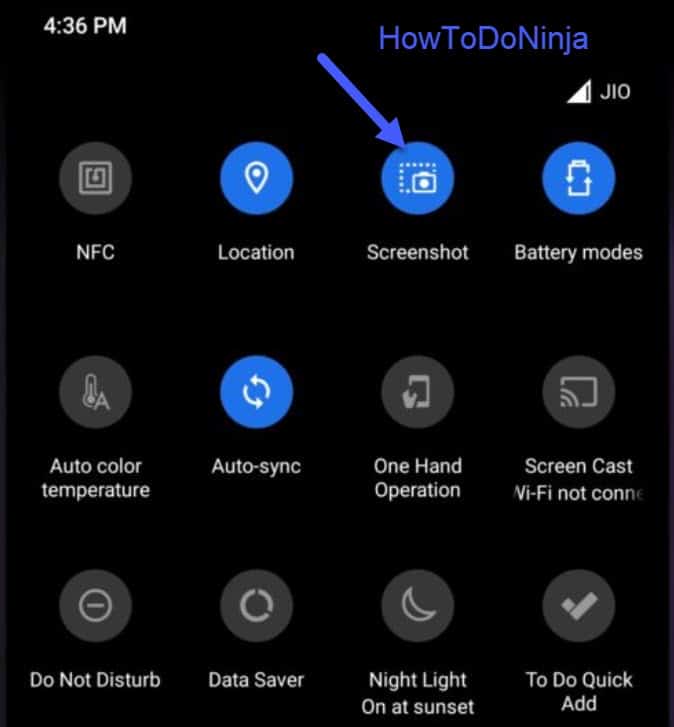
- Open the screen on your vivo Y31 that you want to capture.
- Swipe down from the top of your Vivo notification tray to see the toggle options and locate the Screenshot icon. ( If not visible then use the edit option for the toggle button if you are using android 8 or above to add the screenshot toggle option )
- Click on the “Screenshot icon” on the toggle options.
- Now the screenshot will be taken and the screenshot notification will also appear.
- You can edit your Vivo screenshot by tapping on the Edit option on the screenshot notification. You will also see a floating screenshot which you can click to edit and share.
- That’s it, your screenshots will be saved automatically on your Vivo Photos or Gallery app.
Take A Long Screenshot on vivo Y31?
- In Order to take a long screenshot (a.k.a Scrolling screenshot ) on vivo Y31, go to notification toggle and press the screenshot button or use the hardware buttons.
- A normal screenshot will be taken, then click on the Scrolling Screenshot option to take the full page screenshot.
- When you wanted to end the screenshot, just tap on the screen to stop the long screenshot.
- Your scrolling screenshot is successfully captured on your vivo Y31.
Where are screenshots saved on vivo Y31?
- Your vivo Y31 screenshots taken will be saved insider the Screenshots folder inside the Photos or Gallery app.
- Open Google Photos or Vivo Gallery App and tap the Albums
- Choose the Vivo’s Screenshot folder inside the Albums to view the screenshots taken.
- Click on the screenshot that you want to view and share.
About vivo Y31
vivo Y31 has a 4.7″ display, runs on Mediatek MT6580 (28 nm) and came with Android 5.1 (Lollipop), Funtouch 2.1 ,and Mali-400MP2. It has 1GB RAM and a 2100mAh battery.
That’s it, you have successfully taken a vivo Y31 screenshot.
Don’t forget to leave your valuable comments below and share this tutorial.

He is the founder of howtodoninja.com and is an experienced tech writer and a cybersecurity enthusiast with a passion for exploring the latest technological advancements. He has 10 years of experience in writing comprehensive how-to guides, tutorials, and reviews on software, hardware, and internet services. With an interest in computer security, he strives to educate users by writing content on how to use technology, and how to also protect their smart devices and personal data from cyber threats. He currently uses a Windows computer, and a Macbook Pro, and tests hundreds of Android phones for writing his reviews and guides.
How to Take a Screenshot on vivo Y31: A Comprehensive Guide
The Ultimate Guide to Capturing Screenshots on vivo Y31
Ellis Gibson July 31, 2023 Last Updated: July 31, 2023
0 6 minutes read

In our increasingly digital age, taking a screenshot is an essential skill. Whether you’re trying to remember a recipe, keep track of online receipts, or share a funny conversation, screenshots can be your best friend. This tutorial will focus specifically on how to take a screenshot on vivo Y31, one of the most popular smartphones on the market.
Table of Contents
Why vivo Y31?
vivo Y31 is known for its advanced features, top-notch performance, and excellent battery life. Yet, one of the most often overlooked but essential elements of a smartphone is its ability to easily take and share screenshots. Thankfully, taking a screenshot on the vivo Y31 is straightforward.
Understanding the Basics: What is a Screenshot?
Before we delve into the process, let’s understand what a screenshot is. A screenshot is a digital image that captures whatever is currently displayed on your device’s screen. It’s a handy way to record and share information from your device.
Why Taking a Screenshot is Useful
Screenshots are beneficial in countless scenarios. They allow you to save and share everything on your screen, such as a map direction, a cool outfit from an online shop, or an interesting thread on social media. They’re also useful in tech support, as you can send a screenshot to illustrate the problem you’re facing.
Understanding the vivo Y31 Screen Capture Features
Before we delve into the process of taking a screenshot, let’s familiarize ourselves with the screen capture features available on the vivo Y31. This smartphone boasts a user-friendly interface that allows you to capture your screen effortlessly. With the vivo Y31, you have two main methods for taking screenshots:
- Button Combination: This method involves pressing a combination of physical buttons on your vivo Y31 to capture the screen.
- Gesture Control: The vivo Y31 offers a convenient gesture control feature that allows you to capture a screenshot by swiping your fingers across the screen in a specific manner.
How to Take a Screenshot on vivo Y31: A Comprehensive Guide
Capturing screenshots on the vivo Y31 is a straightforward process. Here, we will discuss three different methods that you can use to take screenshots on your device.
Related Articles

October 20, 2023
October 20, 2023
October 20, 2023

October 20, 2023

October 20, 2023

October 20, 2023
Method 1: Hardware Buttons (Taking a Screenshot Using the Button)
One of the easiest ways to take a screenshot on your vivo Y31 is by using the hardware buttons. To take a screenshot using the button combination method on your vivo Y31, follow these simple steps:
-
- Locate the Power Button and Volume Down Button: On the vivo Y31, the Power button is typically located on the right side of the device, while the Volume Down button is positioned on the opposite side.
- Position the Screen: Make sure the content you want to capture is displayed on the screen before proceeding.
- Simultaneously Press the Buttons: Press and hold the Power button and Volume Down button together for a brief moment.
- Capture Successful: If successful, you will hear a shutter sound or see a visual notification indicating that the screenshot has been taken.
Method 2: Three-Finger Gesture (Taking a Screenshot Using Gesture Control)
Another convenient method to capture screenshots on the vivo Y31 is by using the three-finger gesture feature. If you prefer a more intuitive way of taking screenshots, the vivo Y31 offers gesture control for your convenience. Follow these steps to capture a screenshot using gesture control:
- Enable Gesture Control: Go to your device’s settings and navigate to the “Gestures & Motions” section. Enable the “Three-finger Screenshot” option.
- Position the Screen: Once the gesture control is enabled, position the content you wish to capture on the screen.
- Swipe with Three Fingers: Place three fingers lightly on the screen and swipe downwards. Ensure your fingers make contact with the screen simultaneously.
- Screenshot Captured: If performed correctly, you will receive a confirmation that the screenshot has been taken.
Method 3: Use S-capture
S-capture is a built-in feature on the vivo Y31 for taking various types of screenshots. Here’s how:
- Open S-capture: Swipe up from the bottom of the screen and select ‘S-capture’ from the options.
- Choose Screenshot Type: Choose the type of screenshot you want to take – ‘Rectangular’, ‘Funny Screenshot’, ‘Long Screenshot’, or ‘Screen Recording’.
- Screenshot Captured: The chosen screenshot is captured and saved in your gallery.
Method 4: Notification Panel
vivo Y31 also enables you to take screenshots from the Notification Panel. Here’s how you can do it:
- Open Notification Panel: Swipe down from the top of your screen to access the Notification Panel.
- Expand the Quick Settings: Swipe down once more or use two fingers to swipe down, which will expand the Quick Settings menu.
- Tap on Screenshot Icon: Look for the screenshot icon, typically symbolized by a screen or a square icon. Tap on this icon.
- Screenshot Captured: The screenshot will be taken immediately, and you will receive a notification or see a visual confirmation on your screen. The screenshot will then be saved in your gallery.
Method 5: Smart Click
Smart Click is another great way to capture screenshots on your vivo Y31. Follow these steps:
- Enable Smart Click: Go to ‘Settings’, then ‘Shortcuts & Accessibility’, and enable ‘Smart Click’.
- Set Screenshot as Smart Click Function: Click on ‘Smart Click’ and select ‘Take a screenshot’ from the options.
- Press the Volume Down Button: With the screen you want to capture open, press the volume down button.
- Screenshot Captured: The screenshot is instantly captured and saved in your gallery.
Method 6: Using Third-Party Apps or Google Assistant
If you prefer more advanced screenshot features, you can explore third-party apps available on the Google Play Store. These apps often provide additional functionalities, such as capturing scrolling screenshots or editing options. Search for “screenshot” in the Play Store and choose an app that suits your needs. You can also easily take screenshot through Google Assistant. Just follow these steps:
- Ensure that the Google Assistant is set up on your vivo Y31.
- Go to the screen you want to capture.
- Activate the Google Assistant by saying “Hey Google” or long-pressing the home button.
- Once the Google Assistant is active, say “Take a screenshot.”
- The Google Assistant will capture the screenshot for you.
- Find the screenshot in your gallery or notification panel.
Accessing and Managing Your Screenshots
After successfully capturing a screenshot on your vivo Y31, you may want to access and manage your saved images. Here’s how you can easily find your screenshots:
- Using the Gallery App: Open the Gallery app on your vivo Y31. Look for the “Screenshots” folder, which stores all the screenshots you have captured.
- Using the File Manager: Alternatively, you can use the File Manager app on your device to locate the “Pictures” or “Screenshots” folder, where your screenshots are stored.
Additional Tips for Screenshot Taking on the vivo Y31
To enhance your screenshot-taking experience on the vivo Y31, consider these useful tips:
- Edit and Annotate: The vivo Y31 provides built-in editing tools, allowing you to crop, annotate, and add text to your screenshots before sharing them.
- Screenshots with Scrolling: The device offers a scrolling screenshot feature, enabling you to capture long articles, webpages, or chats by automatically scrolling and stitching multiple screenshots together.
- Using Voice Commands: Take advantage of the voice command feature on your vivo Y31 to capture screenshots hands-free. Simply say the designated voice command, and the device will capture the screen for you.
Conclusion
Taking screenshots on your vivo Y31 is a breeze with the various methods available at your disposal. Whether you prefer using hardware buttons, three-finger gestures, or the Assistive Ball feature, capturing and sharing screenshots has never been easier. Now that you have a comprehensive guide on how to take screenshots on your vivo Y31 device, you can save and share important moments and information with just a few taps. Enjoy exploring the exciting world of screenshots on your vivo Y31!
Frequently Asked Questions (FAQs)
Q1. Can I take a screenshot while playing a game on my vivo Y31?
Yes, you can! The vivo Y31 is designed to take screenshots even during intense gaming sessions. Simply use any of the methods mentioned above, and your gameplay moment will be captured.
Q2. How can I access my screenshots on the vivo Y31?
After taking a screenshot on your vivo Y31, you can access it by following these steps:
Method 1: Go to your gallery app and look for the “Screenshots” folder. The captured screenshots should be saved there.
Method 2: Swipe down from the top of your screen to open the notification panel. Look for the screenshot thumbnail and tap on it to open the screenshot directly.
Q3. Can I take screenshots of my lock screen and notification panel?
Absolutely! You can take screenshots of virtually any screen on your vivo Y31, including your lock screen and notification panel.
Q4. My screenshots are not saving, what should I do?
If your screenshots are not saving, make sure your device has sufficient storage space. If storage is not the issue, consider restarting your phone or reach out to Vivo customer support for help.
Q5. How can I delete screenshots on my vivo Y31?
Screenshots can be deleted just like any other image. Go to your gallery, find the screenshot you want to delete, tap on it, and select “Delete”.
Q6. Is there a limit to how many screenshots I can take on my vivo Y31?
The number of screenshots you can take is limited only by the available storage space on your phone. Once the storage is full, you’ll need to delete some files or transfer them to another device to free up space.
Скриншот VIVO Y31 (2021)
Как сделать снимок экрана на VIVO Y31 (2021)? Каксделать скриншот на VIVO Y31 (2021)? Как сохранить скриншот на VIVO Y31 (2021)?
Простейший способ сделать снимок экрана на VIVO Y31 (2021). После сохранения снимков экрана, вы сможете редактировать / делиться / удалять сохранённые скриншоты в Android 11 галереи. Нажмите здесь для более детальной информации по поводу снимков экрана.
Как сделать скриншот на VIVO Y31 (2021)?
- При запуске перейдите на экран, который хотите сохранить.
- Теперь нажмите на несколько секунд кнопку уменьшения громкости и питания .

- Отлично!

Второй метод:

- Во-первых, откройте верхнюю панель, если вы входите на экран с содержимым.
- Теперь нажмите на быстрый инструмент S-capture .
- Из появившихся вариантов выберите Прямоугольный снимок экрана.
- Скриншот выглядит неплохо. Откройте файлы, чтобы проверить это.
Как сделать снимок экрана на VIVO Y31 (2021)? — HardReset.info
Без рейтинга
Если Вам помогло это решение, поделитесь им с другими чтобы помочь им, и подписывайтесь на наши страницы в Facebook, Twitter and Instagram
Как сделать скриншот на телефоне Виво
Сделать скриншот на телефоне Vivo предлагают 4 способами, 3 из которых реализованы в Funtouch OS непосредственно разработчиками прошивки. Какой вариант удобнее, решать пользователю.

Как сделать скриншот: способы
На выбор: жест тремя пальцами, классическое сочетание клавиш, функция суперскриншота и голосовая команда через Google Ассистента. Пройдемся по каждому методу отдельно.
Жестами
Сделать скриншот на телефоне Vivo Y31, Y35 или T1 можно с помощью жеста:
- Откройте нужную страницу, приложение или игру.
- Одновременно проведите 3 пальцами сверху вниз экрана.

Функция активна по умолчанию, но, если телефоном Виво V17, V23 или V25 пользовались ранее, ее могли отключить:
- Посетите «Настройки» устройства и откройте «Ярлыки и специальные возможности».
- Перейдите в «Суперскриншот».
- В новом окне активируйте «Проведите тремя пальцами вниз, чтобы сделать снимок экрана».
Создание скринов тремя пальцами появилось в Funtouch 4.0, релиз которой состоялся в 2018 году.
Кнопками
Классический способ, как сделать скрин экрана на смартфоне Вива Т1 или Y20:
- Снова откройте нужную страницу.
- Одновременно нажмите клавишу блокировки и качель громкости вниз (минус).
- Спустя долю секунды снимок будет сделан.
На очень старых устройствах под управлением Фантач 3.1 или старее снимки делали немного по-другому – удерживая кнопку «Домой» и щелкая по клавише питания.
С помощью функции Easy Touch
Пользователь может вызвать специальное подменю и сделать скрин:

- Проведите пальцем снизу вверх экрана.
- Появится специальное меню, где нужно выбрать прямоугольный снимок экрана.
Как и в случае с жестами, функция может быть отключена:
- Через «Настройки» попадите в «Ярлыки и специальные возможности».
- Откройте «Easy Touch» и активируйте функцию.
Если снимку нужно придать необычную форму, зайдите в «Забавный скриншот» и выберите круг, сердечко или что-то подходящее под ситуацию.

С помощью Google Ассистента
Эту операцию можно проделать на любом устройстве с Андроид:

- Перейдите в «Настройки», откройте вкладку под названием «Google».
- Теперь откройте «Настройки для приложений Google».
- В новом окне необходимо открыть «Поиск, Ассистент и голосовое управление».
- Появится еще один список, где нужно открыть «Google Ассистент».
- В разделе «Популярные настройки» тапните по «Voice Match/Окей, Google».
- Включите тумблер напротив «Ok, Google».
- Ознакомившись с примечанием и щелкнув «Далее», 3 раза произнесите: «Окей, Гугл».
- Остается нажать «Готово».
Это еще не конец:
- Выйдите на главный экран и произнесите: «Окей, Гугл».
- Когда ассистент сработает, произнесите: «Сделай снимок экрана».
- В открывшемся чате зайдите в «Настройки».
- Включите «Использовать скриншот».
- Спокойно делайте скрины любой информации, используя комбинацию: «Окей, Гугл» – «Сделай снимок экрана».
Делать таким образом моментальные фото не получится, а вот запечатлеть какую-нибудь информацию – более чем.
Как сделать скриншот длинной страницы
В этом случае пригодится панель Easy Touch:
- Проведите пальцем снизу вверх экрана. В открывшемся подменю выберите «Скриншот длинной страницы».
- Определите верхнюю границу снимка – это же будет начальной позицией.
- Теперь необходимо включить «Следующий экран» для прокрутки изображения.
- Когда картинка создана, остается указать нижнюю границу скрина и тапнуть по «Сохранить».
Длинные скрины помогают записать информацию с веб-страниц или меню с настройками.
Как изменить размер скриншота
- Посетите «Альбомы». Тапните по скриншоту, чтобы его открыть.
- Щелкните по «Изменить». Следом выберите «Обрезать».
- Теперь выберите необходимый размер из предложенных или введите его вручную.
В альбомы также попадает запись видео с экрана.
Популярные проблемы
Базовая функция не всегда срабатывает как должна. Это обусловлено системными ограничениями. Разберемся в самых распространенных проблемах.
Почему не получается сделать скриншот
- системный сбой – перезагрузите устройство;
- нехватка памяти в устройстве или на карте памяти;
- проверьте наличие обновления ОС или ПО и загрузите имеющиеся апдейты;
- проблемы с карточкой памяти – извлеките ее и попробуйте сделать скриншот снова.

Если это не помогает, избавьтесь от кеша системных приложений:
- Посетив «Настройки» перейдите в «Дополнительные настройки».
- Тут нужно открыть «Диспетчер настроек», а после щелкнуть по «Еще». В появившемся подменю выберите «Показать системные процессы».
- Выберите «Суперскриншот», после «Память» и нажмите на «Очистить данные».
В крайнем случае понадобится сделать сброс настроек:
- Через «Настройки» откройте «Дополнительные настройки».
- Найдите «Резервное копирование и сброс» и выберите «Восстановить все настройки».
В отличие от полного сброса, восстановление настроек не удаляет пользовательские данные.
Почему не сохраняется
Причины такие же, как и при отказе телефона делать скрин, поэтому обратите внимание на предыдущий подзаголовок.
Система Андроид не дает сделать скриншот на страницах, где нужно вводить пароль: при авторизации в соцсетях, онлайн-банках и подобном.
Размытое изображение
Изображение будет выглядеть размытым, если смотреть на него на экране большего размера. Например, разрешение Vivo V17 составляет 2340 x 1080, если развернуть его снимок на 4K-мониторе, то будут заметны пиксели + отправка изображений через социальные сети и мессенджеры пережимает снимки, из-за чего они становятся менее четкими.