FUJIFILM X-T4: неделя с экспертом
Для беспроводной работы с мобильными устройствами понадобится установить бесплатное приложение Camera Remote от Fujifilm. Все доступные функции выведены на главный экран приложения: это удалённая съёмка с Live View, передача изображений и беспроводной спуск затвора по Bluetooth.

На момент тестирования камеры мы использовали новейшую версию приложения 4.5.0.7. Оно работает ровно и предсказуемо, без глюков и подвисаний. Связь с фотоаппаратом первоначально устанавливается по энергоэффективному протоколу Bluetooth. При дистанционном управлении с Live View и переносе изображений задействуется Wi-Fi. Подключение происходит автоматически, но на это тратится определённое время: около 10 секунд.


С телефона можно менять основные съёмочные параметры для фото- и видеорежима, запускать видеозапись и делать снимки. Управление с камеры при этом игнорируется, чтобы установленные в приложении параметры не противоречили положению дисков и барабанчиков фотоаппарата. Задержка отображения сравнительно мала: в благоприятных условиях она существенно меньше секунды. Из-за наличия помех и большого количества Wi-Fi-устройств могут появляться кратковременные перебои с передачей видеосигнала.
Если живая картинка на дисплее не нужна, можно использовать смартфон просто как Bluetooth-пульт дистанционного спуска. Удобно при пейзажной или ночной съёмке.

Если говорить про передачу изображений, то нужно упомянуть, что камера умеет передавать на смартфон и видеозаписи.

Из дополнительных функций Camera Remote отметим возможность проверки обновлений прошивки фотоаппарата и даже перепрошивку встроенного ПО.

Без проводов FUJIFILM X-T4 синхронизируется и с принтерами Instax для моментальной печати.
Подключение к компьютеру
При подключении к компьютеру FUJIFILM X-T4 позволяет вести съёмку на привязи как по проводу, так и по Wi-Fi. Если вы пользуетесь Lightroom, то соответствующий плагин придётся приобрести за отдельную плату. Бесплатная фирменная утилита FUJIFILM X Acquire ведёт съёмку «на привязи» по проводу и Wi-Fi, но не даёт возможности управления с компьютера.

Интерфейс FUJIFILM X Acquire
Конечно же, полная поддержка работы по проводу есть в полной версии Capture One Fujifilm. Есть у этой программы и «облегчённая» бесплатная версия Capture One Express.
При помощи программы FUJIFILM PC AutoSave можно автоматически копировать результаты съёмок на компьютер. Программа есть и для PC, и для MAC.

Интерфейс X Raw Studio
Наконец, самое интересное фирменное приложение — это X Raw Studio. Оно использует процессор подключённой по USB камеры для обработки RAW-снимков, хранящихся на вашем компьютере. Доступны все те же настройки, которые присутствуют в меню камеры, включая моделирование плёнки или работу с тенями/светами. Благодаря быстрому порту USB3.2 Gen1 обработка проходит быстро.
Connecting to Computers via USB
Connect the camera to a computer to download pictures or take pictures remotely.
Before downloading pictures or taking pictures remotely, connect the camera to a computer and check that it functions normally.
- Turn the computer on.
- Adjust settings according to whether you will be using the camera for tethered shooting, copying pictures to a computer, creating JPEG copies of RAW pictures, or saving and loading camera settings.
- Turn the camera off.
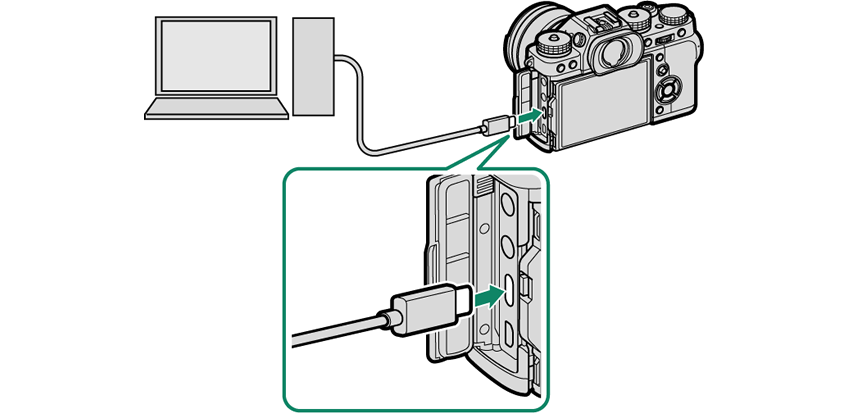
- Connect a USB cable. USB connector (Type-C)
The USB cable must be no more than 1.5 m (4.9 ft.) long and be suitable for data transfer.
Turn the camera off before disconnecting the USB cable.
When connecting USB cables, be sure the connectors are fully inserted in the correct orientation. Connect the camera directly to the computer; do not use a USB hub or keyboard.
Loss of power during transfer could result in loss of data or damage to the memory card. Insert a fresh or fully-charged battery before connecting the camera.
If a memory card containing a large number of images is inserted, there may be a delay before the software starts and you may be unable to import or save images. Use a memory card reader to transfer pictures.
Make sure that the indicator lamp is off or lit green before turning the camera off.
Do not disconnect the USB cable while transfer is in progress. Failure to observe this precaution could result in loss of data or damage to the memory card.
Disconnect the camera before inserting or removing memory cards.
In some cases, it may not be possible to access pictures saved to a network server using the software in the same way as on a standalone computer.
Do not immediately remove the camera from the system or disconnect the USB cable once the message stating that copying is in progress clears from the computer display. If the number of images copied is very large, data transfer may continue after the message has ceased to be displayed.
The user bears all applicable fees charged by the phone company or Internet service provider when using services that require an Internet connection.
- Tethered Shooting: FUJIFILM X Acquire/FUJIFILM Tether Shooting Plug-in/Hyper-Utility Software HS-V5
- Copying Pictures to a Computer
- Creating JPEG Copies of RAW Images: FUJIFILM X RAW STUDIO
- Saving and Loading Camera Settings (FUJIFILM X Acquire)
Tethered Shooting: FUJIFILM X Acquire/FUJIFILM Tether Shooting Plug-in/Hyper-Utility Software HS-V5
Before proceeding, select USB TETHER SHOOTING AUTO for D CONNECTION SETTING > CONNECTION MODE in the camera menus.
FUJIFILM X Acquire, the FUJIFILM Tether Shooting Plug-in, and Hyper-Utility Software HS-V5 can be used for tethered shooting.
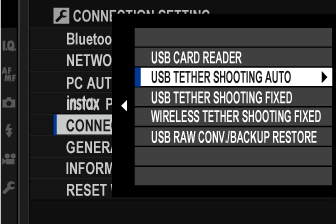
Choose USB TETHER SHOOTING FIXED if the camera will be used solely for tethered shooting. Note that if the USB cable is disconnected, the camera will continue to function in tethered mode and pictures will not be saved to the camera memory card.
For more information, visit the following website:
For more information on FUJIFILM X Acquire, the FUJIFILM Tether Shooting Plug-in, and Hyper-Utility Software HS-V5, see “Software from Fujifilm”.
Copying Pictures to a Computer
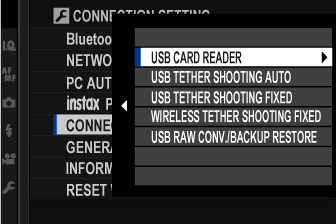
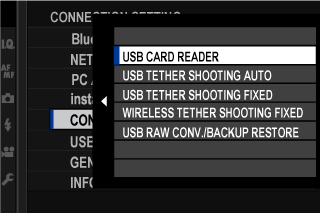
Before copying pictures to a computer, select USB CARD READER for D CONNECTION SETTING > CONNECTION MODE.
The software that can be used to copy pictures varies with your computer operating system.
Mac OS X/macOS
Pictures can be copied to your computer using Image Capture (supplied with your computer) or other software.
Use a card reader to copy files over 4 GB in size.
Windows
Pictures can be copied to your computer using applications supplied with the operating system.
Creating JPEG Copies of RAW Images: FUJIFILM X RAW STUDIO
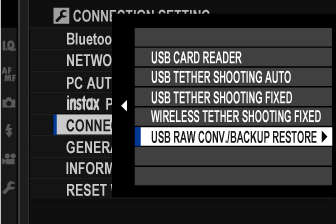
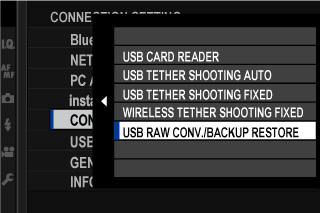
Before proceeding, select USB RAW CONV./BACKUP RESTORE for D CONNECTION SETTING > CONNECTION MODE in the camera menus.
FUJIFILM X RAW STUDIO can be used to create JPEG copies of RAW images.
For more information on FUJIFILM X RAW STUDIO, see “Software from Fujifilm”.
Saving and Loading Camera Settings (FUJIFILM X Acquire)
Before proceeding, select USB RAW CONV./BACKUP RESTORE for D CONNECTION SETTING > CONNECTION MODE in the camera menus.
FUJIFILM X Acquire can be used to save and load camera settings.
For more information on FUJIFILM X Acquire, see “Software from Fujifilm”.
Table of Contents
- Menu List
- Supplied Accessories
- Viewing This Manual
Before You Begin
- Parts of the Camera
- Camera Displays
- Using the Menus
- Touch Screen Mode
- Attaching the Strap
- Attaching a Lens
- Charging the Battery
- Inserting the Battery
- Inserting Memory Cards
- Turning the Camera On and Off
- Checking the Battery Level
- Basic Setup
Basic Photography and Playback
- Taking Photographs (Mode P)
- Viewing Pictures
- Deleting Pictures
Movie Recording and Playback
- P, S, A, and M Modes
- Autofocus
- Manual Focus
- Sensitivity
- Metering
- Exposure Compensation
- Focus/Exposure Lock
- Bracketing
- Continuous Shooting (Burst Mode)
- Multiple Exposures
- Advanced Filters
- Panoramas
- Flash Photography
The Shooting Menus
- The Shooting Menus (IMAGE QUALITY SETTING)
- The Shooting Menus (AF/MF SETTING)
- The Shooting Menus (SHOOTING SETTING)
- The Shooting Menus (FLASH SETTING)
- The Shooting Menus (MOVIE SETTING)
Playback and the Playback Menu
- The Playback Display
- Viewing Pictures
- The Playback Menu
The Setup Menus
- The Setup Menus (USER SETTING)
- The Setup Menus (SOUND SETTING)
- The Setup Menus (SCREEN SETTING)
- The Setup Menus (BUTTON/DIAL SETTING)
- The Setup Menus (POWER MANAGEMENT)
- The Setup Menus (SAVE DATA SETTING)
- The Setup Menus (CONNECTION SETTING)
- Shortcut Options
- The Q (Quick Menu) Button
- The Fn (Function) Buttons
- MY MENU
Peripherals and Optional Accessories
- External Flash Units
- Vertical Battery Grips
- HDMI Output
- Connecting to Smartphones
- Connecting to Computers via USB
- instax SHARE Printers
- Accessories from Fujifilm
- Software from Fujifilm
- For Your Safety
- Product Care
- Cleaning the Image Sensor
- Firmware Updates
- Troubleshooting
- Warning Messages and Displays
- Specifications
- Links
- License
Копирование изображений на компьютер
Подключите камеру при помощи входящего в комплект кабеля USB и скопируйте снимки, как описано ниже.
- Запустите компьютер.
- Выключите фотокамеру.
- Используйте прилагаемый кабель USB для подключения фотокамеры к компьютеру.
Убедитесь, что штекеры находятся в правильном положении и вставлены полностью. Подключайте фотокамеру непосредственно к компьютеру; не используйте концентратор USB или клавиатуру.
MyFinePix Studio/RAW FILE CONVERTER
Используйте MyFinePIx Studio (доступно только для Windows) для копирования изображений на компьютер, где их можно будет просмотреть, упорядочить и распечатать. Для просмотра изображений RAW на компьютере используйте RAW FILE CONVERTER.
При наличии большого количества изображений на установленной карте памяти программа может запускаться с задержкой, а также у Вас могут возникнуть проблемы с импортом и сохранением изображений. Используйте устройство чтения карт памяти для передачи изображений.
Убедитесь в том, что сообщение на компьютере о процессе копирования снимков исчезло, и индикаторная лампа на фотокамере погасла, перед тем, как выключить камеру или отсоединить USB кабель (если количество копируемых снимков очень большое, индикаторная лампа может продолжать гореть после исчезновения сообщения на дисплее компьютера). Несоблюдение данной меры предосторожности может привести к потере данных или повреждению карты памяти.
Перед установкой или извлечением карт памяти отсоединяйте фотокамеру от компьютера.
В некоторых случаях может быть невозможным доступ к снимкам, сохраненным на сетевом сервере с помощью поставляемого программного обеспечения тем же способом, как при использовании не подключенного к сети компьютера.
При использовании услуг, которые требуют подключения к сети Интернет, все расходы, связанные с услугами телефонной компании или провайдера Интернет, оплачивает пользователь.
- MyFinePix Studio (открывается в другом окне)
- RAW FILE CONVERTER на платформе SilkyPix (открывается в другом окне)
Connecting via USB
The camera can be connected to computers and smart-phones via USB.
- Connecting to Computers
- Copying Pictures to a Computer
- Tethered Shooting: Capture One Pro Fujifilm/Adobe ® Photoshop ® Lightroom ® + Tether Plugin/FUJIFILM X Acquire
- Converting RAW Images: FUJIFILM X RAW STUDIO
- Backing up and Restoring Camera Settings (FUJIFILM X Acquire)
- Connecting to Smartphones
Connecting to Computers
Before downloading pictures or taking pictures remotely, connect the camera to a computer and check that it functions normally.
- Turn the computer on.
- Adjust settings according to whether you will be using the camera.
- Copying Pictures to a Computer
- Tethered Shooting: Capture One Pro Fujifilm/Adobe ® Photoshop ® Lightroom ® + Tether Plugin/FUJIFILM X Acquire
- Converting RAW Images: FUJIFILM X RAW STUDIO
- Backing up and Restoring Camera Settings (FUJIFILM X Acquire)
- Turn the camera off.
- Connect a USB cable.
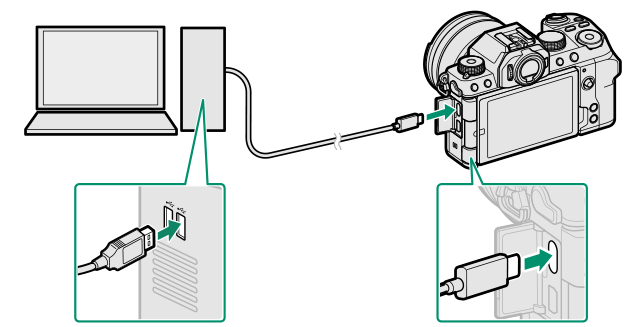
USB connector (Type-C)
The USB cable must be no more than 1.5 m (4.9 ft.) long and be suitable for data transfer.
- Image transfer: Use applications provided with your operating system.
- Tethered shooting: During tethered shooting, you can copy pictures using tethered shooting software such as the Capture One Pro Fujifilm/Adobe ® Photoshop ® Lightroom ® + Tether Plugin/FUJIFILM X Acquire.
- RAW conversion: Process RAW images using FUJIFILM X RAW STUDIO. The power of the camera’s image processing engine is used for rapid processing.
- Saving and loading camera settings: Use FUJIFILM X Acquire to save or load camera settings. Save your preferred settings to a file in a single operation and copy them to multiple cameras.
Turn the camera off before disconnecting the USB cable.
When connecting USB cables, be sure the connectors are fully inserted in the correct orientation. Connect the camera directly to the computer; do not use a USB hub or keyboard.
Loss of power during transfer could result in loss of data or damage to the memory card. Insert a fresh or fully-charged battery before connecting the camera.
If a memory card containing a large number of images is inserted, there may be a delay before the software starts and you may be unable to import or save images. Use a memory card reader to transfer pictures.
Make sure that the indicator lamp is off or lit green before disconnecting the camera.
Do not disconnect the USB cable while transfer is in progress. Failure to observe this precaution could result in loss of data or damage to the memory card.
Disconnect the camera before inserting or removing memory cards.
In some cases, it may not be possible to access pictures saved to a network server using the software in the same way as on a standalone computer.
Do not immediately remove the camera from the system or disconnect the USB cable once the message stating that copying is in progress clears from the computer display. If the number of images copied is very large, data transfer may continue after the message has ceased to be displayed.
The user bears all applicable fees charged by the phone company or Internet service provider when using services that require an Internet connection.
Copying Pictures to a Computer
- Before copying pictures to a computer, select USB CARD READER for D CONNECTION SETTING >CONNECTION MODE.
- The software that can be used to copy pictures varies with your computer operating system.
Mac OS X/macOS
Pictures can be copied to your computer using Image Capture (supplied with your computer) or other software.
Use a card reader to copy files over 4 GB in size.
Windows
Pictures can be copied to your computer using applications supplied with the operating system.
Tethered Shooting: Capture One Pro Fujifilm/Adobe ® Photoshop ® Lightroom ® + Tether Plugin/FUJIFILM X Acquire
Before proceeding, select USB TETHER SHOOTING AUTO for D CONNECTION SETTING > CONNECTION MODE in the camera menus.
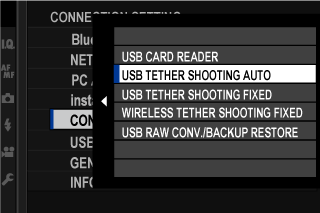
Choose USB TETHER SHOOTING FIXED if the camera will be used solely for tethered shooting. Note that if the USB cable is disconnected, the camera will continue to function in tethered mode and pictures will not be saved to the camera memory card.
For more information, visit the following website:
Capture One Pro Fujifilm, Adobe ® Photoshop ® Lightroom ® + Tether Plugin, and FUJIFILM X Acquire can be used for tethered shooting.
For more information on Capture One Pro Fujifilm, Adobe ® Photoshop ® Lightroom ® + Tether Plugin, and FUJIFILM X Acquire, see “Software for Use with Your Camera”.
Converting RAW Images: FUJIFILM X RAW STUDIO
- Before proceeding, select USB RAW CONV./BACKUP RESTORE for D CONNECTION SETTING >CONNECTION MODE in the camera menus.
- FUJIFILM X RAW STUDIO can be used to convert RAW images to JPEG or TIFF images.
For more information on FUJIFILM X RAW STUDIO, see “Software for Use with Your Camera”.
Backing up and Restoring Camera Settings (FUJIFILM X Acquire)
- Before proceeding, select USB RAW CONV./BACKUP RESTORE for D CONNECTION SETTING >CONNECTION MODE in the camera menus.
- FUJIFILM X Acquire can be used to backup and restore camera settings.
For more information on FUJIFILM X Acquire, see “Software for Use with Your Camera”.
Connecting to Smartphones
To copy pictures to a smartphone, select OFF for D CONNECTION SETTING > USB POWER SUPPLY SETTING and connect the camera to the phone using a USB cable.
For Customers Using Android Devices
How you will connect the camera depends on the type of USB connector with which your smartphone is equipped.
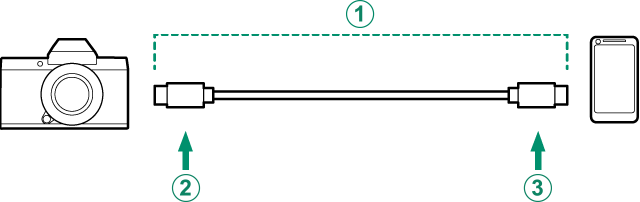
Type-C
Ready a cable equipped with connectors matching the USB (Type-C) connector on the camera.
A Third-party USB cable
B Type-C connector (male)
C Type-C connector (male)
Micro-B
Use a USB on-the-go (OTG) cable.
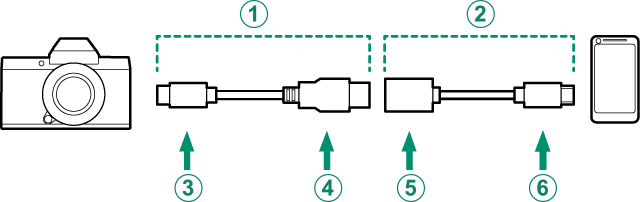
A Supplied USB cable
B USB OTG cable
C Type-C connector (male)
D Type-A connector (male)
E Type-A connector (female)
F Micro-B connector (male)
The smartphone must support USB OTG.
The desired results cannot be achieved with a USB Type-C–to–Mirco-B cable. Use an OTG cable.
- Set the camera’s D CONNECTION SETTING >USB POWER SUPPLY SETTING to OFF.
- Connect the camera and smartphone using a USB cable.
If the smartphone asks for permission for an application other than the “Camera Importer” to access the camera, tap “Cancel” and move on to the next step.
If the message “There is no MTP device connected” appears on the app, please try again from step 2.
For Customers Using iOS
An Apple Lightning to USB Camera Adapter is required.
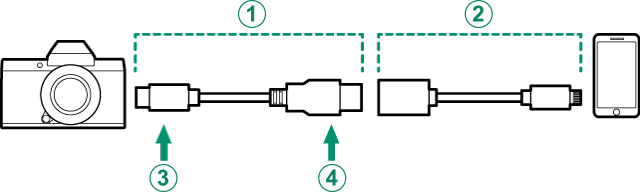
Use an Apple Lightning to USB Camera Adapter
A Supplied USB cable
B Apple Lightning to USB Camera Adapter
C Type C connector (male)
D Type-A connector (male)
- Set the camera’s D CONNECTION SETTING >USB POWER SUPPLY SETTING to OFF.
- Connect the camera and smartphone using a USB cable. The “Photos” app will automatically start and allow you to import photos and movies to your smartphone.
The desired results cannot be achieved with a USB Type-C–to–Lightning cable. Use a camera adapter.
Table of Contents
- Menu List
- Supplied Accessories
- Viewing This Manual
Before You Begin
- Parts of the Camera
- Camera Functions
- Camera Displays
- Using the Menus
- Touch Screen Mode
- Attaching the Strap
- Attaching a Lens
- Inserting the Battery and a Memory Card
- Charging the Battery
- Turning the Camera On and Off
- Checking the Battery Level
- Basic Setup
Basic Photography and Playback
- Taking Photographs
- Viewing Pictures
- Deleting Pictures
Movie Recording and Playback
- Choosing a Shooting Mode
- Autofocus
- Manual Focus
- Exposure Compensation
- Sensitivity
- Metering
- Focus/Exposure Lock
- Bracketing
- Continuous Shooting (Burst Mode)
- HDR
- Panoramas
- Multiple Exposures
- Flash Photography
The Shooting Menus
- IMAGE QUALITY SETTING (Still Photography)
- AF/MF SETTING (Still Photography)
- SHOOTING SETTING (Still Photography)
- FLASH SETTING (Still Photography)
- MOVIE SETTING (Still Photography)
- MOVIE SETTING (Movie Recording)
- IMAGE QUALITY SETTING (Movie Recording)
- AF/MF SETTING (Movie Recording)
- AUDIO SETTING (Movie Recording)
- TIME CODE SETTING (Movie Recording)
Playback and the Playback Menu
- The Playback Display
- Viewing Pictures
- The Playback Menu
The Setup Menus
- USER SETTING
- SOUND SETTING
- SCREEN SETTING
- BUTTON/DIAL SETTING
- POWER MANAGEMENT
- SAVE DATA SETTING
- CONNECTION SETTING
Peripherals and Optional Accessories
- HDMI Output
- Connecting to Smartphones
- Connecting via USB
- instax SHARE Printers
- Accessories from Fujifilm
- Software for Use with Your Camera
- For Your Safety
- Product Care
- Cleaning the Image Sensor
- Firmware Updates
- Troubleshooting
- Warning Messages and Displays
- Memory Card Capacity
- Specifications
- Links
- License